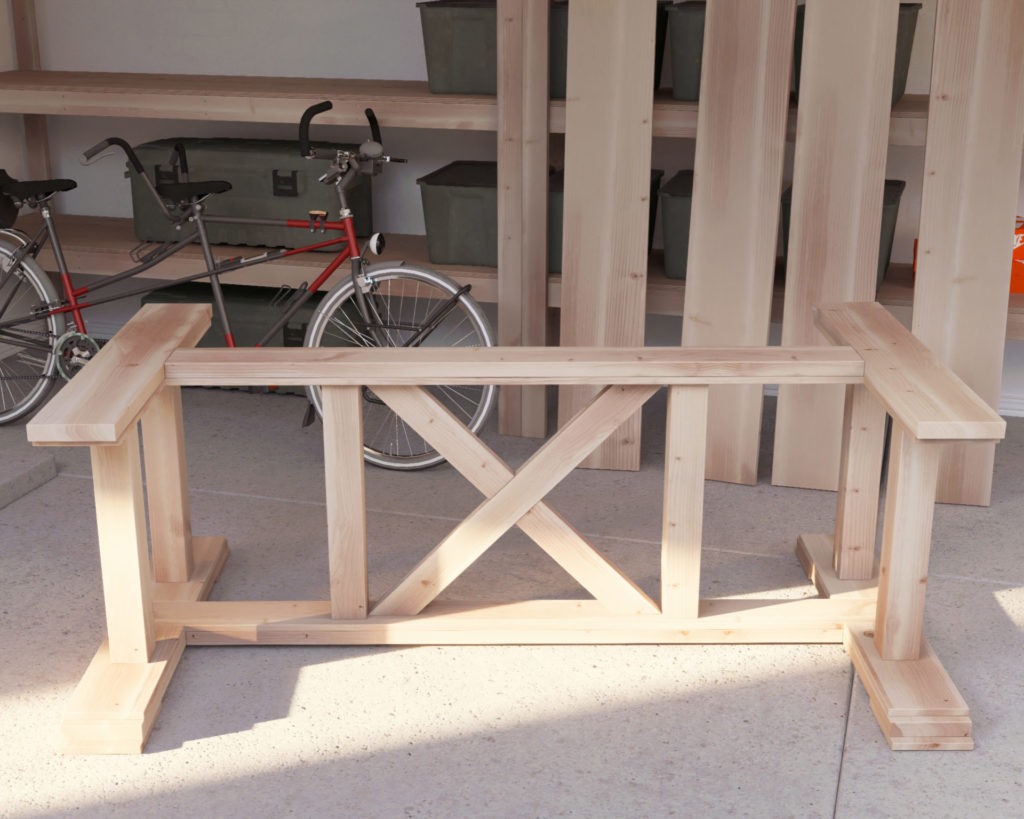
Have You Ever Dreamt of Crafting Your Own Dining Table Centerpiece?
Think of all the stories and memories that play out around a dining table. That special birthday celebration, the everyday family dinners, the hearty laughs with friends. Now, imagine the pride in knowing that the base of that table was crafted by your hands.
Wood: The Timeless Choice for Craftsmen:
There’s a reason wood remains the go-to choice for furniture. Its natural elegance, coupled with robust durability, offers both warmth and reliability. For DIYers who cherish authenticity, a wooden table base is the embodiment of rustic charm.
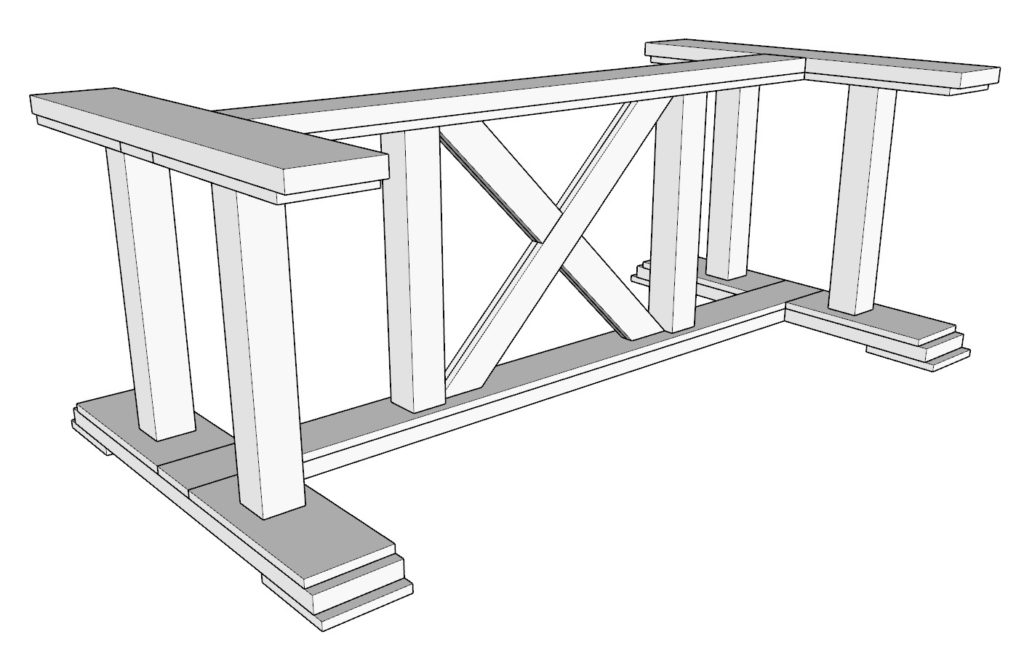
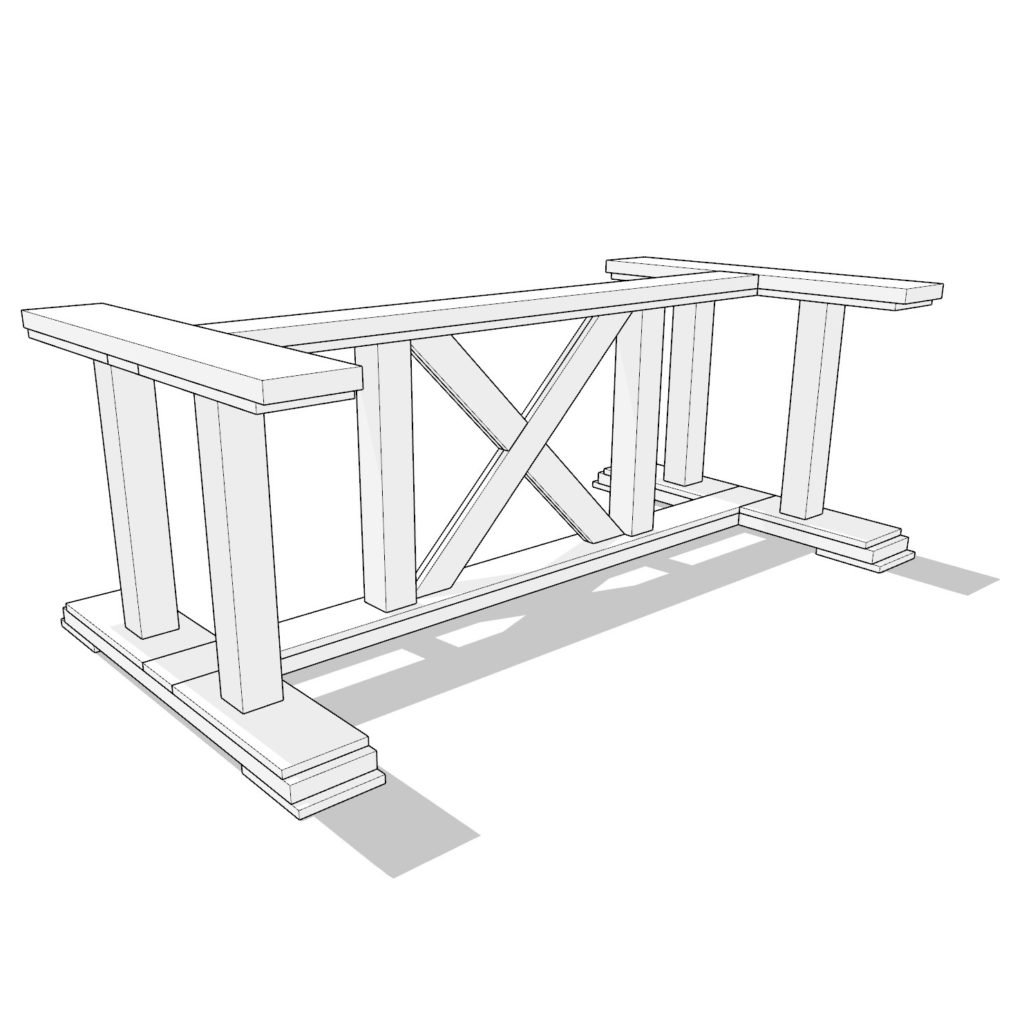
Unveiling the Signature Crossbuck Design:
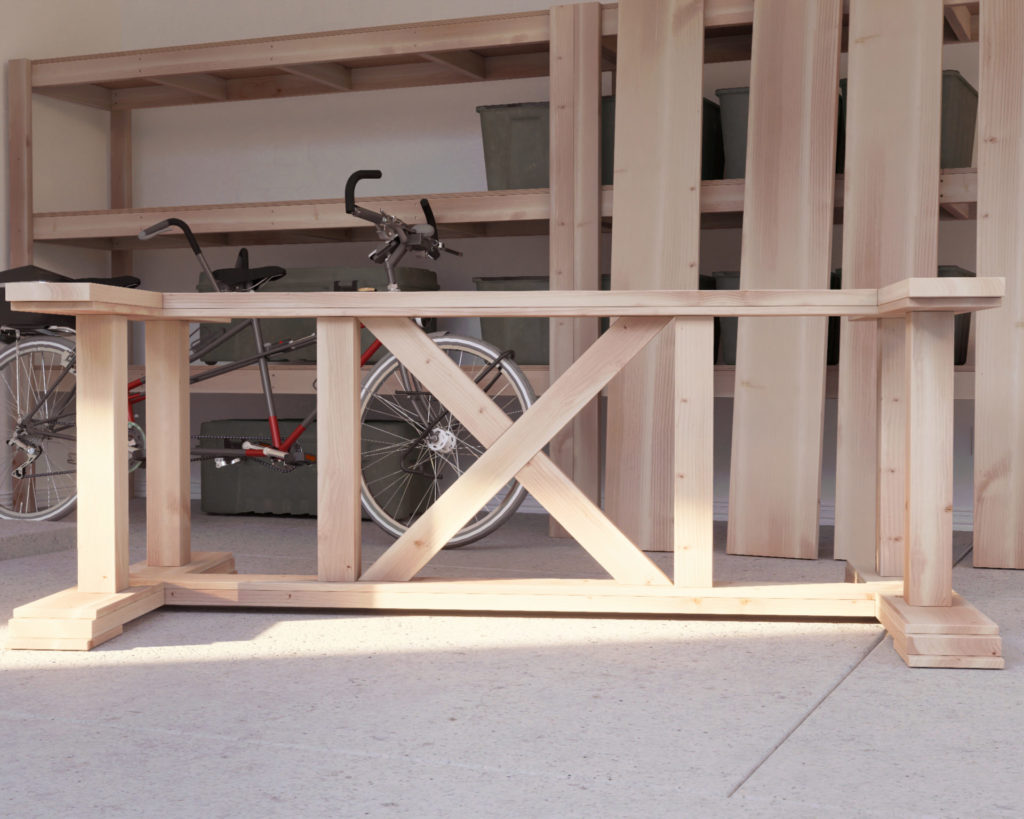
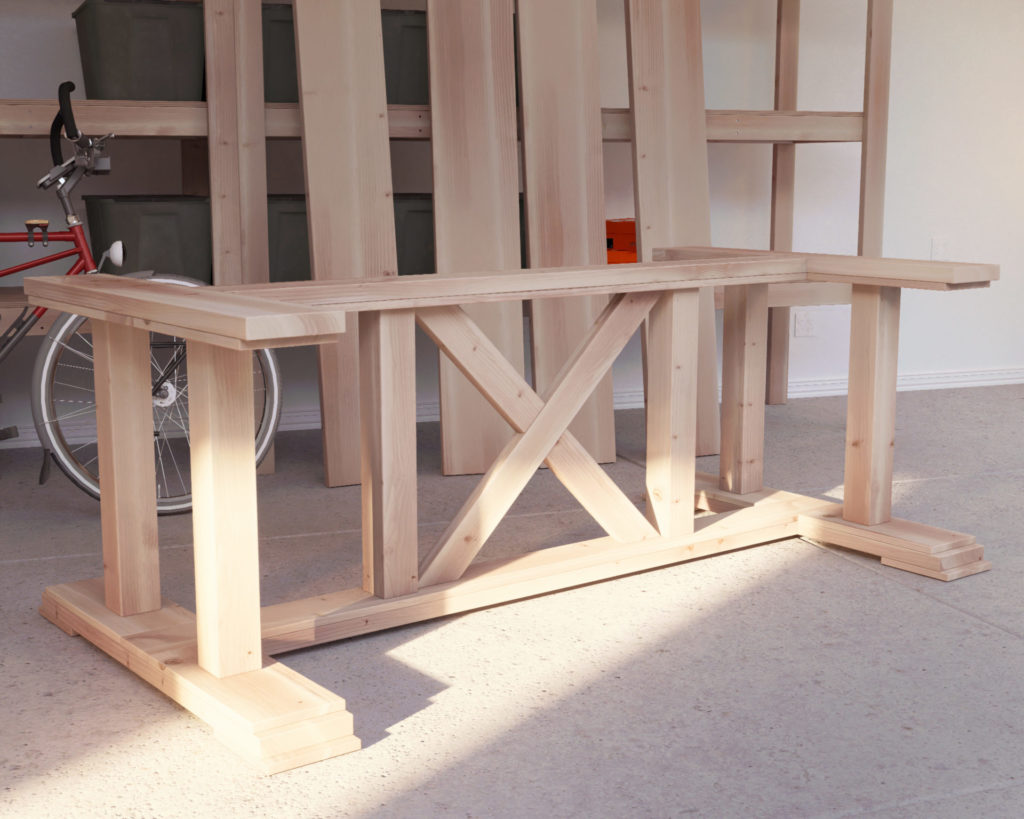
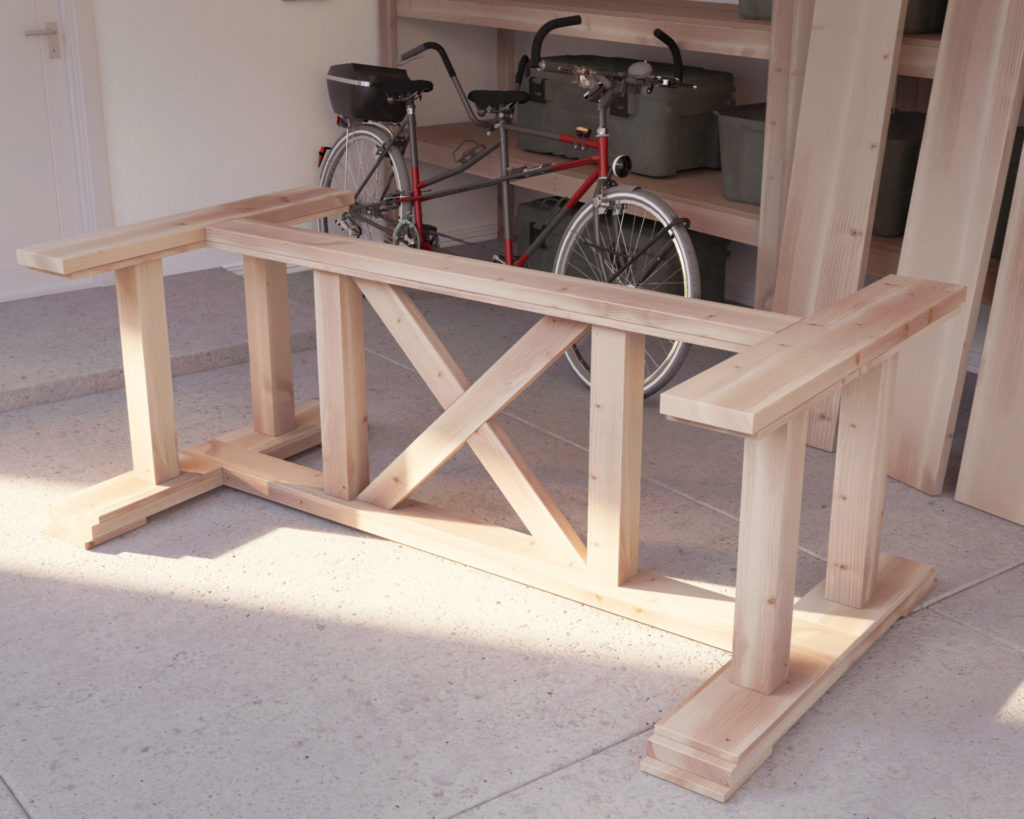
In DIY, design isn’t just an aesthetic choice; it’s about merging beauty with functionality. The crossbuck design of our table base does precisely that. While it adds a layer of rustic sophistication to your dining space, it also ensures that the table stands firm and durable. Ever wondered how the crossbuck pattern provides such stability? Dive into our plan to discover the crafting secrets!
Function Meets Elegance:
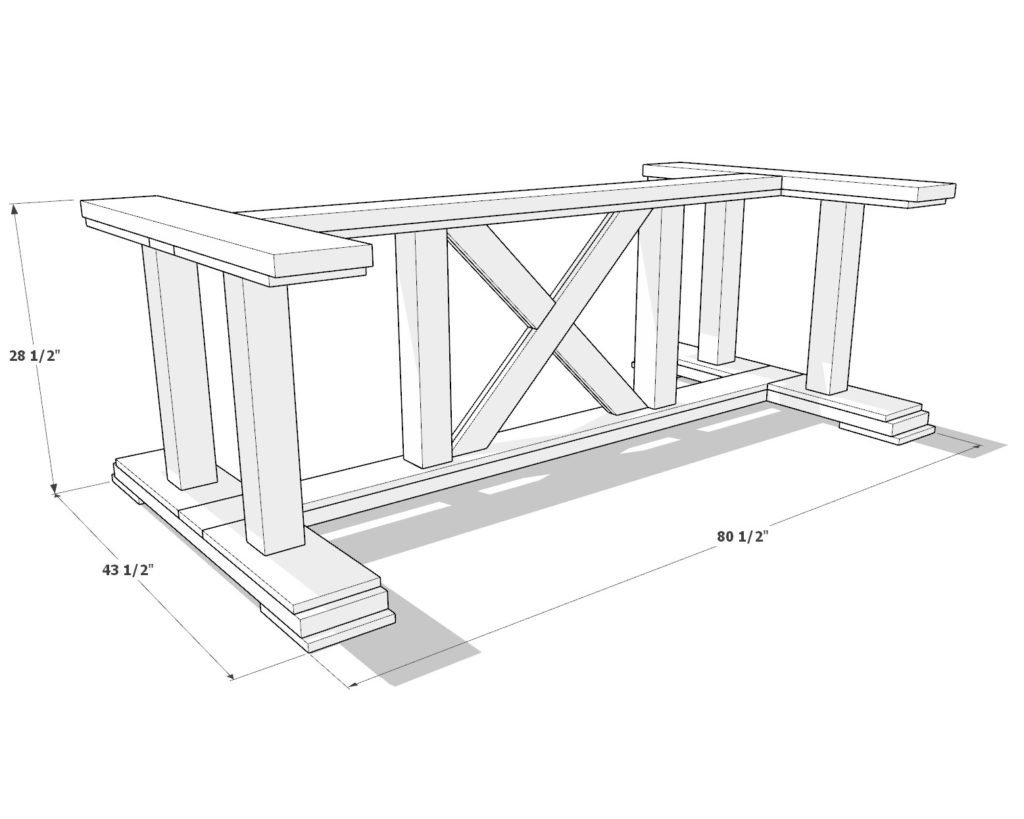
DIY is about creating solutions. With our design, you won’t just craft a table base; you’ll design a functional piece with the option of a detachable tabletop. Perfect for easy movements or rearrangements. And with a recommended length of 112 to 120 inches, you’re equipped for both cozy family dinners and grand festive feasts.
Styling Your Masterpiece:
A crafted table base is a joy, but pairing it with the right chairs can amplify its beauty. Consider complementing it with “X” backrest wooden chairs. This pairing not only harmonizes design elements but sets the stage for a complete farmhouse ambiance.
The True Value of DIY:
Beyond the evident cost savings, DIY brings an emotional richness. The daily pride of using something you’ve built, the constant reminder of your skill and dedication. Our table base isn’t just a piece of furniture; it’s a testament to your craftsmanship.
Your Next Crafting Adventure Awaits:
Visualize the moments, the gatherings, and the cherished memories around a table you’ve crafted. Ready to turn this vision into reality? Our comprehensive DIY plan is meticulously crafted, ensuring clarity and ease for both beginners and seasoned DIY enthusiasts.
Time
4 hours
Cost
$125
Skill level required
Beginner
DIY Table Base PDF Plan
What is included in the PDF download?
- Easy to read step by step instructions
- Material list
- Tools needed
- Helpful links to materials and tools needed
DIY Farmhouse Table Base Dimensions
Tools Needed for This Project:
Available with the purchase of the DIY plan PDF. Thank you for your support and for making this site possible!
Lumber Shopping & Cut List
Available with the purchase of the DIY plan PDF. Thank you for your support and for making this site possible!
Step 1: Constructing the Crossbuck Base
Begin the table’s foundation by crafting its distinctive crossbuck (or trestle) base.
Preparation of Lumber:
- Before starting with the cuts, pass each board through a planer. This ensures they’re straight, even, and reduces sanding time later.
- For an enhanced finish, sand each board lightly after planing.
Cutting the Lumber:
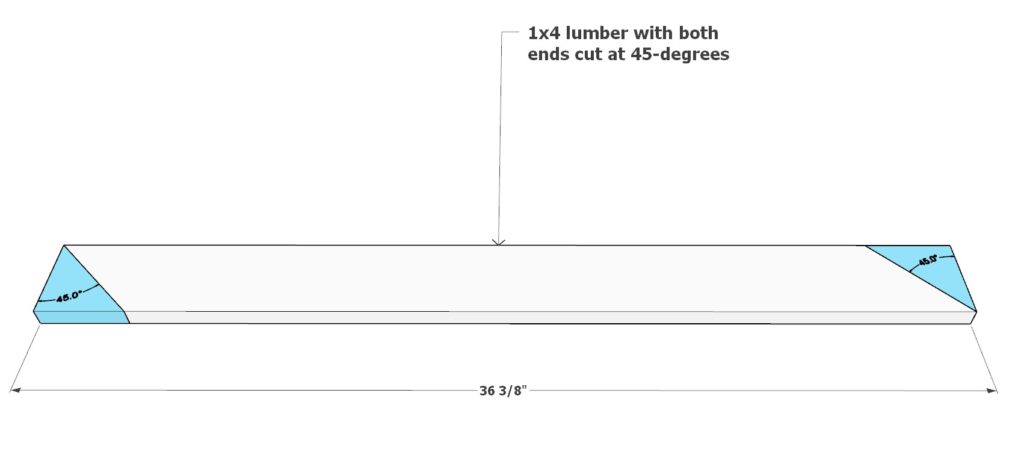
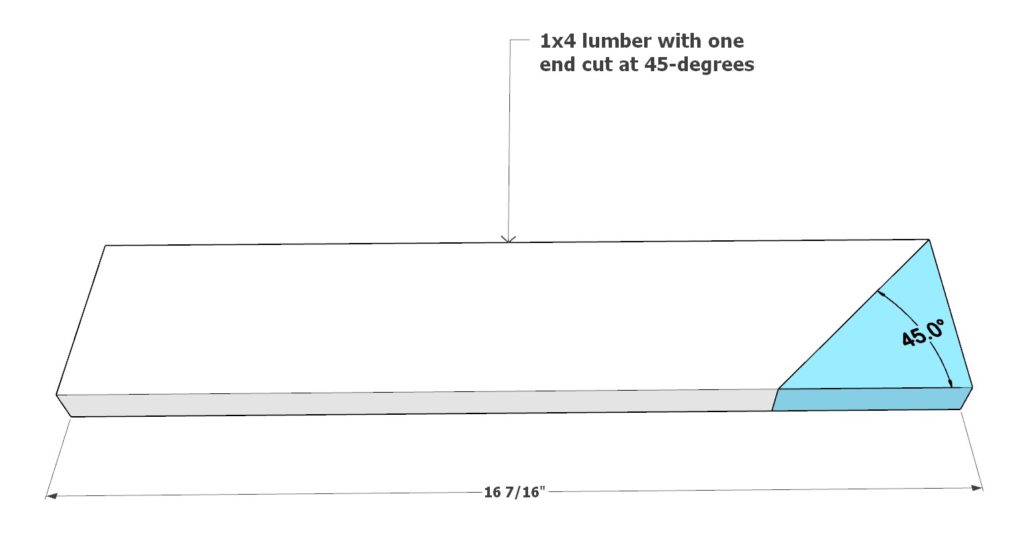
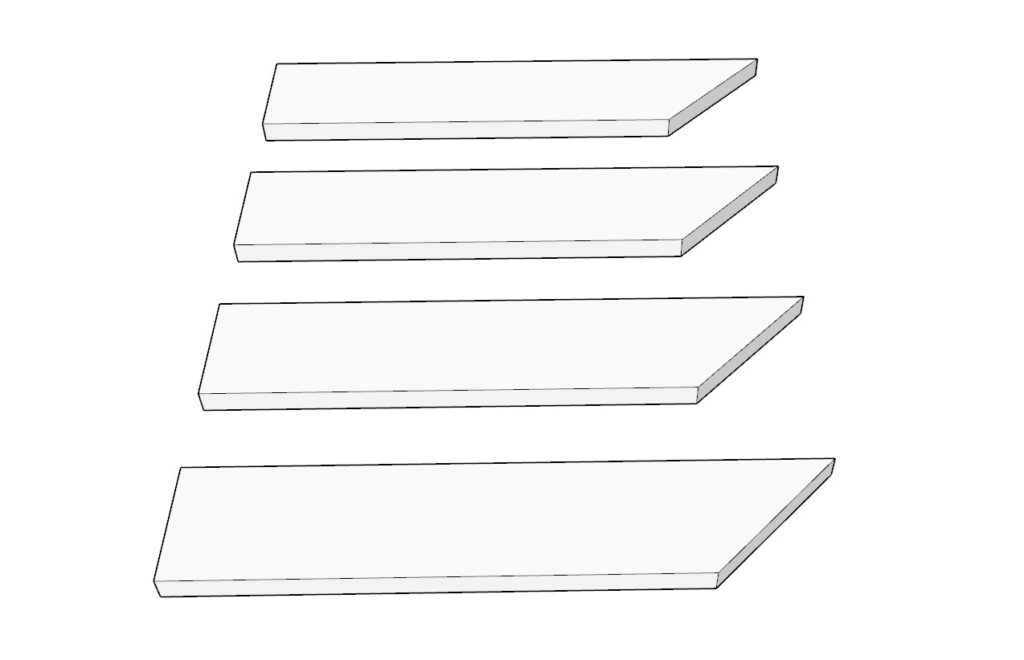
- Start with a 36-3/8 inch long 1×4 lumber piece. Angle your saw to 45-degrees and trim both ends as indicated in the provided diagram. Repeat to get a total of two pieces.
- For the shorter pieces, take a 16-7/16 inch long 1×4 lumber and similarly cut one end at a 45-degree angle. Ensure you have four of these pieces in total.
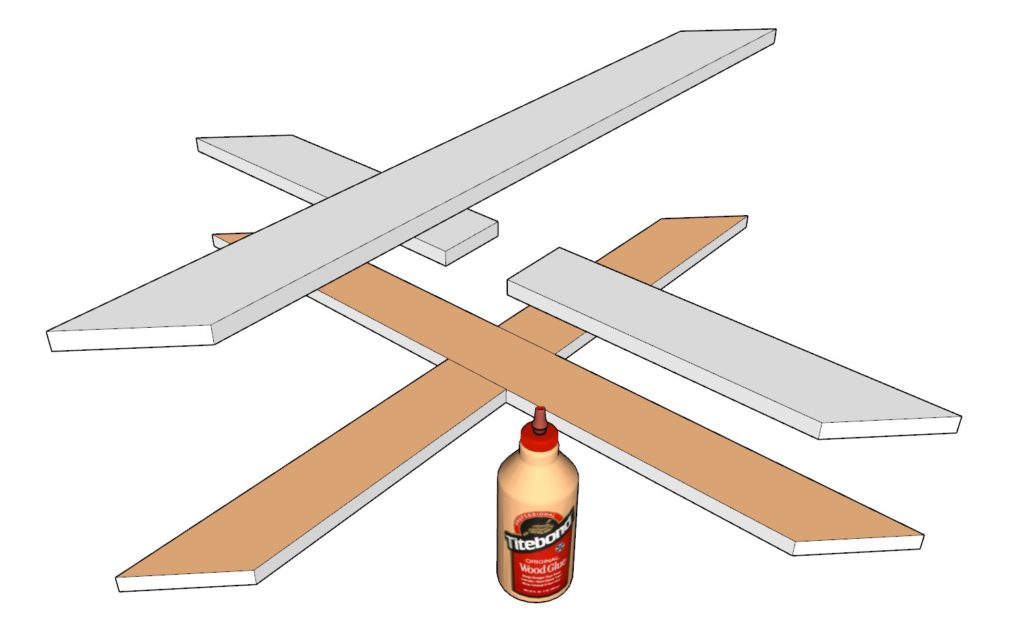
Assembly:
- Lay out the cut components as illustrated in the diagram below.
- Apply a generous amount of wood glue at the joints to ensure a strong bond.
- Using a nail gun, secure the pieces together with 1-inch nails.
Pro Tip: For a seamless look, always make sure to wipe away any excess glue immediately after joining two pieces. This prevents hardened glue spots which can disrupt the finishing process later on.
Step 2: Adding the Stretcher and Central Planks
Strengthen and unify your table’s base by attaching the central beam, also known as the stretcher, followed by the central planks.
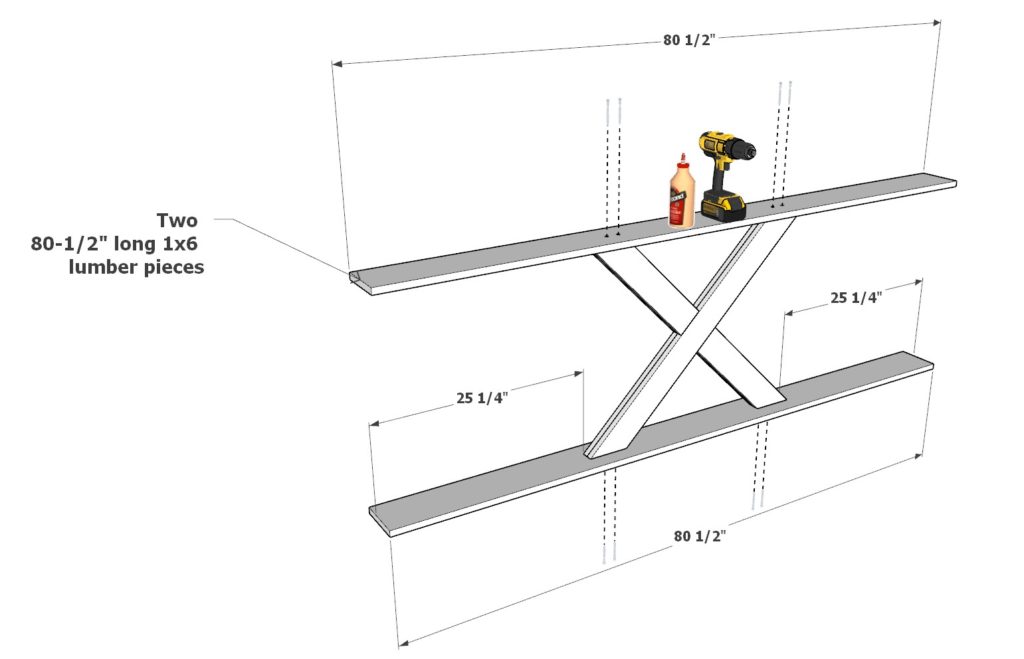
Attaching the Stretcher:
- Obtain two 80-1/2″ long 1×6 lumber pieces.
- Align them to the crossbuck base as depicted in the diagram below.
- Before joining, apply wood glue thoroughly to all contact areas.
- For a solid connection, predrill holes and then secure the pieces using 3-inch screws.
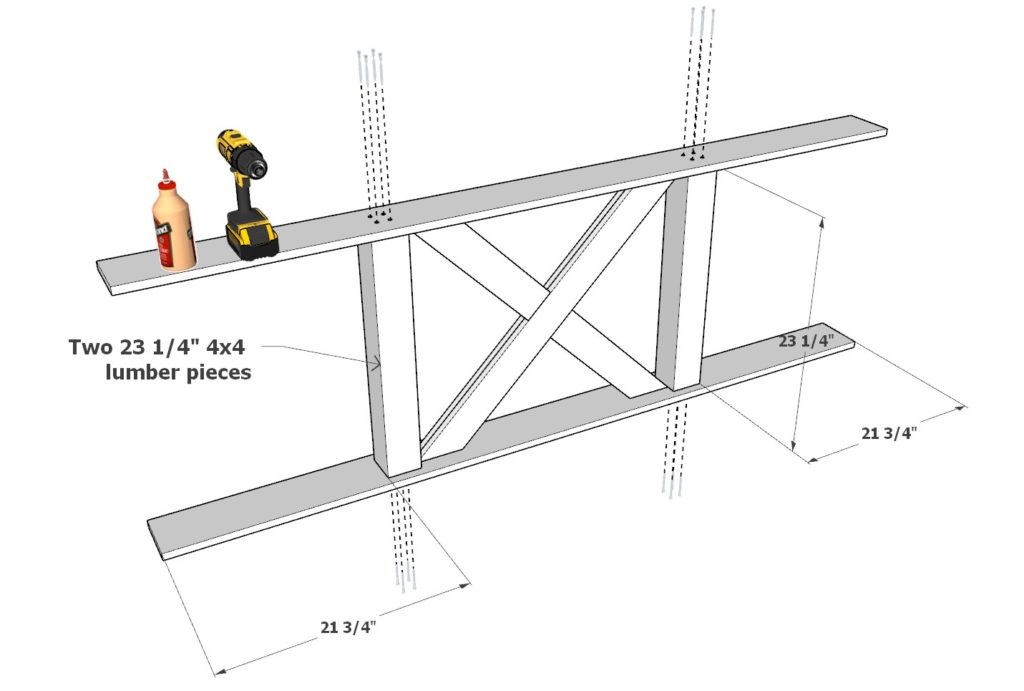
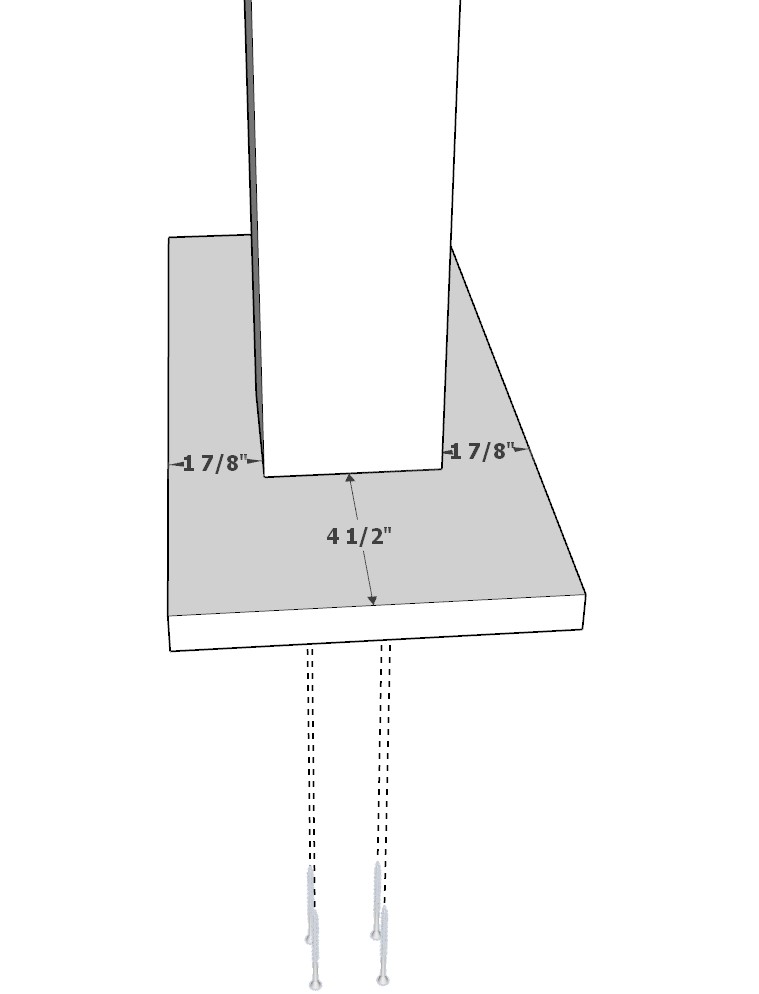
- Add two 23-1/4″ 4×4 lumber boards next to the crossbuck and secure them in place using 3-inch screws.
Pro Tip: Always predrill holes, especially near the ends of boards, to prevent the wood from splitting.
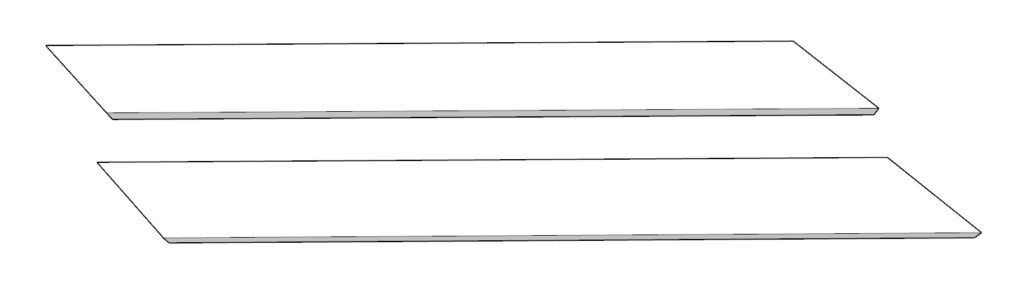
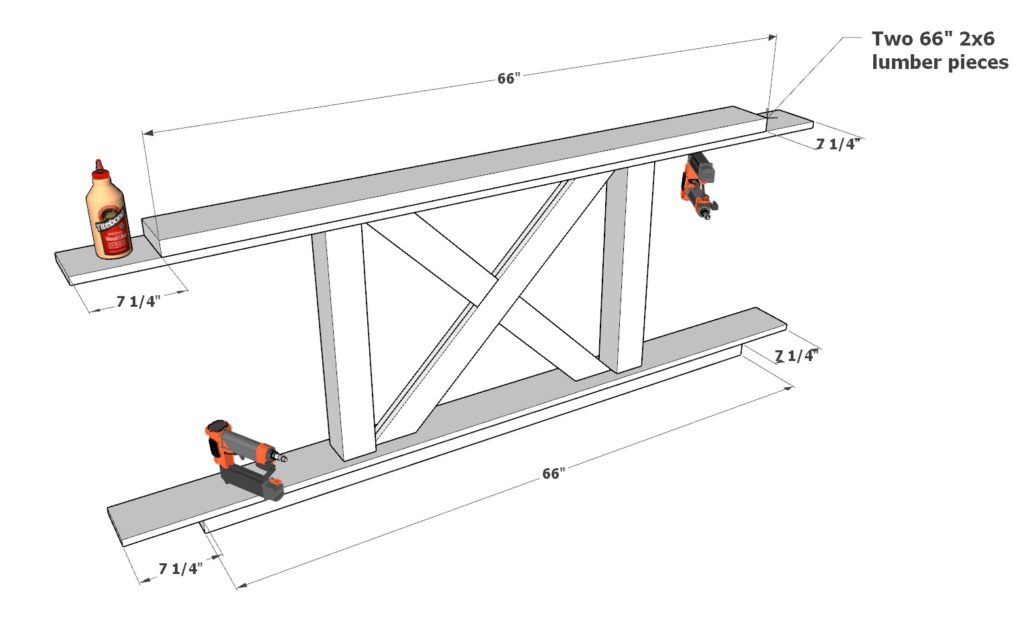
- Take two 66-inch 2×6 lumber pieces.
- Position them on top of the 80-1/2″ 1×6 lumber pieces, ensuring they are centered.
- Apply wood glue at the joints for a sturdy bond.
Use a nail gun to fasten the planks in place with 1-inch nails.
Mounting the Central Planks:
Pro Tip: For a refined appearance, sand each component after assembly, ensuring smooth transitions between joined pieces.
Step 3: Crafting and Assembling the Table Legs
Establish a strong foundation for your table by creating robust table legs and seamlessly integrating them with the stretcher.
Pro Tip: When working with wood, tools like planers, saws, and extensive sanding can introduce slight variations in measurements. Before proceeding, double-check that a 25-inch long 4×4 matches your needs.
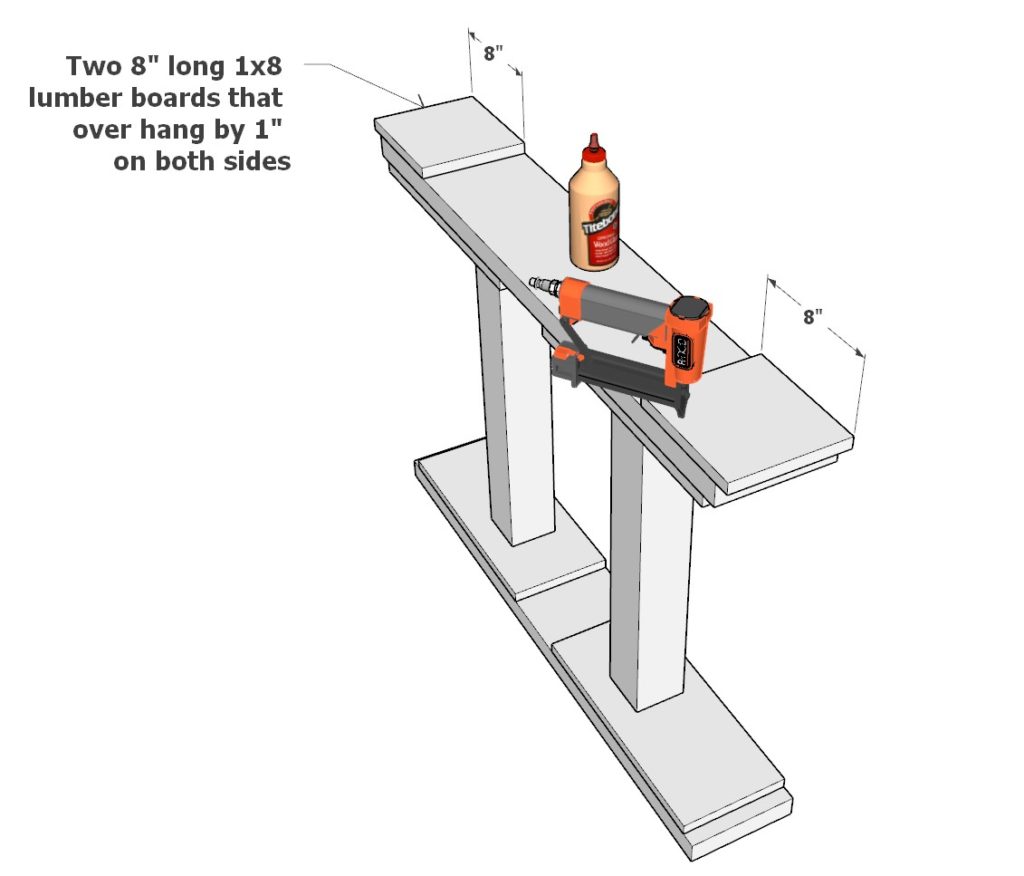
Constructing Individual Leg Components:
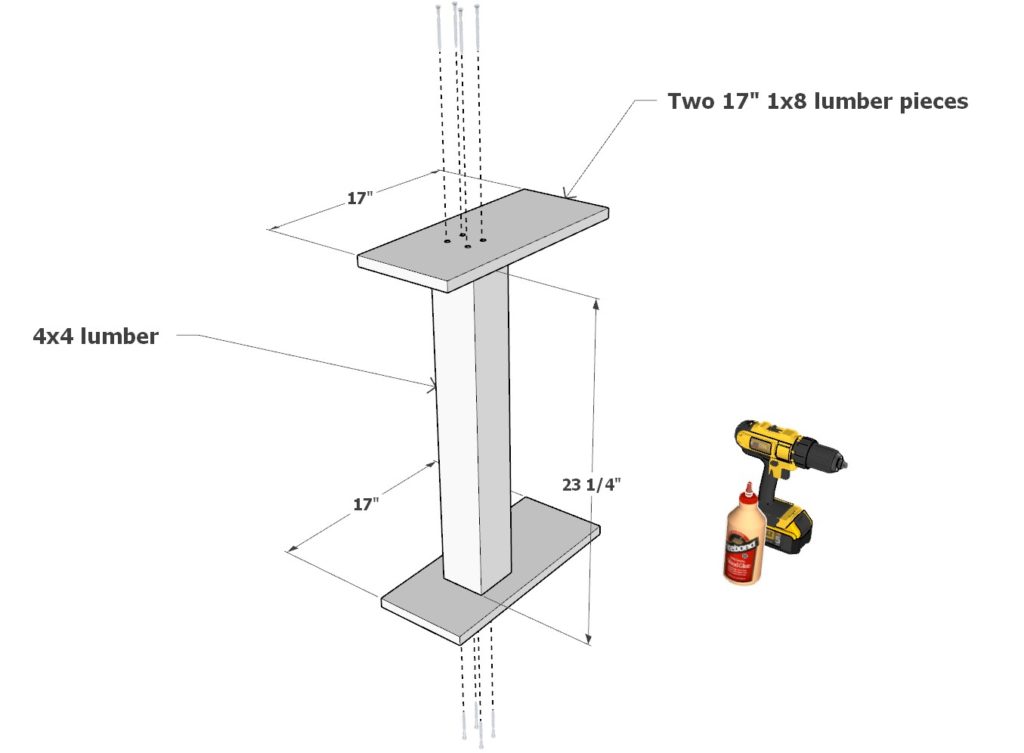
- Obtain a 23-1/4-inch long 4×4 lumber piece and two 17-inch long 1×8 lumber pieces.
- Arrange these pieces as illustrated in the first and second diagrams.
- Apply wood glue at the joints, predrill holes for enhanced stability, and firmly fasten them using 3-inch screws.
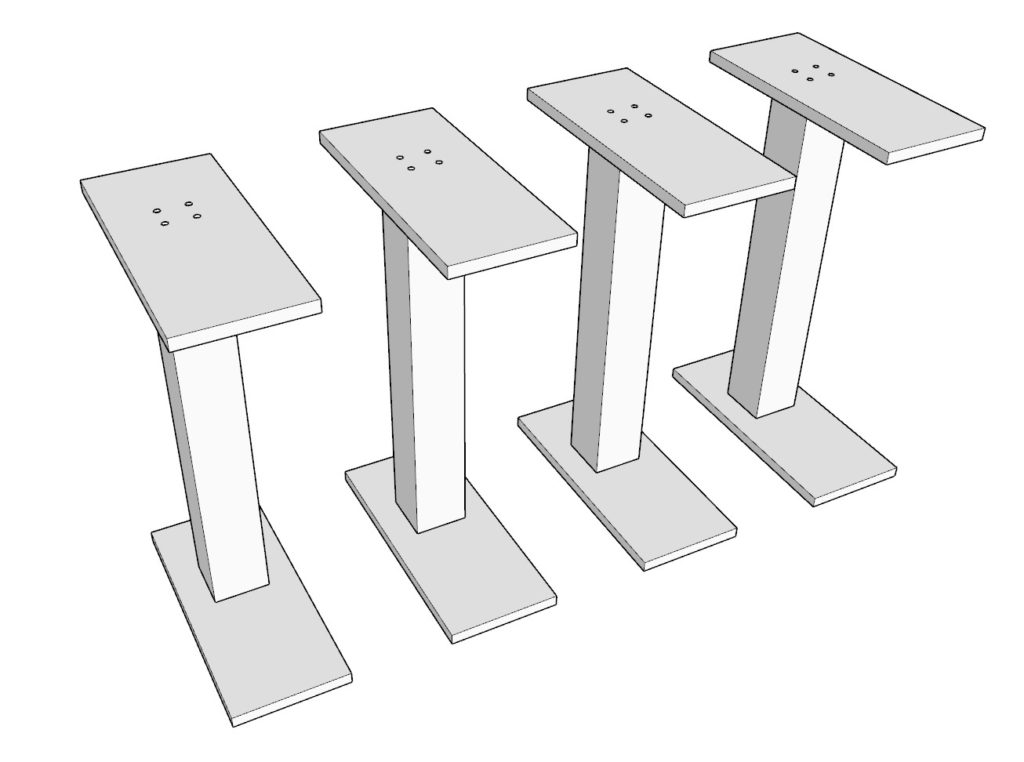
- Ensure you have four identical leg components by the end of this sub-step.
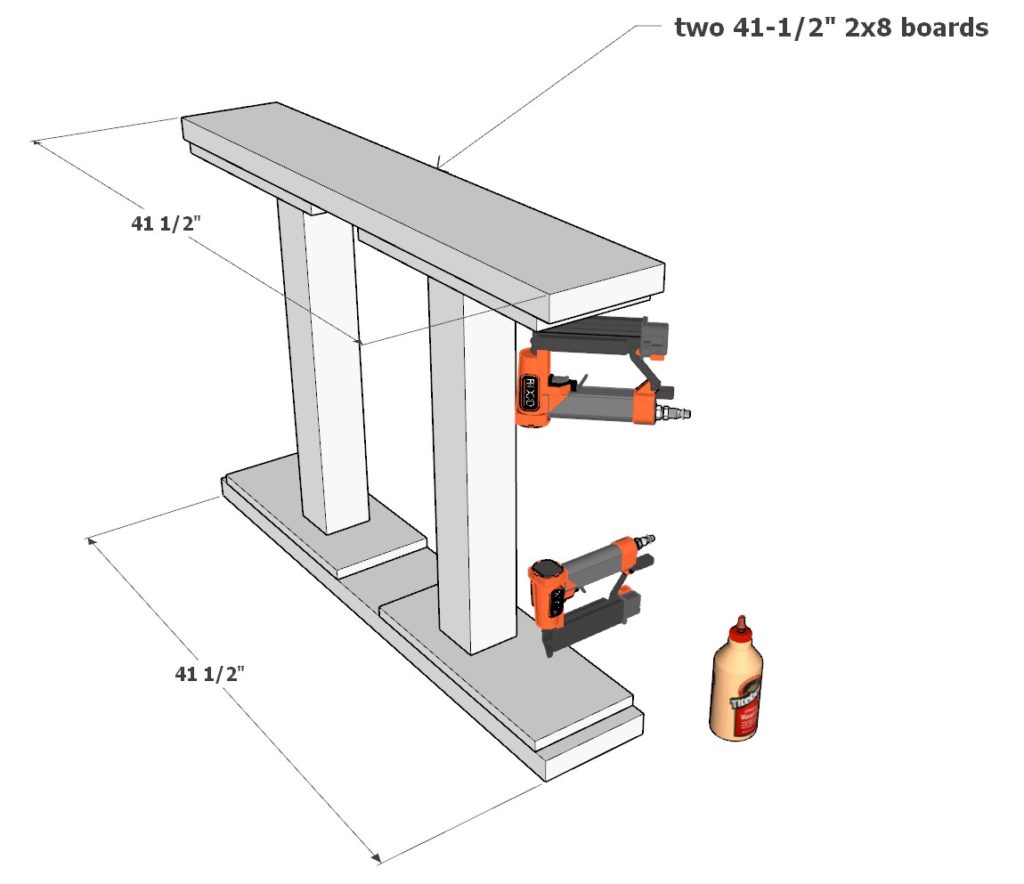
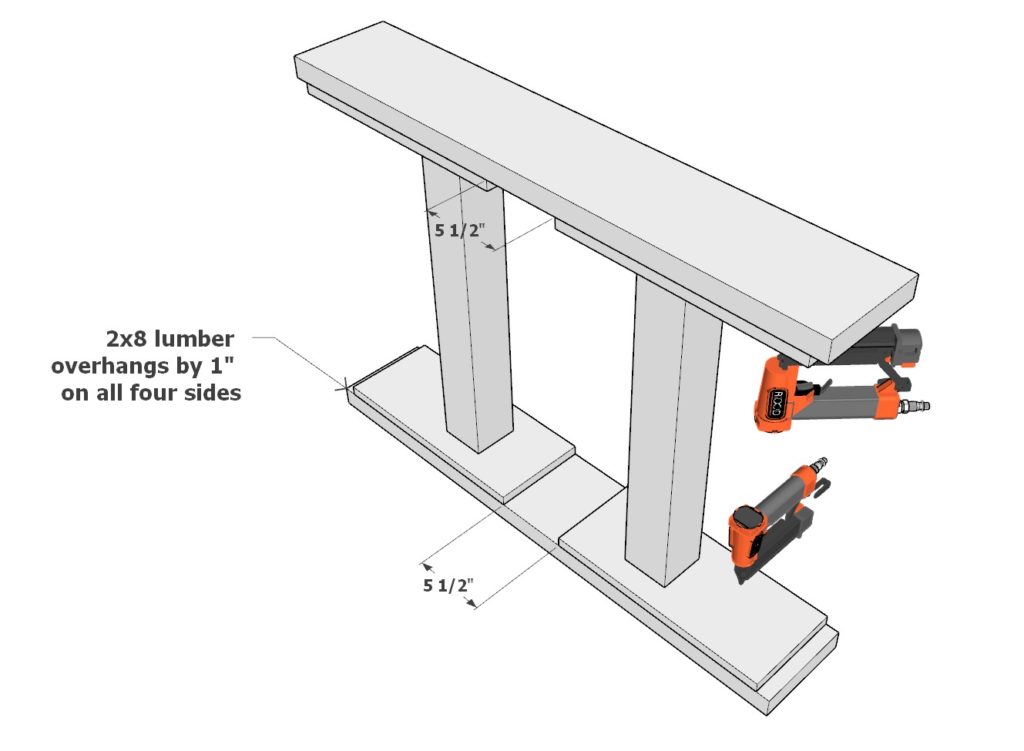
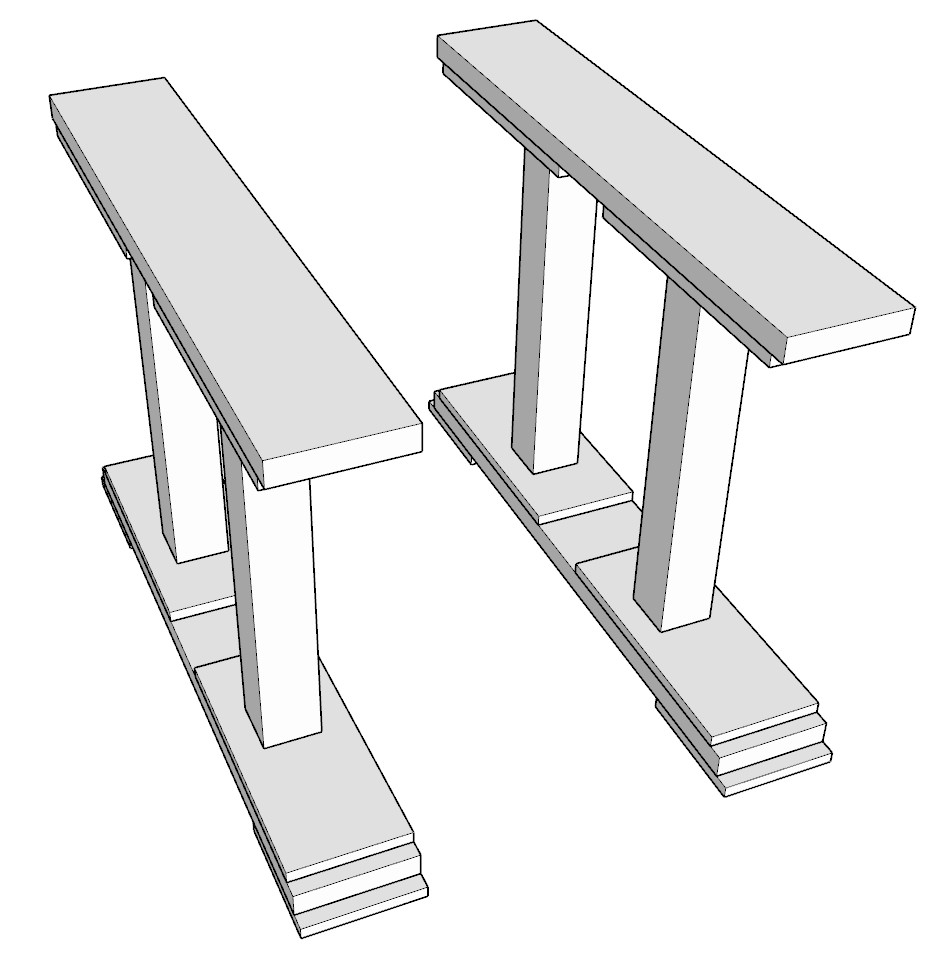
Assembling the Table Base Legs:
- Pair up two of the leg components from the previous step.
- Integrate them using two 41-1/2 inch long 2×8 lumber boards—one at the top and the other at the base of the paired leg components.
- Before attaching, measure to confirm the fitment for the stretcher.
- Upon verifying the measurements, glue and nail the pieces in place using 1-inch nails from a nail gun.
- To elevate the table and enhance its rustic charm, attach two 8-inch long boards to the bottom of this assembly, creating a subtle foot.
- Complete this process twice to yield two table base legs.
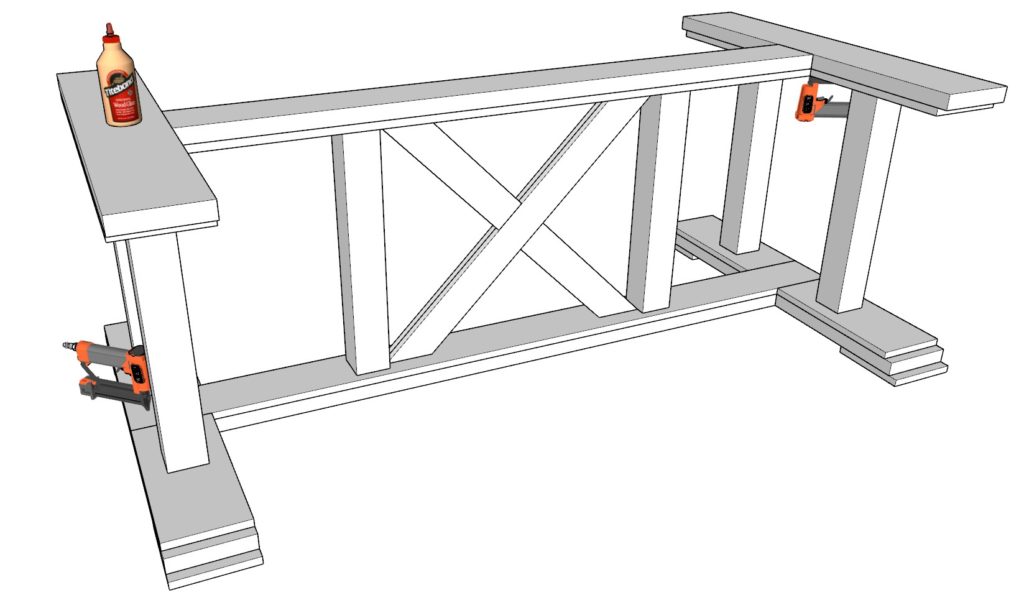
Joining Legs with the Stretcher:
- Position the two assembled table legs at the fitting distance.
- Attach them to the stretcher or beam using wood glue for a sturdy bond.
- Ensure everything is aligned and then use a nail gun to secure them with 1-inch nails.
Step 4: Finishing Touches and Refinements for Your Table Base
Before diving in, always ensure you’re working in a well-ventilated area and wearing appropriate safety gear like gloves, masks, and safety glasses.
Sanding:
- Begin with coarse sandpaper (80-grit) to tackle any major imperfections. Transition to finer grits, up to 220-grit, for a polished finish.
- Use an orbital sander for vast surfaces. For precision on edges and intricate areas, opt for handheld sanding blocks or sponges.
Safety Tip: Always sand in the direction of the grain to avoid splinters.
Routing Edges:
- Soften sharp corners or edges with a router for enhanced safety and a polished finish.
Distressing Techniques:
- Wire Brushing: Brush along the grain for an aged texture.
- Hammer and Chain: Create authentic dents and divots.
- Screw and Nail Head Impressions: Produce small, controlled dents.
- Scraping Edges: Emulate natural wear, especially on corners.
Pro Tip: Pairing multiple distressing techniques can yield a more authentic rustic appearance.
Covering Nail Holes:
- Wood Filler: Ensure it’s stainable to match the surrounding wood.
- Sawdust and Glue: A homemade solution for better color matching.
- Embrace Them: Nail holes can add to the rustic charm.
Staining:
- Prep the wood with a tack cloth to remove dust.
- Apply a wood conditioner for even stain absorption.
- Test the stain on scrap wood first. Once satisfied, apply in the direction of the grain.
- Wipe away excess after a few minutes and apply additional coats if a darker finish is desired.
Achieving a Harmonious Color on Different Woods:
- Layered Staining: Multiple coats can help different woods match better.
- Wood Conditioner: Essential for woods like pine that might stain unevenly.
- Natural Finish: Sometimes, different woods naturally harmonize.
- Strategic Placement: Differences might be less visible depending on the table’s design.
Painting:
- Prime first for better paint adherence.
- Opt for semi-gloss or satin finishes for their look and durability. Apply in thin coats, sanding lightly in between.
- Finish with a protective topcoat for longevity.
Additional Tips:
- When using tools or chemicals, always refer to the manufacturer’s safety guidelines.
- It’s essential to let paint and stain dry thoroughly before adding additional coats or using the table base. This ensures durability and the best finish.