Introduction:
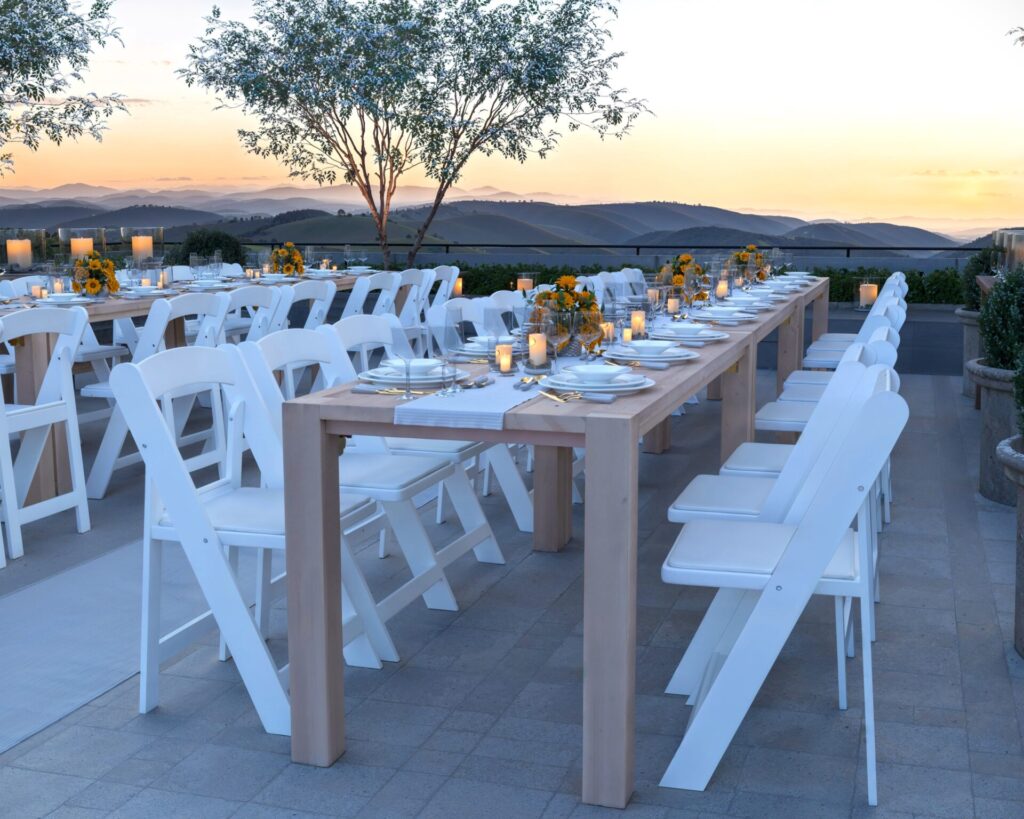
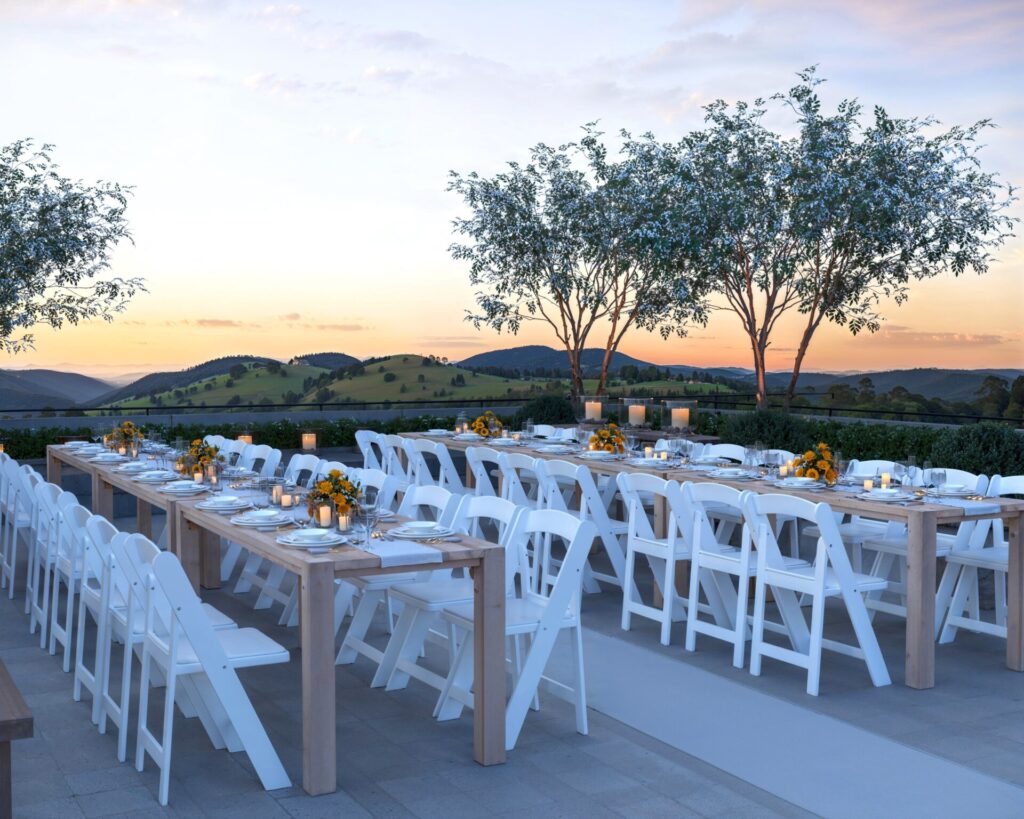
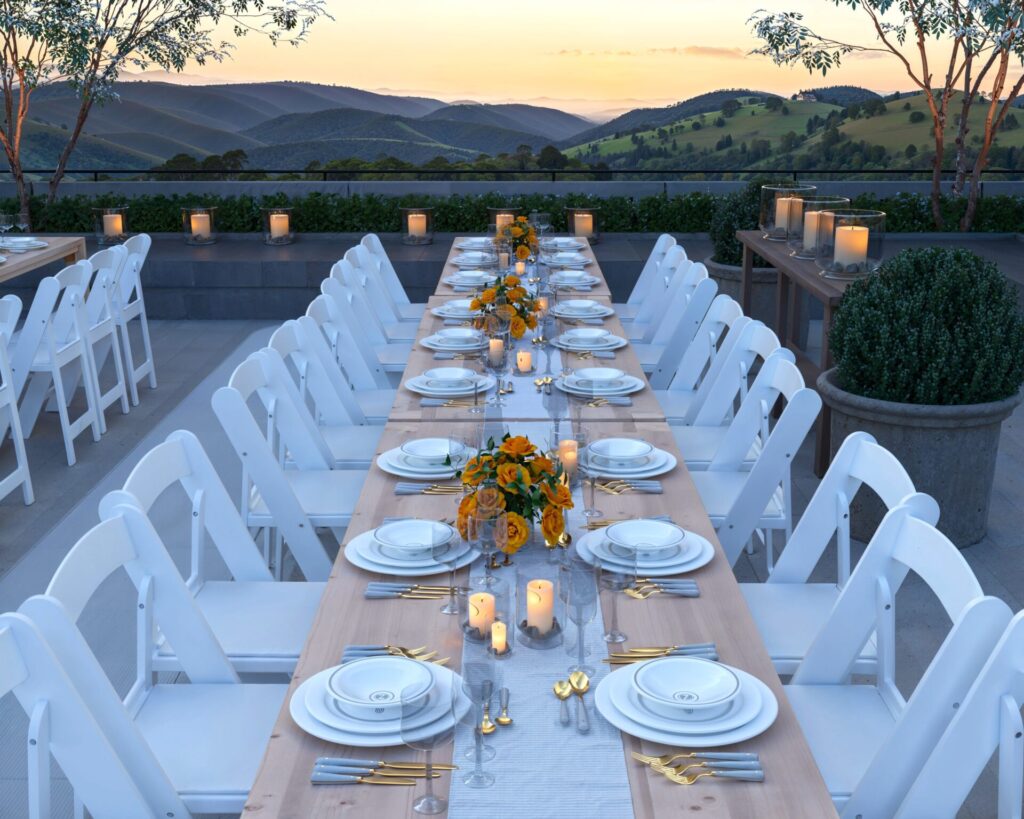
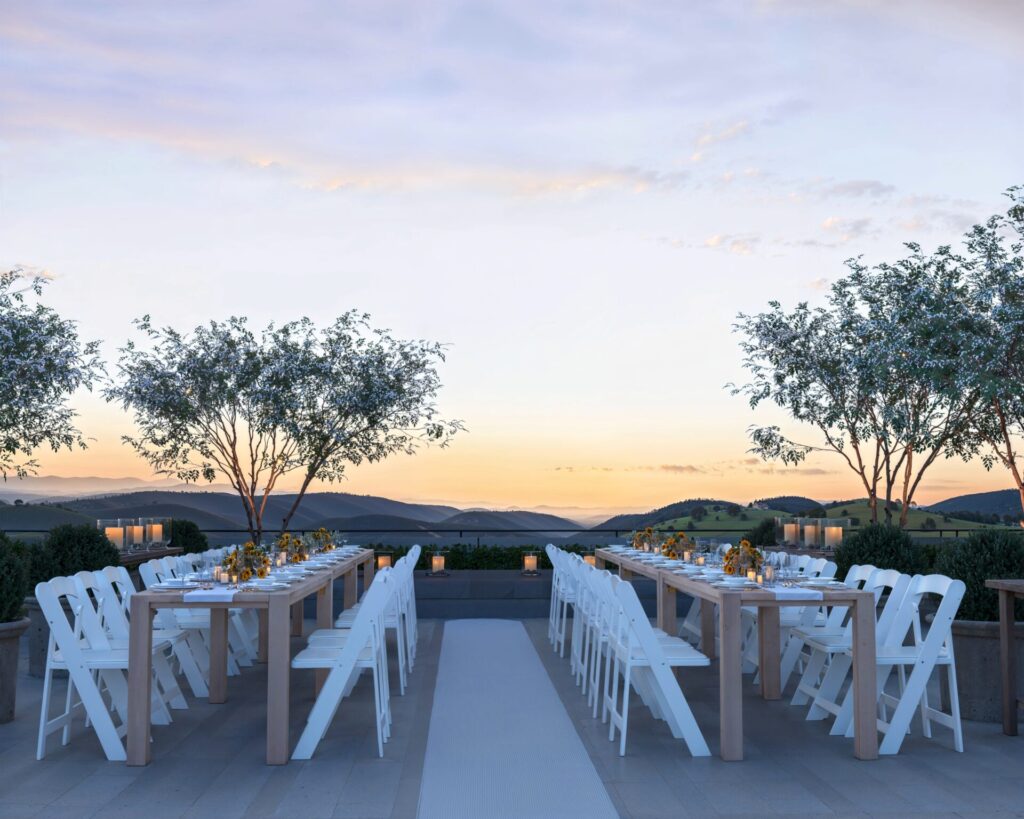
Embark on a delightful woodworking journey with our elegantly designed DIY Folding Event Table Plan. Tailored for both novices and seasoned crafters, this digital download delivers a detailed blueprint to construct a solid wood table that marries functionality with modern farmhouse charm. Ideal for an array of occasions, from intimate backyard weddings to grand celebrations, this table is a testament to style meeting utility.

Specifications:
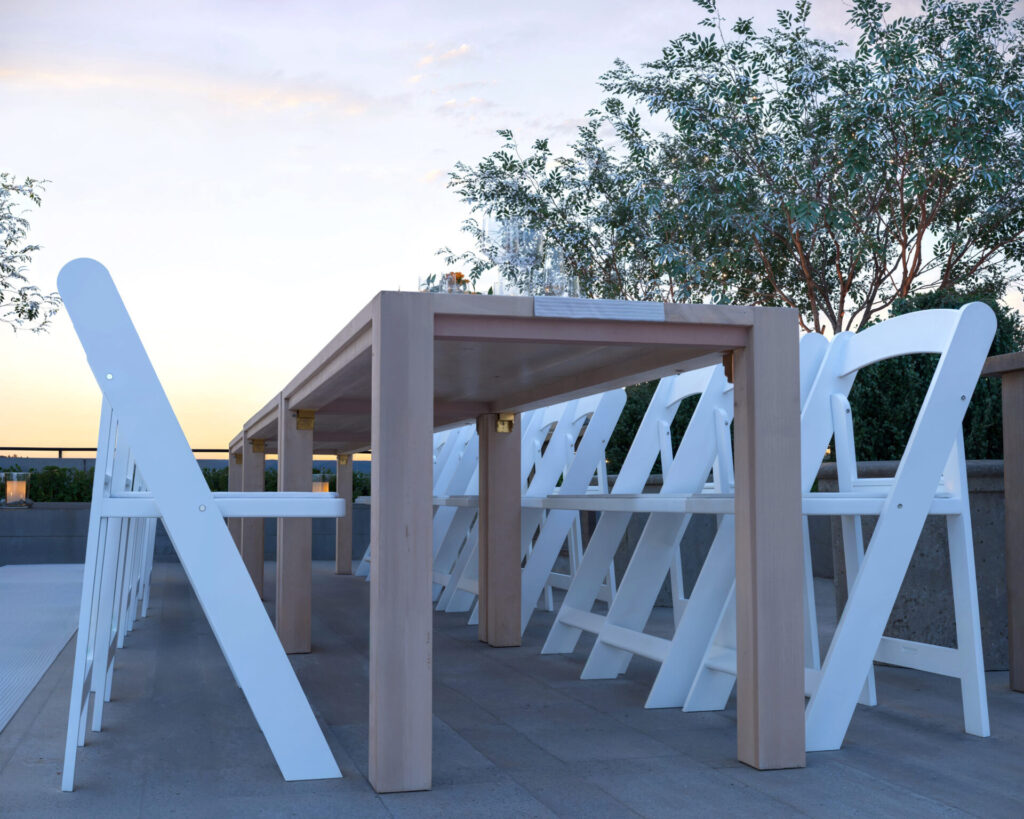
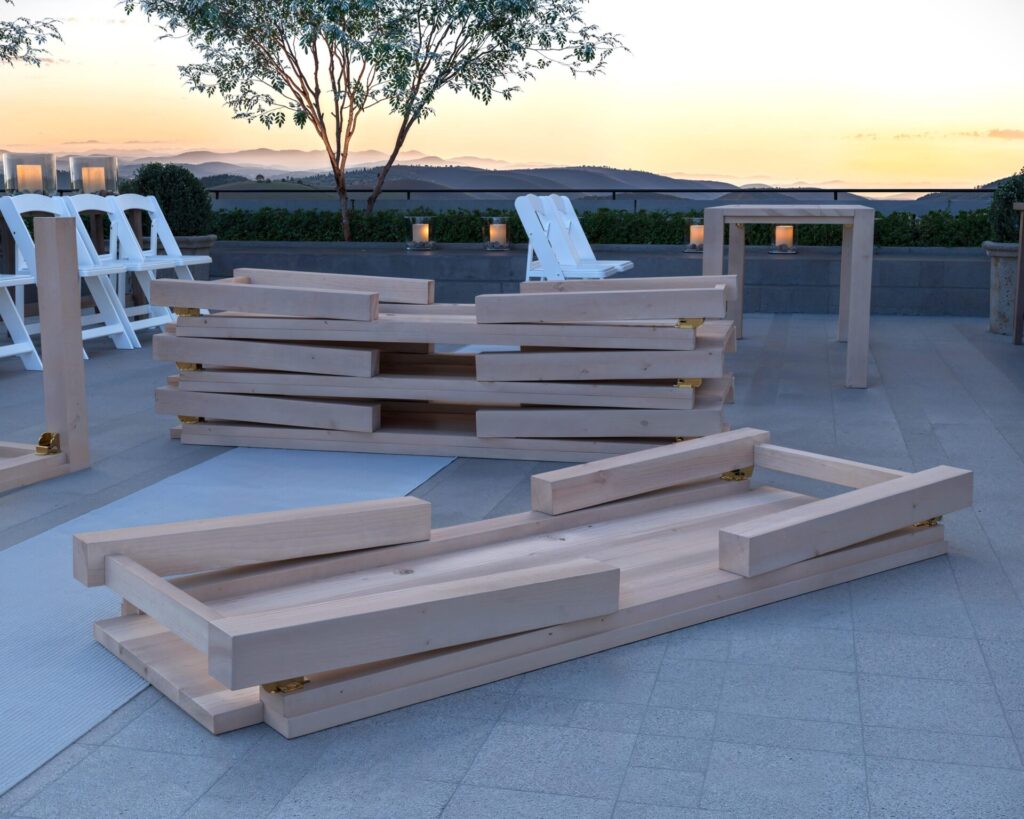
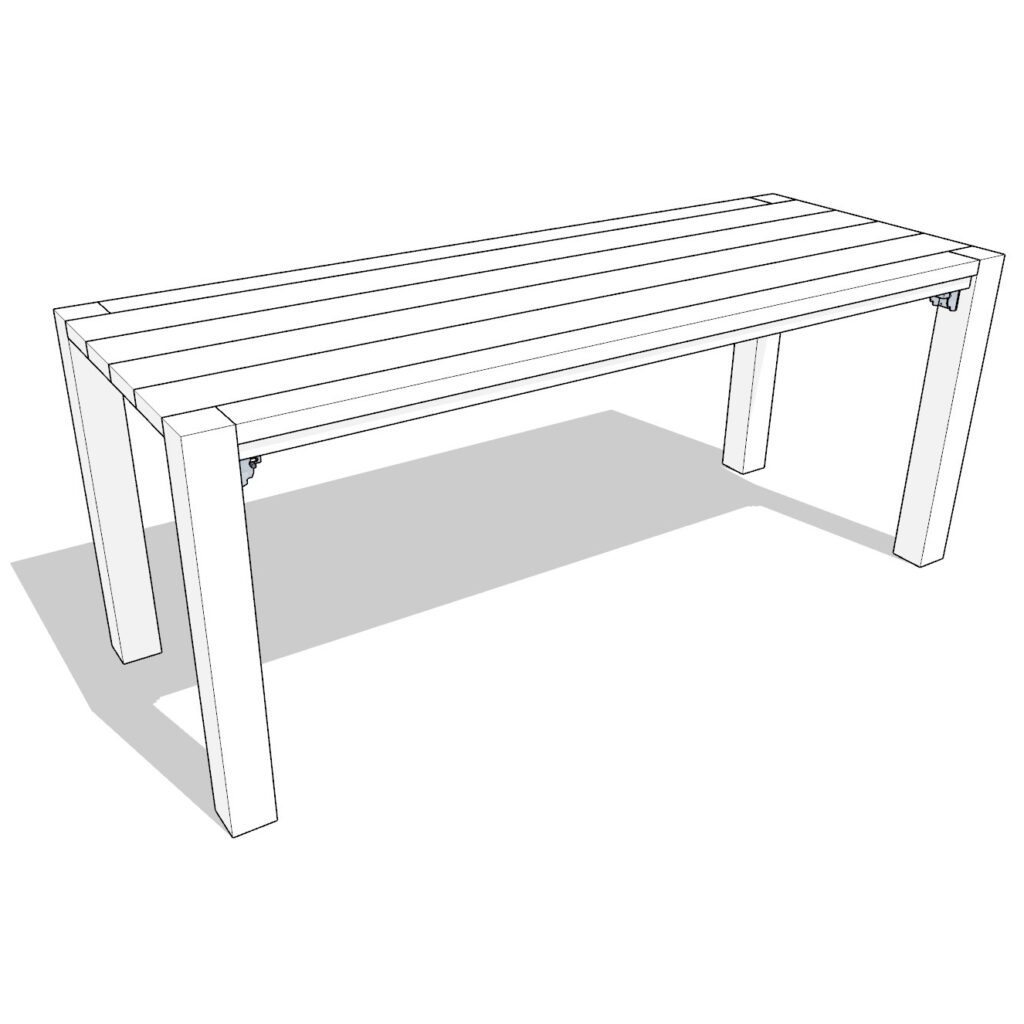
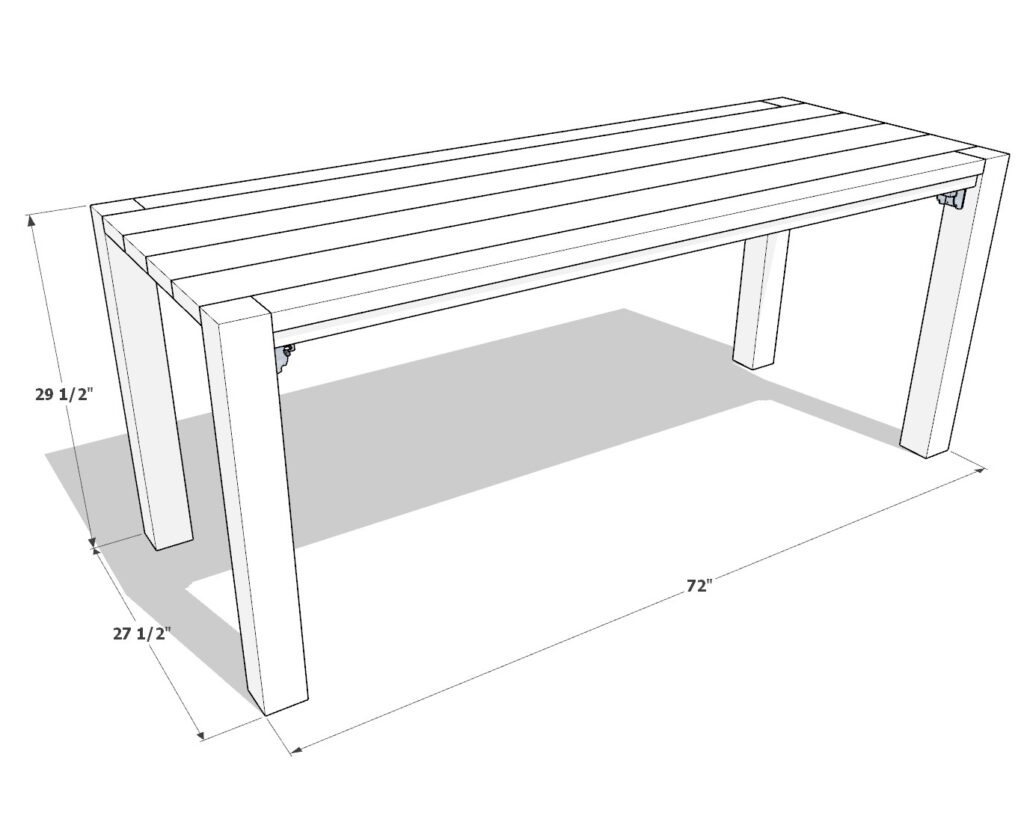
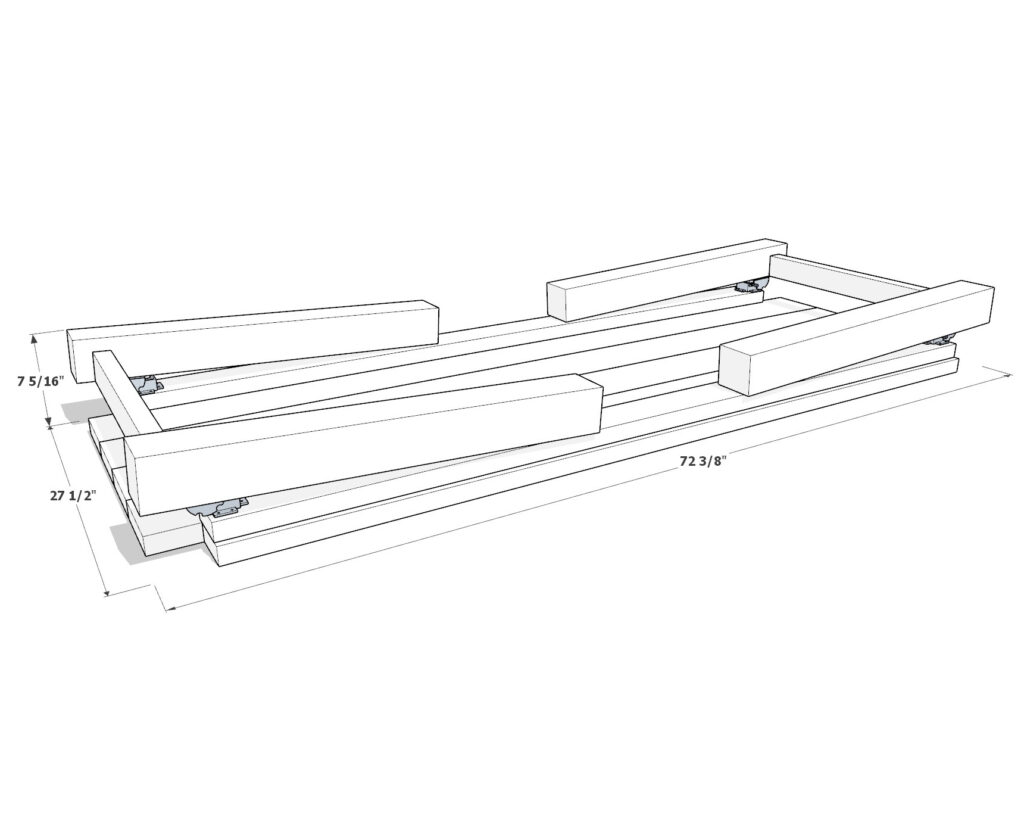
Delve into crafting a table that boasts both the robustness demanded by festive events and the simplicity needed for home assembly. With a final weight of about 117.51 pounds, this table stands solid, promising stability without compromising on its easy-to-manage folding mechanism. Its compact design, unfolding to a generous 29.5 inches tall, 27.5 inches wide, and 72 inches long, folds down to a mere 7-5/16 inches high for convenient storage and transport.
Engineered for durability, our plan details a creation process resulting in a weather-resistant finish, ensuring your table remains a centerpiece through the seasons. The aesthetic appeal is not just a promise but a delivered feature, with the table’s modern farmhouse style ready to elevate any event it graces. A secure locking mechanism ensures safety at your gatherings, while the scratch-resistant finish means your creation maintains its allure over time.
The financial and temporal investment in this DIY venture is efficiently optimized; materials and hardware total approximately $167.01, with an estimated labor time of about 11.2 hours. This is a project that rewards you with more than just a piece of furniture—it’s an enriching experience culminating in a product of pride and practicality.
DIY Plans: Clear and Simple
Our DIY plans are beginner-friendly and take you through each stage of construction. You’ll get a detailed cut list, a shopping guide for materials, and a list of tools you’ll need. The instructions are straightforward, with diagrams and step-by-step guidance to make the process as simple as possible.
Conclusion:
Ready to transform lumber into a testament of your craftsmanship? Our Folding Event Table Plan is more than just instructions; it’s your gateway to bringing a convivial atmosphere to life. Whether it’s for a wedding feast, a special family occasion, or simply adding a touch of elegance to your home’s outdoor space, this table stands as a symbol of your DIY prowess. With comprehensive guidance from start to finish, embark on this wood-crafting journey to realize that joyous moment of unveiling a masterpiece you built with your own hands.
Time
(varies with experience)
Cost
Estimated Built Cost: $170 (Note: Costs can vary by location and supplier. This estimate excludes cost of cushions.)
Skill level required
Beginner
DIY Folding Table PDF Plan
What is included in the PDF download?
- Easy to read step by step instructions
- Material list
- Tools needed
- Helpful links to materials and tools needed
DIY Folding Table Dimensions

Tools and Materials:
Available with the purchase of the DIY plan PDF build guide.
Lumber Shopping & Cut List:
Available with the purchase of the DIY plan PDF build guide.
Step 1: Select and Prepare Your Lumber
1.1 Choosing the Right Wood: Selecting the ideal wood is crucial for building a durable and aesthetically pleasing table. Here are your primary options along with their pros and cons:
- Douglas Fir: Widely available and affordable, Douglas fir is a strong wood with a moderate hardness. It’s fairly resistant to warping but does have more knots. Ideal for sturdy constructions but may require careful selection to avoid knotty pieces.
- Pine: Pine is soft, inexpensive, and easy to work with, making it great for beginners. However, it’s prone to dents and scratches, so it’s less durable for heavy-duty use.
- Cedar: Naturally resistant to moisture, decay, and insect infestation, cedar is perfect for outdoor furniture. It is softer than Douglas fir, making it less ideal for heavy loads.
- Redwood: Highly durable and beautiful, redwood is excellent for outdoor/indoor use but can be more expensive and less readily available outside the Western USA.
For this project, you will need access to 2×4, 4×4, and 2×6 lumber sizes. Check availability and pricing in your area to make the best choice.
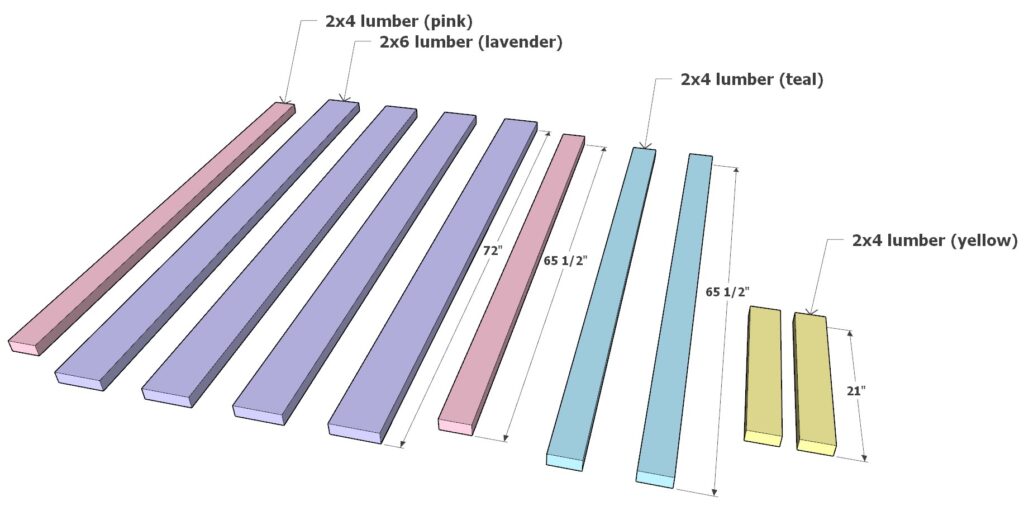
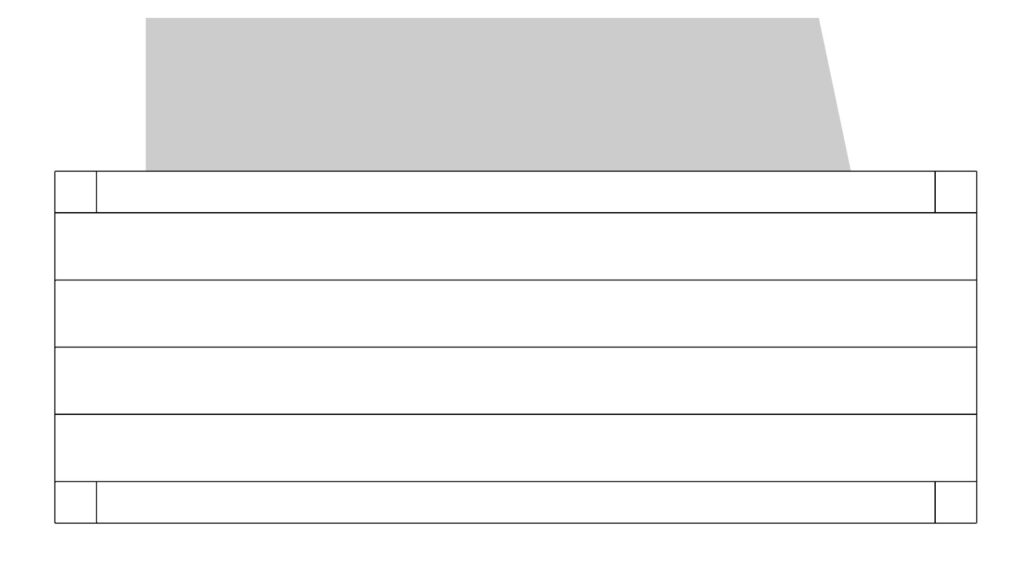
1.2 Lumber Dimensions and Preparation: Ensure you have the following pieces cut to size and ready for further processing:
- Two 2x4s, each 65-1/2 inches long (represented in pink in the diagram)
- Four 2x6s, each 72 inches long (represented in lavender in the diagram)
- Two additional 2x4s, each 65-1/2 inches long for table supports (represented in teal in the diagram)
- Two 2x4s, each 21 inches long for additional support (represented in yellow in the diagram)
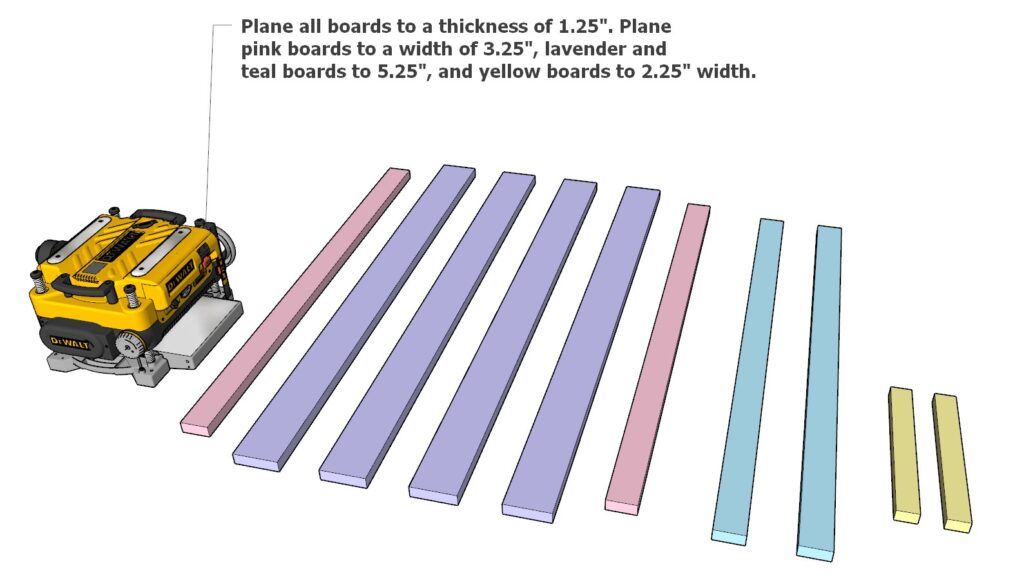
1.3 Planing the Wood: Plane all the boards to a uniform thickness of 1.25 inches. Adjust the widths according to their final use in the table:
- Pink boards to a width of 3.25 inches
- Lavender and teal boards to a width of 5.25 inches
- Yellow boards to a width of 2.25 inches
This preparation will ensure that your table components fit together perfectly and maintain a smooth, uniform appearance. Always wear protective gear when operating planing equipment to ensure safety.
Step 2: Assemble and Finish the Tabletop
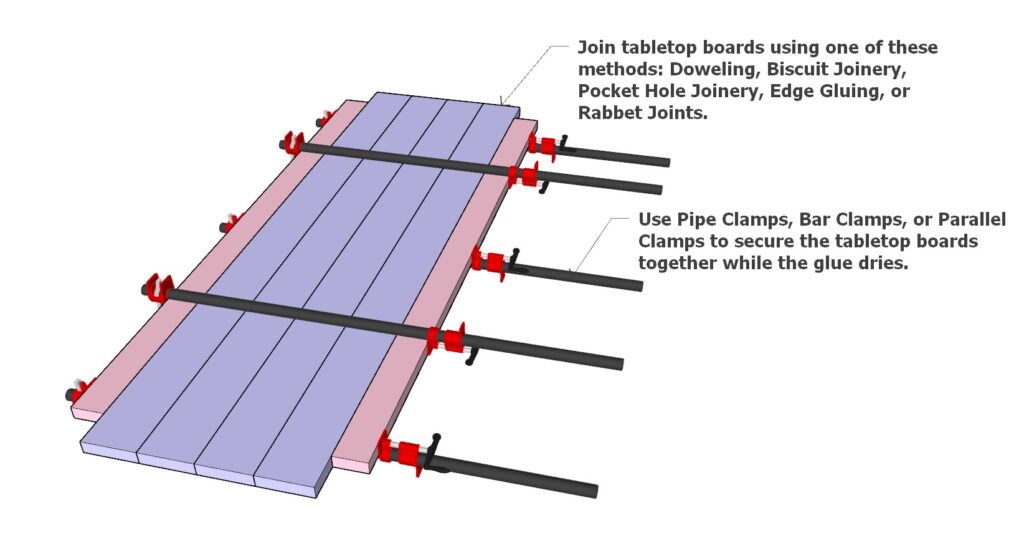
2.1 Selecting the Joinery Method: Choosing the right joinery technique is key to assembling a stable and durable tabletop. Here are some recommended methods:
- Doweling: Provides strong alignment and reinforcement.
- Biscuit Joinery: Excellent for aligning the boards and creating a seamless surface.
- Pocket Hole Joinery: Quick and robust, ideal for DIY projects.
- Edge Gluing: Simple and effective, but relies heavily on the glue’s strength.
- Rabbet Joints: Offers additional surface area for gluing, enhancing durability.
Select a method that suits your skill level and the tools you have available.
2.2 Clamping the Boards: After applying glue (follow the glue manufacturer’s instructions for best results), use clamps to hold the tabletop boards together tightly. The type of clamps you can use includes:
- Pipe Clamps: Great for large projects like tabletops.
- Bar Clamps: Provide a good grip and even pressure.
- Parallel Clamps: Best for maintaining parallel alignment without warping.
Ensure the boards are perfectly aligned and flat before leaving them to dry.
2.3 Drying Time: Allow the glue to dry completely, usually taking between 24-48 hours. Check the glue manufacturer’s instructions for specific drying times and conditions.
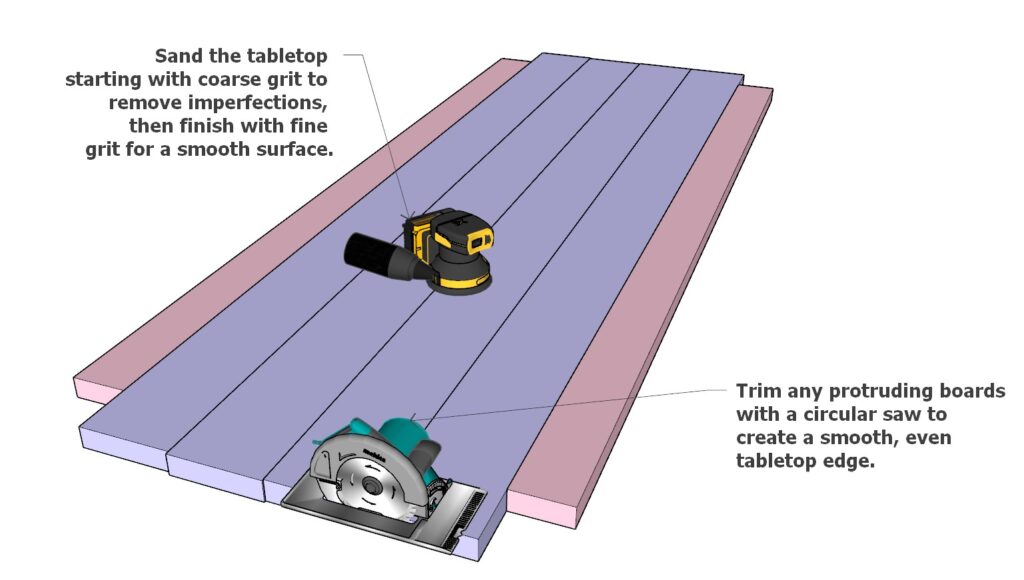
2.4 Sanding the Tabletop: Once the glue has set:
- Start sanding with a coarse-grit sandpaper to remove any glue residue and surface imperfections.
- Gradually move to finer grits to achieve a smooth finish.
2.5 Trimming the Edges: Use a circular saw to trim any protruding edges from the glued boards, ensuring each side of the tabletop is smooth and even.
2.6 Final Touches: Inspect the tabletop for any missed spots or rough areas, and give it a final sand if necessary. Cleaning up the dust after sanding will prepare the surface for any finishing treatments like staining or sealing.
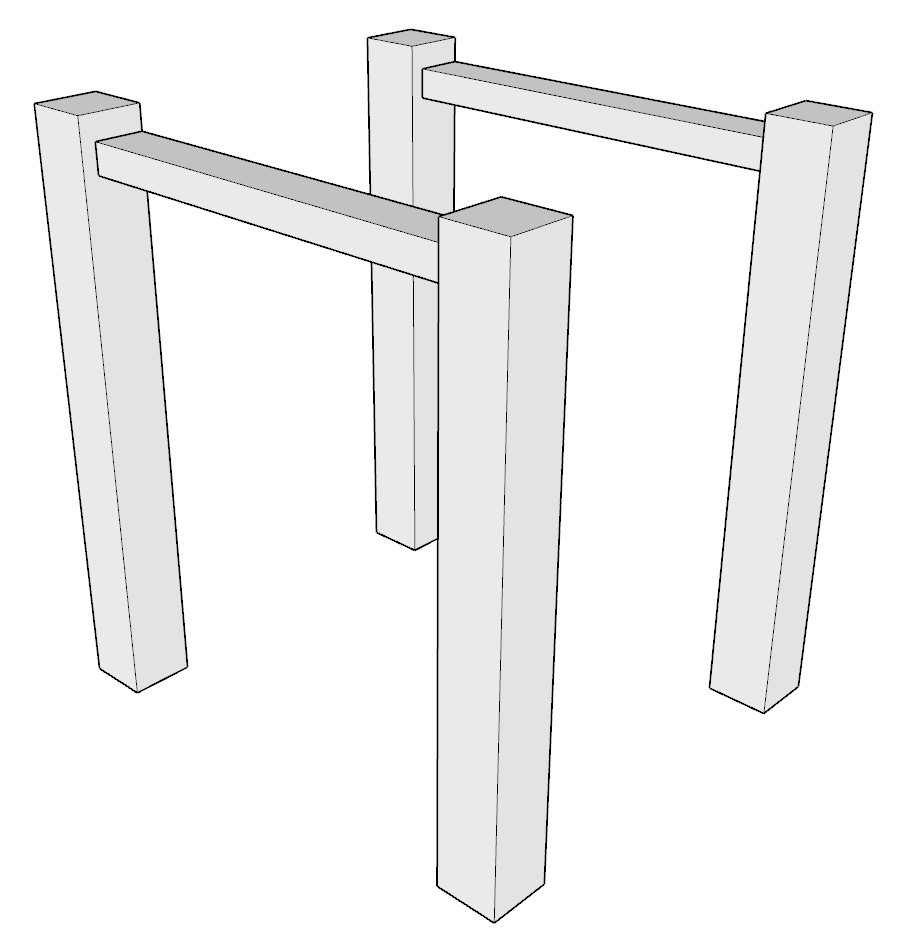
Step 3: Construct the Table Leg Assemblies
3.1 Preparing the Leg Boards: Begin by preparing your leg boards for assembly.
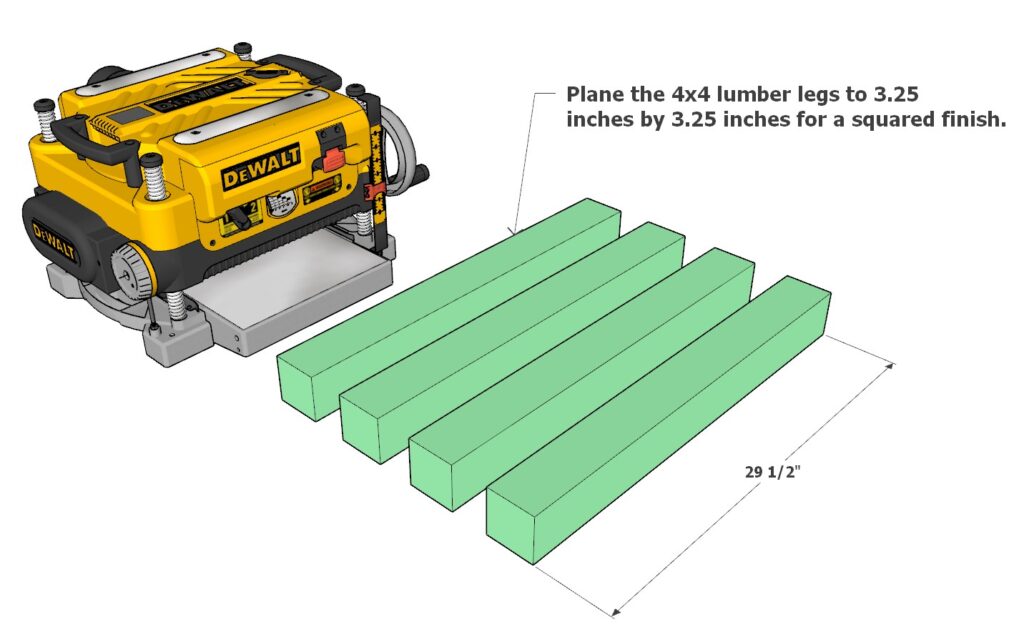
- Select and Plane 4×4 Lumber: You will need four 4×4 boards, each 29-1/2 inches long (represented in green in the diagram).
- Plane Dimensions: Plane each board to a final size of 3.25 inches by 3.25 inches to ensure a squared and uniform finish.
3.2 Assembling the Legs: Follow these steps to assemble each set of table legs.
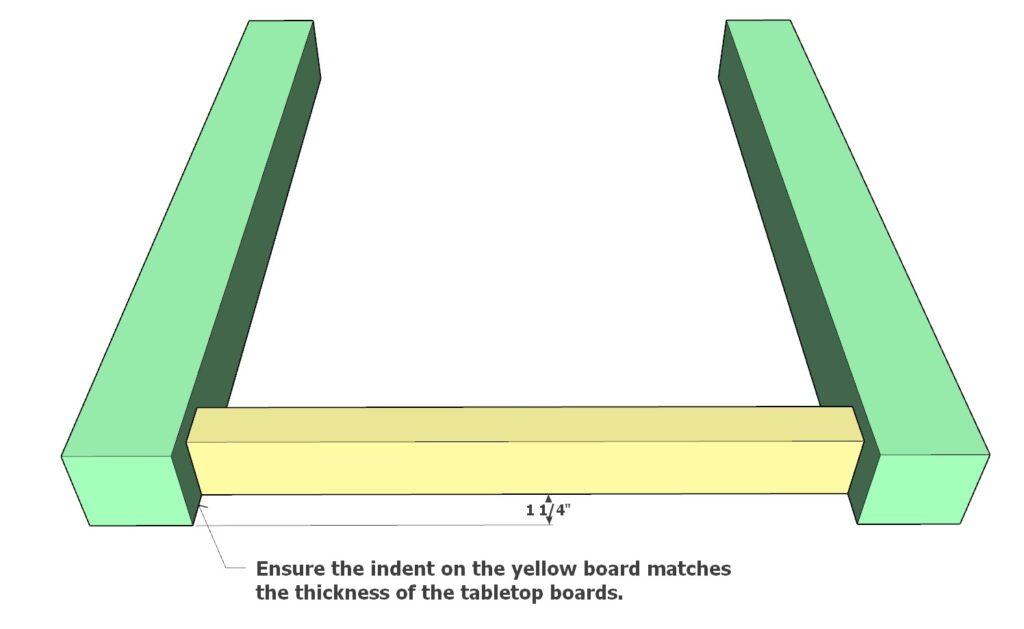
- Layout: Take two of the green boards and one yellow board (21 inches long 2×4, serving as the reinforcement beam).
- Check Fit: Ensure that the indent on the yellow board matches the thickness of the tabletop boards. This is crucial for stability and alignment.
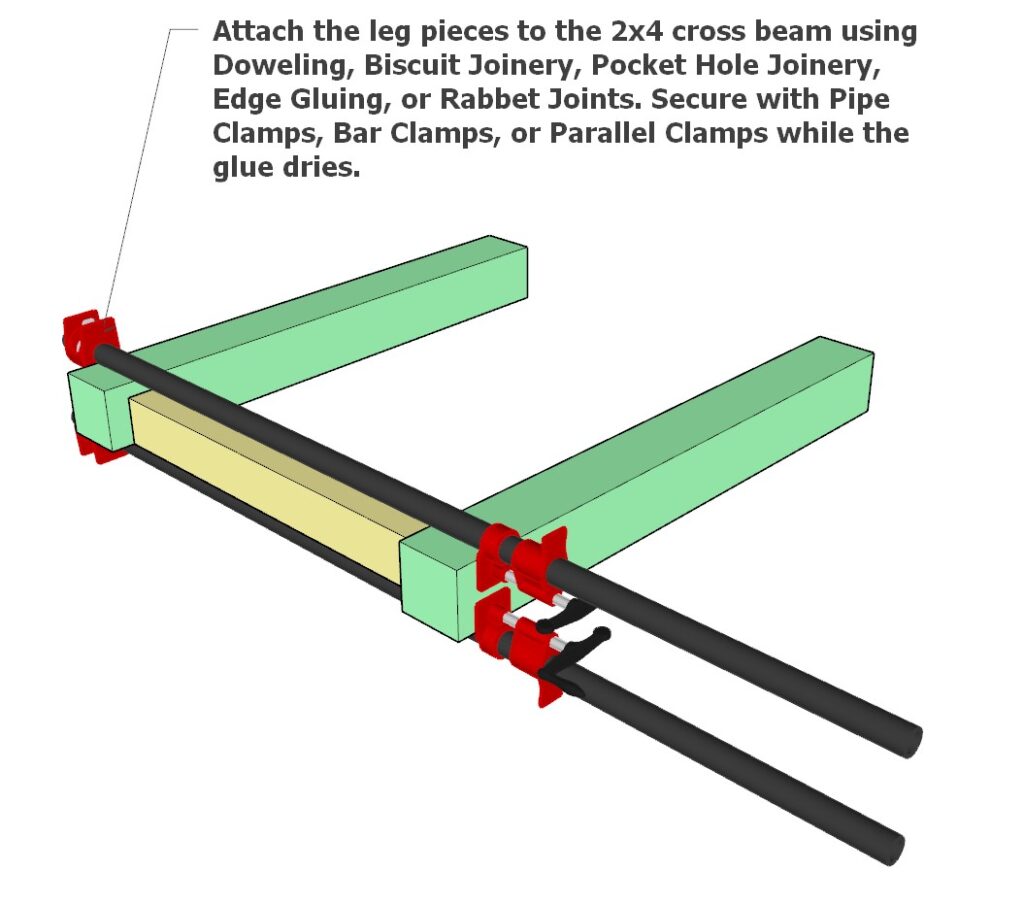
- Joinery Method: Choose a suitable joinery technique based on your tools and preference. Options include Doweling, Biscuit Joinery, Pocket Hole Joinery, Edge Gluing, or Rabbet Joints.
- Assembly: Attach each leg piece to the 2×4 cross beam using the selected joinery method.
3.3 Securing the Assembly: Ensure everything is aligned correctly, then secure the assembly.
- Clamping: Use Pipe Clamps, Bar Clamps, or Parallel Clamps to hold the components together tightly while the glue dries.
- Check Alignment: Double-check that all parts are properly aligned and the structure is square before leaving it to set.
3.4 Drying and Inspection:
- Drying Time: Allow the glue to dry thoroughly, typically between 24-48 hours, depending on the glue type and environmental conditions.
- Inspection: Once dry, inspect the leg assemblies for any shifts during drying or areas that may require additional sanding or adjustment.
3.5 Completion of Leg Assemblies:
- Final Setup: You should have two leg assemblies, each consisting of two green 4×4 leg boards and one yellow reinforcement board.
- Ready for Next Steps: With the leg assemblies complete, ensure they are prepped and ready for attachment to the tabletop in subsequent steps.
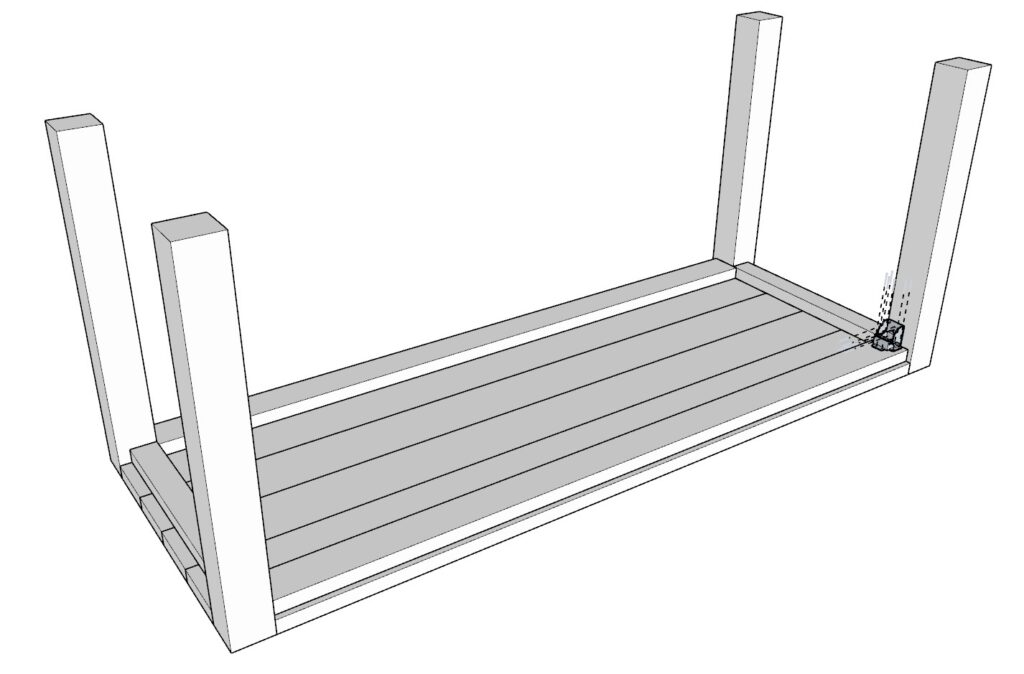
Step 4: Attach the Support Beams and Install Folding Mechanism
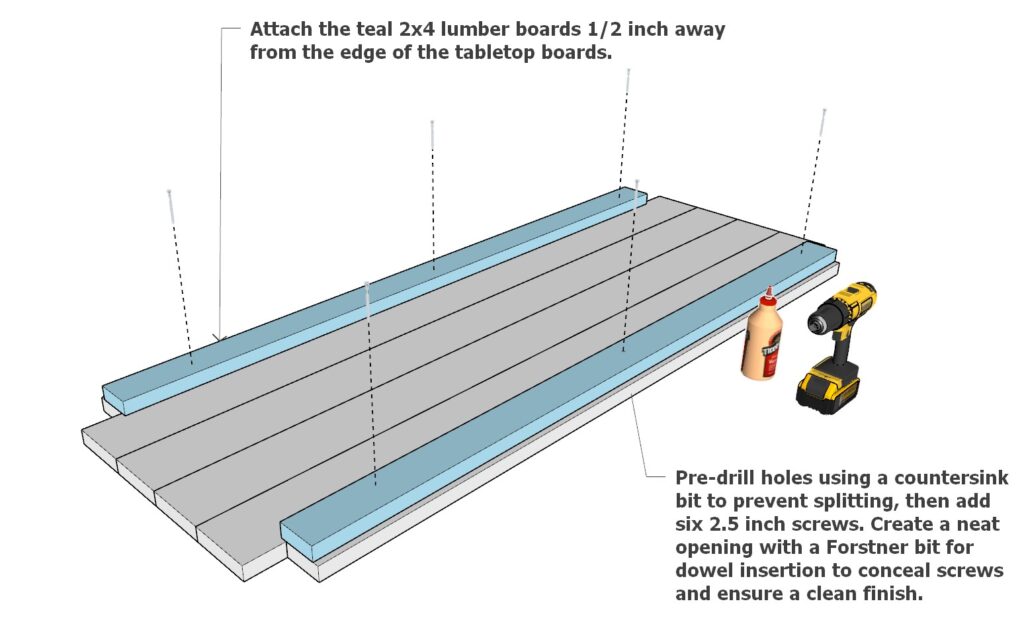
4.1 Attaching the Support Beams: Add structural integrity to your table by attaching the support beams to the underside of the tabletop.
- Positioning the Beams: Position the teal 2×4 lumber boards on the bottom of the tabletop. These should be placed 1/2 inch away from the edge of the tabletop boards to ensure even distribution of support.
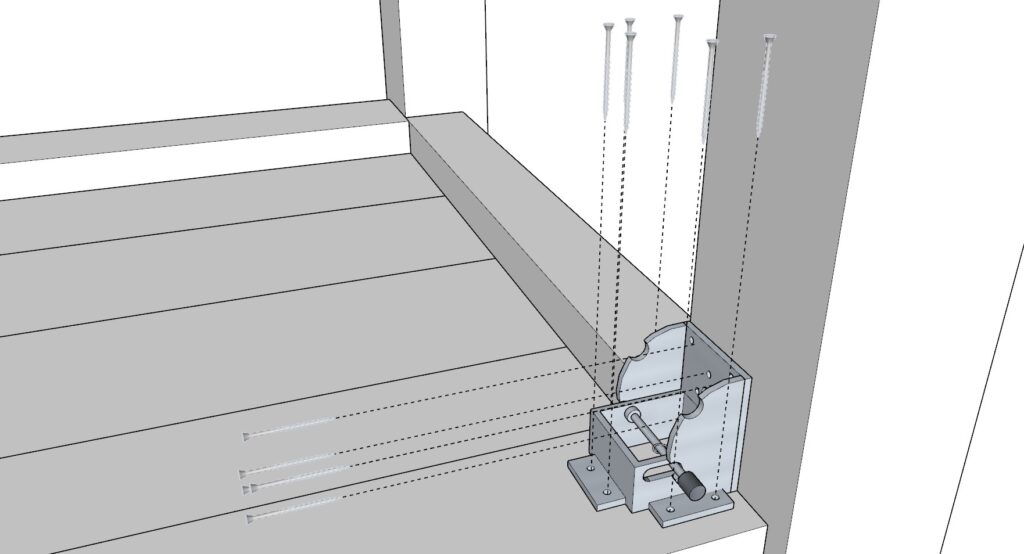
- Pre-drilling Holes: Before attaching the beams, use a countersink bit to pre-drill holes. This step is crucial to prevent the wood from splitting when inserting screws.
- Securing with Screws: Attach the beams using six 2.5-inch screws per beam. Ensure the screws are evenly spaced for optimal support.
- Concealing Screws: To achieve a neat finish, use a Forstner bit to create openings for dowel insertion over the screws. This not only conceals the screws but also enhances the aesthetic appeal of your table.
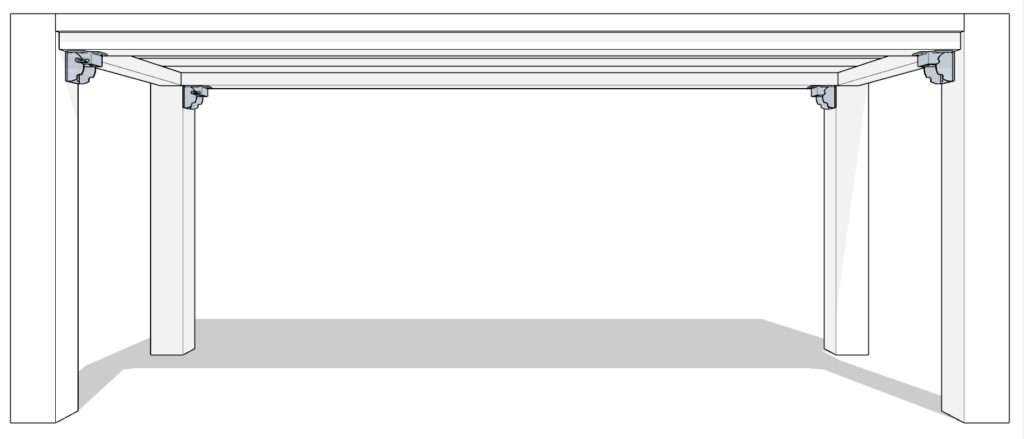
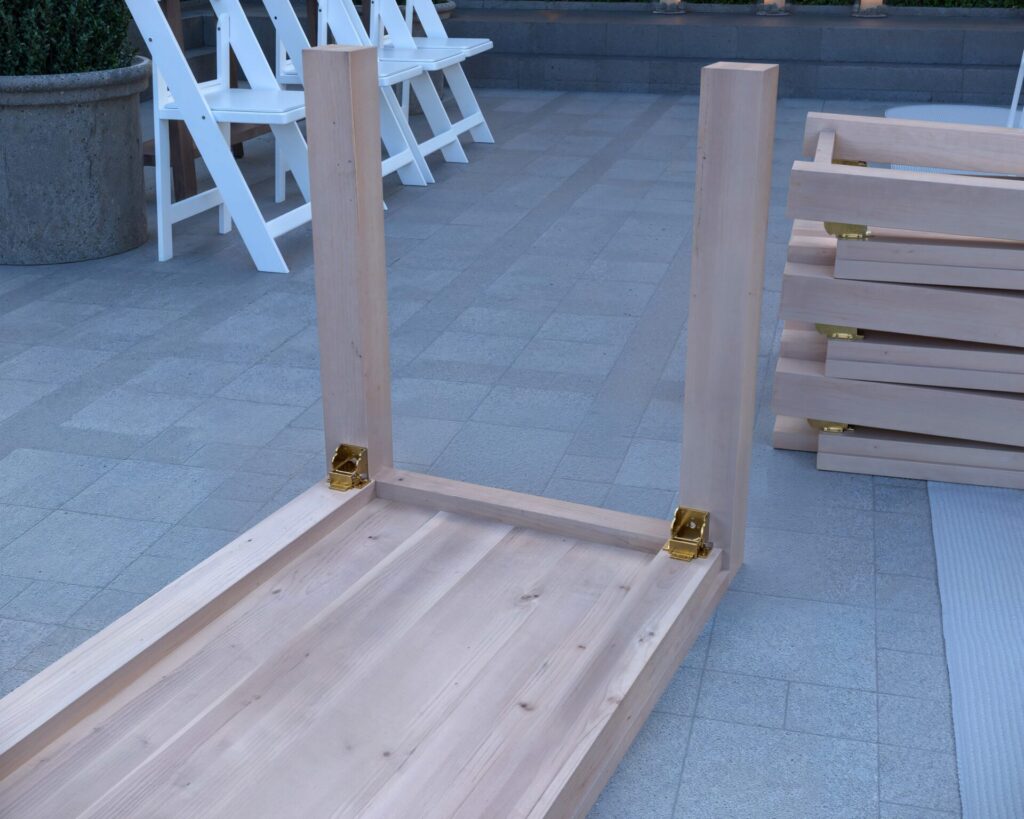
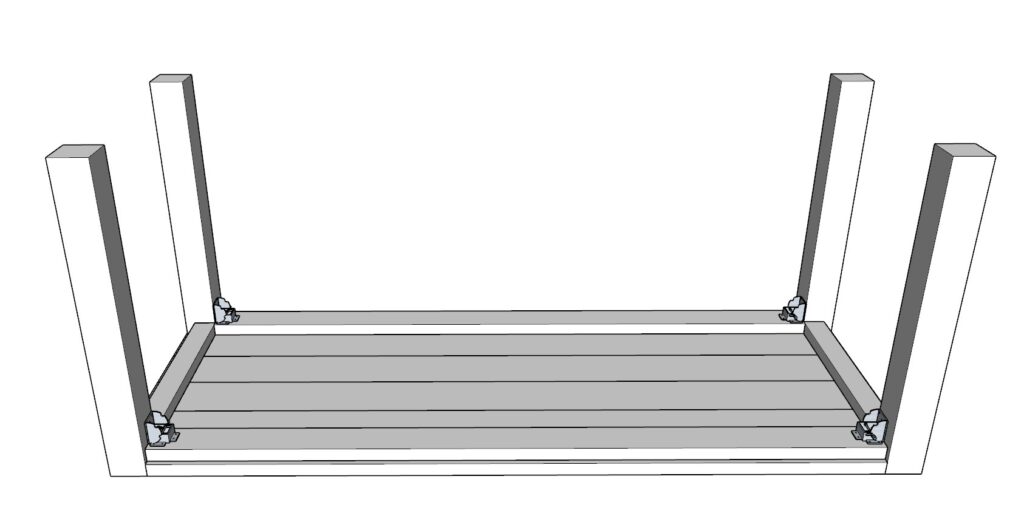
4.2 Installing the Folding Mechanism: Attach the folding stands to enable easy manipulation and secure locking of the table legs.
- Attaching the Hinges: Take the four Self-Locking Leg Hinges and attach them as indicated in the diagram. A pair should be fixed to each of the leg assemblies and then to the teal support boards.
- Ensuring Proper Alignment: It’s essential that the hinges are aligned correctly to facilitate smooth folding and unfolding of the table legs.
- Testing Swivel Action: After installation, test the swivel action of the legs to ensure they move freely and lock securely. The Self-Locking Hinged Leg mechanism should engage properly, providing stability when the table is in use.
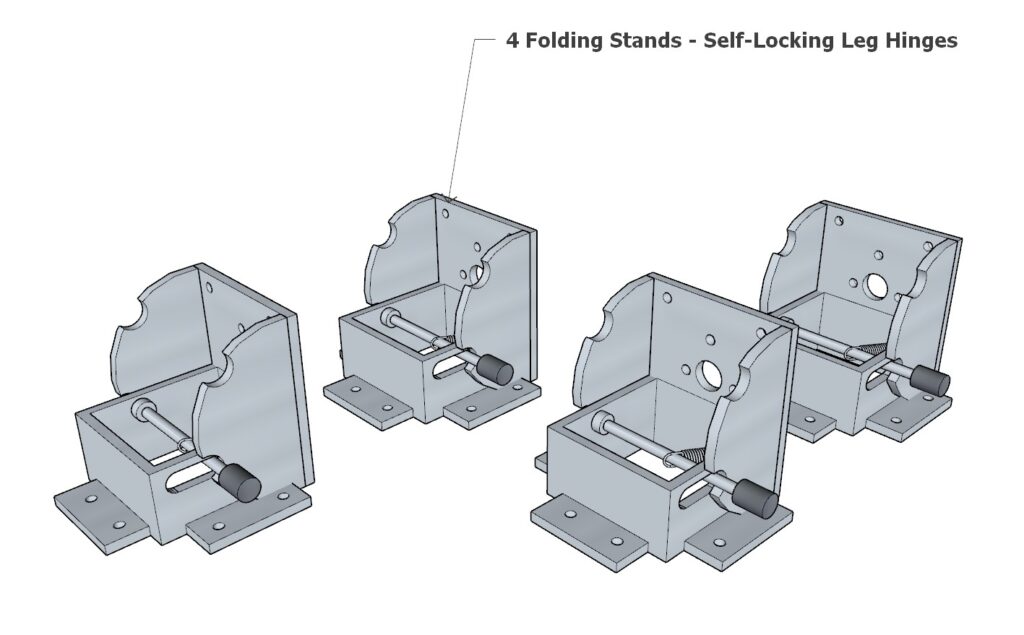
4.3 Safety and Functionality Check: Before proceeding, conduct a thorough check of all moving parts and locking mechanisms.
- Testing the Locking Mechanism: Verify that the spring-activated “forced lock” engages correctly. It should lock the legs in the open position to ensure stability and safety during use.
- Fold and Unfold Test: Perform several fold and unfold cycles to confirm that the mechanism works smoothly and consistently. This test is critical to ensure the table can be easily set up and stored without issues.
4.4 Final Adjustments: Make any necessary adjustments to the hardware to improve performance and ensure user safety.
Step 5: Finishing and Maintaining Your Folding Table
5.1 Preparing the Table for Finishing: Proper preparation of the wood surface is crucial for a high-quality finish, whether you plan to paint, stain, or whitewash the table.
- Sanding the Surface: Start with a coarse-grit sandpaper (around 80 grit) to remove any rough spots and imperfections. Gradually progress to medium (120 grit) and then fine-grit (220 grit) sandpapers. This step ensures a smooth base for any finish and prevents uneven staining or painting.
- Routing the Edges: Use a router with a round-over bit to smooth the edges of the tabletop and legs. This not only enhances the table’s aesthetic but also makes it more comfortable to use, eliminating sharp edges that can snag clothing or cause injuries.
5.2 Whitewashing the Table: Whitewashing gives your table a rustic, weathered look while still showcasing the wood grain.
- Applying the Whitewash: Mix equal parts white latex paint and water. Apply the mixture with a brush, working in sections. Wipe off excess with a rag as you go, allowing the wood grain to show through.
- Reasoning: Whitewashing is a great option for those seeking a lighter, more casual finish that enhances rather than obscures the natural wood.
5.3 Staining the Table: Staining enhances the natural beauty of the wood and provides color while allowing the grain to remain visible.
- Applying Pre-Stain Wood Conditioner: This helps prevent blotches and promotes even stain absorption, crucial for woods like pine that tend to absorb stains unevenly.
- Staining: Apply your chosen stain with a brush or rag, working along the wood grain. Allow it to penetrate the wood for 5-15 minutes, then wipe off any excess with a clean rag.
- Applying Polyurethane: Finish with a clear polyurethane coat to protect the stained surface. Choose between a gloss, semi-gloss, or matte finish based on your aesthetic preference. Apply using a fine-bristle brush, and allow it to dry completely, following with a light sanding between coats for a smooth finish.
5.4 Painting the Table: Painting can provide a bold, solid look and is available in an endless variety of colors.
- Priming: Apply a primer to help the paint adhere better and to cover any pre-existing stains or wood treatments.
- Painting: Choose a high-quality acrylic or oil-based paint. Apply the first coat, let it dry, then apply a second coat for even coverage.
- Reasoning: Painting is ideal for achieving a specific style or matching the table with other décor elements.
5.5 Maintaining the Table: To ensure your table lasts for many years, regular maintenance is key.
- Regular Cleaning: Wipe the surface with a damp cloth to remove dust and spills. Avoid harsh chemicals that can damage the finish.
- Reapply Finish: Depending on usage, reapply polyurethane or another finish every few years to maintain its resistance to wear and weather.
5.6 Adding Handles and Ergonomic Lifting: Given the table’s weight, adding handles can make transportation easier and safer.
- Installing Handles: Install durable handles on the sides of the table to facilitate lifting and carrying. Ensure they are securely attached and capable of supporting the table’s weight.
- Ergonomic Lifting Techniques: Always lift with your legs, not your back. When lifting the table, keep it close to your body, bend at the knees, and use a partner to help with the weight. This reduces the risk of injury and makes handling the heavy table much safer.