Introduction
Embarking on a DIY journey to create the perfect wooden doghouse offers not just a shelter for your furry friend but a labor of love that ensures safety, comfort, and style. This guide delves deep into the nuances of constructing a doghouse that stands the test of time and elements, aiming to answer all your questions meticulously.
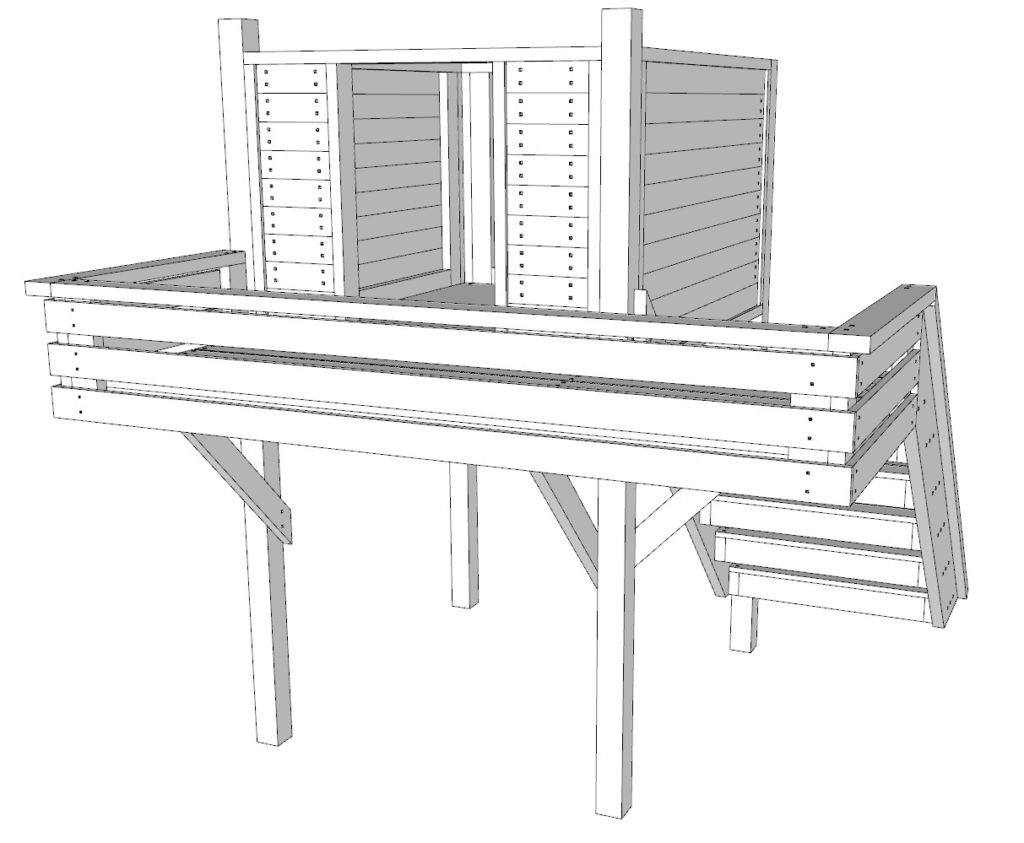
Specifications of the Doghouse
Diving into the specifications, this DIY wooden doghouse is designed with precision and care to ensure it meets the diverse needs of different dog breeds while offering durability and functionality. Here’s a closer look at what sets this doghouse apart:
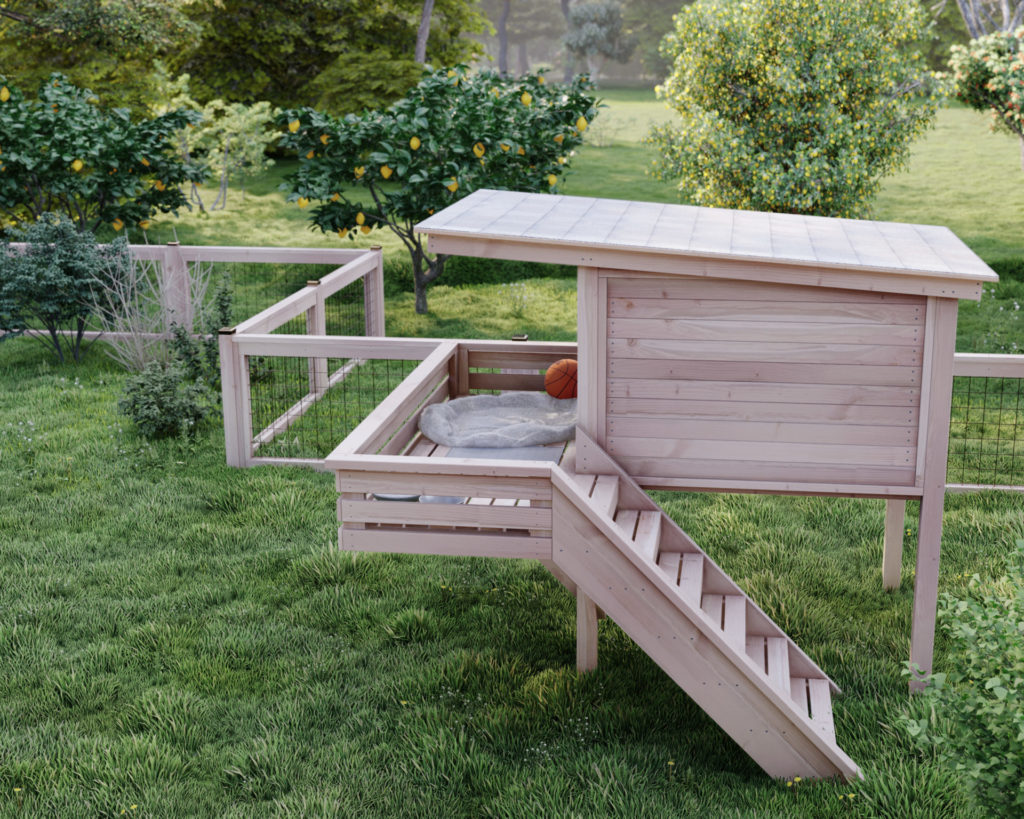
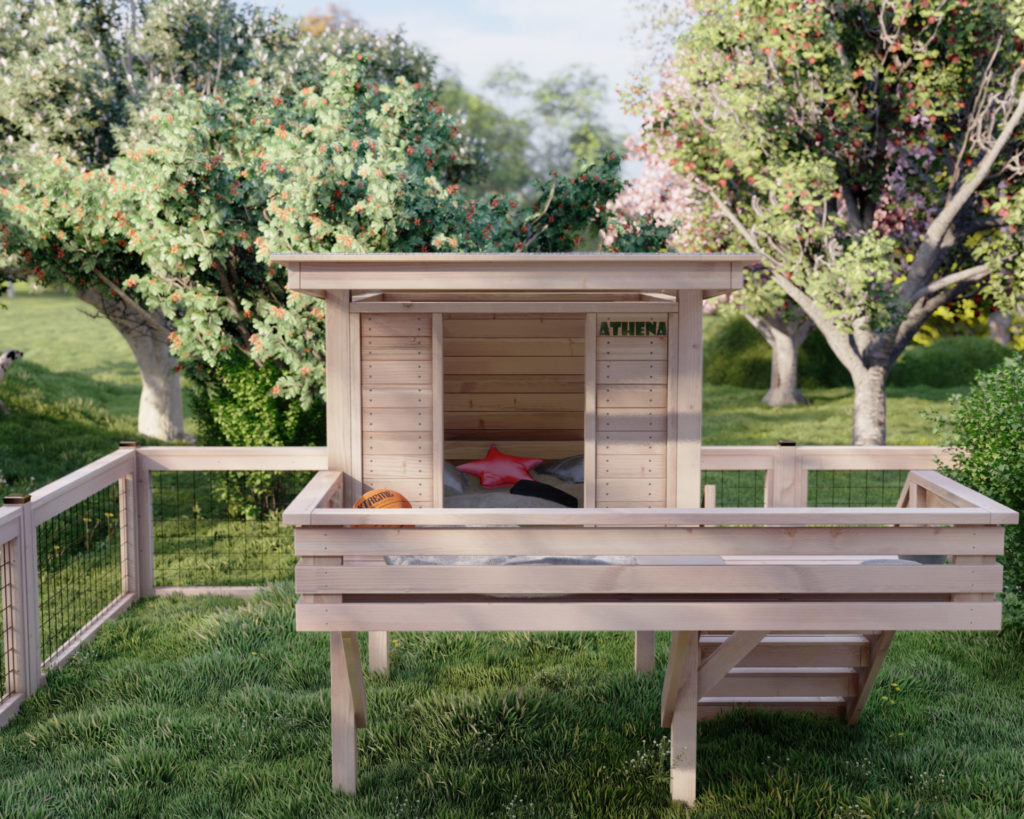
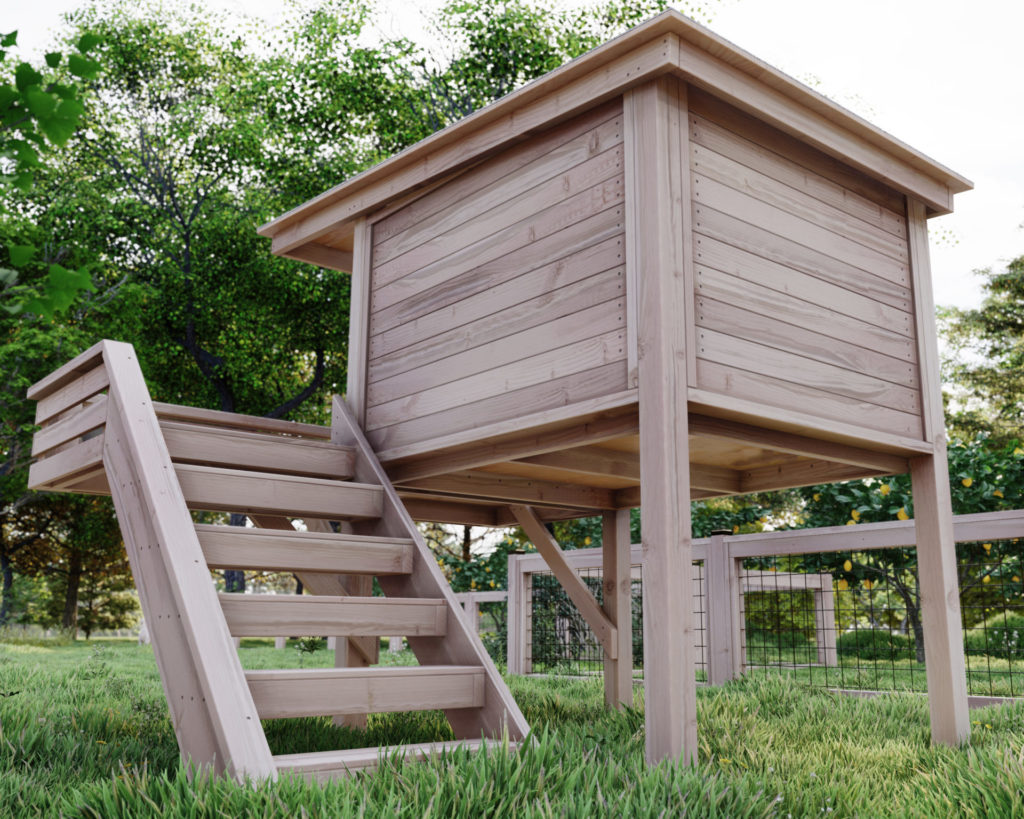
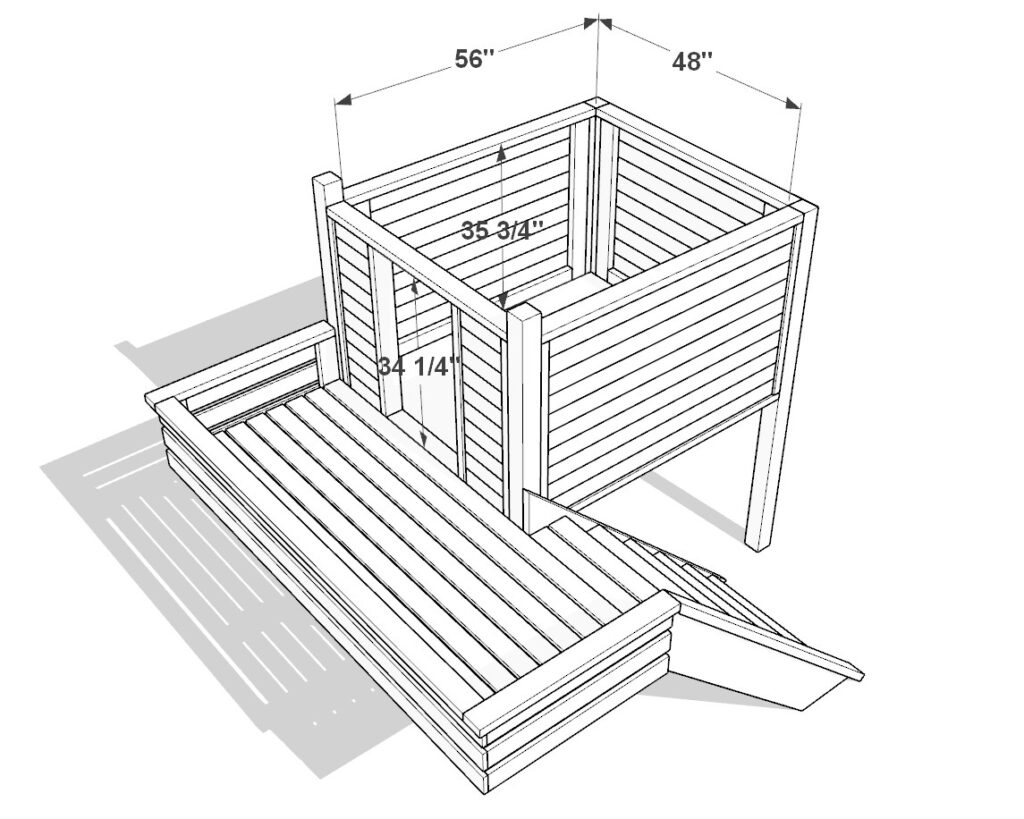
Internal Dimensions: Designed thoughtfully, the doghouse interior measures 48 inches in length, 56 inches in depth, and 35-3/4 inches tall. These dimensions have been carefully chosen to provide ample space for your dog to move around comfortably without feeling cramped.
Entrance Specifications: The entrance is strategically sized with a height of 34-1/4 inches to accommodate both small and large breeds. The width is optimized to allow easy access for dogs, ensuring they can enter and exit the doghouse without any hassle. This thoughtful consideration in design eliminates the need for bending or crouching, catering to dogs of various sizes and ages.
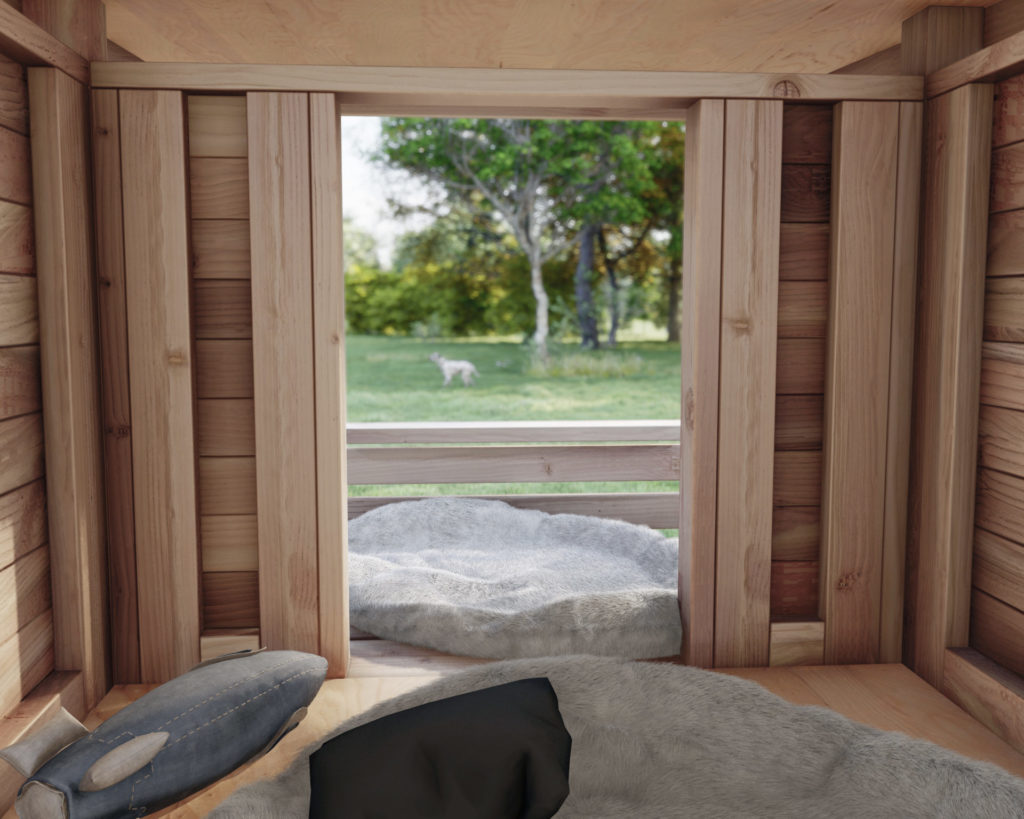
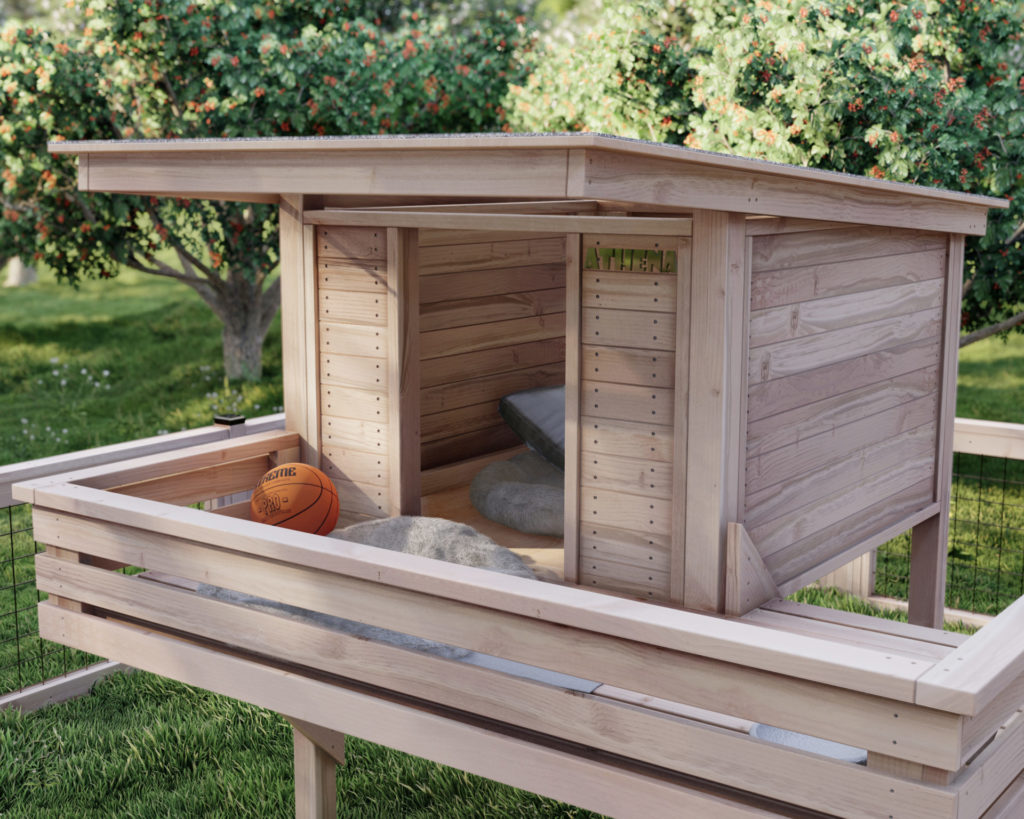
Interior Space: Inside the doghouse, there’s plenty of room for your pet to stand up, stretch out, and lie down comfortably. The spacious interior is crucial for your dog’s comfort and wellbeing, providing them with a sense of security and personal space.
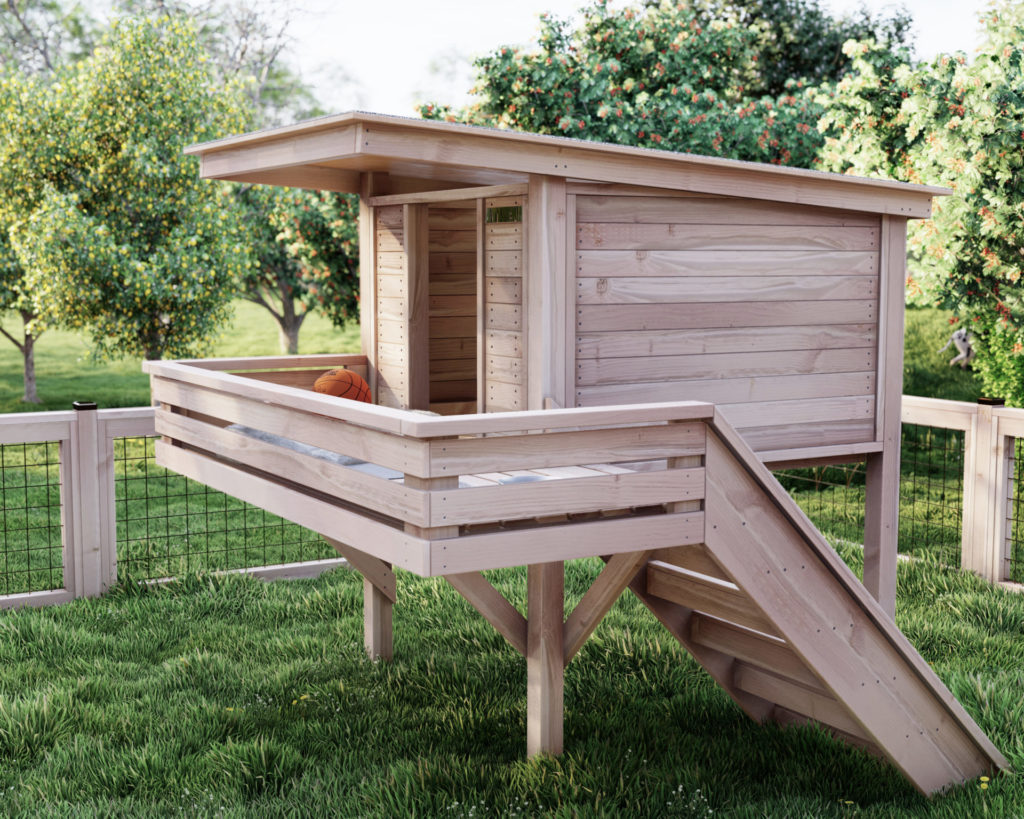
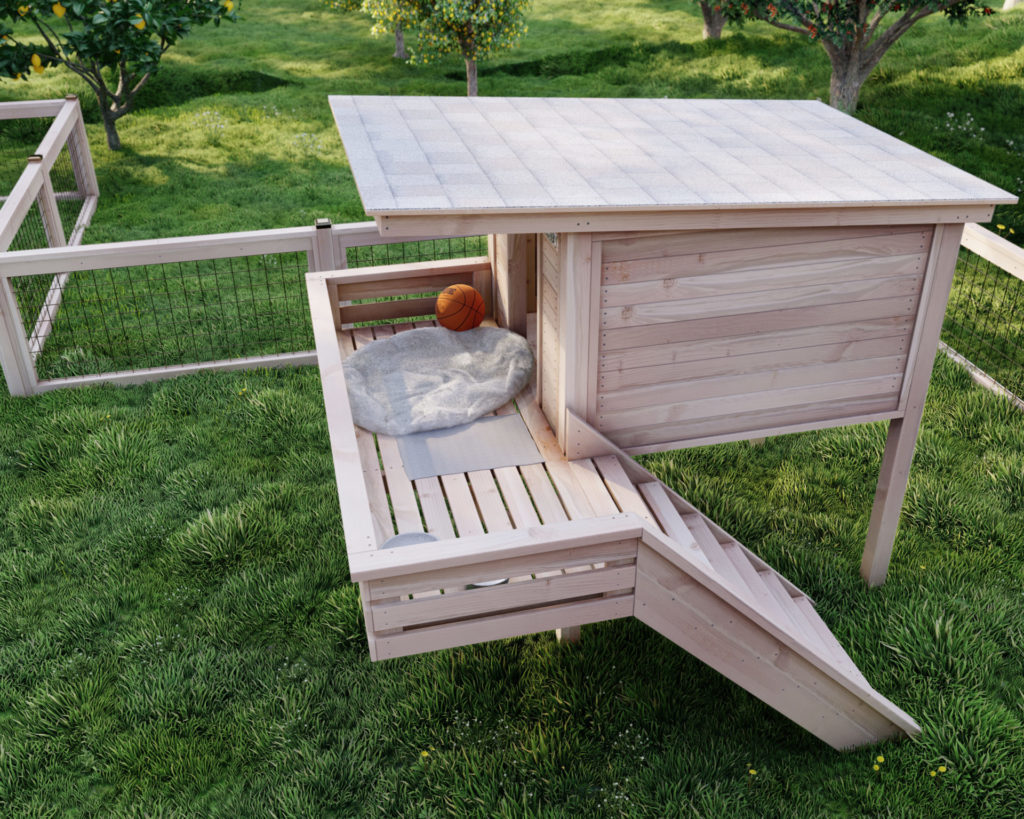
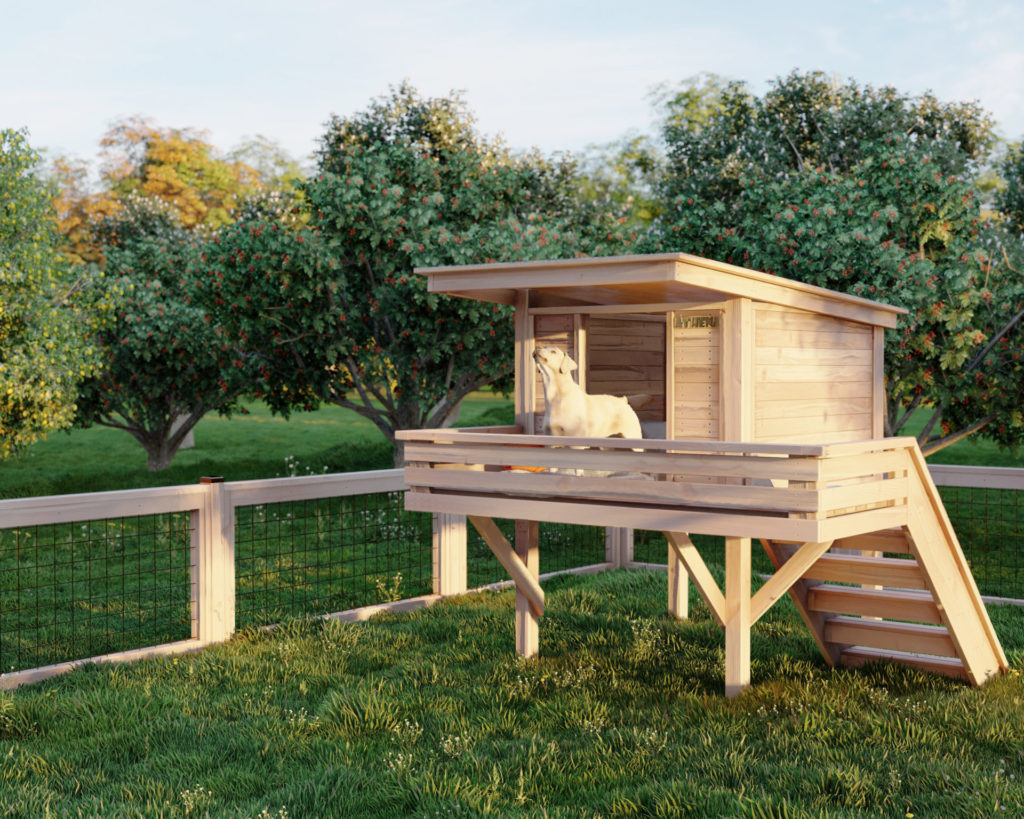
Raised Design: The doghouse features a raised design, elevating the sleeping area off the ground. This not only protects your pet from damp and cold ground during the winter months but also promotes air circulation underneath, helping to keep the interior cool during the summer.
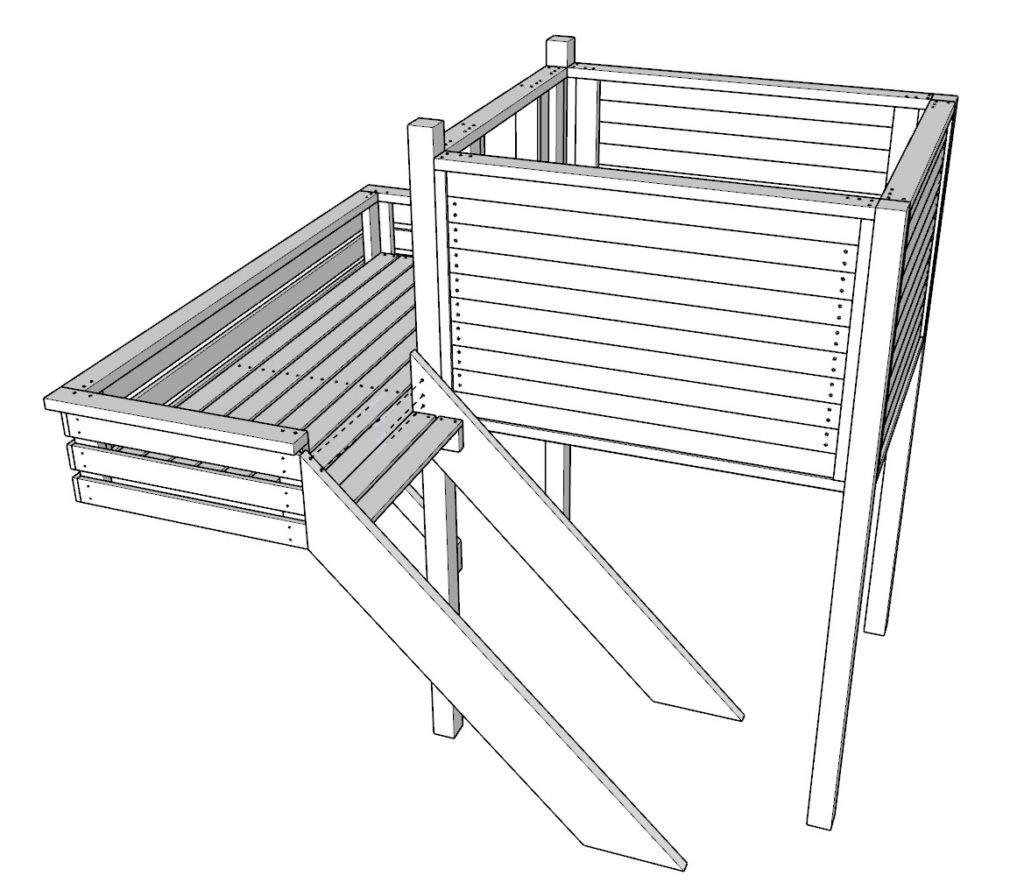
Balcony/Porch Area: Adding to the luxury of this design, the doghouse includes a balcony or porch area. This feature offers additional living space where your dog can enjoy the outdoors while still being protected. The balcony is perfect for lounging in the shade on hot days or simply enjoying the view.
Stair Accessibility: The inclusion of stairs leading up to the balcony ensures that dogs of all ages, including those with arthritis or mobility issues, can easily access this extra space. The stairs are designed to be pet-friendly, with gentle inclines and secure footing.
Is the Doghouse Right for My Dog?
Selecting the perfect doghouse involves more than just admiring its design; it’s about ensuring it meets your dog’s specific needs for comfort, space, and accessibility. This section will help you determine if this DIY doghouse is the ideal fit for your furry companion:
Size Suitability: With internal dimensions of 48 inches in length, 56 inches in depth, and a height of 35-3/4 inches, this doghouse is versatile enough to accommodate a wide range of dog breeds comfortably. The spacious interior ensures that dogs can easily stand, turn around, and stretch out, which is essential for their comfort and well-being.
Entrance Design: The entrance height of 34-1/4 inches is thoughtfully designed to cater to various breeds, facilitating easy entry and exit. This feature is particularly beneficial for larger dogs or those with mobility issues, as it reduces the need to crouch or squeeze through a tight space.
Breeds That Benefit Most:
- Medium to large breeds like Labrador Retrievers, German Shepherds, Golden Retrievers, and Boxers will find the size and space ideal.
- Smaller breeds such as Beagles, Bulldogs, and Poodles can enjoy the ample room and the added balcony space for outdoor enjoyment.
- Even larger breeds, including Great Danes and Bernese Mountain Dogs, can comfortably fit within the dimensions, provided their size is within the recommended shoulder height.
Accessibility for Aging or Mobility-Impaired Dogs: The inclusion of stairs with a gentle incline means older dogs, or those with arthritis, won’t be left out. The design ensures these pets can still enjoy the luxury of their own space without the strain of climbing.
Comfort Across Seasons: Whether you live in a region that experiences harsh winters or sweltering summers, this doghouse is designed to provide a comfortable refuge. Its insulation features and raised design make it suitable for keeping your dog warm in the cold months and cool during the heat, addressing climate compatibility effectively.
Safety and Security: Beyond the physical comfort, the doghouse’s construction considers your pet’s safety and security. The raised design protects against ground moisture and pests, while the sturdy build ensures a durable shelter against the elements.
Climate Compatibility: Ensuring Comfort in Any Weather
The design of this DIY wooden doghouse takes into account the varying climates your dog might face throughout the year. It’s built not only to provide shelter but to ensure that your pet remains comfortable in both cold and warm climates. Here’s how this doghouse stands up to different weather conditions:
For Cold Climates:
- Insulation: The doghouse walls are designed to accommodate insulation materials, helping to keep the interior warm during winter months. The snug fit of the insulation panels within the structure prevents cold drafts and retains heat, providing a cozy environment for your pet.
- Raised Design: By elevating the doghouse off the ground, it reduces the risk of cold seeping in from the ground, further insulating your pet against freezing temperatures.
For Warm Climates:
- Ventilation: Strategic ventilation ensures ample air circulation within the doghouse, crucial for keeping your pet cool on hot days. This includes the design of the entrance, as well as additional ventilation openings that allow for a breeze to pass through.
- Shaded Balcony/Porch: The inclusion of a balcony or porch provides a shaded outdoor area for your dog to relax while staying protected from the direct heat of the sun.
Benefits Across All Climates:
- Durability: Materials selected for the doghouse are meant to withstand various weather conditions, from scorching sun to snow and rain, ensuring the structure remains intact and protective over the years.
- Customizable Features: The design allows for seasonal adjustments. For example, adding a door flap in winter can help retain heat, while removing it in summer can increase airflow.
Benefits of a Raised Doghouse
Elevating the doghouse off the ground provides several key advantages that contribute significantly to the health, comfort, and safety of your pet. Here’s a closer look at why a raised design is beneficial:
Enhanced View and Security:
- Visibility: A raised position gives dogs a better vantage point, allowing them to survey their surroundings easily. This can be comforting to pets and provide a sense of security.
- Protection: Being elevated helps keep your pet out of reach from certain ground-level threats and predators, offering an added layer of safety.
Improved Comfort Across Seasons:
- Cooler in Warm Weather: Air circulation underneath the doghouse helps keep the floor area cooler during hot weather, providing a more comfortable resting space.
- Warmer in Cold Weather: Elevation prevents the cold and damp from seeping in, keeping the interior warmer in the winter months.
Health and Hygiene:
- Dry and Clean: The raised design ensures that water, snow, or mud does not enter the doghouse, keeping your dog dry and the interior clean.
- Pest Deterrence: Elevating the doghouse reduces the risk of infestation by fleas, ticks, and other ground-based parasites, contributing to a healthier environment for your pet.
Ease of Maintenance:
- Cleaning Accessibility: Being raised makes it easier for owners to clean underneath and around the doghouse without the need to bend down too much, simplifying maintenance tasks.
- Durability: The separation from the ground slows down the wood decay process, ensuring the doghouse lasts longer even in varying weather conditions.
Can a Beginner to Woodworking Make This?
One of the most appealing aspects of this DIY wooden doghouse project is its accessibility to individuals with varying levels of woodworking experience, including beginners. Here’s why this project is a great start for those new to the craft:
Simplified Construction Techniques:
- Straightforward Design: The doghouse plans are crafted with simplicity in mind, using straight cuts and requiring minimal complex joinery. This approach makes the building process less daunting for newcomers.
- Step-by-Step Instructions: The project comes with detailed, easy-to-follow instructions that guide you through each phase of construction. Visual aids and color-coded sections further simplify the process, ensuring clarity and ease of understanding.
No Advanced Tools Required:
- Basic Toolset: The required tools for this project are basic and commonly found in a standard home toolbox. This includes a saw (though a miter saw is recommended for precision), drill, measuring tape, and a few others detailed in the tools list.
- Alternative Techniques: For tasks that might typically require specialized tools, the instructions provide alternative methods that achieve similar results with basic tools.
Learning Opportunity:
- Skill Development: Building the doghouse offers a hands-on learning experience, allowing beginners to familiarize themselves with woodworking principles, tool usage, and project planning in a practical setting.
- Problem-Solving: The project presents opportunities to solve minor challenges, a key skill in woodworking and DIY projects. This encourages creative thinking and adaptability.
Community Support:
- Online Resources: For any stumbling blocks encountered along the way, there’s a wealth of online tutorials, forums, and videos available. These resources can provide additional tips, tricks, and clarifications, making the DIY process less isolating.
Encouragement for First-Timers:
- Achievable Milestone: Completing a tangible project like a doghouse instills a sense of accomplishment and can ignite a passion for woodworking. It’s a rewarding first step into the world of DIY projects.
What is Included in the PDF Download?
The comprehensive PDF download for the DIY wooden doghouse project is designed to provide you with all the tools, information, and guidance needed to successfully complete the build. Here’s what you can expect to find in this meticulously prepared package:
Optimized Cut List:
- Minimize Waste: The cut list is carefully optimized to ensure efficient use of materials, reducing waste and saving costs.
- Easy to Follow: Organized by type and size of material for straightforward reference during the cutting phase.
Detailed Shopping List:
- Materials and Quantities: A precise list of all materials required for the project, including dimensions and quantities, making your shopping trip efficient and accurate.
- Tool Checklist: Ensures you have or obtain all necessary tools before starting, avoiding project delays.
Comprehensive Tools and Materials List:
- Essential Tools: From basic hand tools to more specific equipment like a pin nailer, every tool is listed to ensure you’re fully prepared.
- Materials Explained: Each type of wood, fastener, and additional material is clearly described, with explanations for their use and benefits.
Step-by-Step Construction Guides:
- Visual Instructions: Color-coded diagrams and photographs accompany each step, offering visual clarity to the written instructions.
- Written Descriptions: Each step is described in detail, providing context, tips, and cautionary advice to guide you through the build seamlessly.
Helpful Links and Resources:
- Affiliate Recommendations: Where applicable, affiliate links to recommended tools and materials are provided. These are carefully selected based on quality and reliability.
- Supporting Resources: Links to tutorials, forums, and videos that can offer additional help or alternative methods for certain steps.
Additional Support Materials:
- Project Estimate: An overview of time and cost involved, helping you plan according to your budget and schedule.
- Maintenance Tips: Advice on keeping the doghouse in top condition, ensuring longevity and comfort for your pet.
- Finishing Tips: Techniques for painting, staining, and adding final touches to make your doghouse not just functional but also aesthetically pleasing.
- Safety Precautions: Important safety tips to protect you during the construction process.
This PDF download is more than just a set of instructions; it’s a comprehensive toolkit designed to make the process of building your doghouse enjoyable, educational, and successful. By providing a detailed roadmap from start to finish, this guide ensures that builders of all skill levels can create a durable, comfortable, and stylish home for their furry friends. Whether you’re a seasoned DIYer or a beginner looking to undertake your first project, this guide has everything you need to embark on this rewarding journey.
Time to build
(Varies with experience)
Total cost of build
About $900-$1000 (material prices may fluctuate; verify current costs for accuracy)
Skill level required
Beginner-intermediate
Download the PDF Plans

Raised Doghouse PDF Plan
What is included in the PDF download?
- Easy to read step by step instructions
- Material list
- Tools needed
- Helpful links to materials and tools needed
Raised Doghouse Dimensions

Tools & Materials List
Available with the purchase of the DIY plan PDF.
Lumber Shopping & Cut List
Available with the purchase of the DIY plan PDF.
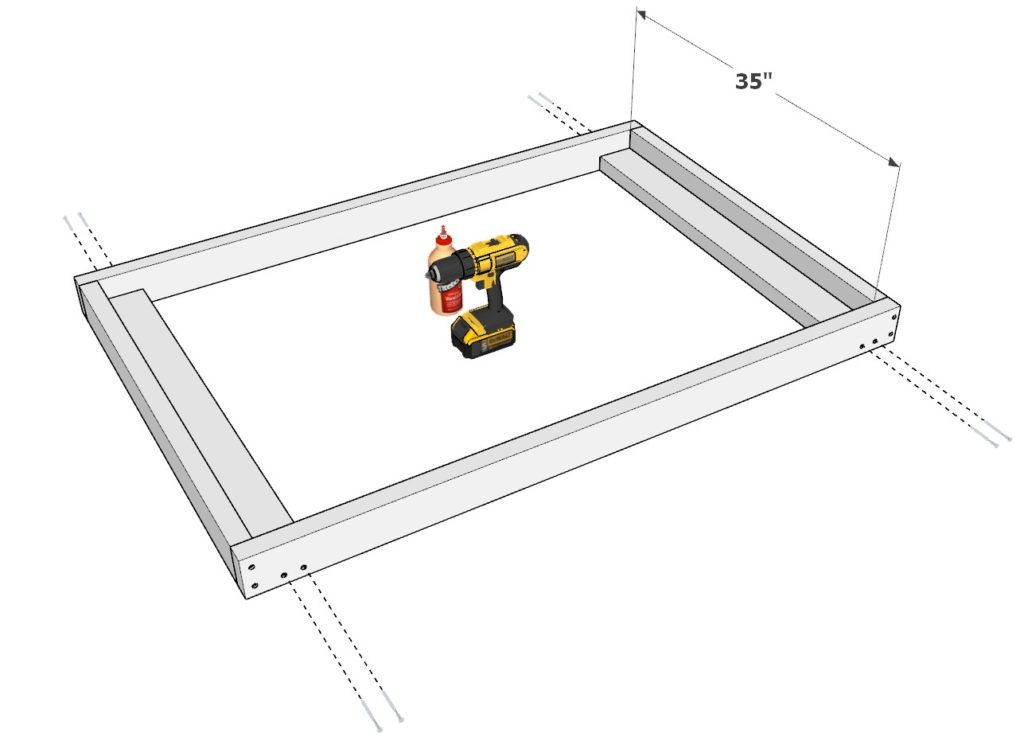
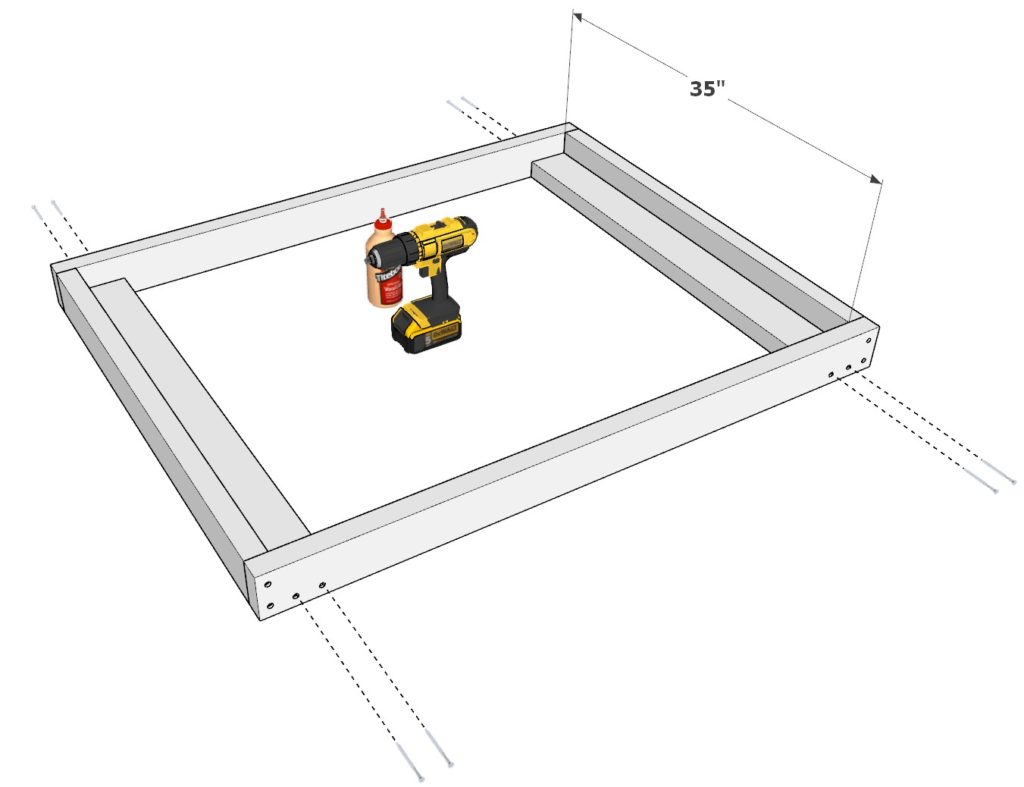
Step 1: Constructing the Side Wall Panels
In this step, you’ll create two identical side wall panels for your doghouse. Follow these detailed instructions to ensure a sturdy and accurate construction:
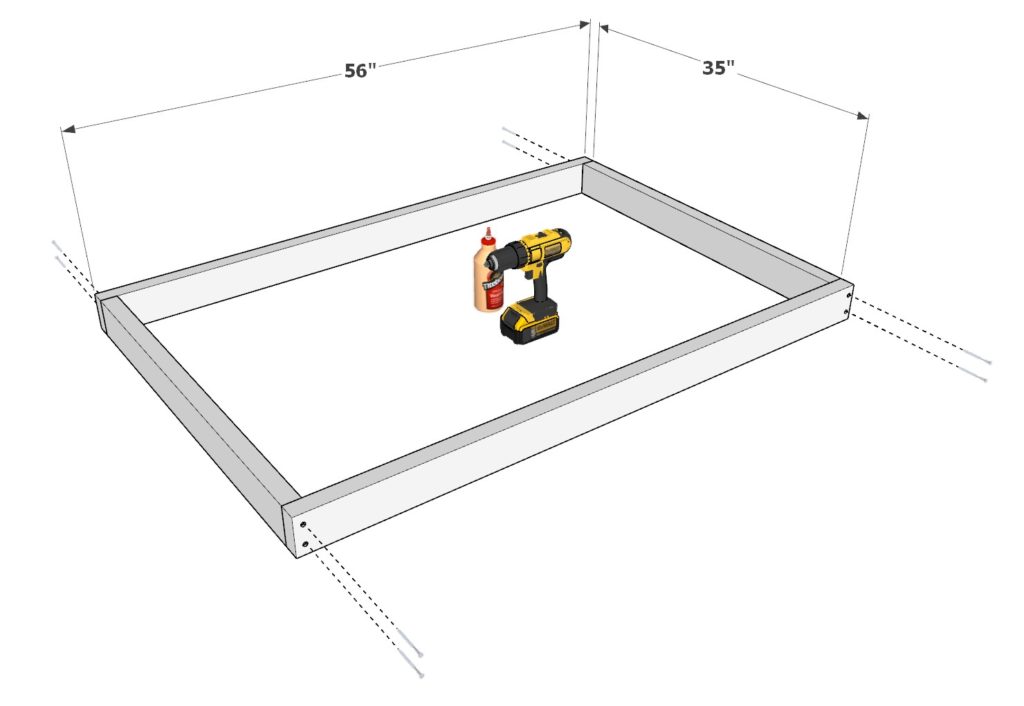
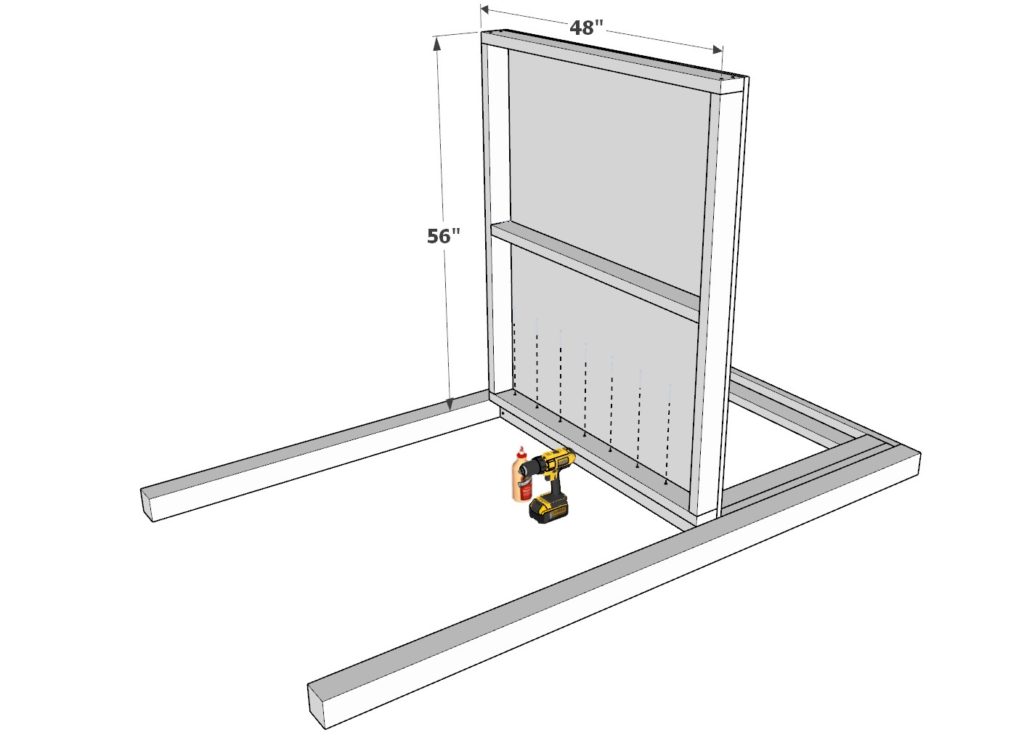
Assemble the Rectangle Frame:
- Begin by selecting two pieces of 2×4 lumber measuring 35 inches and two pieces measuring 56 inches. Arrange these four pieces into a rectangle, positioning the shorter pieces between the longer ones to form the sides.
- Apply wood glue to the ends of the 35-inch pieces where they will connect with the 56-inch pieces. To prevent splitting the wood, pre-drill holes at each joining point.
- Secure the pieces together using 3.5-inch wood screws, ensuring each corner is square and the frame is flat.
Install the Middle Support Beams:
- Next, integrate two additional 35-inch 2x4s as internal supports within the rectangle. These should be placed perpendicular to the original 35-inch sides. Refer to the provided image for exact placement.
- For each support beam, apply glue at the ends, pre-drill, and fasten with 3.5-inch screws to the top and bottom of the frame.
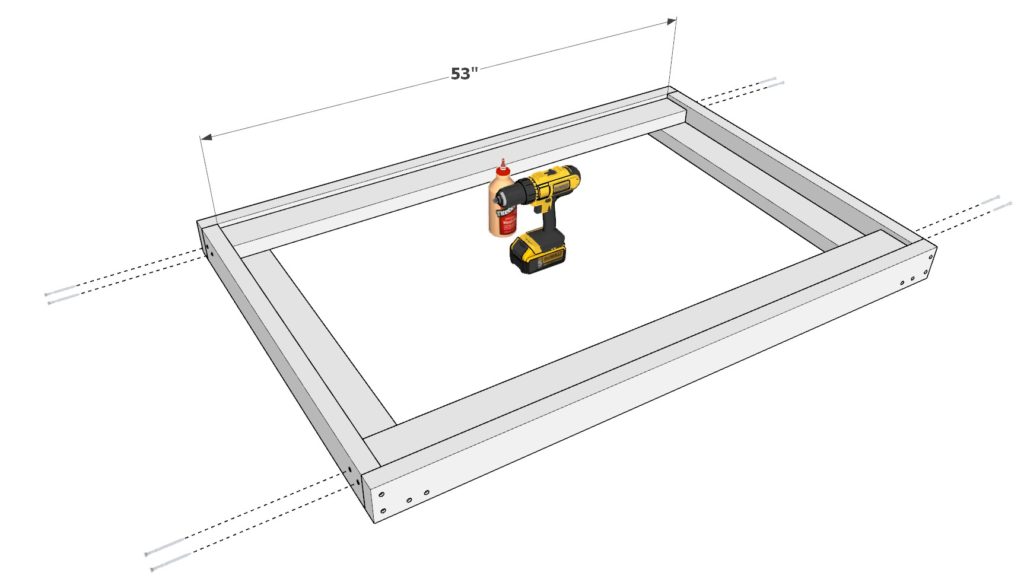
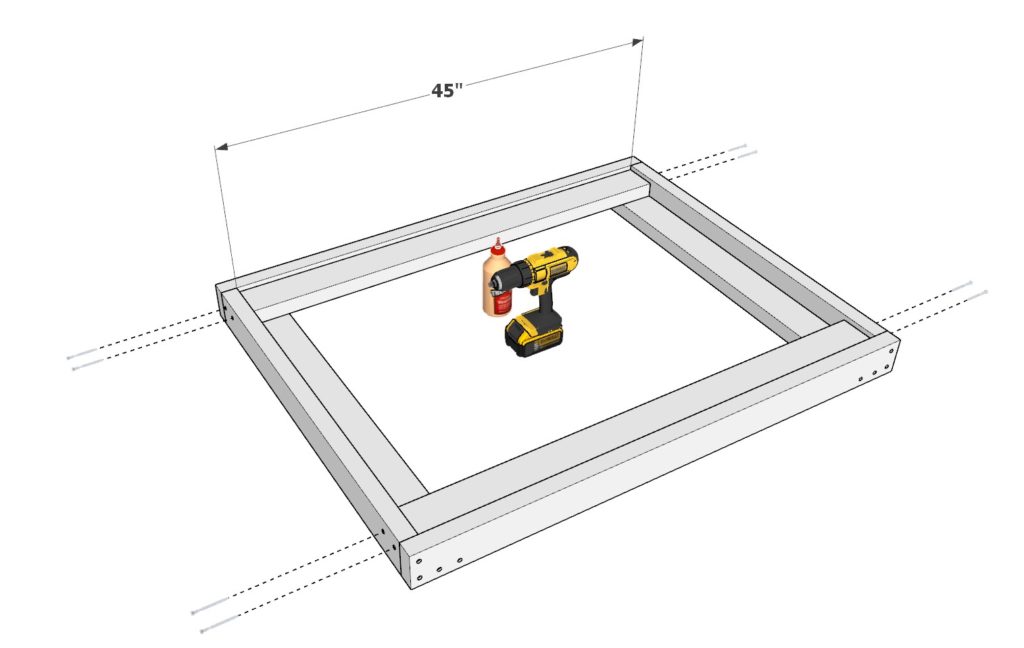
Attach Horizontal Stabilizers:
- Incorporate two 53-inch 2×4 lumber pieces horizontally across the frame, attaching them perpendicular to the 56-inch sides for added stability. Position these as indicated in the image below.
- Follow the same procedure: apply glue, pre-drill, and then secure with screws.
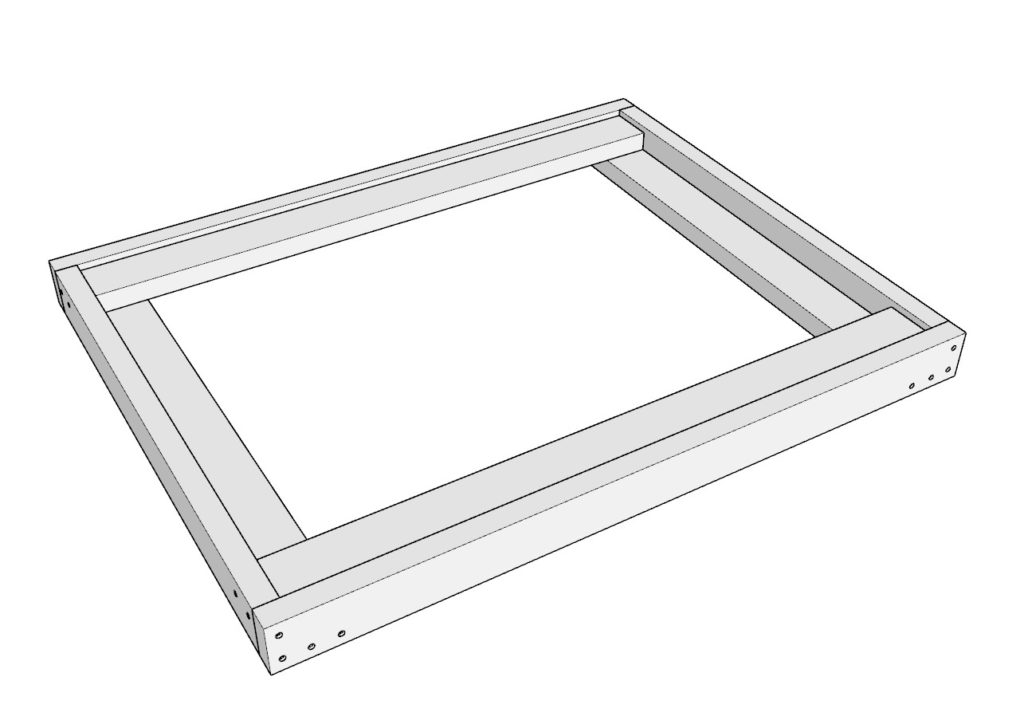
Repeat for Second Panel:
- Once the first side wall panel is complete, replicate the process to create a second identical panel. This ensures both sides of your doghouse will be symmetrical and sturdy.
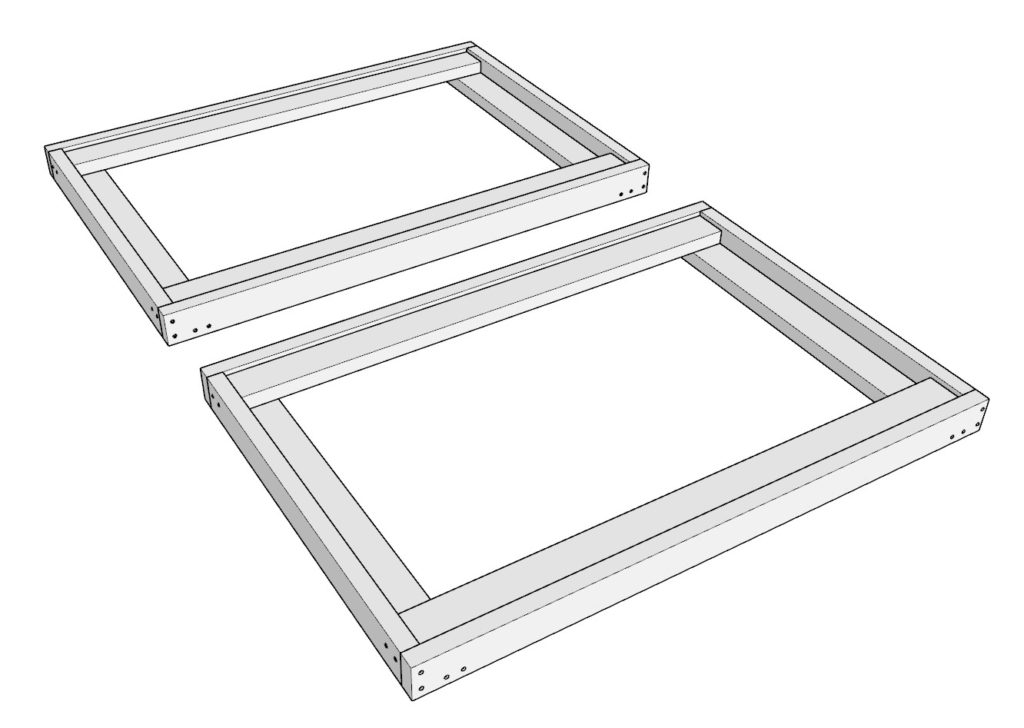
Pro Tip: Always pre-drill holes before inserting screws to prevent the wood from splitting. This simple step can greatly enhance the durability of your doghouse.
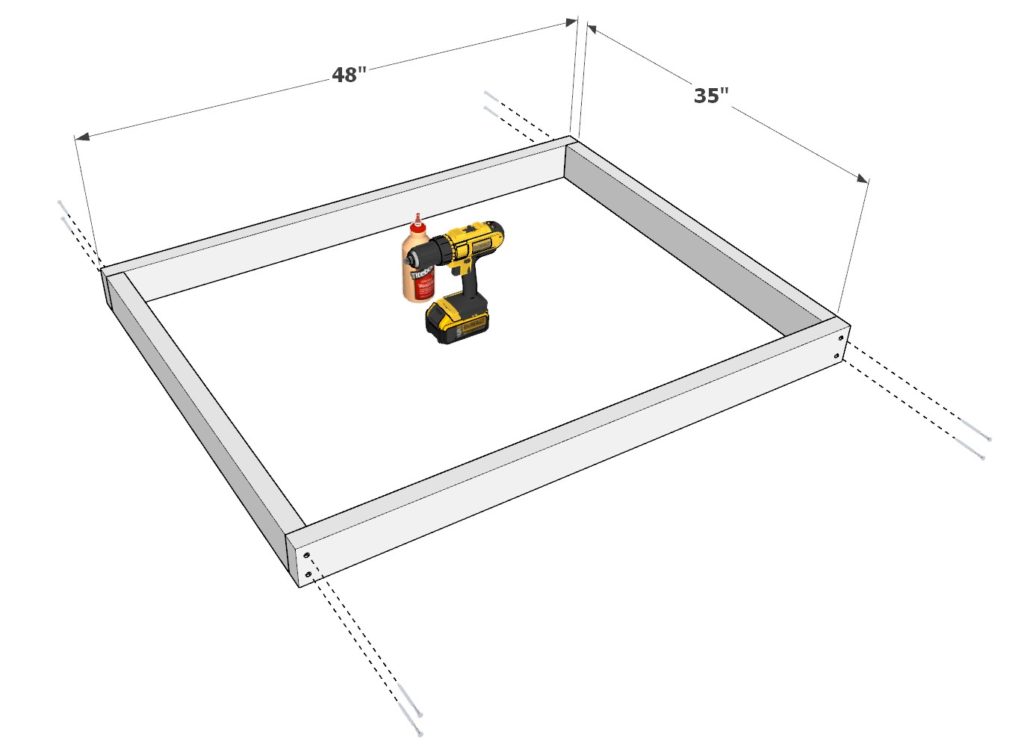
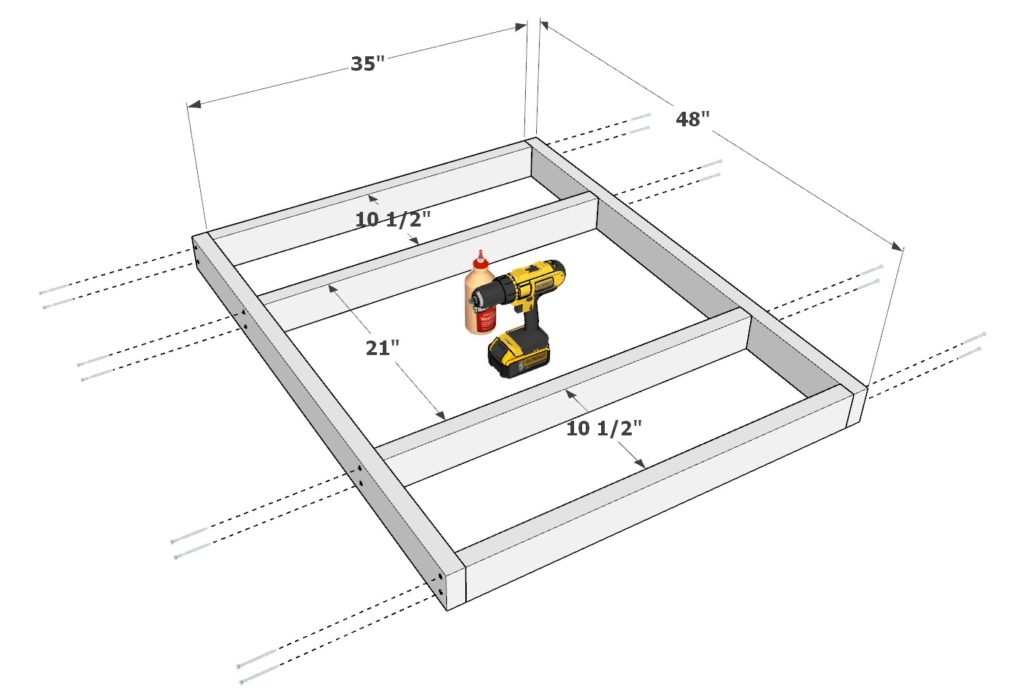
Step 2: Building the Back Wall
This step focuses on constructing the back wall of the doghouse, ensuring it is robust and properly aligns with the side panels.
Form the Base Rectangle:
- Begin with two 35-inch 2×4 lumber pieces and two 48-inch 2×4 lumber pieces. Arrange them to form a rectangle, placing the shorter 2x4s between the longer ones, creating the frame.
- To join these pieces, apply glue to the ends of the 35-inch pieces where they meet the 48-inch pieces. Pre-drill holes to prevent the wood from splitting, then fasten the pieces together using 3.5-inch screws. Ensure the frame is square and flat.
Install Internal Horizontal Supports:
- Add two more 35-inch 2×4 lumber pieces inside the rectangle for additional support. These should be placed perpendicular to the original 35-inch side pieces and evenly spaced. Reference the image below for exact placement.
- Secure these supports by applying glue at the ends, pre-drilling, and fastening with 3.5-inch screws to the longer sides of the rectangle.
Attach Horizontal Stabilizers:
- Incorporate two 45-inch 2×4 lumber pieces vertically within the frame, positioning them as indicated in the third image. These are to be attached perpendicular to the 48-inch sides, adding further stability to the structure.
- Follow the established method of glue application, pre-drilling, and securing with screws to ensure a strong and durable back wall.
Step 3: Constructing the Front Walls and Entryway
This step focuses on crafting the front walls of the doghouse, incorporating an entryway for your dog. Precise assembly is key for aesthetic appeal and functionality.
Assemble the Base Framework:
- Start with two 48-inch 2×4 lumber pieces and four 35-inch 2×4 lumber pieces. Lay them out to create the front wall structure, paying close attention to the specific placement of the 35-inch pieces for proper support and the formation of the entryway.
- Before joining, apply wood glue to the contact points, pre-drill holes to prevent splitting, and secure the pieces together with 3.5-inch screws. Ensure the arrangement matches the provided image for accurate construction.
Install Additional Supports:
- Integrate four more 35-inch 2×4 lumber pieces into the framework, placing them perpendicular to the original set of 35-inch pieces you assembled.
- For each of these supports, use the same assembly method: apply glue at the ends, pre-drill, and then attach with 3.5-inch screws. Refer to the designated image for the precise arrangement and positioning of these pieces.
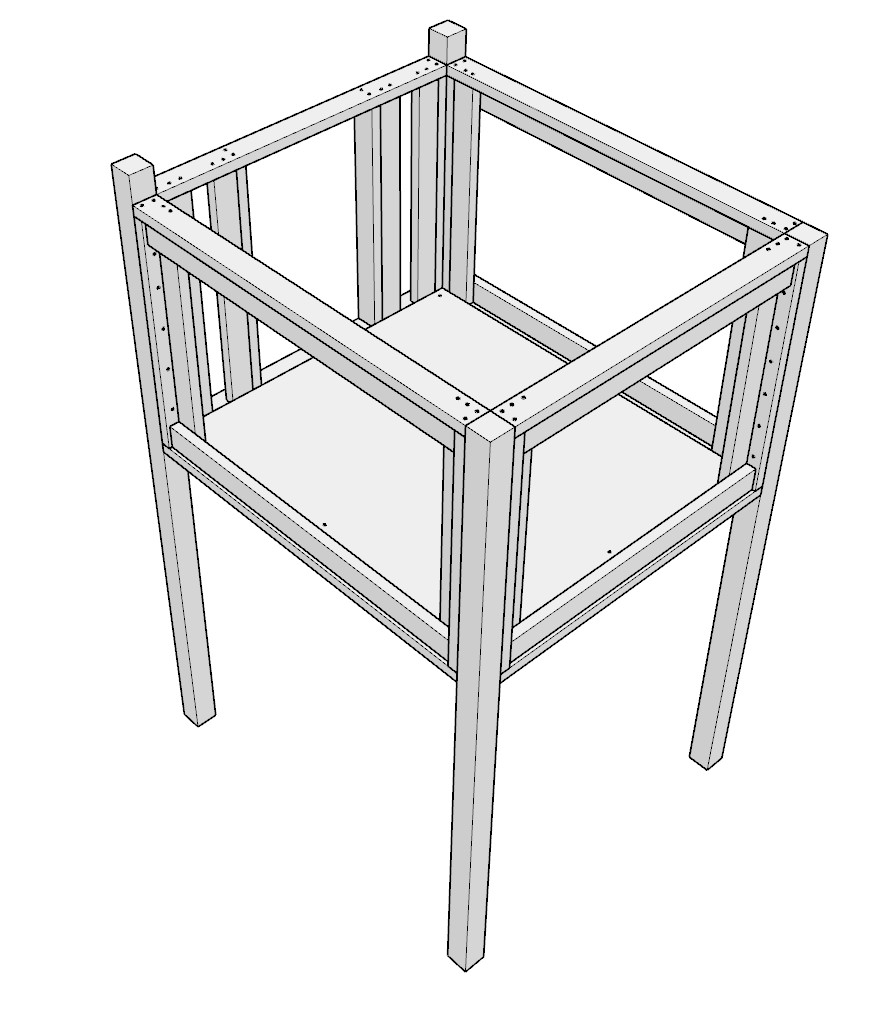
Step 4: Building the Base and Floor
In this essential step, you’ll construct a solid and durable base for the doghouse, ensuring a stable foundation and a comfortable floor for your pet.
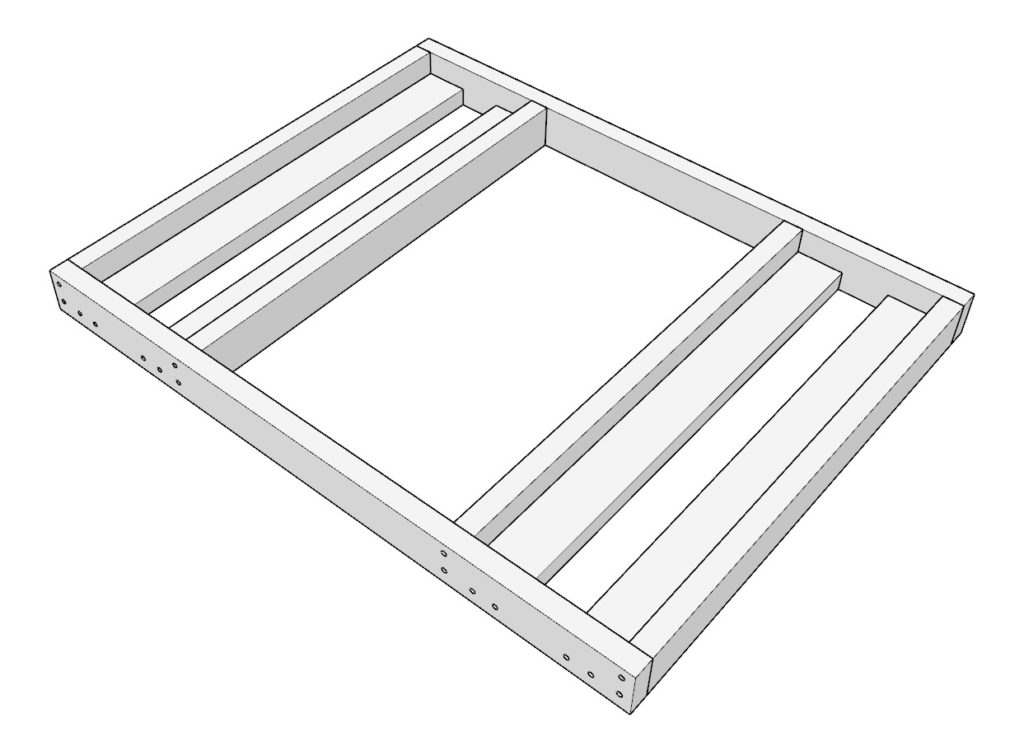
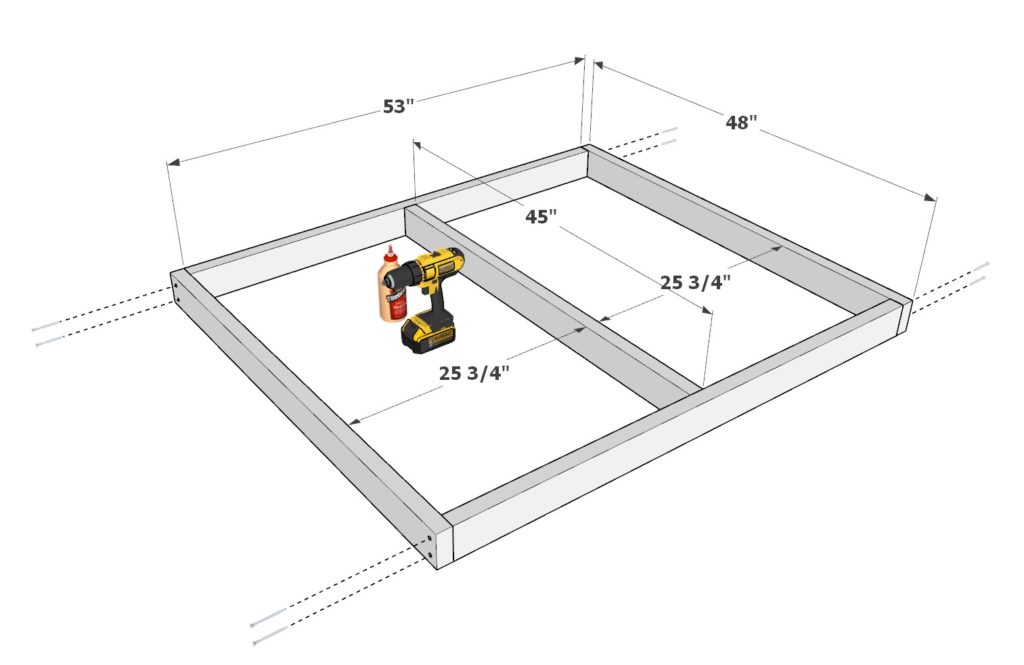
Construct the Floor Frame:
- Start by taking two 53-inch 2×4 lumber pieces and two 48-inch 2×4 lumber pieces, along with one 45-inch 2×4 lumber piece. Arrange these pieces to form the outer frame of the doghouse floor, with the 45-inch piece serving as a middle support.
- To assemble the frame, first apply wood glue to the joints, then pre-drill holes to prevent the wood from splitting. Secure the pieces together using 3.5-inch screws, ensuring the frame is square and flat.
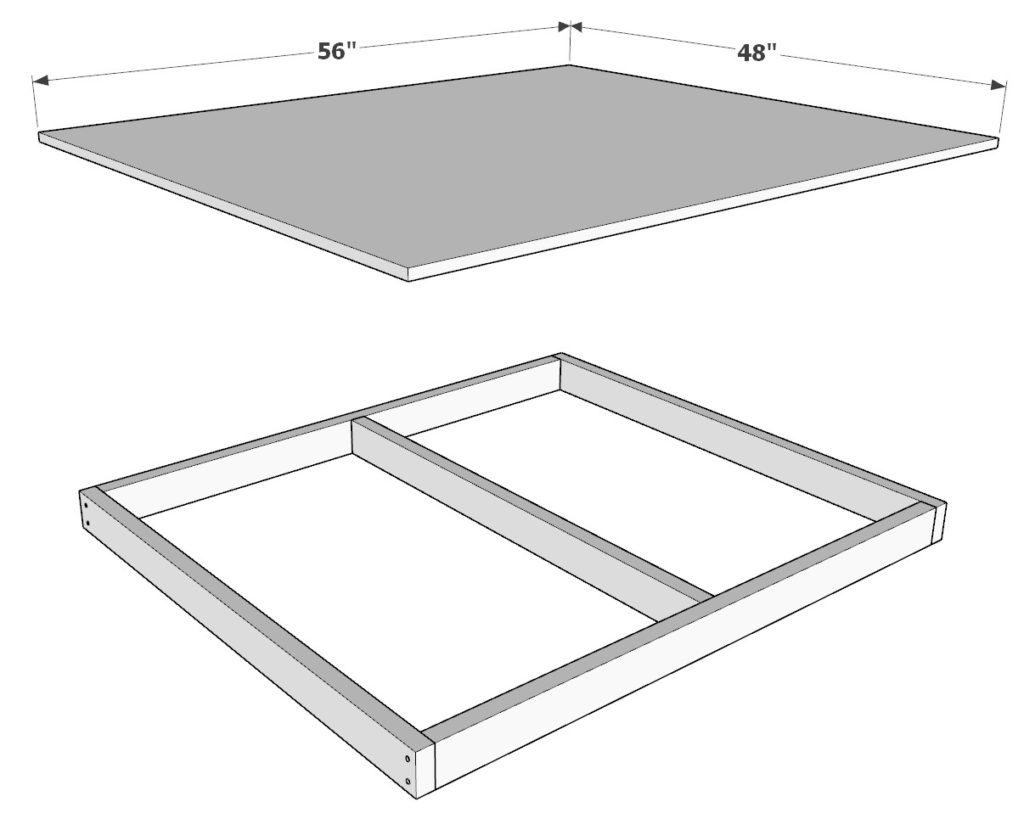
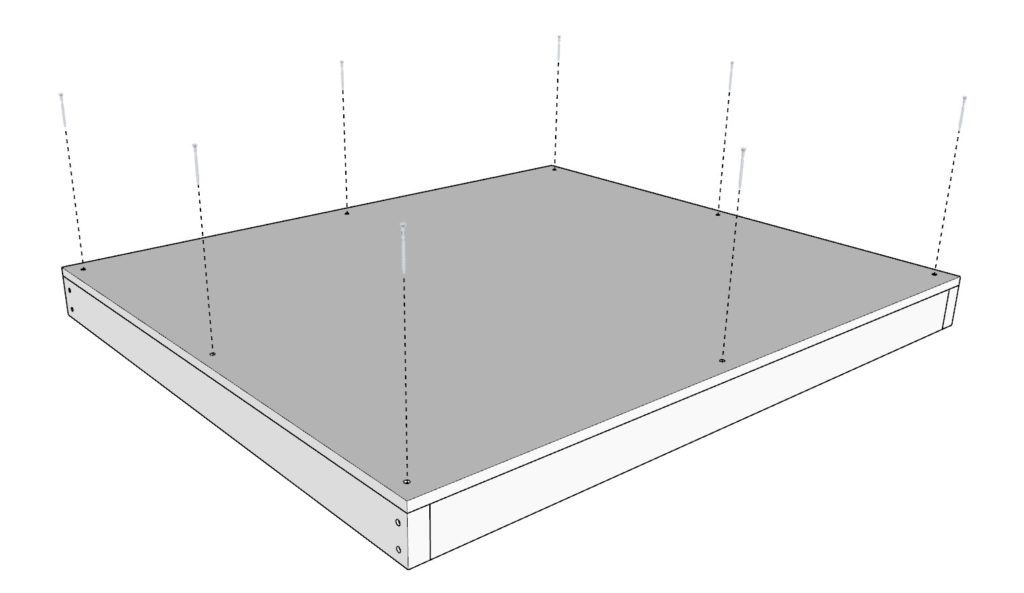
Attach the Plywood Sheet:
- Cut a 3/4-inch thick plywood sheet to a dimension of 48 inches by 56 inches. This will serve as the flooring for your doghouse.
- Place the plywood sheet on top of the constructed frame. Apply glue to the top edges of the frame for a secure bond, then pre-drill holes through the plywood into the frame to prevent the layers of the plywood from splitting.
- Fasten the plywood to the frame using 3.5-inch or 2.5-inch screws, ensuring it’s evenly secured across the entire surface of the frame.
Pro Tip: Plywood is made of multiple layers glued together, making it susceptible to delamination (layers peeling apart) if not handled correctly. Pre-drilling holes before screwing is crucial to prevent splitting or breaking off the layers of plywood, ensuring a smooth and durable surface for your doghouse floor.
Step 5: Elevating and Assembling the Base
This step is crucial for raising the doghouse off the ground, promoting airflow and reducing moisture-related issues. You’ll attach the back wall to sturdy 4×4 posts and then secure the floor frame to this elevated structure.
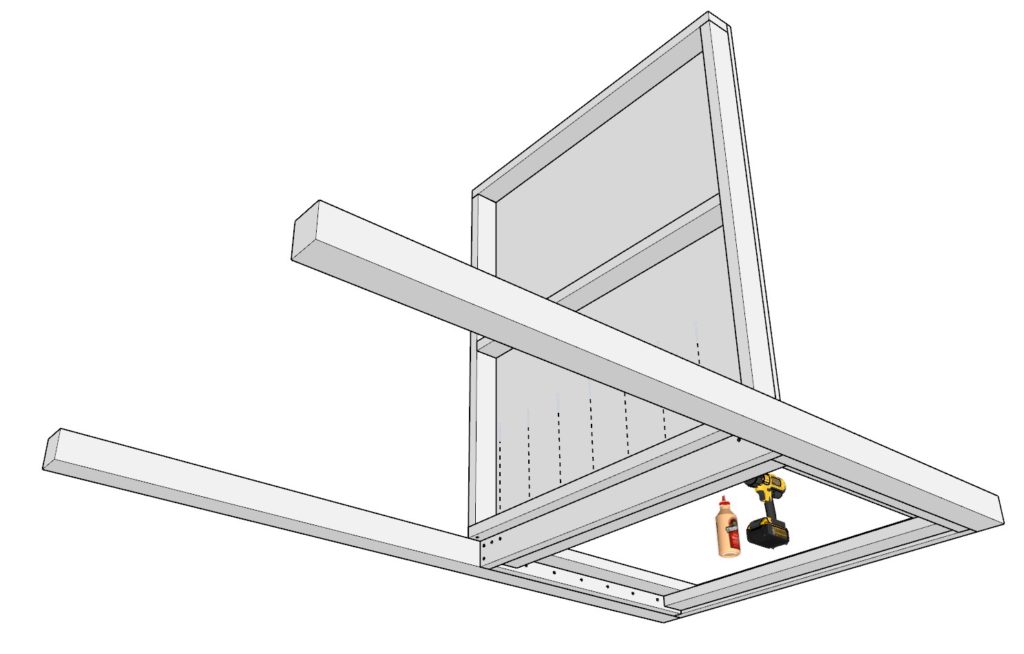
Attach 4×4 Posts to the Back Wall:
- Begin by taking two 92-inch 4×4 lumber posts and the back wall frame you constructed in Step 2. Arrange these elements as outlined in the provided diagram, positioning the posts vertically at each end of the back wall frame.
- To secure the back wall to the posts, apply wood glue at the contact points, pre-drill holes to prevent wood splitting, and fasten with 3.5-inch screws.
Pro Tip: Using pressure-treated posts for your doghouse foundation is a smart choice for extending its lifespan, thanks to their resistance to rot and pests, despite potential aesthetic differences. These posts are treated with preservatives, making them more durable against environmental threats, although they may not match untreated wood in appearance, especially if you’re staining rather than painting. The greenish tint or altered texture of pressure-treated wood can pose a challenge for staining projects, leading to uneven finishes. However, this concern diminishes if you opt to paint your doghouse, as paint can mask these discrepancies, allowing you to enjoy the structural benefits without compromising on looks.

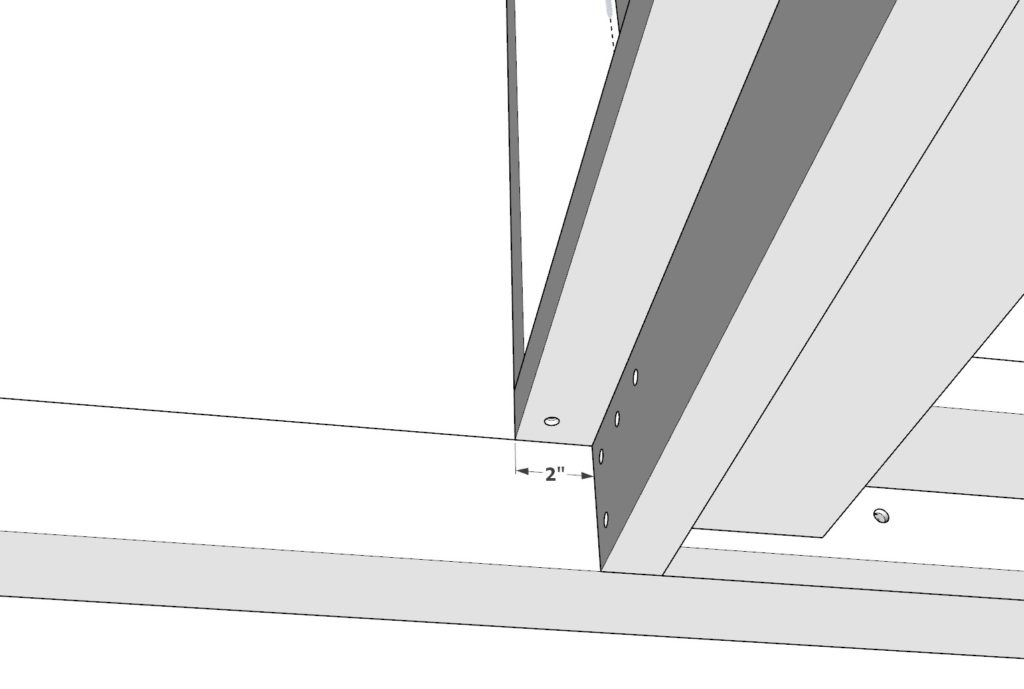
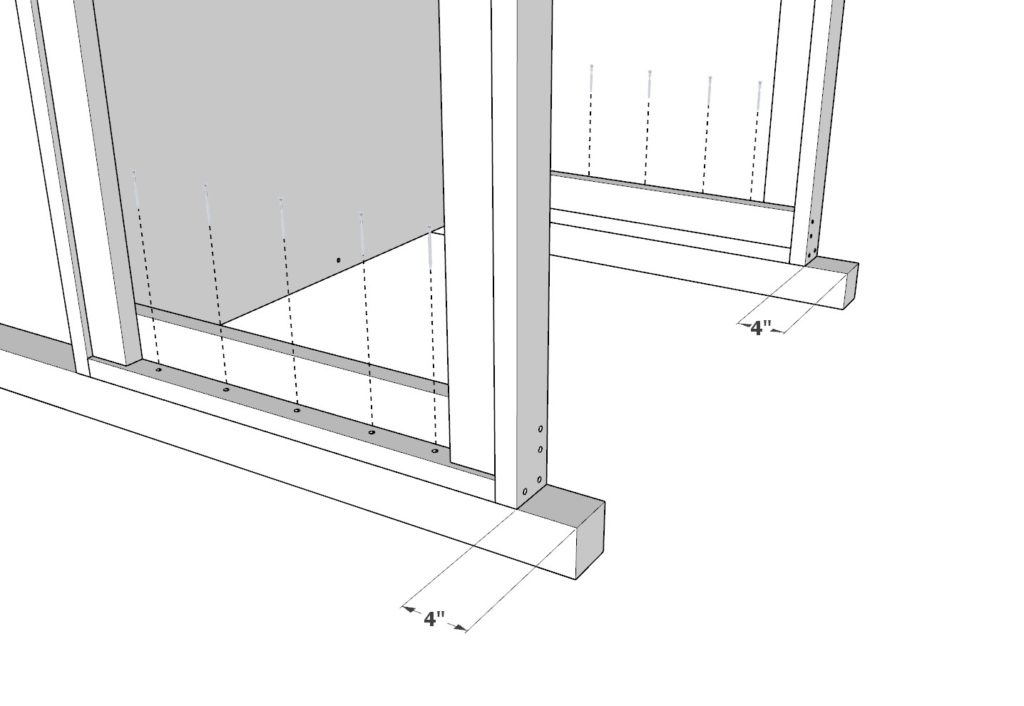
Secure the Floor Frame to the Elevated Structure:
- Take the floor frame built in Step 4 and position it against the back wall assembly, ensuring it is set 2 inches from the end of the 48-inch back wall frame as illustrated in the final image of this step.
- Before securing, check the alignment of the floor frame to ensure it is perfectly square and flush with the back wall frame. Apply glue to the touching surfaces, pre-drill holes, and fasten the floor frame to the back wall frame using 3.5-inch screws.
Pro Tip: It’s helpful to have assistance during this step to hold the components in place while you work, ensuring safety and accuracy. Ensuring everything is properly aligned before securing will result in a stable and level doghouse.
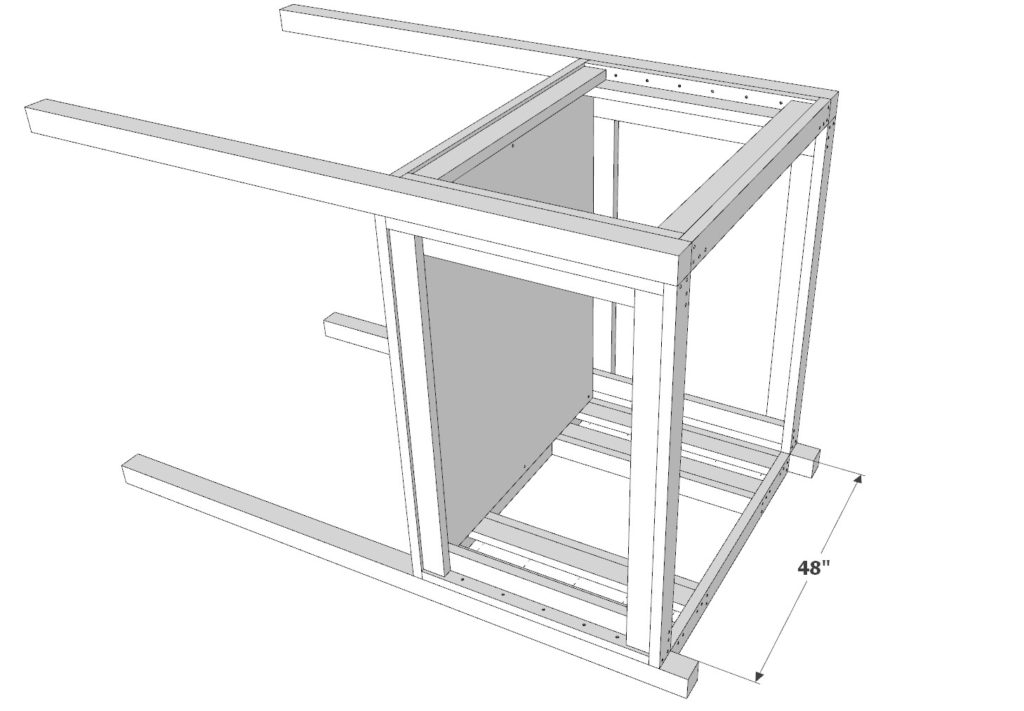
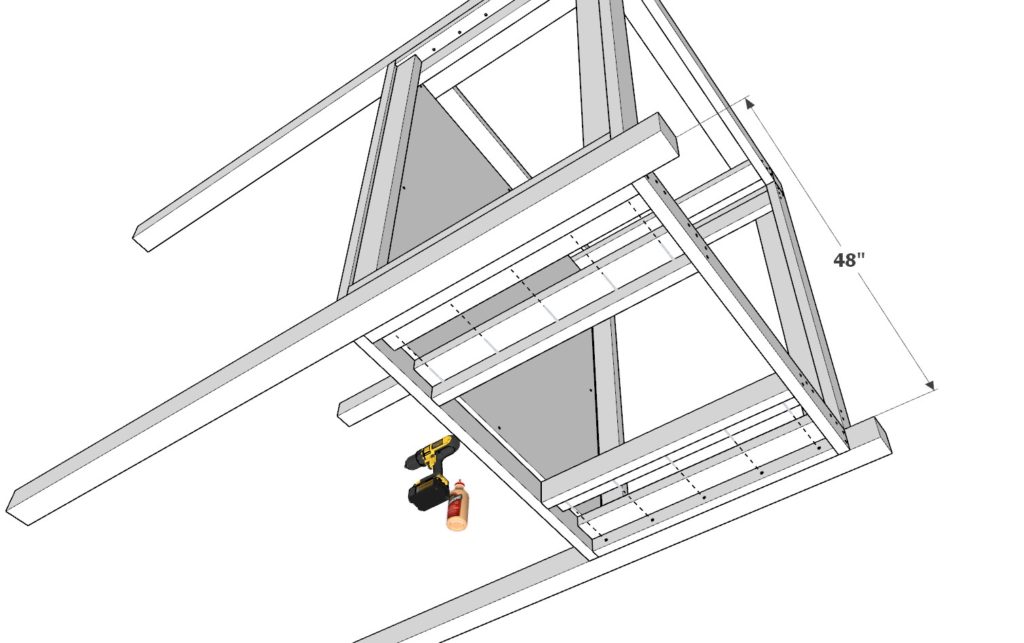
Step 6: Attaching the Side Panels
In this phase, you’ll incorporate the side panels constructed earlier (in Step 1) into the elevated doghouse structure, solidifying the framework and preparing for the roof and front wall installation.
Attach Side Frames to the 4×4 Posts:
- Begin with the two side panels you assembled in Step 1. Position these panels on either side of the doghouse structure, aligning them with the 4×4 posts that you attached the back wall to in the previous step.
- To secure each side panel to the 4×4 posts, apply wood glue to the edges where the side panels and the posts meet. Pre-drill holes to prevent the wood from splitting, and fasten the panels to the posts using 3.5-inch screws, ensuring the panels are upright and flush with the posts.
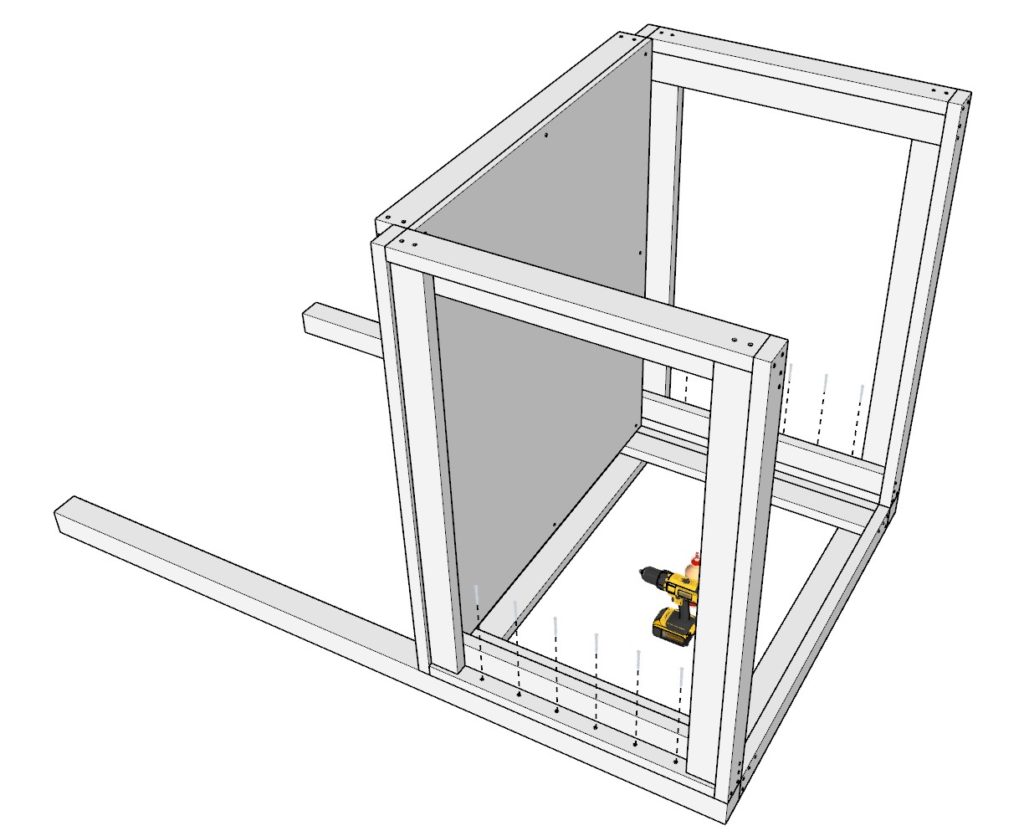
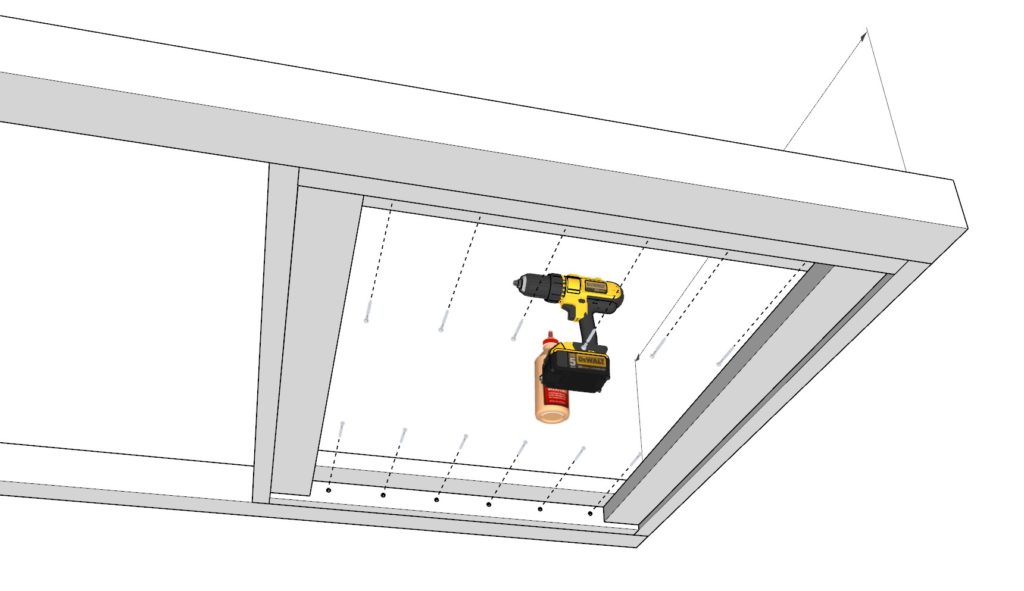
Secure the Base to the Side Frames:
- Now, ensure the base of the doghouse, constructed in Step 4, is properly aligned with the side frames you’ve just attached. The base should fit snugly between the side panels, creating a coherent structure.
- Apply glue to the touching edges of the base and side frames for a strong bond. Pre-drill holes through the base frame into the side frames to ensure accurate, split-free attachment. Secure the base to the side frames using 3.5-inch screws, following the alignment and positioning indicated in the last two images of this step.

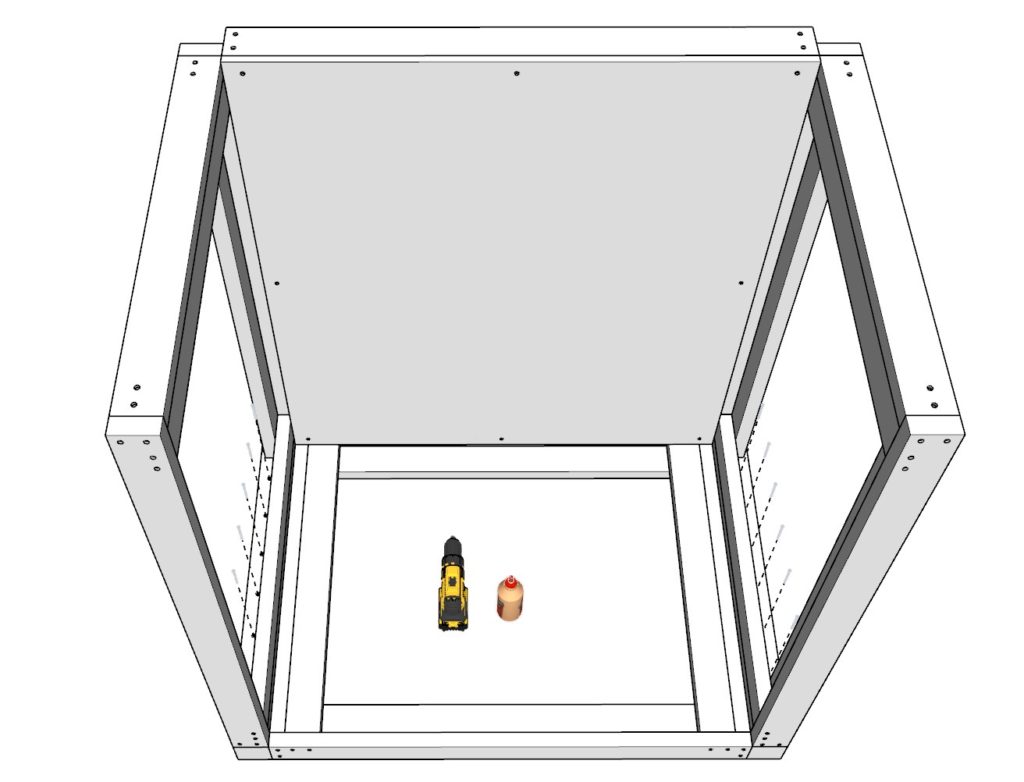
Step 7: Installing Additional Pillars and the Entrance Panel
This step involves adding two more pillars for support and attaching the front entrance panel, which was constructed in Step 3, to the structure. This will define the entryway for your doghouse and prepare it for the roof installation.
Install the Additional 4×4 Pillars:
- Begin by positioning two 96-inch long 4×4 lumber pieces at the front corners of the doghouse, attaching them to the side wall panels created in Step 1. These front pillars should extend 4 inches above the height of the side panels. This intentional overhang is crucial for creating a sloped roof, which will ensure proper drainage and add architectural interest.
- To secure these pillars in place, apply wood glue to the ends that will attach to the side panels, pre-drill holes to prevent the wood from splitting, and fasten with 3.5-inch screws, as detailed in the provided imagery. Ensure the pillars are perfectly vertical and the overhang is precisely 4 inches.
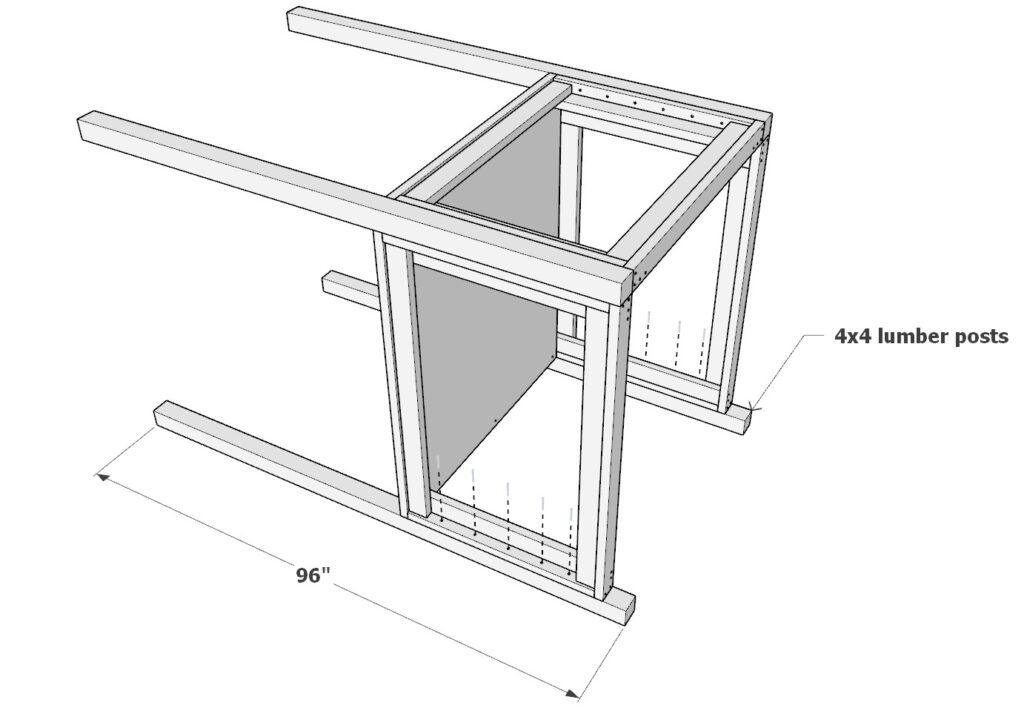
Attach the Entrance Frame to the Structure:
- Now, take the entrance frame you assembled in Step 3 and position it between the two front pillars, ensuring it is aligned according to the images provided. This step requires careful placement to ensure the entrance is centered and the structure remains symmetrical.
- Apply glue to the contact points, pre-drill holes to maintain the integrity of the wood, and secure the entrance frame to the pillars and the floor frame using 3.5-inch screws.
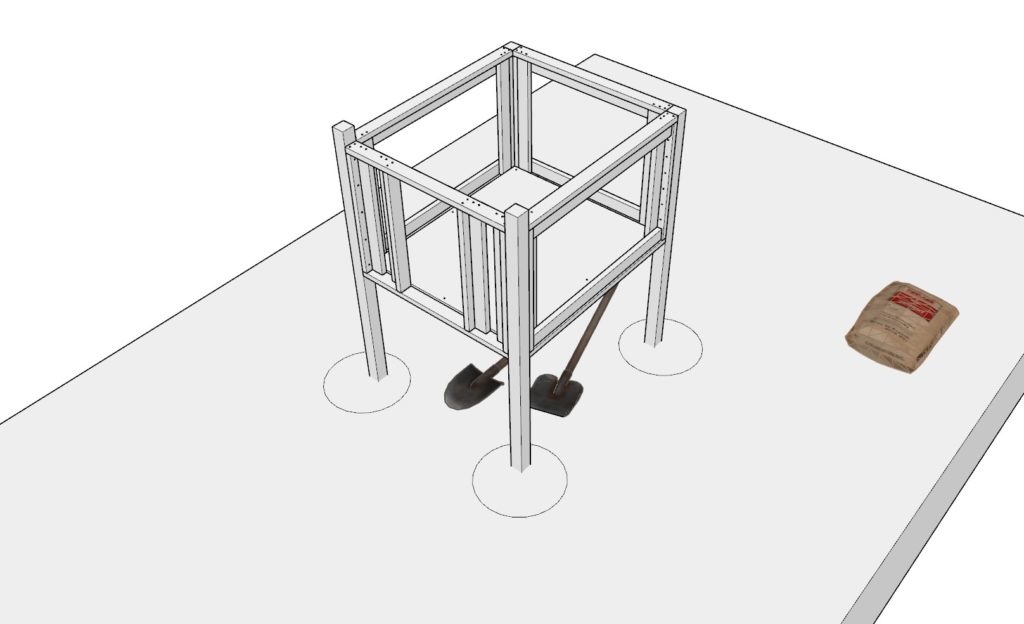
Step 8: Preparing and Securing the Foundation
This crucial step ensures your doghouse is stable and durable, by anchoring it into the ground. It requires at least two people for safe handling of the heavy frame.
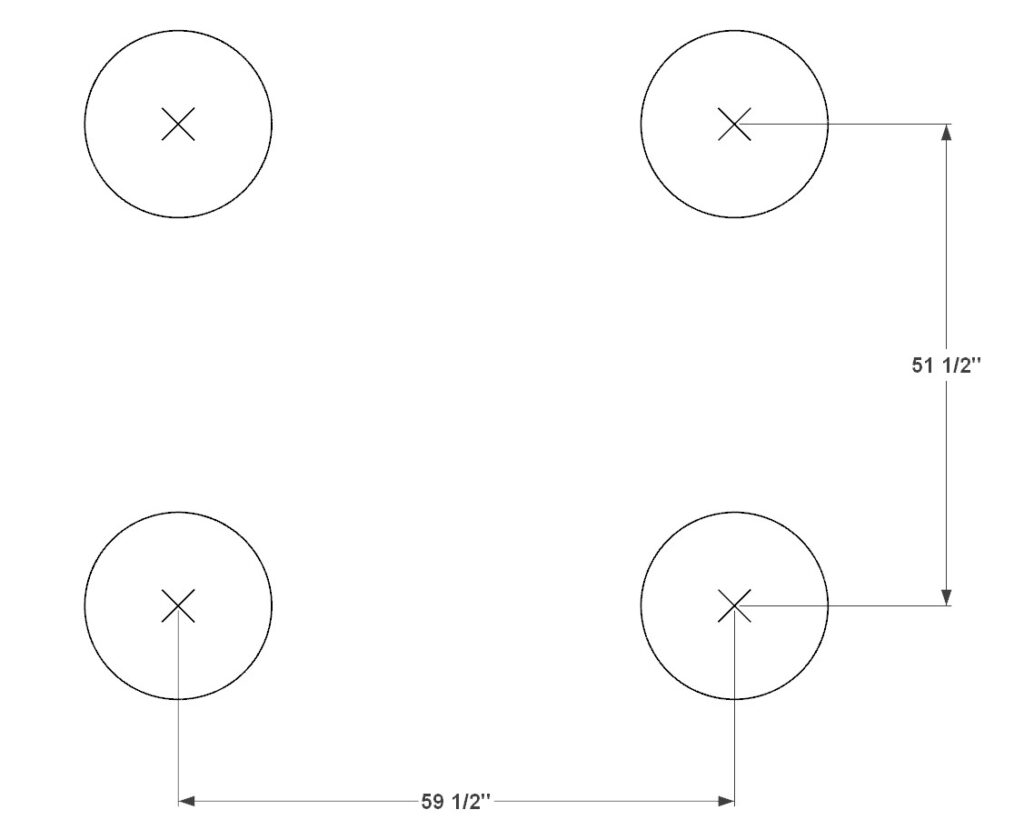
Digging the Foundation Holes:
- Start by digging four holes, each about 18 inches deep, at the locations where the 4×4 pillars of the doghouse frame will be placed. This depth is ideal for stabilizing the structure with concrete while allowing any attached stairs to align flush with the ground on a level surface.
- For accurate hole placement, measure 59-1/2 inches apart from the center of each hole on the longer side of the doghouse, and 51-1/2 inches apart on the shorter side, matching the first diagram provided for this step. A recommended diameter for the holes is about 10-12 inches, ensuring enough space for the posts and concrete.
Adding Gravel for Drainage:
- Before inserting the pillars, fill the bottom of each hole with a layer of gravel or small rocks, about 3-4 inches deep. Gravel improves drainage around the posts, preventing water accumulation that can lead to wood rot and prolonging the life of the posts. Compact the gravel firmly to create a stable base.
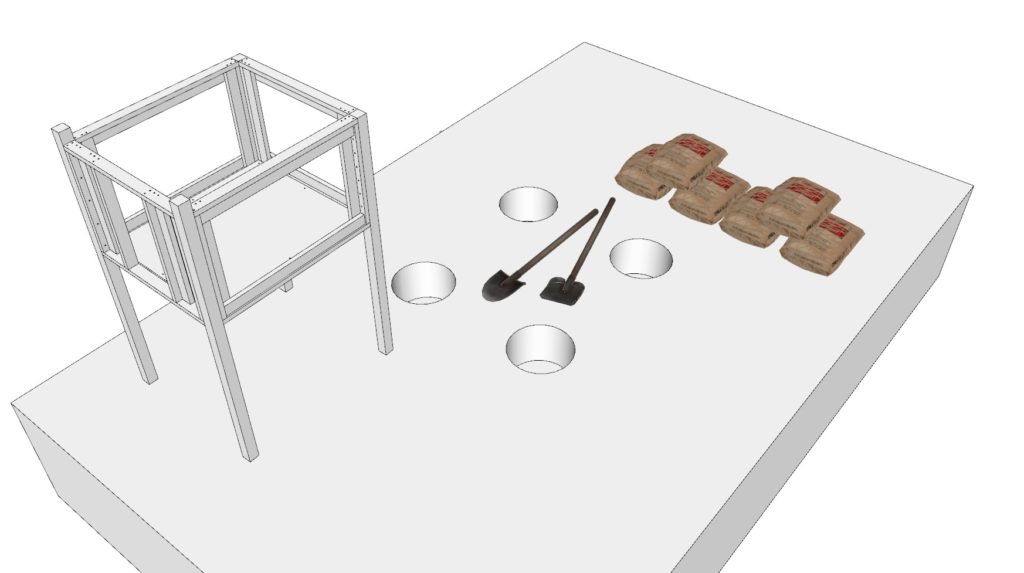
Installing the Doghouse Frame:
- Carefully place the doghouse frame into the holes, ensuring each pillar sits squarely on the gravel layer. Use a level to check the frame is perfectly horizontal from all sides; adjustments may be needed to ensure the structure is level before proceeding.
- Once positioned and level, mix concrete according to the manufacturer’s instructions and pour it around each post in the holes, filling to just below ground level. Make sure the posts remain vertical and the frame level as the concrete sets.
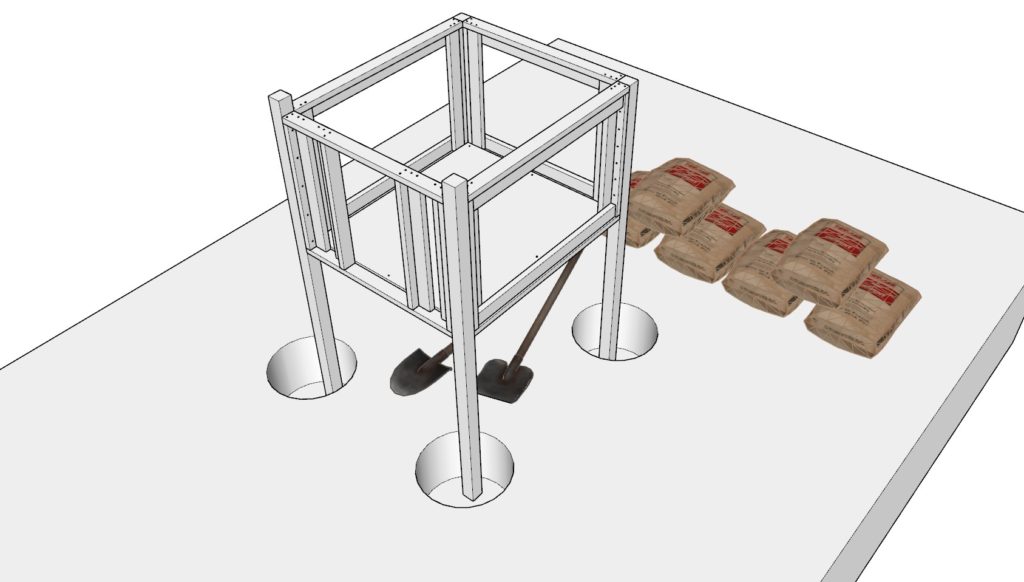
Curing the Concrete:
- Allow the concrete to cure as per the instructions on the packaging, typically 24-48 hours, before proceeding with any further construction or weight-bearing activities. This curing process is vital for the concrete to reach its full strength and firmly anchor the doghouse in place.
Pro Tip: The use of gravel not only aids in drainage but also acts as a barrier to pests and wood decay. Additionally, ensuring the doghouse is level during the concrete pouring phase is critical for the overall stability and functionality of the structure. By following these detailed steps, you’ll create a strong foundation that supports the doghouse’s weight and withstands environmental conditions, making your pet’s new home safe and secure.
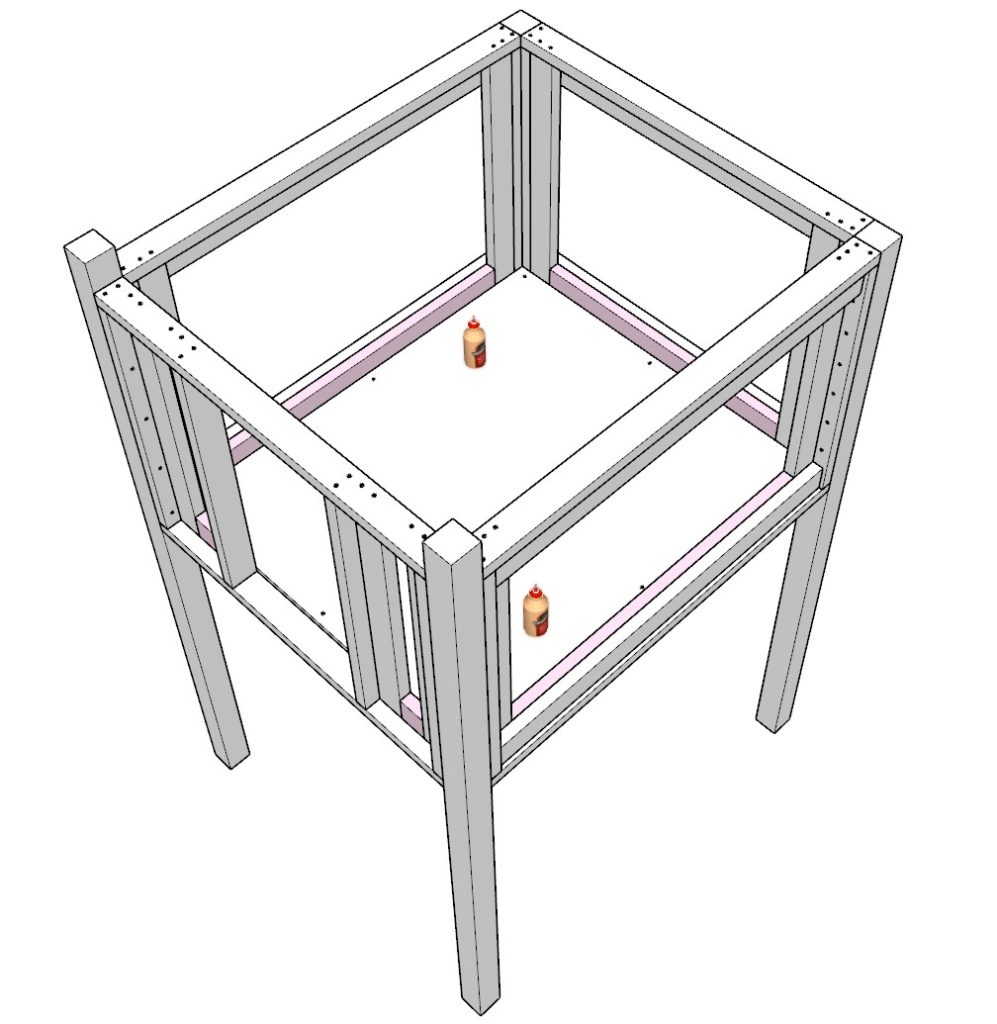
Step 9: Sealing Interior Gaps for Insulation and Comfort
This step is focused on enhancing the comfort and insulation of the doghouse by adding additional 2×4 lumber pieces inside. These fill any gaps, eliminating nooks where pests could hide or drafts could enter, and improve the overall insulation, creating a cozier space for your dog.
Prepare and Insert Lumber Pieces:
- Begin by cutting two pieces of 2×4 lumber to 46 inches, one piece to 38 inches, and two pieces to 3-1/2 inches in length. These dimensions are chosen to snugly fit into the existing gaps within the doghouse frame, thereby enhancing the structure’s insulation and comfort.
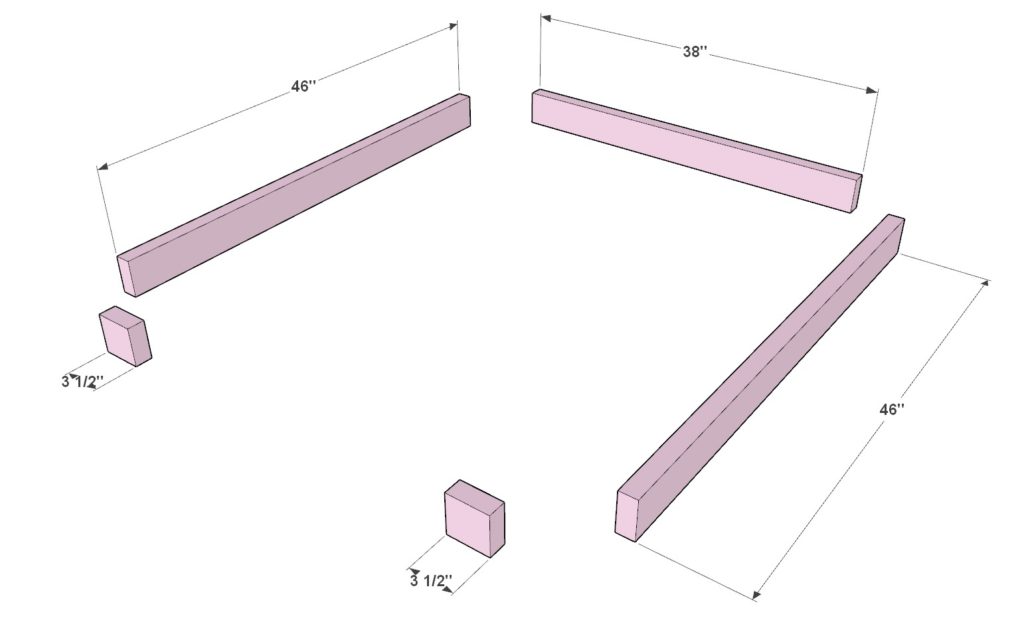
Attachment Options:
- For attachment, wood glue can be sufficient due to the minimal stress these pieces will endure. Apply a generous amount of wood glue to the ends of each piece before pressing them into their designated spots. This method offers a clean and straightforward installation.
- Alternatively, for added durability, you can secure the pieces with screws. Pre-drill holes to avoid splitting the wood, then drive 3.5-inch screws through the lumber pieces into the frame. This method is recommended if you anticipate heavy use or need to ensure the pieces are firmly attached.
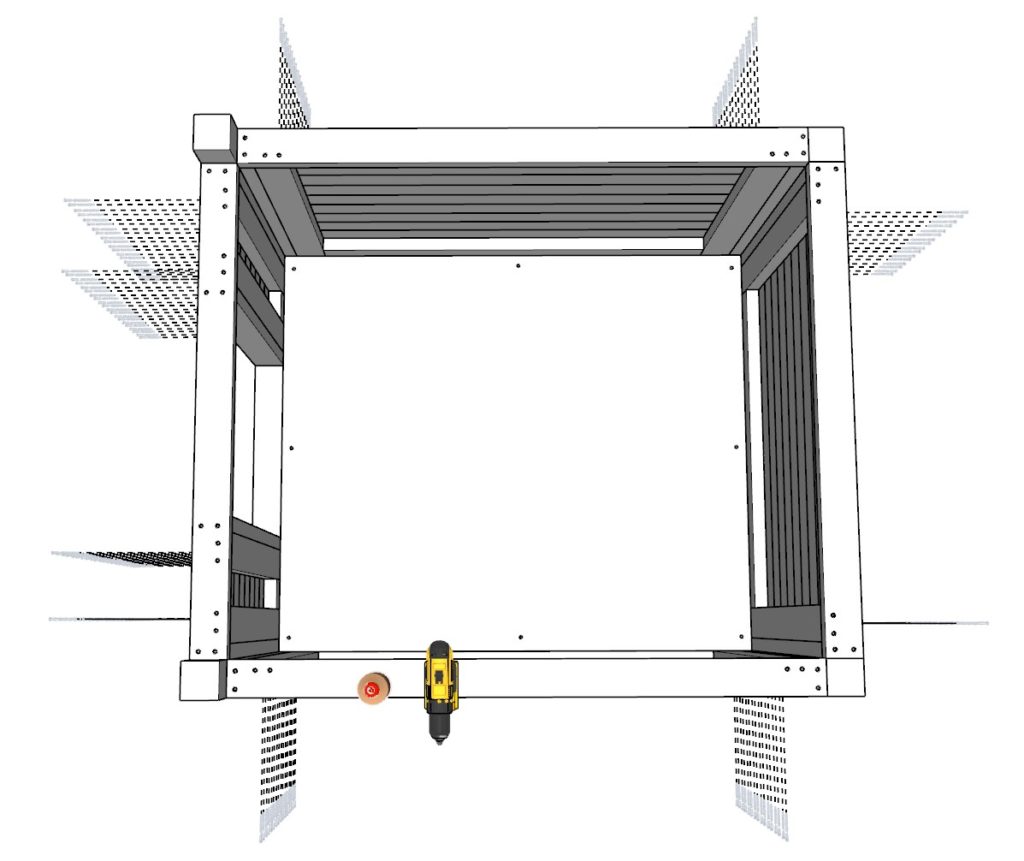
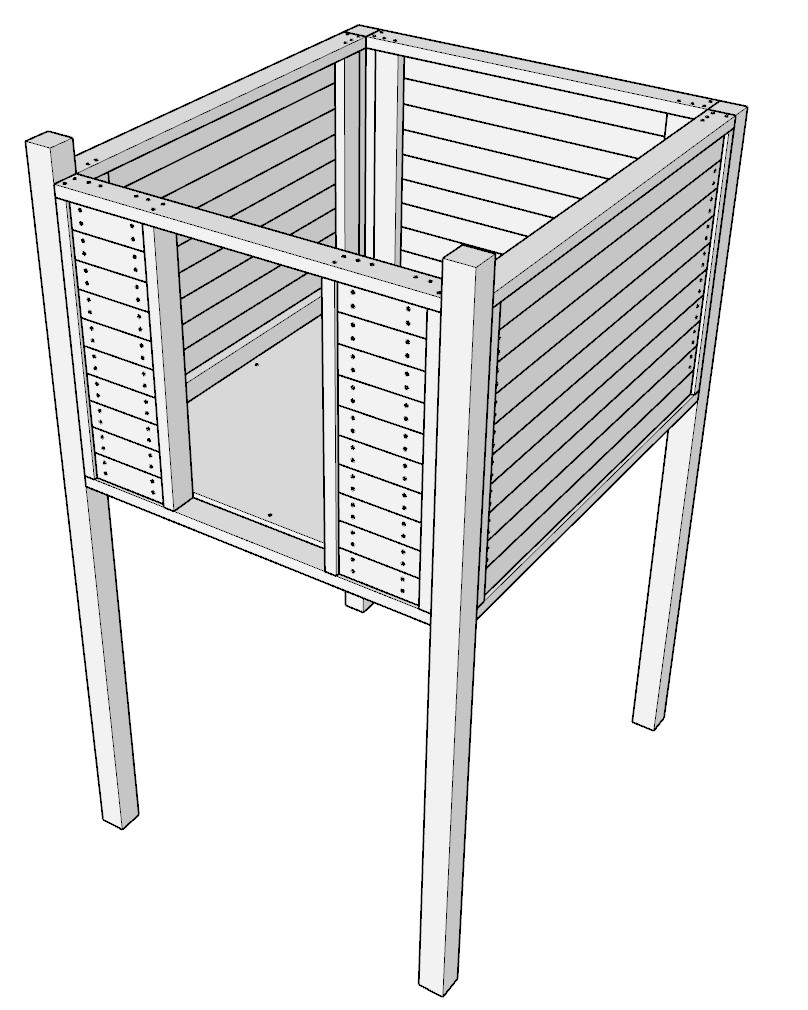
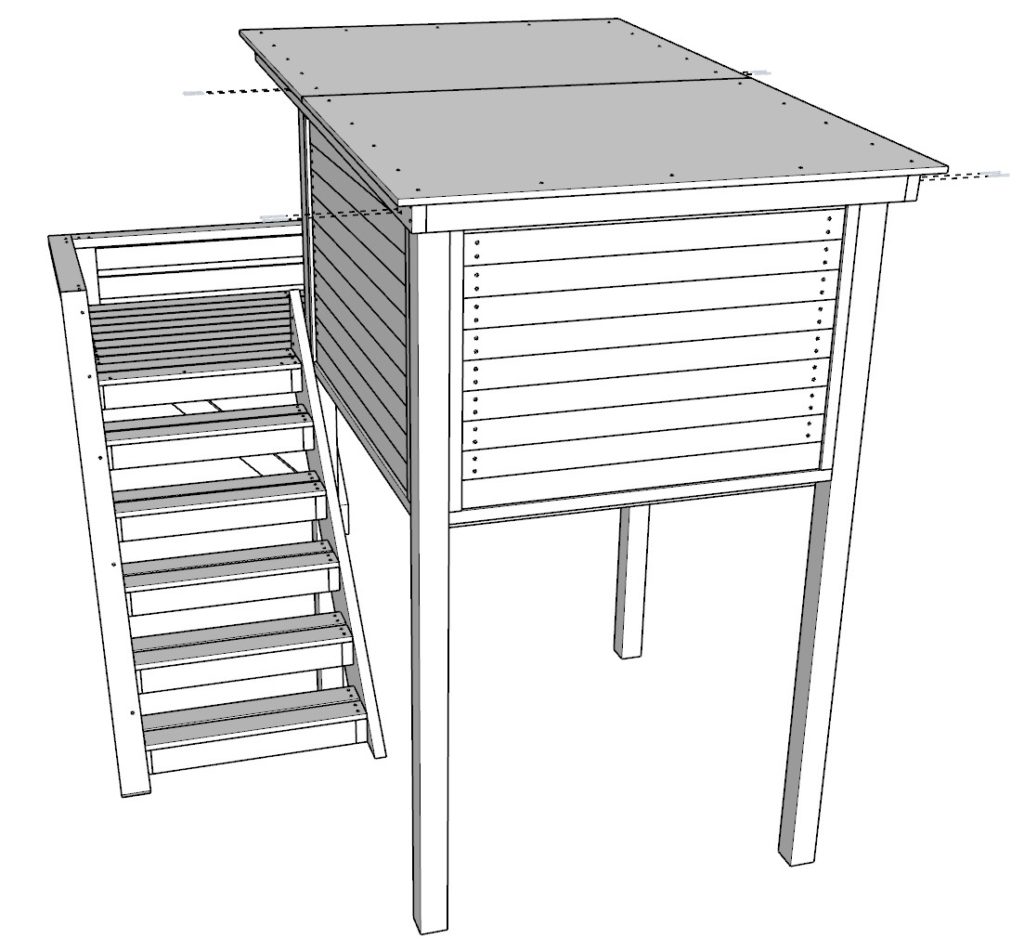
Step 10: Attaching the Siding for Enclosure
In this step, you’ll be working on enclosing the doghouse by adding 2×4 lumber as siding. This not only seals the doghouse, enhancing its insulation and security but also adds to its aesthetic appeal.
Gather and Cut Lumber Pieces:
- Prepare your materials by cutting sixteen pieces of 2×4 lumber to 53 inches, eight pieces to 45 inches, and twenty pieces to 10-1/2 inches. These dimensions are designed to cover the sides of the doghouse effectively, ensuring a snug fit that leaves no gaps.
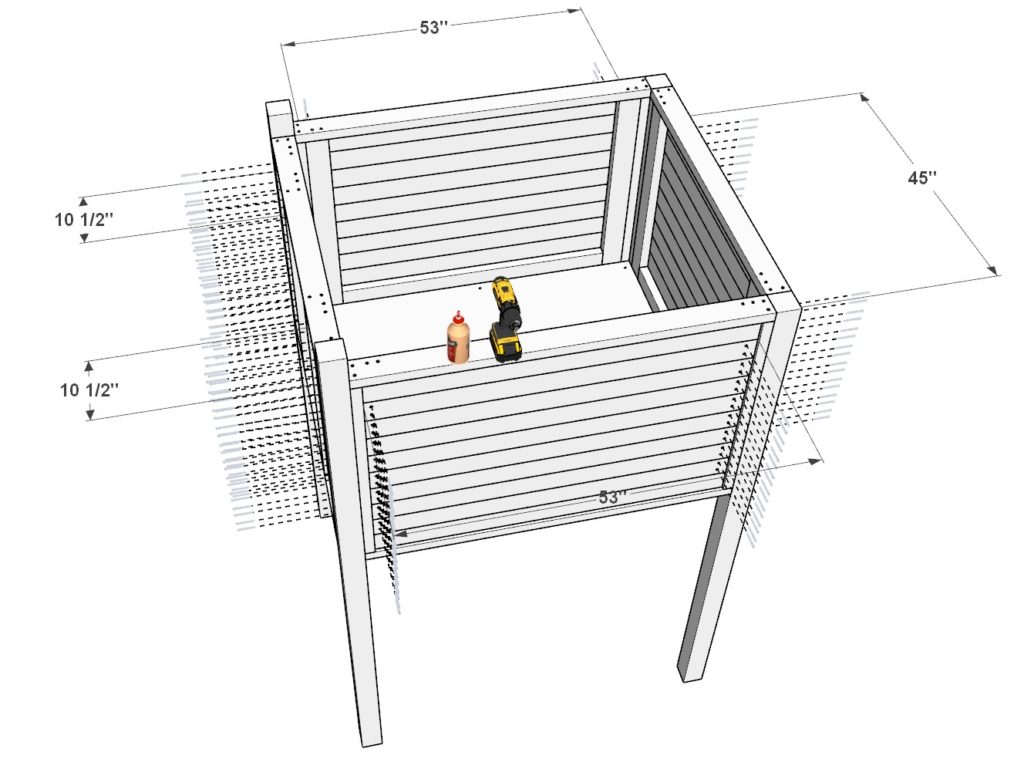
Arrange the Siding Pieces:
- Lay out the siding pieces around the doghouse frame as per the instructions provided in the diagrams. The 53-inch pieces will cover the longer sides of the doghouse, the 45-inch pieces are for the back side, and the 10-1/2 inch pieces are for the front of the doghouse.
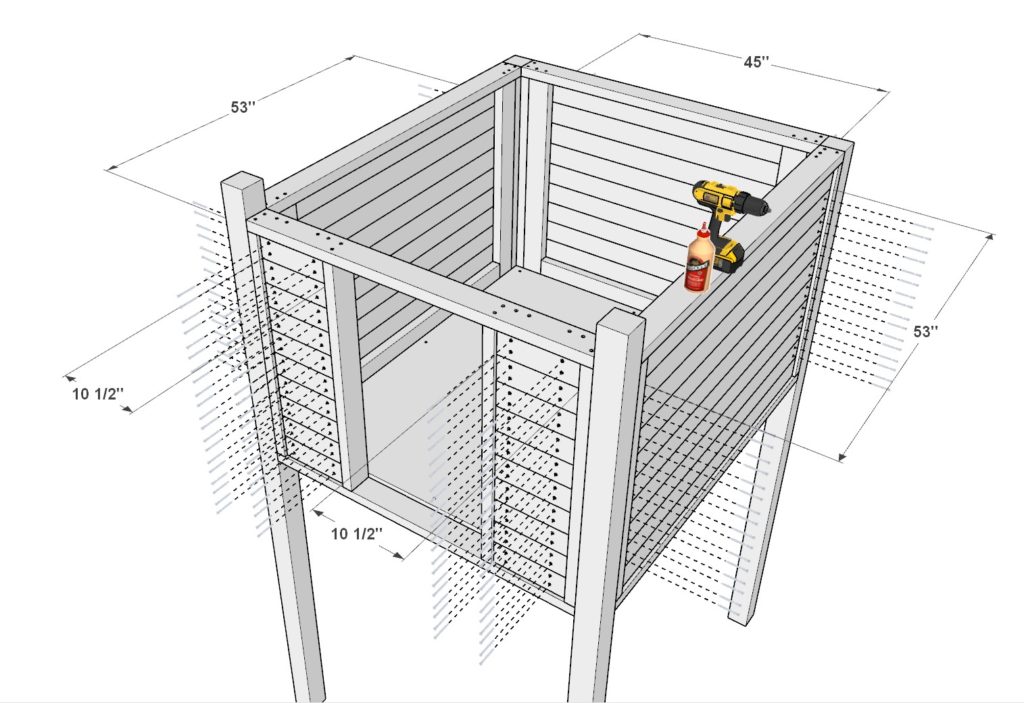
Secure the Siding:
- To attach the siding, first apply a liberal amount of wood glue to the back of each piece to ensure a strong bond to the frame. This will prevent the siding from loosening over time.
- Pre-drill holes through the siding pieces to prevent the wood from splitting when inserting the screws. It’s essential to use 2.5-inch screws for this step to avoid them protruding through the lumber, which could potentially harm the doghouse’s occupants.
- Secure each piece firmly to the frame, making sure the edges align neatly and the surface is uniform. This meticulous attention to detail will result in a polished and professional-looking finish.
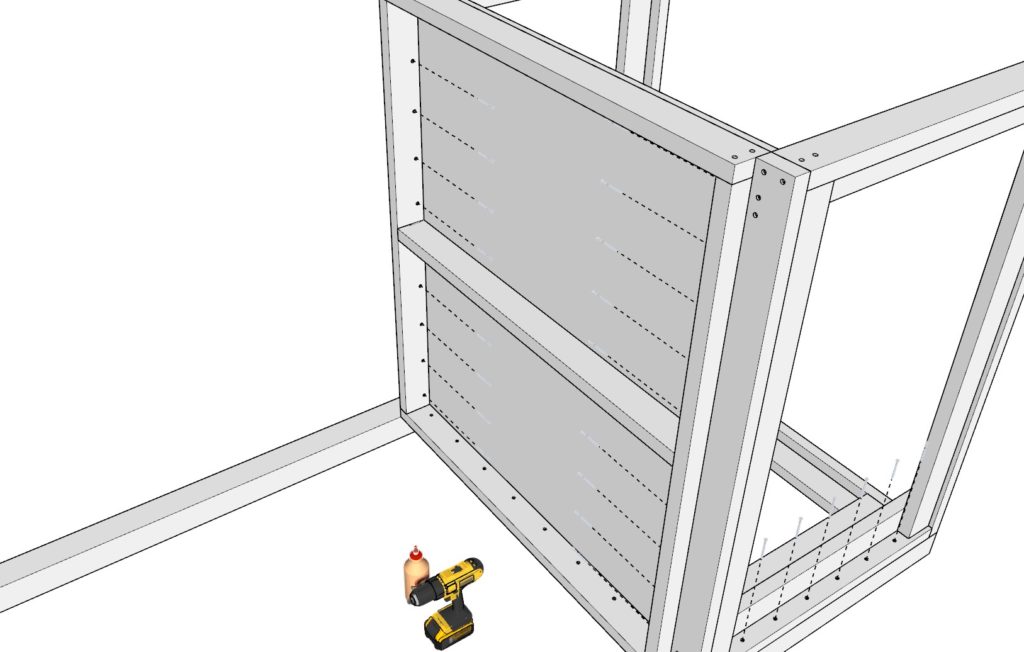
Step 11: Adding Insulation for Cold Climates
This step is crucial for ensuring your doghouse remains warm and comfortable during colder months. While this step is optional and specifically targeted at cold regions, properly insulating the doghouse can significantly enhance your pet’s comfort.
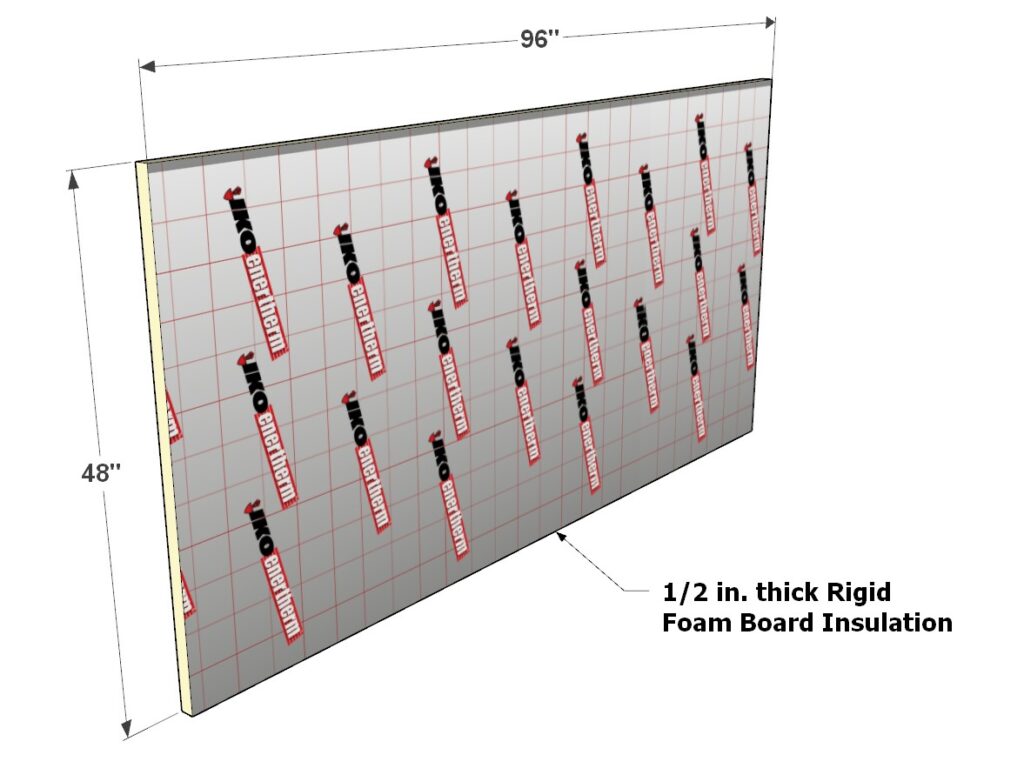
Install Rigid Foam Board Insulation:
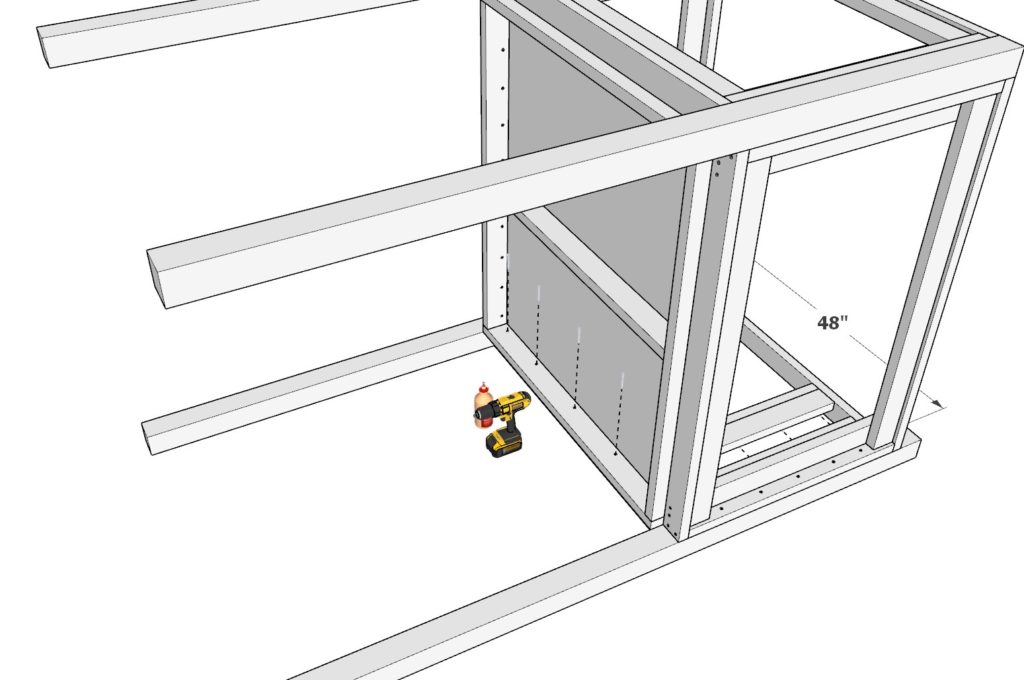
- Begin with three 1/2 inch x 48 inch x 8 ft. rigid foam board insulation pieces. Cut one of these panels according to the specific dimensions required to fill the gaps in the doghouse’s side walls, back wall, and front entrance walls. Carefully insert these cut pieces into the designated gaps, ensuring a snug fit for optimal insulation.
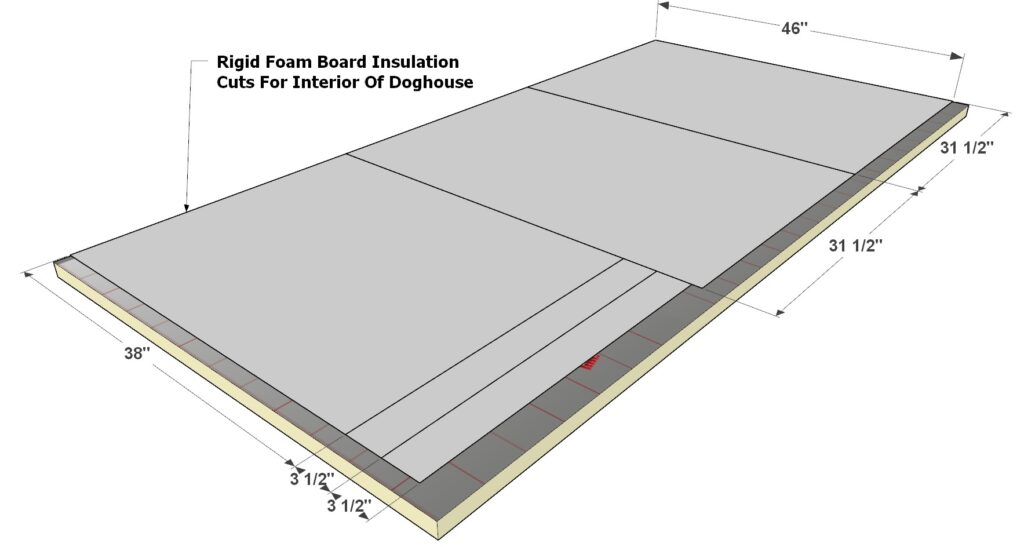
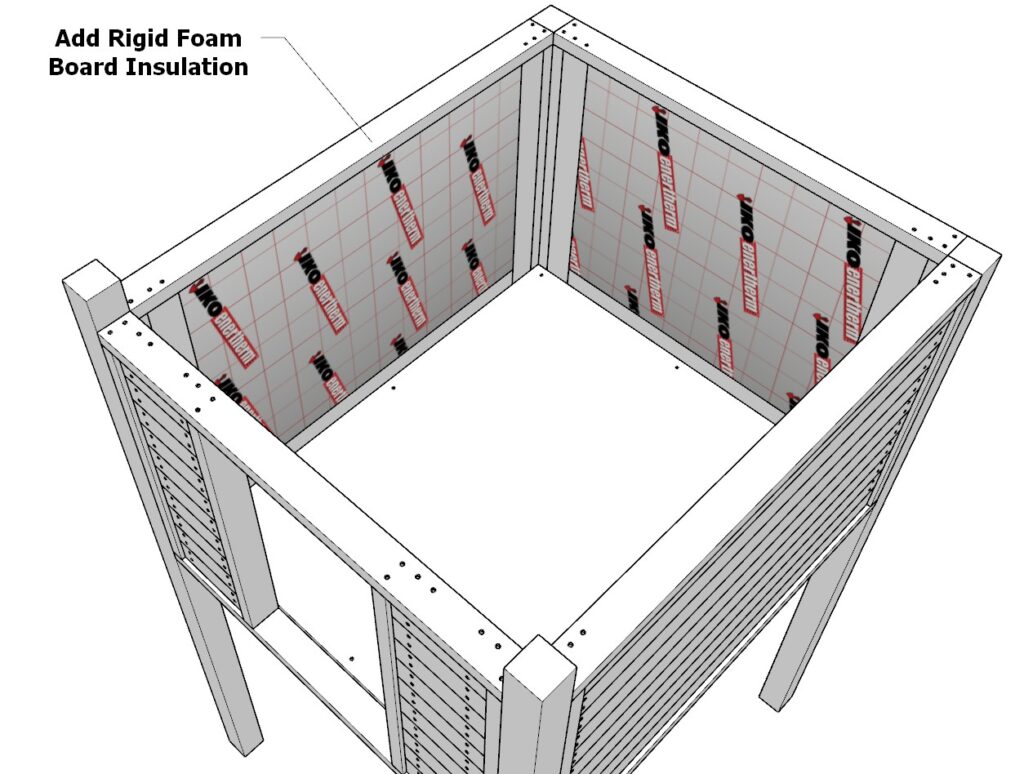

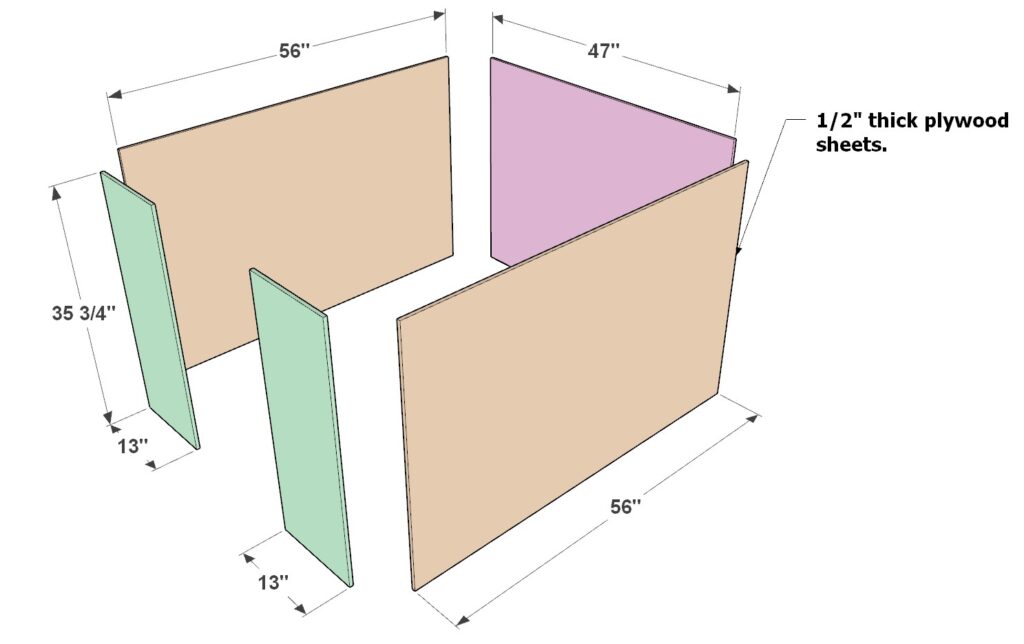
Seal Insulation with Plywood:
- To encase the insulation, prepare plywood panels: two measuring 56in x 35-3/4in, two measuring 13in x 35-3/4in, and one measuring 47in x 35-3/4in. Attach these panels over the insulation on the doghouse walls using wood glue and a pin nailer equipped with 1-1.5 inch pin nails, creating a sealed and insulated wall.

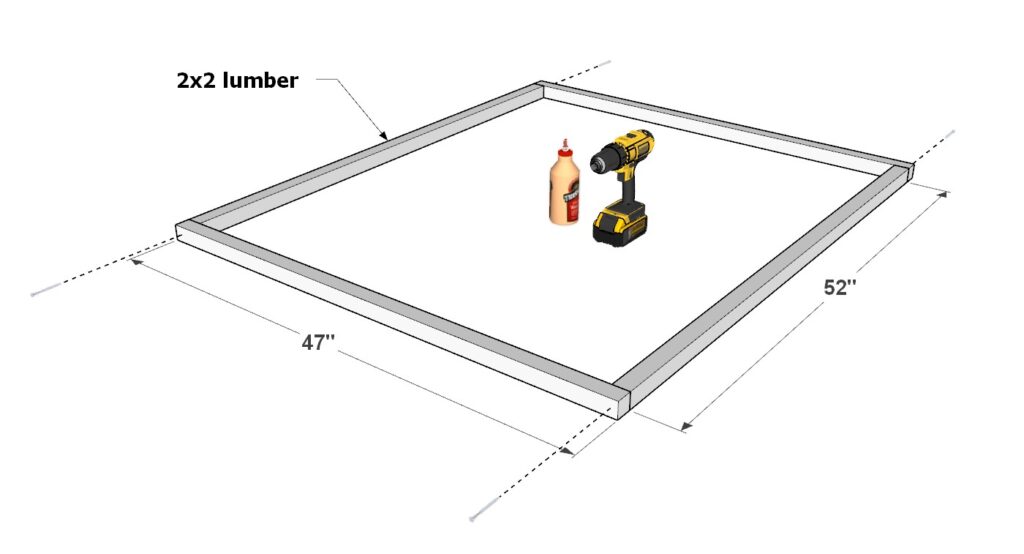
Construct and Insulate the Roof Basin:
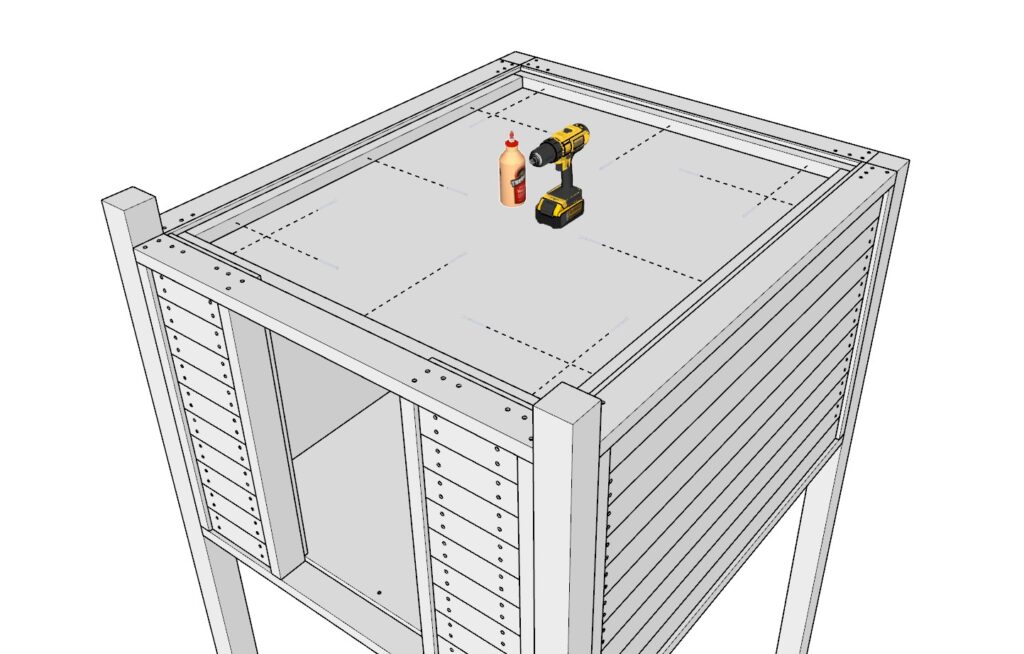
- For the roof insulation, assemble a frame using two 52 inch 2×2 lumber pieces and two 47 inch 2×2 lumber pieces into a rectangle. Secure them with 3.5 inch screws and wood glue.
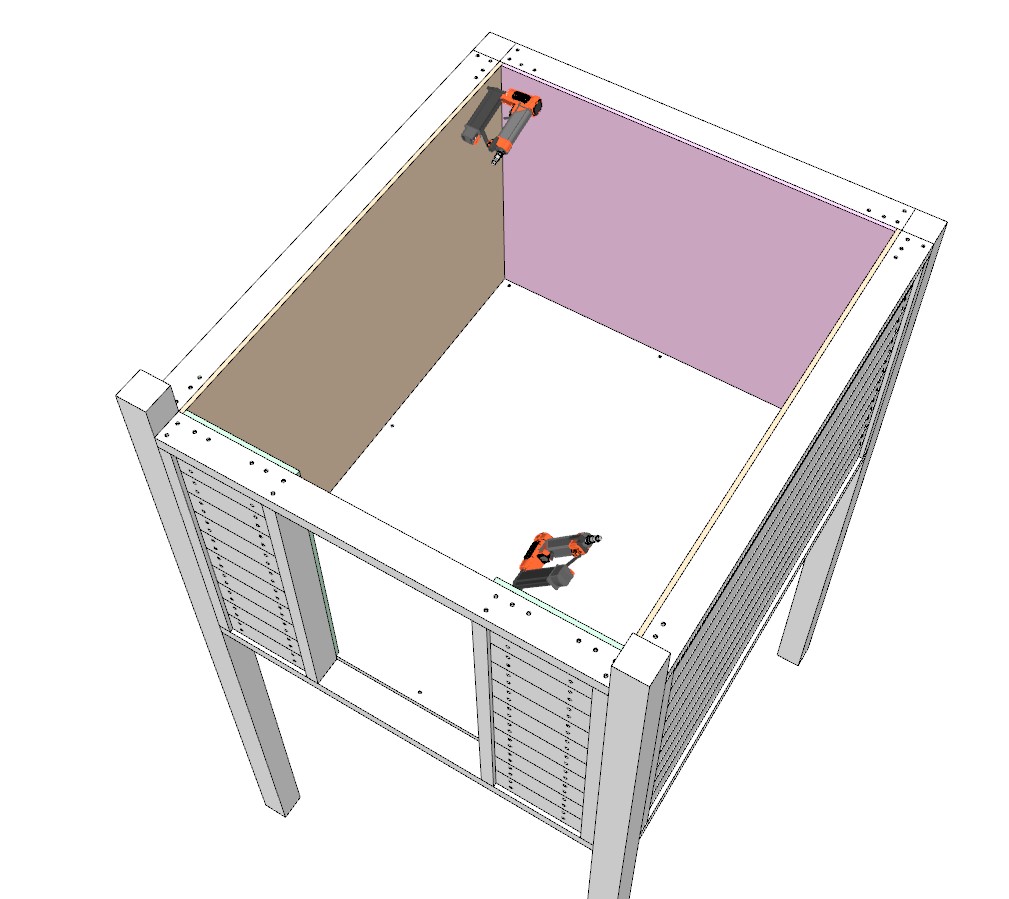
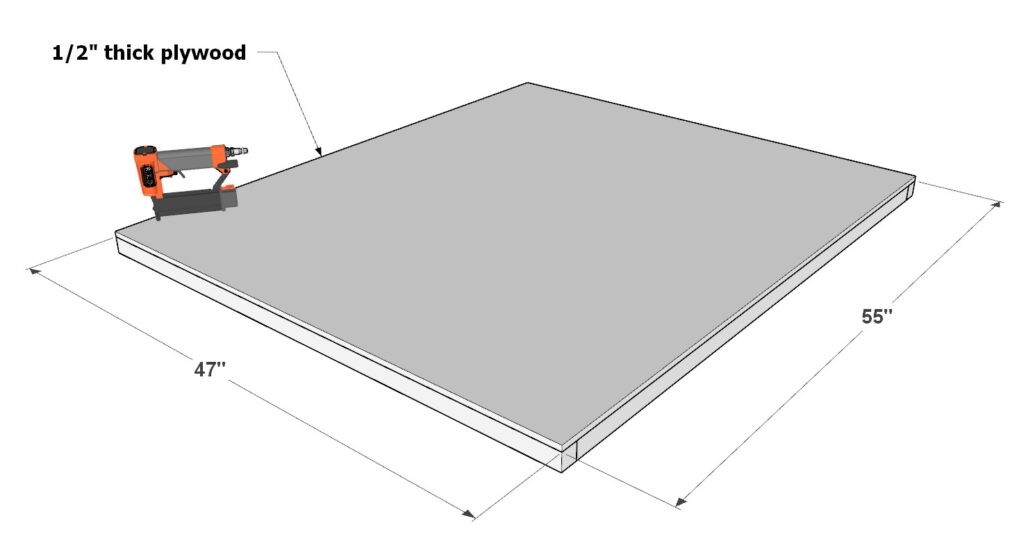
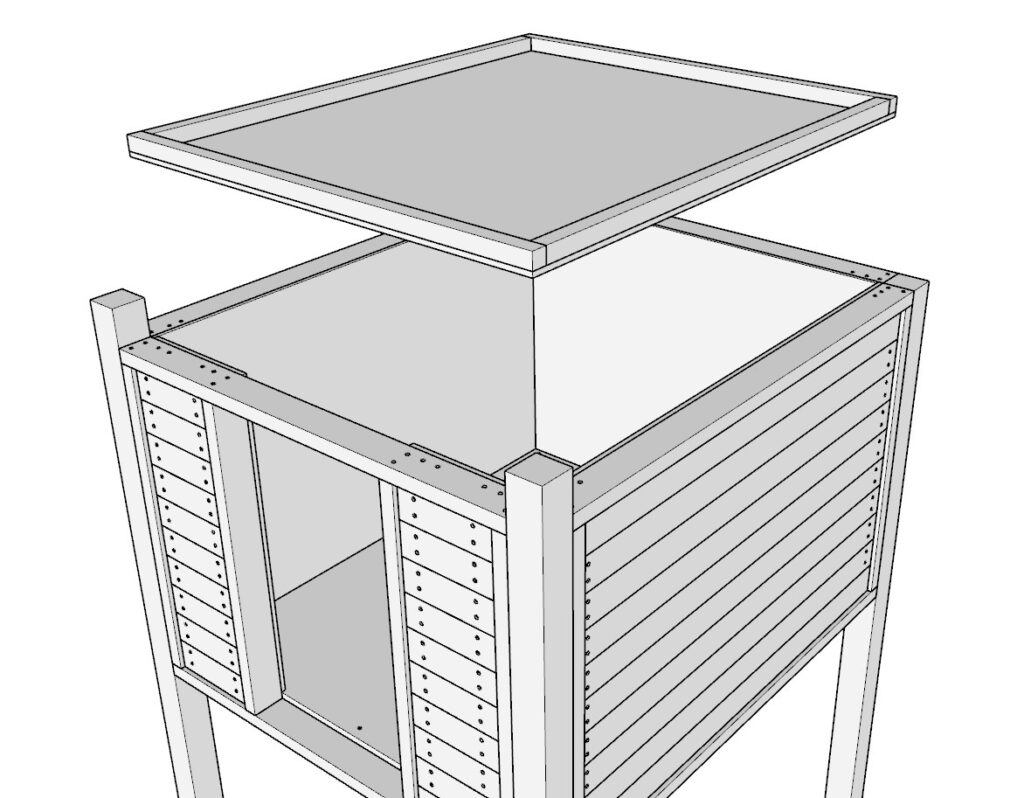
- Cover this frame with a 1/2″ thick, 47in x 55 inch plywood sheet, securing it with glue and pin nails to form a basin. This basin will be added to the top of the doghouse, positioned 1/2 inch below the side and back walls’ top edges, and fixed in place with wood glue and screws.

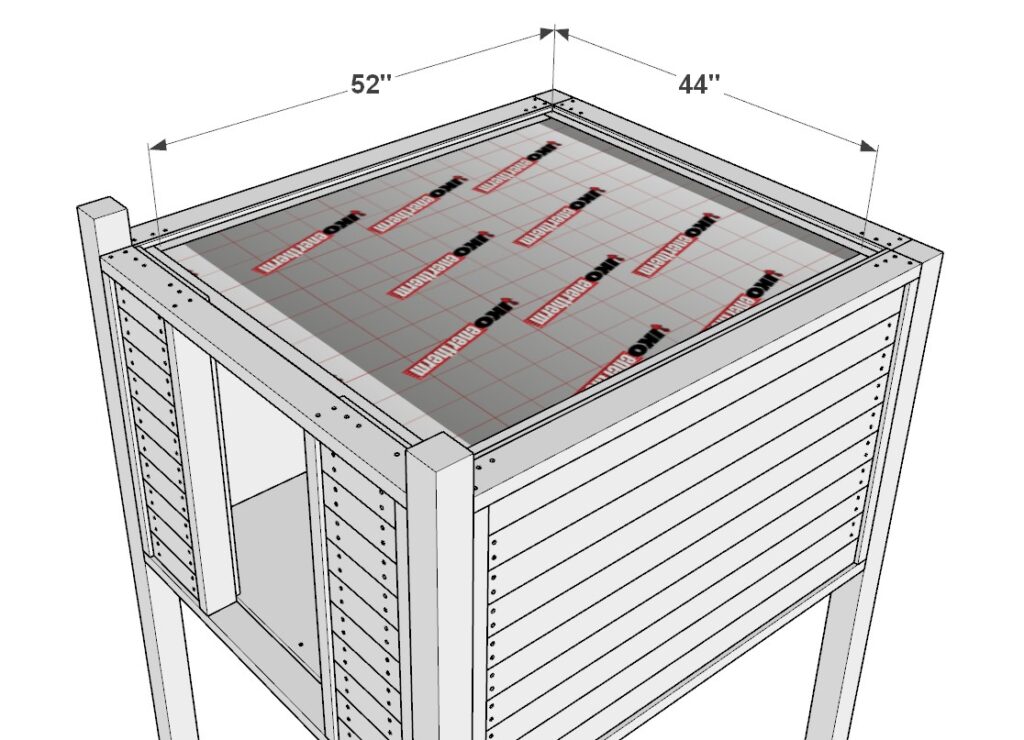
Fill the Roof Basin with Insulation:
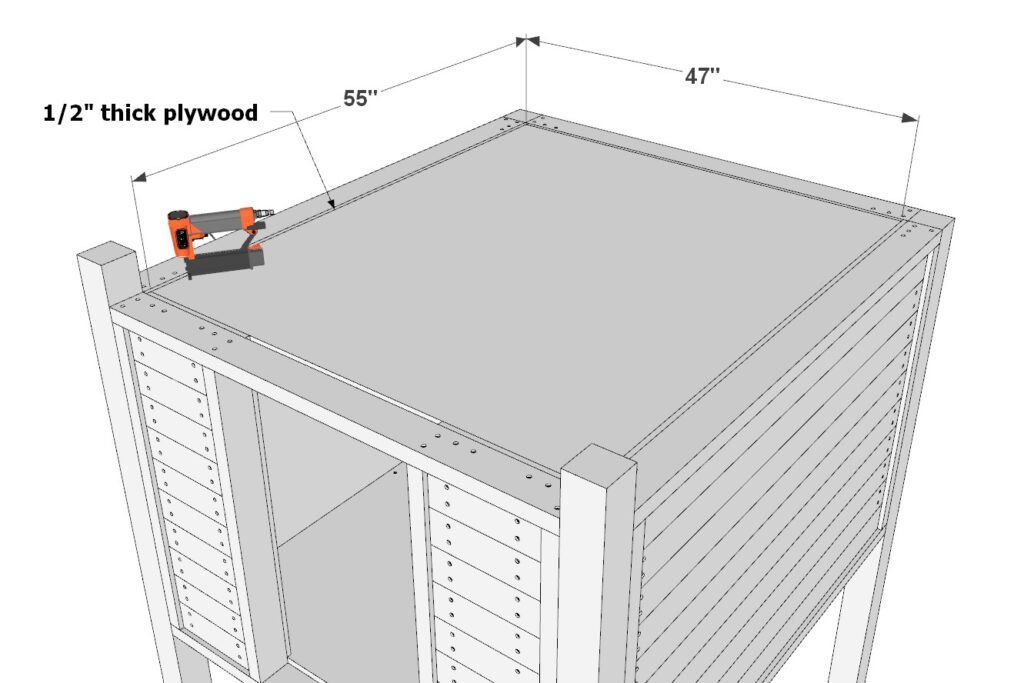
- Insert a 44in x 52 inch rigid foam board insulation piece into the basin, then seal it with a 55 inch x 47 inch 1/2″ thick plywood sheet on top. Use glue and pin nails to secure the plywood, effectively sealing the insulation within the roof basin.
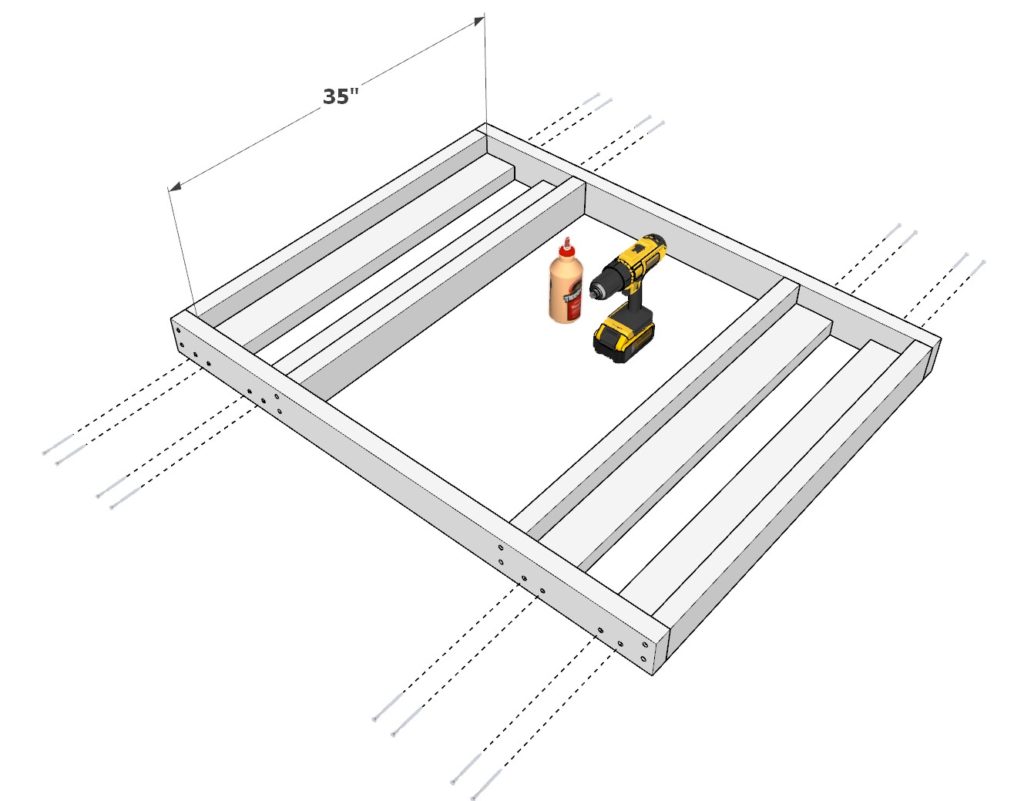
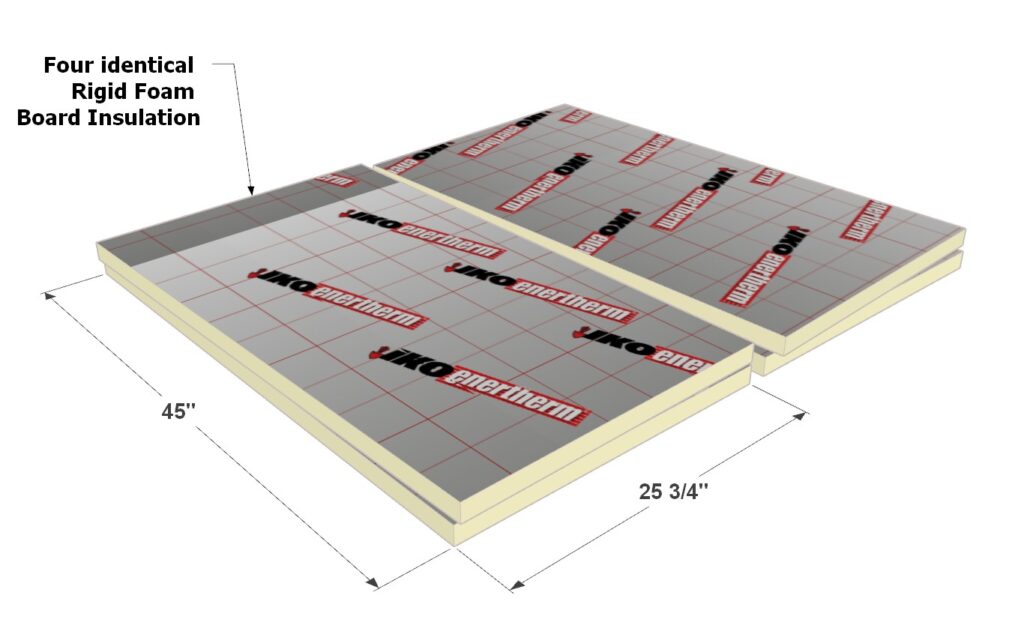
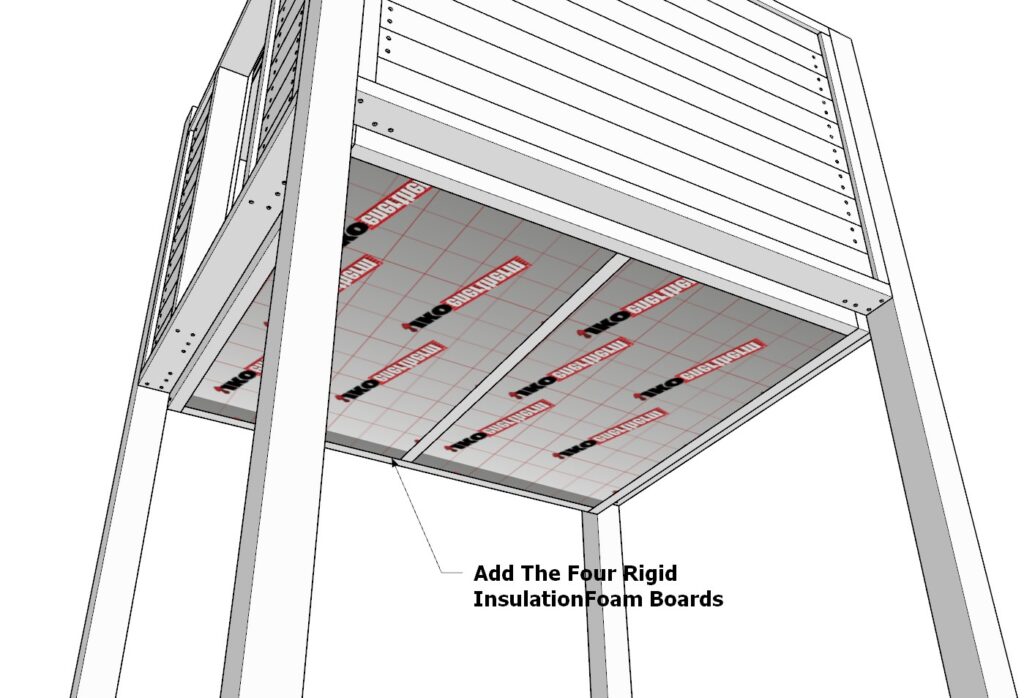
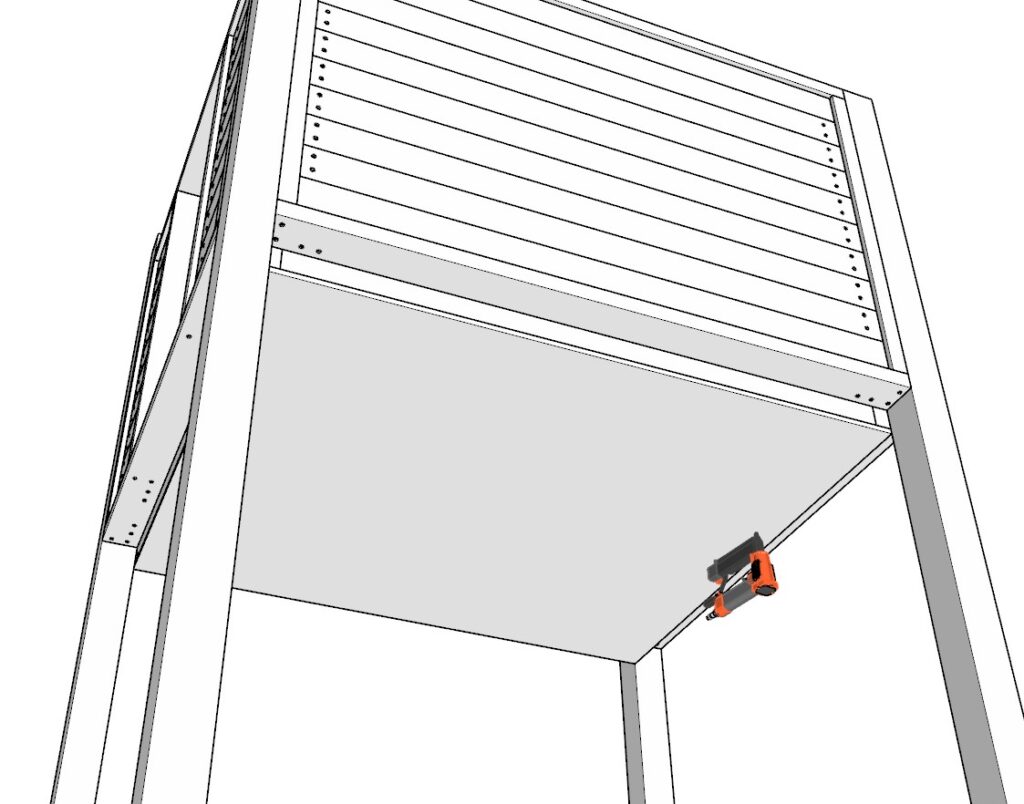
Insulate the Doghouse Bottom:
- For bottom insulation, cut four pieces of rigid foam insulation to 25-3/4 inch x 45 inch. Place these panels on the bottom of the doghouse for ground insulation.
- Cover these insulation panels with a 48 inch x 56 inch piece of outdoor-grade, pressure-treated plywood for durability and moisture resistance. Secure the plywood with a pin nailer, ensuring a tight seal and protection from the elements.

Pro Tip: Proper insulation not only keeps the doghouse warm but also helps in maintaining a stable temperature, making the space comfortable year-round. Ensure all insulation is securely sealed to prevent drafts and moisture ingress, prolonging the life of the doghouse and providing a cozy retreat for your pet.
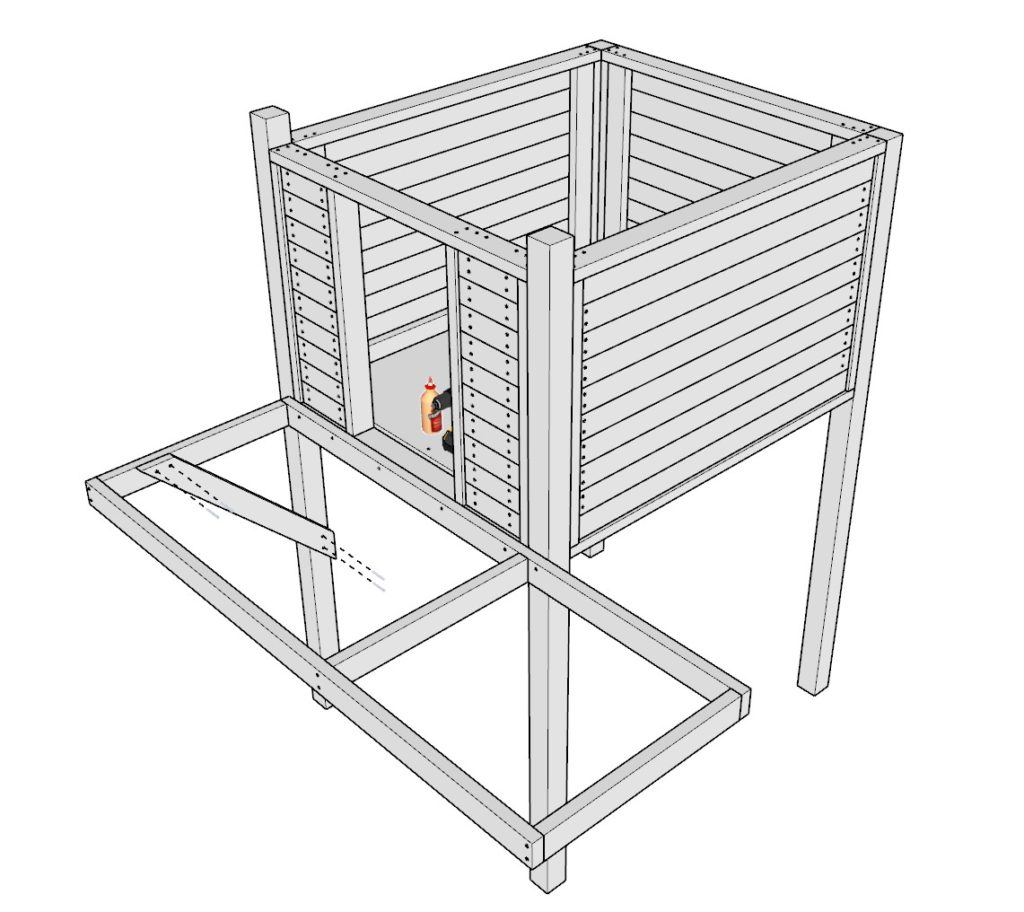
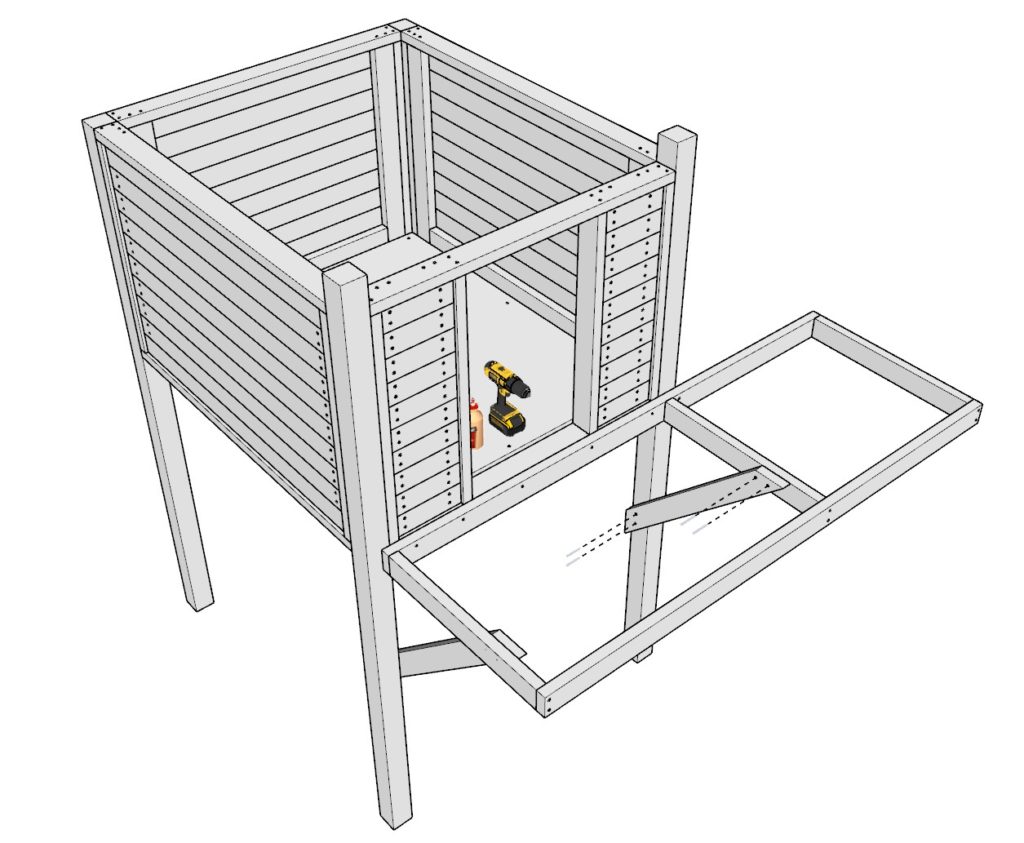
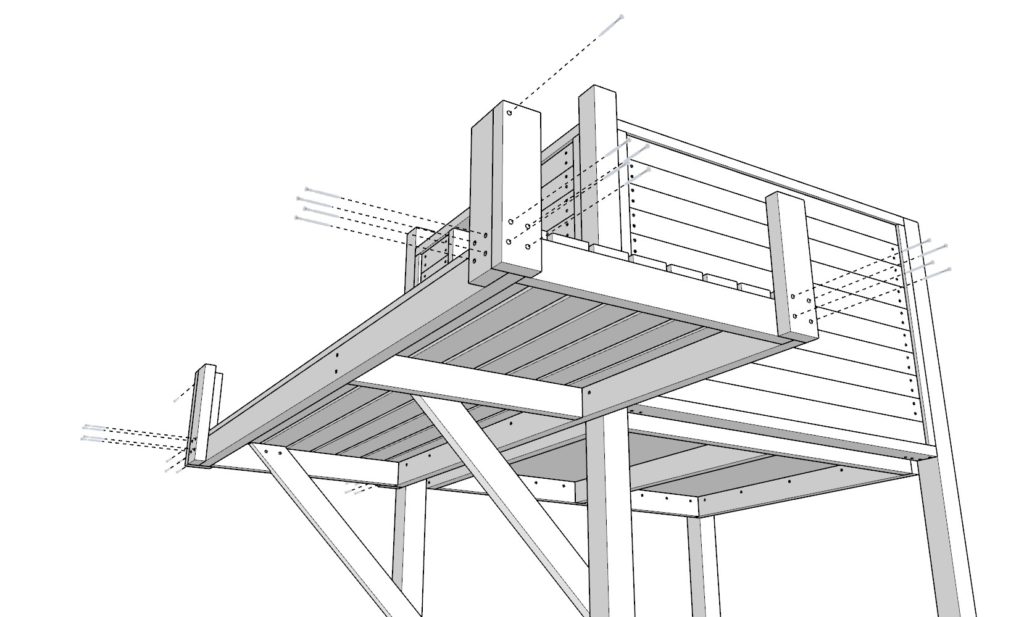
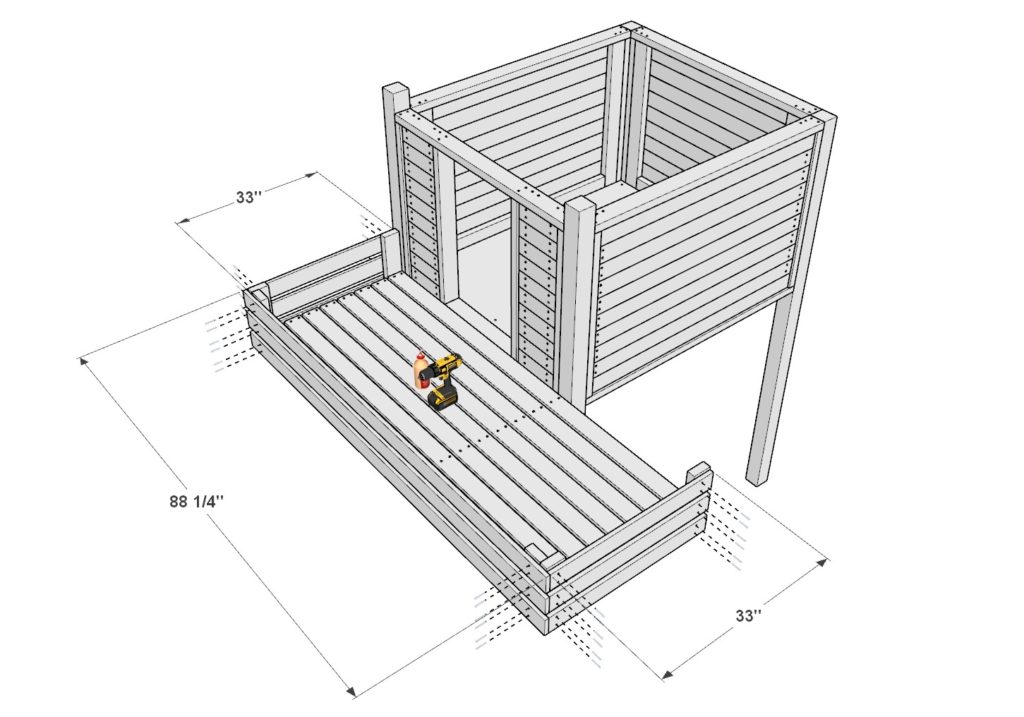
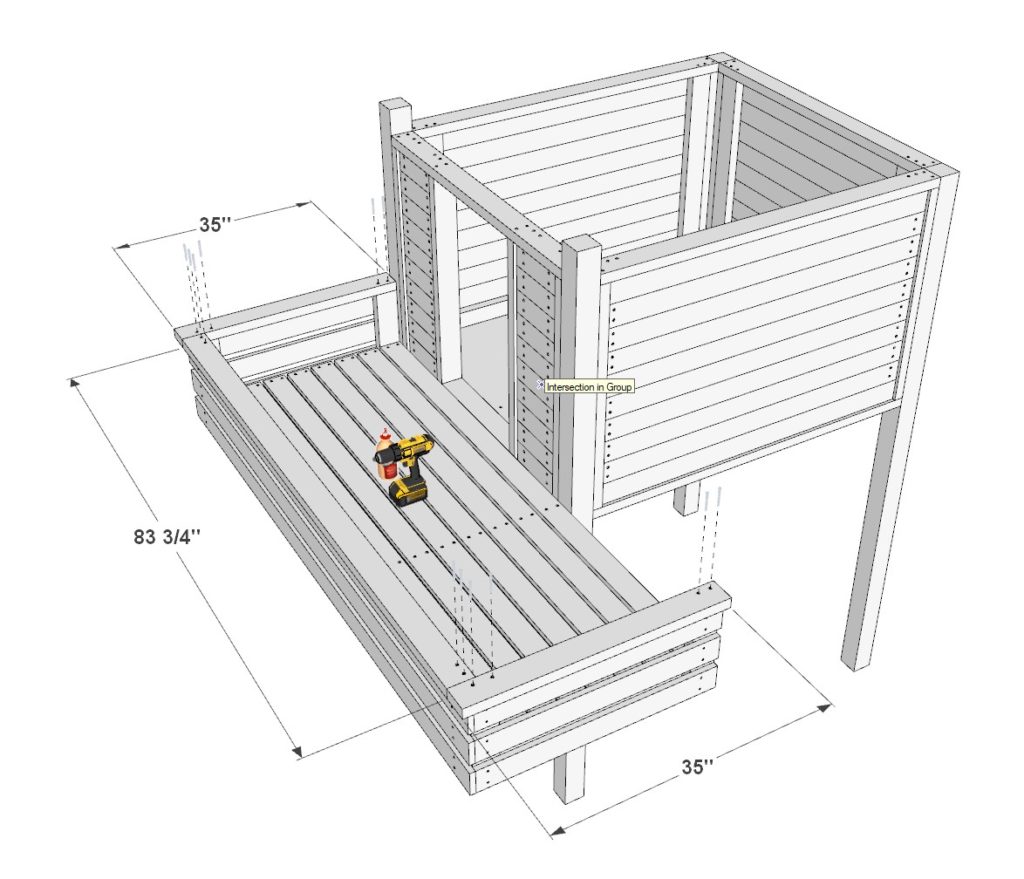
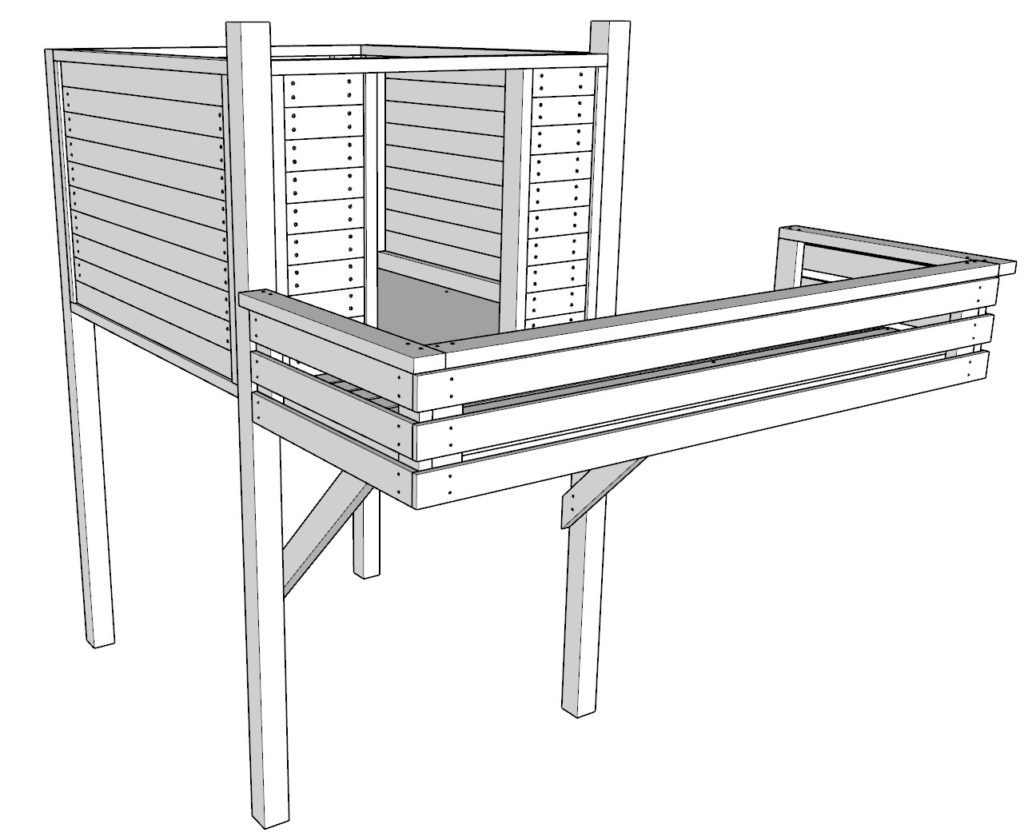
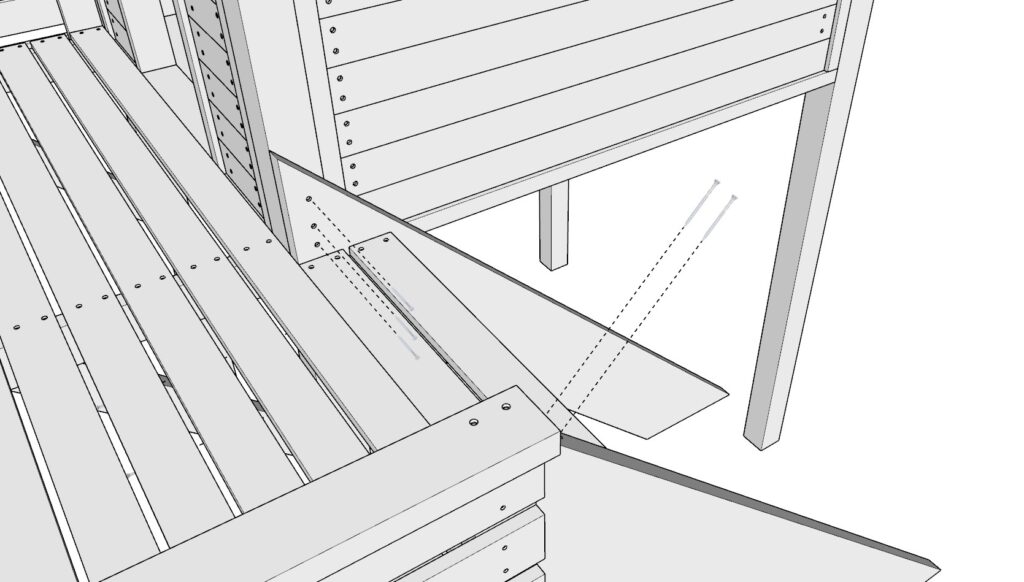
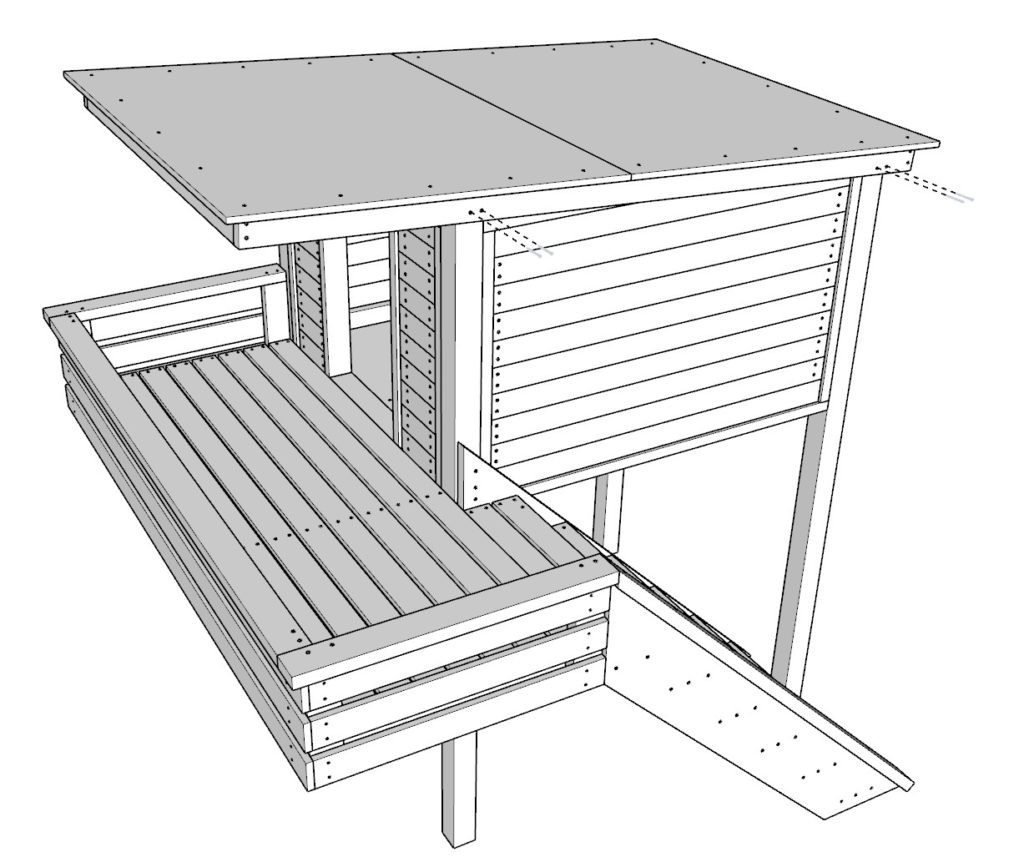
Step 12: Building and Attaching the Patio Extension
Enhance the comfort and functionality of your doghouse by adding a patio or porch extension. This step involves constructing and attaching a patio frame that extends the living space, providing a shaded and comfortable area for your dog to relax outdoors.
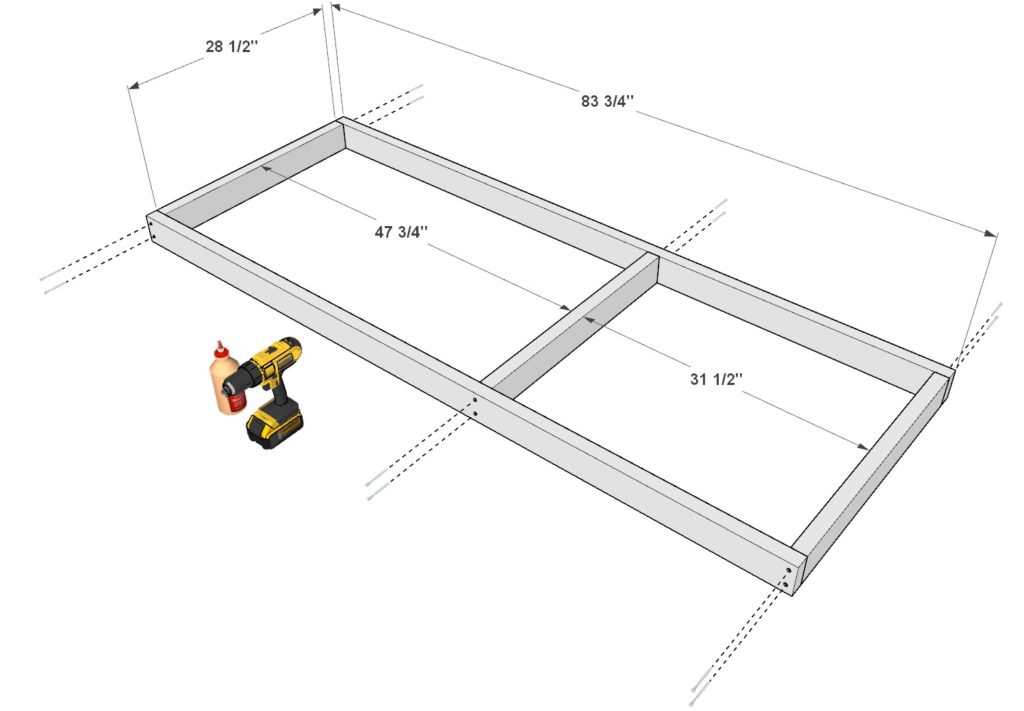
Assemble the Patio Frame:
- Begin with two 83-3/4 inch 2×4 lumber pieces and three 28-1/2 inch 2×4 lumber pieces. Arrange these pieces to form the base frame of the patio, with the 28-1/2 inch pieces spaced evenly across for support, as illustrated in the provided image. The accurate spacing of these support pieces is crucial for structural integrity and alignment with the doghouse.
- Before securing the frame, apply wood glue to the joints, pre-drill holes to prevent splitting, and then fasten with 3.5-inch screws. Ensure the frame is square and the supports are properly aligned.
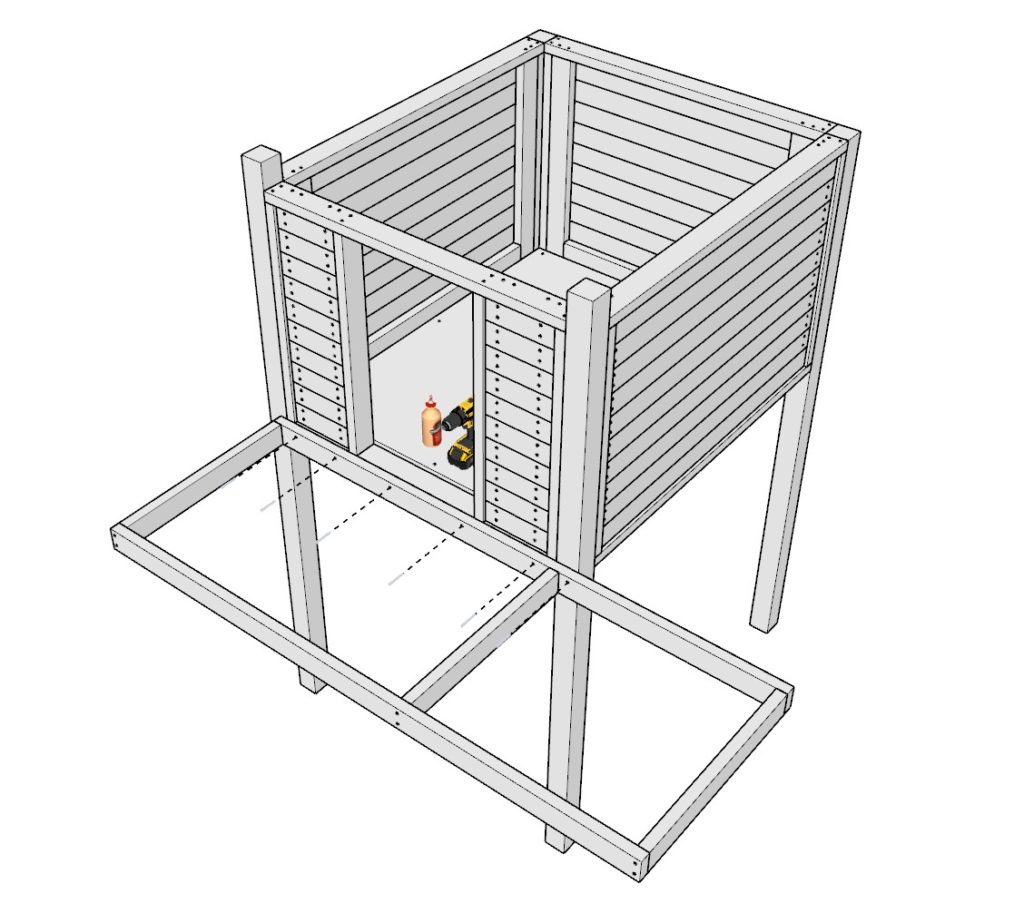
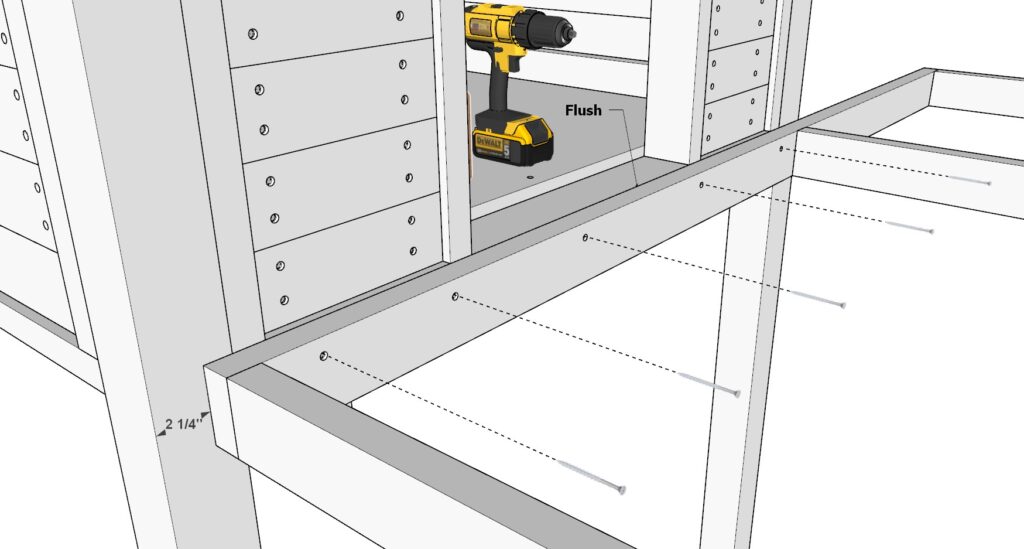
Attach the Patio Frame to the Doghouse:
- Position the assembled patio frame adjacent to the front of the doghouse. The frame should be indented by 2-1/4 inches from the edge of the front doghouse pillar, aligning flush with the doghouse floor frame for a seamless transition. Use the provided images as a guide for correct placement.
- Secure the patio frame to the doghouse using 3.5-inch screws, ensuring it is firmly attached and level with the doghouse floor.
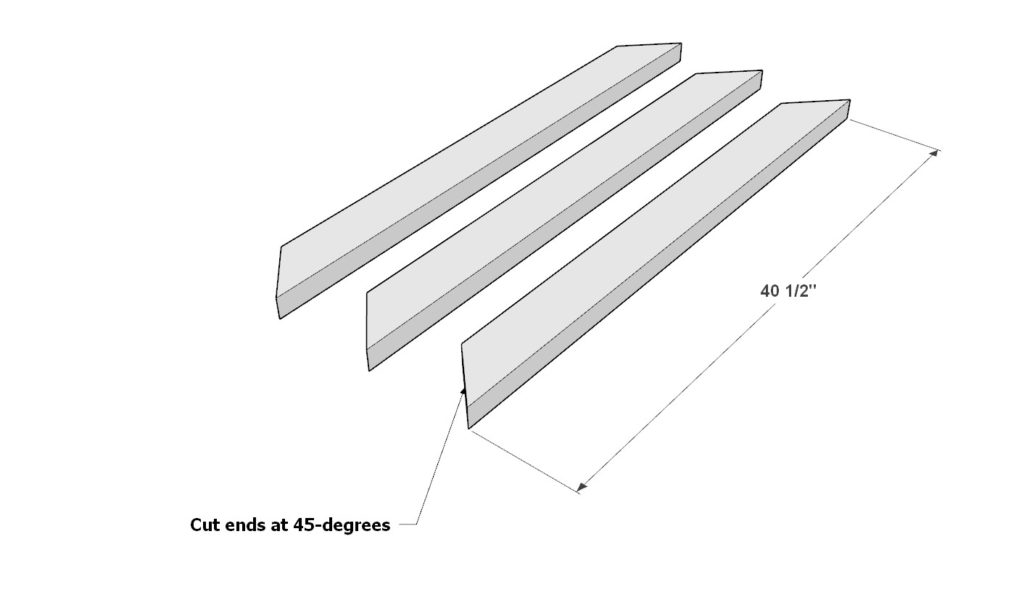
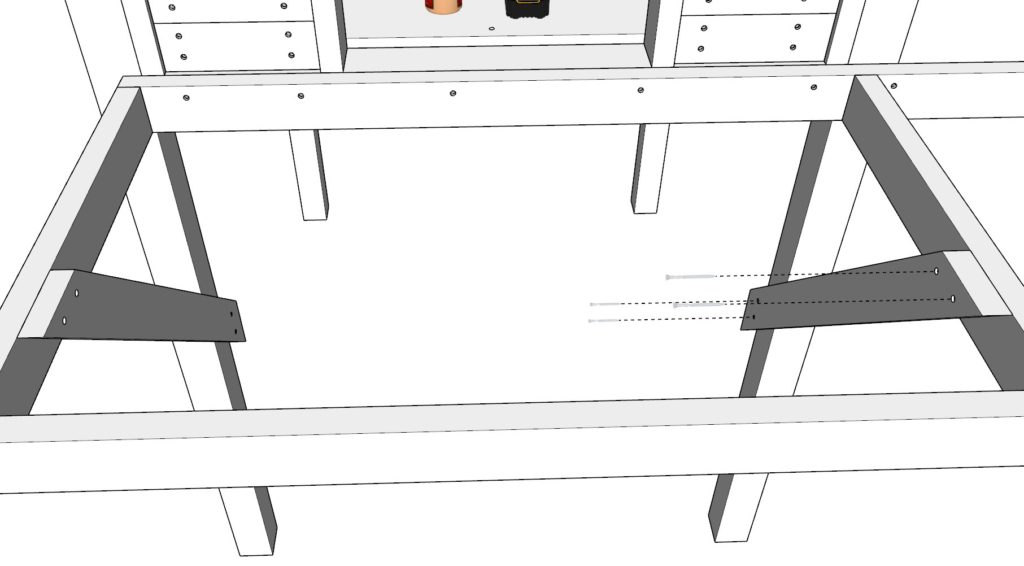
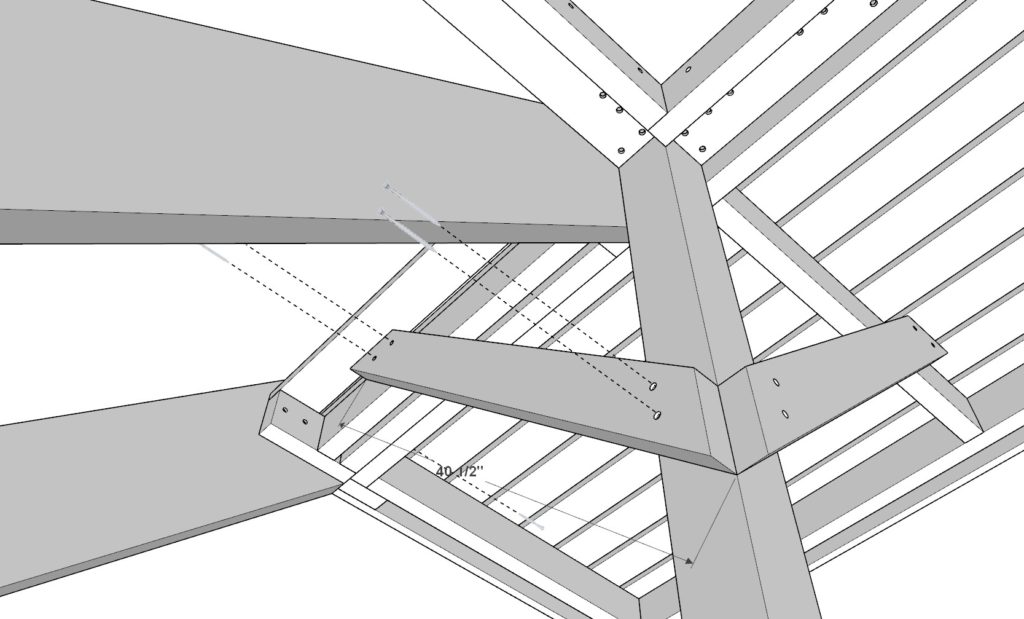
Reinforce the Patio Frame:
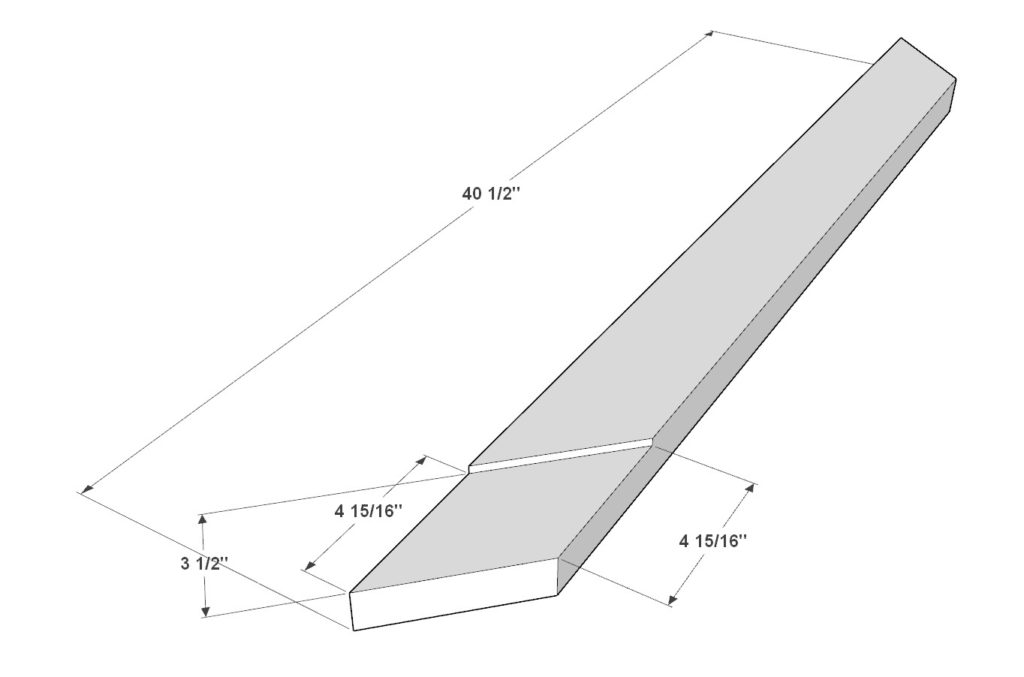
- Cut three 40-1/2 inch 2×4 lumber pieces, angling both ends at 45 degrees for a snug fit as reinforcement braces. These braces will enhance the stability and durability of the patio.
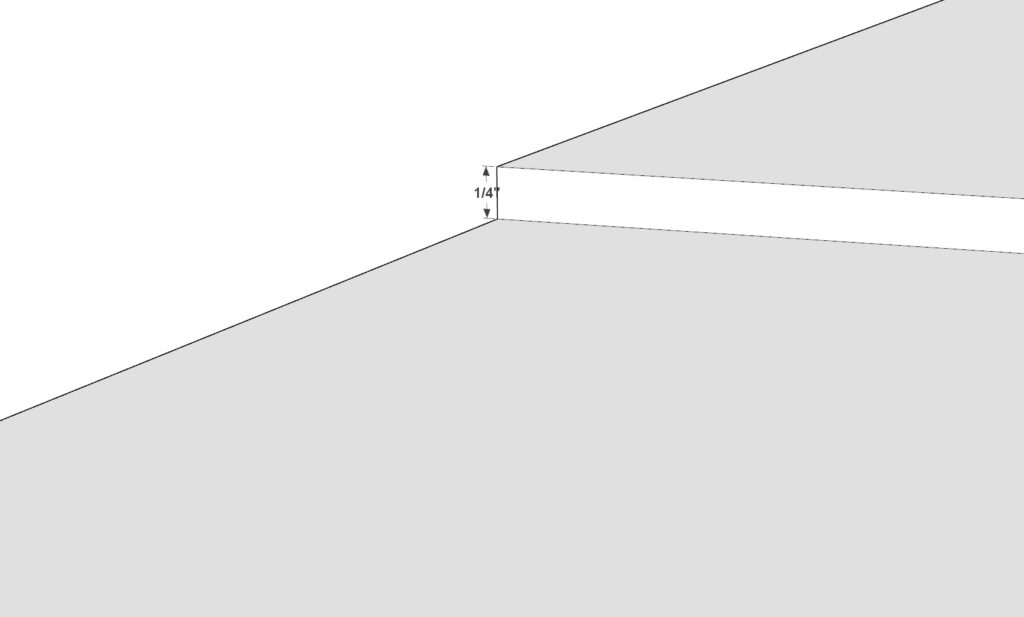
- Modify one of the 40-1/2 inch pieces by cutting a 1/4 inch deep indent as specified in the diagram. This can be achieved using a saw, handheld planer, or chisels. This modification allows the piece to fit snugly around any protrusions or design features on the doghouse’s front pillar.
- Attach the modified piece to the front 4×4 pillar of the doghouse as indicated, securing it with glue and 3.5-inch screws for added stability.
Finalize Patio Reinforcements:
- Attach the second unmodified 40-1/2 inch 2×4 reinforcement piece according to the diagram, ensuring it is securely fastened to provide additional support to the patio structure.
- Reserve the last reinforcement piece for a future step, as it will be used to further enhance the patio’s stability or for additional structural elements.
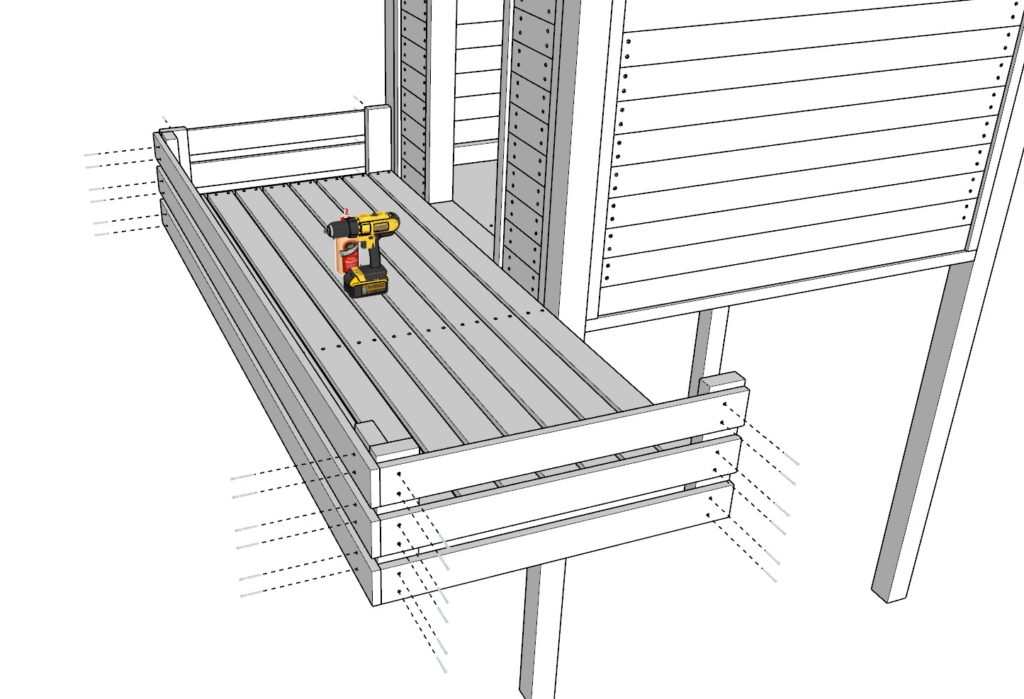
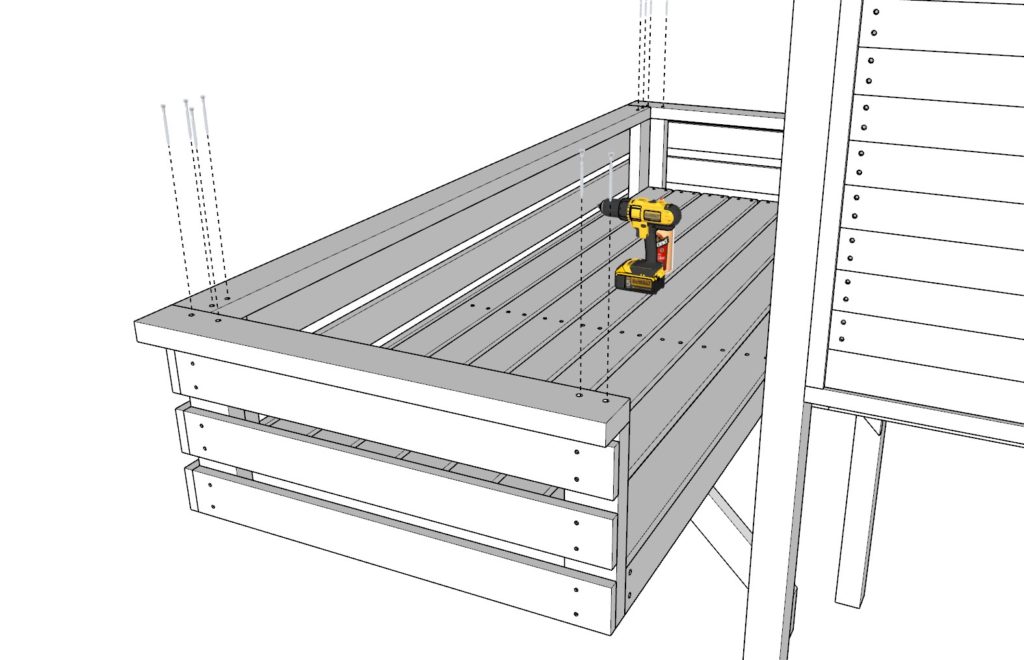
Step 13: Installing Decking for the Porch
This step focuses on completing the patio or porch area by adding decking, which will provide a finished look and a comfortable surface for your dog to enjoy. Decking installation is straightforward but requires attention to detail to ensure durability and aesthetic appeal.
Lay Out the Decking Boards:
- Start with eight 83-3/4 inch 1×4 lumber pieces for the main decking area. Position these boards across the top of the patio frame you’ve constructed, ensuring they run parallel and are evenly spaced.
- Maintain approximately 1/2 inch spacing between each decking board. This spacing allows for water drainage and wood expansion, preventing the decking from warping or becoming damaged over time.
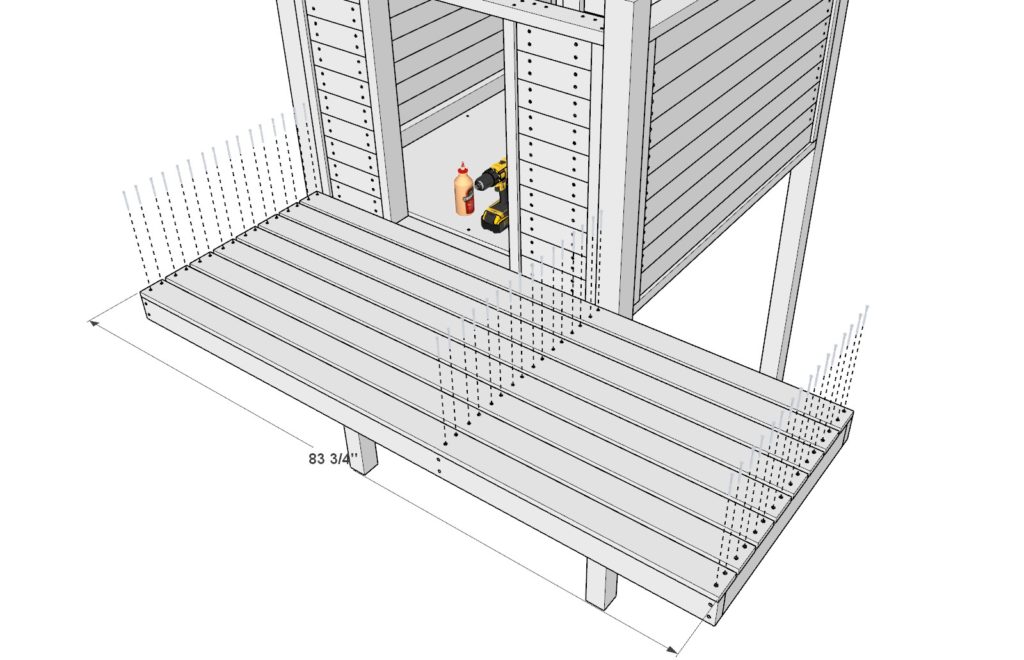
Secure the Decking Boards:
- Once positioned, secure each decking board to the patio frame. Apply wood glue along the underside of each board for added adhesion.
- Pre-drill holes along the length of each board to prevent the wood from splitting when inserting screws. Fasten the boards using either 2.5 or 3.5-inch screws, depending on your preference for screw visibility and the thickness of the patio frame.
- Alternatively, for a less intrusive finish, you can use a pin nailer with 1.5-inch pin nails to attach the decking boards. This method reduces the visibility of fasteners and provides a cleaner look.

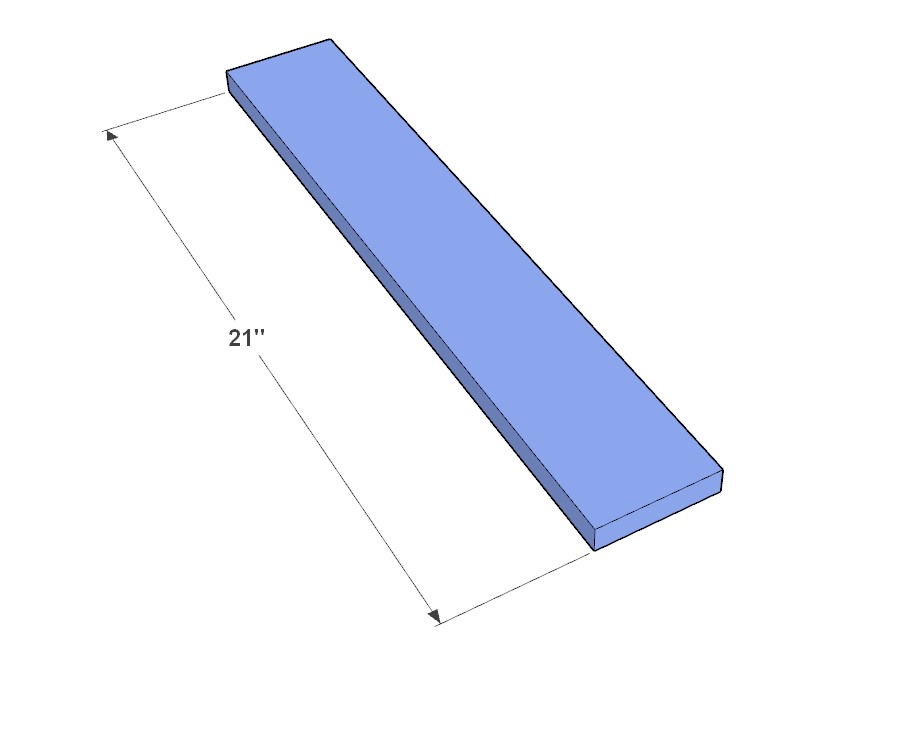
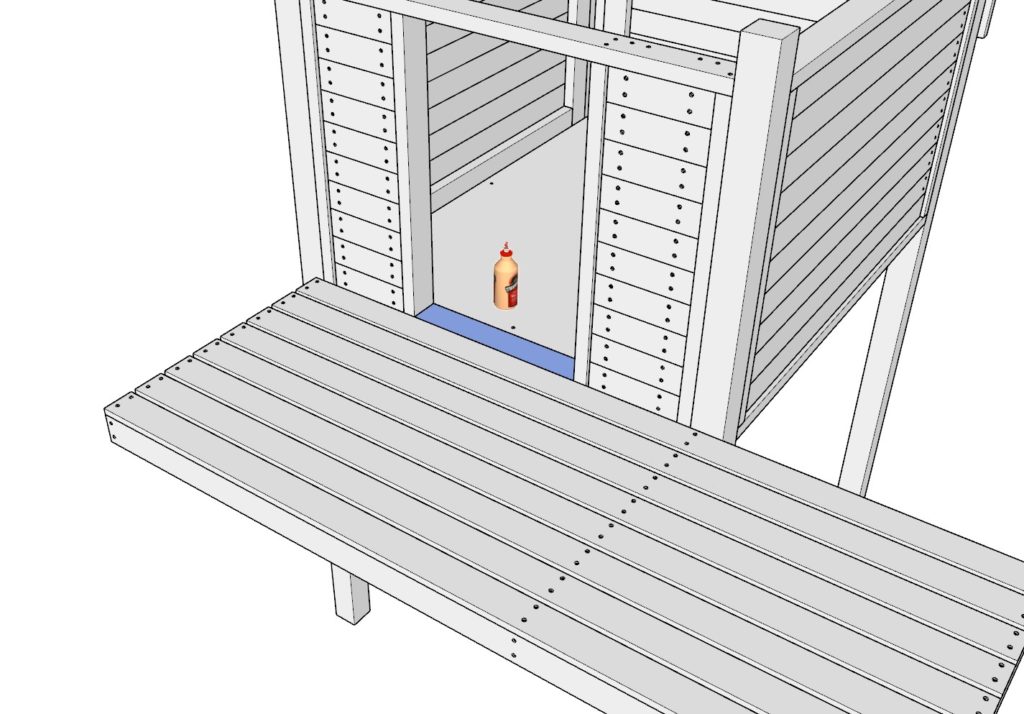
Install the Final Decking Piece:
- Take a small 21-inch 1×4 lumber piece and position it as indicated in the provided diagram, used to fill a remaining gap to complete the decking layout.
- For this piece, apply glue to the underside and use the pin nailer with 1.5-inch pin nails to secure it in place. The pin nails provide sufficient hold for smaller or less structurally critical pieces and maintain the neat appearance of the porch.
Pro Tip: When spacing the decking boards, consider using a spacer or a small piece of wood cut to the desired gap width to maintain consistent spacing between boards. This ensures a uniform appearance and functionality of the decking.
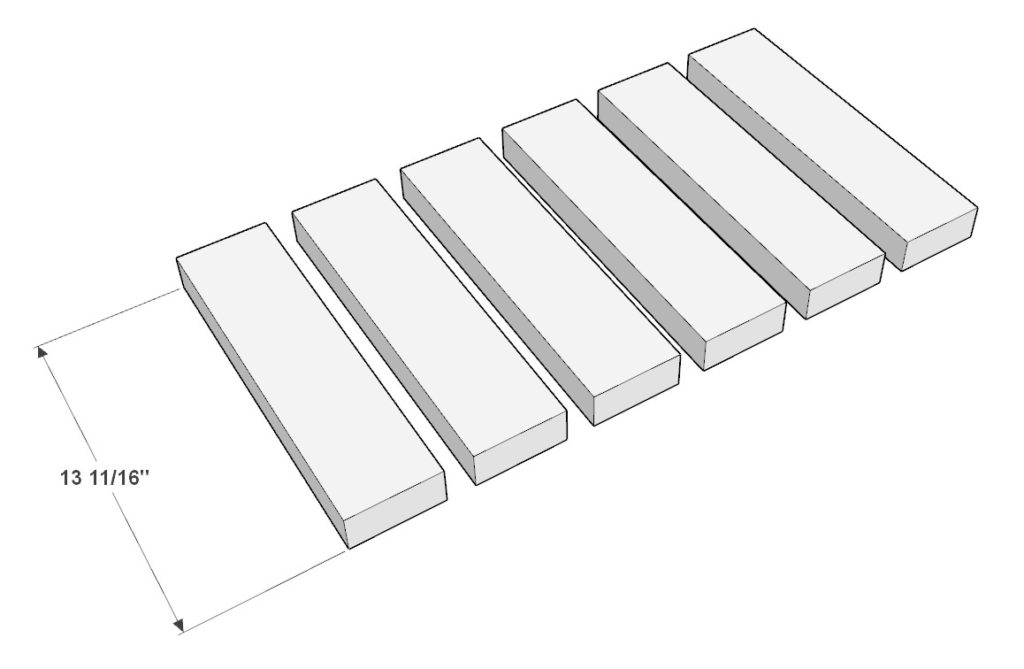
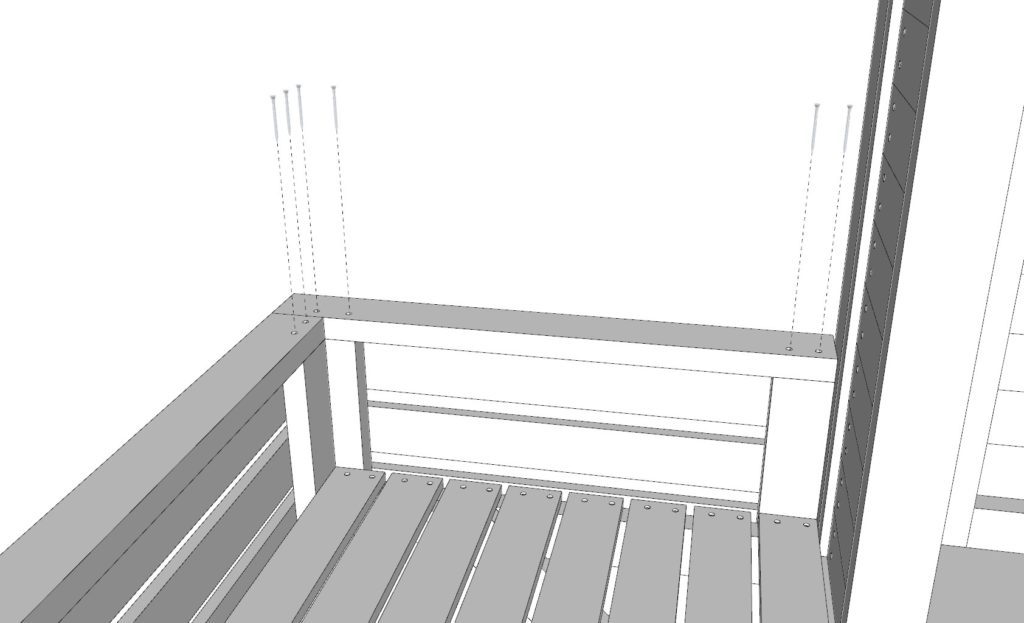
Step 14: Installing the Security Railing
Adding a security railing around the doghouse patio is essential for ensuring the safety and comfort of your pet. This step involves constructing a railing that encircles the patio, providing a barrier that prevents falls while also enhancing the overall aesthetics of the doghouse.
Install Vertical Supports:
- Begin by preparing six 13-11/16 inch 2×4 lumber pieces. These will serve as the vertical supports for the railing, spaced evenly around the perimeter of the patio.
- Secure each vertical support in place by applying wood glue to the bottom, pre-drilling holes to prevent the wood from splitting, and then fastening them to the patio frame with 2.5-inch screws. Ensure they are upright and evenly spaced according to the layout shown in the diagram.
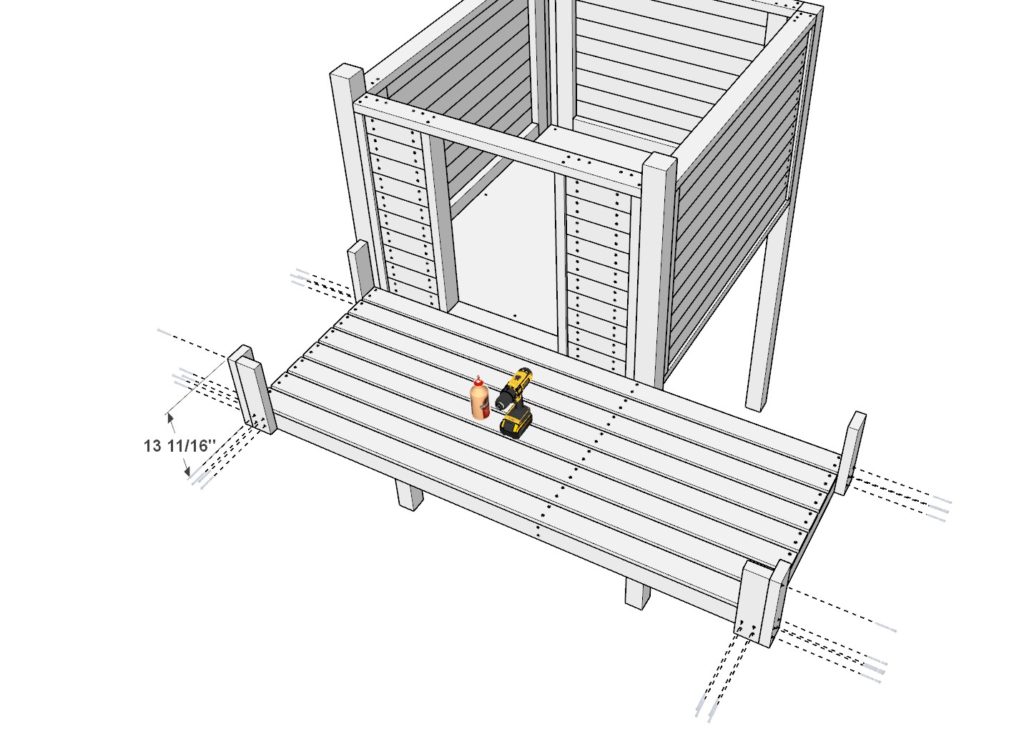
Attach Horizontal Railing Pieces:
- Next, take three 88-1/4 inch 1×4 lumber pieces and six 33 inch 1×4 lumber pieces. These will form the horizontal components of the railing, attached to the outside of the vertical supports.
- Space the 1×4 pieces as illustrated in the provided image, creating a balanced and visually appealing railing design. For each piece, apply glue to the ends, pre-drill holes, and secure with 1.5-inch screws. As an alternative, using a nailer with pin nails can simplify this step and provide a clean finish.
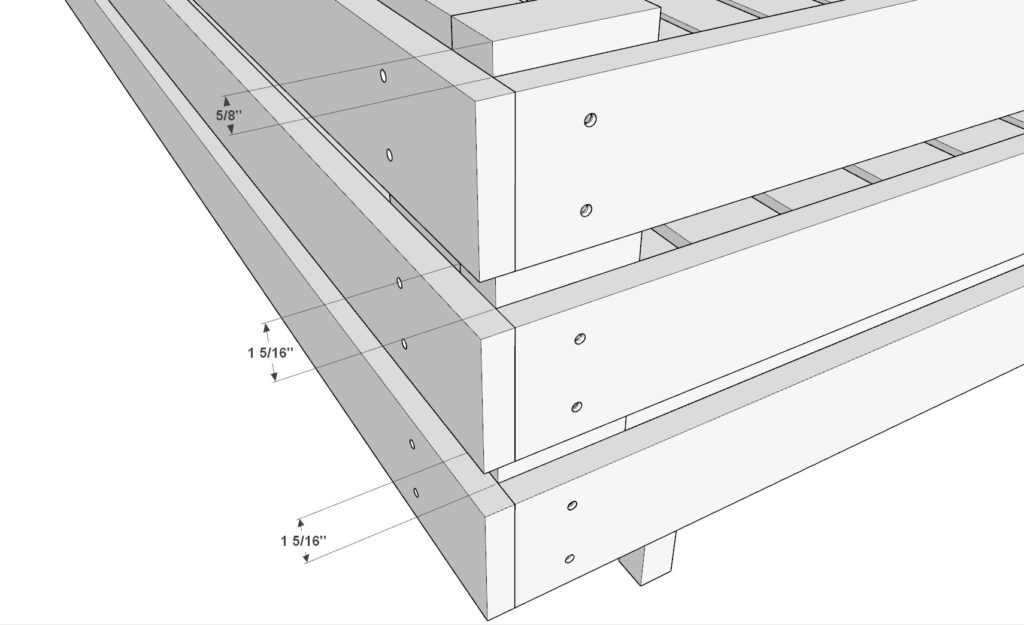
Complete the Railing with Top Pieces:
- Finally, add the top of the railing using two 35 inch 2×4 lumber pieces and one 83-3/4 inch 2×4 lumber piece. These pieces will sit atop the vertical supports, providing a smooth, finished look and additional structural integrity to the railing.
- Secure the top pieces by applying glue, pre-drilling holes, and fastening with 3.5-inch screws for a robust connection. Again, using a nailer with pin nails is an alternative method that may offer a neater appearance.
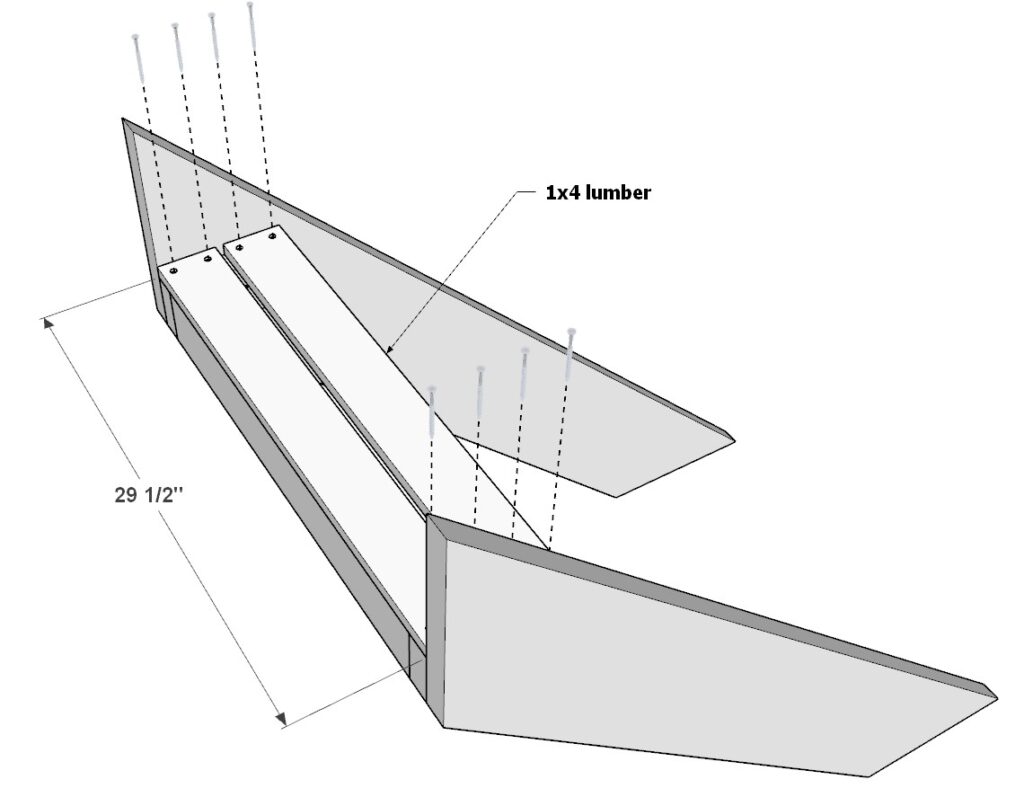
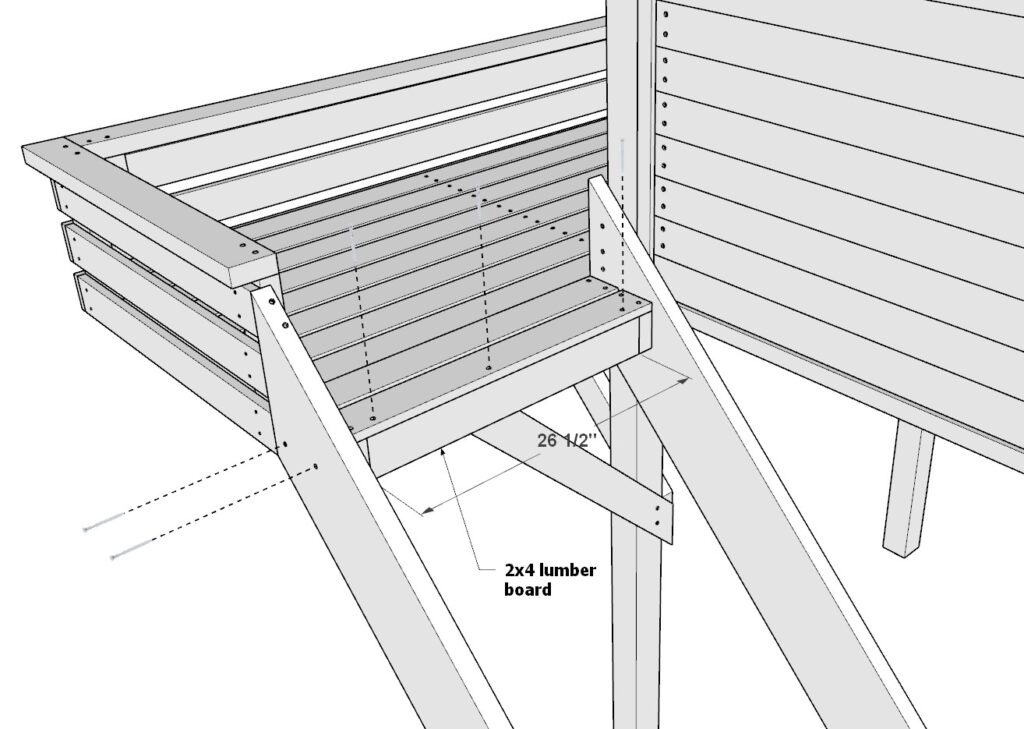
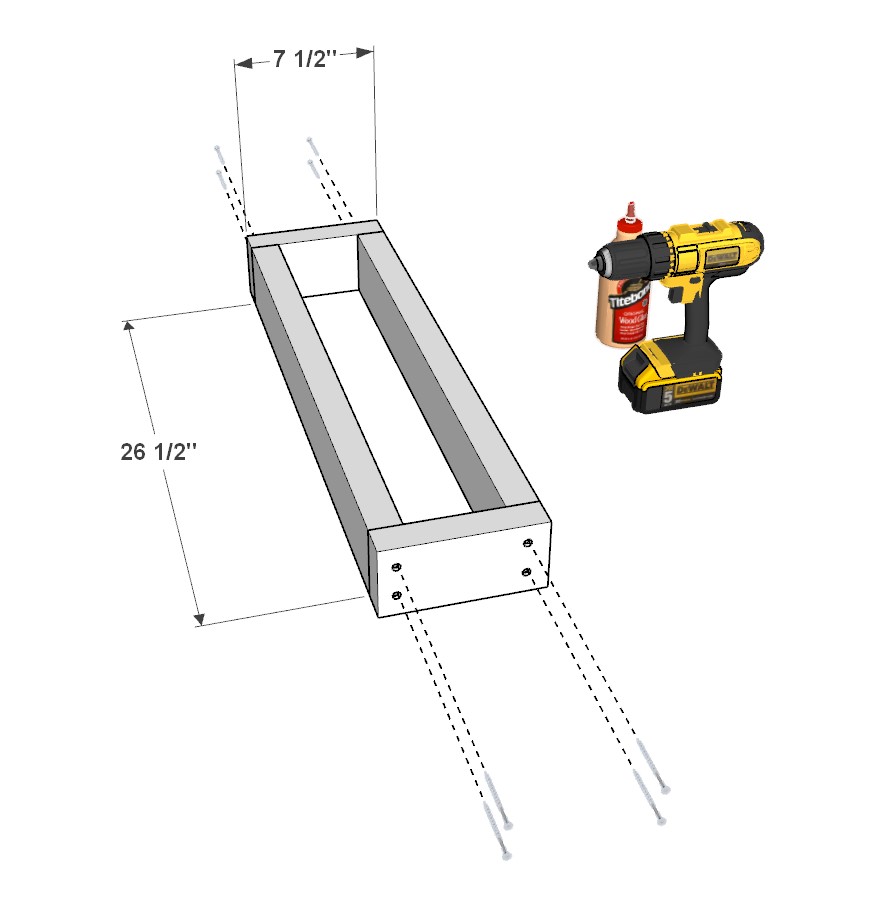
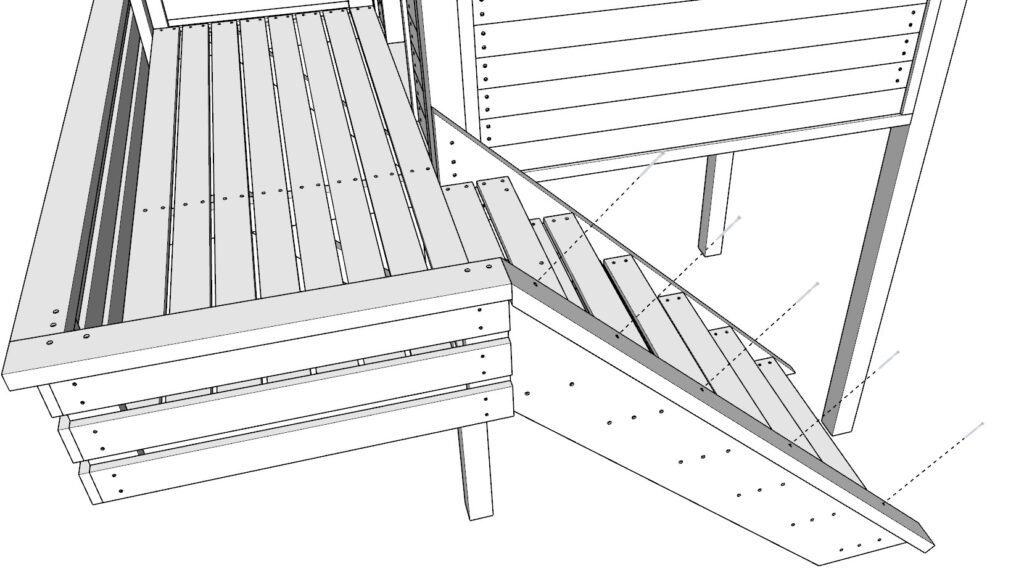
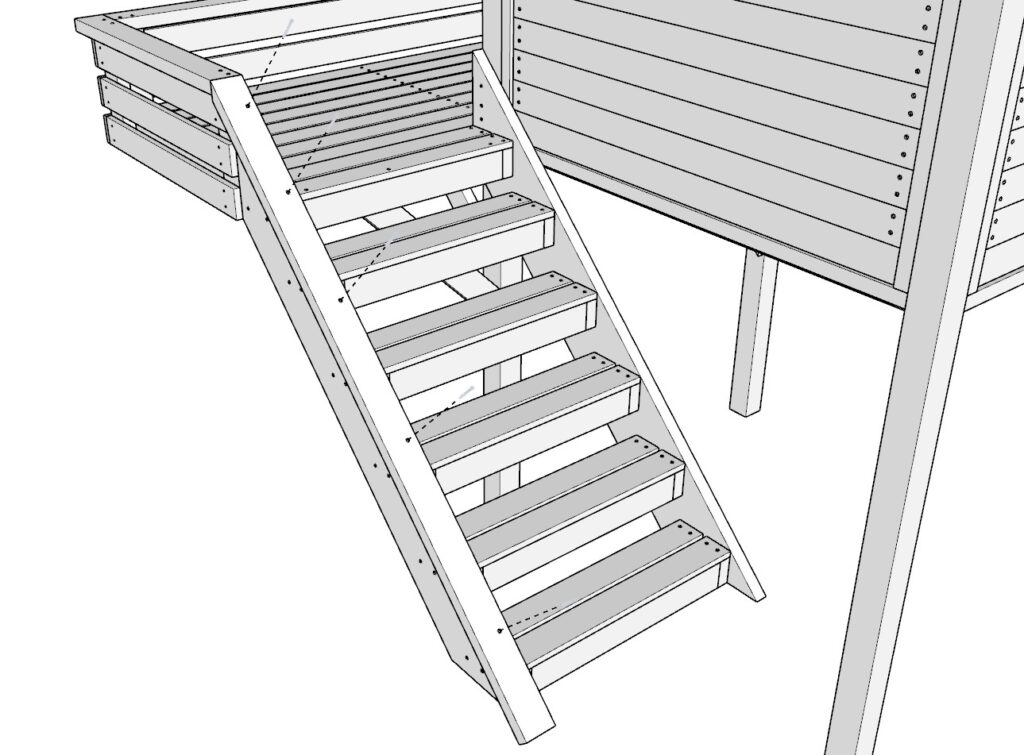
Step 15: Adding Stairs to the Doghouse
Incorporating stairs into your doghouse design improves accessibility, making it easier for your pet to enter and exit the raised structure. This step guides you through building and attaching a sturdy set of stairs.
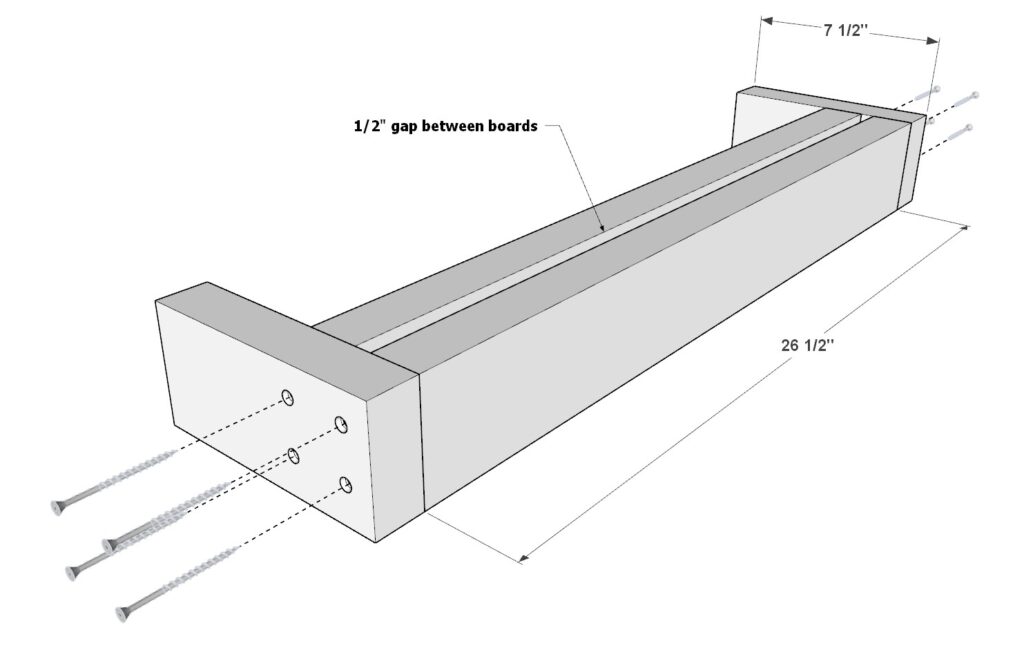
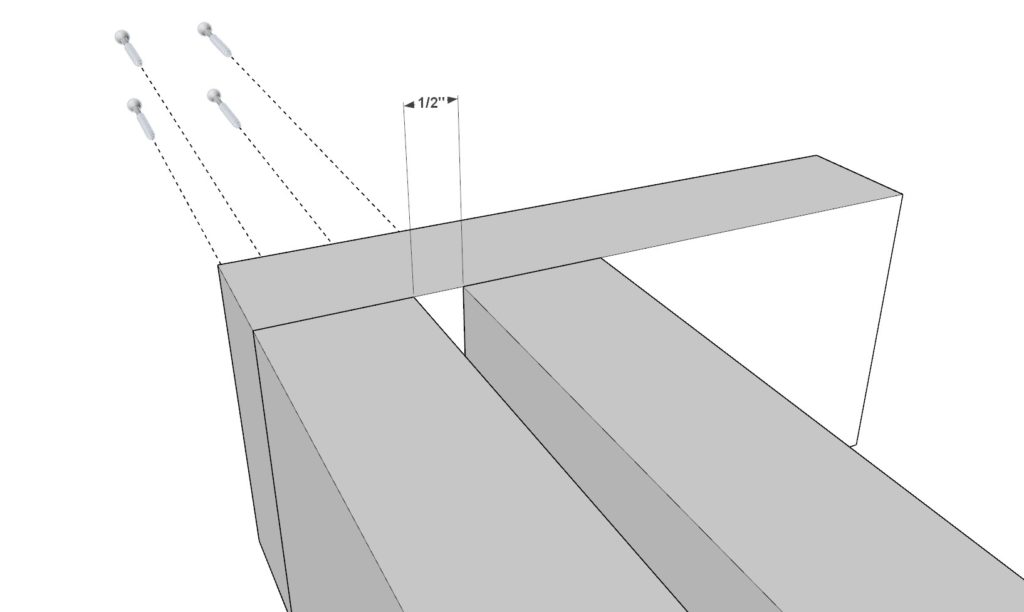
Construct the Stair Supports:
- Start by arranging two 7-1/4 inch 2×4 lumber pieces and two 26-1/2 inch 2×4 lumber pieces as indicated in the provided diagram. Ensure the two 26-1/2 inch pieces are spaced 1/2 inch apart to accommodate the stair treads properly.
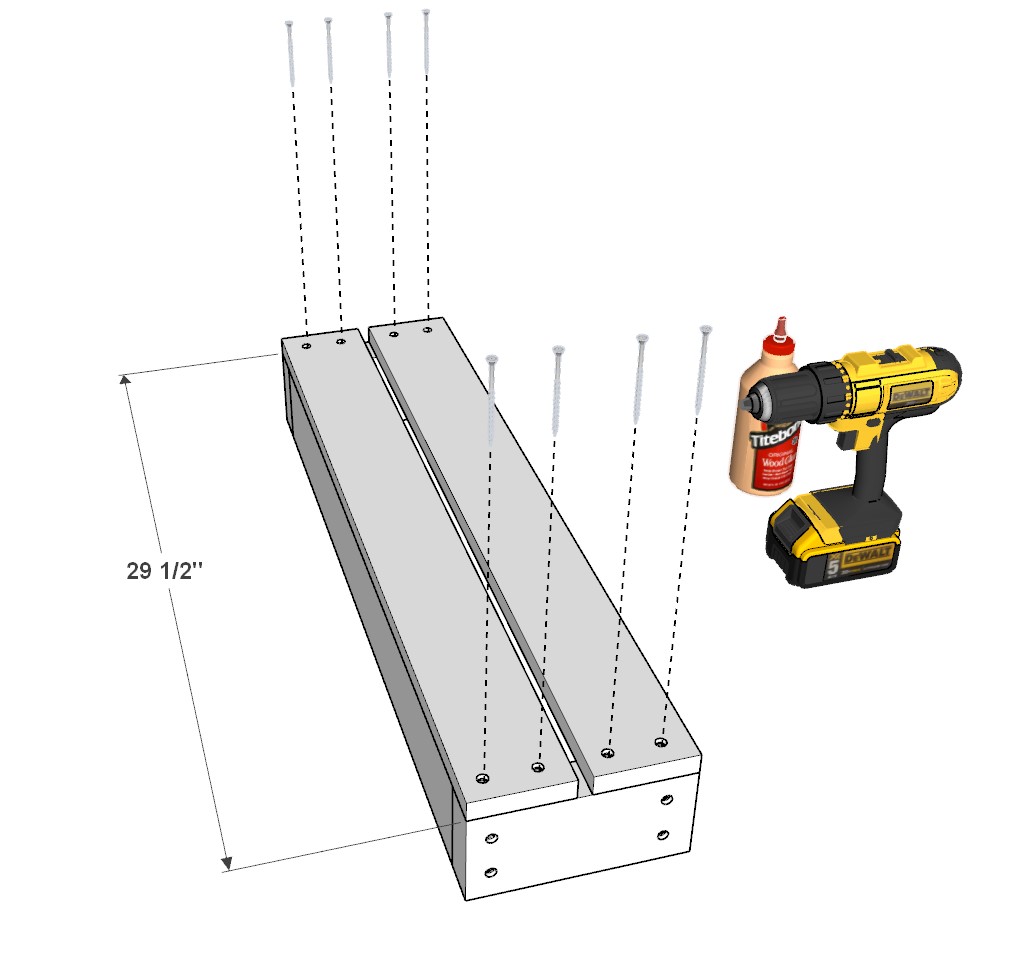
Prepare the Stringers:
- Cut two 69-5/8 inch long 2×10 lumber pieces, making sure both ends of each piece are cut at a 45-degree angle. These will serve as the stringers that support the stair steps.

Install the First Stair Step:
- Attach the first stair step to the 2×10 stringers. Position the step according to the instructions shown, then apply wood glue to the contact surfaces, pre-drill holes to avoid splitting, and secure the step with 2.5 inch screws. This initial step is crucial for establishing the correct rise and run of the stairs.
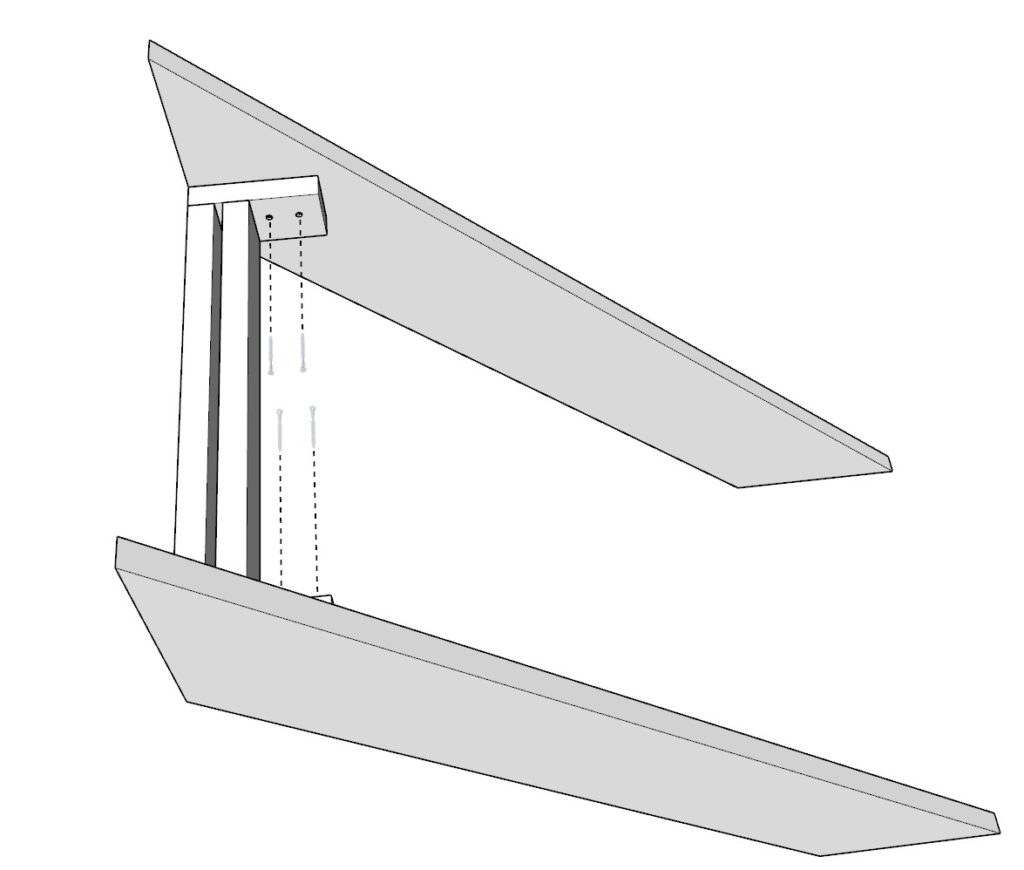
Add Treads to the First Step:
- Place two 29-1/2 inch long 1×4 lumber pieces on the first step to act as the tread. These provide a flat and stable surface for the step. Secure them using 2.5 inch screws and glue, ensuring they are evenly spaced and flush with the edges of the stair stringers. A pin nailer with 1.5 inch pin nails can also be used for a cleaner finish.
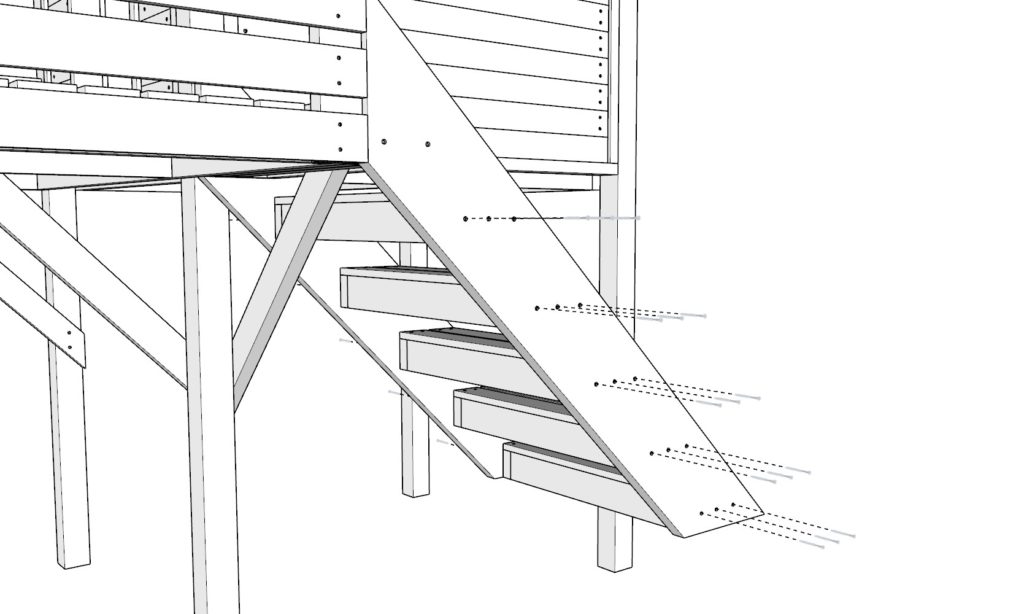
Attach the Stairs to the Doghouse:
- Finally, secure the assembled stairs to the patio and the main frame of the doghouse. The correct placement is crucial for stability and seamless integration with the structure. Apply glue to the areas of contact, pre-drill holes to ensure a secure attachment without wood damage, and fasten with 3.5 inch screws.

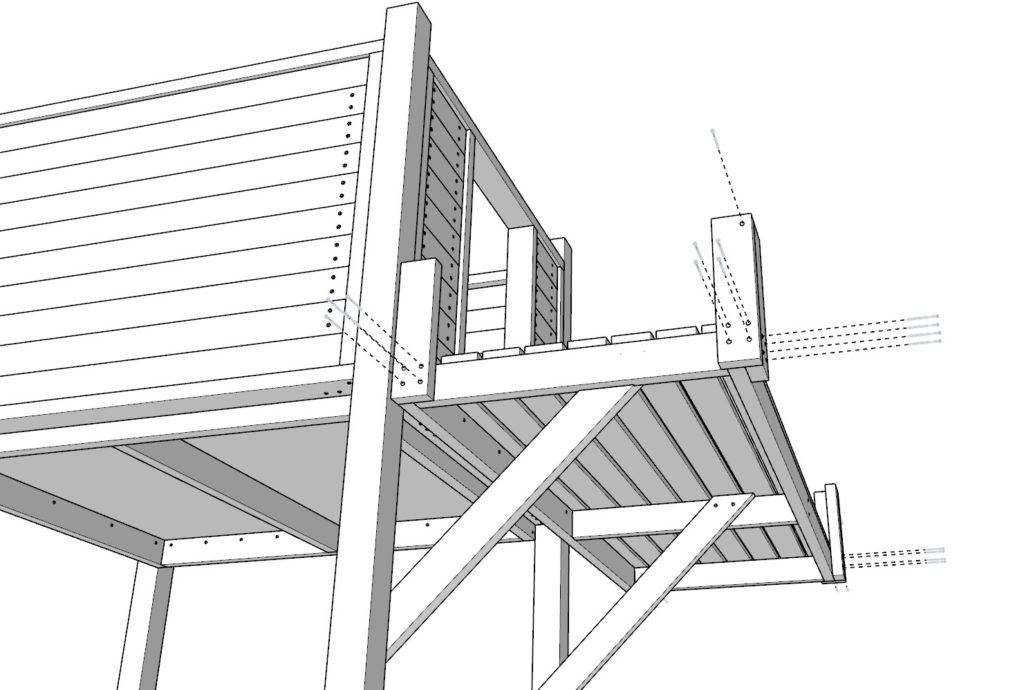
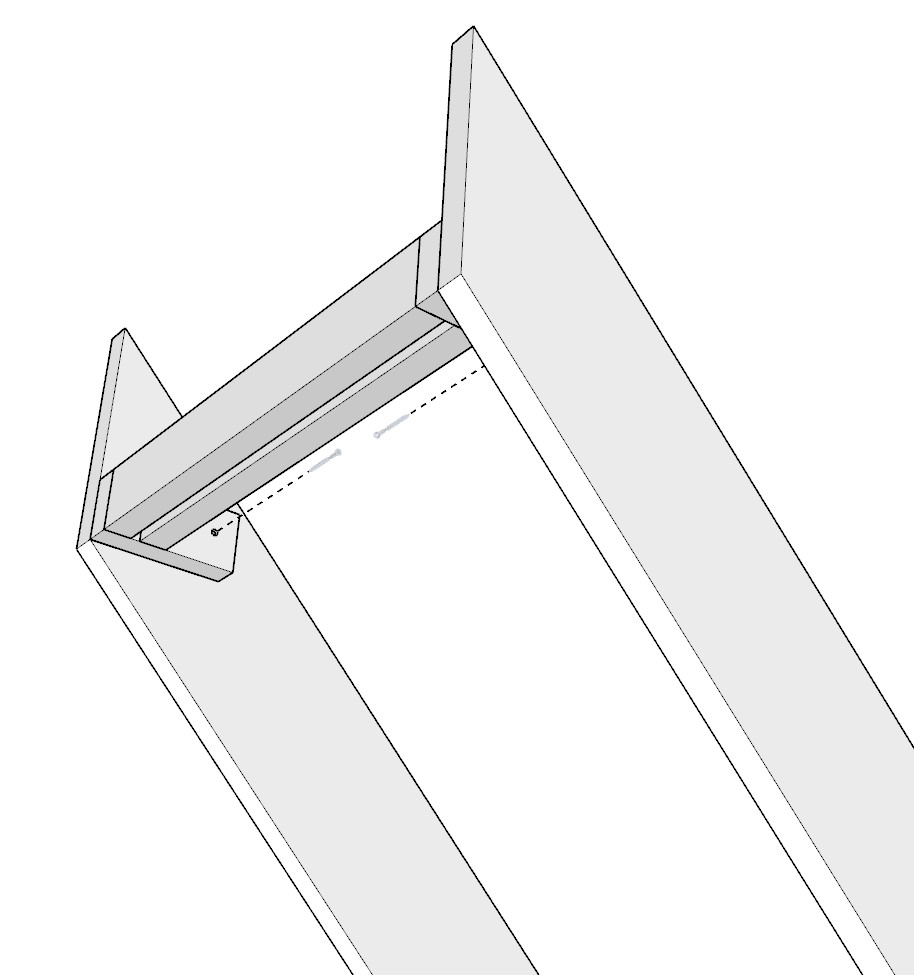
Step 16: Reinforcing the Staircase
To ensure the staircase attached to your doghouse is sturdy and safe for your pet, this step involves adding crucial reinforcements. These enhancements will provide additional support and durability to the stairs, ensuring they can withstand regular use without compromising safety.
Attach the Angled Reinforcement Piece:
- Utilize the 40-1/2 inch 2×4 lumber piece reserved from a previous step, which has been cut at a 45-degree angle on both ends. This piece will act as a diagonal brace, adding structural integrity to the staircase.
- Position this piece as indicated in the diagrams provided, ensuring it aligns properly with the stringers and the steps of the staircase. Apply wood glue to the contact points before positioning the brace to ensure a strong bond.
- Secure the brace to the staircase using 3.5 inch screws. Pre-drill holes to prevent splitting the wood and to ensure a tight, secure fit. This reinforcement not only strengthens the stairs but also helps distribute weight more evenly across the structure.

Close Up the First Step:
- Take a 26-1/2 inch 2×4 lumber piece and use it to close up the open space beneath the first step. This piece will act as both a cosmetic enhancement and an additional structural support.
- Position the lumber piece so that it fills the gap directly under the first tread of the stairs. Apply glue to the ends of the lumber piece where it will make contact.
- Secure the lumber piece in place with 3.5 inch screws, again pre-drilling holes to ensure a secure attachment without damaging the wood.
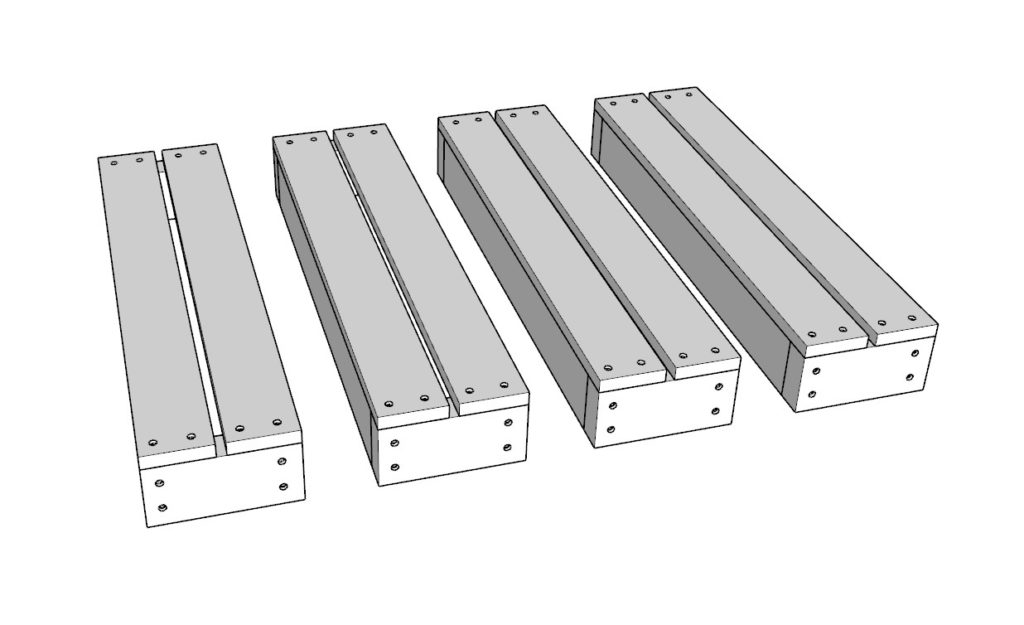
Step 17: Assembling and Attaching Stair Steps
Creating a functional and safe staircase for your doghouse involves adding individual steps and a railing for additional support. This step focuses on assembling these stair steps and securely attaching them to the staircase structure.
Assemble the Stair Steps:
- Begin by arranging two 7-1/2 inch 2×4 lumber pieces and two 26-1/2 inch 2×4 lumber pieces for each step, as outlined in the provided diagram. These pieces form the frame for each step.
- Secure the frame pieces together by applying wood glue at the joints, pre-drilling holes to avoid splitting the wood, and fastening with 3.5-inch screws. Ensure the frame is square and sturdy.
Add the Step Top:
- For the top of each step, use two 29-1/2 inch 1×4 lumber pieces. These pieces provide the flat surface of the steps.
- Attach these top pieces to the frame with wood glue and secure them using 2.5-inch screws. Alternatively, for a cleaner finish, you can use a pin nailer with appropriate-length pin nails.
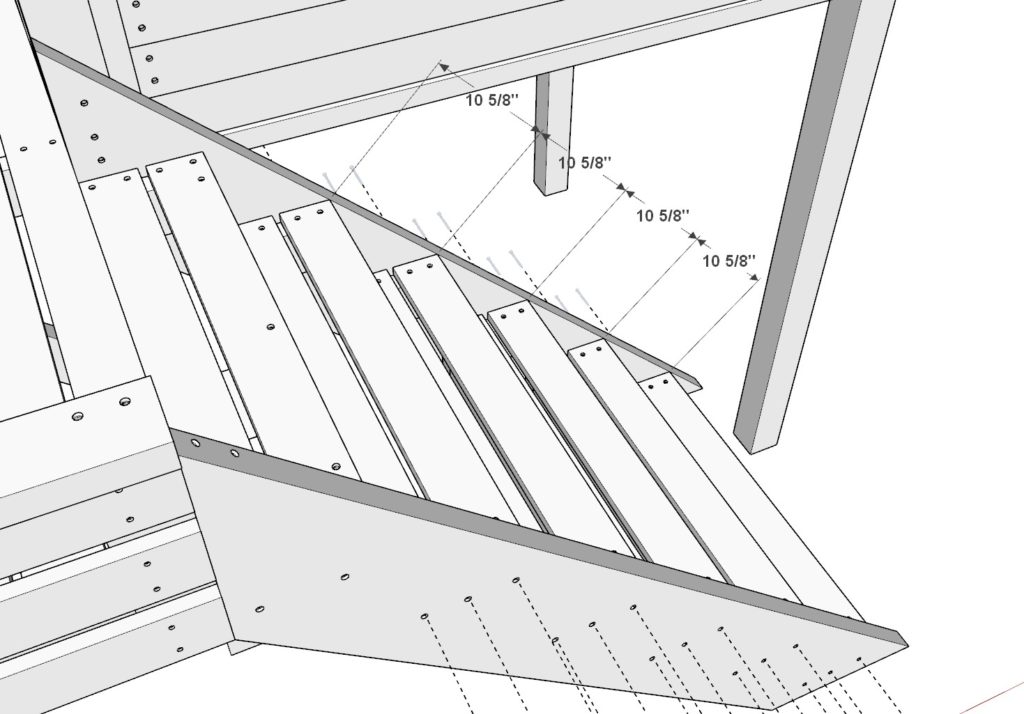
Attach Steps to the Staircase:
- Construct a total of four steps following the assembly process outlined above.
- Attach these steps to the prepared staircase structure, spacing them approximately 10-5/8 inches apart for even and comfortable step height. Use the provided images as a guide for proper placement.
- Secure each step to the staircase with wood glue and 2.5-inch screws, ensuring they are pre-drilled to maintain the integrity of the wood and provide a secure attachment.

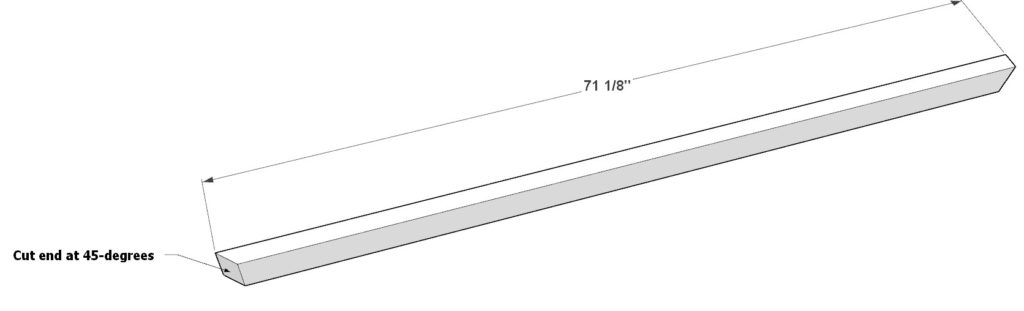
Install the Staircase Railing Top:
- Take a 71-1/8 inch long 2×4 lumber piece and cut one end at a 45-degree angle to match the angle of the staircase railing.
- Position this piece as the top of the staircase railing, following the diagram for accurate placement. This railing top adds a finished look and provides additional support.
- Secure the railing top to the staircase railing with wood glue and 3.5-inch screws, pre-drilling holes to ensure a strong, lasting connection.
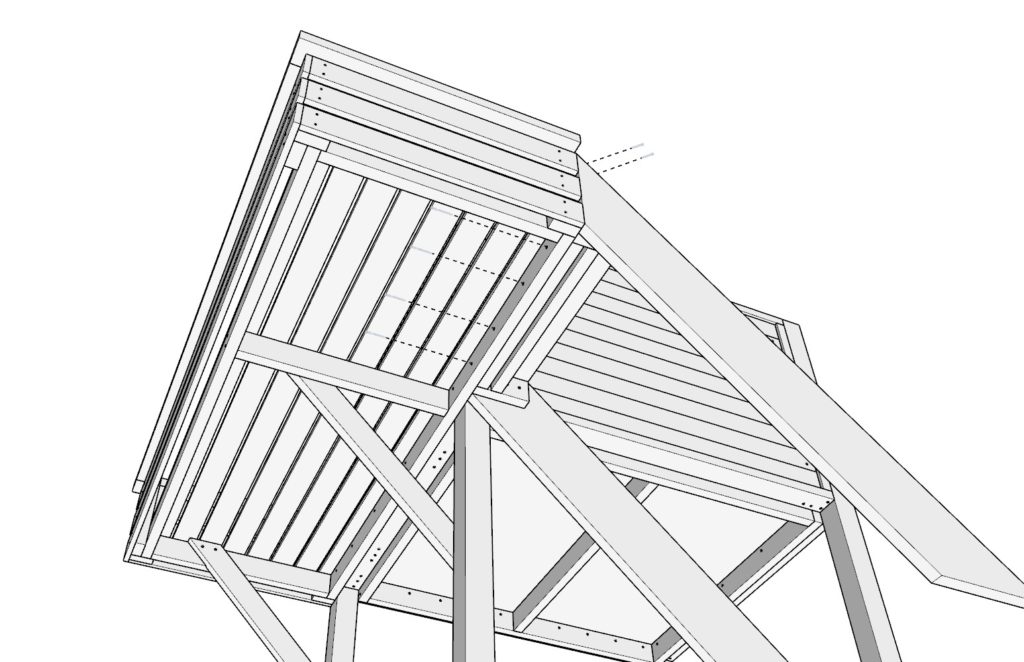
Step 18: Adding the Roof to the Doghouse
The final major construction step for your DIY doghouse involves assembling and attaching the roof. A solid roof not only provides shelter and protection from the elements but also adds to the overall aesthetic appeal of the structure.
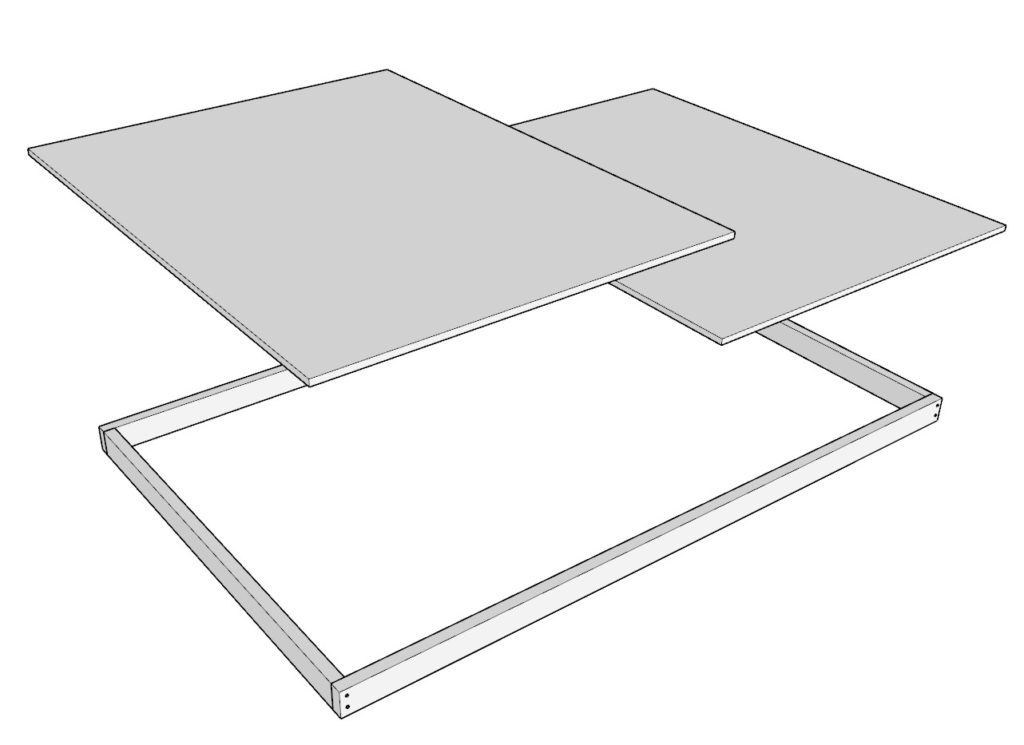
Assemble the Roof Frame:
- Begin by taking two 92-inch 2×4 lumber pieces and two 55-inch 2×4 lumber pieces. Arrange them to form the rectangular frame for the roof, following the layout provided in the instructions.
- Secure the frame by applying wood glue at the joints, pre-drilling holes to prevent the wood from splitting, and fastening with 3.5-inch screws. Ensure that the frame is square and sturdy.

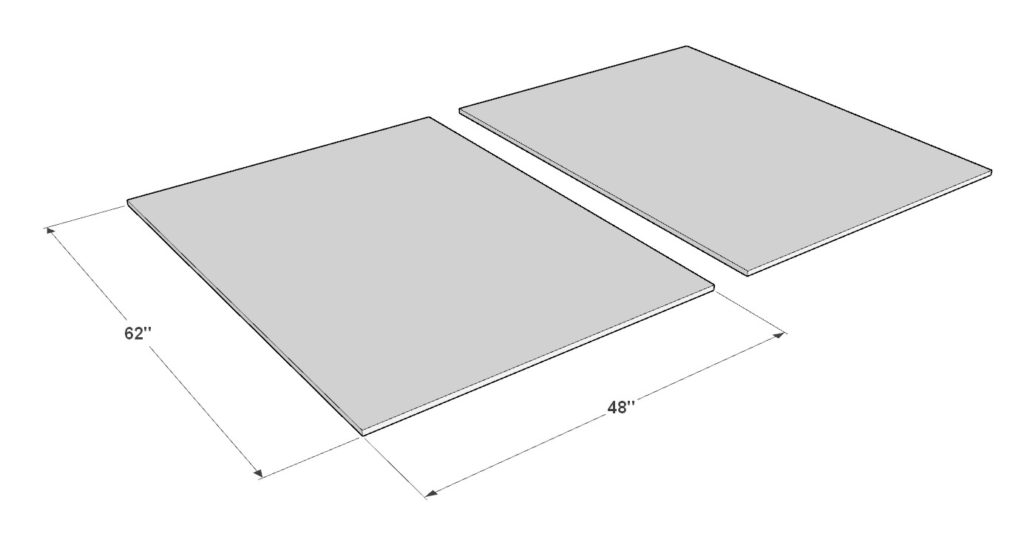
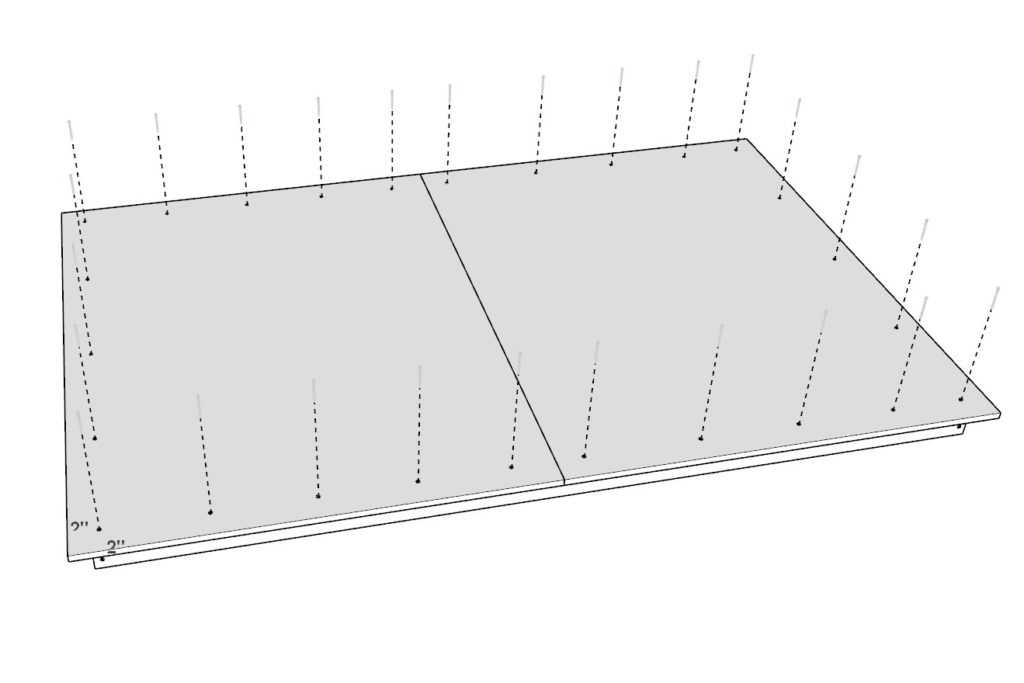
Attach the Plywood Sheets to the Roof Frame:
- Prepare two plywood sheets measuring 48 inches by 62 inches each. These sheets will cover the roof frame, providing a solid surface for the roof.
- Place the plywood sheets on top of the assembled roof frame. The sheets should overlap the frame by 2 inches on all sides, ensuring complete coverage and overhang for water runoff.
- Secure the plywood to the frame with 3.5-inch screws, applying wood glue between the plywood and the frame for added durability. Make sure to pre-drill the plywood to prevent splitting.
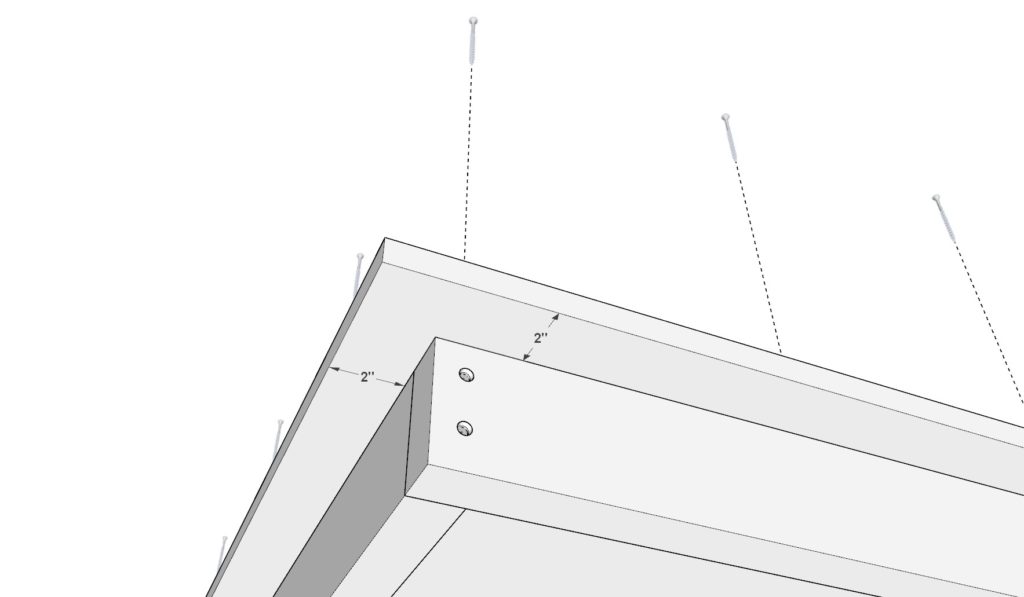
Install the Roof on the Doghouse:
- With the help of a friend, carefully lift the assembled roof component and position it atop the doghouse. Align the front edge of the roof with the front pillars and the back edge with the back pillars. Slide the roof towards the patio until it reaches its designated position.
- Once the roof is properly aligned and seated on the doghouse, attach it by driving 3.5-inch screws directly into the 4×4 lumber pillars from the top of the roof. This direct attachment method ensures the roof is securely fastened to the structure and will withstand weather conditions.
Step 19: Finishing Touches - Paint, Stain, Roofing, and Maintenance
This comprehensive guide covers the final touches to your doghouse, including preparation for painting or staining, proper application techniques, roofing options, and essential maintenance tips to ensure longevity.
Preparing Wood for Painting or Staining:
- Sanding: Start by sanding the wood surface with medium-grit sandpaper (120-150 grit) to remove any rough spots or imperfections. Progress to fine-grit sandpaper (220 grit) for a smooth finish.
- Cleaning: Use a tack cloth or a slightly damp cloth to remove all dust from sanding. Ensure the wood is completely dry before applying paint or stain.
- Priming (for painting): Apply a quality wood primer to ensure even paint coverage and to increase paint adhesion. Let it dry according to the manufacturer’s instructions.
Painting Properly:
- Choose Exterior Paint: Select a high-quality exterior paint suitable for wood surfaces. Exterior paint will provide durability and protection against weather.
- Application: Use a high-quality brush or roller for application. Apply the paint in thin, even coats to avoid drips or brush marks. Allow each coat to dry thoroughly before applying the next.
- Finishing: Typically, two to three coats will achieve a solid, even color. For added protection, consider a final coat of clear polyurethane.
Staining Properly:
- Selecting Stain: Choose an exterior wood stain. Stains come in various opacities from transparent to solid, depending on the desired appearance.
- Application: Apply the stain with a brush, following the wood grain. Work in manageable sections, wiping away excess stain with a clean rag to achieve an even finish.
- Sealing: After the stain has dried, apply a clear wood sealer to protect against moisture and UV damage.
Adding Shingles to the Roof:
- Underlayment: Before shingling, install roofing felt or a similar underlayment to provide an extra layer of protection against leaks.
- Shingle Installation: Start at the bottom edge of the roof and work your way up, overlapping shingles according to the manufacturer’s instructions.
- Finishing: Secure the shingles with roofing nails, and apply a bead of roofing sealant along the edges and over nail heads for additional waterproofing.
Installing a Metal Roof:
- Preparation: Cut metal panels to size, allowing for a slight overhang. Install a weather-resistant barrier over the roof frame.
- Attachment: Secure the metal panels using screws designed for metal roofing, spaced according to the panel manufacturer’s guidelines.
- Sealing: Apply a sealant along the edges and over screws to prevent leaks.
Maintaining the Doghouse:
- Regular Inspections: Check annually for any signs of wear, including loose shingles, cracked paint, or rot.
- Cleaning: Clean the doghouse regularly, removing debris and washing the exterior with a mild soap solution.
- Reapply Finish: Depending on exposure to elements, repaint or re-stain the doghouse every 2-3 years to maintain its protective coating.
- Pest Control: Check for and address any signs of pests that could damage the wood.
By following these detailed, professional steps, you ensure not only a visually appealing finish for your doghouse but also protect and extend its lifespan, providing a safe and comfortable shelter for your furry friend for many years.

Step 20: Taking The Doghouse To The Next Level
Enhancing your DIY doghouse with solar-powered features not only elevates its functionality but also promotes sustainability. This step delves into adding solar lights, a solar-powered heater, and the possibility of integrating powered amenities for ultimate comfort and convenience.
Solar Lighting for the Porch
Benefits for Your Dog:
- Security: Provides illumination, making the doghouse welcoming and safe during the night.
- Comfort: A well-lit porch allows your dog to navigate and relax outside after dark.
Choosing the Perfect Solar Light:
- Brightness: Look for lights that offer sufficient brightness without being overwhelming.
- Durability: Opt for weather-resistant models suitable for outdoor use.
- Battery Life: Select a light with a long battery life to ensure night-long operation.
- Style: Choose a design that complements the aesthetic of the doghouse.
Installation Guide:
- Positioning: Place the solar panel in a location where it receives maximum sunlight.
- Mounting: Follow the manufacturer’s instructions to securely mount both the solar panel and the light fixture. Typically, this involves screwing the base into the doghouse structure.
- Connection: Connect the solar panel to the light, ensuring all connections are secure and waterproof.
Solar-Powered Unit Heater
Installation Guide:
- Selection: Choose a solar heater designed for small spaces, ensuring it’s suitable for the dimensions of your doghouse.
- Placement: Install the unit inside the doghouse, preferably on a wall opposite the entrance for optimal heat distribution.
- Solar Panel Installation: Mount the accompanying solar panel on the roof or a nearby location with unobstructed sun exposure.
- Connection: Connect the heater to the solar panel as per the instructions, ensuring all cables and connections are safely secured and insulated.
Adding Power to the Doghouse
Integrating electrical power into the doghouse allows for additional amenities such as powered heaters and lights. However, this process is significantly more complex and requires professional expertise.
Important Legal Disclaimer: GoodDIYplans does not assume responsibility for any issues, damages, or injuries resulting from electrical installations within the doghouse. Electrical work poses significant risks and must comply with local building codes and regulations. It is strongly advised that you hire a qualified, licensed electrician or contractor to undertake any electrical enhancements. By choosing to add electrical power, you acknowledge the potential risks and agree that GoodDIYplans is not liable for any adverse outcomes. Always prioritize safety and legal compliance in your DIY projects.
Conclusion
Enhancing your doghouse with solar-powered lights and a heater unit significantly improves the comfort, safety, and usability of the space for your furry friend. While solar enhancements can be a DIY project, incorporating powered amenities should be handled by professionals. This step towards a more advanced, comfortable, and sustainable doghouse ensures your pet enjoys their home to the fullest, day and night.