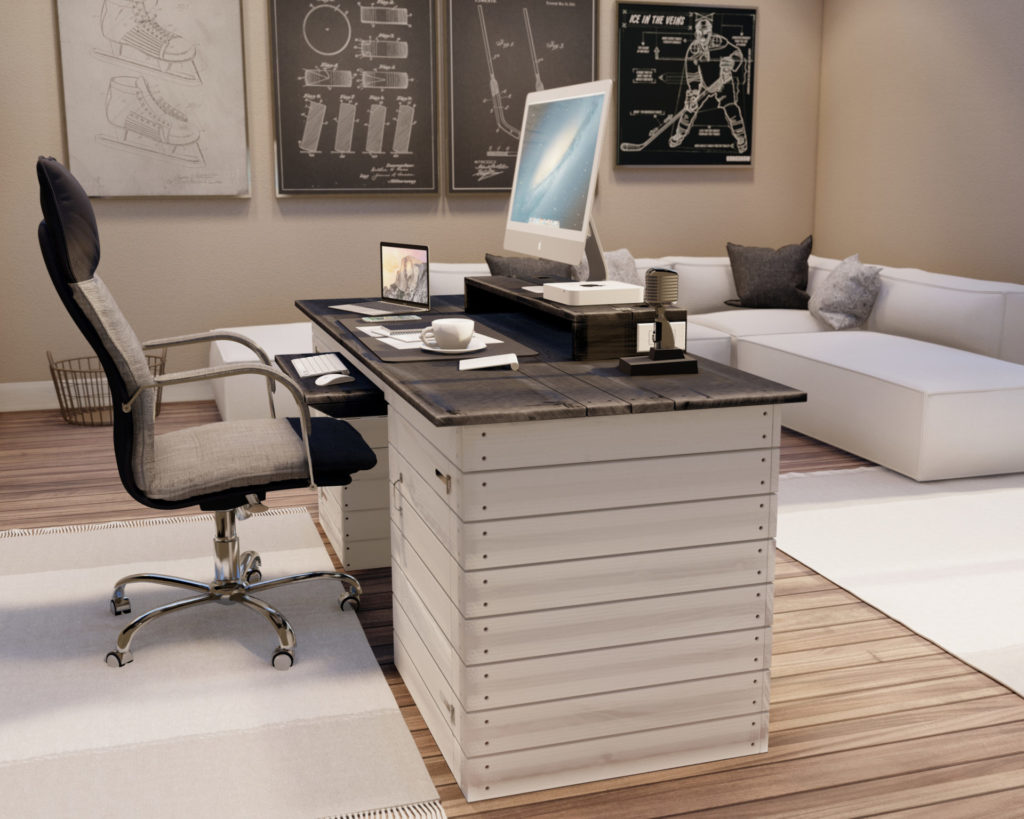
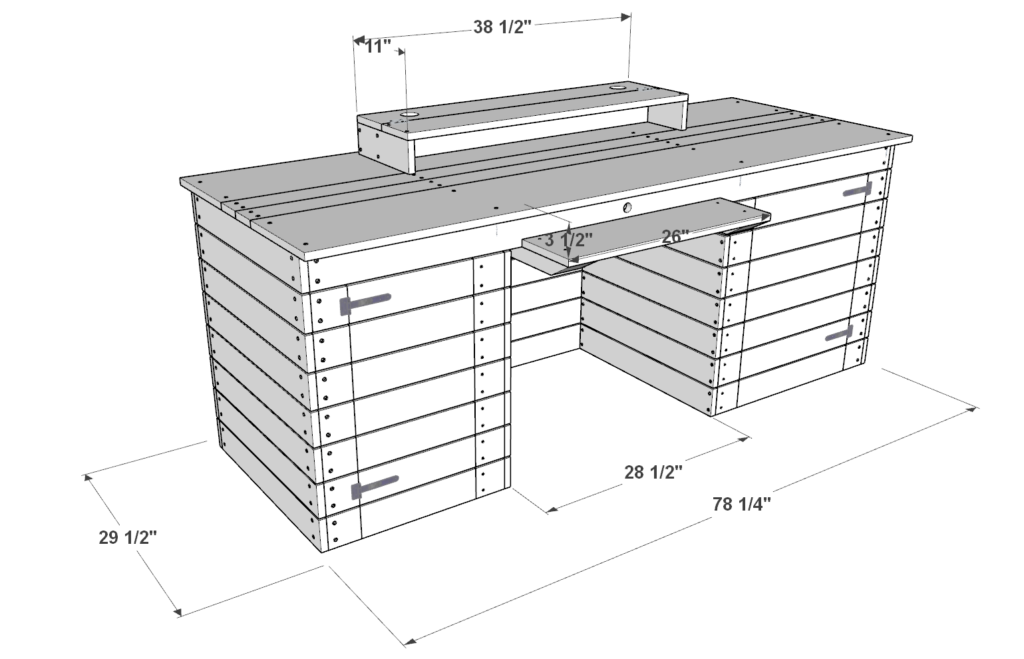
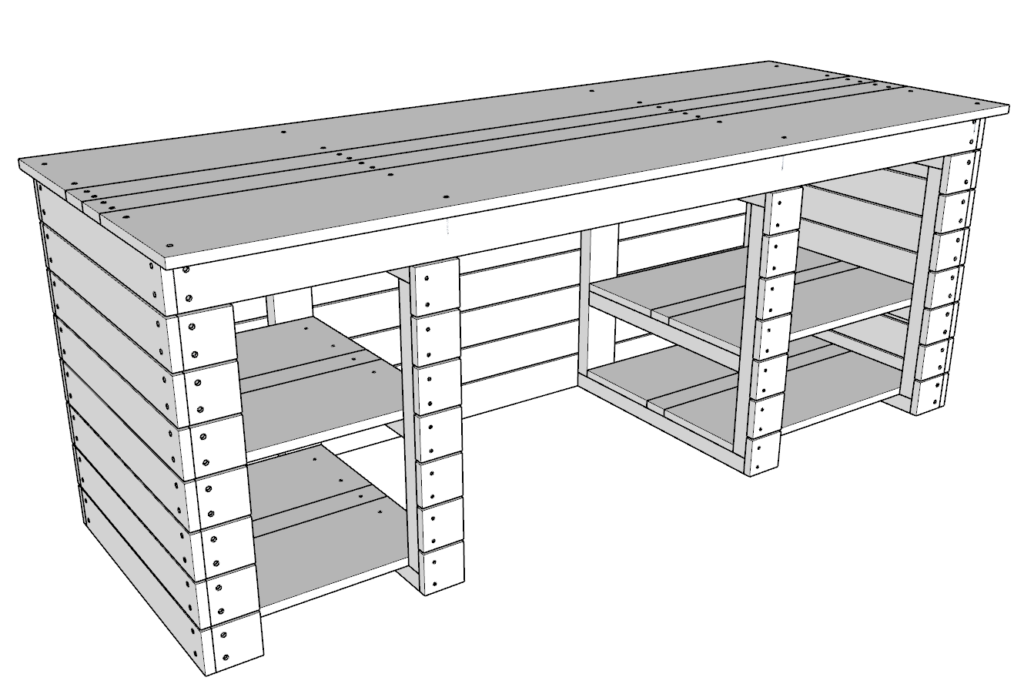
Why choose this DIY desk design?
This DIY computer desk is ergonomic, provides plenty of storage, is aesthetic, and simple to build. If you are looking for desk ideas for a work desk, gaming desk, or office desk, then look at this exciting design! Some of the important features of this DIY computer desk are listed below.
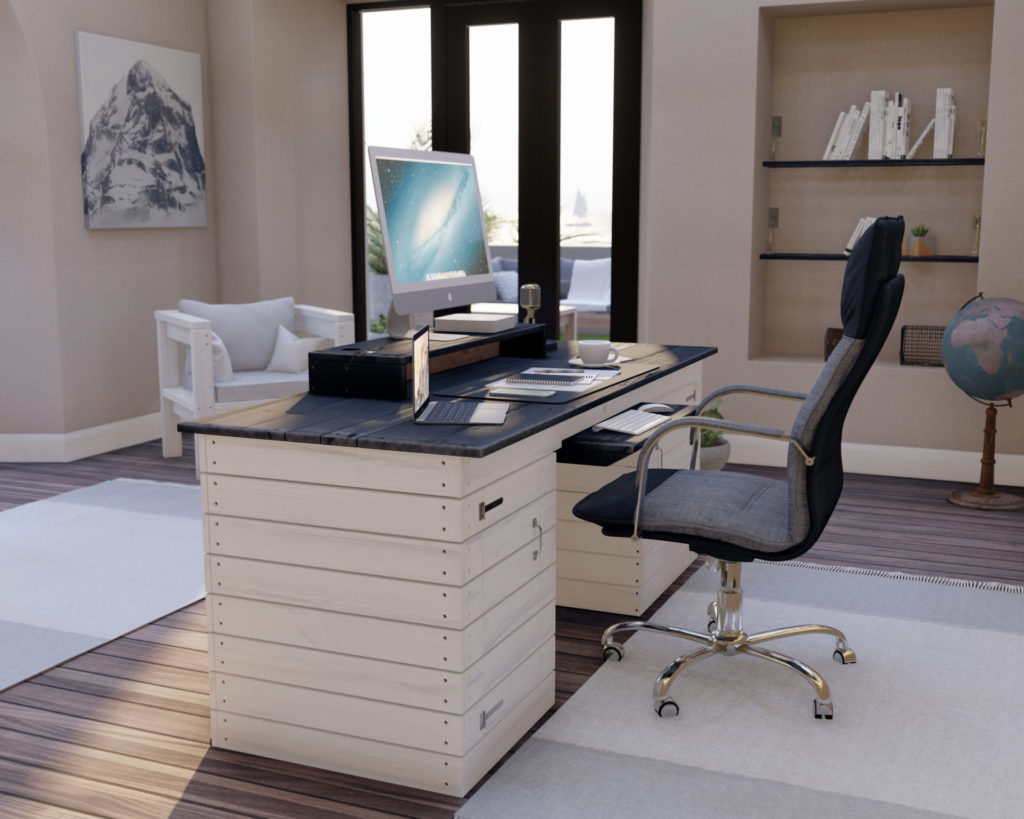
DIY desk is Ergonomic
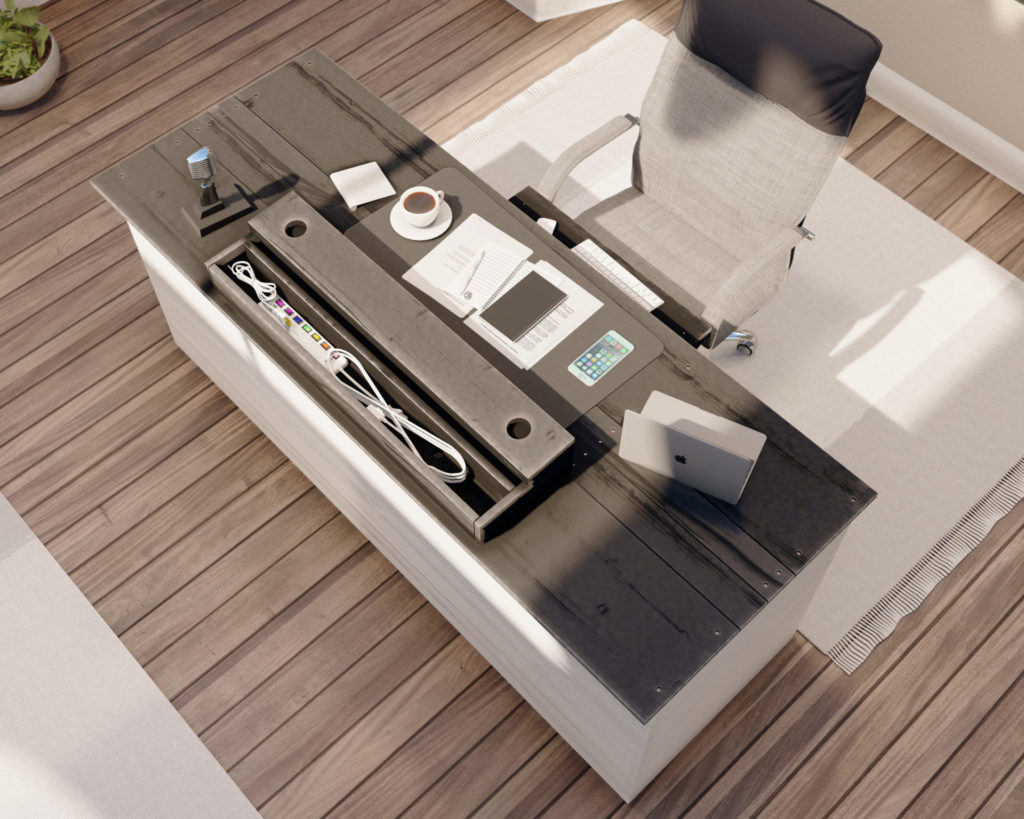
- The raised platform where the office PC, monitor, or laptop stands is elevated to allow for the top of the computer screen to be at eye level. This reduced neck stain and helps the back to remain in a neutral position without extra slumping one would have with a screen below eye level.
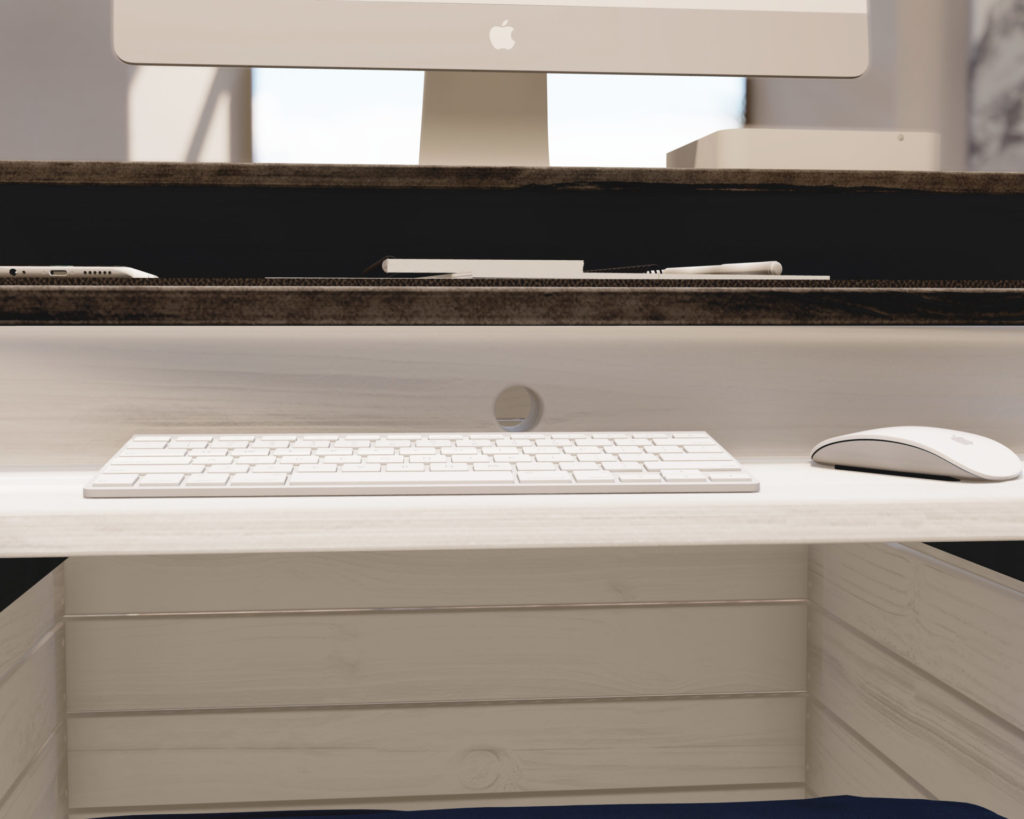
- The keyboard and mouse platform is lower than the computer desktop. This reduces wrist stain by allowing the arms to remain at a more neutral 90-degree angle when typing or mousing. This helps reduce developing soft tissue injuries like carpel tunnel.
DIY desk has storage and allows optimal organization
- The raised platform upon which the monitor stands doubles as additional storage. One can insert slide out cubbies to store small and commonly used items like pens, sticky notes, dry erase makers, highlighters, printer ink and toner, office stationery, etc. This platform also has a separate storage system to extension cords, outlets, and cables. This not only organized the desktop to look more neat, but it also hides the unwanted cords out of sight.
- The desk has plenty of workspace on the desktop to accommodate office equipment such as office phones, laptops, iPad, speakers, etc. More space means that you can remain organized and on task when working.
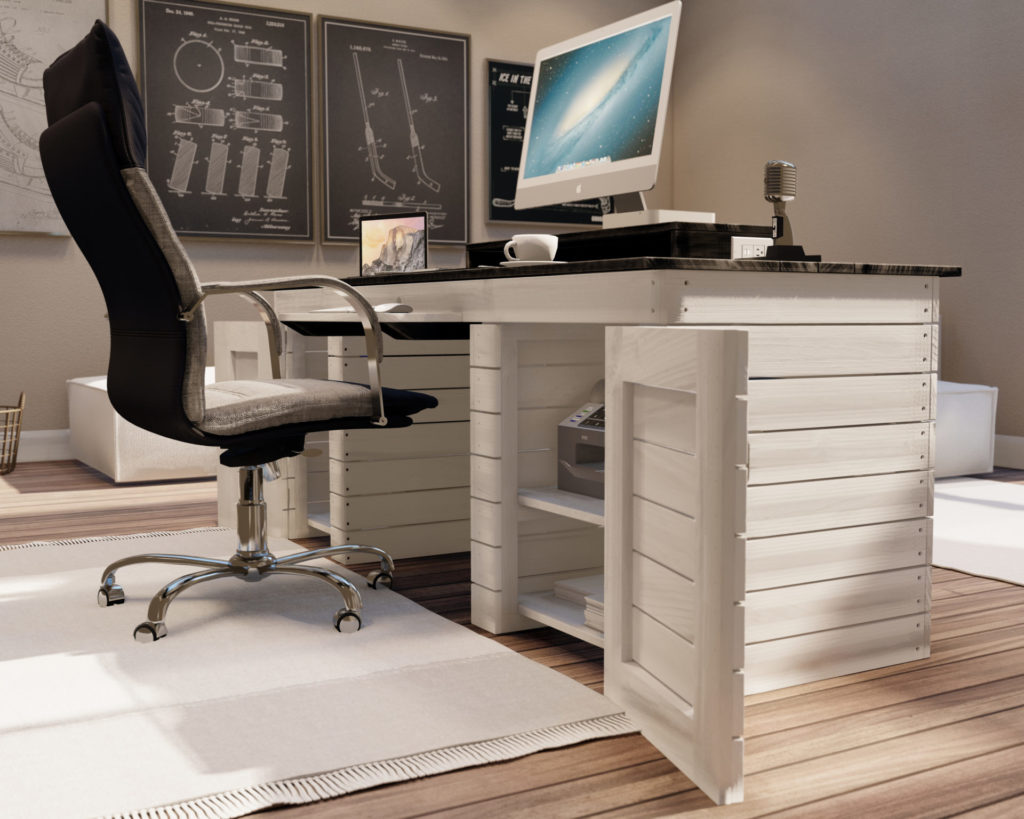
- One of the most useful features of the office desk is the ability to hide larger office equipment in the storage cabinets below. Bulky items like office printers, gaming computers, networking tools (like routers), power strips, surge protectors, backup storage hard drives, etc., can all be tucked away and out of sight. The slats in the wood allow for ventilation to prevent these expensive pieces of equipment from overheating.
- The keyboard and mouse cords are also tucked out of the way by passing the cords through the opening that feeds into the center of the desk.
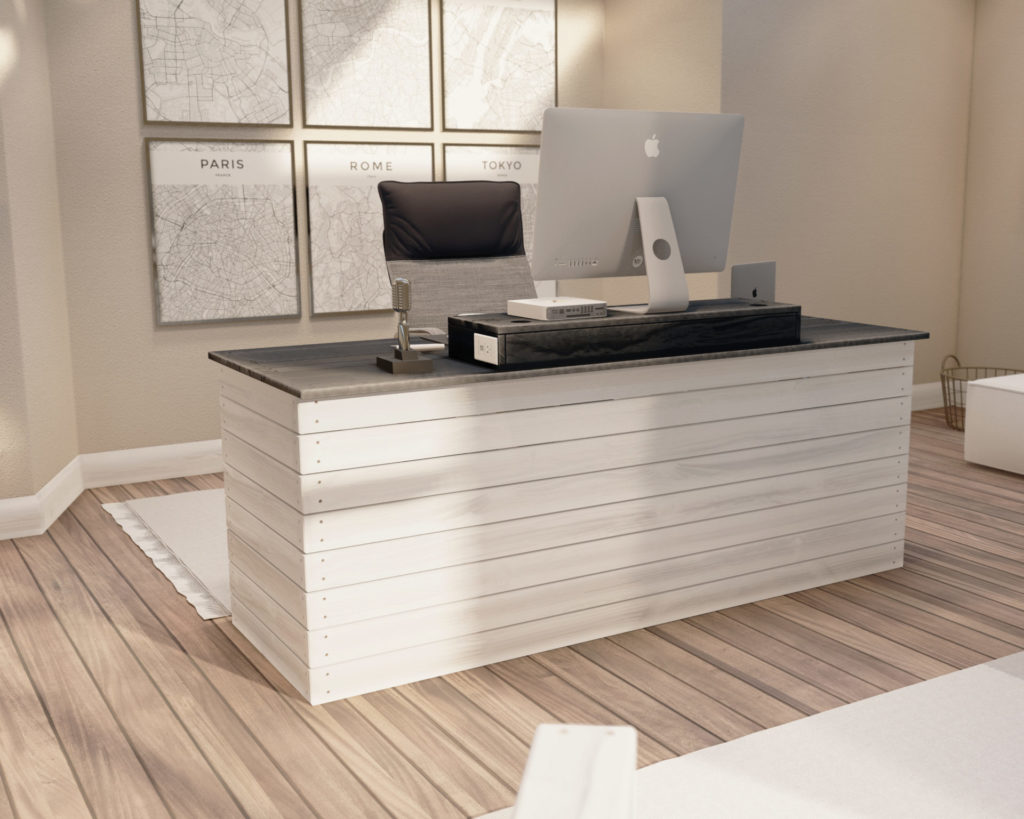
DIY desk aesthetics
This beautiful design can be made to look modern, minimalistic, rustic, or farmhouse style. The flexibility you get when building your own desk allows you to stain or paint the desk to make this office desk fit in virtually any room.
Who can build this DIY computer desk?
I would recommend this project to anyone who is new to woodworking. No fancy joints, no fancy cuts, the simple step by step instruction provided will guide beginners though the build in a smooth way. Using a DIY plan helps reduce waste, save time, and save the do-it-yourselfers from frustration.
What about the other DIY pieces in the photos?


Time to build
About 10 hours
Total cost of build
About $450
Skill level required
Beginner-Intermediate
Download the PDF plans
DIY desk PDF plans
What is included in the PDF download?
- Easy to read step by step instructions
- Material list
- Cut list
- Tools needed
DIY desk step by step instructions
Tools and material list
- Saw (miter saw recommended for precision cuts)
- Drill
- Impact driver with bit for screws
- Sander
- wood countersink drill bit
- about 15lbs of 3.5 in long screws (highly recommend T25 Star Drive screws)
- about 15lbs of 1.5 in long screws (highly recommend T25 Star Drive screws)
- about 1 lb of 1 in long screws
- Wood glue
- Sand paper
- Small hinges
- Optional Desk outlet
- 2 inch forstner bit
- Pencil
Wood cut list
Available with purchase of PDF plans.
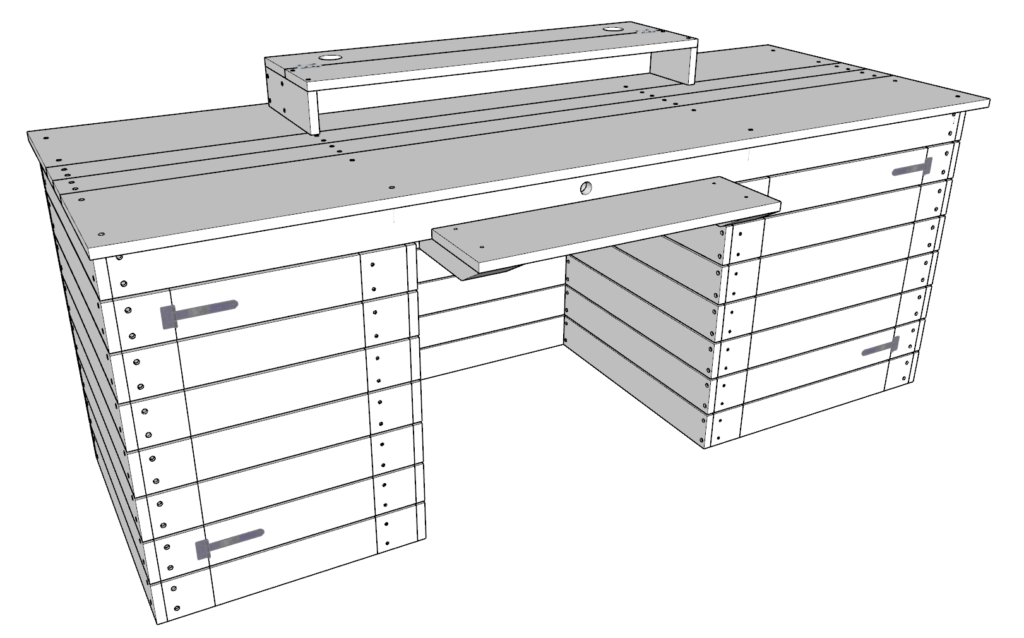
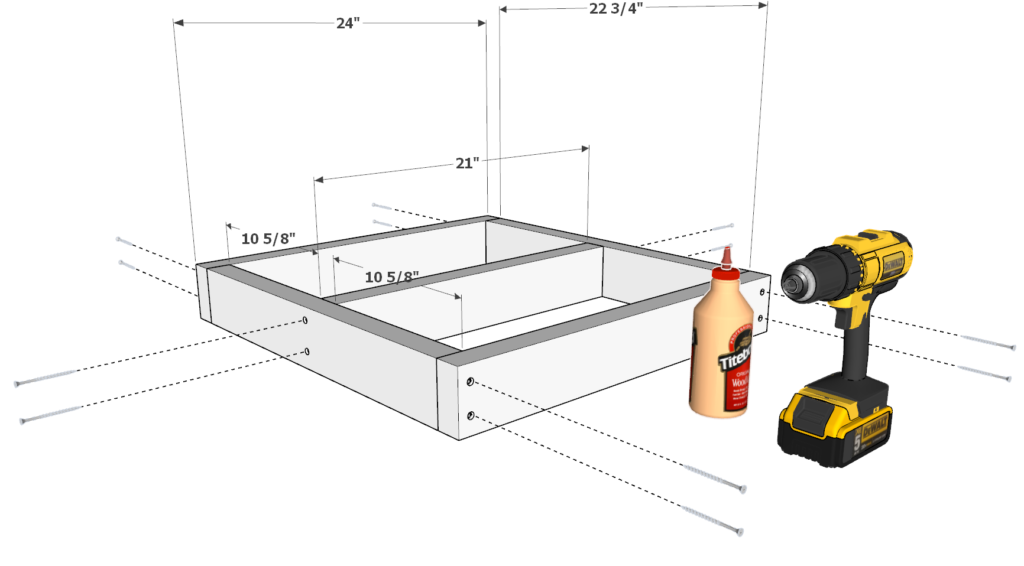
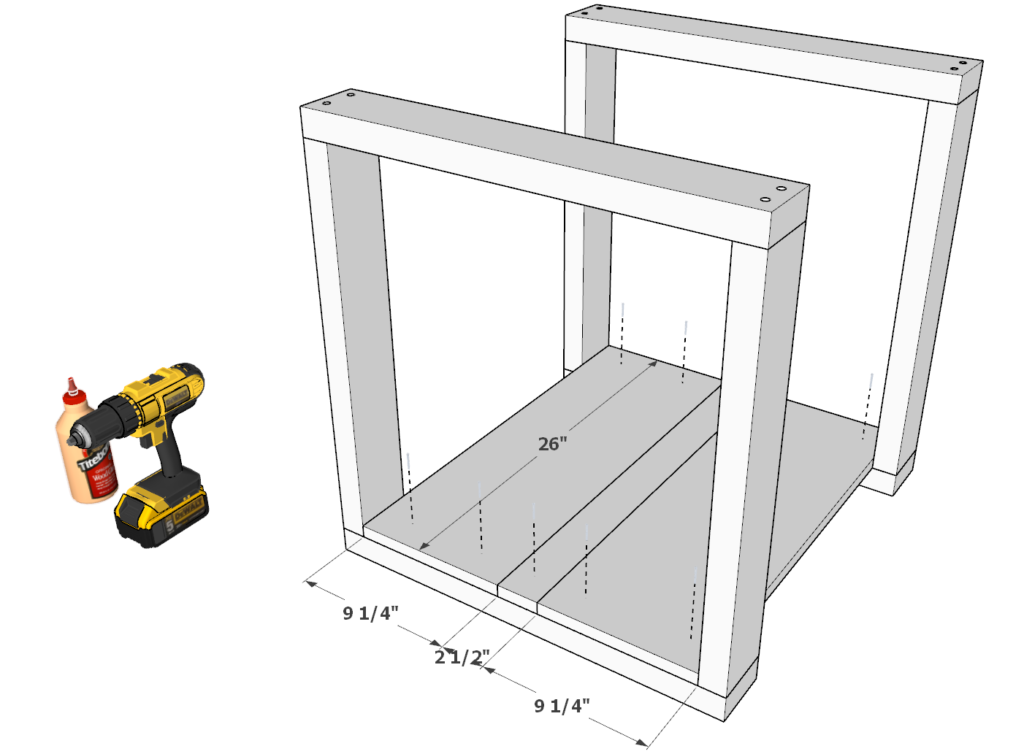
Step 1 (DIY desk)
Take two 24 inch 2×4 lumber pieces, two 22-3/4 inch 2×4 lumber pieces, and one 21 inch 2×4 -lumber pieces and arrange them as shown bellow.
Join the pieces by predrilling holes, adding glue, and adding 3.5 inch long screws.
It is recommended to predrill the wood prior to putting in a screw to prevent the wood from splitting. What works for me is to us a wood countersink drill bit.
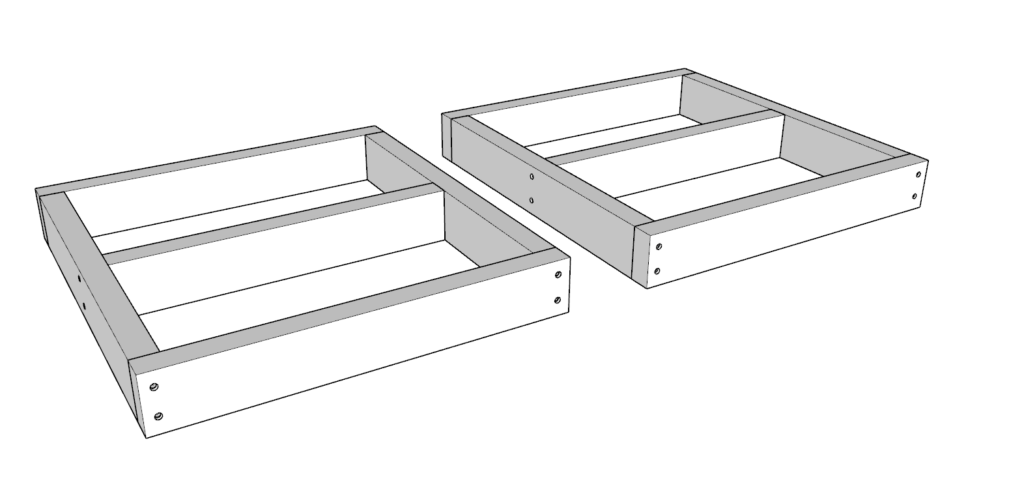
Make a total of two identical frame pieces.
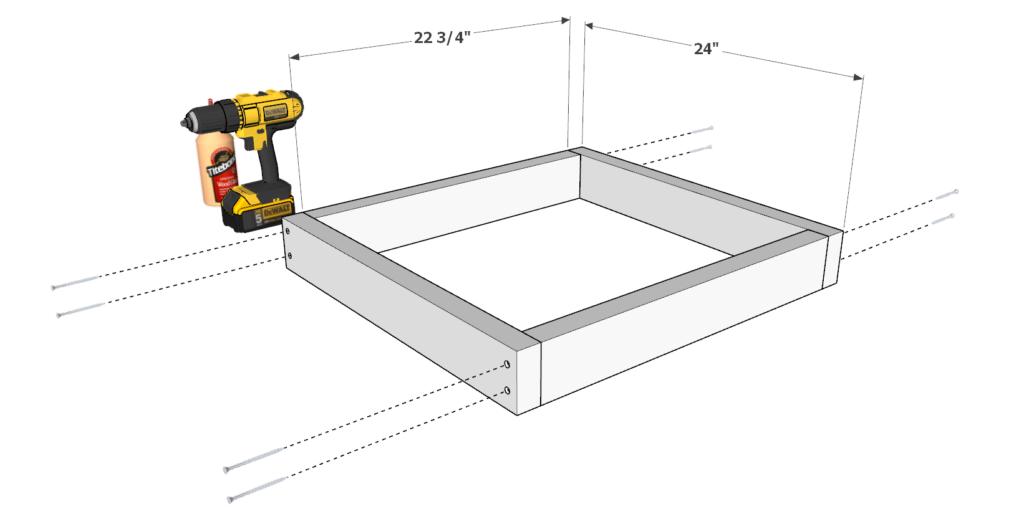
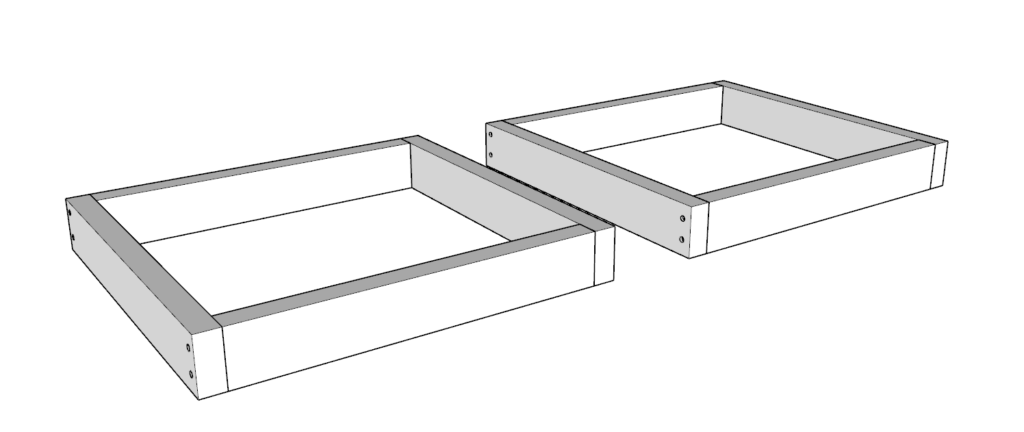
Step 2 (DIY desk)
Next, take two 24 inch 2×4 and two 22-3/4 inch 2×4 lumber pieces and arrange them as shown in the diagram. Add glue, predrill, and add 3.5 inch screws to join the pieces together.
Make a total of two identical frame pieces.
Step 3 (DIY desk)
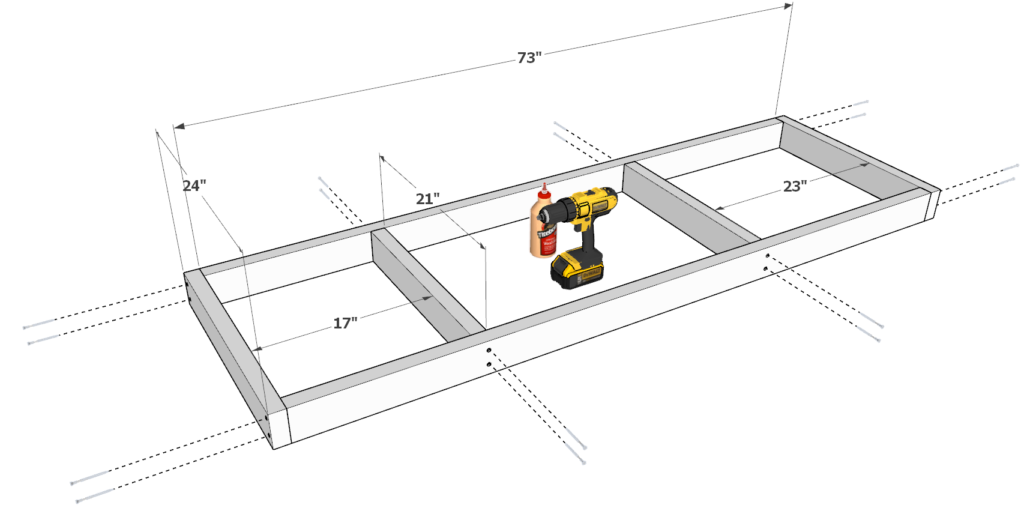
Next, take two 73 inch 2×4 lumber pieces, two 24 inch 2×4 lumber pieces, and two 21 inch 2×4 lumber pieces and arrange them as shown below.
Make sure the spacing on the 21 inch 2×4 lumber pieces is 23 inches and 17 inches away from the sides as shown in the diagram below.
As before, predrill, add glue, and add 3.5 inch screws.
Step 4 (DIY desk)
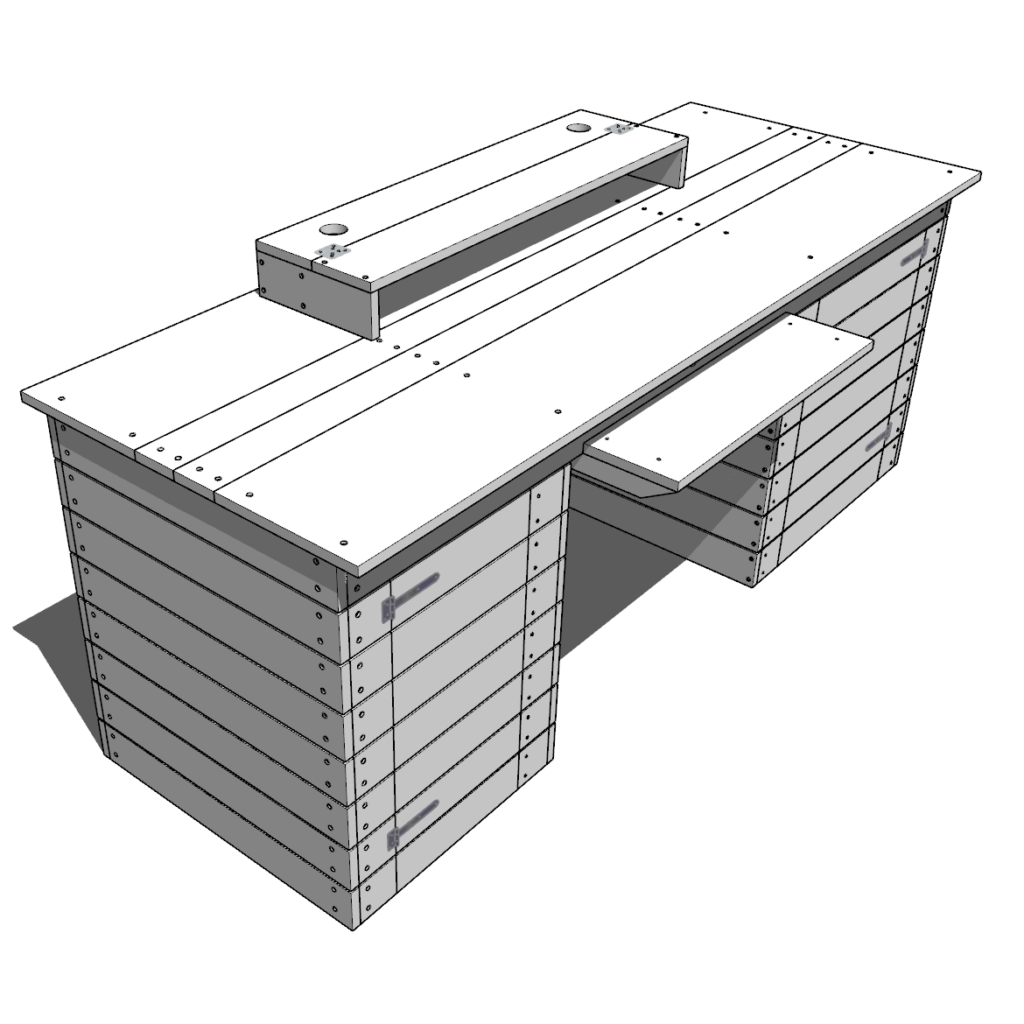
Next, take the two frame pieces from step 1 and add the shelfing pieces.
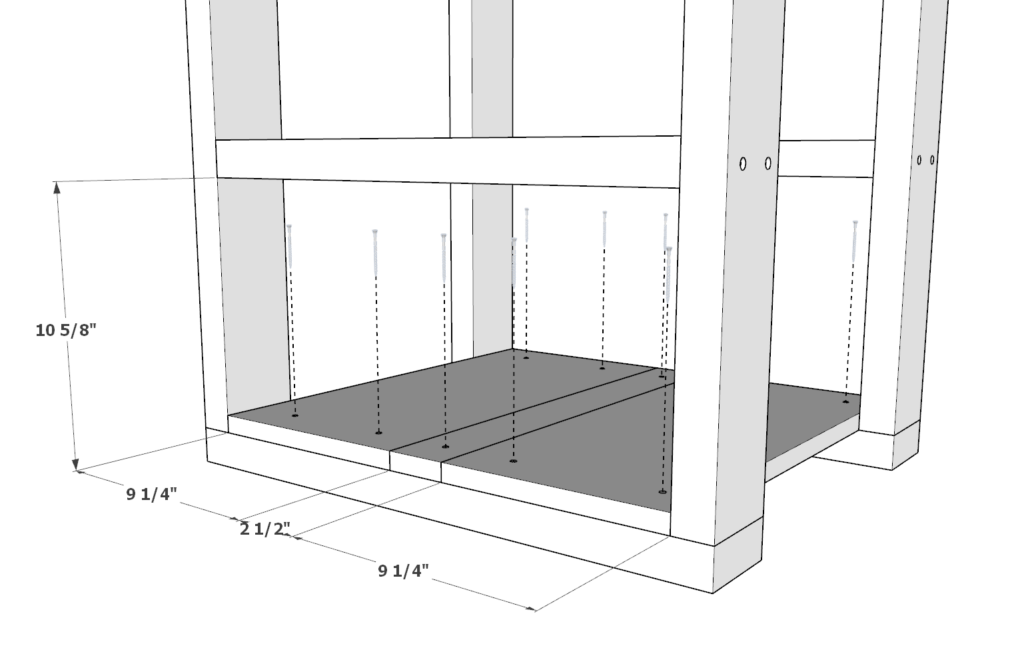
Take two 20 inch 1×10 lumber pieces and one 20 inch 1×3 lumber pieces and arrange them as shown below.
Predrill, add glue, and add 1.5 inch screws.
Repeat this for the top shelf as well.
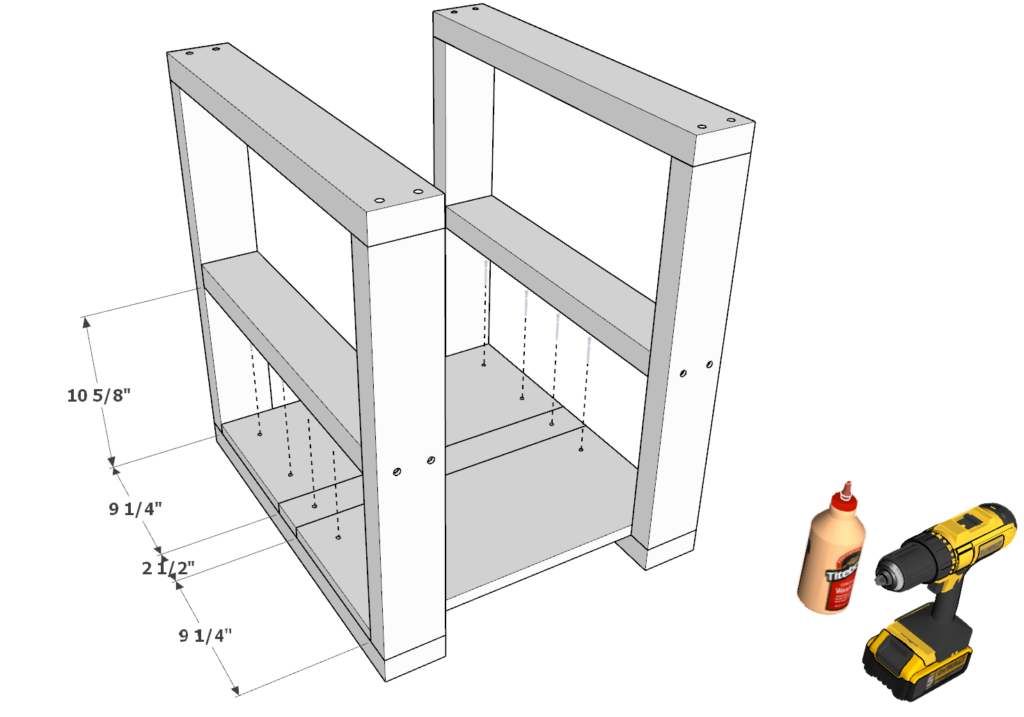
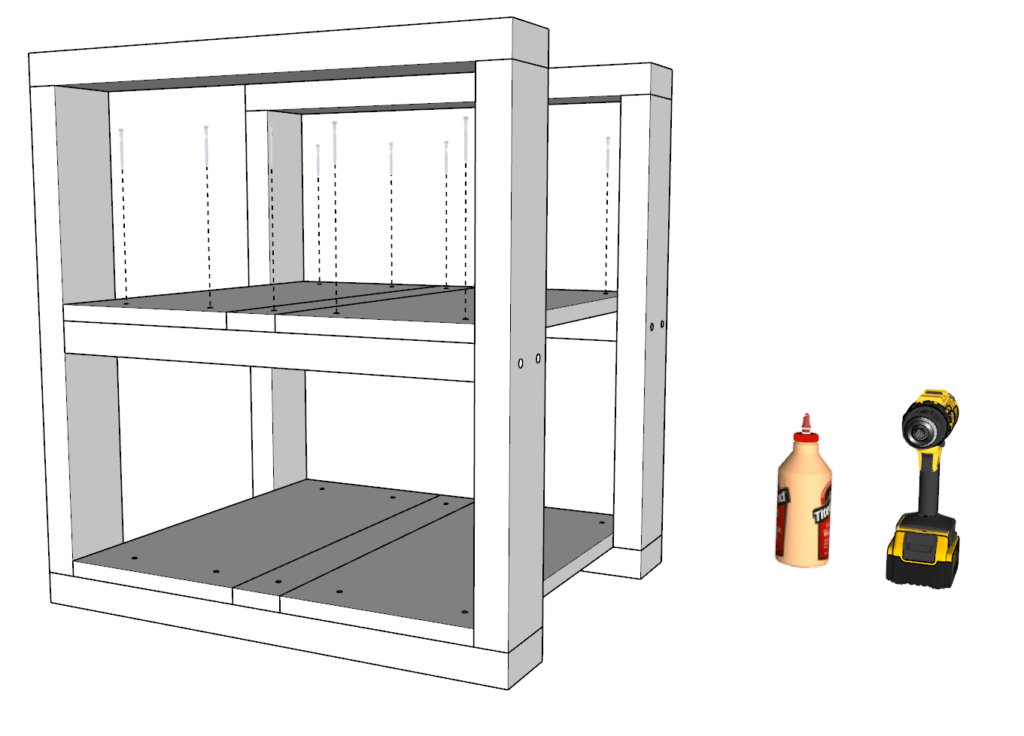
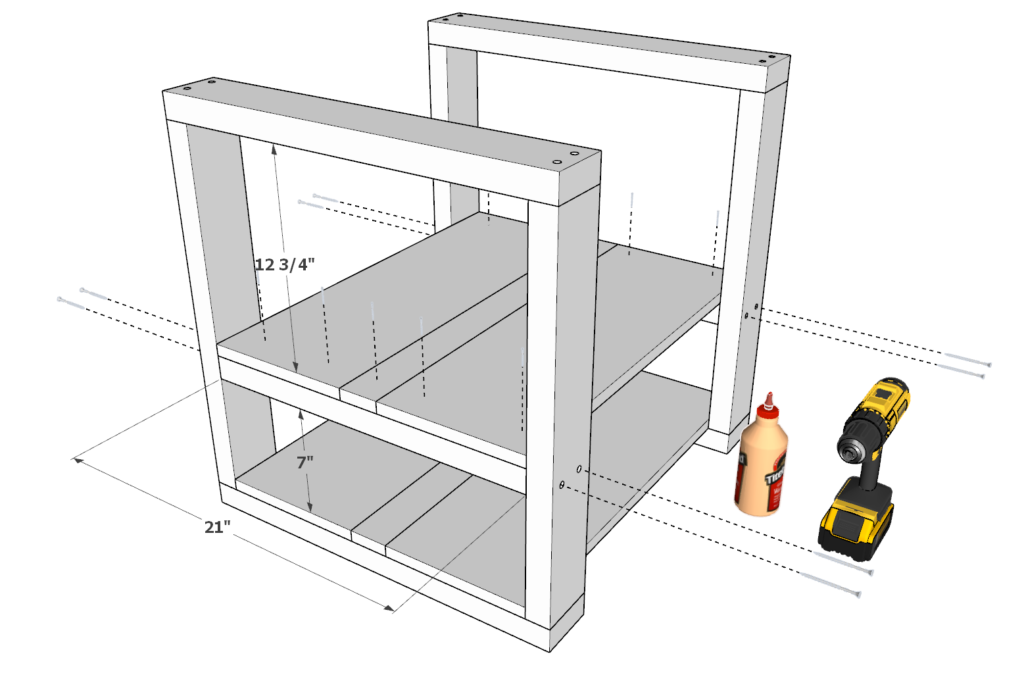
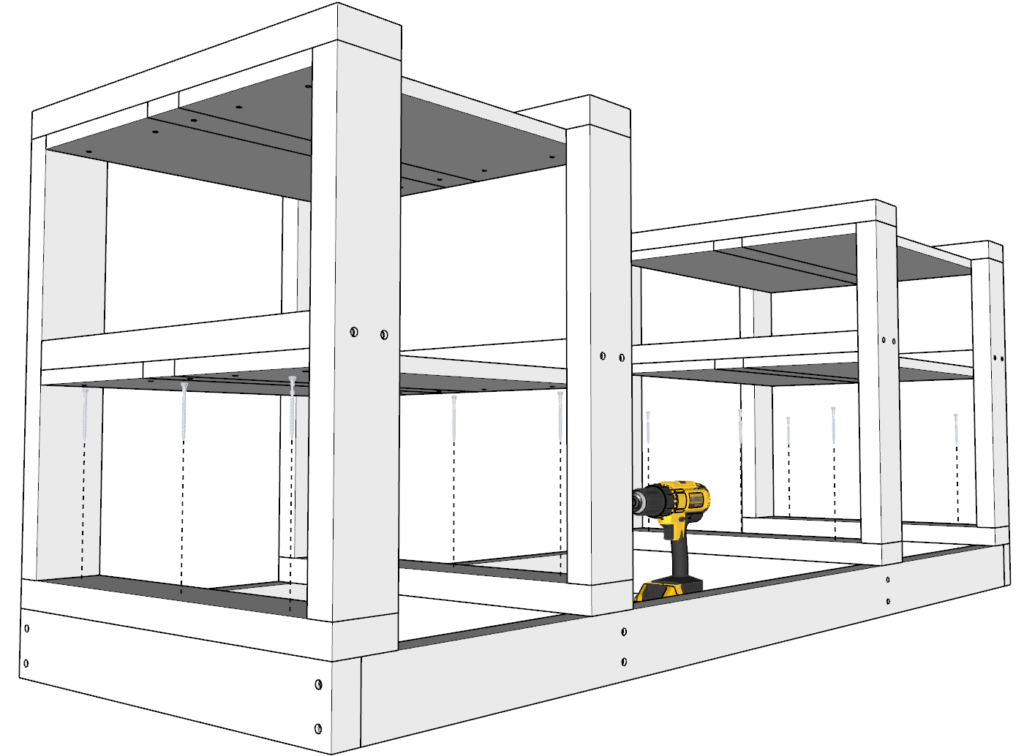
Step 5 (DIY desk)
Next, take the two frame pieces from step 2 and add the shelfing pieces.
Take two 26 inch 1×10 lumber pieces and one 26 inch 1×3 lumber pieces and arrange them as shown below.
Predrill, add glue, and add 1.5 inch screws.
next, add two 21 inch 2×4 lumber pieces at a 7 inch height. Add glue, predrill, and add 3.5 inch screws.
Add the shelfing pieces to the top shelf just like you did for the bottom storage shelf.
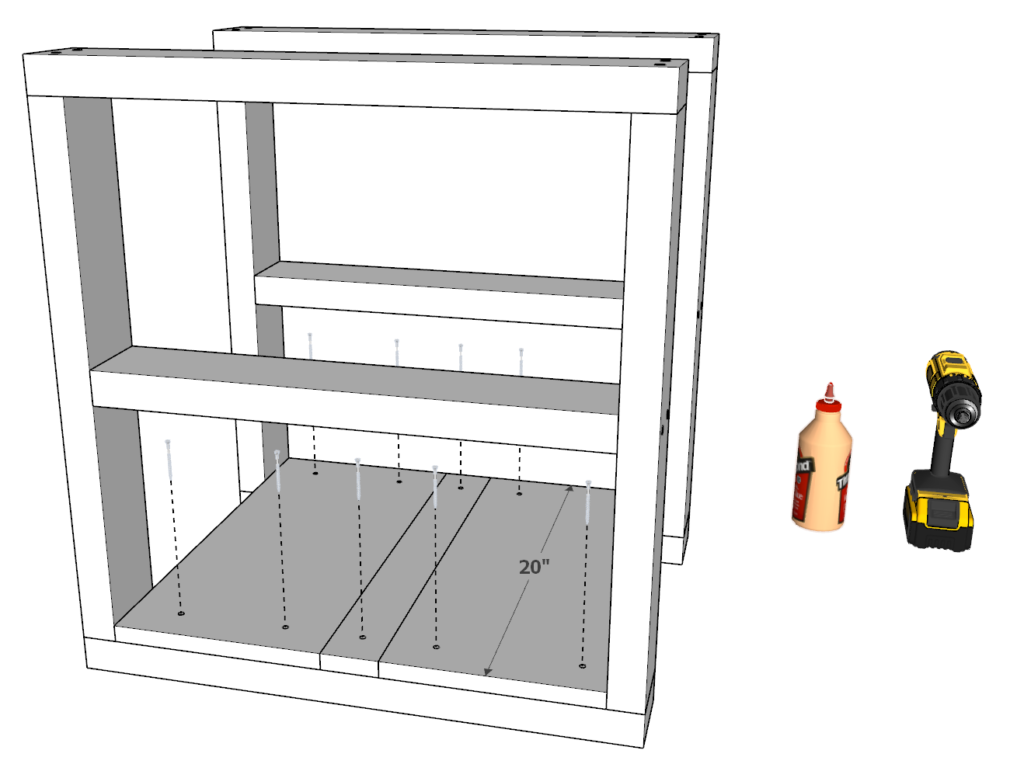
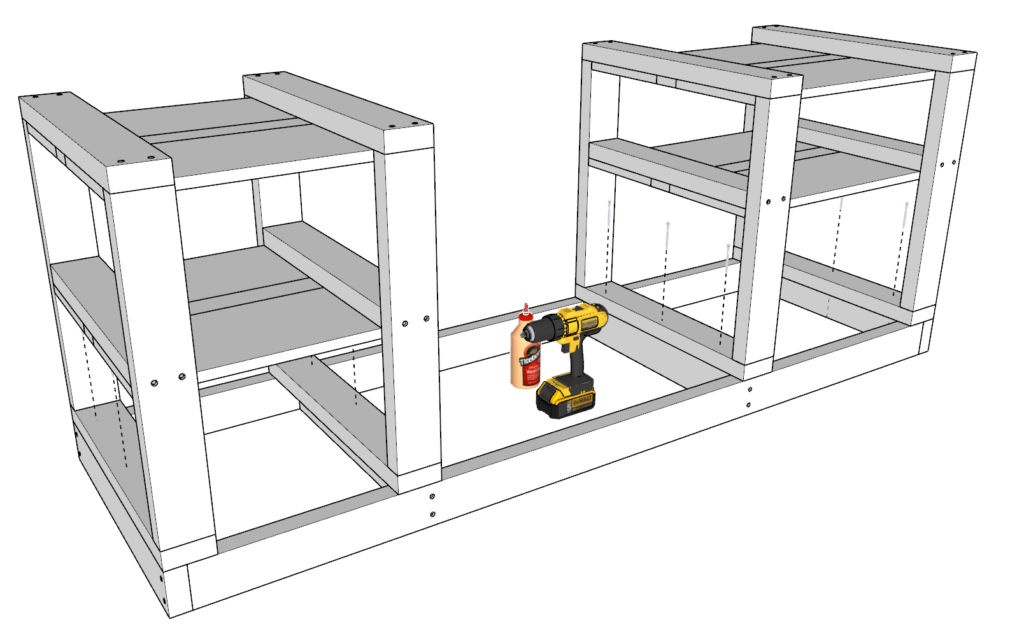
Step 6 (DIY desk)
Next, take the two shelfing frame pieces and attach them the main desk top frame.
Align the shelving frame pieces with the main desk frame as shown below. Keep in mind that the desktop frame is not the same on both sides.
Add glue, predrill, and add 3.5 inch screws.
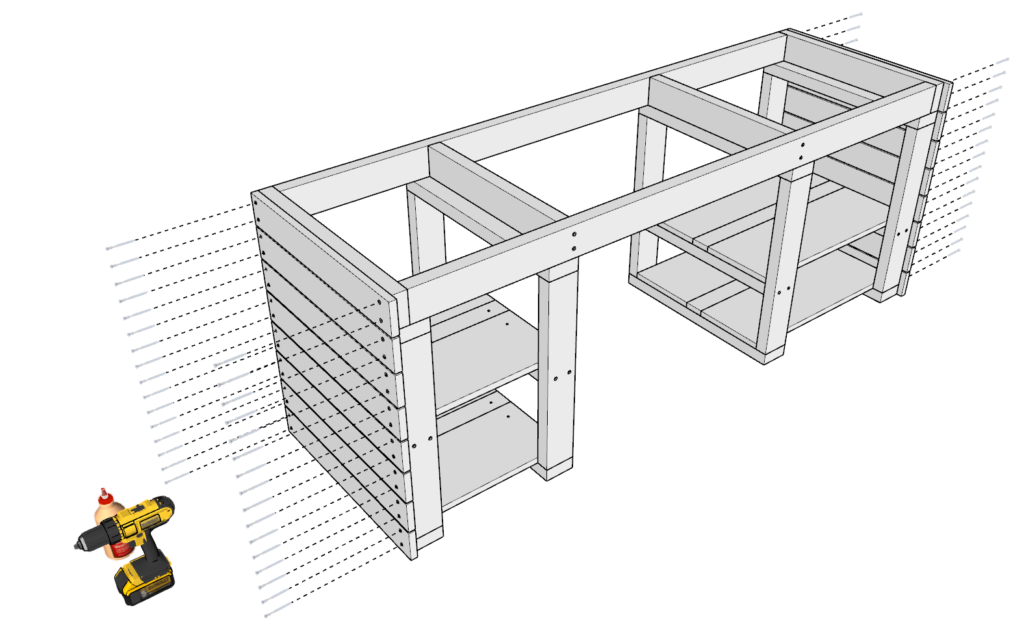
Step 7 (DIY desk)
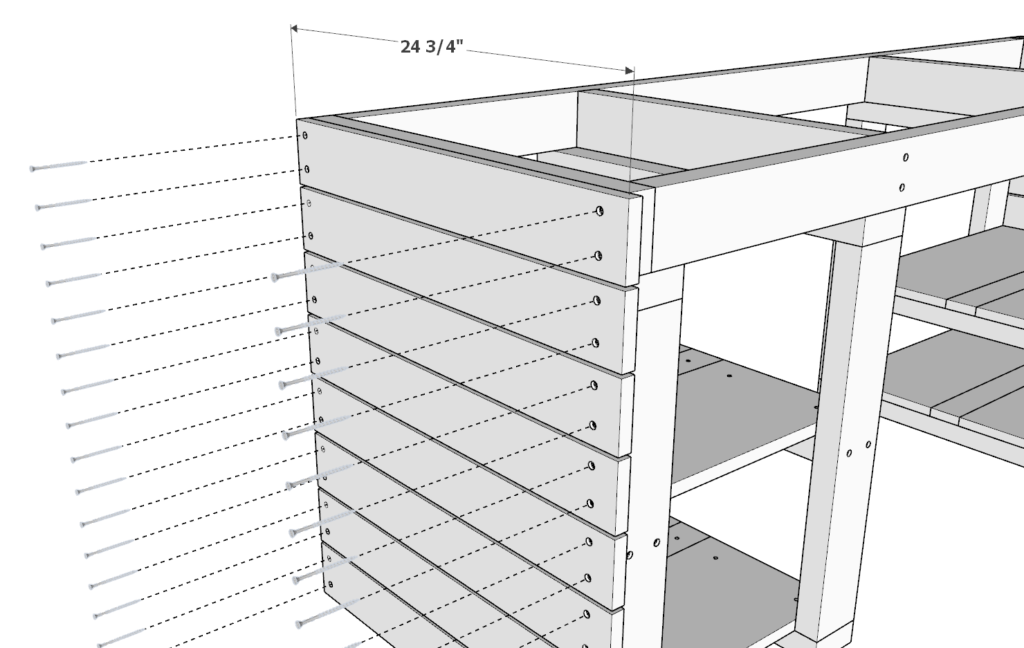
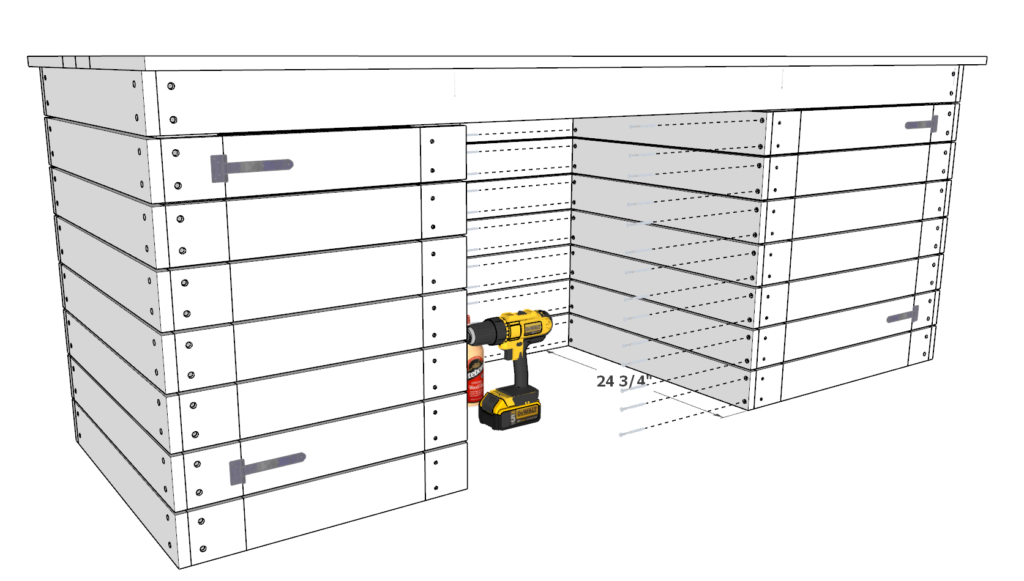
Next, add the DIY desk side panel pieces.
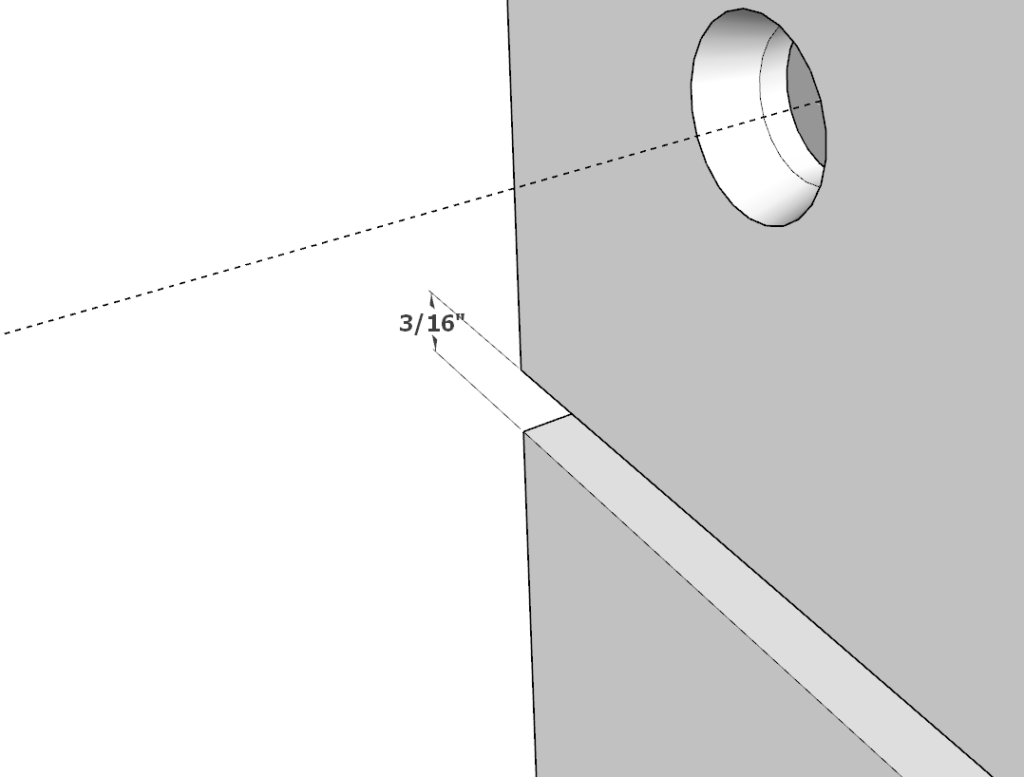
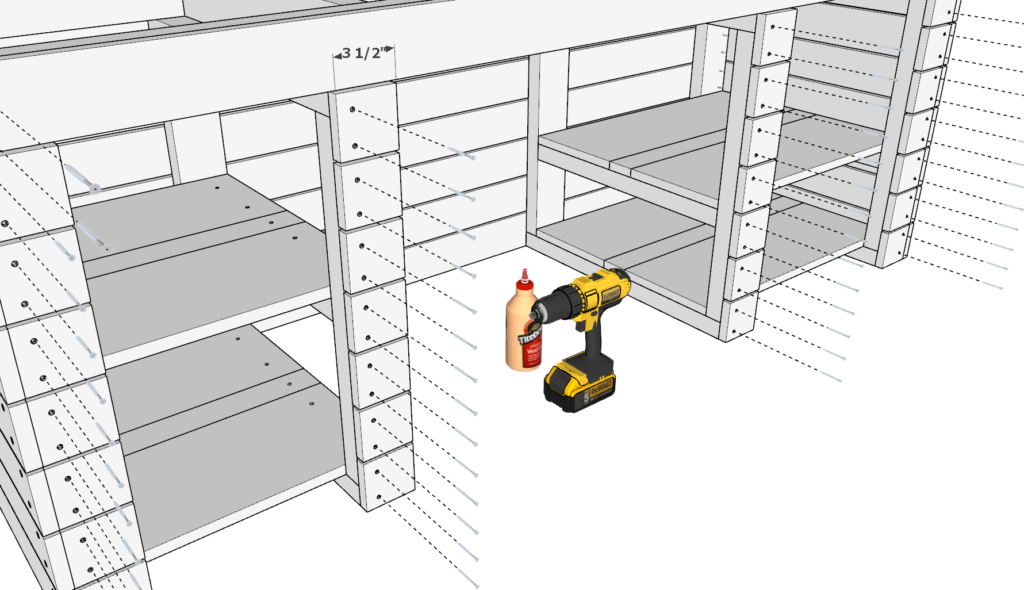
Add eight 24-3/4 inch 1×4 lumber pieces to each side of the desk as shown below. Space them out about 3/16 inches apart. I would recommend creating several spacers from scrap wood that you can use again and again to ensure a uniform spacing on all siding pieces.
Add glue, predrill, and add 1.5 inch screws.
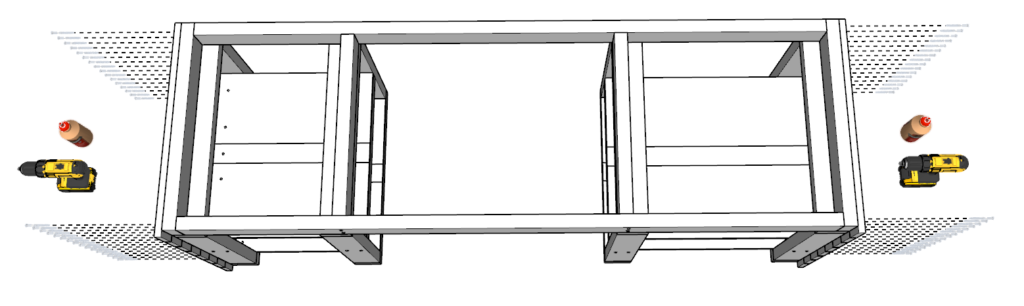
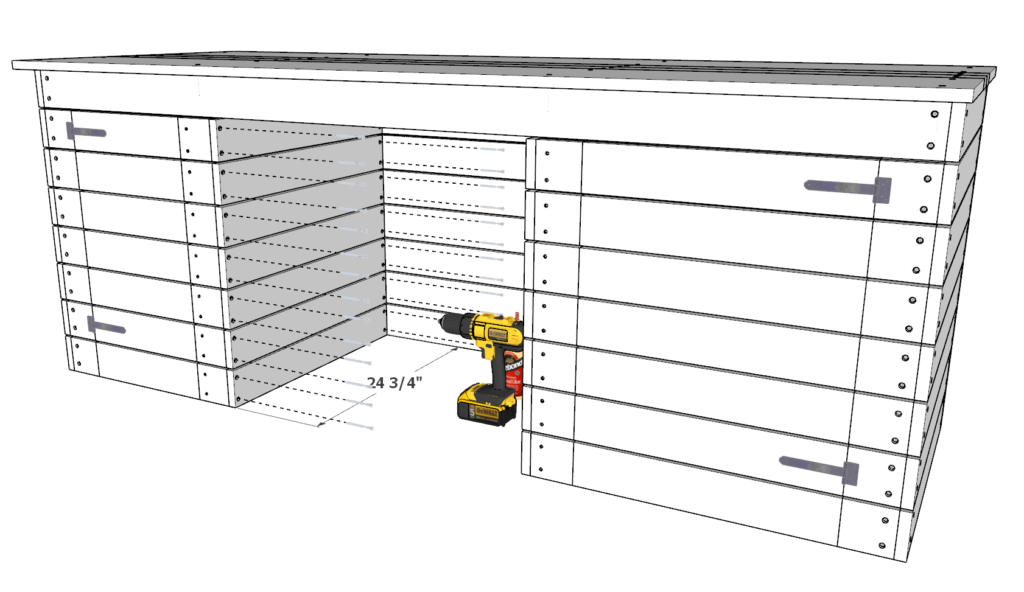
Step 8 (DIY desk)
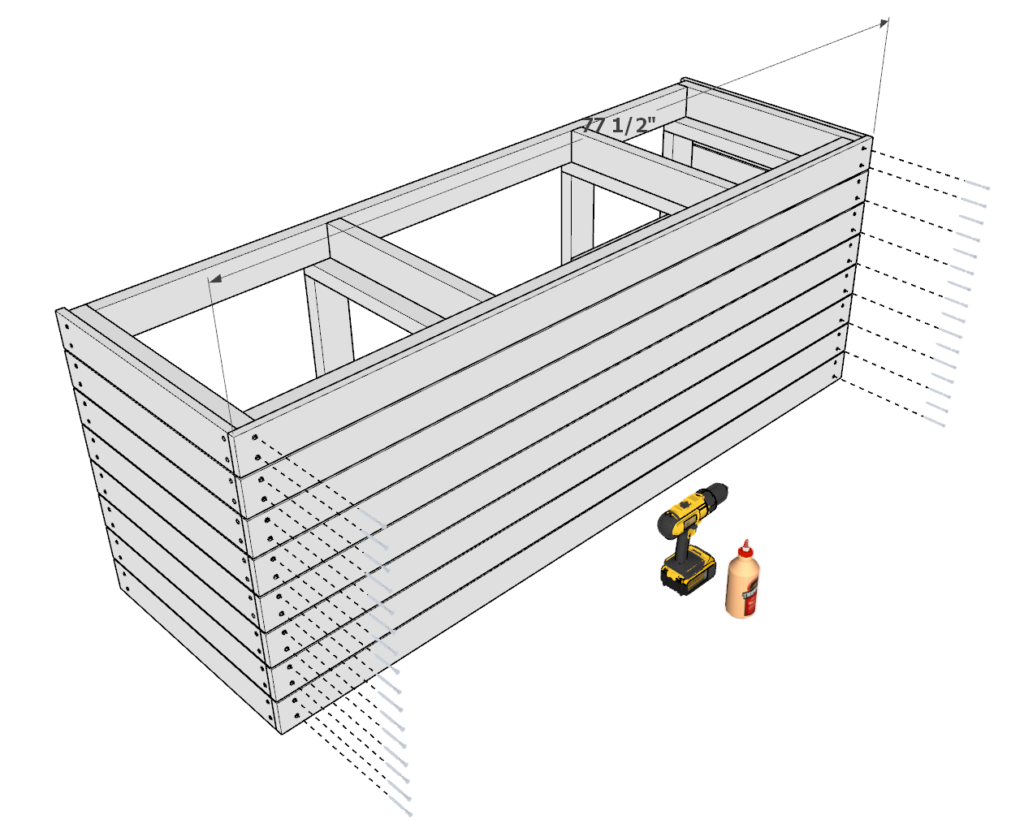
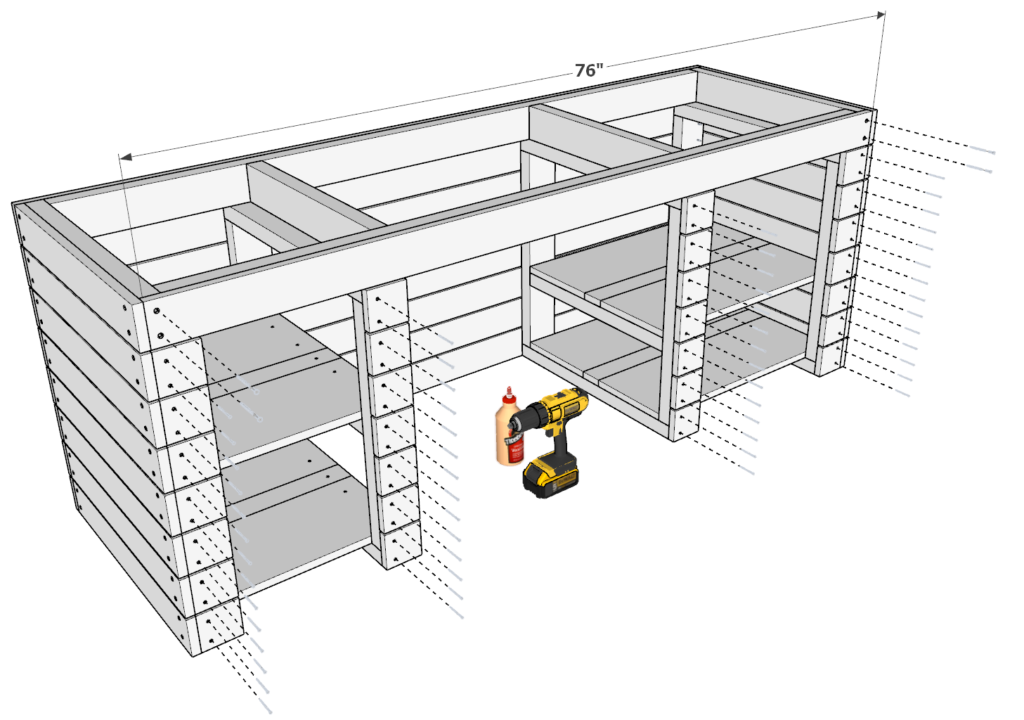
Next, continue adding all siding pieces to both the front and back of the DIY desk.
Use eight 77-1/2 inch 1×4 lumber pieces for the front of the desk, one 76 inch 1×4 lumber piece, and twenty eight 3-1/2 inch 1×4 lumber pieces for the back of the desk.
As before space these out 3/16 in apart, add glue (especially for the smaller 3-1/2 pieces), predrill (especially for the smaller 3-1/2 pieces), and add 1.5 inch screws.
Step 9 (DIY desk)
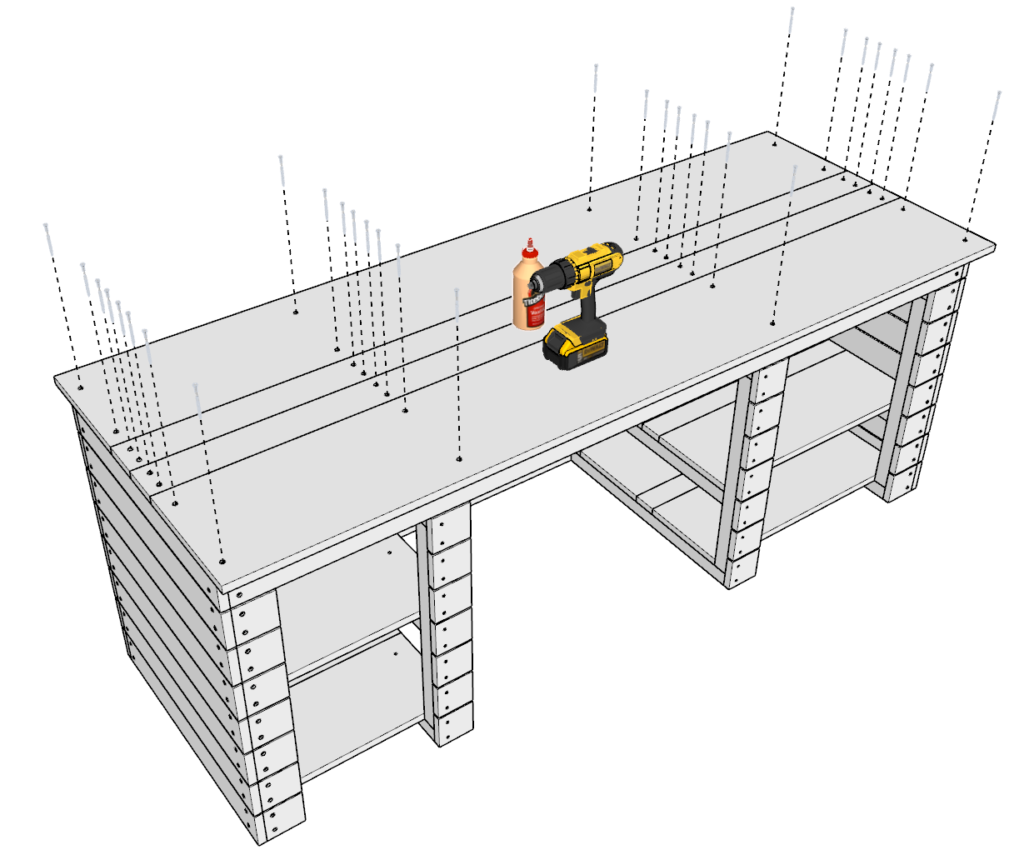
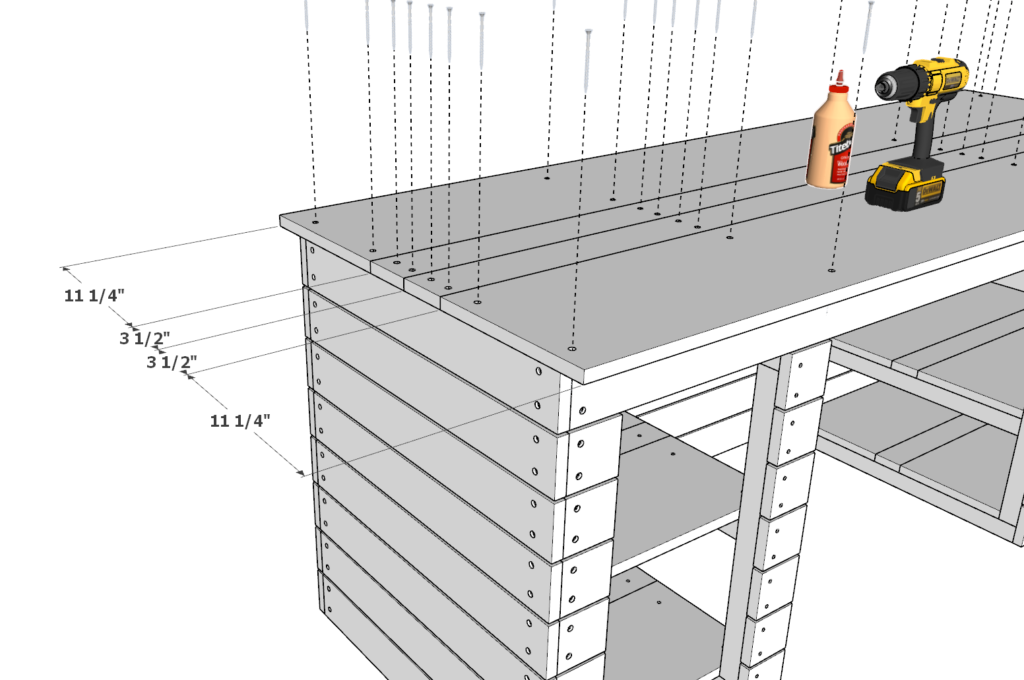
Next, add the desk top to the main frame of the desk.
Take two 78-1/4 inch 1×12 lumber pieces and two 78-1/4 inch 1×4 lumber pieces and arrange them as shown below.
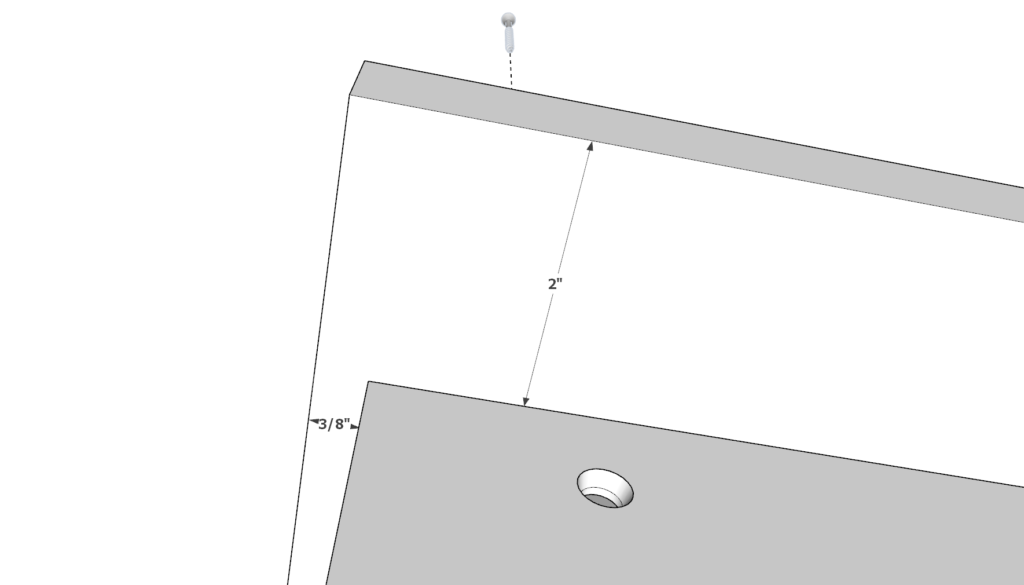
Before adding screws ensure that the table top is aligned. It must be two inches away from the ends in the front and back of the desk and about 3/8 inches away from the ends on the sides of the desk.
Add glue, predrill, and add 3.5 inch screws. Ensure that the screws go into the 2×4 framing pieces and are not sticking out as this could be dangerous.

Step 10
Next, assemble to desk shelf doors.
The two doors are diffent in size.
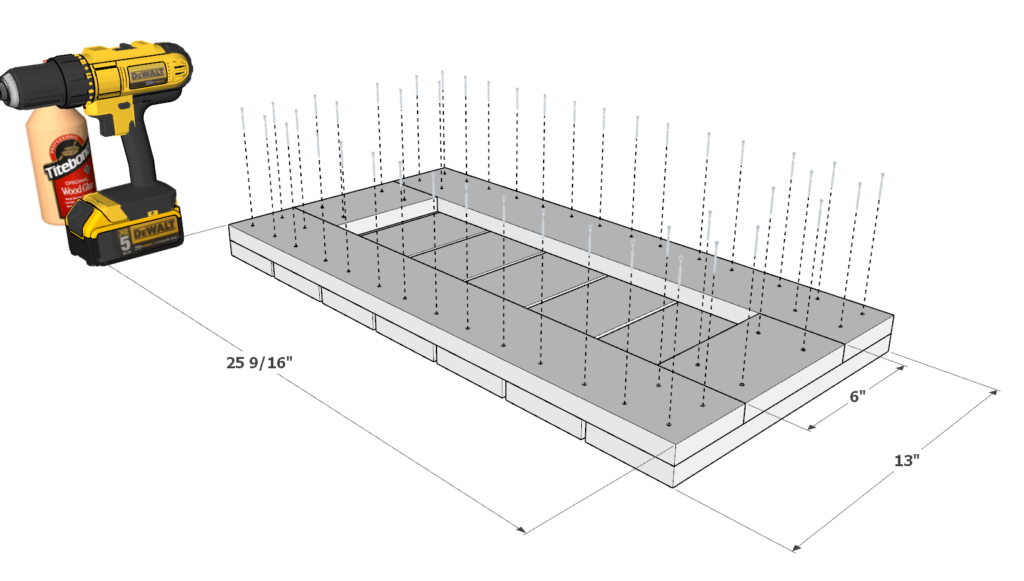
Door 1:
Use two 6 inch 1×4 lumber pieces, two 25-9/16 inch 1×4 lumber pieces, and seven 13 inch 1×4 lumber pieces.
Space out the siding pieces 3/16 in apart. Add glue, predrill, and use 1 inch screws.
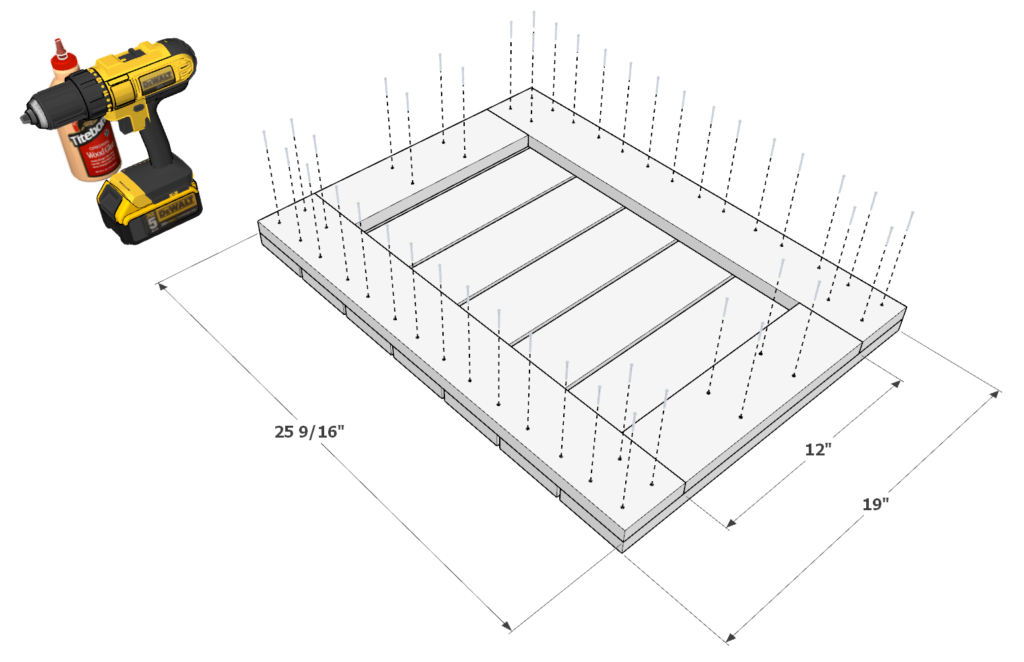
Door 2:
Use two 12 inch 1×4 lumber pieces, two 25-9/16 inch 1×4 lumber pieces, and seven 19 inch 1×4 lumber pieces.
Space out the siding pieces 3/16 in apart. Add glue, predrill, and use 1 inch screws.
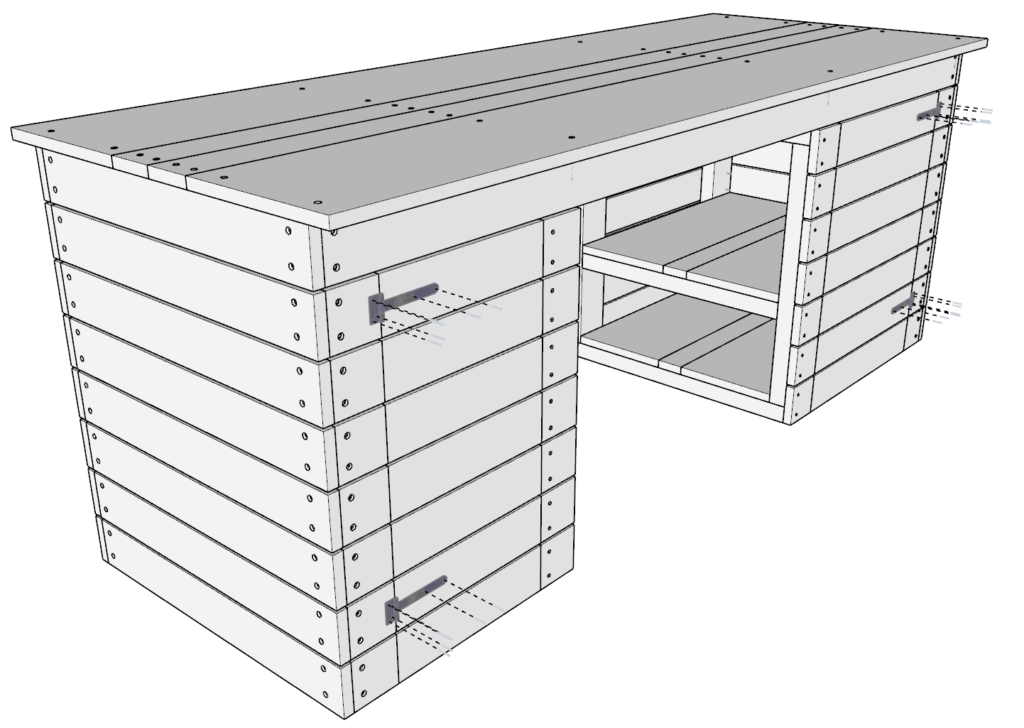
Step 11
Next, attach the doors to the desk with simple hinges and attach the remaining side panels to the desk to full enclose the storage areas.
Use seven 24-3/4 inch 1×4 lumber pieces for each of the sides, as before space them out 3/16 in apart. Predrill, add glue, and add 1.5 inch screws.
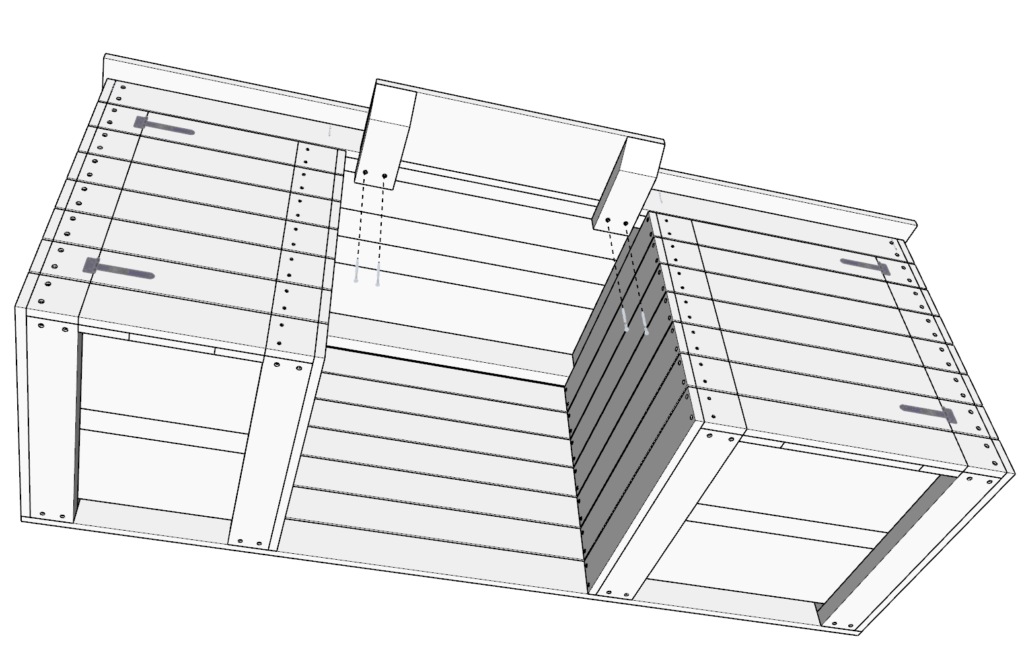
Step 12
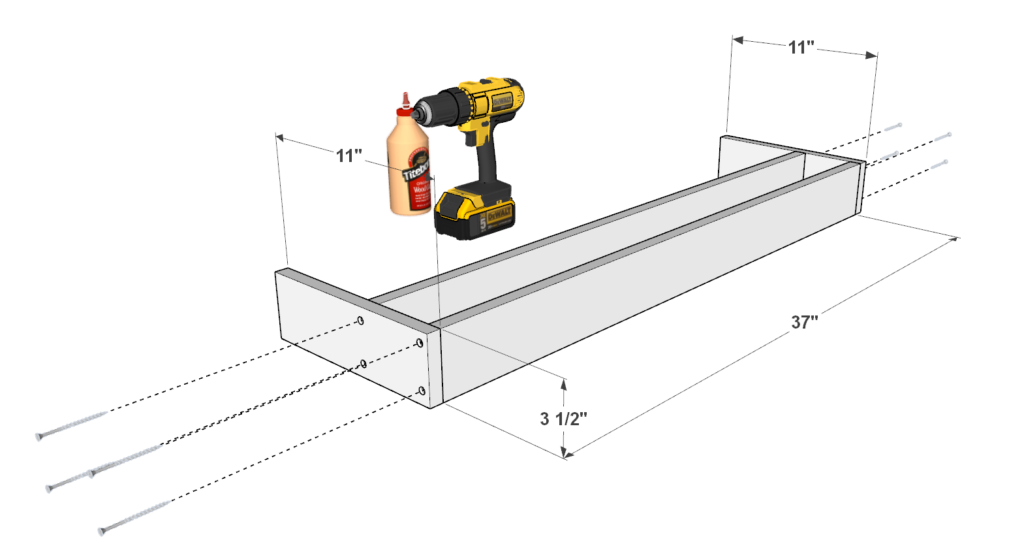
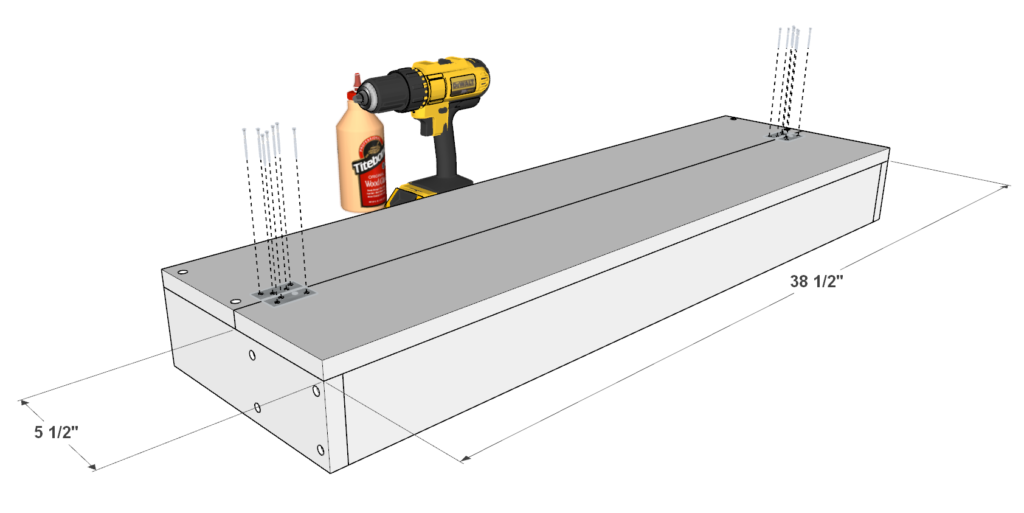
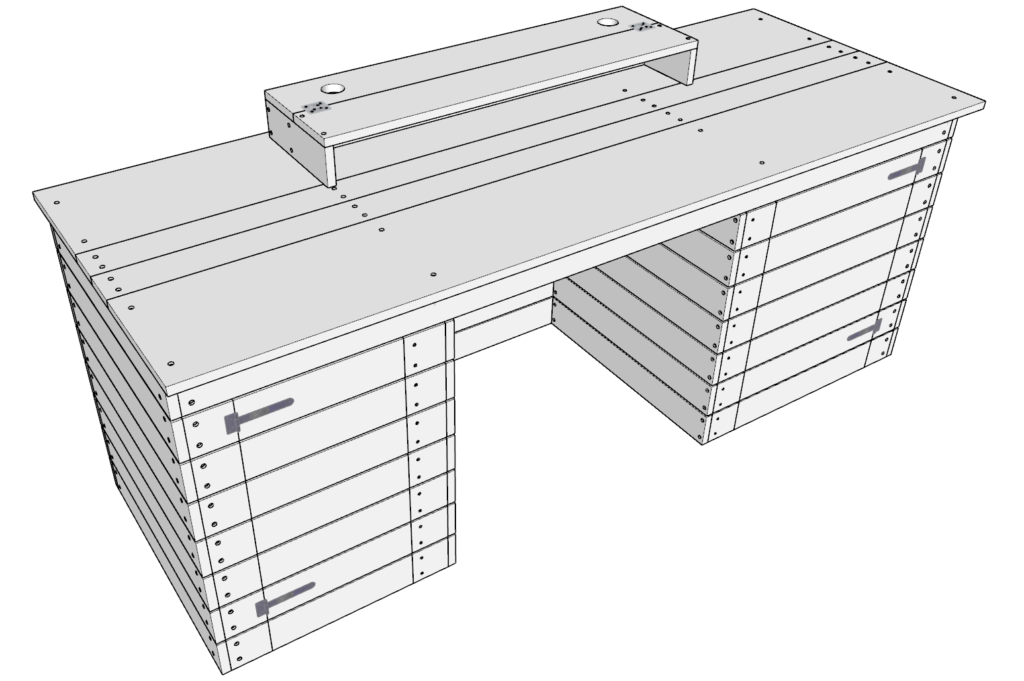
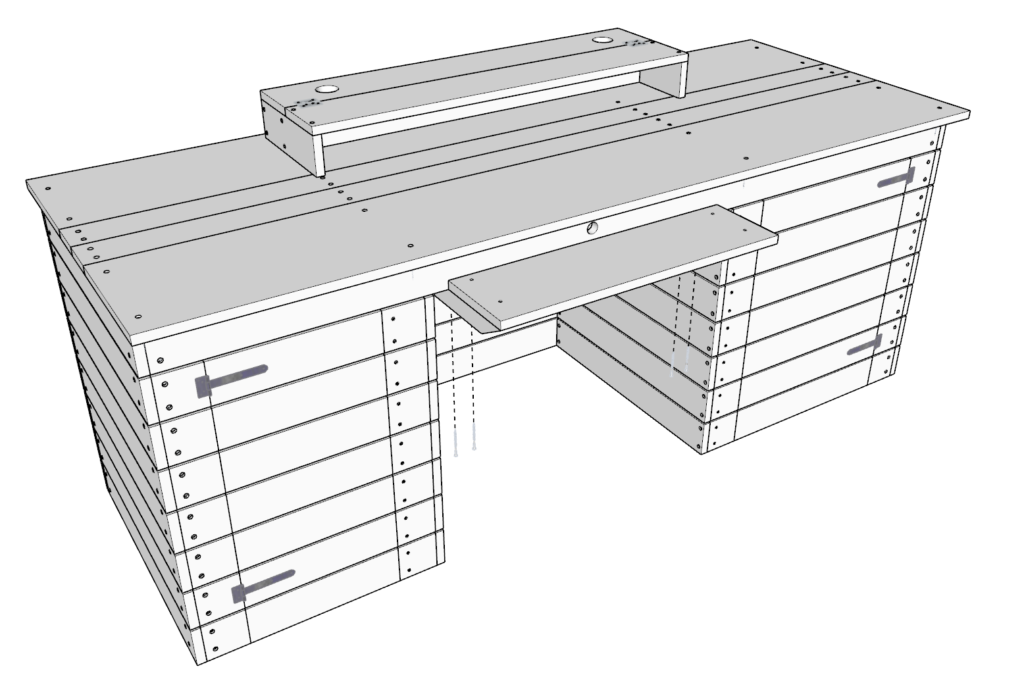
Next, assemble the monitor platform as storage piece.
Take two 11 inch 1×4 lumber pieces and two 37 inch 1×4 lumber pieces and join them with glue, predrilling, and 3.5 inch screws.
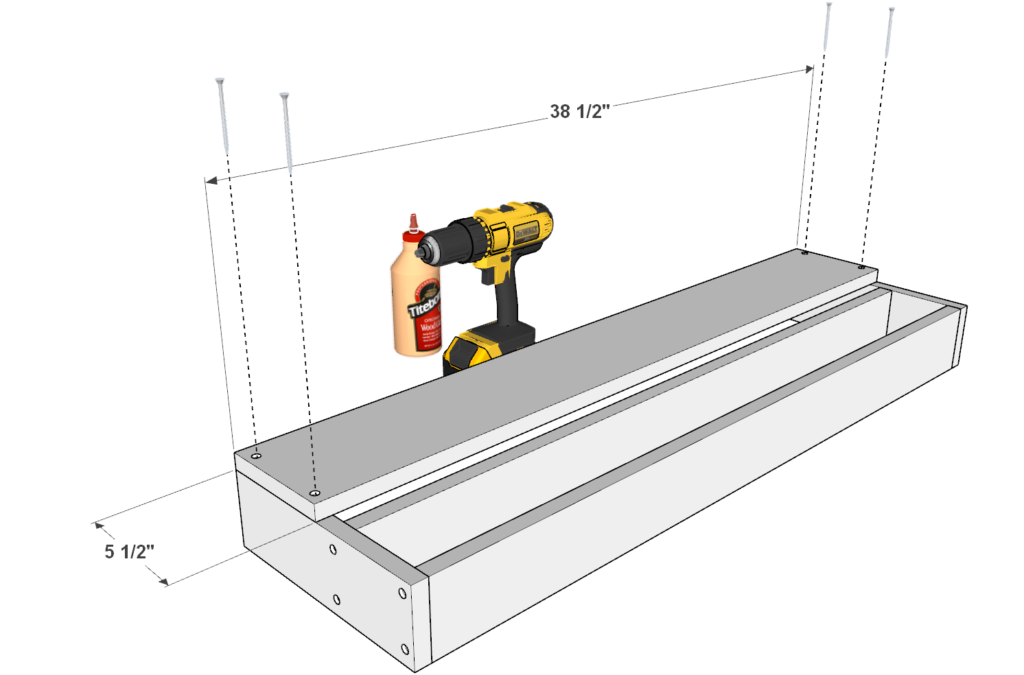
Next, attach one 38-1/2 inch 1×6 lumber piece on top of the monitor frame as shown below. Predrill, add glue, and add 1.5 inch screws.
Next, attach the second 38-1/2 inch 1×6 lumber pieces with simple hinges to the first 1×6 lumber pieces. This will create a space where the power cords can be stored and hidden.
Next, use a 2 inch forstner bit to drill one or two holes in the top of the 38-1/2 inch 1×6 lumber piece that swings open. These holes will enable you to pass the monitor cords down into the cord storage area.
Optional: You can also add a USB desk outlet to charge iPhones, iPads, Samsung devices, Android devices, etc. This can help declutter the desk top work space and allows for easy device charging (these can simple be installed by cutting out the wood to allow the outlet to fit).
Step 13
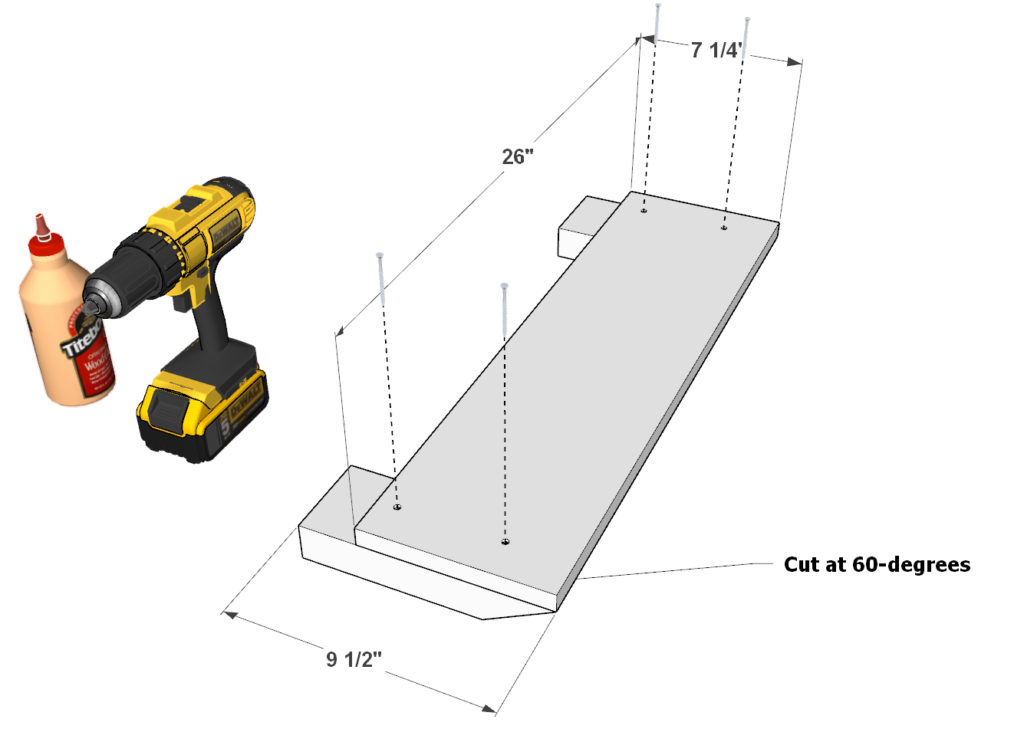
Next, assemble the keyboard and mouse tray.
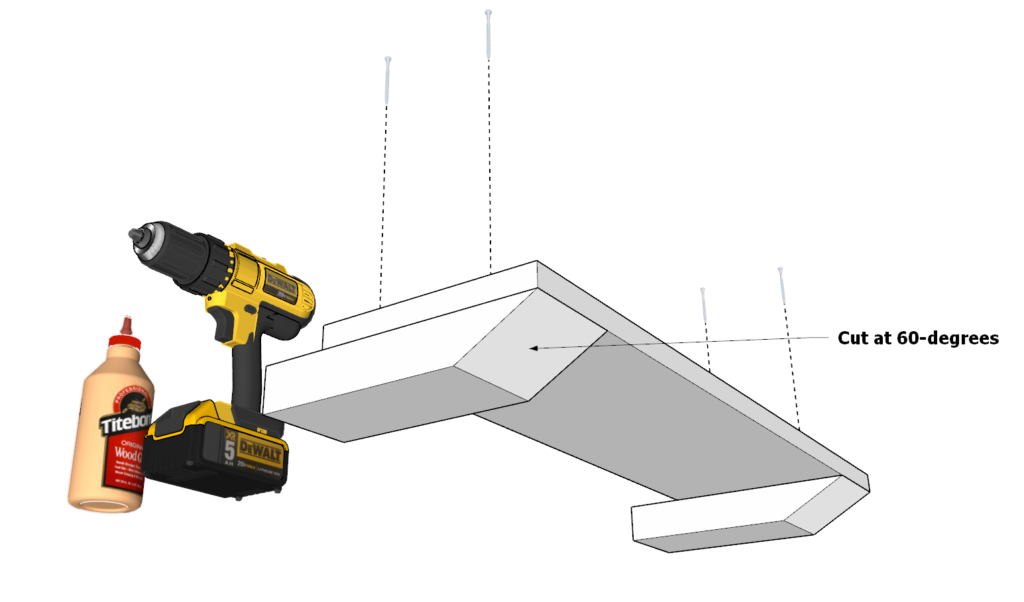
Take two 9-1/2 inch 2×4 lumber pieces that are cut at one end at 60-degrees and one 26 inch 1×8 lumber pieces and arrange them as shown below. Attach the pieces by predrilling, adding glue, and adding 1.5 inch screws.
Step 14
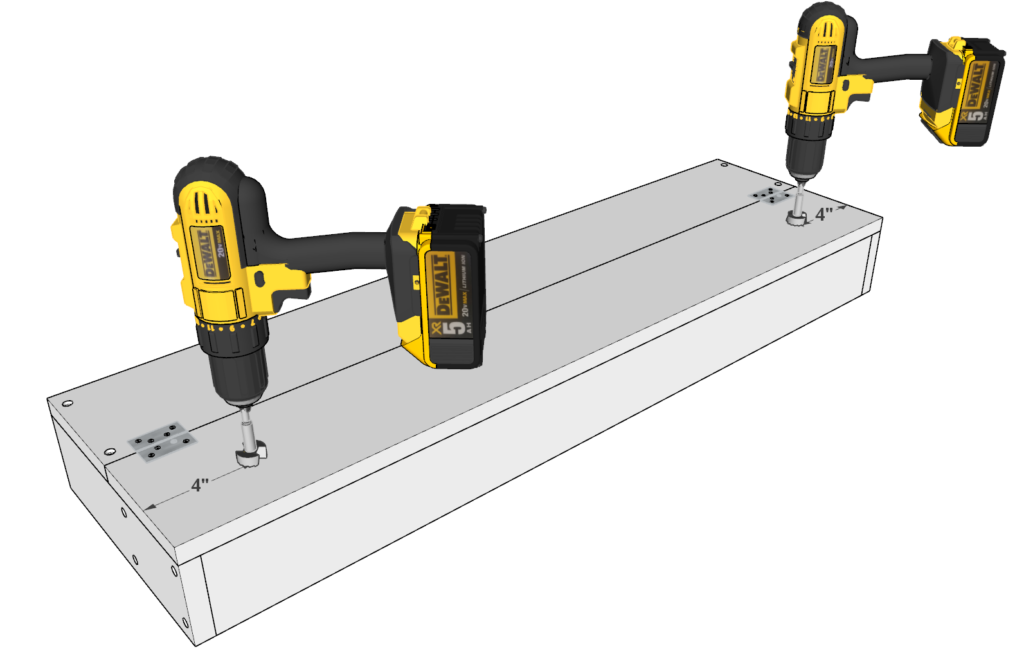
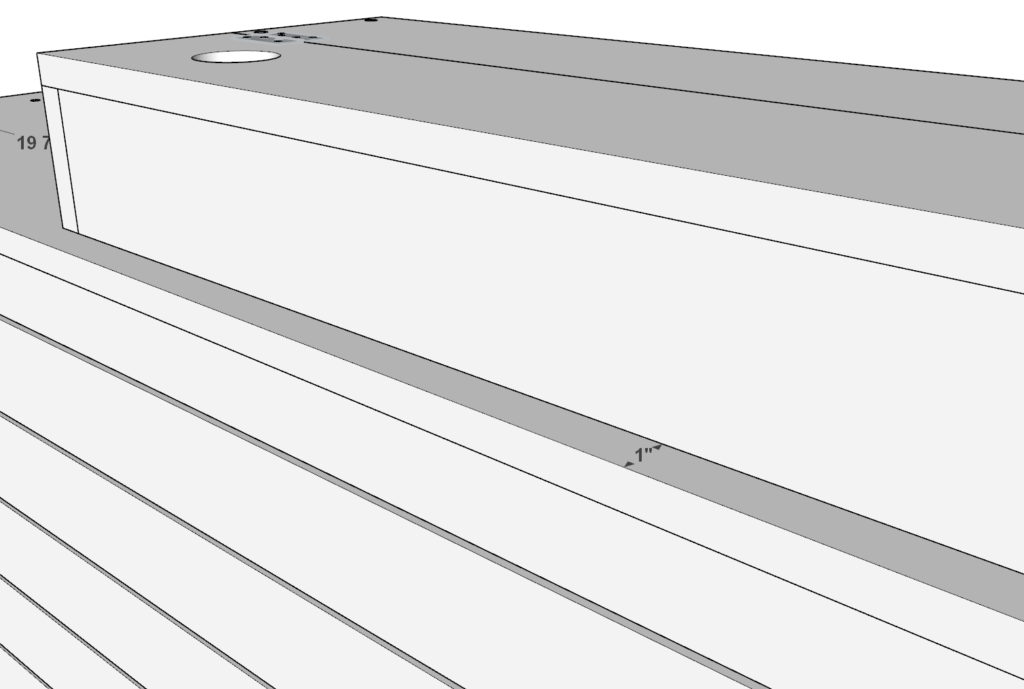
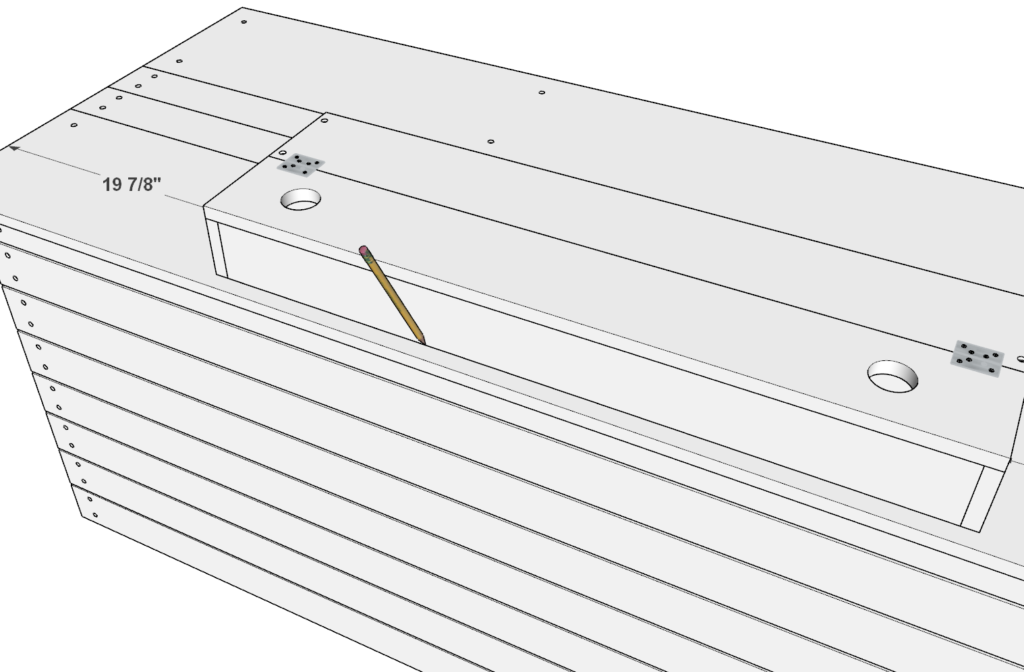
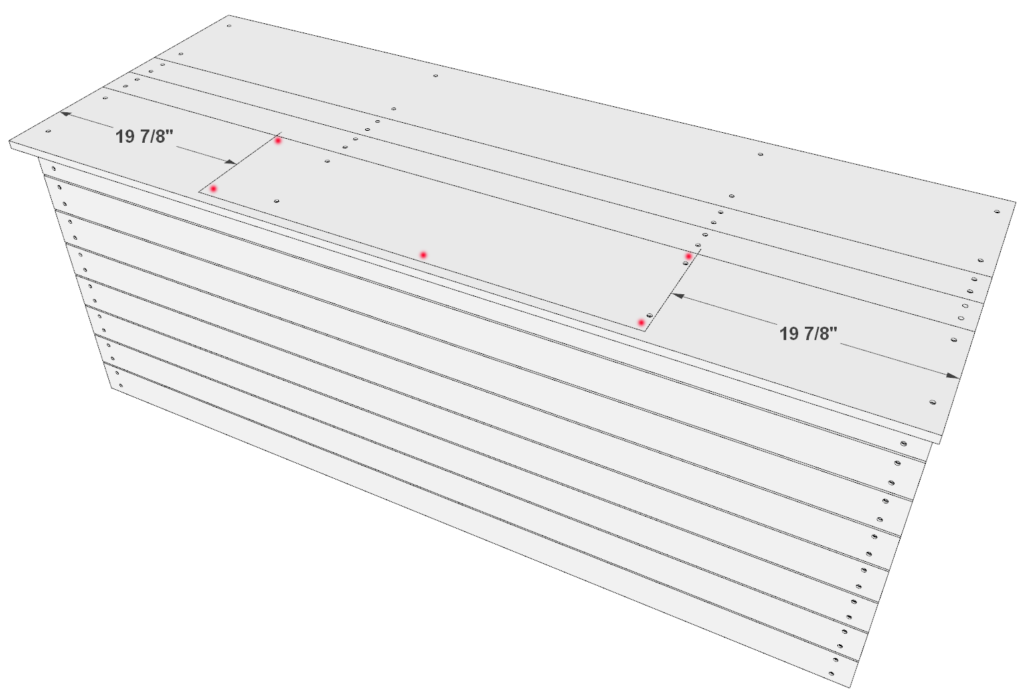
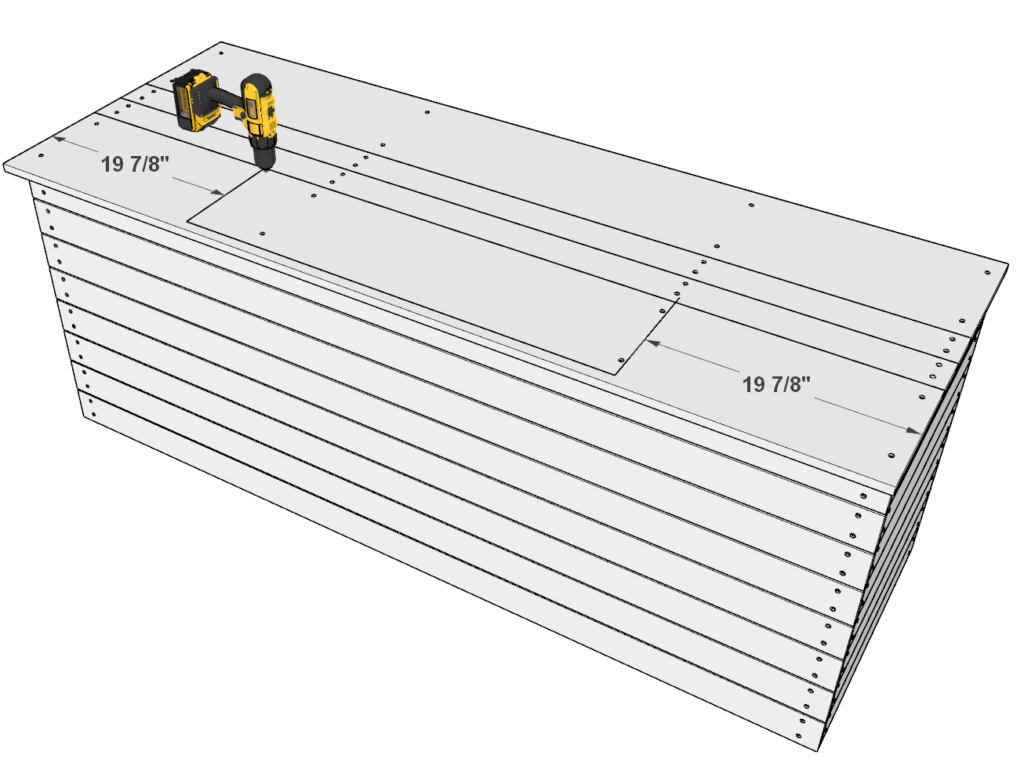
Next attach the monitor platform and storage system to the DIY desk top.
One way this can be done is by placing the platform as close to the dimensions shown below, tracing the perimeter with a pencil onto the table, removing the platform, and drilling holes all the way through the table top (recommended hole placement indicated by red dots).
Next, place the platform on top again in the same location, and add screws from the bottom.
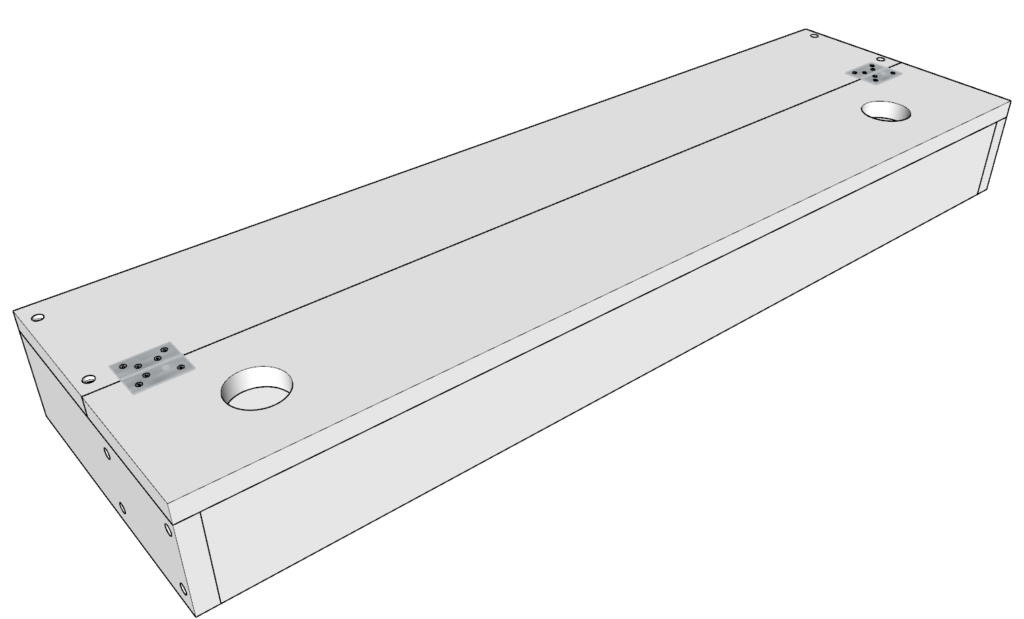
Next, drill a cable hole in the table top as shown below.

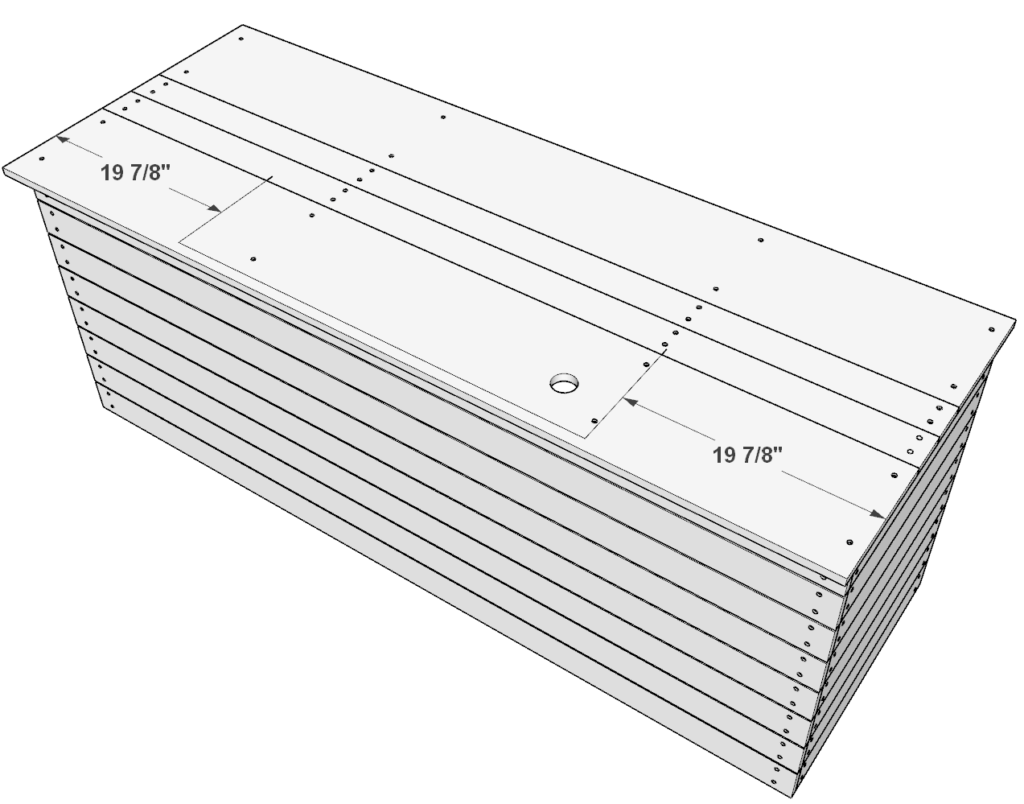
Step 15
Next, drill the cable hole for the mouse and keyboard.
Next, attach the keyboard and mouse tray by predrilling, adding glue, and adding 3.5 inch screws as shown below.

Step 16
Next, sand down the desk . This can be time consuming. I use an orbital sander to speed up the process
I use a rough 80 grit paper first and then finish it with a 220 grit paper.
Filling in the holes is optional.
At this point it is ready to be stained or painted!