Introduction
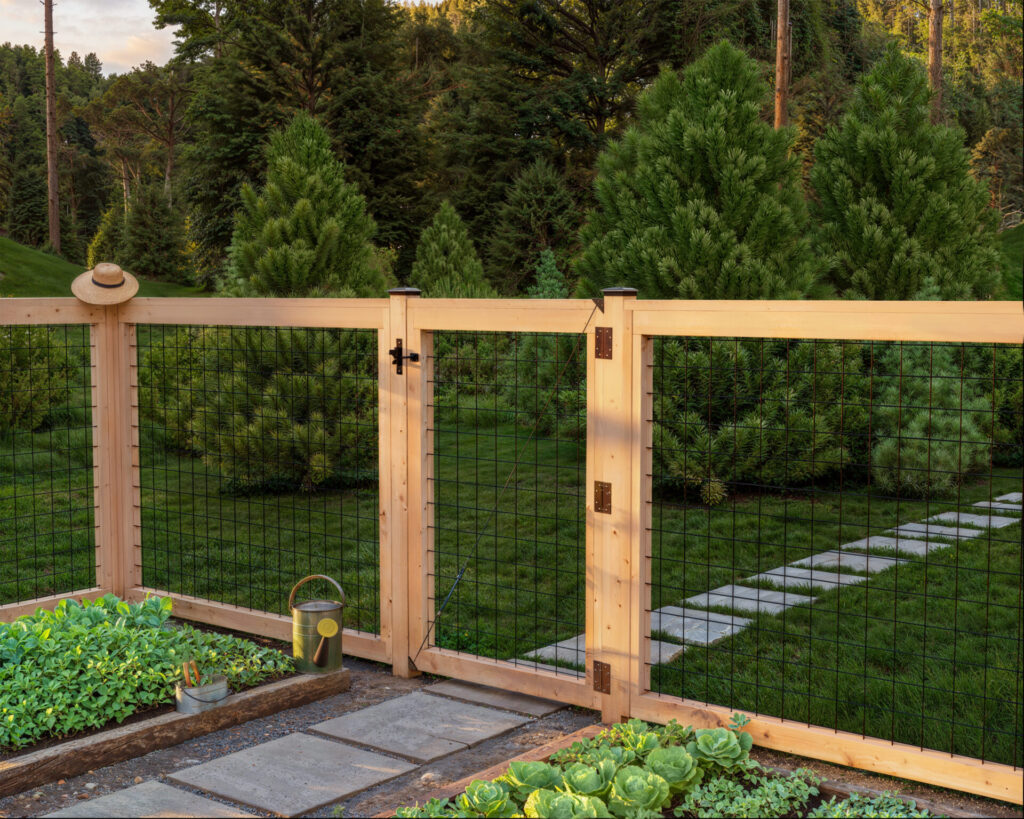
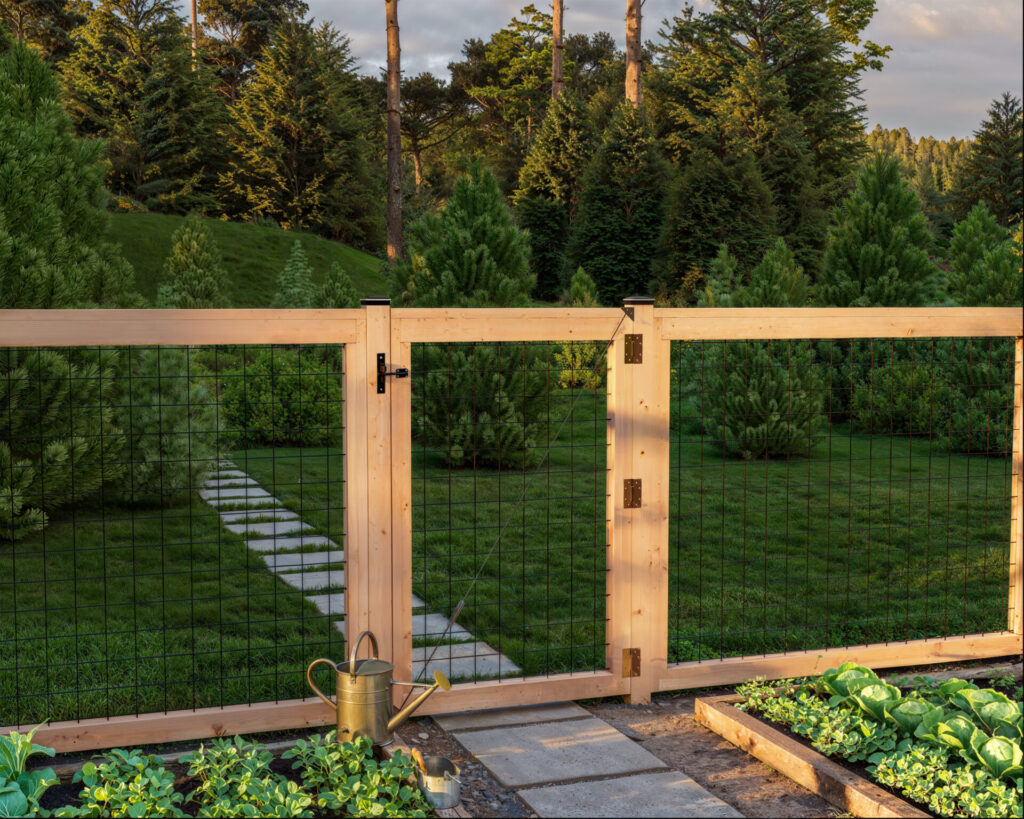
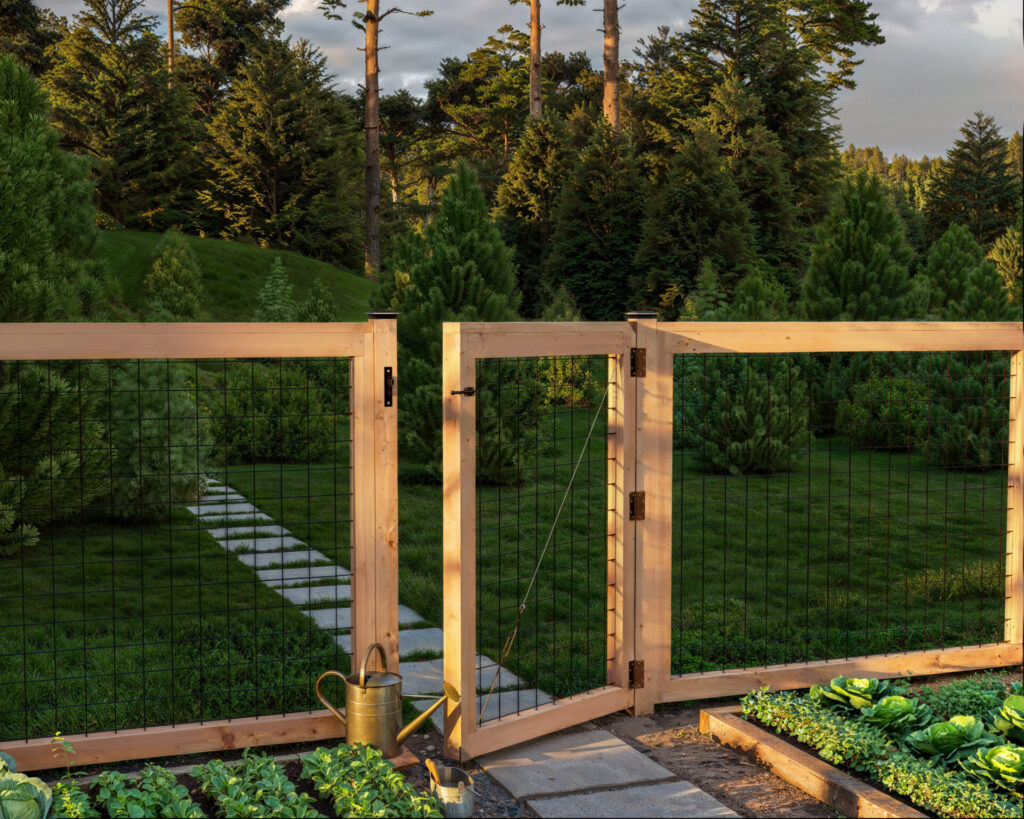
Welcome to our latest DIY masterpiece – the perfect gate to complement your stylish, secure, and scenic fencing project! This gate design is the crowning piece of our fencing solution, designed with the modern homeowner in mind, seamlessly integrating with our Wild Hog black metal railing fence panels. Now, you can complete your backyard sanctuary with a gate that not only matches the aesthetic of your fence but enhances the overall look and feel of your outdoor space.
Our DIY gate project is crafted to inspire and empower both beginners and experienced DIY enthusiasts alike. With clear, step-by-step instructions and vibrant 3D illustrations, this guide makes building your own gate not just a possibility, but a fun and rewarding project.

Key Features of Our Gate Guide:
Detailed Instructions: Our guide takes you through each step of constructing your DIY gate, ensuring that it fits perfectly with your Wild Hog black metal railing fence panels. From selecting materials to the final touches, we provide comprehensive guidance to create a gate that stands the test of time.
Material Selection: We’ve curated a list of materials that are not only cost-effective but also easy to find, ensuring that you can start your project without any delays.
Essential Tools: Emphasizing simplicity and accessibility, our guide requires only the essential tools, making sure that anyone can undertake this project with confidence.
Visual Clarity: Like our fencing guide, this gate guide comes with detailed 3D illustrations to visually guide you through each step, ensuring a smooth building process.
Perfect Compatibility: Designed to perfectly complement our fence panels, this gate not only enhances security and privacy but also ensures a seamless aesthetic across your property.
Whether you’re looking to complete your fencing project with a matching gate or simply need a standalone gate that combines style, security, and functionality, our DIY gate guide is the perfect choice. It offers an opportunity to not only beautify your home but to take pride in building something with your own hands.
Why Choose Our DIY Gate Plan?
This gate is more than just an entryway to your backyard; it’s a statement of style, a mark of craftsmanship, and a testament to your dedication to creating a beautiful, secure outdoor space. Pairing perfectly with our fencing panels, it offers an uninterrupted view of your surroundings while keeping your space secure and private.
Embrace the DIY spirit and complete your outdoor sanctuary with a gate that reflects your personal style and creativity. Purchase our DIY gate plan today and unlock the path to a beautiful, cohesive, and self-made backyard paradise.
Time to build
(varies with experience)
Cost
Estimated fence gate cost: $150 (material prices may fluctuate; verify current costs for accuracy)
Skill level required
Beginner
Download the PDF plans
Fence Gate PDF plan
What is included in the PDF download?
- Easy to read step by step instructions
- Material list
- Tools needed
- Helpful links to materials and tools needed
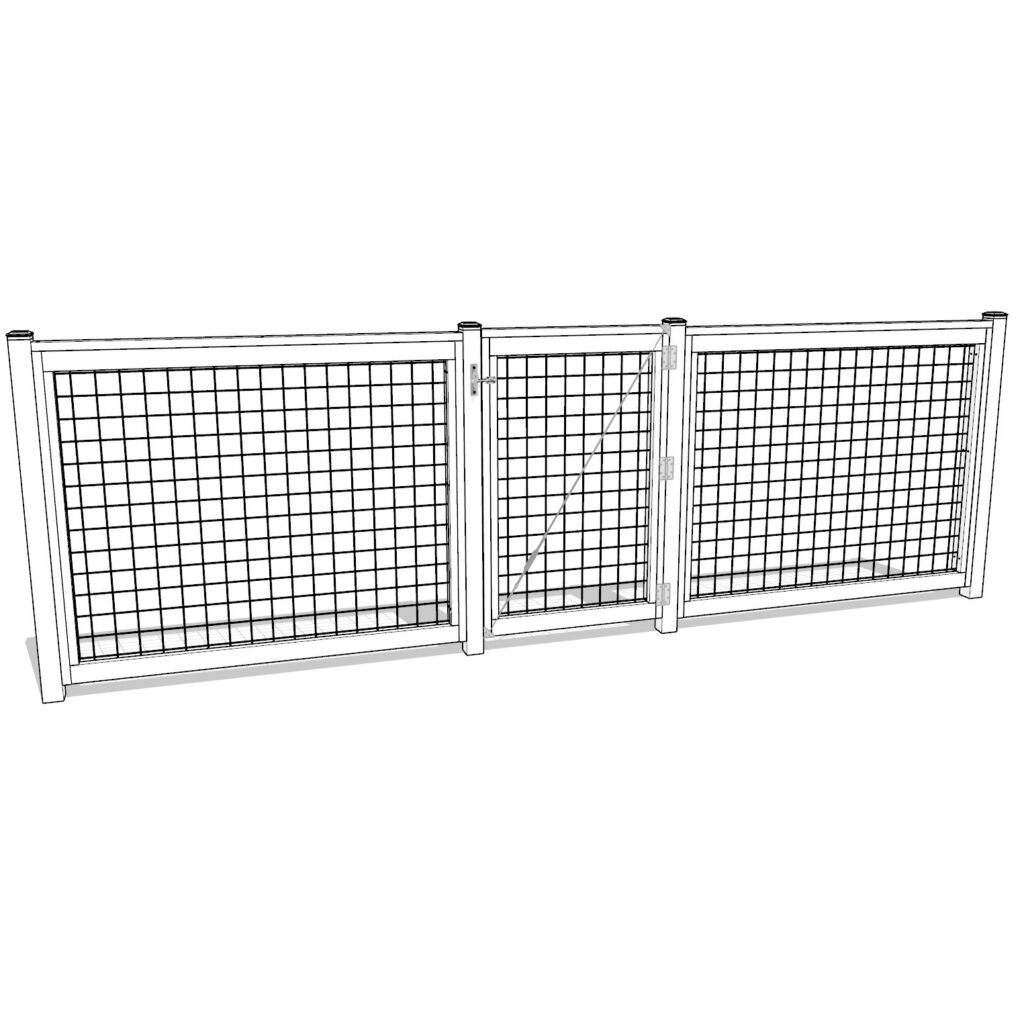
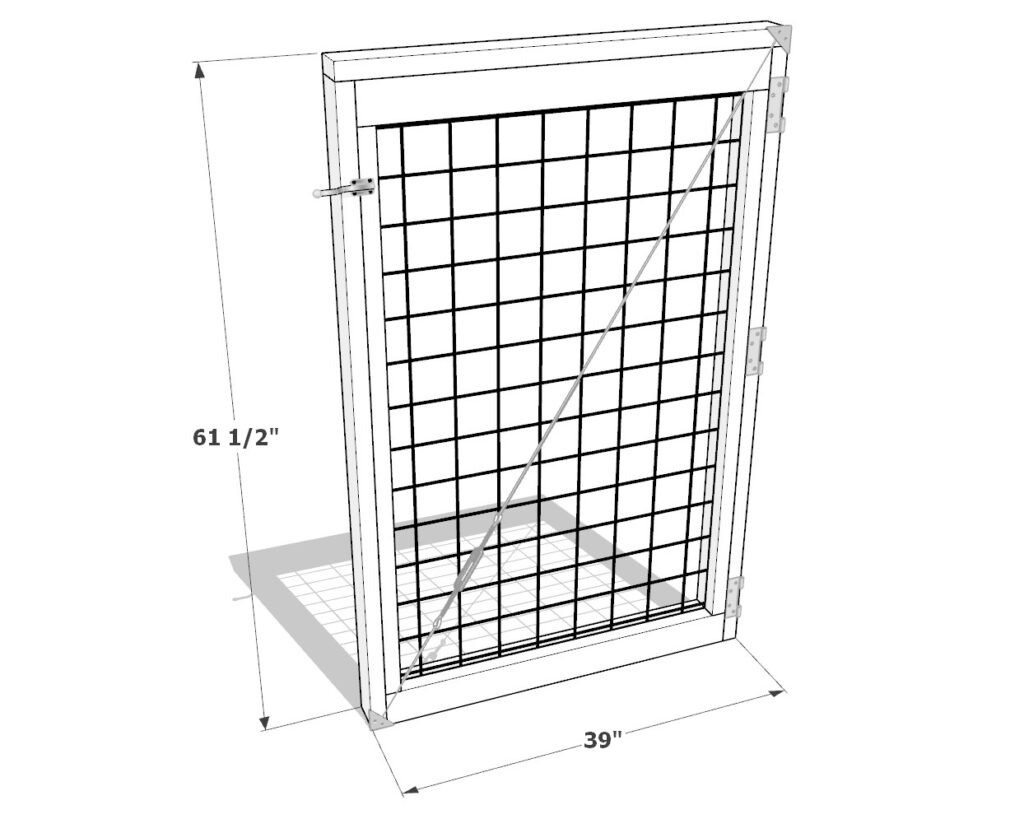
DIY Fence Gate Dimensions
Recommend tools and materials
Available with the purchase of the DIY plan PDF.
Lumber list and cut list
Available with the purchase of the DIY plan PDF.
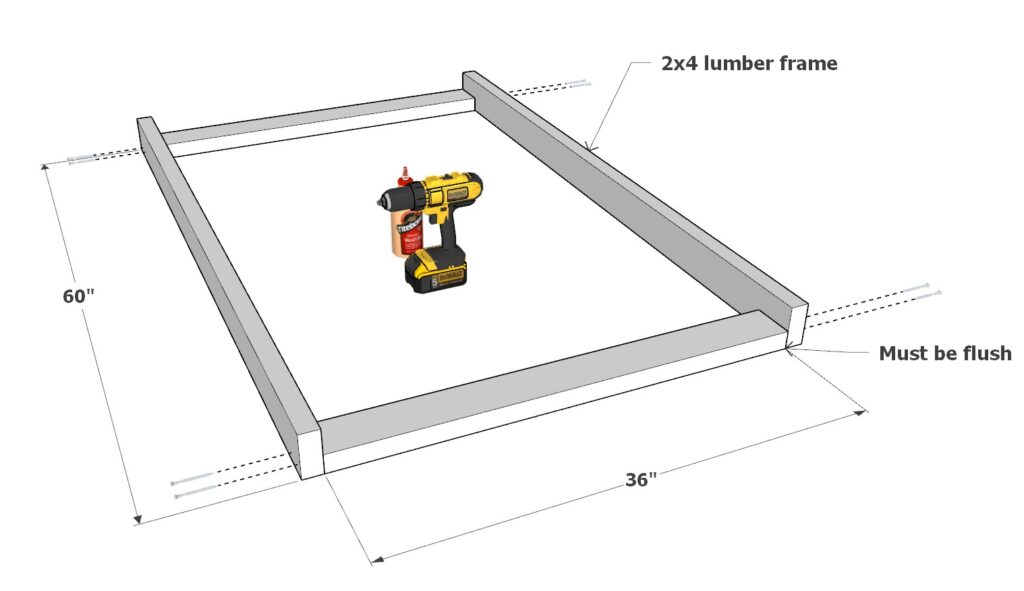
Step 1: Assembling the Gate Frame
Begin by gathering two 36-inch 2×4 lumber pieces and two 60-inch 2×4 lumber pieces and arrange them into a rectangular frame, as shown in the provided diagram.
To prevent the wood from splitting and ensure a strong connection, predrill holes at all the corners where the lumber pieces will be joined together. Apply a layer of wood glue and secure the frame together using 3.5-inch screws, providing optimal stability and durability for your gate.
Step 2: Installing the Metal Railing Panel on the Gate Frame
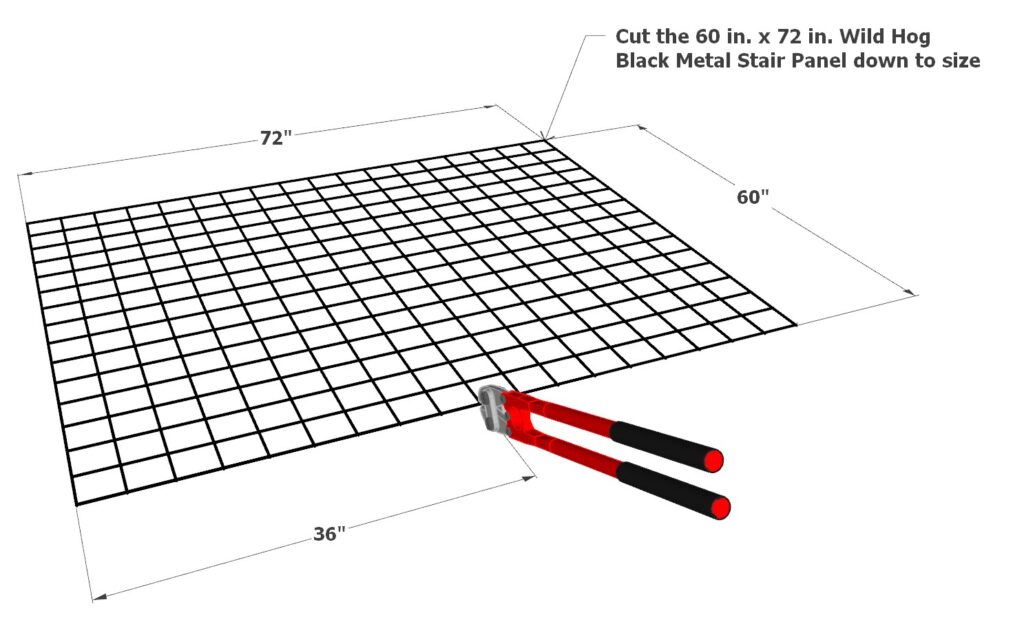
First, prepare the 60-inch x 36-inch metal railing panel for the gate. Cut a stock 72-inch x 60-inch panel down to size using bolt cutters, a grinder, or a metal saw, and then sand down the edges for a smooth finish.
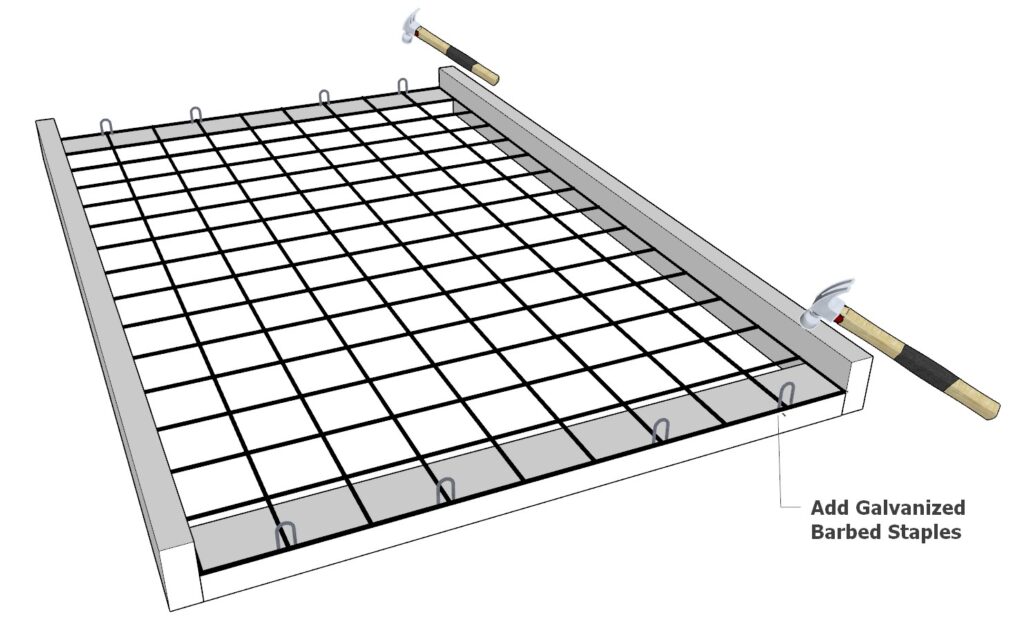
Next, place the 60-inch x 36-inch metal railing panel into the gate frame, ensuring it is properly positioned. Secure the panel with double point staples, hammering them into place until they are flush with the wooden frame and metal.
To prevent the metal railing panel from sliding or shifting within the frame, strategically place the staples to provide adequate support and stabilization. This may require evenly distributing the staples throughout the panel’s edges.

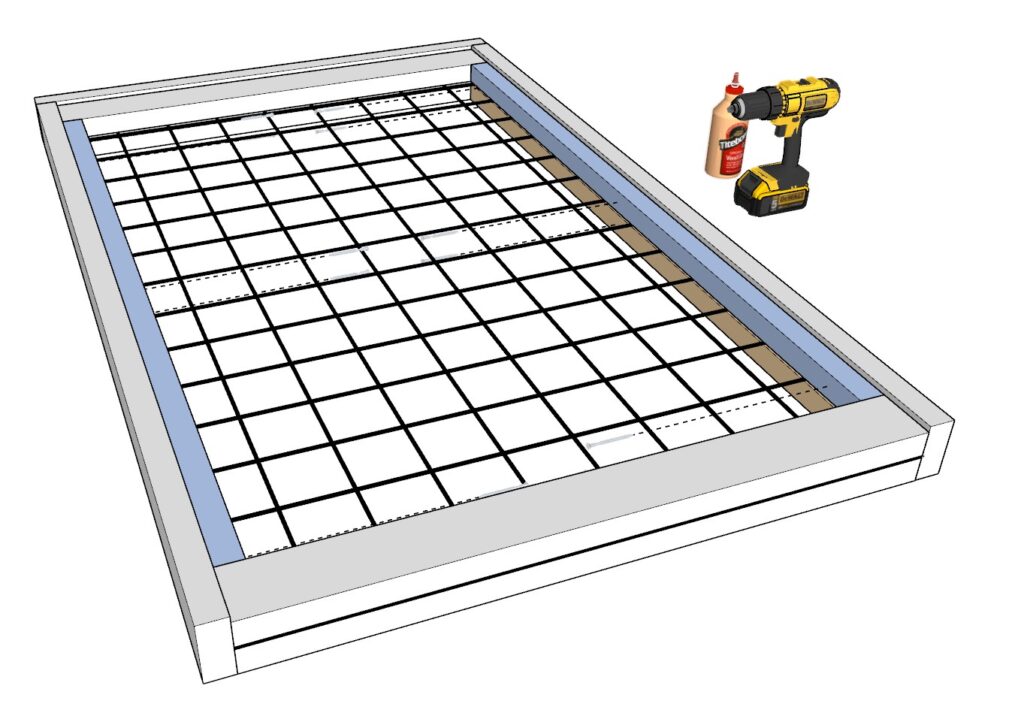
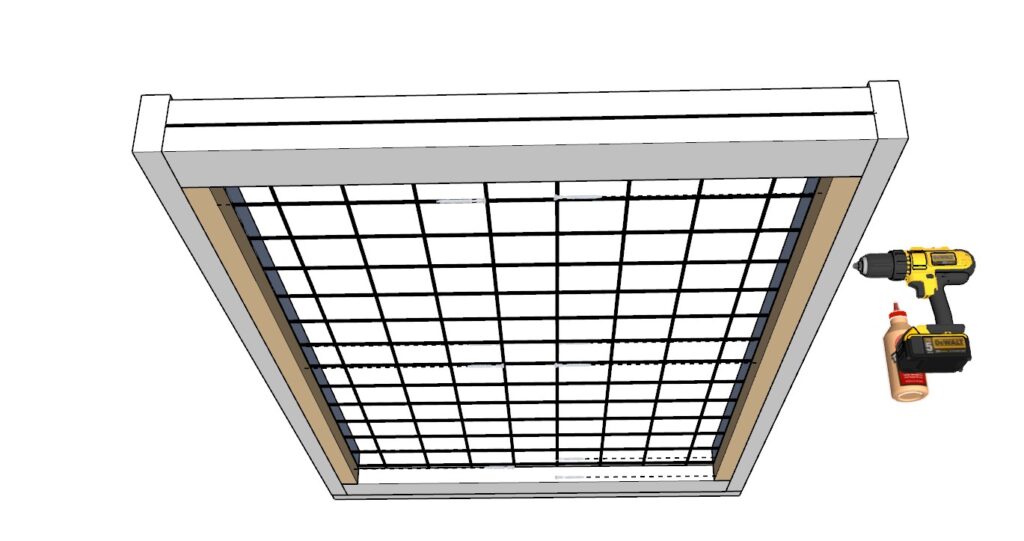
Step 3: Securing the Metal Railing Panel and Completing the Gate Assembly
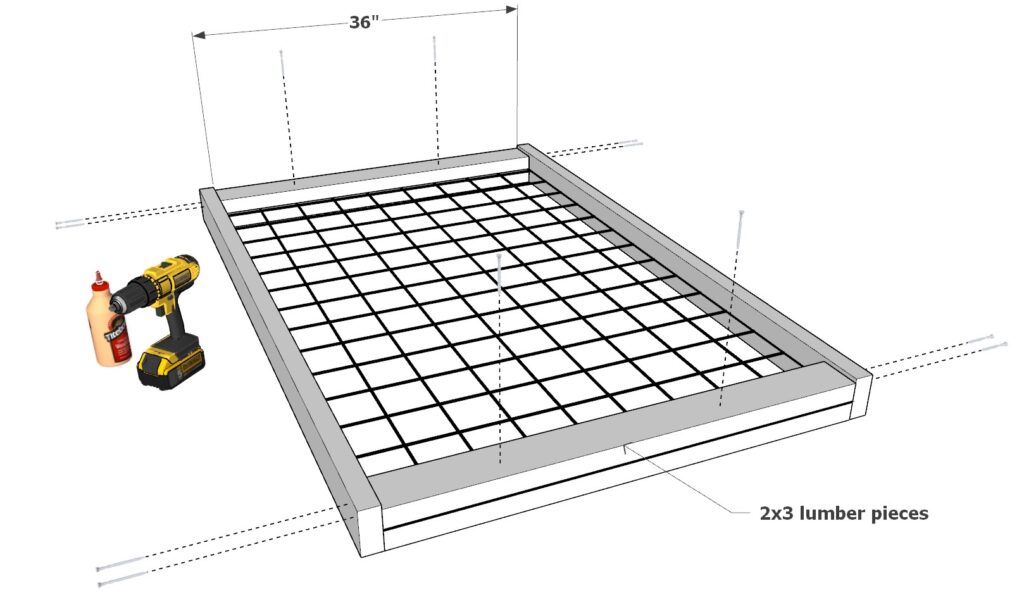
First, take two 36-inch 2×4 lumber pieces and place them directly on top of the metal railing panel to lock it in, as shown in the provided diagram. Predrill holes to prevent wood from splitting and secure the lumber pieces with screws, ensuring the metal panel is firmly held in place within the frame.
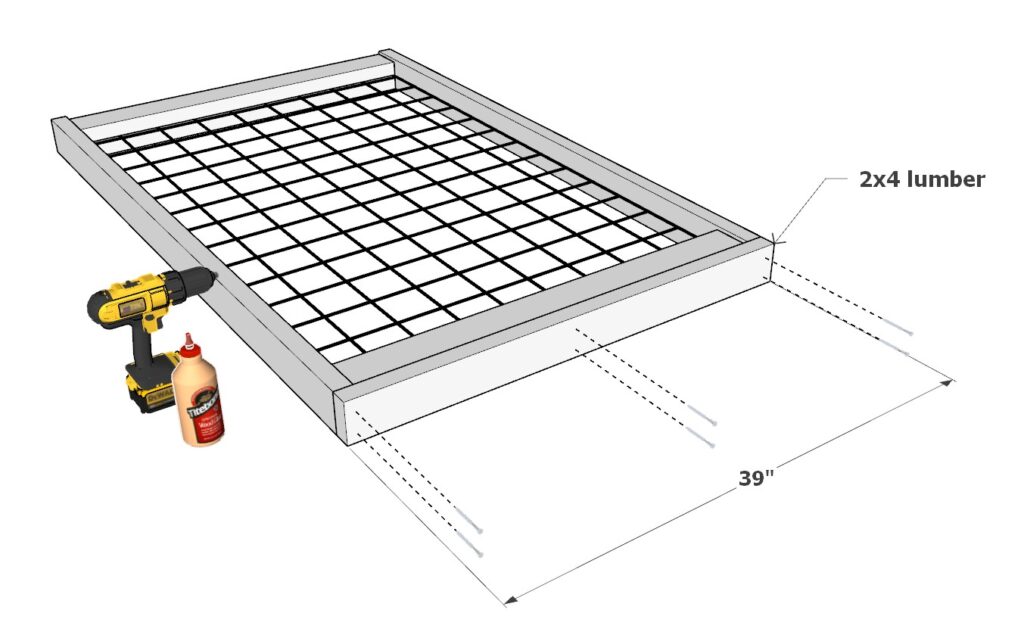
Next, “cap” off the gate by adding a 39-inch 2×4 lumber piece at the top of the gate frame. As before, predrill holes and secure the lumber piece with screws to keep the metal panel in place.
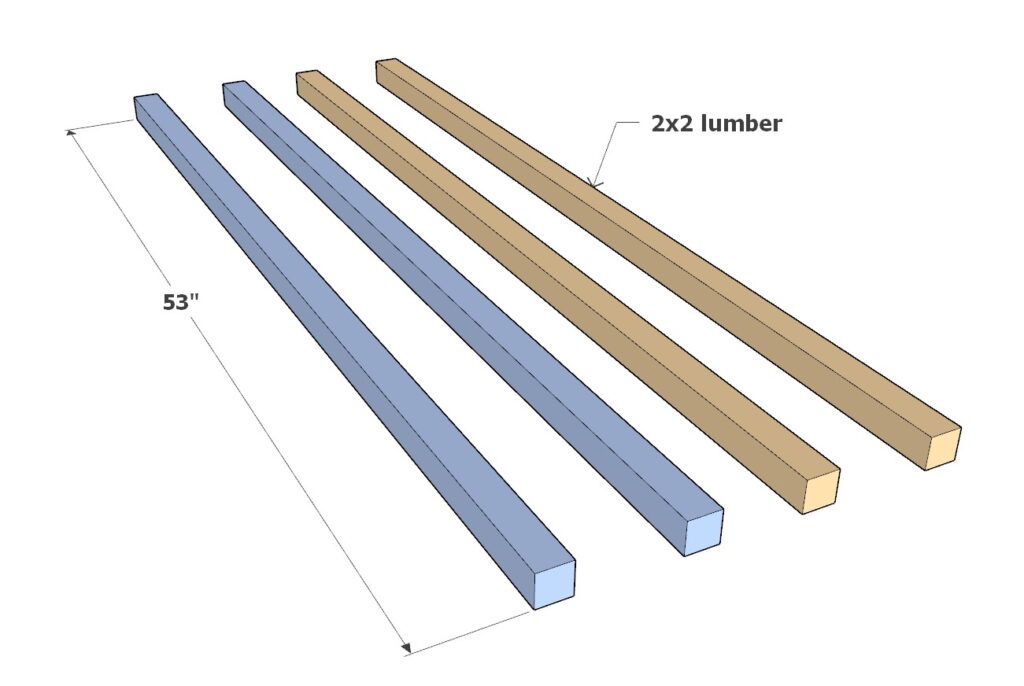
Lastly, add four 53-inch 2×2 lumber pieces to the positions indicated in the provided diagram. Use 2.5-inch screws to secure these in place to prevent them from showing through the other side. Before attaching, predrill holes, apply glue, and then fasten the screws, creating a strong and well-stabilized gate.
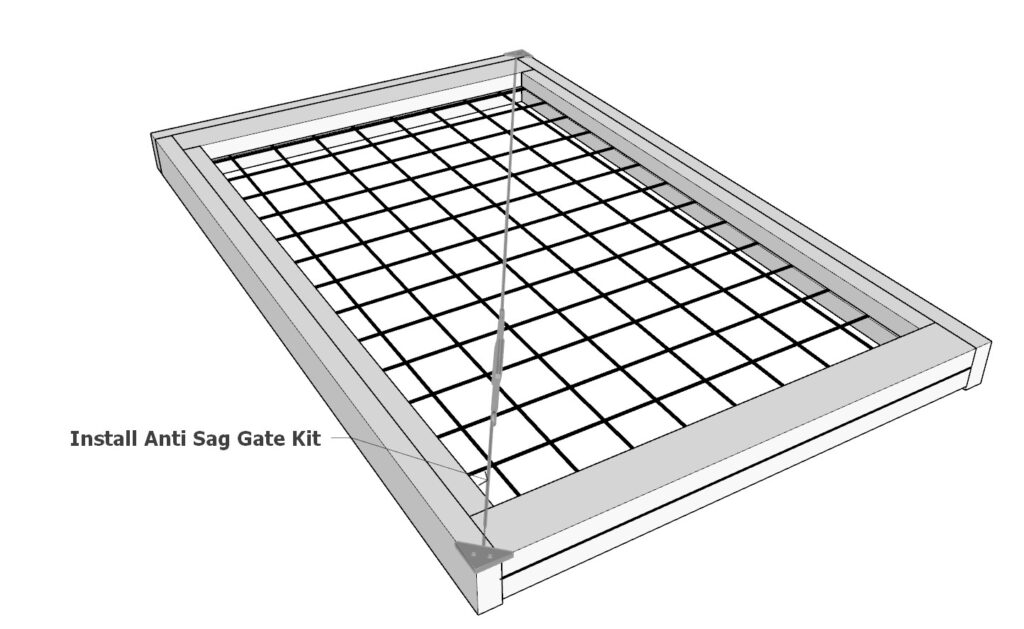
Step 4: Installing an Anti-Sag Gate Kit
To ensure the long-term stability of your gate and prevent sagging over time, we recommend installing an anti-sag gate kit. There are various kits available online, and while the specific installation may vary slightly, the general concept is similar for most kits.
1. Attach a metal bracket to the upper corner of the gate, located on the hinge side. Ensure it’s properly aligned and securely fastened in place.
2. Mount another bracket diagonally at the lower corner of the gate, on the latch side, following the same alignment and attachment process as the first bracket.
3. Attach cables to each corner bracket by threading them through the designated openings. Connect the two ends of the cable to a turnbuckle, which will allow you to adjust the tension as needed.
By properly installing and maintaining the anti-sag gate kit, you’ll help prevent your gate from sagging over time and keep it in optimal condition for years to come.
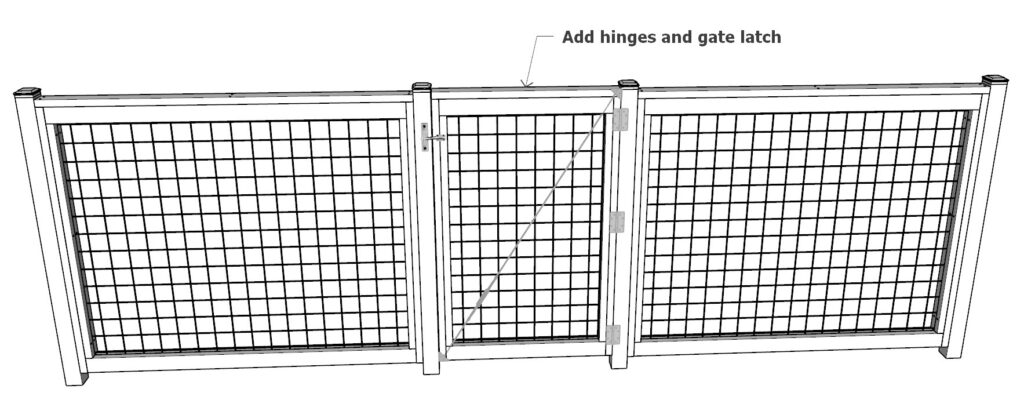
Step 5: Installing Hinges and Gate Lock Hardware
Now, it’s time to add the hinges and gate lock hardware to your gate.
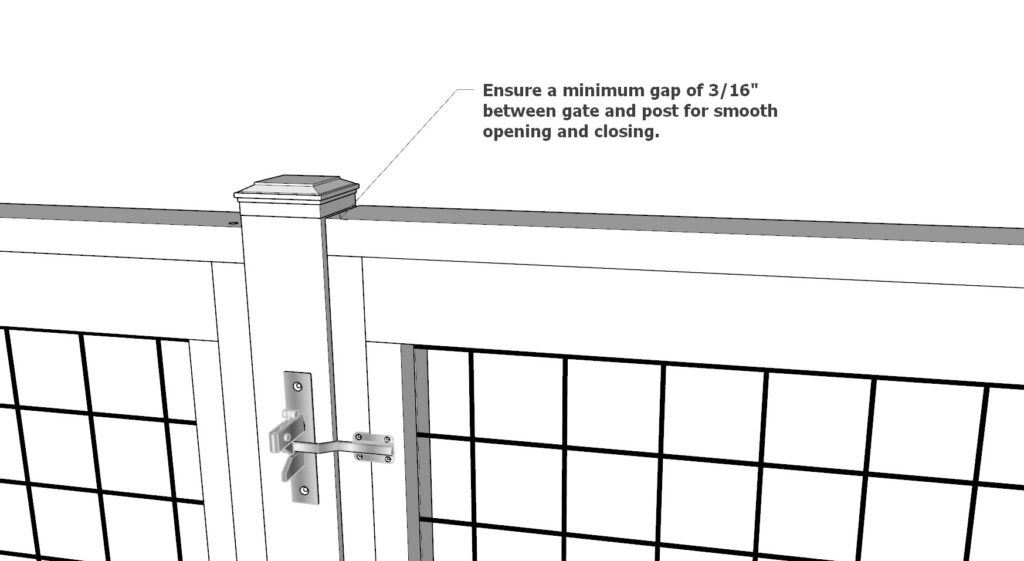
1. Start by attaching the hinges to the “flat” side of the gate, where the 2×4 lumber pieces are flush with one another. Make sure they are positioned correctly for proper alignment and movement.
2. Install the gate within the fence, ensuring that there is at least a 3/16-inch gap between the gate and the fence post. This gap is essential to prevent the gate from becoming stuck when opening and closing. If you find that the gap is too narrow, you can shave down the side of the gate that makes contact with the post until it has an appropriate clearance.
3. Once the gate is securely and properly installed, attach the gate lock hardware following the manufacturer’s instructions, ensuring it is securely fastened and functions properly.
With your gate fully assembled and installed, you can now proceed to paint or stain it to match your fence and create a seamless and cohesive appearance. Your gate is now ready to provide added security and functionality to your outdoor space.