
The Ultimate DIY Project: A Storage Bed Frame That Stands Out
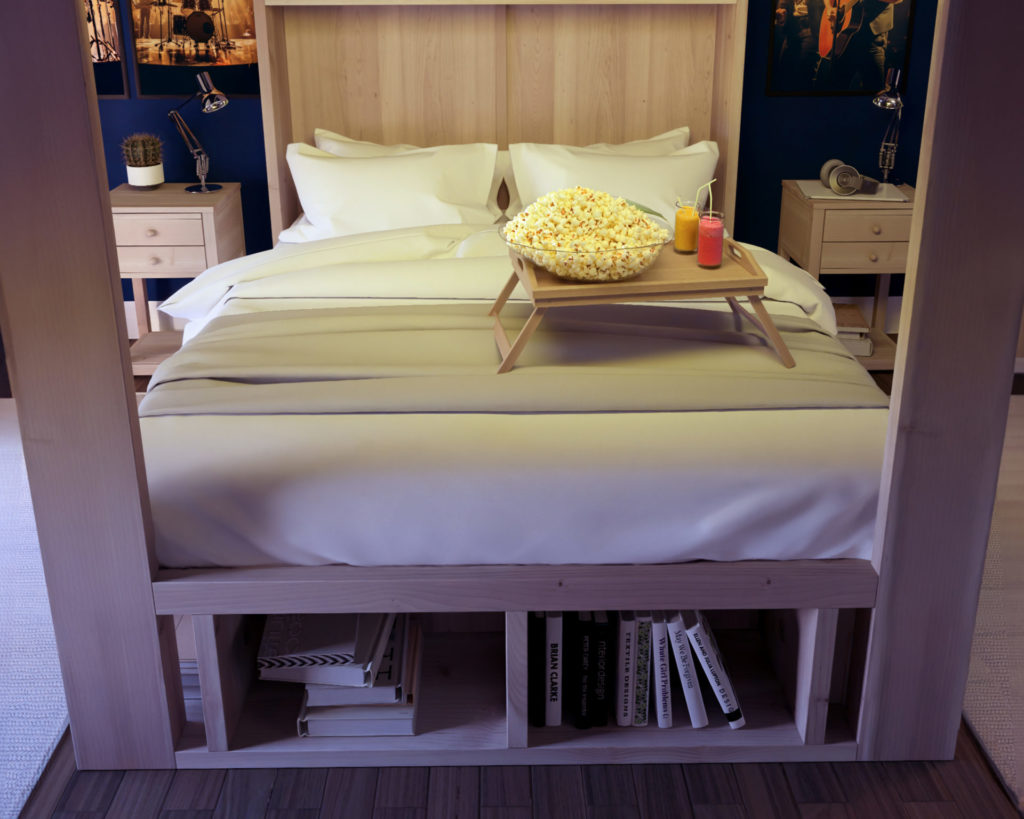
In every room, there’s a centerpiece that captures attention, sets the mood, and defines the space. In a bedroom, it’s often the bed, and with the DIY Storage Bed Frame, you can make that centerpiece uniquely yours.


Why This DIY Storage Bed Frame?
1. Modern Elegance: It’s not just a bed; it’s a statement. The sophisticated canopy design creates a personal space to unwind, watch a movie, or get lost in a book. This is more then just a bed, it’s a retreat right in your home.
2. Practical Design: Beyond its aesthetics, this bed frame shines with functionality. Open cubbies around the base are perfect for books, gadgets, and essentials. The tiered headboard offers additional storage, making it ideal for your speakers, alarm clock, and other personal items.
3. Beginner-Friendly: Though it’s a sizable project, it’s crafted with simplicity in mind. Avoiding complex cuts and intricate joints, it’s designed for those new to DIY. With clear directions and straightforward techniques, it’s a rewarding endeavor for both novices and experienced builders.
4. Seamless Assembly: Constructed to assemble outside the room, each piece easily transitions through standard doorways. The assembly process is intuitive, and the concealed hardware ensures a sleek, professional finish.
Step into the World of DIY
There’s a profound sense of accomplishment in creating something yourself, especially when it seamlessly combines utility and style. The DIY Storage Bed Frame offers that unique blend. Whether you’re an avid DIY enthusiast or just starting, this project promises satisfaction and a final product that elevates any space.
Dive into the experience, step by step, and craft a bed frame that’s not just functional, but a reflection of your style and ambition.
Time
18 hours (Varies based on experience)
Cost
$600 (Varies based on location and materials)
Skill level required
Beginner
DIY Storage Bed PDF Plan
What is included in the PDF download?
- Easy to read step by step instructions
- Material list
- Tools needed
- Helpful links to materials and tools needed
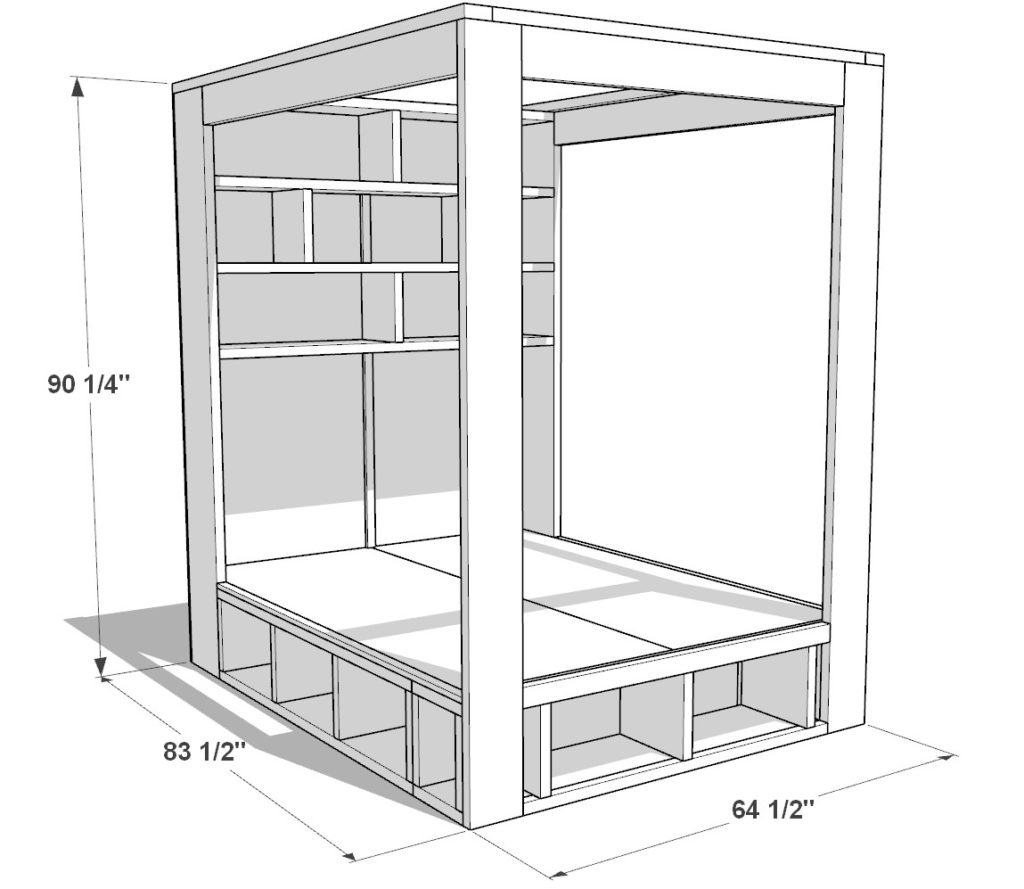
DIY Storage Bed Dimensions
Tools Needed for This Project:
Available with the purchase of the DIY PDF plan. Thank you for your support and for making this website possible!
Lumber Shopping & Cut List
Available with the purchase of the DIY PDF plan. Thank you for your support and for making this website possible!
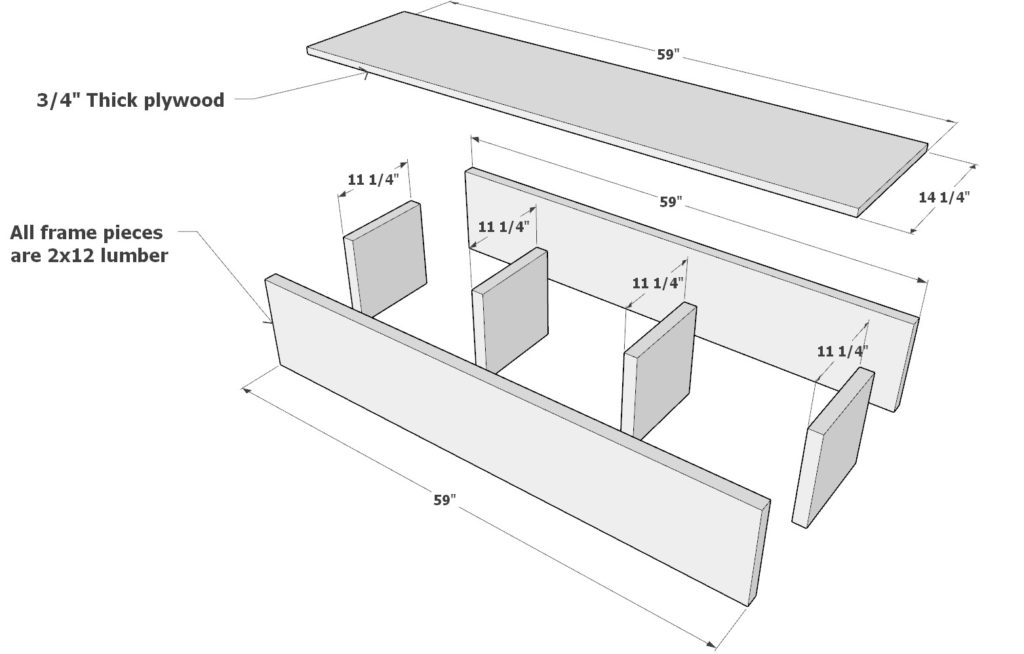
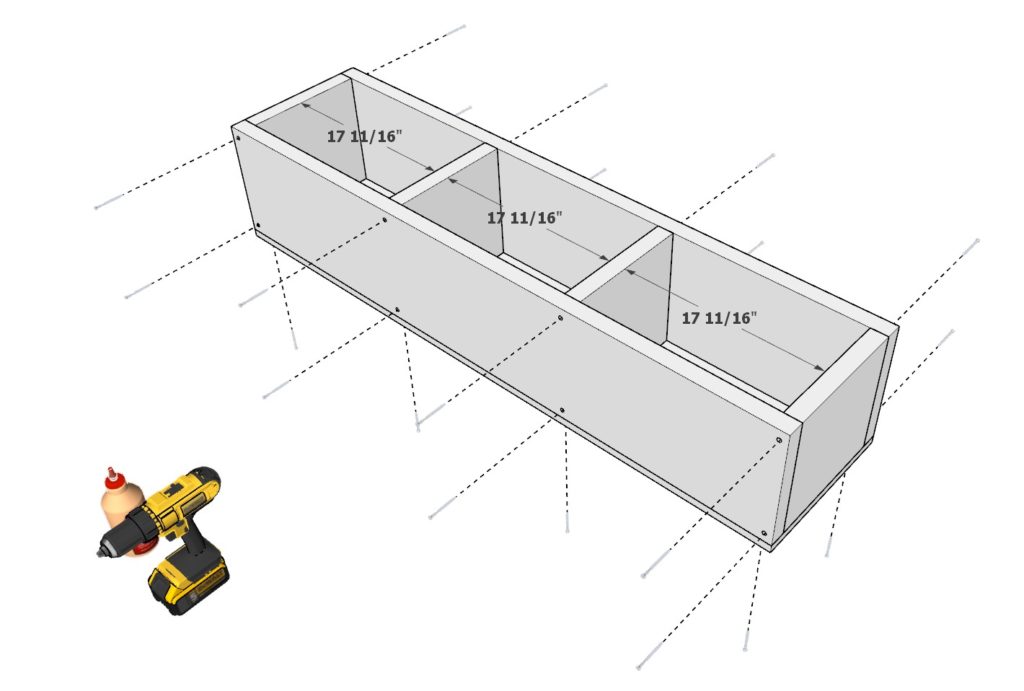
Step 1: Constructing the Side Storage Cubbies
Begin your storage bed journey by building the side storage cubbies. These cubbies will provide essential storage space and form the bed’s main structure.
Materials Needed:
- Two 59-inch long 2×12 lumber pieces.
- Four 11-1/4 inch long 2×12 lumber pieces.
- One 59in x 14-1/4in plywood sheet (3/4″ thick).
Instructions:
- Arrange the lumber pieces and plywood sheet as depicted in the accompanying diagram.
- Using 3.5-inch screws and wood glue, securely join the pieces together.
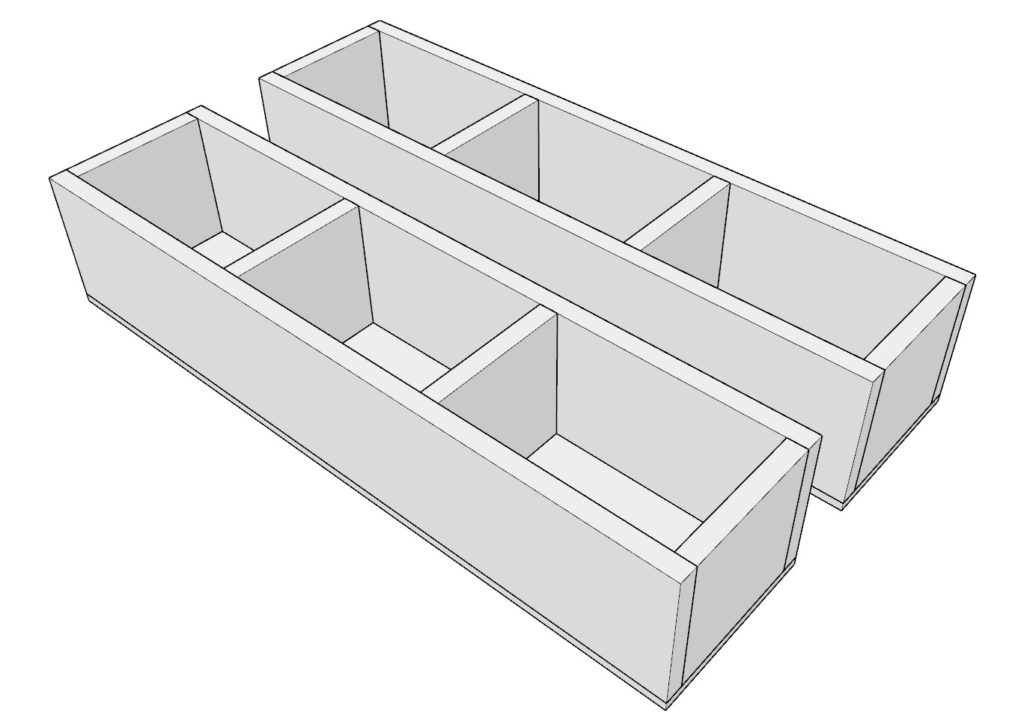
- Ensure you’ve created two identical cubby structures.
Pro Tips:
- Always predrill holes using a countersink bit to prevent wood splitting and achieve a smooth finish.
- Sand and plane your lumber pieces before assembly for a refined look.
- Consider painting or staining individual components or boards before full bed assembly for a cohesive and polished appearance.
Additional Endeavors Post David Series
Travel & Exploration Videos
- Long Form:
- In-depth explorations traveling to Israel, diving deeper into the locations mentioned in the series.
- Potential affiliations with Israeli travel agencies or tours for collaboration and detailed insights.
- Short Form:
- Quick snippets, highlights, and discoveries during the Israel trip.
- Long Form:
Complementary Blog
- Written content to accompany the video series.
- Provides readers with an alternative medium to explore the topics in depth, share insights, and discuss the content.
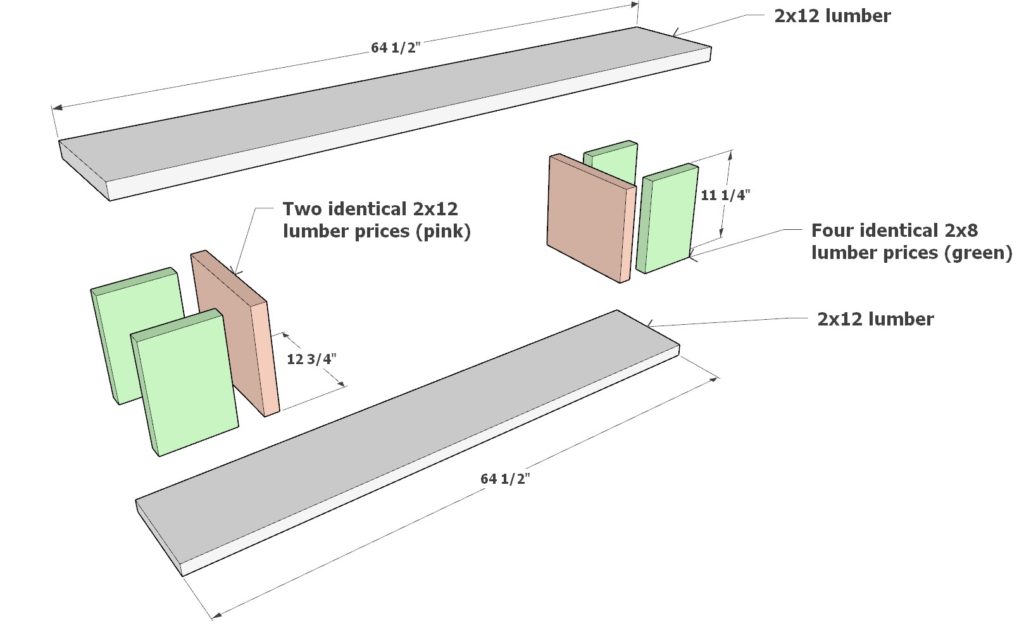
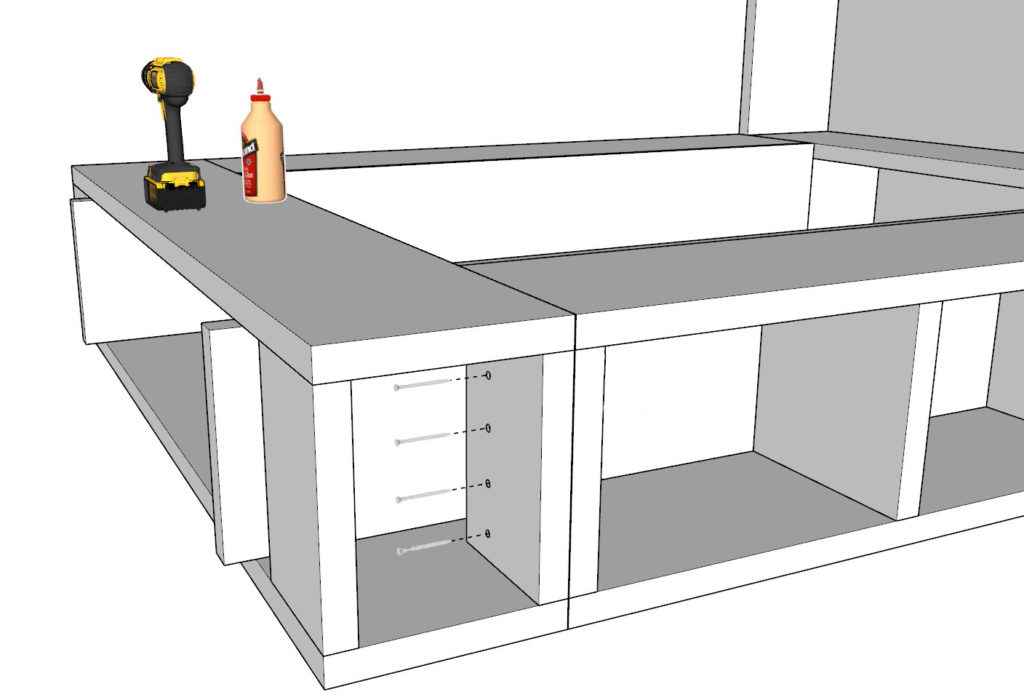
Step 2: Assembling the Footboard Shelves
The footboard shelves provide additional storage and anchor the bed’s design. Let’s construct them.
Materials Needed:
- Two 64-1/2 inch long 2×12 lumber pieces.
- Two 12-3/4 inch long 2×12 lumber pieces.
- Four 11-1/4 inch long 2×8 lumber pieces.
Instructions:
- Lay out the lumber pieces as illustrated in the accompanying diagram.
- Using 3.5-inch screws combined with wood glue, fasten the pieces together securely.
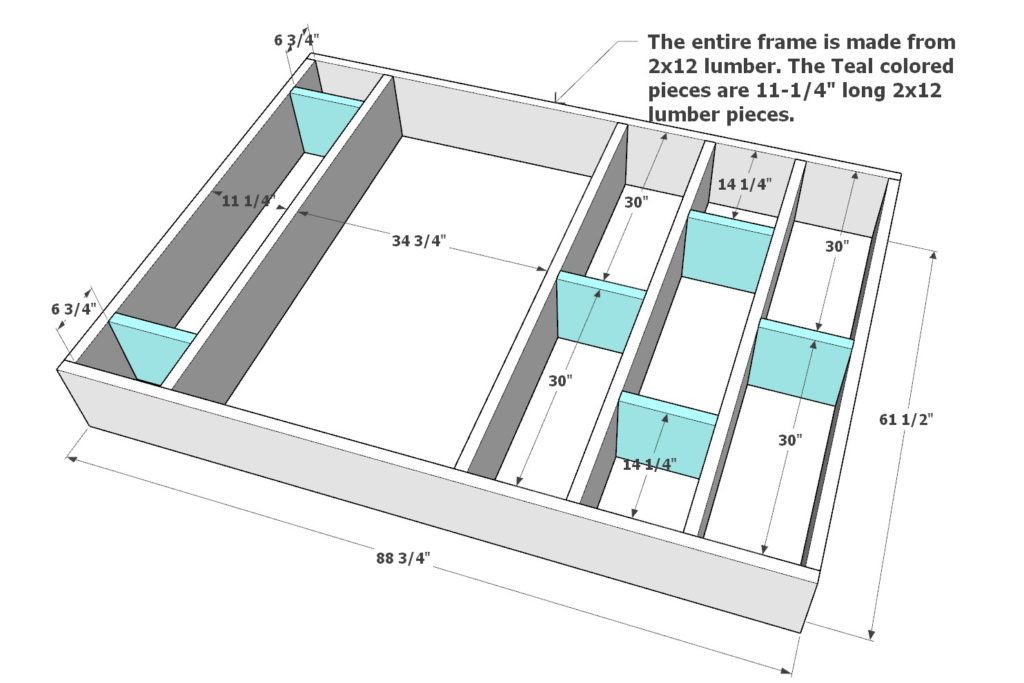
Step 3: Constructing the Headboard with Storage Cubbies
The headboard isn’t just a decorative element—it’s a storage powerhouse. Let’s build it.
Materials Needed for the Frame:
- Two 88-3/4 inch long 2×12 lumber pieces.
- Six 61-1/2 inch long 2×12 lumber pieces.
- Six 11-1/4 inch long 2×12 lumber pieces.
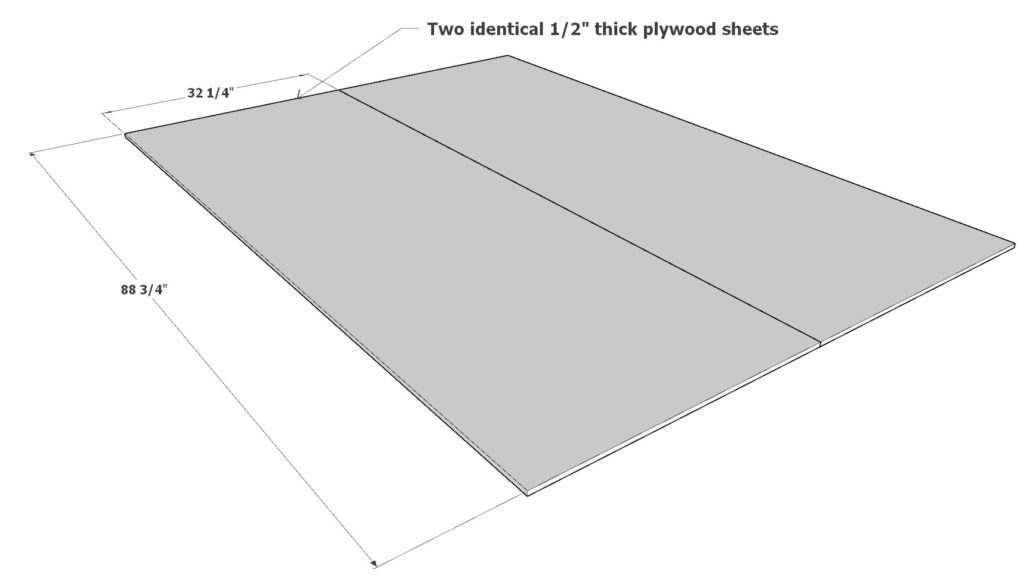
Materials Needed for the Backing:
- Two 32-1/4 inch x 88-3/4 inch plywood sheets (1/2″ thick).
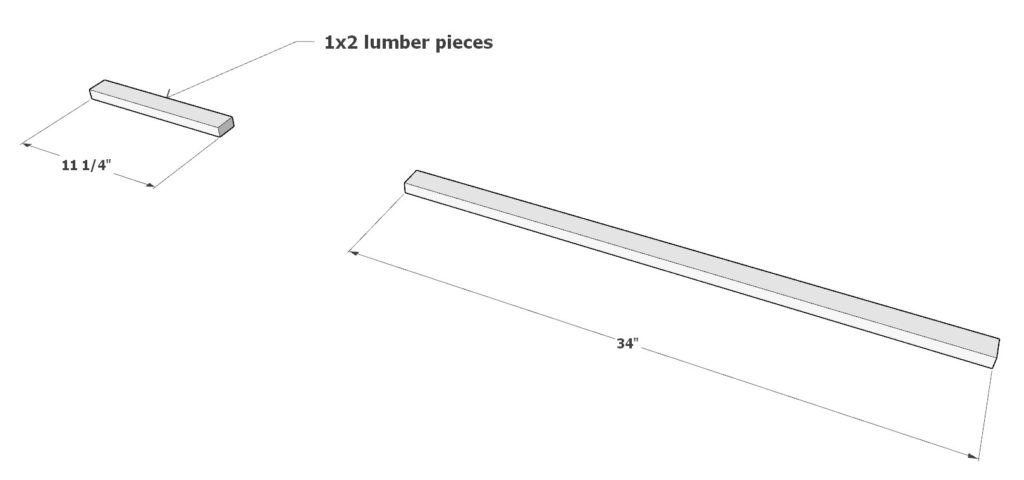
Materials Needed for Finishing:
- One 11-1/4 inch long 1×2 lumber piece.
- One 34 inch long 1×2 lumber piece.
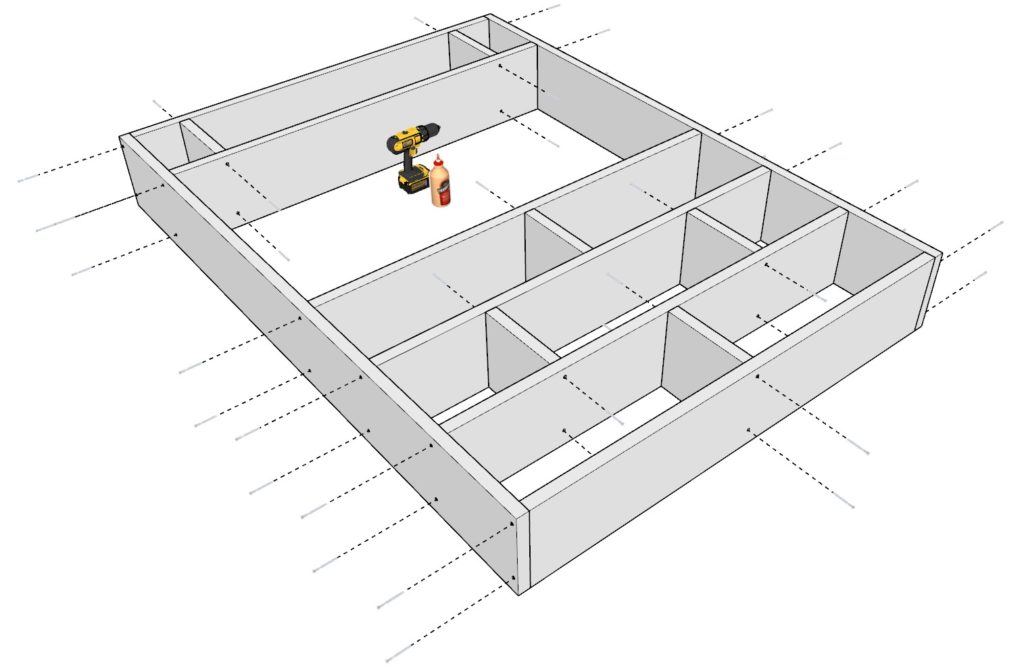
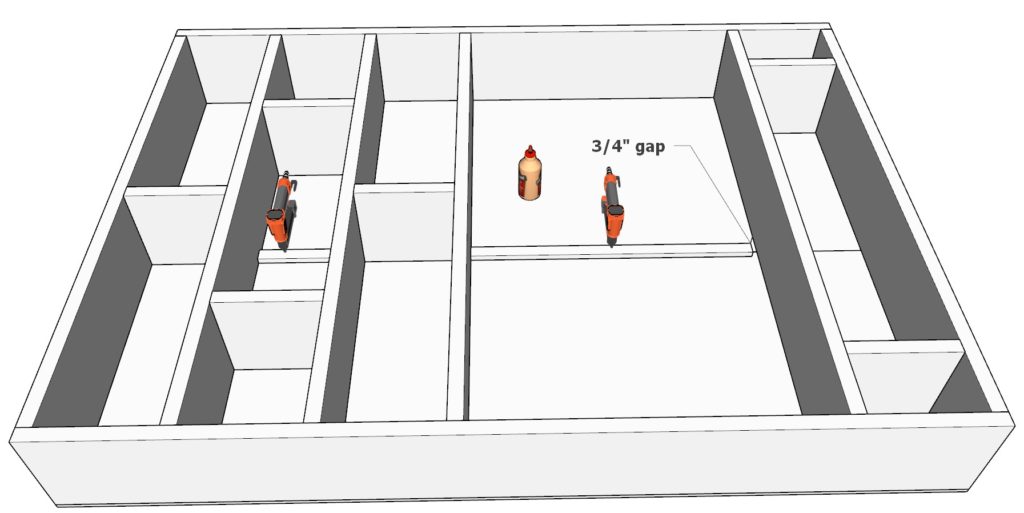
Instructions:
- Lay out the lumber pieces for the frame as illustrated in the accompanying diagram.
- Using 3.5-inch screws and wood glue, securely fasten the pieces together.
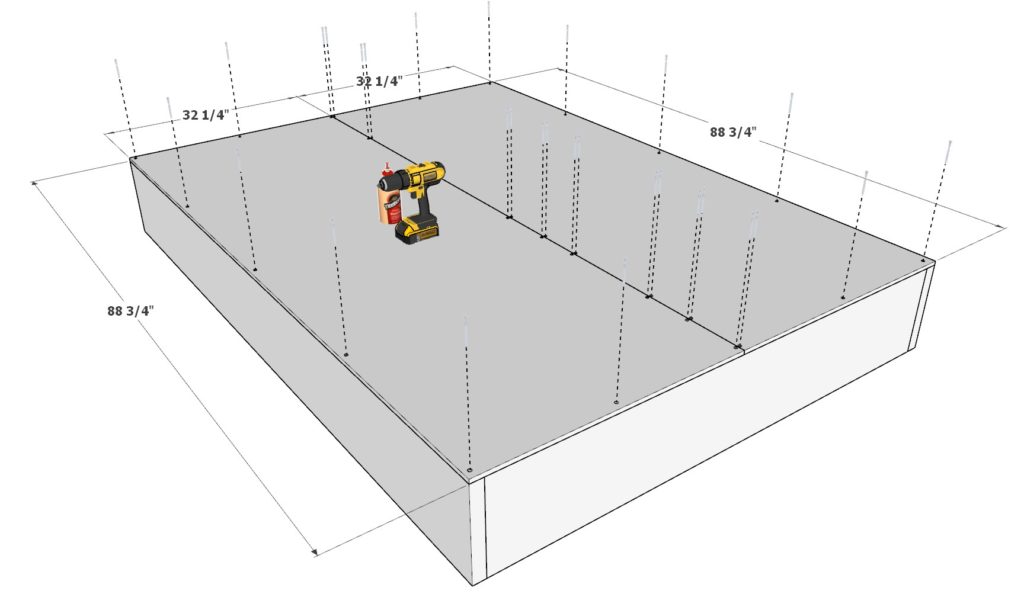
- Attach the plywood sheets to the back of the frame using 2.5-inch screws and glue for added stability.
- To give the headboard a polished look, conceal the plywood seam by attaching the 1×2 lumber pieces. Secure them to the frame using a pin nailer, pin nails, and glue.
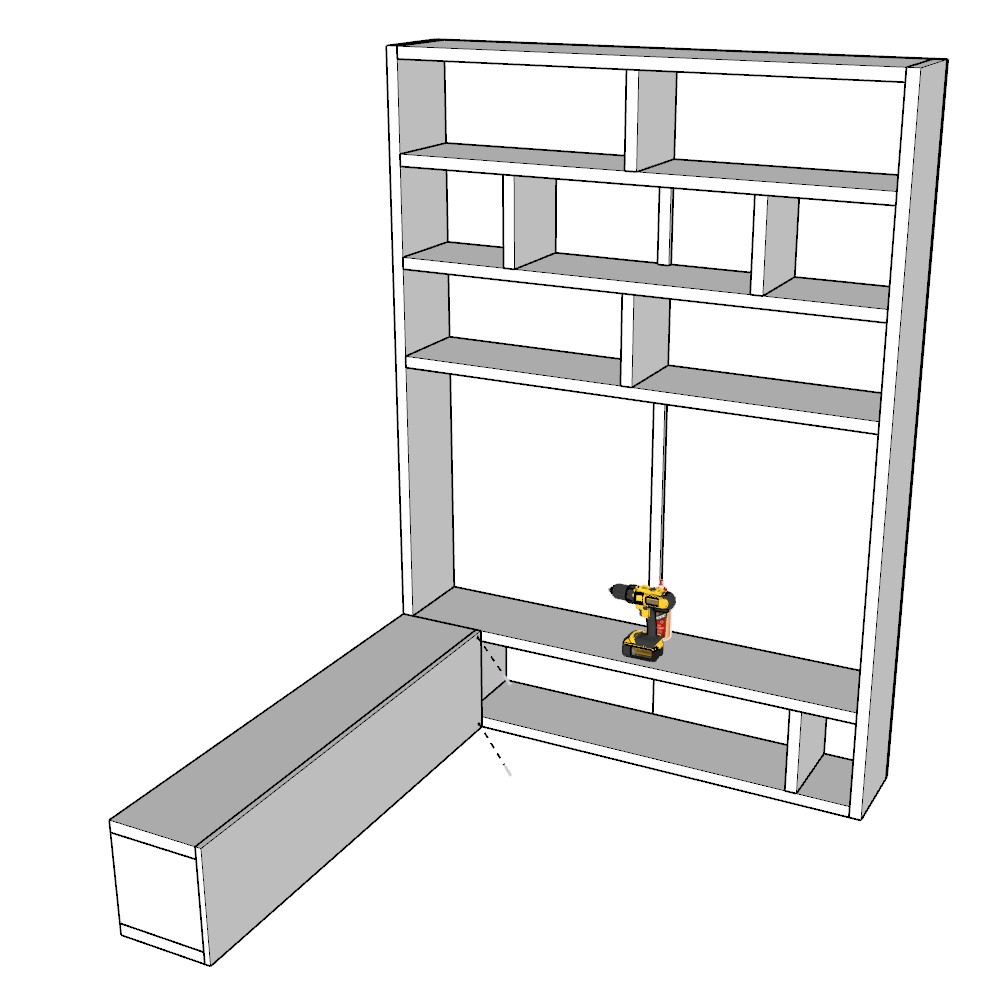
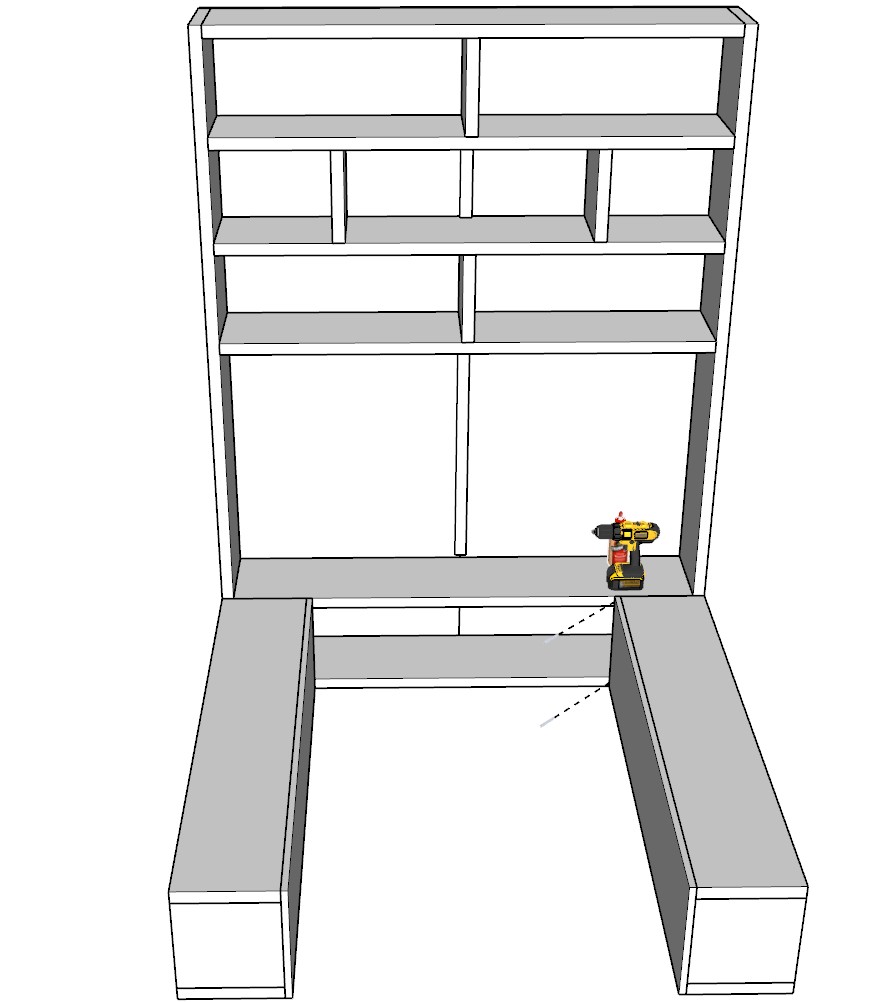
Step 4: Room Assembly and Safety Precautions
Bringing your bed to life requires careful assembly in its final location. Here’s how to do it safely and efficiently.
Preparation:
- Carefully transport each component through the door. Ensure you have a helping hand, as these pieces can be heavy and cumbersome.
- Begin with the back shelf component, setting it upright. Enlist assistance to stabilize it and prevent any dangerous tip-overs during assembly.
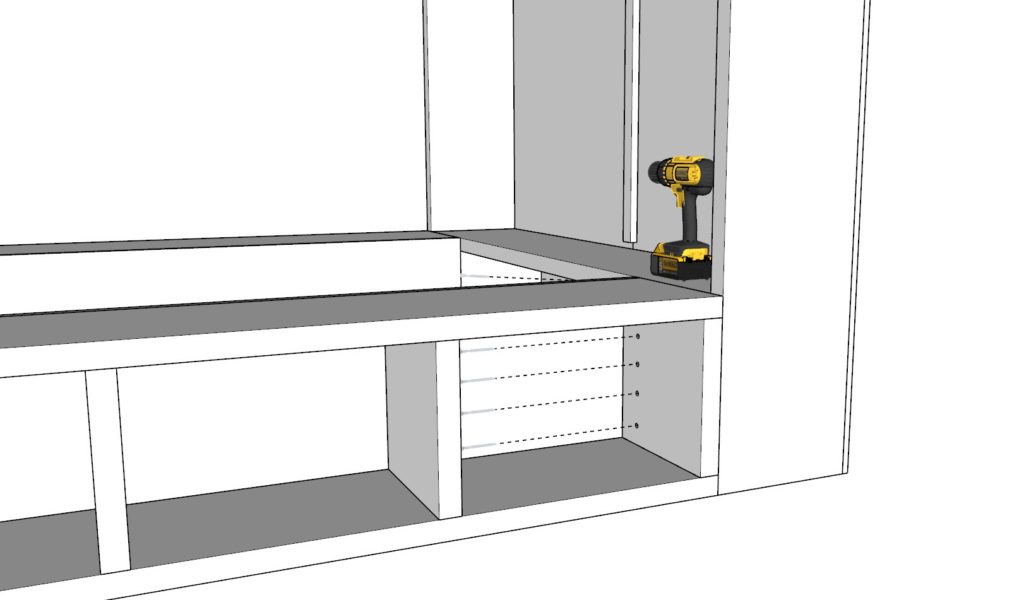
Assembly:
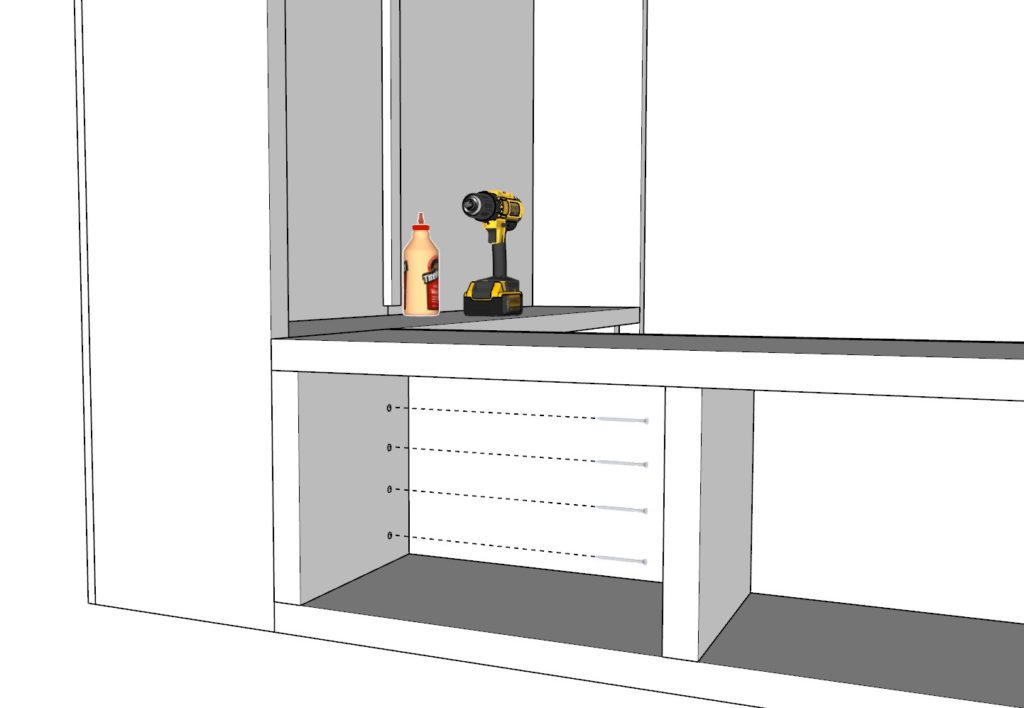
- Attach the bed side storage components to the back shelf. Use wood glue and 3.5-inch screws for a secure fit.
- Add the footboard cubbies next, again securing with 3.5-inch screws and wood glue.
Safety Precautions:
- It’s crucial to anchor the tall shelf components to the wall. As these shelves get filled with books and other items, the added weight poses a tipping hazard. Anchoring ensures stability and safety, protecting you and your loved ones from potential accidents.
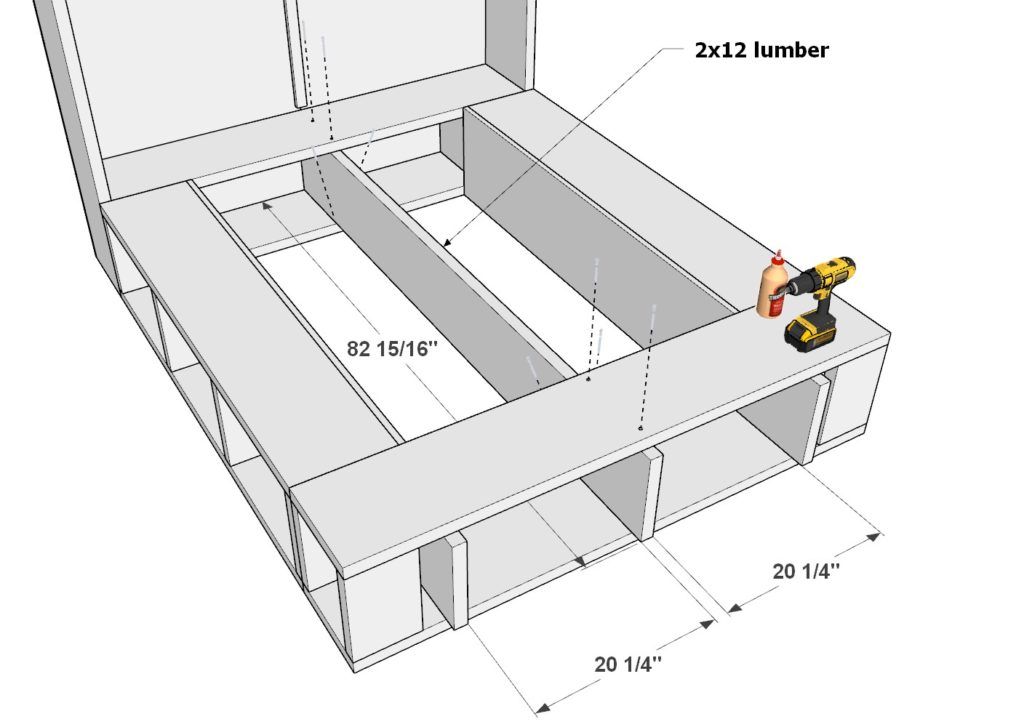
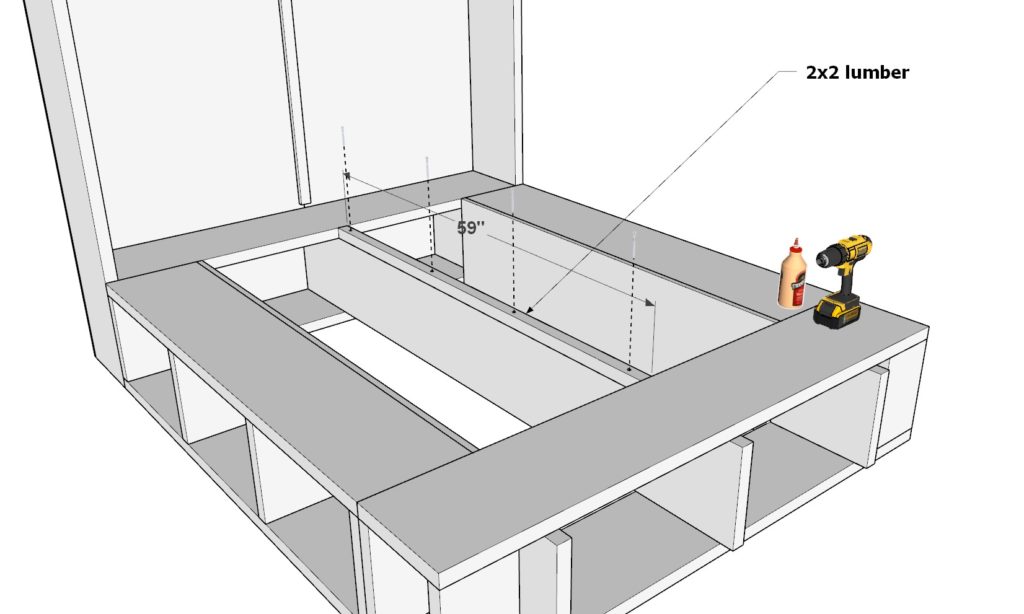
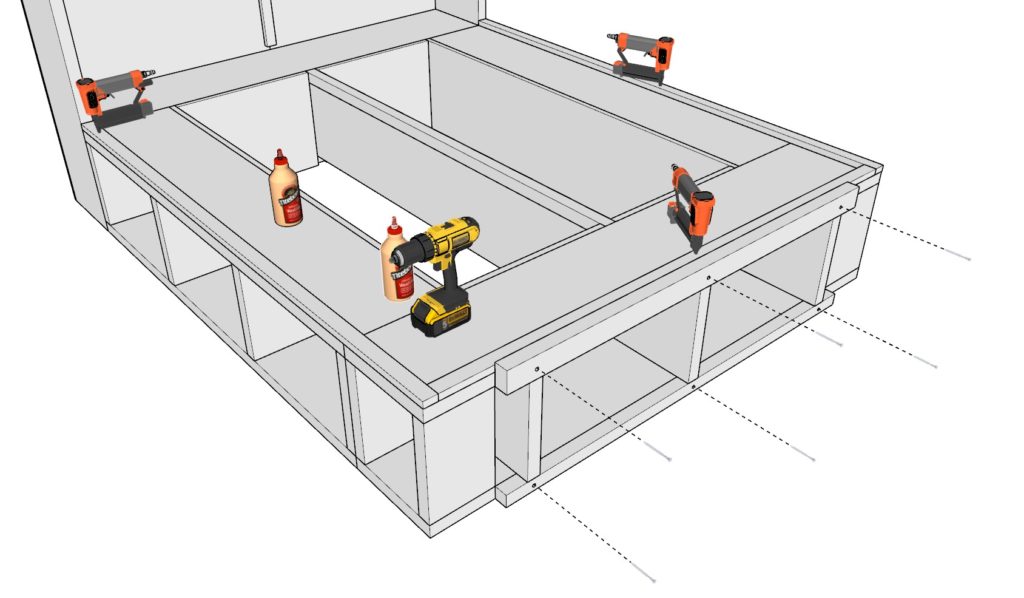
Step 5: Installing the Central Support and Plywood Rest
Creating a sturdy foundation for your mattress is crucial for comfort and longevity. Here’s how to set up the central support system.
Materials Needed:
- One 82-15/16 inch long 2×12 lumber piece.
- One 59 inch long 2×2 lumber piece.
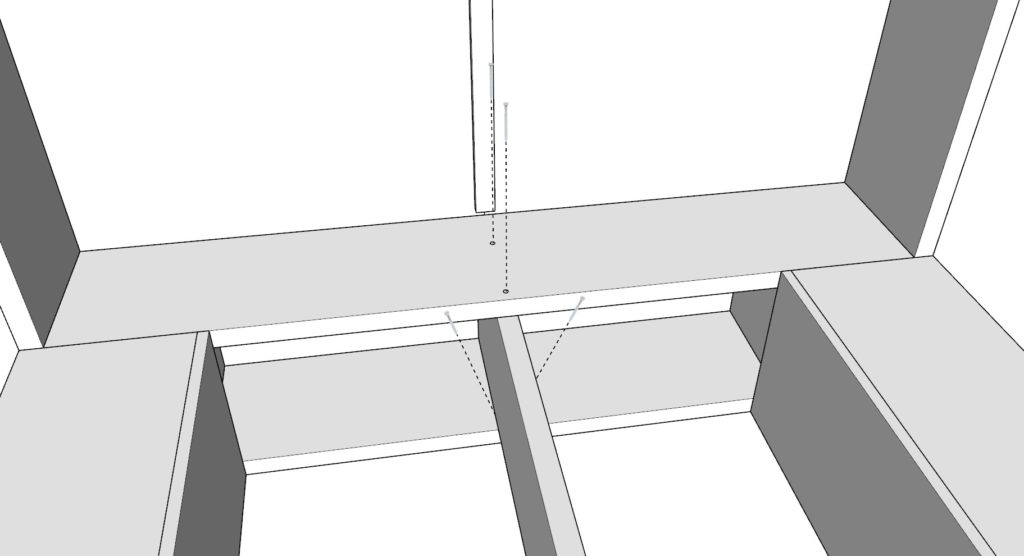
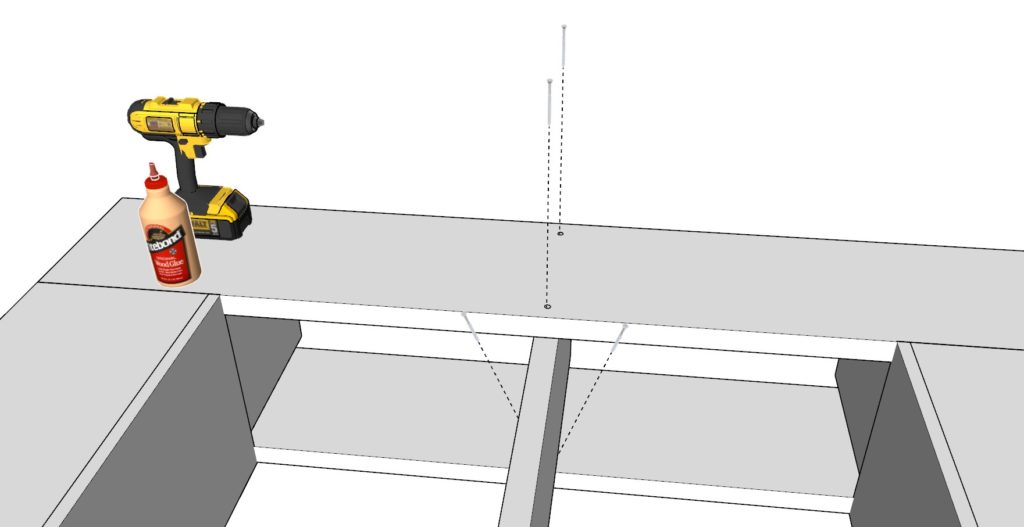
Instructions:
- Place the 2×12 lumber piece down the center of the bed frame. This will act as the primary support for the plywood sheets that hold the mattress. Secure it using 3.5-inch screws.
- Lay the 2×2 lumber piece on top of the central support, ensuring it aligns correctly. Fasten it into place with 3.5-inch screws.
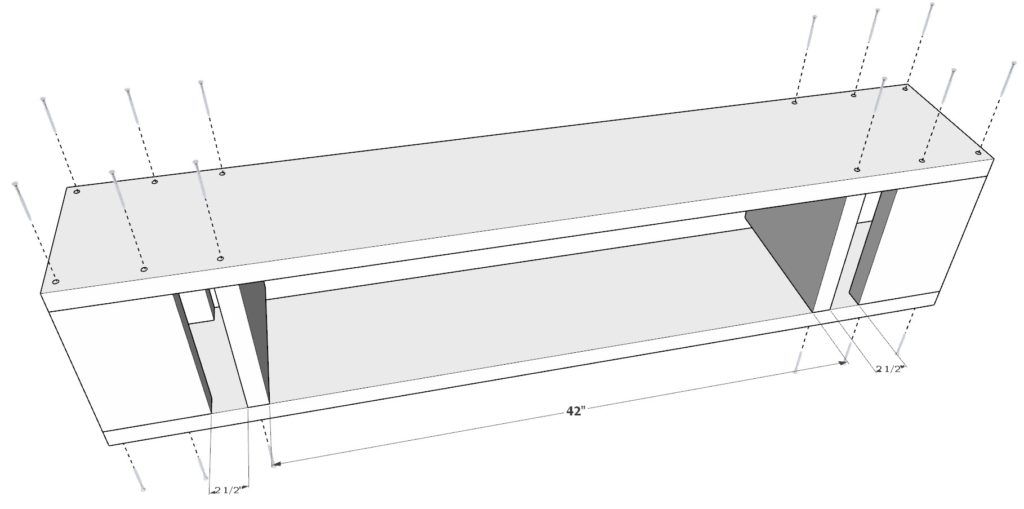
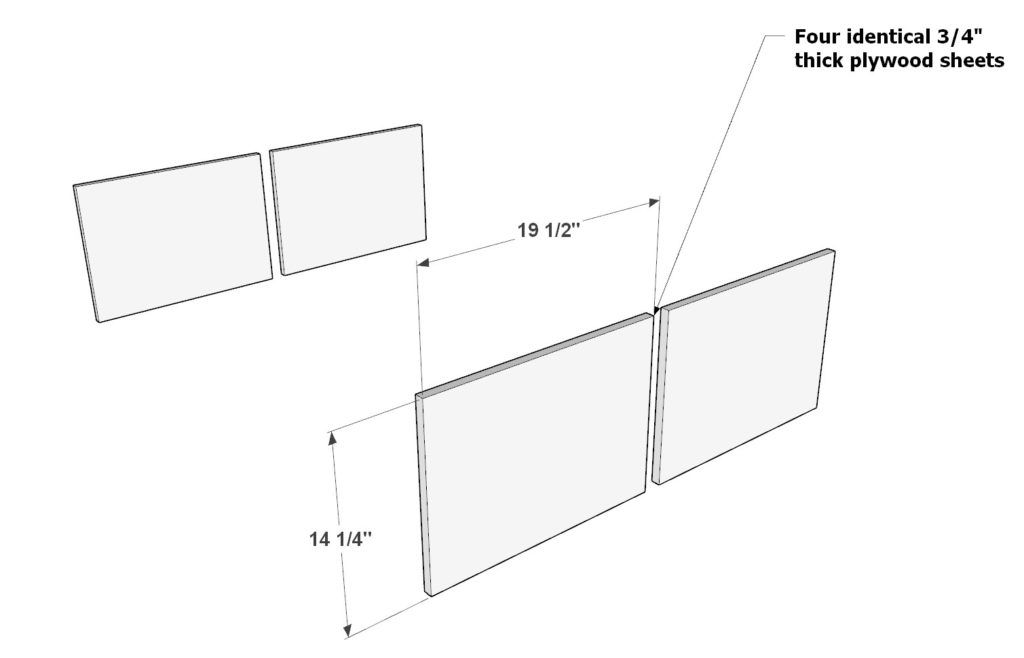
Step 6: Enhancing the Cubbies and Setting the Mattress Base
A bed is as much about aesthetics as it is about function. This step will ensure your bed’s storage looks polished and the mattress base is solidly supported.
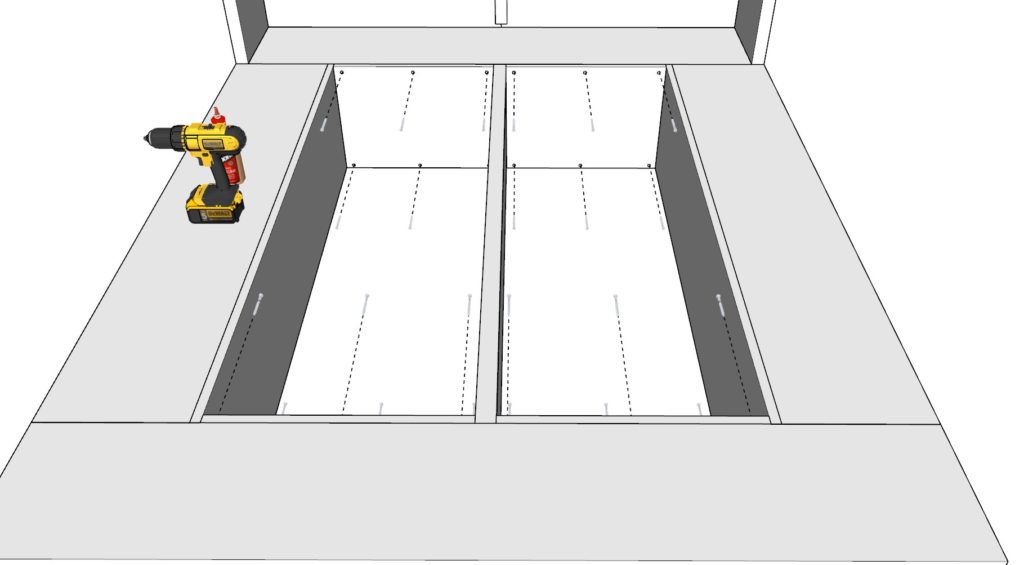
Lining the Cubbies: Materials Needed:
- Four 19-1/2 inch x 14-1/4 inch plywood sheets (3/4″ thick).
Instructions:
- Line the inside of each cubby with the plywood sheets.
- Secure them in place using 2.5-inch screws and wood glue.
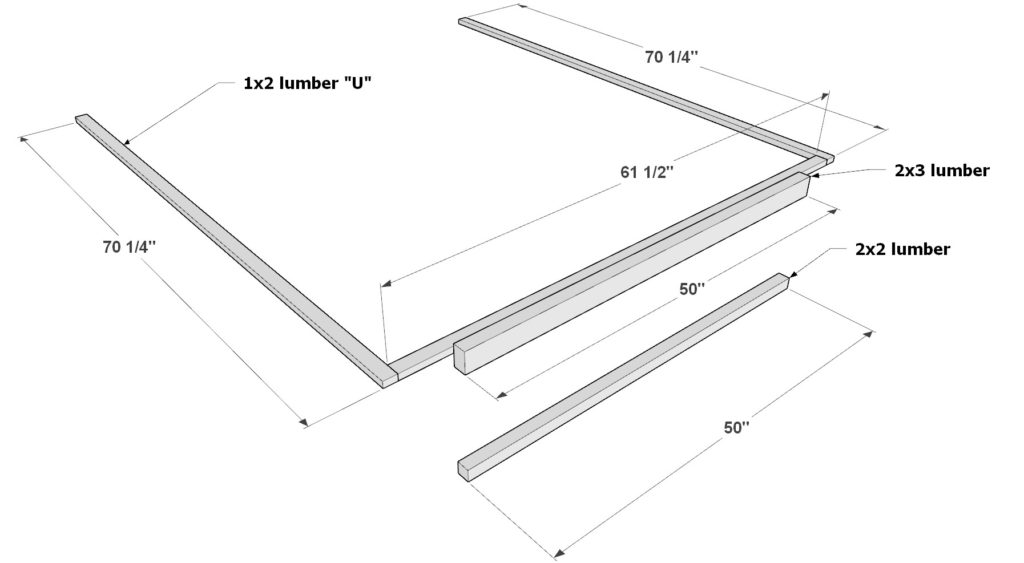
Adding Decorative Trim: Materials Needed:
- Two 70-1/4 inch long 1×2 lumber pieces.
- One 61-1/2 inch 1×2 lumber piece.
- One 50 inch 2×3 lumber piece.
- One 50 inch long 2×2 lumber piece.
Instructions:
- Arrange the lumber pieces around the cubbies to conceal the edges of the plywood, enhancing the bed’s aesthetic appeal.
- Attach the trim pieces using wood glue, pin nails, and 2.5-inch nails.
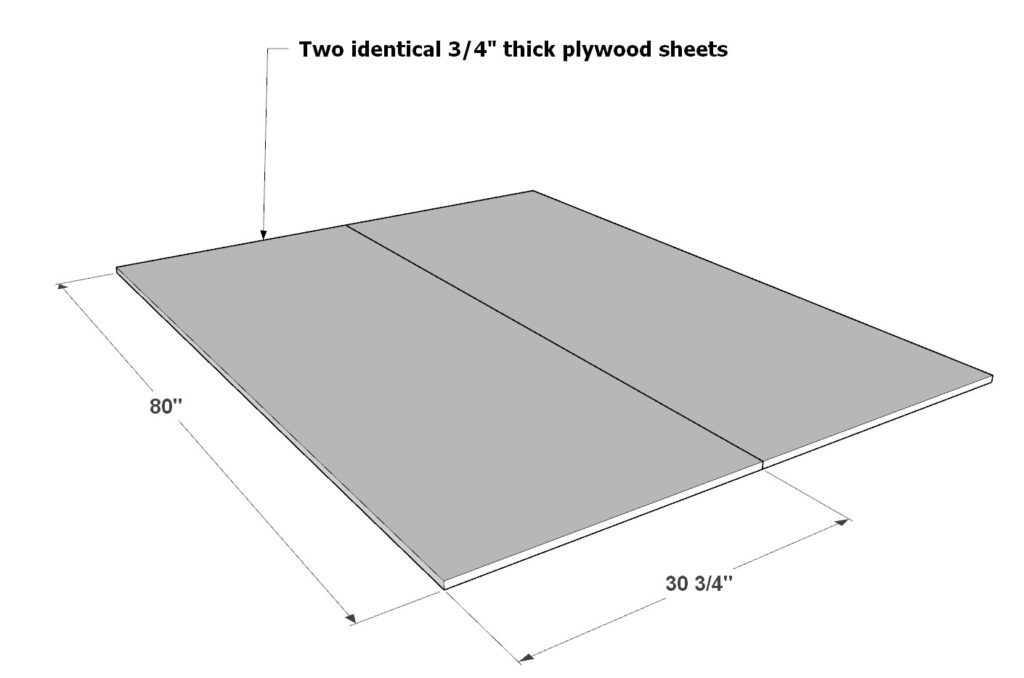
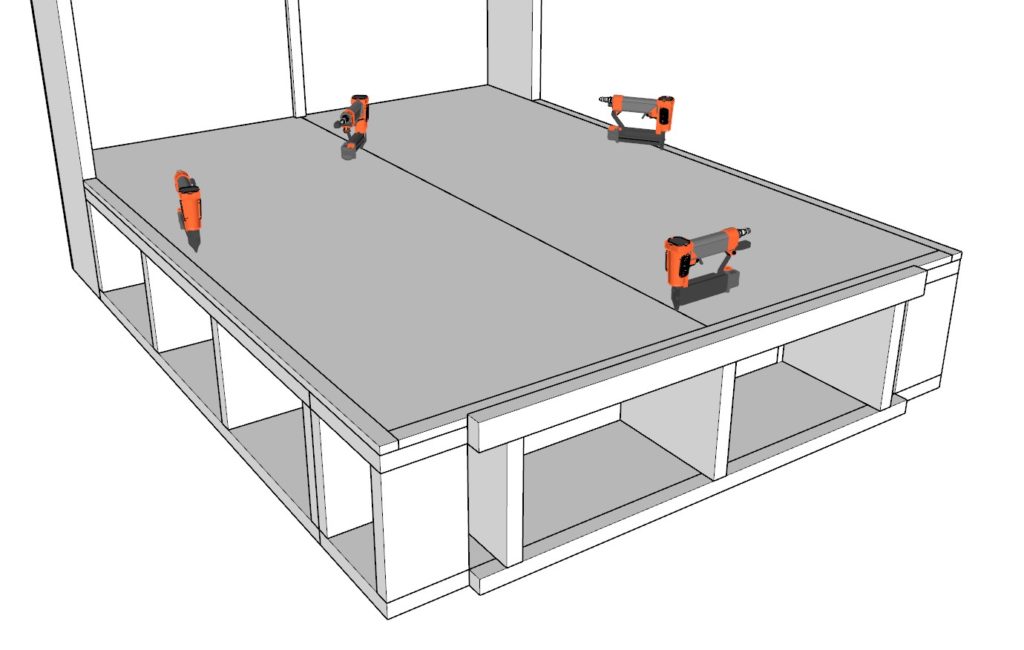
Setting the Mattress Base: Materials Needed:
- Two 30-3/4 inch x 80 inch plywood sheets (3/4″ thick).
Instructions:
- Lay down the plywood sheets across the frame, ensuring they fit snugly.
- Secure them in place using either glue and pin nails or 2.5-inch screws.
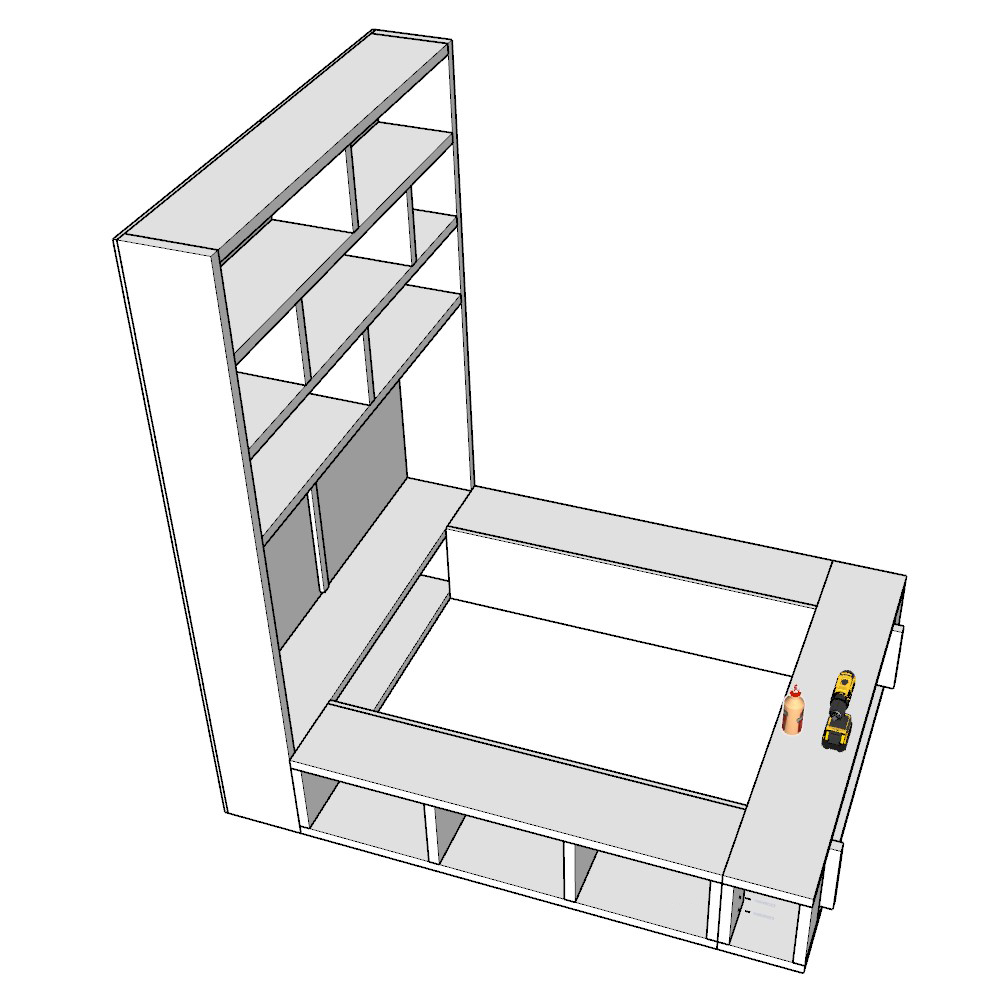
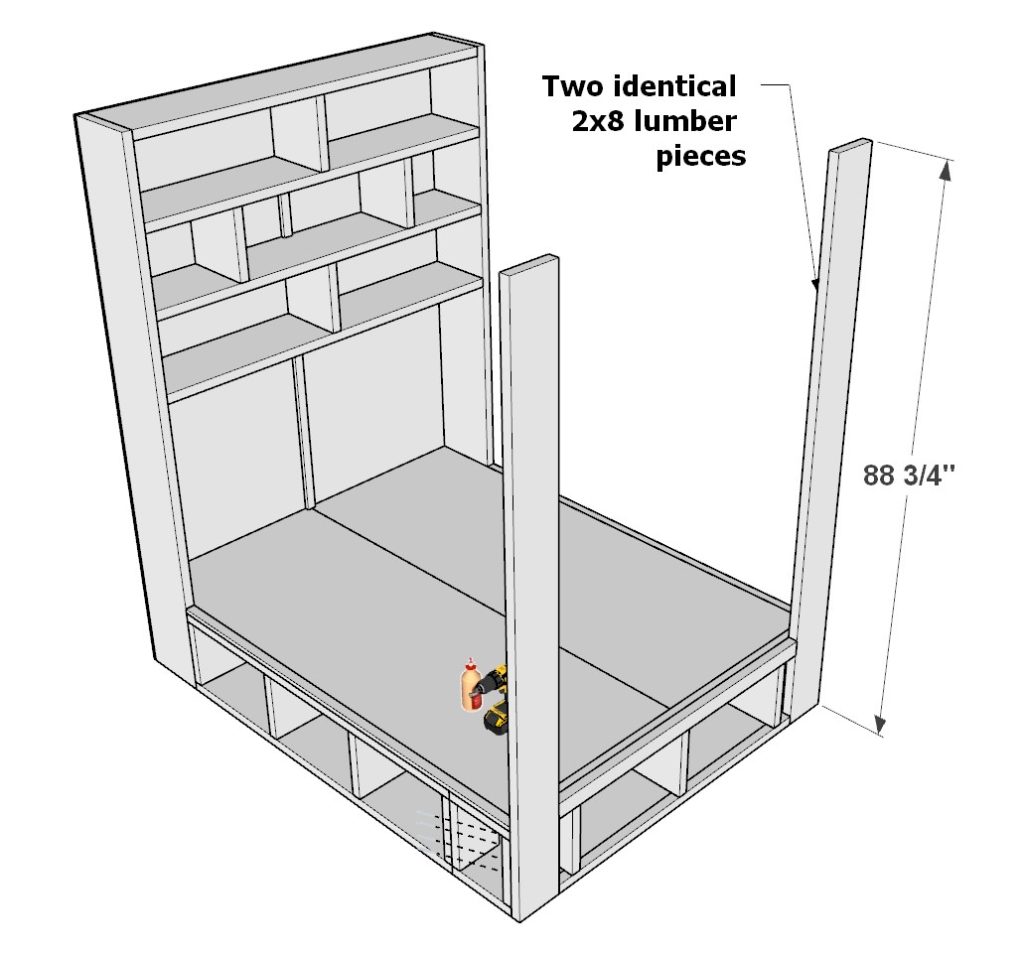
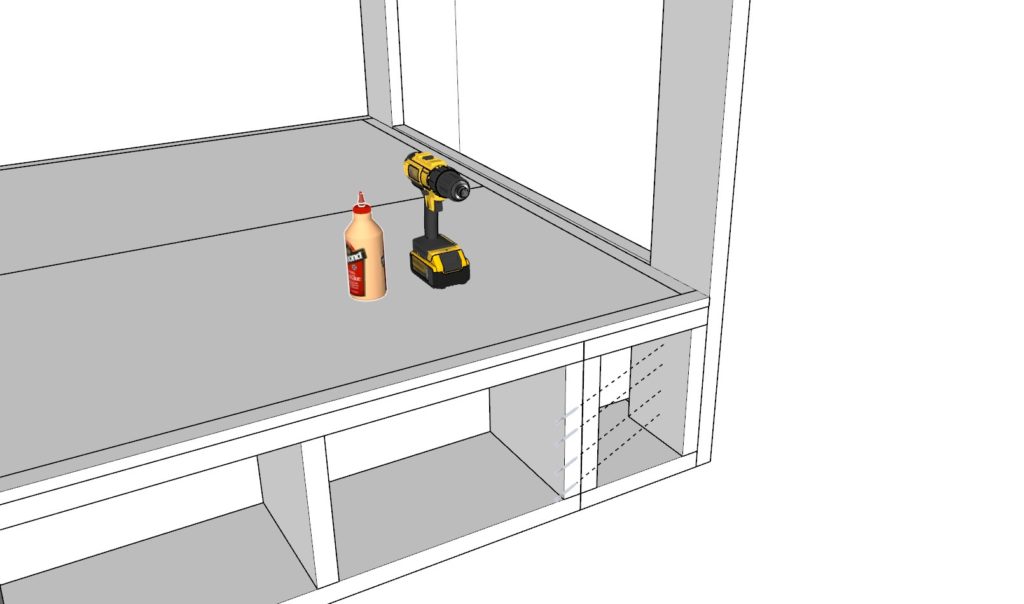
Step 7: Installing the Canopy Frame
A canopy elevates the bed’s aesthetics, creating a distinctive and elegant look. Let’s set up the canopy frame to complete your bed’s transformation.
Setting Up the Base Canopy: Materials Needed:
- Two 88-3/4 inch long 2×8 lumber pieces.
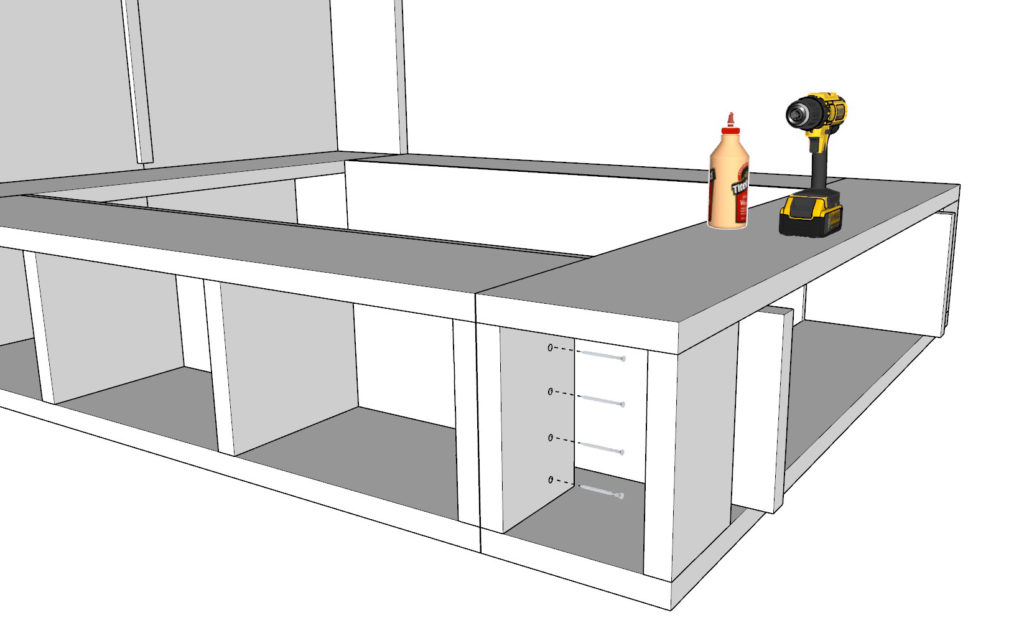
Instructions:
- Attach the 2×8 lumber pieces to the bed’s base and side cubbies, ensuring they align as depicted in the accompanying diagram.
- Secure them in place using 2.5-inch screws and wood glue.
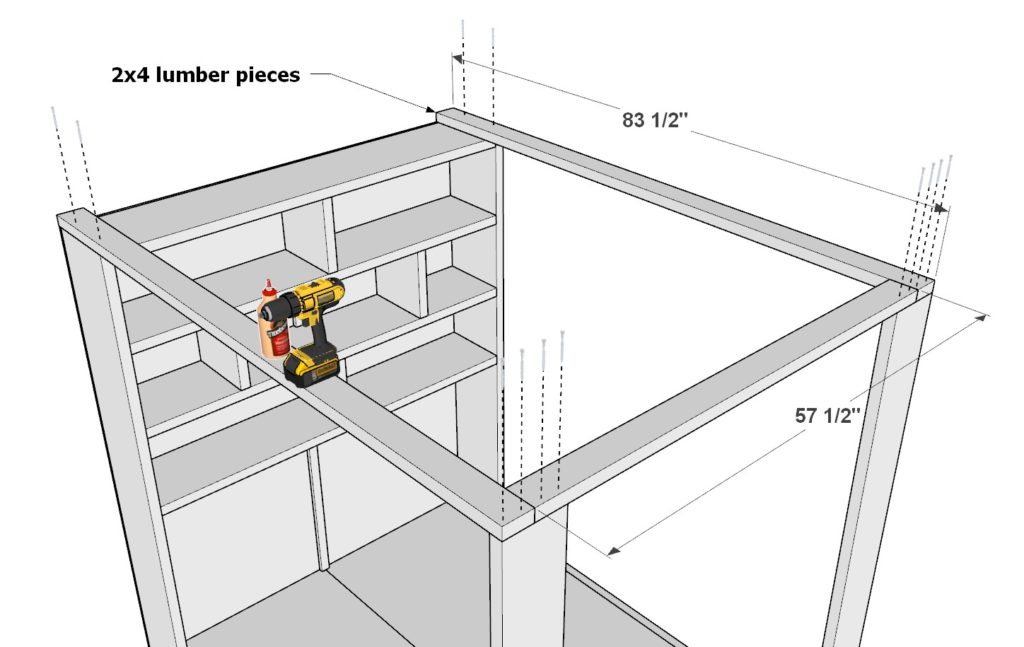
Adding the Canopy Supports: Materials Needed:
- One 57-1/2 inch long 2×4 lumber piece.
- Two 83-1/2 inch long 2×4 lumber pieces.
Instructions:
- Fasten the 2×4 lumber pieces to the canopy base, ensuring they fit perfectly.
- Use wood glue and 3.5-inch screws for a sturdy assembly.
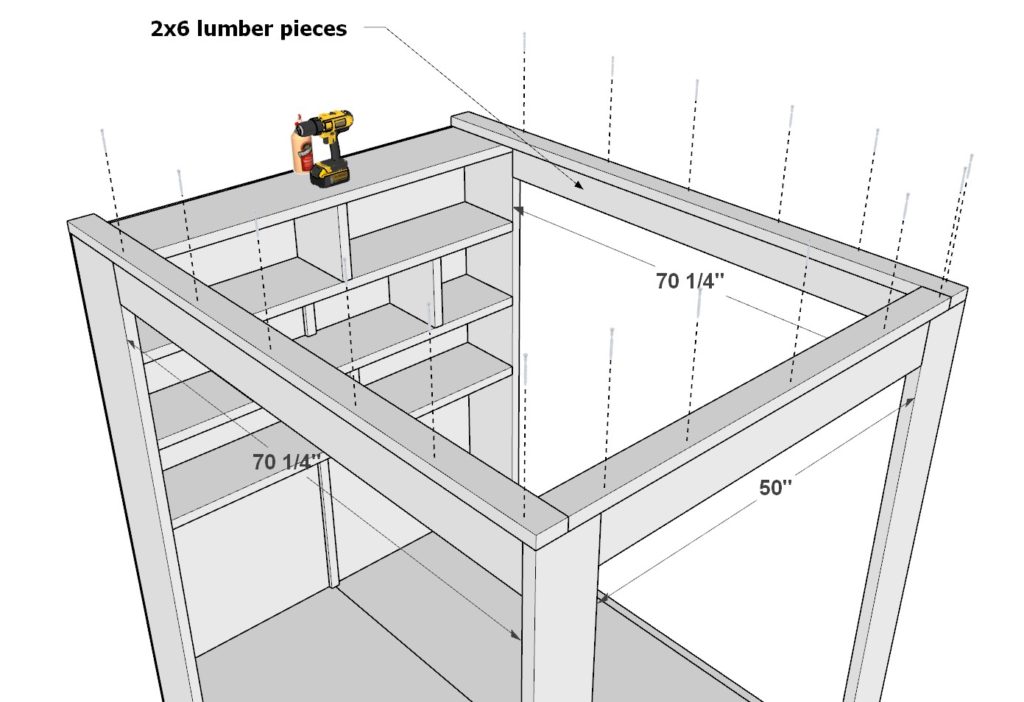
Finishing with the Top Canopy Frame: Materials Needed:
- One 50 inch long 2×6 lumber piece.
- Two 70-1/4 inch long 2×6 lumber pieces.
Instructions:
- Place the 2×6 lumber pieces on the canopy supports, creating the top frame.
- Secure them in place using appropriate fasteners.
Step 8: Prepping, Staining, and Painting the Storage Bed
Prepping the Storage Bed for Sanding or Staining:
Materials Needed:
- Fine-grit sandpaper (120-150 grit)
- Tack cloth or microfiber cloth
- Wood filler
- Putty knife
- Protective gloves and eyewear
- Dust mask
Instructions:
- Safety First: Before beginning, wear protective gloves, eyewear, and a dust mask to ensure you don’t inhale any wood particles or come into contact with splinters.
- Inspect the Bed: Examine the entire surface of the bed, looking out for any visible nails, screws, or other fasteners that may be protruding. Ensure they’re all sunk below the wood’s surface.
- Fill Gaps: Using a putty knife, apply wood filler to any holes, cracks, or imperfections. Let it dry as per the manufacturer’s instructions. This provides a smooth surface, ensuring an even stain or paint application.
- Sanding: Start sanding the bed with your fine-grit sandpaper. Sand in the direction of the wood grain to avoid scratching the wood. Ensure all surfaces, corners, and edges are smooth, paying special attention to areas where wood filler was applied.
- Cleaning: Once you’ve sanded the entire bed, wipe it down with a tack cloth or microfiber cloth to remove any dust or debris. This ensures the stain or paint will adhere properly.
Staining the Storage Bed:
Materials Needed:
- Wood stain of your choice
- Foam brush or paintbrush
- Clean rags
- Protective gloves
- Ventilated workspace
Instructions:
- Safety and Setup: Work in a well-ventilated area. Wear protective gloves to avoid staining your hands.
- Stir, Don’t Shake: Open your wood stain can and stir the contents gently. Avoid shaking, as this can create bubbles.
- Application: Using a foam brush or paintbrush, apply the stain in the direction of the wood grain. Use even strokes, ensuring coverage over the entire surface.
- Wipe Away Excess: After letting the stain sit for a few minutes (or as per manufacturer’s recommendations), use a clean rag to wipe away any excess stain. This helps in achieving an even finish.
- Multiple Coats (if desired): If you want a darker finish, wait for the first coat to dry and then apply additional coats, following the same procedure.
- Dry Time: Allow the stain to dry completely as per the manufacturer’s instructions before moving or using the bed.
Painting the Storage Bed:
Materials Needed:
- Primer (if necessary)
- Paint of your choice
- Paintbrushes or foam brushes
- Roller (for larger surfaces)
- Paint tray
- Protective gloves and eyewear
Instructions:
- Safety First: Wear protective gloves and eyewear to avoid any paint splatters.
- Priming (if necessary): If your paint isn’t a combined paint and primer, apply a wood primer first. This ensures better paint adherence and a more vibrant color. Let it dry as per the manufacturer’s instructions.
- Paint Application: Pour your paint into a paint tray. Using your brush or roller, start applying the paint in even strokes. For detailed areas or edges, a smaller brush might be more efficient.
- Multiple Coats: After the first coat dries, inspect the bed for any missed spots or uneven areas. Apply a second coat if necessary, ensuring each coat is dry before adding the next.
- Dry Time: Let the paint dry completely as per the manufacturer’s instructions. Once dried, your bed is ready for assembly and use.