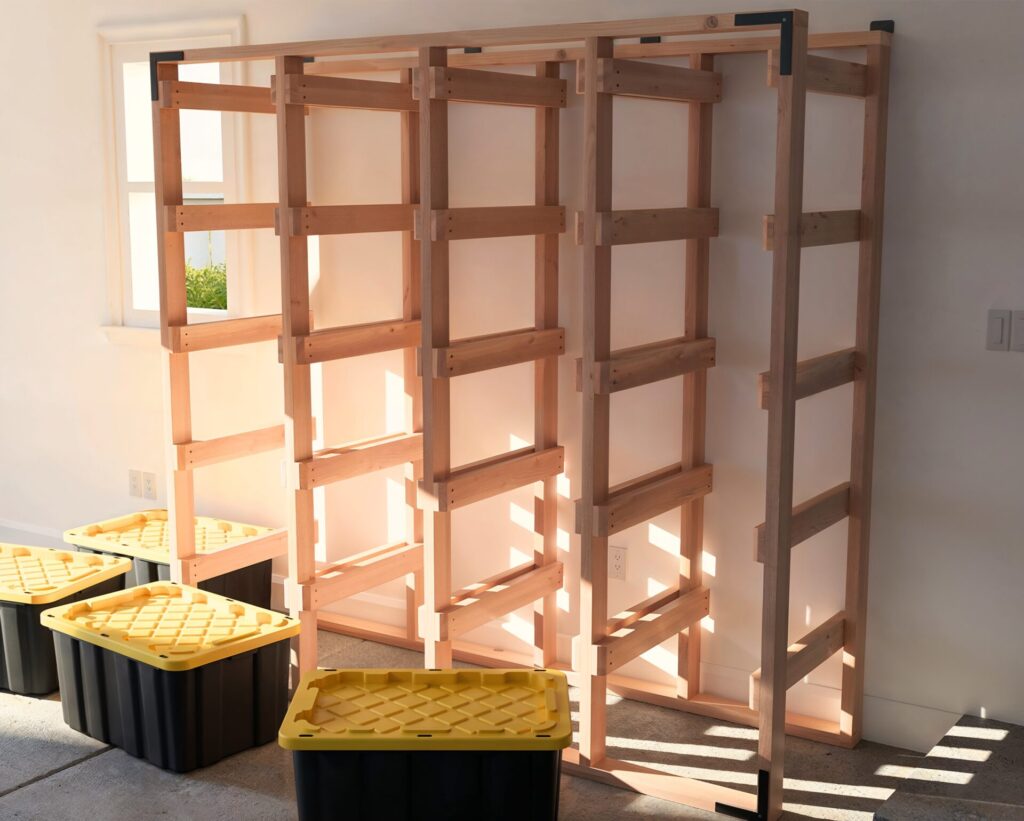
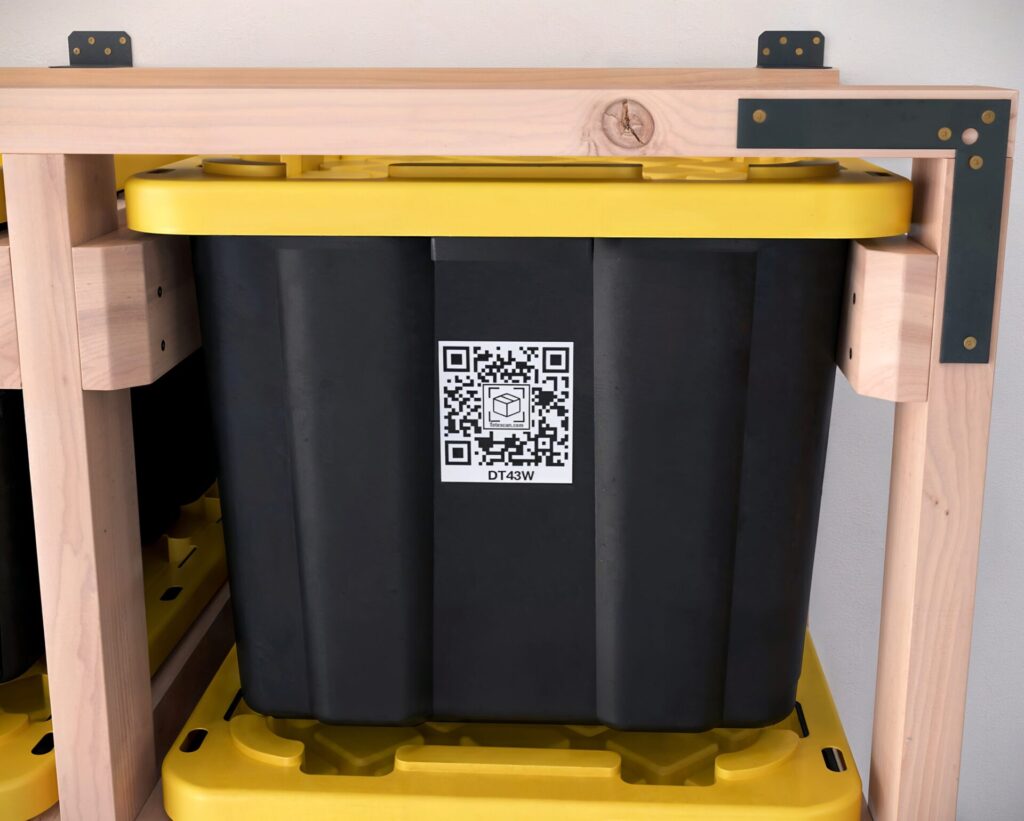
Transform Your Garage with DIY Tote Racks
“Your Space, Your Rules—Let’s Build Together”
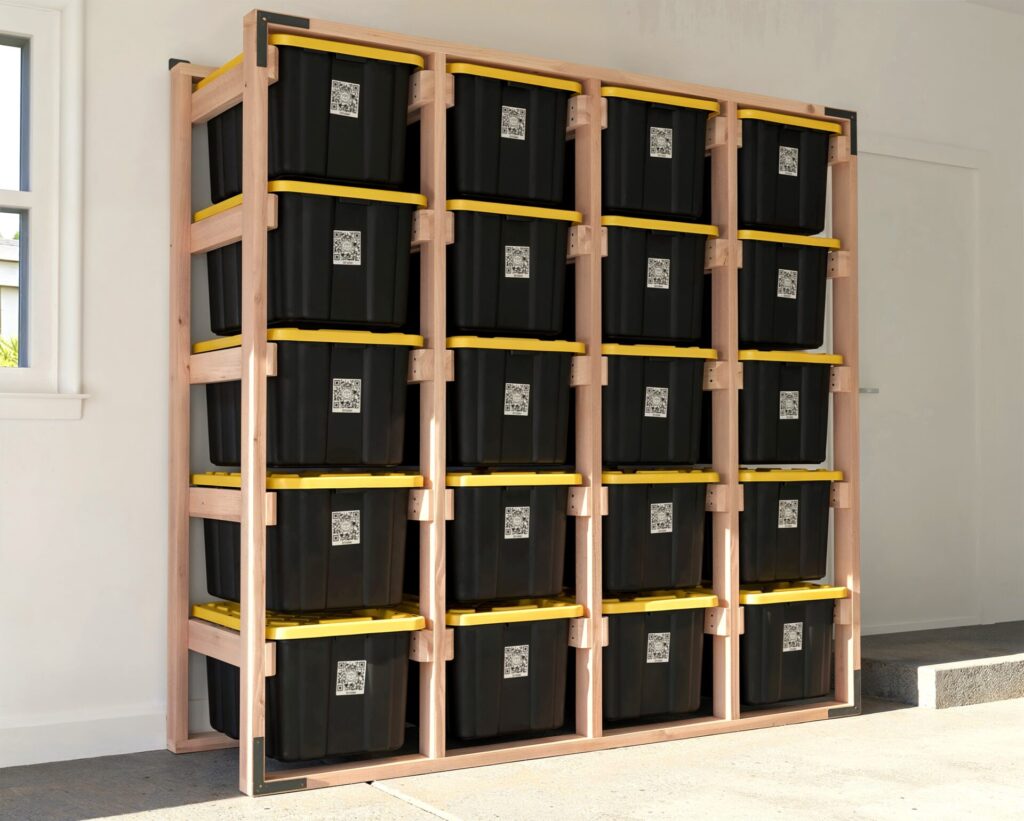
Does your garage feel overwhelming with totes stacked everywhere? If you’re like most people, keeping your space functional and organized can feel like a challenge. That’s why creating a custom tote rack is a game-changer. Whether you’re managing a few totes or a collection that keeps growing, this DIY project can adapt to fit your needs and simplify your life.
Why I Love This Project (And Why You Will Too)
“It’s More Than Just a Rack”
Building something with your own hands is incredibly rewarding. It’s not just about having a place for your totes—it’s about the pride you’ll feel every time you look at what you’ve built. It’s practical, sure, but it’s also personal. This isn’t just a storage solution; it’s proof that you can take control of your space in a way that works for you.
You don’t need to be an experienced builder to get started. And if you’ve never built something like this before, now’s the perfect time to try.
The Benefits of a Tote Rack System
“Built for Real Life”
Here’s why tote racks are so popular—and why they could be the solution for your garage:
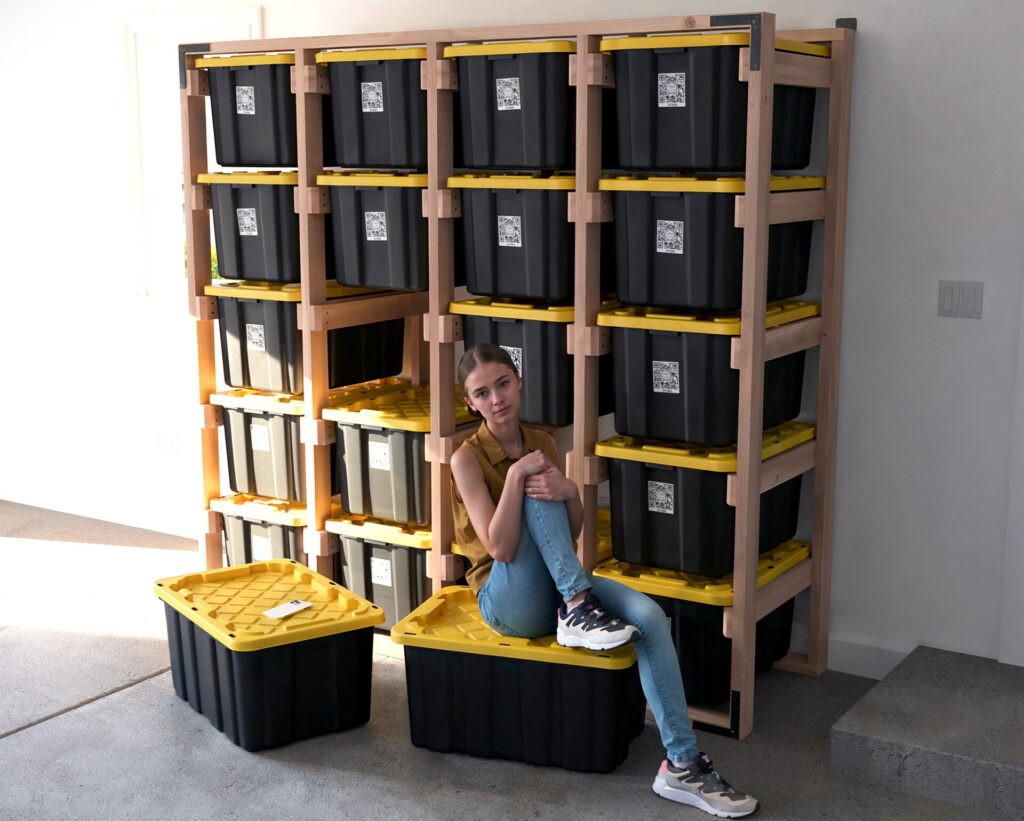
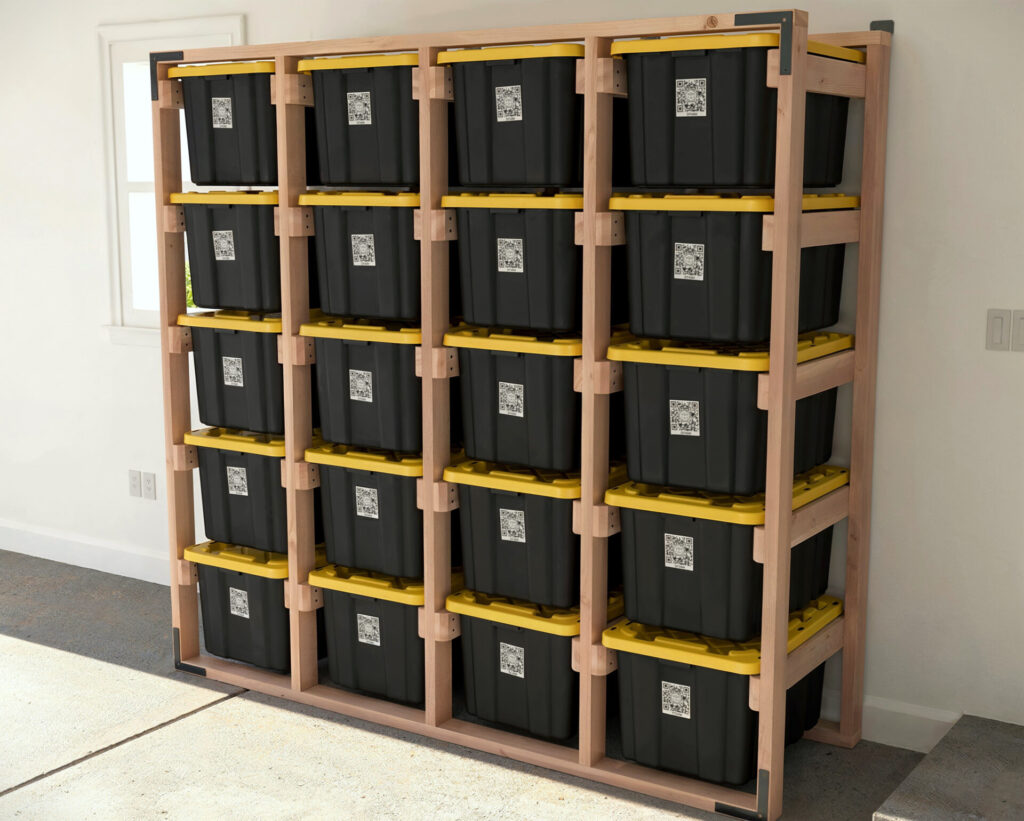
- Customizable Storage: Whether you need space for a few totes or an entire collection, this design scales to meet your needs.
- Efficient Use of Space: Tote racks make the most of your vertical space, freeing up the floor for other uses.
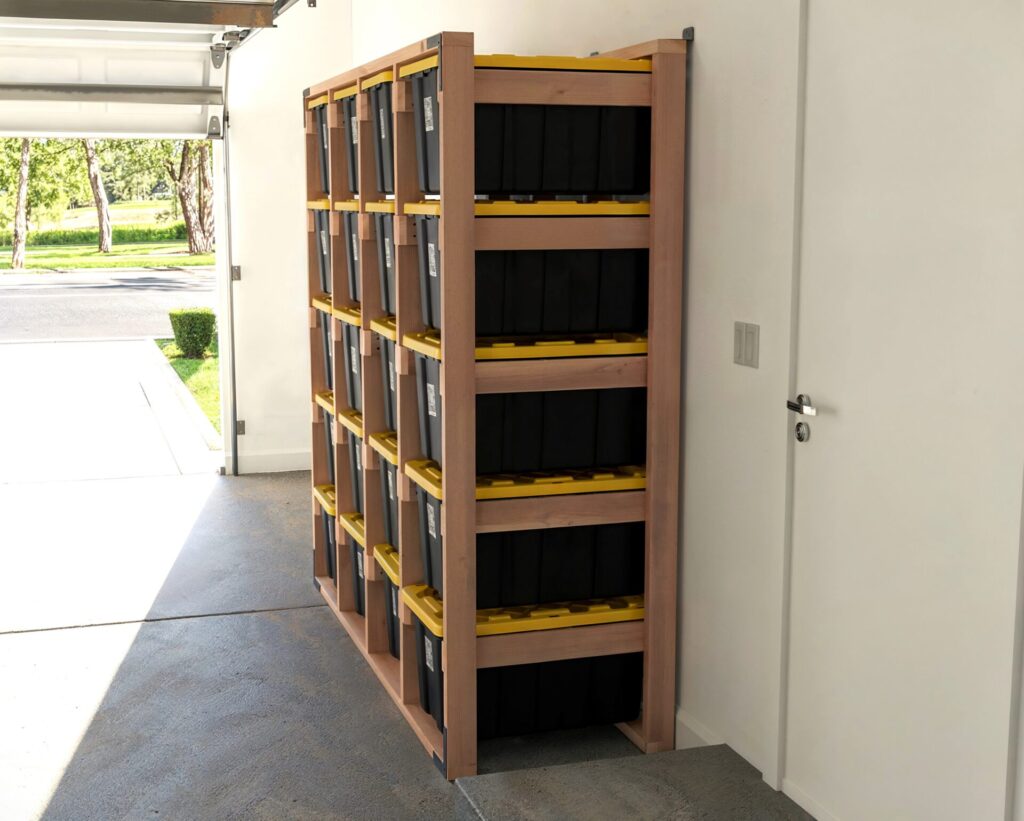
- Simplified Access: Say goodbye to lifting heavy stacks to get to that one tote at the bottom. Each tote slides in and out easily.
- Durable Design: Made with simple, sturdy materials, these racks can hold up to real-life use.
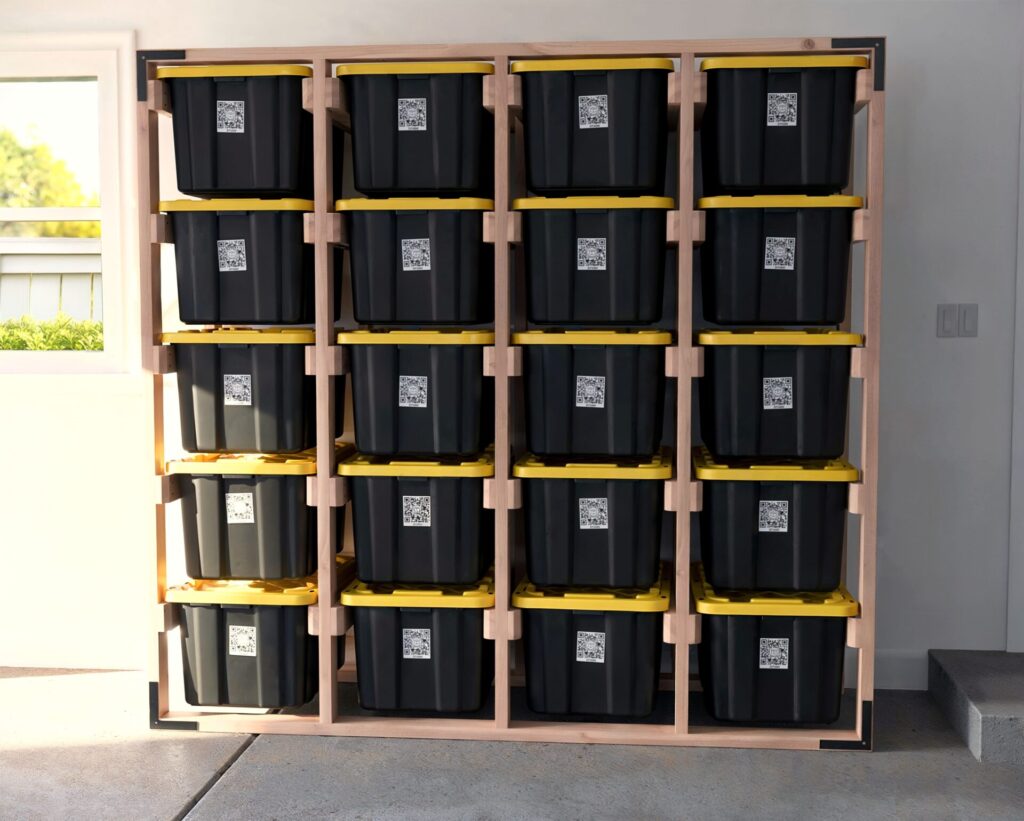
- Organized Appearance: No more clutter—just a clean, functional system that looks as good as it works.
What’s Inside the DIY Plan
“Your Blueprint for Success”
When you download the plan, you’re not just getting a guide—you’re getting a step-by-step roadmap to make your project a success.
Here’s what’s included:
- Clear, Step-by-Step Instructions: Written to help you avoid common pitfalls.
- Detailed Visuals: Diagrams accompany every step to make the process straightforward.
- Material and Shopping Lists: Know exactly what you need before heading to the hardware store.
- Cut List: Get precise measurements to minimize waste.
- Beginner-Friendly Tips: Perfect for first-time builders, but rewarding for seasoned DIYers too.
I’ve worked on enough DIY projects to know where things can go wrong, so I’ve packed this plan with tips to help you succeed.
Why This Project Works for Any Garage
“Big or Small, This Rack Adapts to Your Space”
This isn’t a one-size-fits-all solution. Whether you’re tackling a small garage with just a few totes or you’re looking to organize a larger setup, the design can be tailored to fit your space. The flexibility of the plan means it’s not about how many totes you have—it’s about creating a system that works for you.
Let’s Build Something Great Together
“Your Garage Won’t Organize Itself”
This project isn’t just about storage—it’s about reclaiming your space, your time, and your peace of mind. Imagine walking into your garage and knowing exactly where everything is. It’s not just functional—it’s freeing.
Whether you’re an experienced DIYer or someone picking up a saw for the first time, this is your chance to create something durable, practical, and satisfying.
So what are you waiting for? Your organized, functional garage is just a few steps away.
Time to build
(varies with experience)
Cost
Estimated cost: About ({$100}) for the rack, and the totes will cost approximately ({$160}). (Note: Prices may fluctuate.)
Skill level required
Beginner
Download The PDF Plan
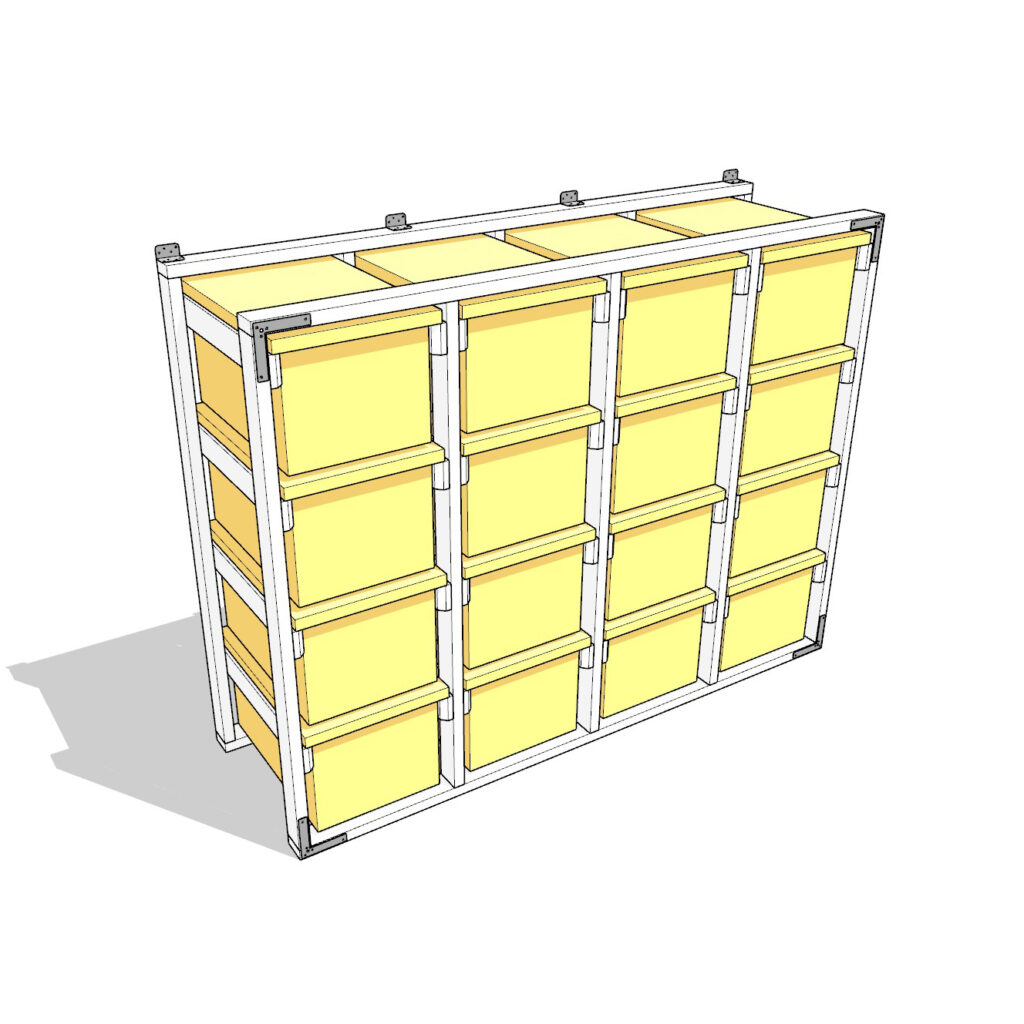
DIY 27 Gallon Tote Storage Rack Plans
What is included in the PDF download?
-Step-by-Step Written Instructions
-Detailed Images
-Cut List
-Lumber Shopping List
-Materials List
-Tools List
-Project Estimates
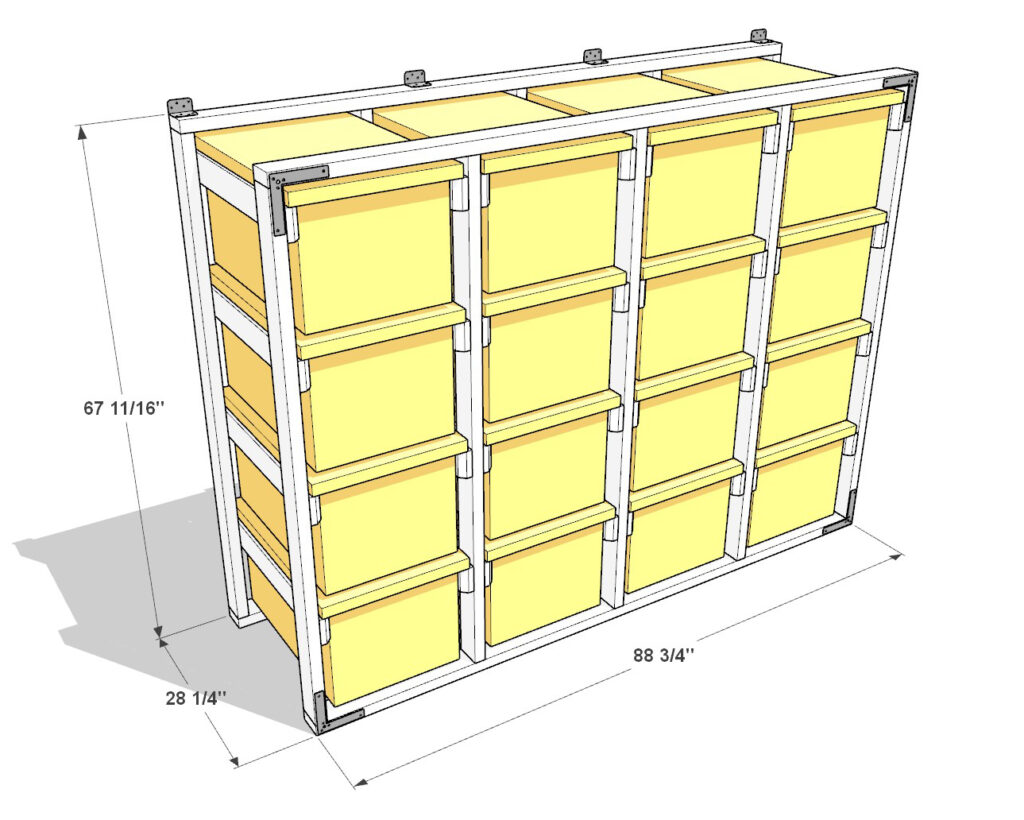
DIY 27 Gallon Tote Storage Rack ({4 Wide x 4 Tall}) Dimensions
Recommend Tools & Materials
Tools
- Miter Saw – For precise and square cuts; essential for accurate shelf supports.
- Screwdriver/Drill – Drives screws easily and efficiently; used in most steps.
- Drill – Needed for pre-drilling holes to prevent wood splitting.
- Countersink Drill Bit (Optional) – Allows screws to sit flush and prevents splitting for a cleaner finish.
- Stud Finder – Identifies wall studs for securely mounting the rack in Step 6.
Materials
- 3.5″ Screws – Approximately ({80 pieces}); used for structural connections.
- 2.5″ Screws – Approximately ({128pieces}); primary fasteners throughout the build.
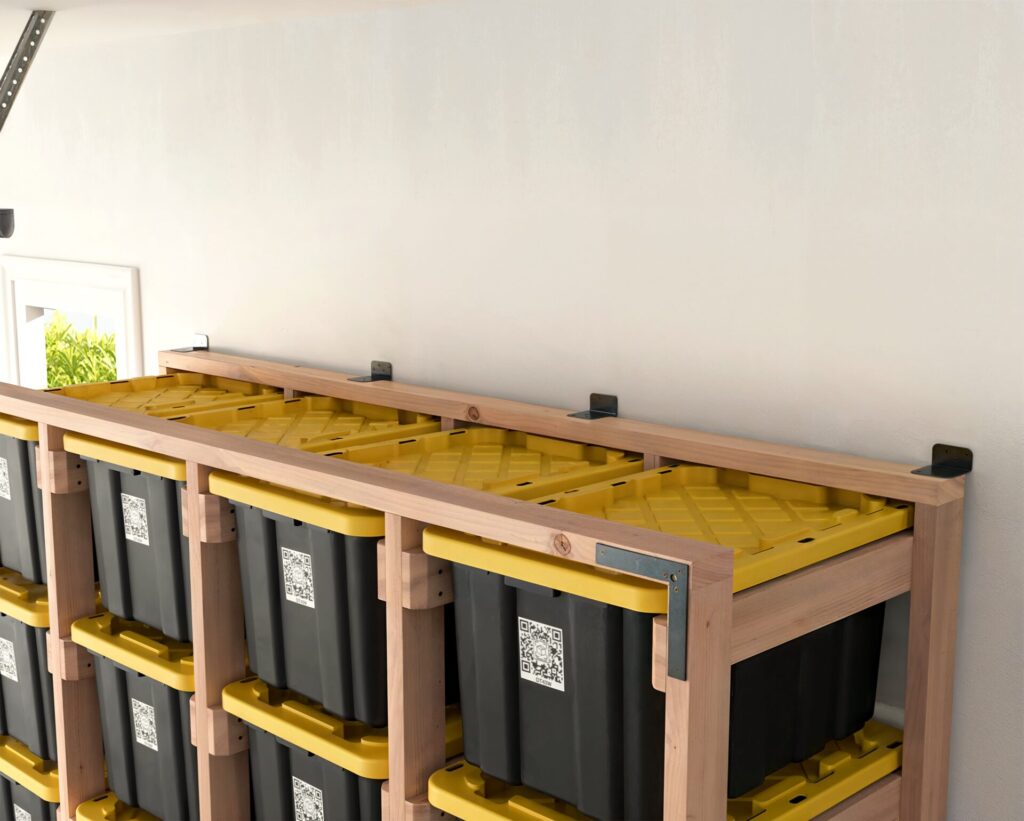
- Flat Corner Brace L Brackets – Total of 8; reinforces the rack at all corners in Step 5.
- Wood Glue – Provides additional strength at joints; optional but recommended.
- 2×4 L Angle Strong Ties – adds structural stability.
- ToteScan Labels System (Optional) – Helps organize stored items.
- ({Home Depot Totes}) – Total of ({16}); the rack is designed to accommodate these.
Affiliate Link Notice
I recommend tools and materials I trust and use. Purchasing through my affiliate links supports my work at no extra cost to you. Thank you for your support!
Lumber Shopping/Cut List
Lumber Shopping List:
- ({22 pieces}) – ({2x4x8ft}) dimensional lumber
Cut List:
Dimensional Lumber (2x4s)
- ({10 pieces}) – ({64-11/16″}) vertical supports (green)
- ({32 pieces}) – ({28-1/4″}) shelf supports (uncolored)
- 4 pieces – ({88-3/4″}) horizontal frame pieces (blue)
Step 1: Cutting and Preparing the Tote Supports
In this step, you’ll prepare the shelf supports—the 2×4 lumber pieces where the tote lid flaps (or ears) will rest. Follow these instructions carefully to ensure proper alignment and functionality.
1.1 Cut the Shelf Supports
- Measure and cut 2×4 lumber into pieces that are ({28-1/4}) inches long.
- Optional decorative trim: Trim both ends of each piece at 45-degree angles for a polished look. This is purely decorative and not required for structural integrity.
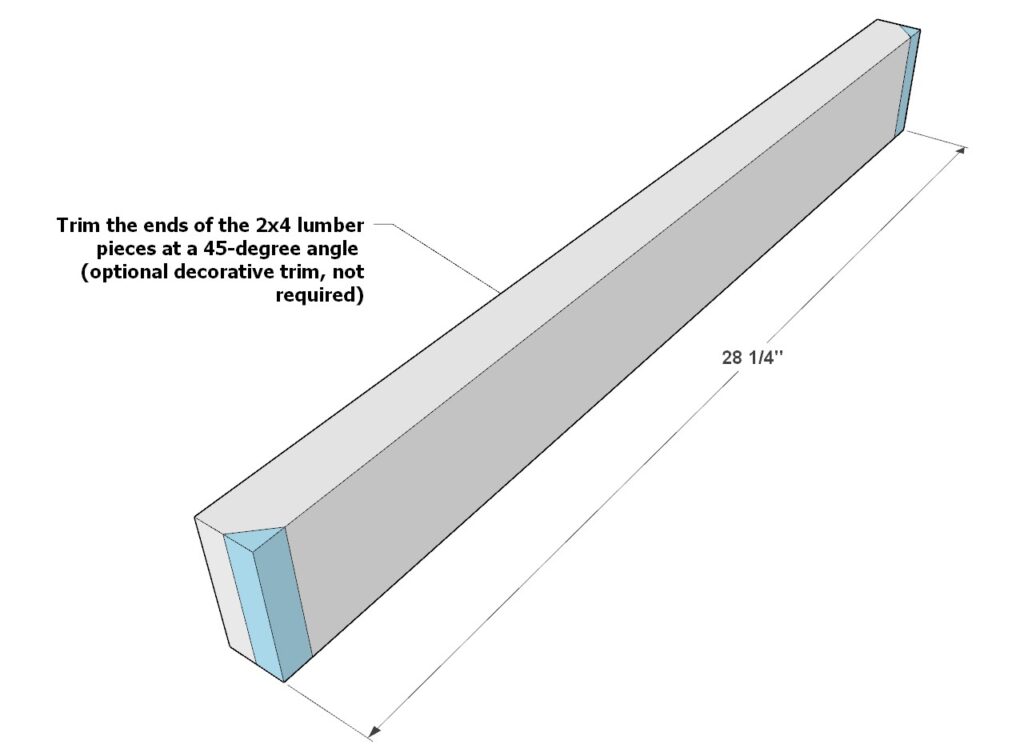

1.2 Create ({32}) Identical Pieces
- Repeat the cutting process until you have a total of ({32}) identical shelf supports.
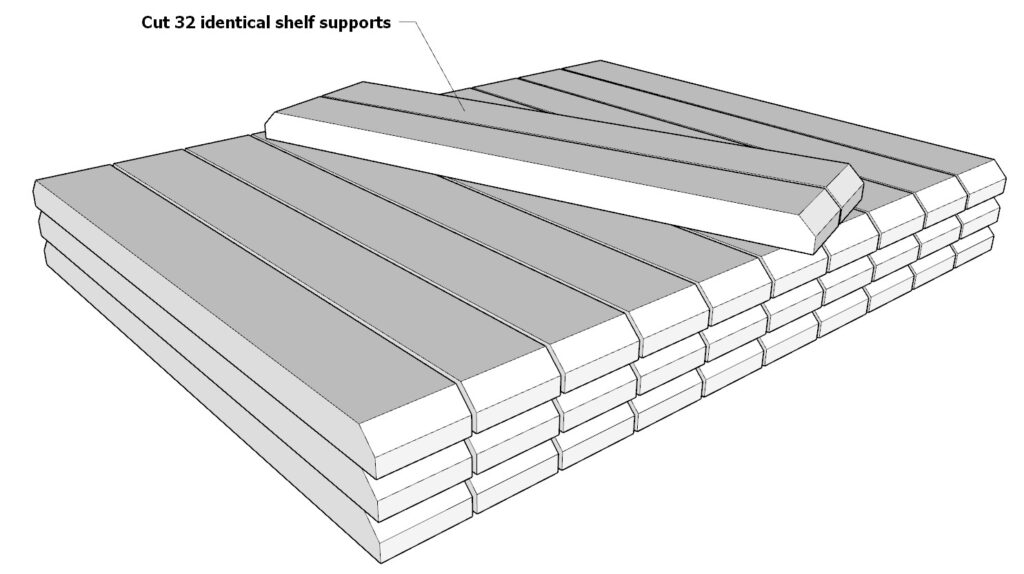
1.3 Tips for Preparing Your Lumber
- Planing lumber (if needed): If you’re using a planer, avoid removing more than 1/8 inch from each side. Over-planing can affect the alignment and spacing of your rack, potentially causing issues later.
- Sanding now vs. later: Sand your pieces before assembly to save time and effort. Smooth surfaces make assembly easier and provide a cleaner final look.
Step 2: Building the Ladder Structures
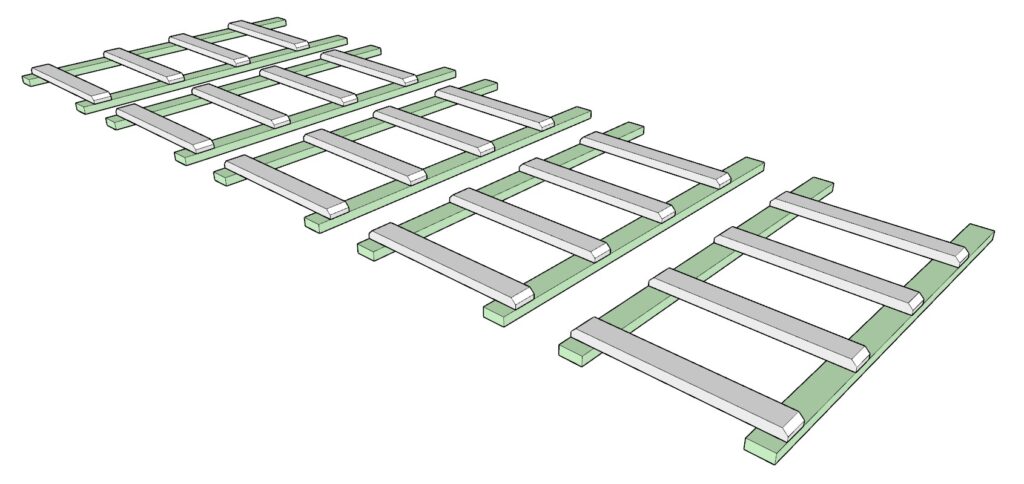
In this step, you’ll assemble the ladder structures, which form the framework of your tote rack. You’ll use the tote supports from Step 1 and integrate them with vertical 2×4 pieces to create sturdy and evenly spaced components for the rack.
2.1 Assemble the Ladder Structure
Gather Your Materials:
- Two vertical green components ({64-11/16}) inch long 2×4 pieces (prepared in this step).
- ({Four}) tote support pieces from Step 1.
Lay Out the Components: Arrange the two vertical green components flat and parallel on your work surface.
Add the Shelf Supports:
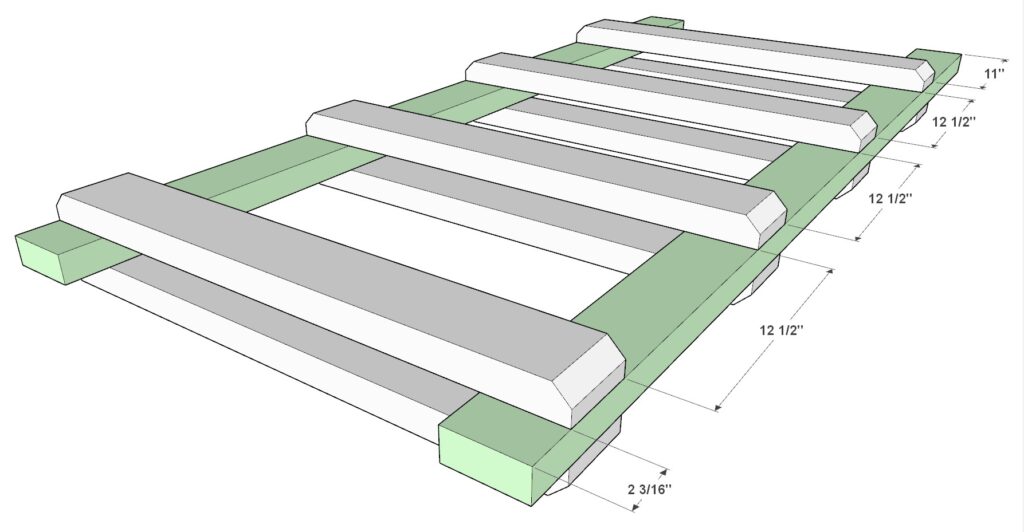
- Position the shelf supports along the length of the vertical pieces, following the spacing shown in the diagram.
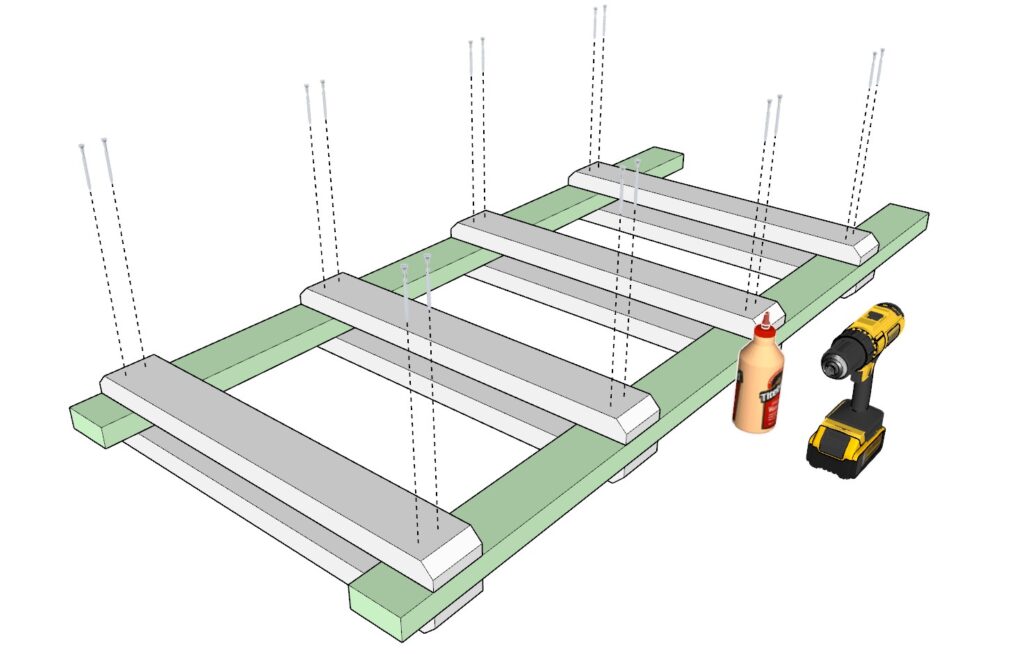
Secure the Structure: Use 2.5-inch screws to fasten each shelf support to the vertical pieces. Optionally, apply wood glue for added strength.
Repeat this process to create a total of ({five}) identical ladder structures.
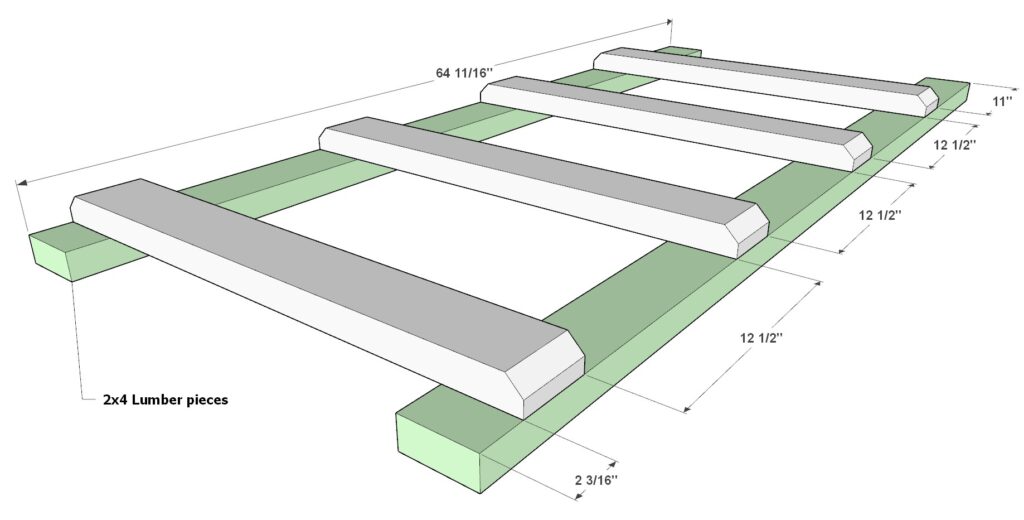
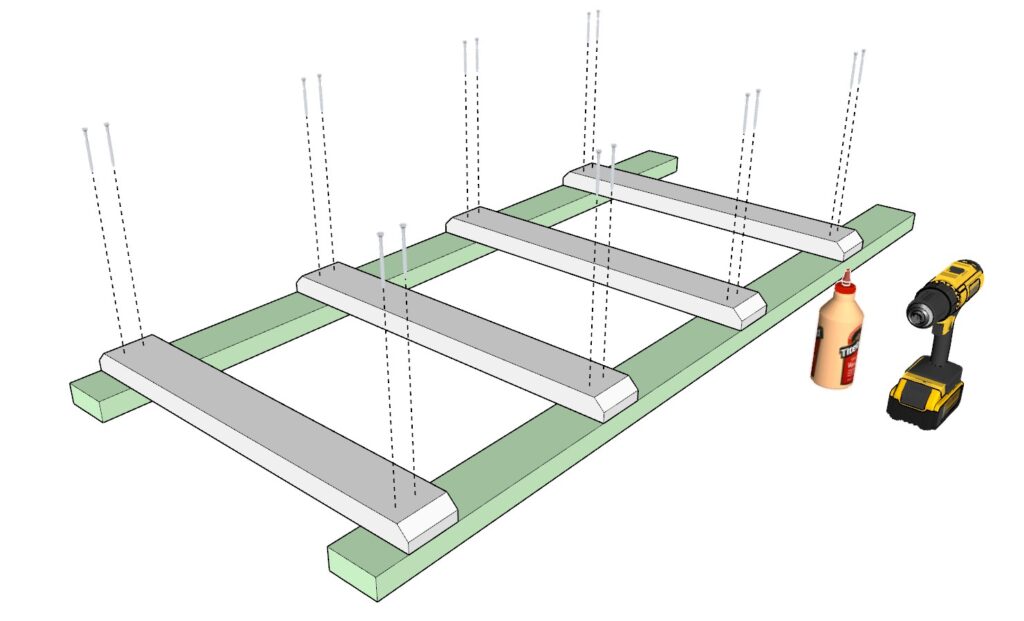
2.2 Tips for a Smooth Build
- Use a Spacer for Even Gaps: Cut a piece of scrap wood to the desired spacing width and use it as a guide to ensure consistent and even spacing between the shelf supports. This saves time and keeps the alignment precise.
- Sand as You Go: Sand the assembled ladder structures at this stage for a smoother finish, making them easier to handle and giving the final rack a polished, professional look.
Step 3: Modifying the Ladder Structures
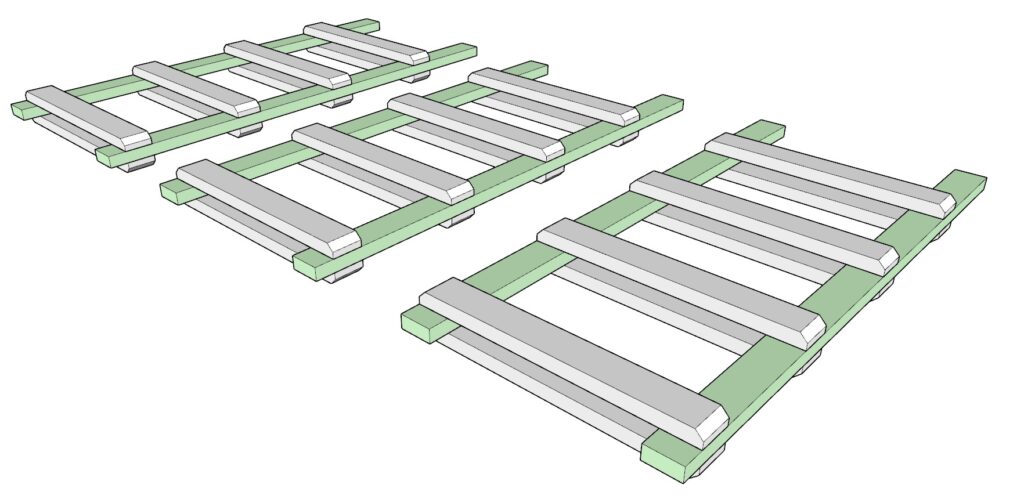
In this step, you’ll take some of the ladder structures from Step 2 and add additional shelf supports to the opposite side, making them double-sided.
3.1 Modify the Ladder Structures
Position the Ladder Structure
- Lay one of the ladder structures flat on your work surface with the shelf supports facing down.
Add Shelf Supports to the Opposite Side
- Attach ({four}) shelf supports to the front side of the vertical green components (2x4s), ensuring they match the spacing on the back side. Refer to the diagram for accurate placement.
- Tip: Use a scrap wood spacer to keep the spacing even between supports.
Secure the Additional Shelf Supports
- Apply wood glue (optional) to the ends of the shelf supports for added strength.
- Fasten each support using 2.5-inch screws, ensuring they are secure.
Repeat the Process
- Make a total of ({three}) double-sided ladder structures.
Step 4: Assembling the Tote Rack Skeleton
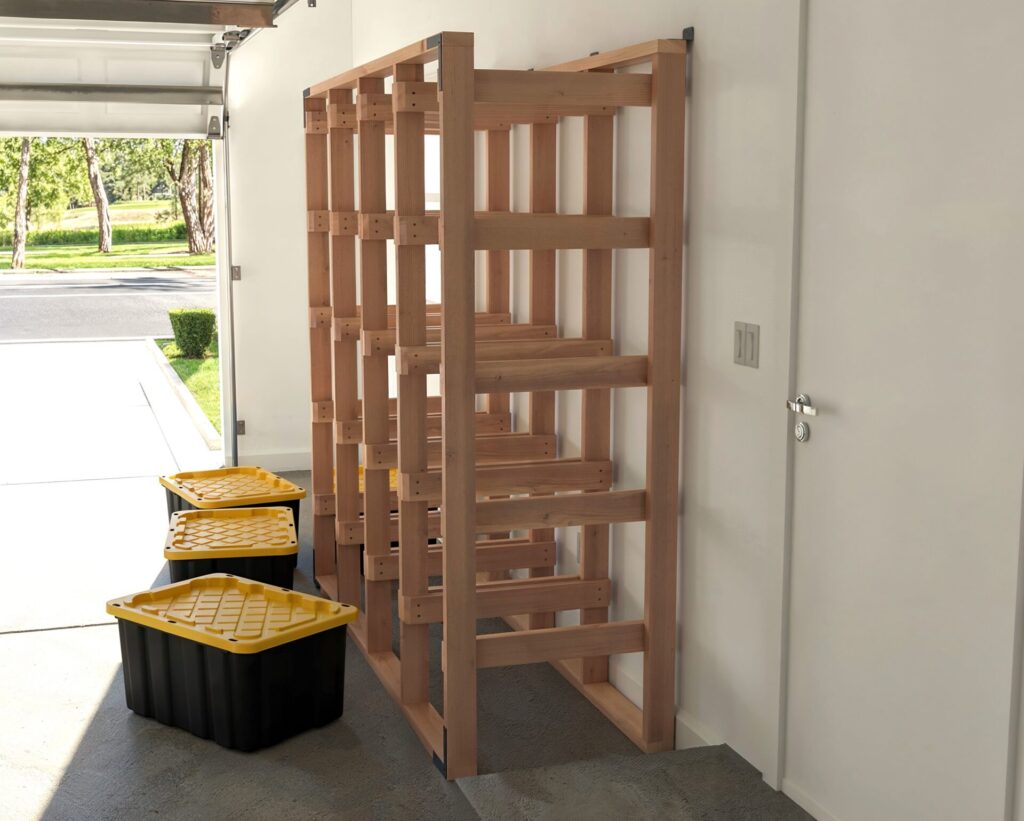
In this step, you’ll assemble the ladder components from the previous steps into a complete frame, forming the skeleton of your tote rack. Follow these detailed steps to ensure proper alignment and a sturdy structure.
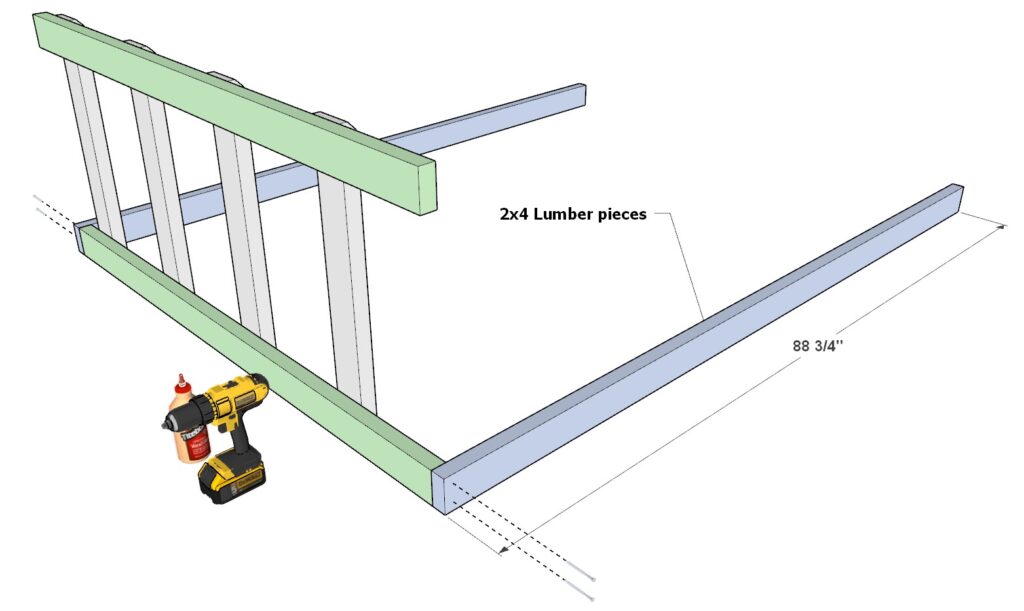
4.1 Position and Secure the First Single-Sided Ladder
- Take one single-sided ladder structure from Step 2 and place it horizontally on your work surface.
- Attach two ({88-3/4 inch}) 2×4 lumber pieces (color-coded in blue) to the top and bottom ends of the ladder structure.
- Ensure the shelf supports face inward as shown in the diagram.
- Predrill holes using a countersink drill bit to avoid splitting the wood and for a cleaner finish.
- Secure the blue 2x4s to the ladder using 3.5-inch screws and wood glue (optional but recommended for added strength).
- Double-check for proper alignment before fully tightening the screws.
4.2 Attach the Second Single-Sided Ladder
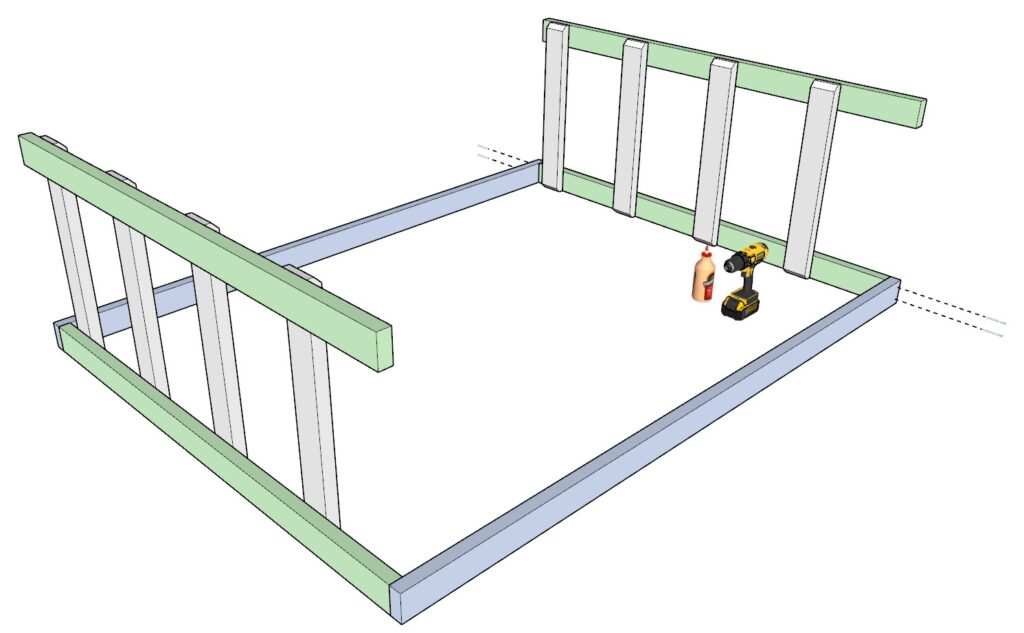
- Place another single-sided ladder structure on the opposite side of the blue 2×4 pieces.
- Secure it using wood glue and 3.5-inch screws.
- Make sure the shelf supports face inward to match the diagram.
4.3 Add the Double-Sided Ladders
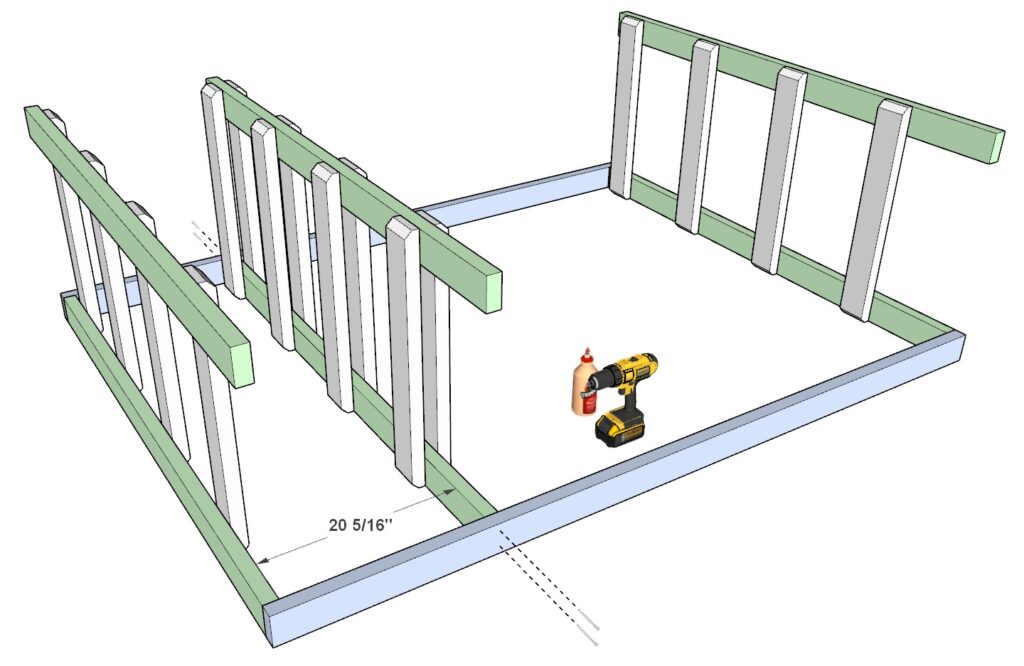
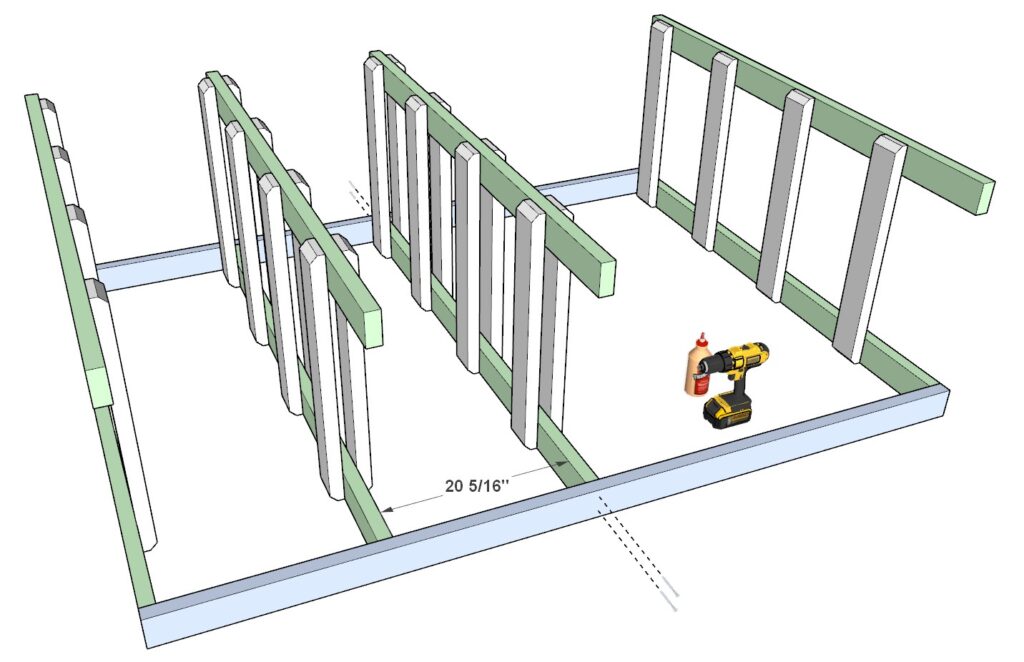
- Begin placing the double-sided ladder structures between the two single-sided ladders.
- Refer to the diagram for proper spacing between each ladder.
- Tip: Use a scrap wood spacer to maintain consistent spacing as you work.
- Secure each double-sided ladder with 3.5-inch screws and wood glue, ensuring everything stays aligned.
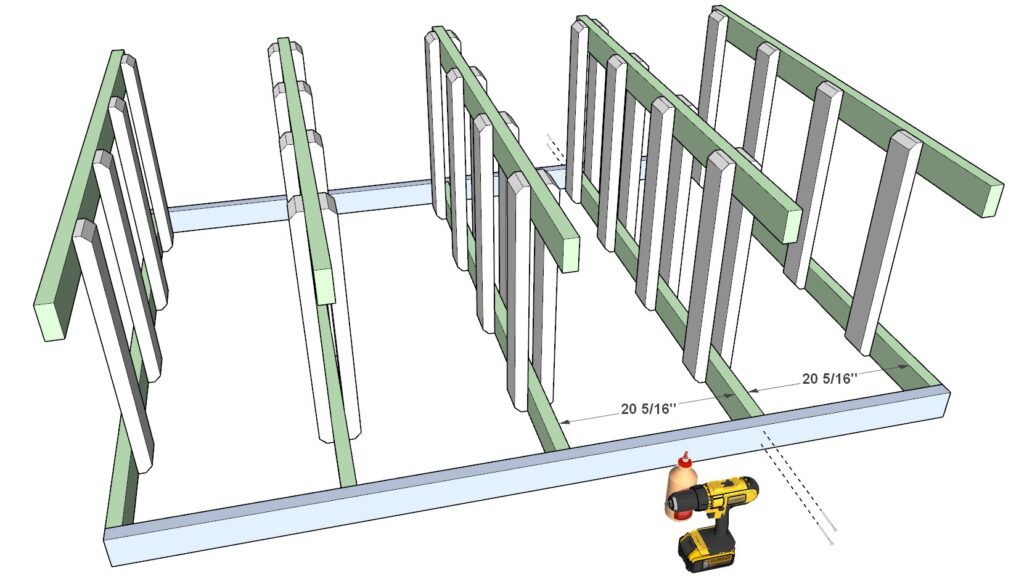
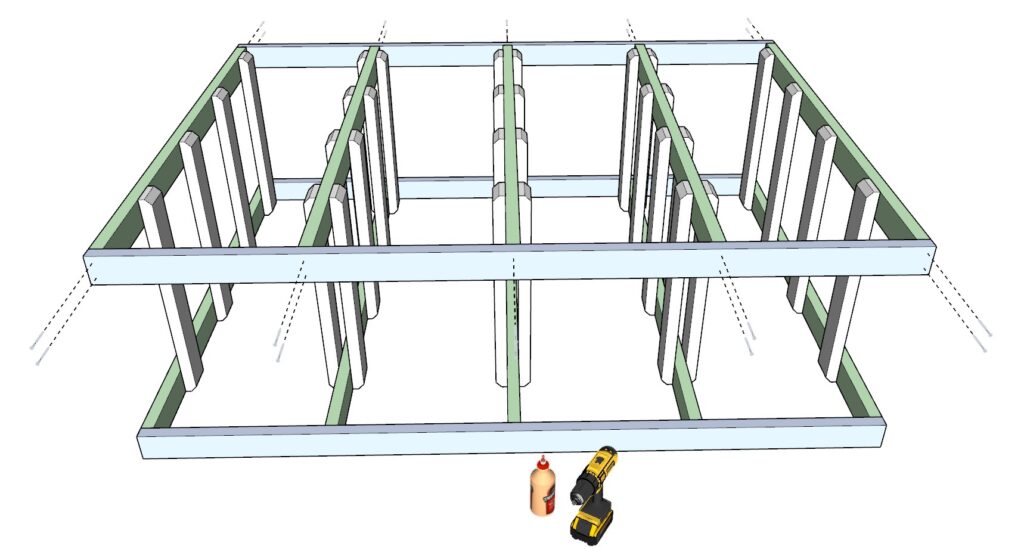
4.4 Reinforce the Frame
- Once all the ladder components are in place, attach two additional ({88-3/4 inch}) blue 2x4s to the top and bottom of the structure.
- Secure these pieces with wood glue and 3.5-inch screws for added stability.
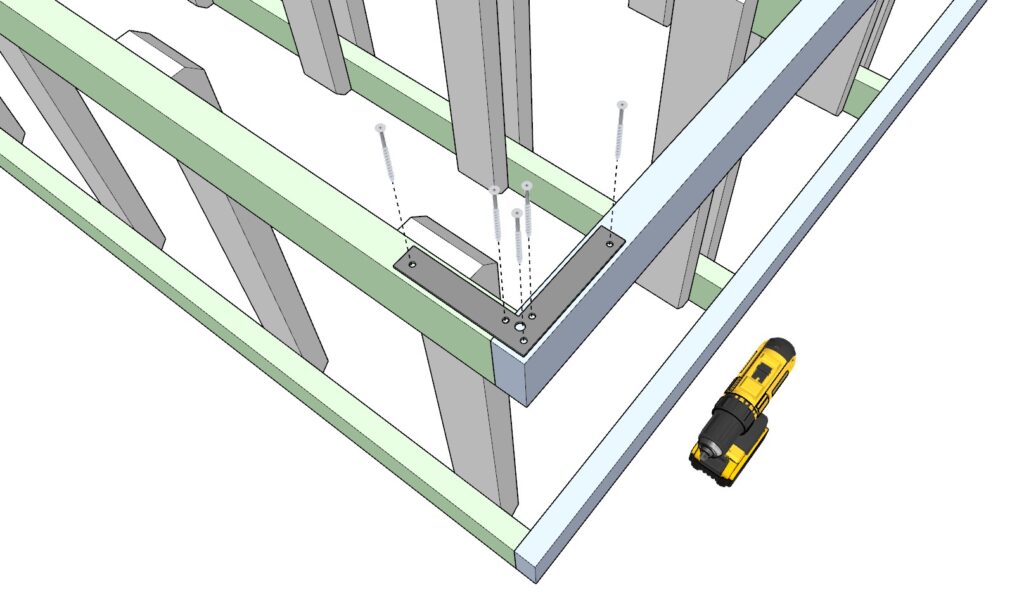
Step 5: Reinforcing the Rack with L-Shaped Brackets
In this step, you’ll enhance the stability of the tote rack by adding L-shaped angle brackets to reinforce the corners of the structure. This will make the rack more durable and capable of withstanding long-term use.
5.1 Prepare for Installation
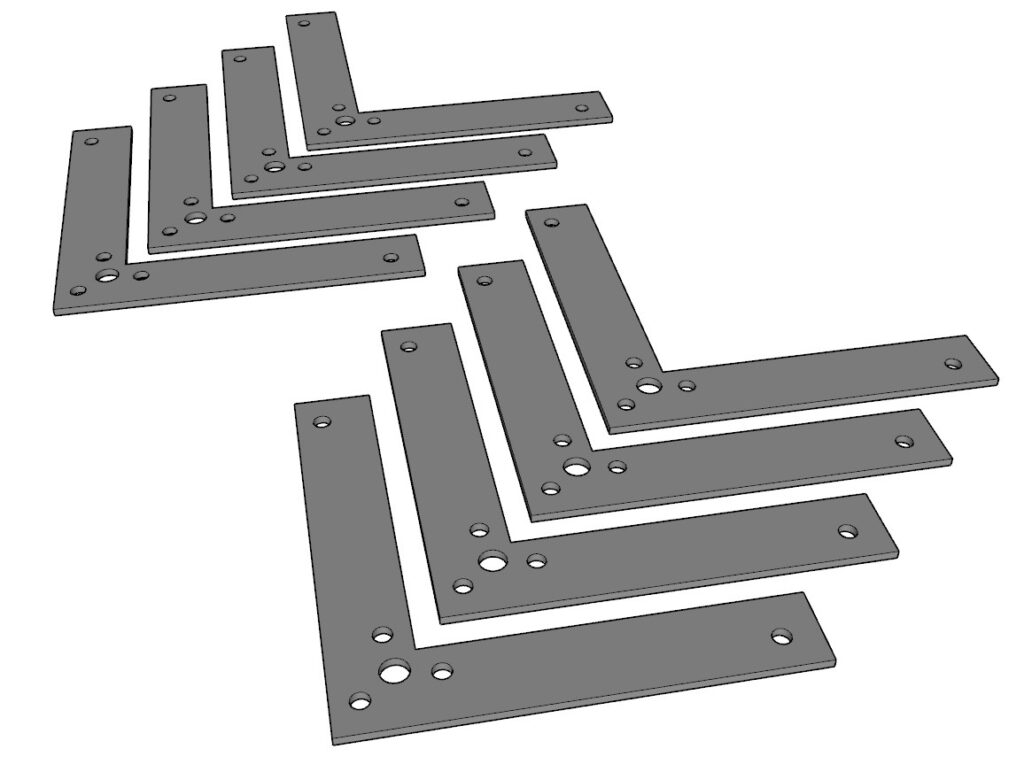
- Gather 8 L-shaped angle brackets.
- Ensure you have 2.5-inch screws on hand to secure the brackets.
- Have your drill and countersink bit ready for predrilling holes to prevent splitting the wood.
5.2 Install the Brackets
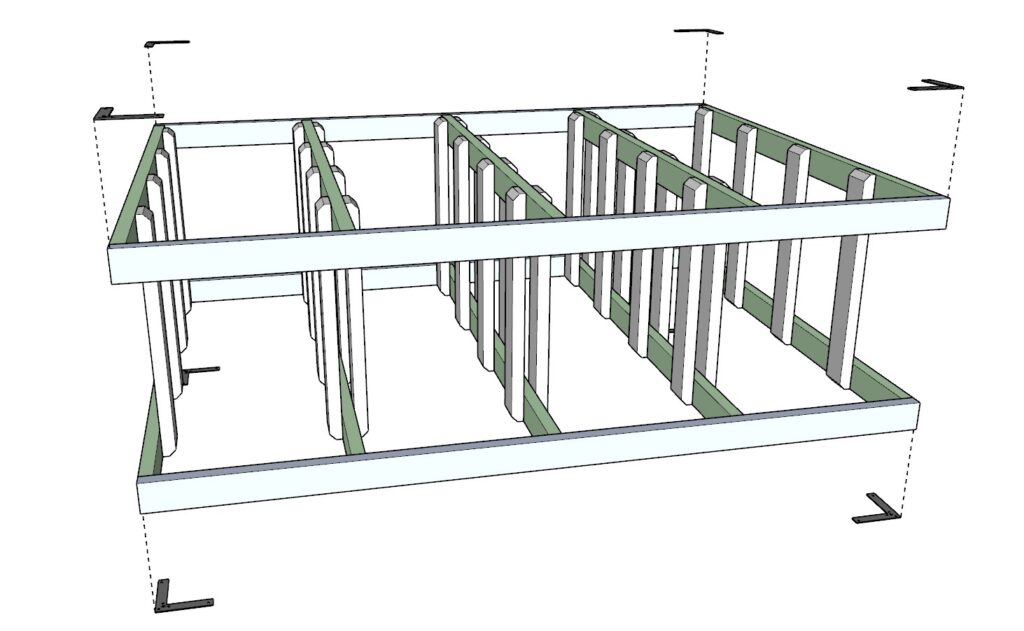
Position the Brackets:
- Place one L-shaped bracket at each corner of the rack, as indicated in the diagram.
- Ensure the brackets sit flush against the wood for a snug and secure fit.
Predrill the Holes:
- Using a countersink drill bit, predrill holes for each screw. This step is critical to prevent the wood from splitting during installation.
Secure the Brackets:
- Attach each bracket using 2.5-inch screws. Tighten the screws firmly but avoid over-tightening, which could damage the bracket or wood.
Step 6: Securing the Tote Rack to the Wall
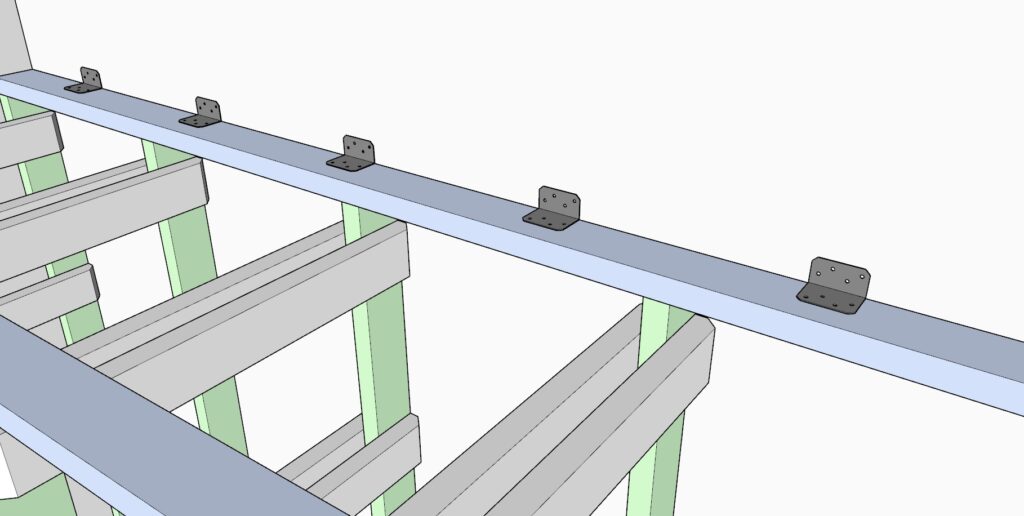
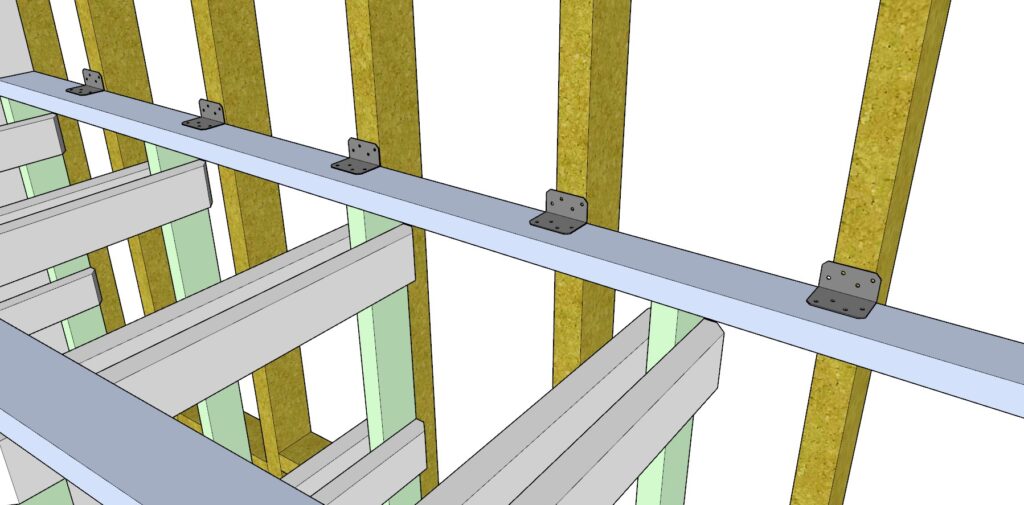
6.1 Locate the Wall Studs
Find the Studs:
- Use a stud finder to locate the studs in the wall. Follow these general steps:
- Turn on the stud finder and place it flat against the wall.
- Slowly slide the device horizontally until it signals a stud’s edge.
- Mark the beginning and end of the stud with a pencil.
- Repeat this process to identify all studs needed for securing the rack.
- Use a stud finder to locate the studs in the wall. Follow these general steps:
Double-Check Your Markings:
- Run the stud finder over the same areas again to confirm the stud locations.
- This ensures accuracy when securing the brackets.
6.2 Secure the Rack to the Wall
Attach the Brackets:
- Position an L-shaped bracket at the top corner of the rack, aligned with a marked stud.
- Secure the bracket to the rack first using 1.5-inch screws.
Anchor to the Wall:
- Drill pilot holes into the studs where the brackets will attach. Use 3.5-inch screws to secure the brackets to the wall.
- If the stud depth requires longer screws for a firm grip, use 4-inch screws as needed.
Stabilize the Base:
- Add small shims or scrap wood under the base of the rack to eliminate any wobbling. Ensure the rack is level and all weight rests firmly on the floor, not the wall brackets.
Step 7: Combining Multiple Racks Together
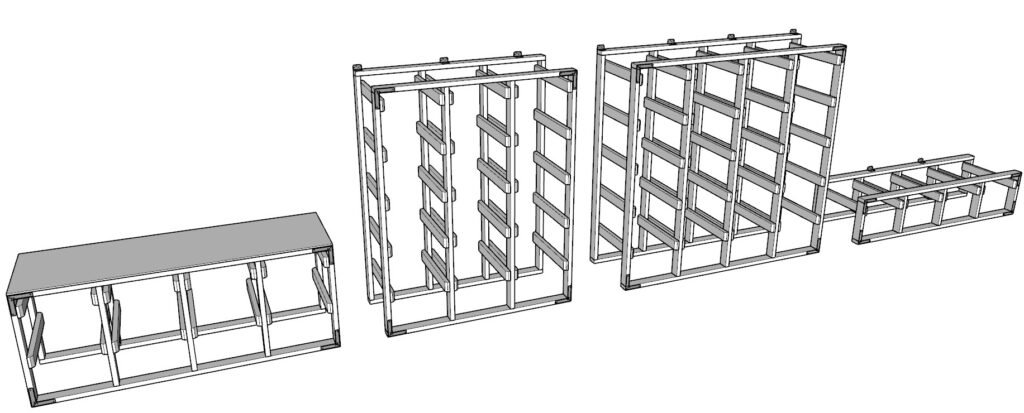
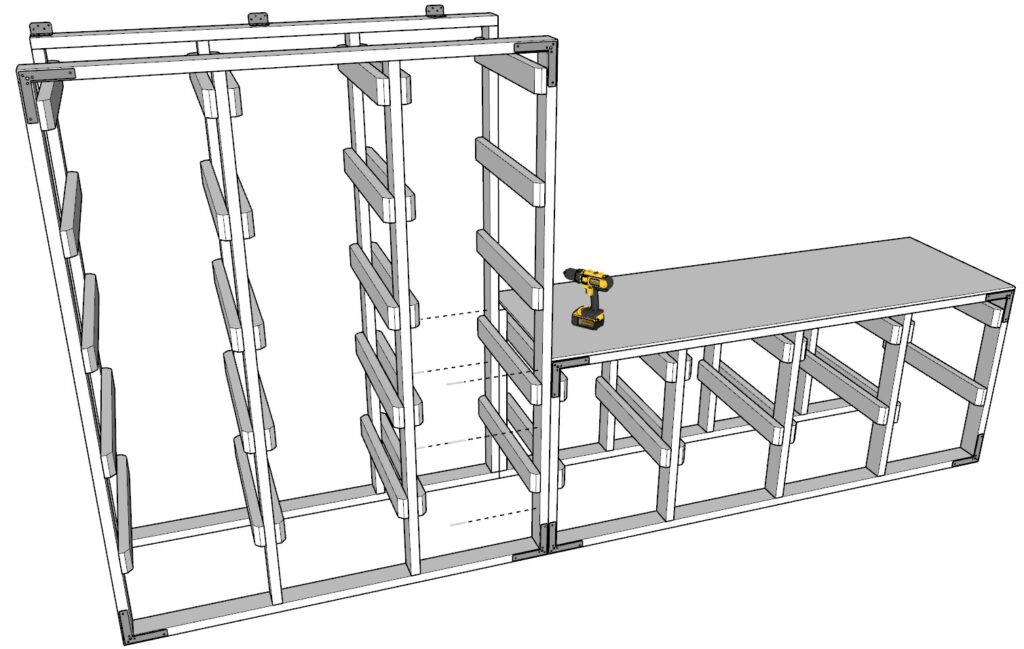
This step explains how to connect multiple racks seamlessly. The process applies regardless of the types of racks being combined.
7.1 Prepare the Racks for Combination
- Ensure all racks are fully assembled and securely built as per their individual instructions.
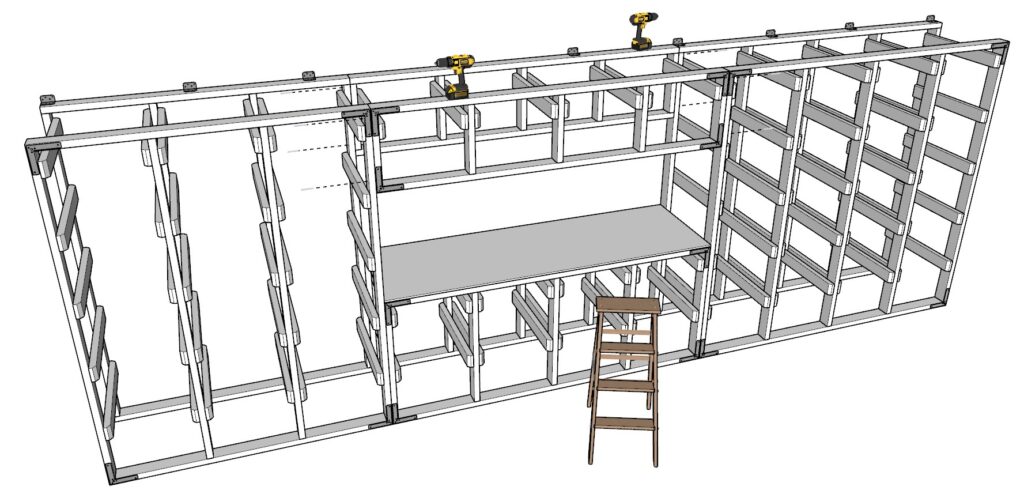
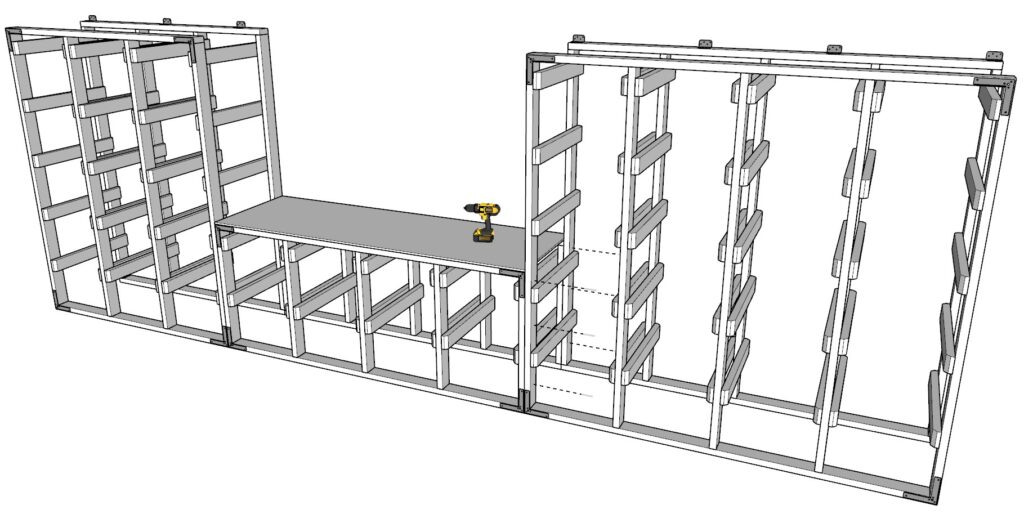
- Position the racks in their final arrangement. In this example, we’re combining:
- A 4-wide x 5-tall rack.
- A 3-wide x 5-tall rack.
- A workbench rack.
- A bridge rack.
7.2 Use the Right Screws
- Choose 2.5-inch screws: Cabinet screws or screws with a wide cap are ideal. These provide strong connections without driving completely through the 2×4 lumber.
- Avoid glue: This allows you to disassemble the racks when needed, such as for moving or reorganization.
7.3 Align and Secure the Racks
- Position the racks so that their frames align flush with one another.
- Secure the racks together:
- Place screws at key connection points.
7.4 Test the Connection
- Once secured, gently push and pull the connected racks to ensure they are sturdy and do not wobble.
- Add additional screws if needed for extra reinforcement.
7.5 Continue Adding Racks
- Repeat the process for any additional racks.
- Reference the example arrangement to visualize the assembly of multiple racks into a cohesive storage system.
7.6 Add Shims for Proper Leveling
- Inspect the combined racks to ensure they are level and resting securely on the ground.
- If there are gaps between the base of the racks and the floor, use shims or small pieces of scrap wood to fill these spaces. This is crucial to:
- Prevent the weight of the racks and their contents from relying on the L-shaped brackets attached to the wall.
- Ensure the rack sits evenly on the ground to support the load safely and effectively.
- Garage floors may appear level but often have slight inconsistencies. Adjust the shims until the racks are stable, with no wobbling or leaning.
- Tip: Check the entire base of the combined racks and adjust shims at multiple points if necessary to distribute the weight evenly.
