DIY chair overview:
Building your own DIY wooden chair is a fantastic way to add a touch of personal flair to your home, office, or outdoor space. Not only is the process of constructing a chair a fun and satisfying experience, but it also allows you to customize the chair to fit your specific needs and preferences. Whether you’re looking for a comfortable reading chair, a stylish outdoor seating option, or a sturdy work chair, a DIY wooden chair is the perfect solution.
When building your own wooden chair, you have the freedom to choose the type of wood you want to use. You can opt for a more traditional look with a hardwood like oak or maple, or you can choose a softer wood like pine for a more rustic feel. You can also choose to paint or stain the chair to match your existing décor. The possibilities are endless!
Not only does building your own chair save you money, but it also gives you a sense of accomplishment and pride in your work. Imagine sitting back in your own handcrafted chair and enjoying a good book or a cup of tea. The feeling of satisfaction and pride in a job well done is truly priceless.
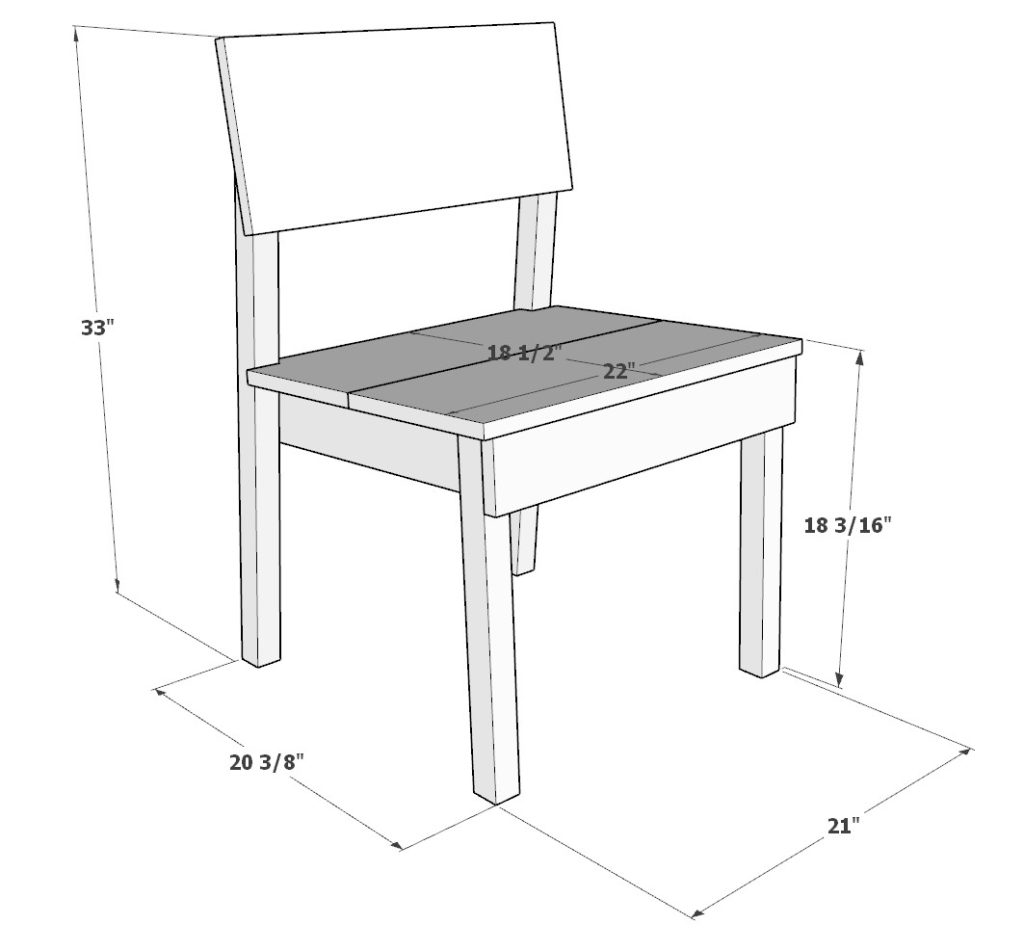
DIY chair specifications:
This DIY wooden chair can be easily transformed into a DIY folding chair or a DIY collapsible chair by simply removing four bolts to take off the back legs and backrest. This feature makes it a convenient seating option for outdoor adventures, storage, or transportation.
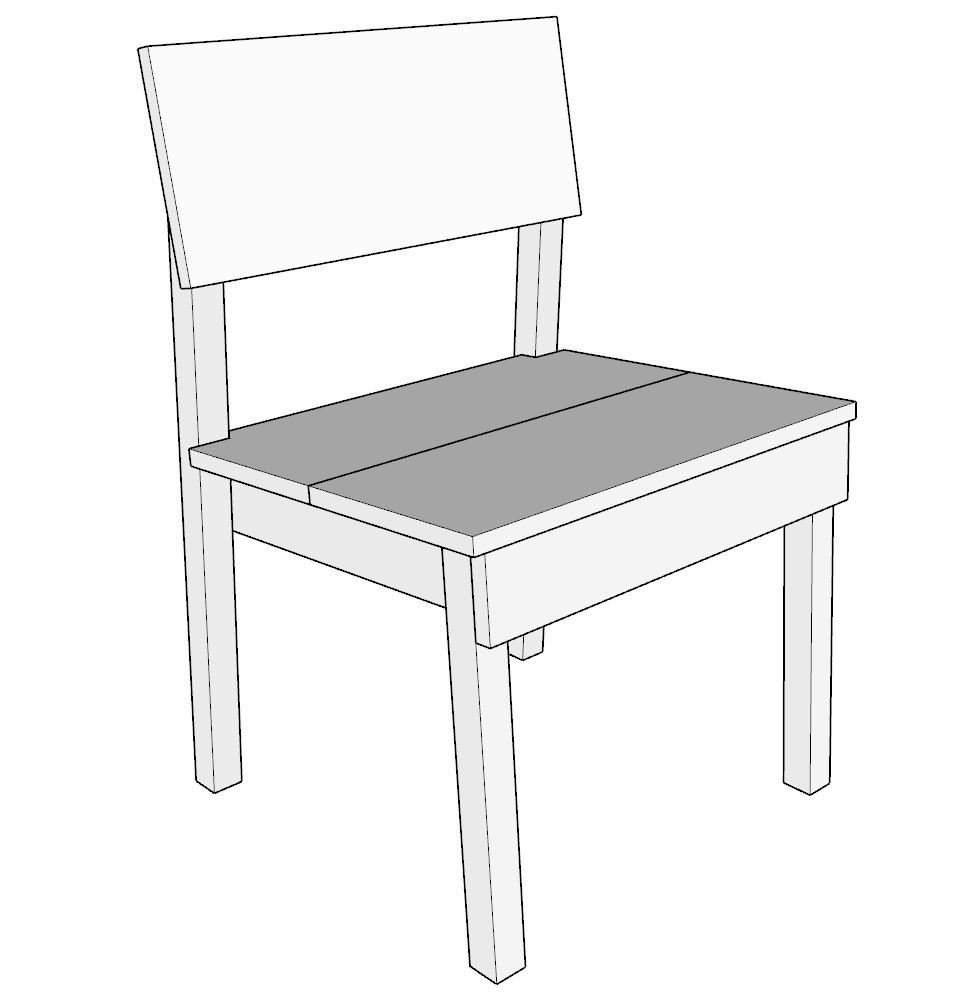
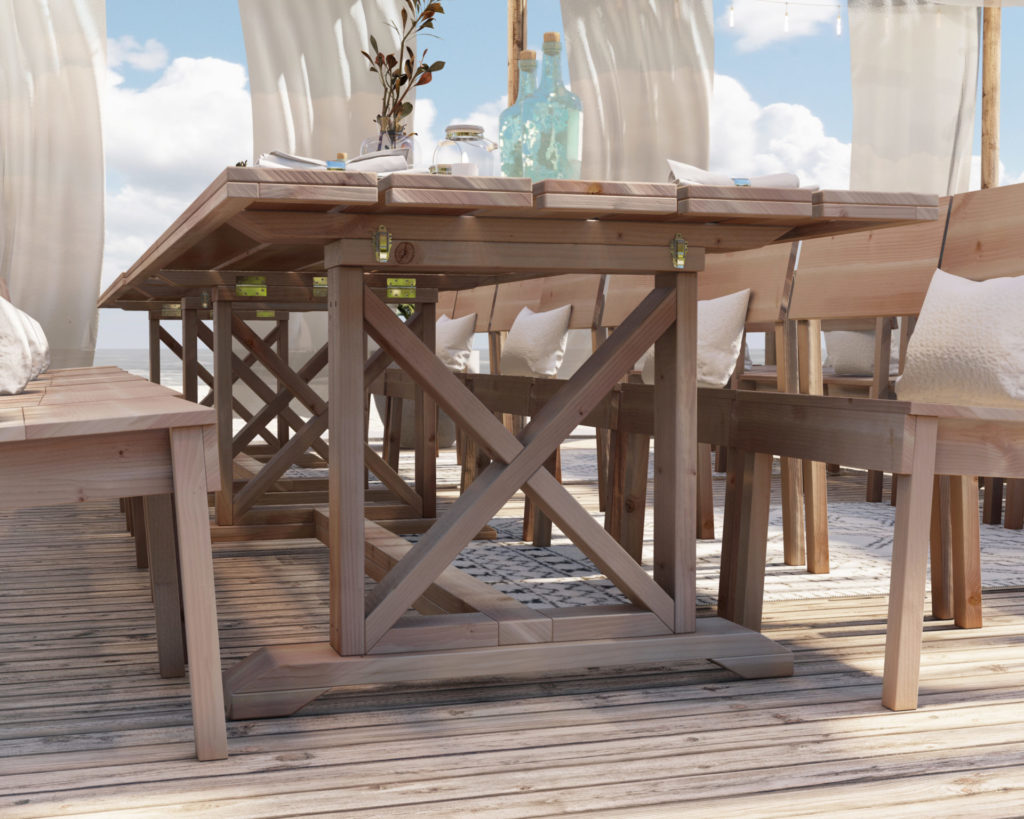
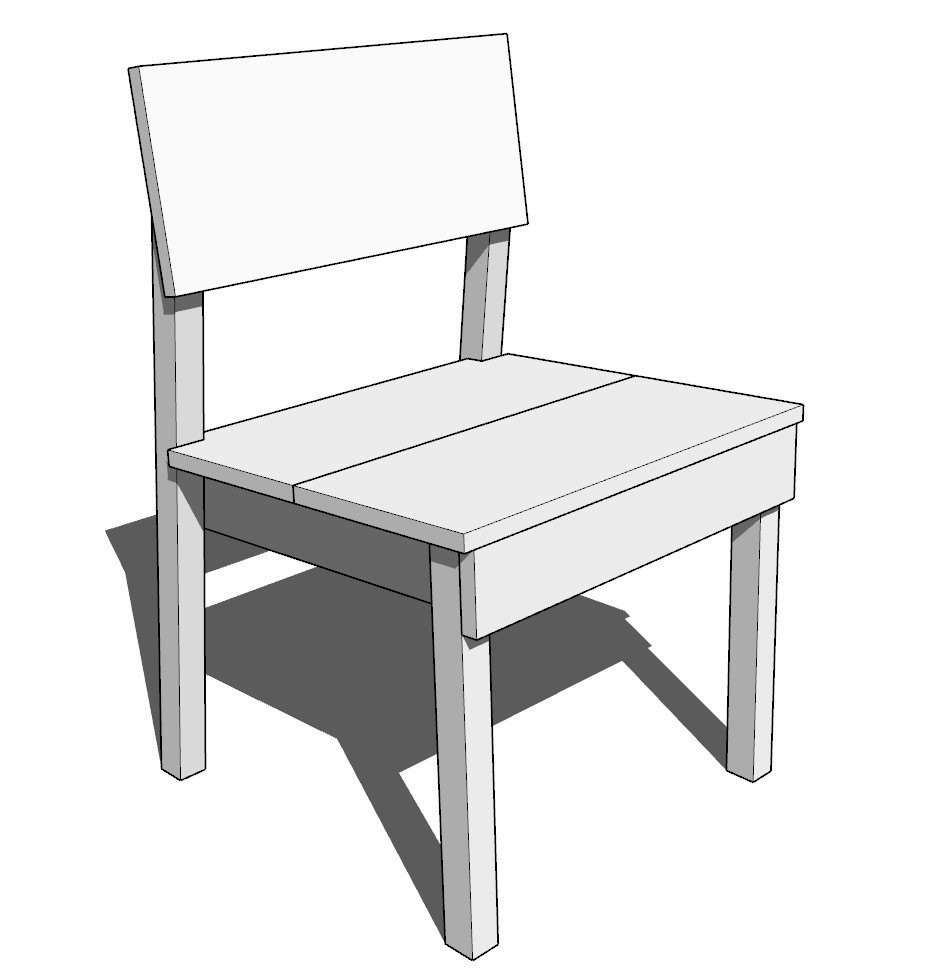
The chair platform of this particular design has a natural incline and a backrest that allows a person to sit back comfortably, providing support for your back and promoting good posture. The overall design is sleek, simple, and elegant looking, making it a great addition to any space. The chair’s design is inspired by the DIY wooden table, which can be found in the photos provided. The folding table plans can be found here.
DIY chairs perfect for specials events
The DIY wooden chair is the perfect choice for events such as weddings, quinceañeras, outdoor parties, and more. This chair combines style and functionality, making it the ideal seating option for your guests. Here’s why:
- Space-saving design: One of the key features of this chair is its ability to collapse and be easily transported. When the back legs and backrest are removed, you can fit up to 32 chairs in one truck bed, saving you valuable space and making it easier to transport to your event location.
- Customizable: With the option to choose the type of wood and finish, you can create a chair that perfectly matches your event’s theme and décor. This adds a personal touch to your special day and creates a cohesive look for your guests.
- Sturdy and comfortable: The chair’s natural incline and backrest provide comfortable support for your guests, promoting good posture and ensuring that they have a pleasant seating experience. The sturdy construction and solid materials used in this DIY project make this chair a reliable and long-lasting seating option.
- Cost-effective: Building your own chairs is a budget-friendly option compared to purchasing pre-made chairs. Not only do you save money, but you also have the satisfaction of knowing that you created the chairs yourself.
Is this DIY chair a beginner friendly wood working porject?
One of the best things about this DIY woodworking plan is that it is perfect for any beginner to woodworking. These DIY chair plans do not include any fancy joint or advanced woodworking techniques, making it easy for anyone to complete. With only three pieces of 8-foot lumber and a cost of less than $30 per chair, this DIY project is not only a budget-friendly option, but it is also a great way to put your woodworking skills to the test.


Time to build
About 1 hours per chair
Total cost of build
About $30 per chair
Skill level required
Beginner
Download the PDF plans
DIY chair PDF plans
What is included in the PDF download?
Easy to read step by step instructions
Material list
Tools needed
3D illustrations
Recommended tools/materials
- Miter saw
- Drill
- Impact driver with bit for screws
- Sander
- wood countersink drill bit
- 30-40 1/2 inch screws
- Wood glue
- sand paper
- Four 2.5 inch bolts, eight washers, and four bolts (per chair)
- Wood clamps (optional but helpful)
Shopping list and cut list
Available with purchase of the DIY plan. Thank you for your support and for making this website possible.
Step 1 (DIY chair leg cut list)
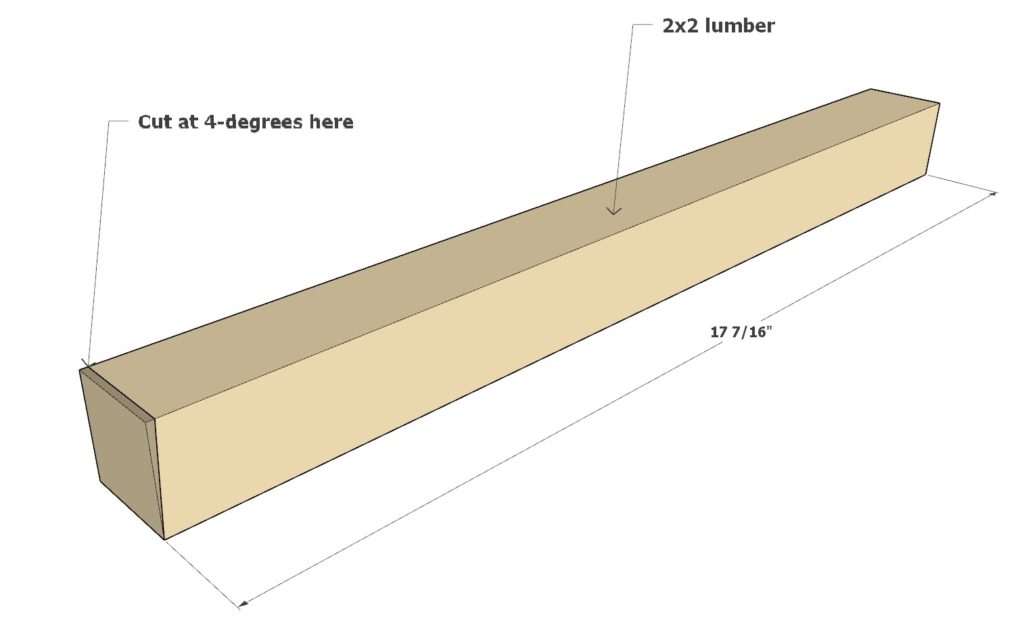
First, cut the 2×2 lumber to the correct size to make the legs of the DIY chair.
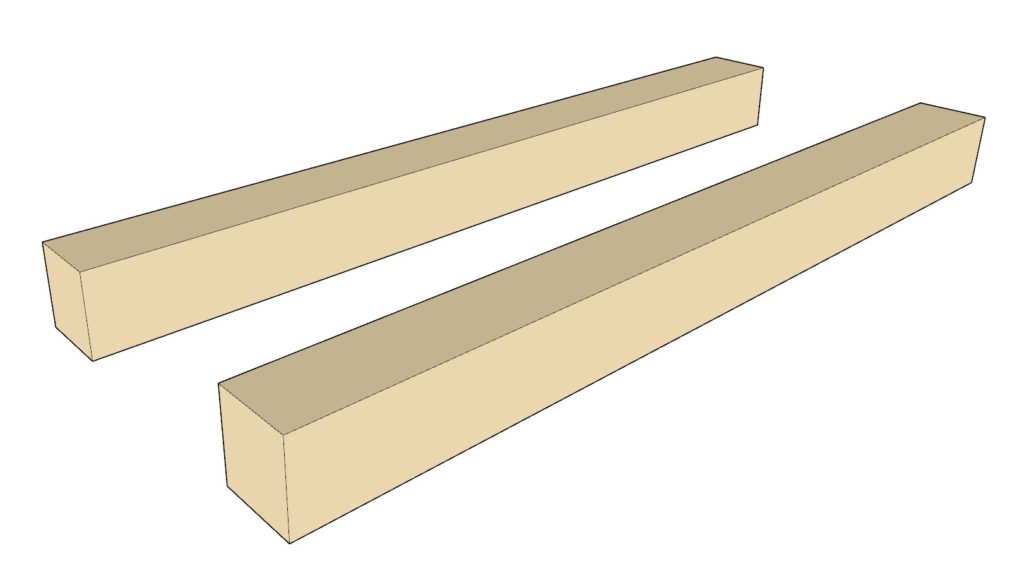
Take a 17-7/16 inch 2×2 lumber piece and cut off one of the ends at 4-degrees as shown below (in brown).
Make an identical piece to have a total of two front legs.
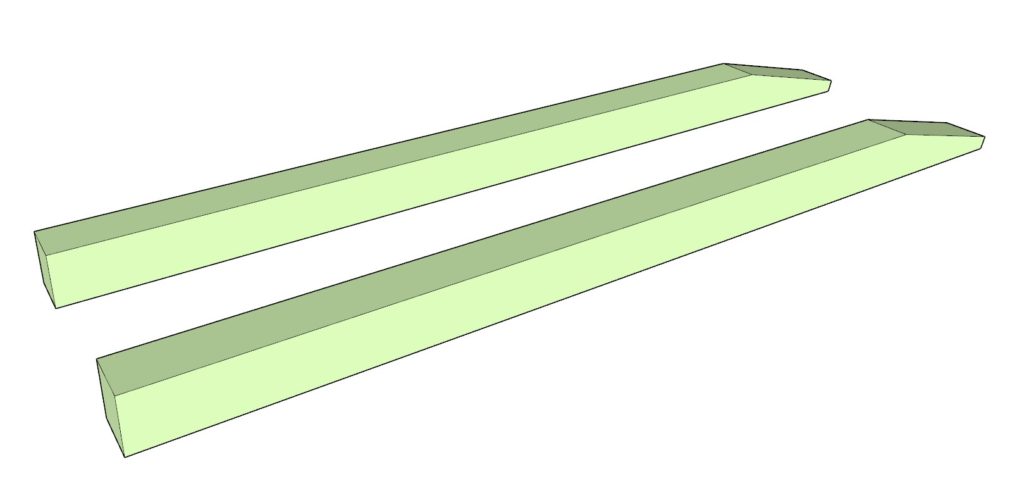
Next, take a 28-1/4 inch 2×2 lumber piece and cut one end at 75-degrees and 14-degrees as shown below (in green)
Make an identical piece to have a total of two back legs.

Step 2 (DIY chair seating frame assembly)
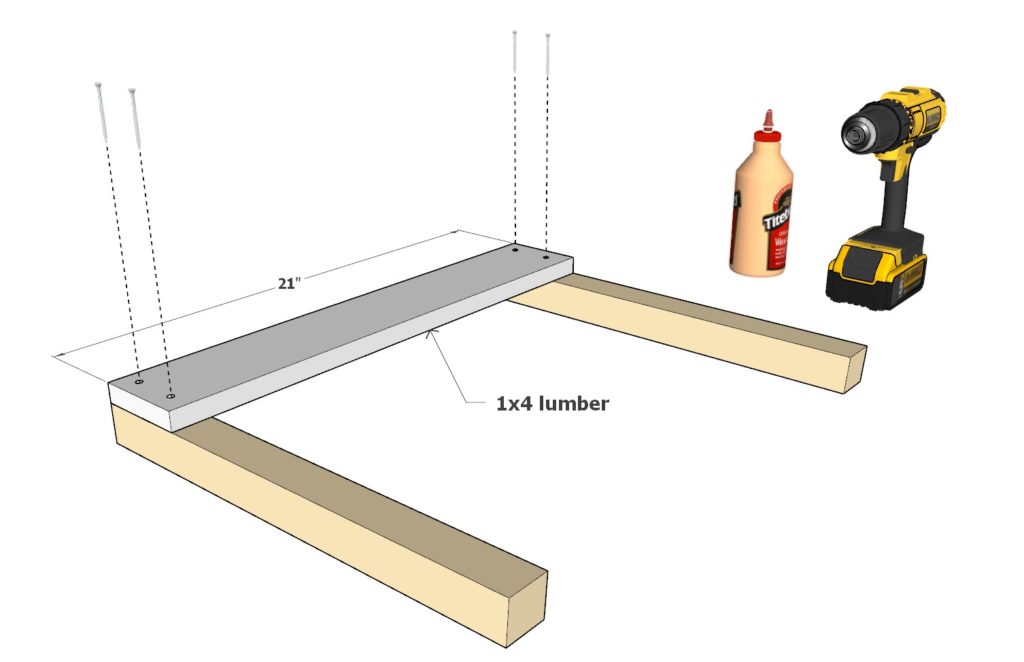
Next, begin building the seating frame of the DIY chair.
Take the two “brown” front legs and take one 21 inch 1×4 lumber pieces and attach it to the legs using 1.5 inch screws glue. Predrill the wood to prevent the wood from splitting. (orientation of the “brown” legs is indicated by the blue outline in the second diagram).
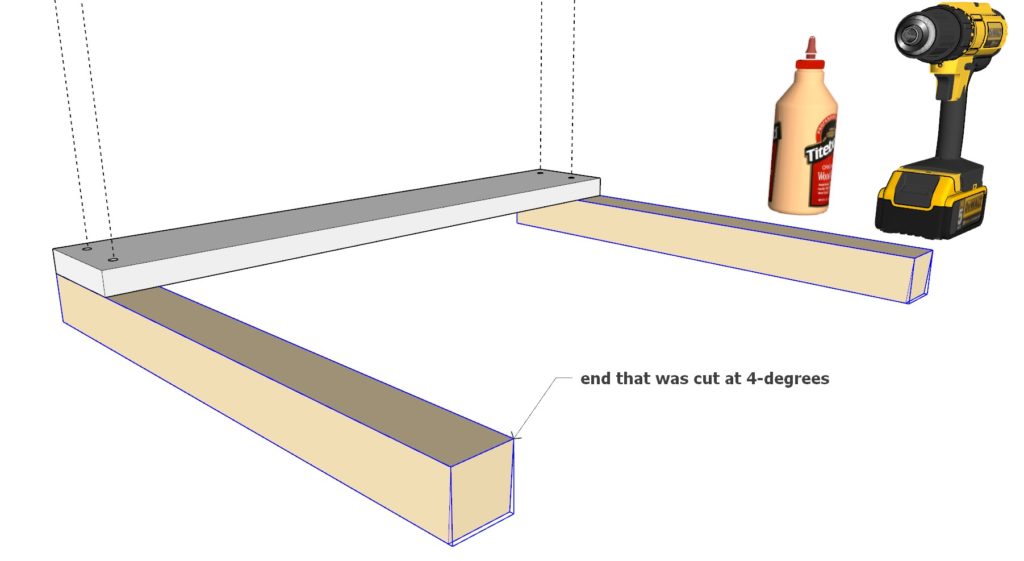
Step 3 (DIY chair seating frame assembly continued)
next, continue adding to the seating frame.
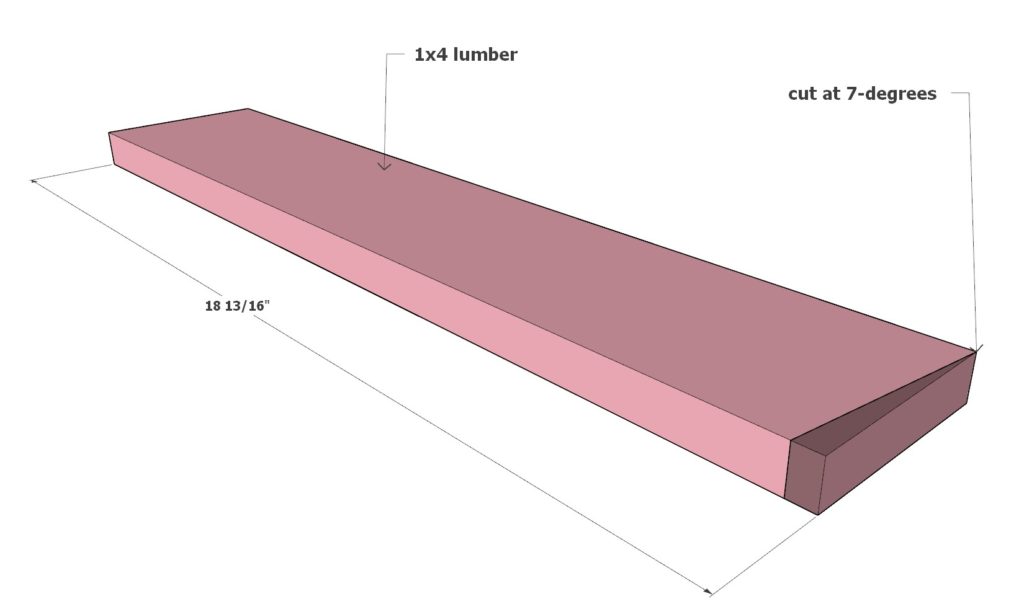
Take one 18-13/16 inch 1×4 lumber piece and cut one end at 7-degrees as shown below (in pink).
Cut an identical piece for a total of two “pink” components.
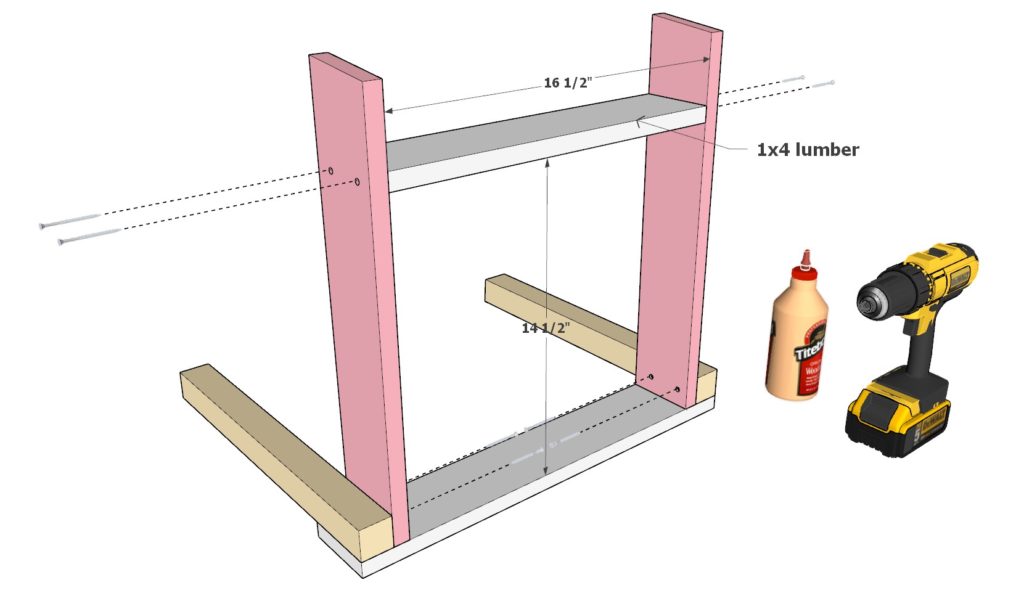
Next, incorporate the “pink” 1x4s into the DIY chair seating frame as shown below. Attach these 1x4s using glue, predrilling, and 1.5 inch screws.
Add a 16-1/2 inch 1×4 lumber piece and join it to the “pink” components as shown below using 1.5 inch screws, glue, and predrilling.


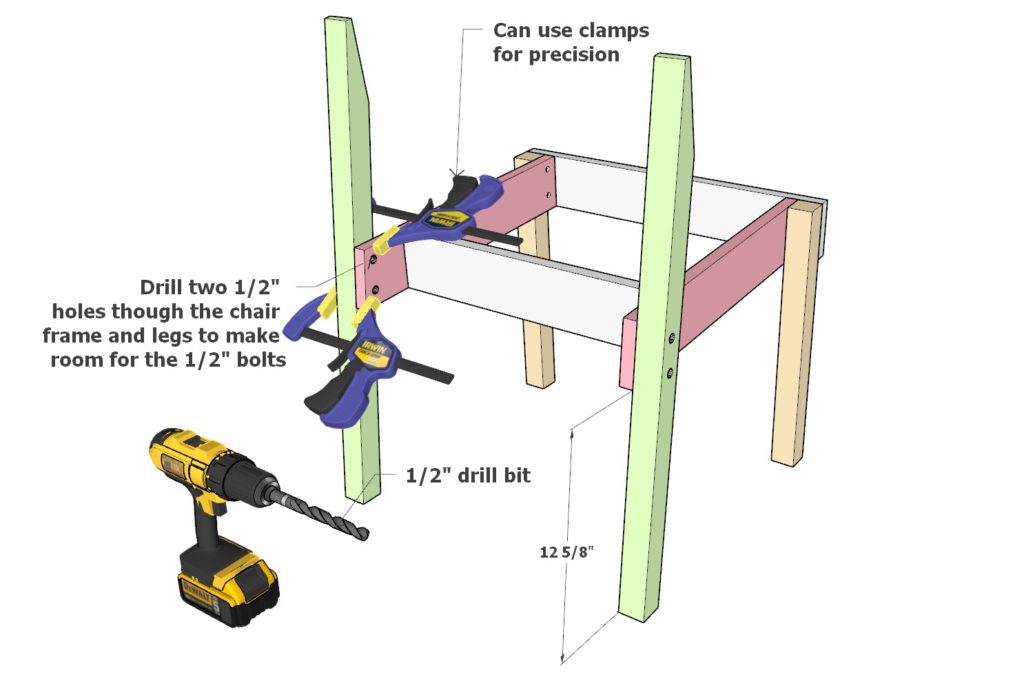
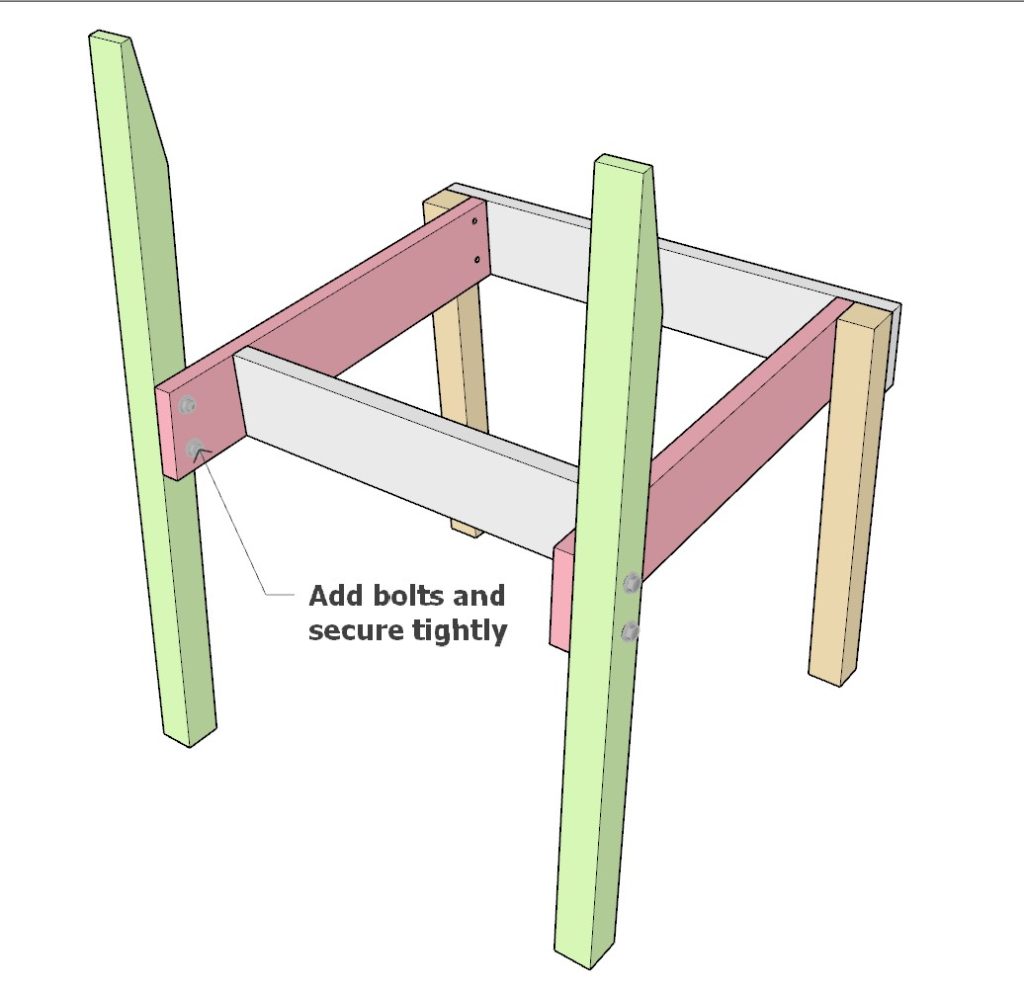
Step 4 (Adding back legs to DIY chair)
To add legs to the DIY chair you will need to drill four 1/2″ holes directly though the chair frame (shown in pink) and the legs (shown in green).
Ensure that the frame height is 12-5/8 inches off the ground, use clamps to secure the chair frame and leg together, then drill the holes directly though.
It is important that in this step you make all your holes the same to ensure that if in the future one of the back rest components is exchanged for another, you would not have any issues with aligning the holes for the bolts. If you are not able to drive precise holes, consider using a smaller diameter of bolts to ensure that even in a case where the holes don’t align perfectly, you will still be able to join them together.
Next, take the bolts, nuts, and washers and add them to the chair.

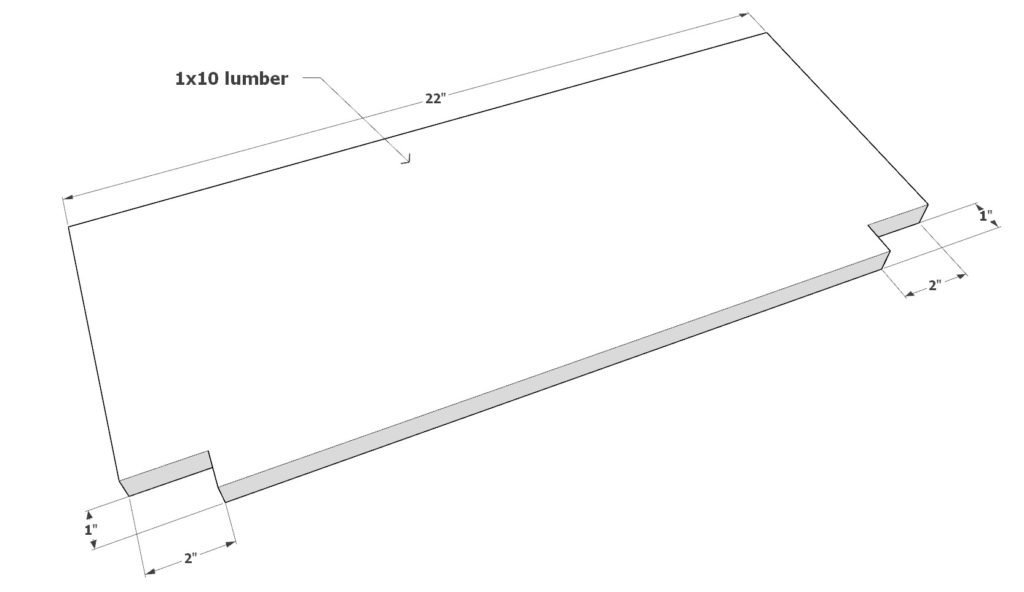
Step 5 (Adding the seating platform a backrest to DIY chair)
Next, add the seating platform and the back rest of the DIY chair.
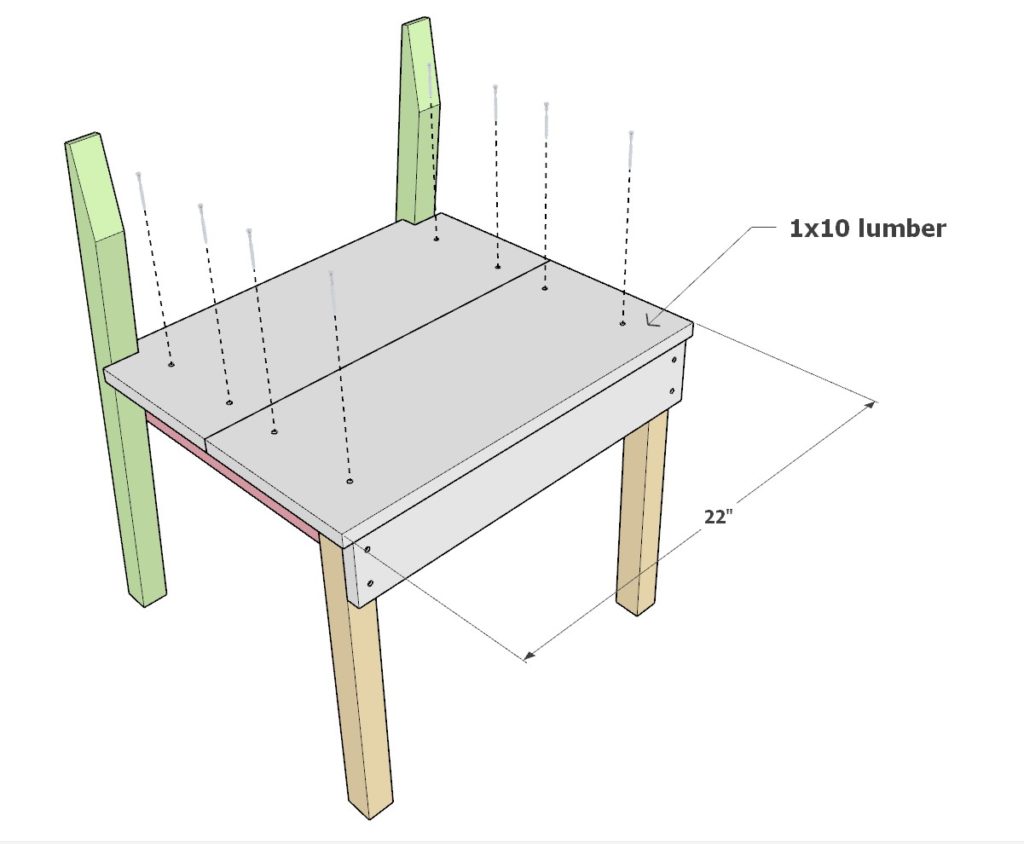
Take one 22 inch 1×10 lumber piece and cut 1 inch x 2 inch notches on two ends of the board as shown below.
Add the 22 inch board along with another 22 inch 1×10 inch board without notches to make the seating platform. Attach the board with glue, predrilling, and glue.
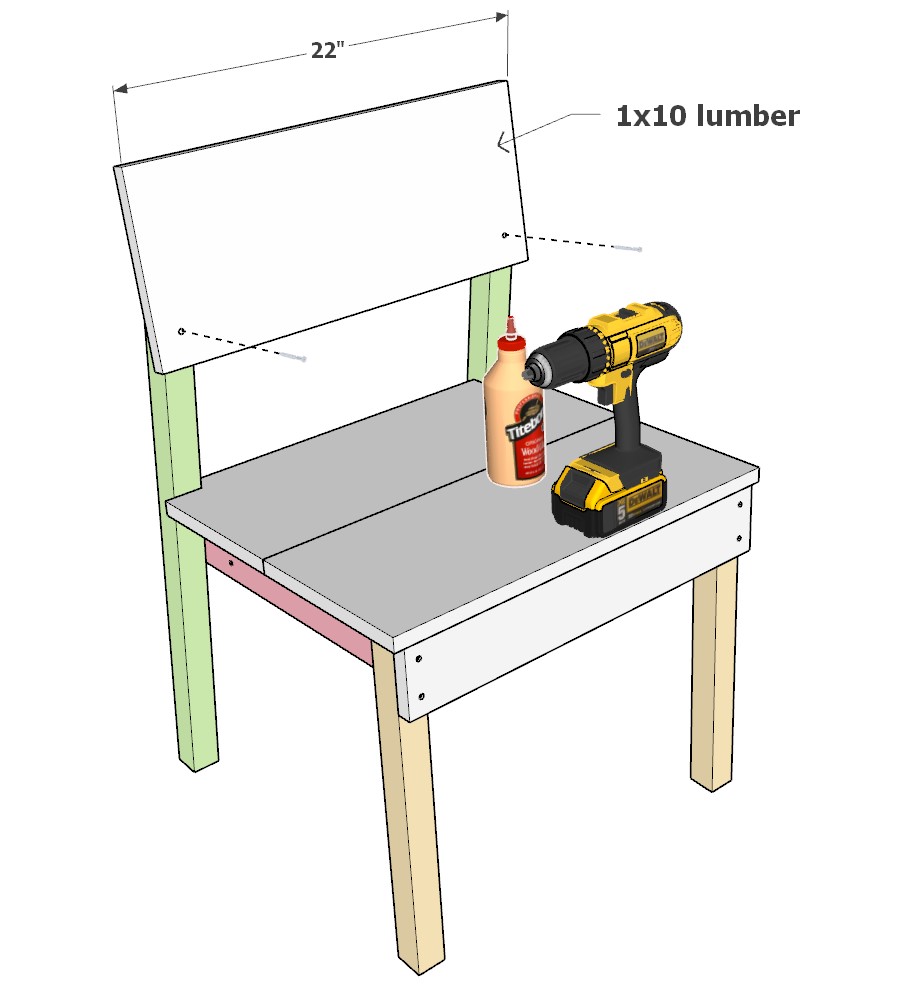
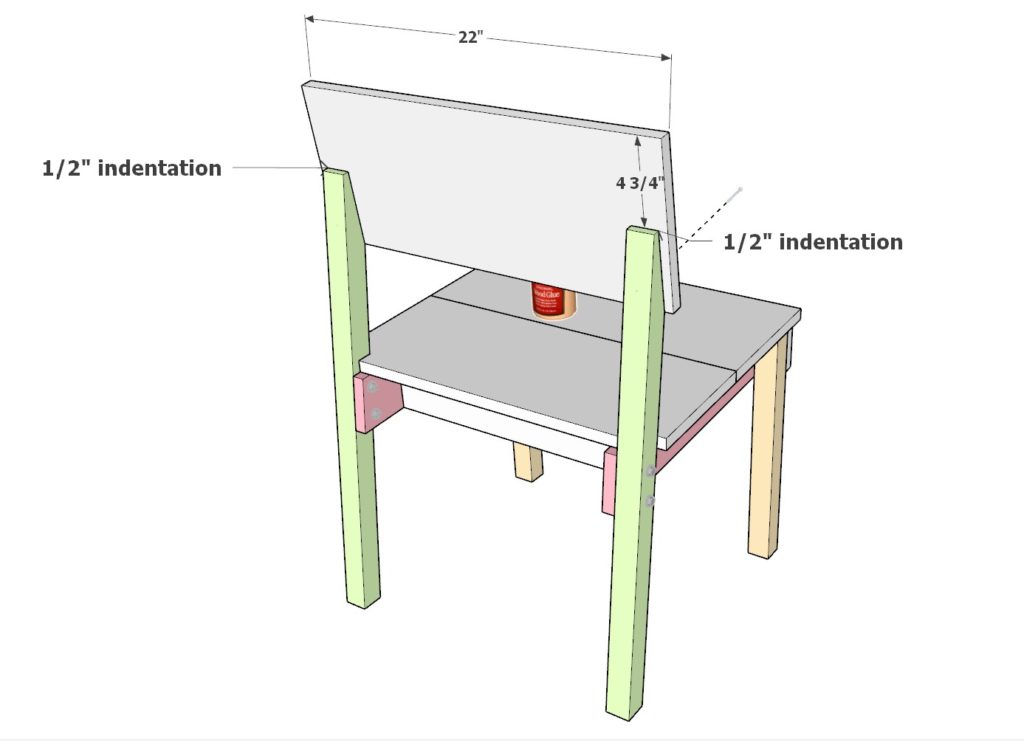
Next, add the back rest of the chair.
Take one more 22 inch 1×10 lumber piece and attach it to the back of the chair as shown below. Use glue, 1.5 inch screws, and predrilling once the piece is centered.
How to stack, collapse, and store the DIY chairs
To collapse a chair, simply remove the four bolts.
The chair base can be stacked one on top of the other in 49 inch high stacks. The back rests can be stacked one on top of the other as well to form a 36 inch stack. Bolts can be placed in a storage bag for later use.
These collapsed chair sacks and back rests can be transported in several ways.
You can wrap a ratchet strap around the chair frame bundle and tighten it gently. The same can be done for the back rests.
These bundles can then be loaded and unloaded off the bed of a truck.

DIY chair finishing touches
Next, prepare the chair for staining or painting.
Step 1: Sanding
Before staining or painting your DIY chair, it is important to sand the surface to ensure that it is smooth and even. This will also help the paint or stain to adhere properly. Use a medium grit sandpaper (around 120-150) to lightly sand the surface of the mudroom. Pay special attention to any rough or uneven areas, and sand until the surface is smooth.
Step 2: Cleaning
After sanding, it is important to thoroughly clean the surface of the chair to remove any dust or debris. This can be done using a dry cloth or a vacuum.
Step 3: Filling Holes
If you have any screw holes or other imperfections in the wood, it is important to fill them before staining or painting. You can use wood filler, putty, or even a mixture of sawdust and glue to fill the holes. Simply apply the filler to the hole, smooth it out with a putty knife or scraper, and allow it to dry completely. Once the filler is dry, sand it smooth with a fine grit sandpaper (around 220).
Step 4: Priming
If you are painting your chairs, it is important to prime the surface before applying the paint. This will help the paint to adhere better and give you a more even finish. You can use a brush, roller, or sprayer to apply the primer. If you are using a brush or roller, be sure to use long, even strokes and avoid overloading the brush or roller with too much primer. If you are using a sprayer, make sure to hold it a consistent distance from the surface and overlap your passes to ensure even coverage.
Step 5: Staining or Painting
Once the primer is dry, you can begin staining or painting your chairs. If you are staining, be sure to follow the manufacturer’s instructions for application and drying times. If you are painting, use a brush, roller, or sprayer to apply the paint in the same manner as the primer. Be sure to work in thin, even coats and allow each coat to dry completely before applying the next one.