Introduction:
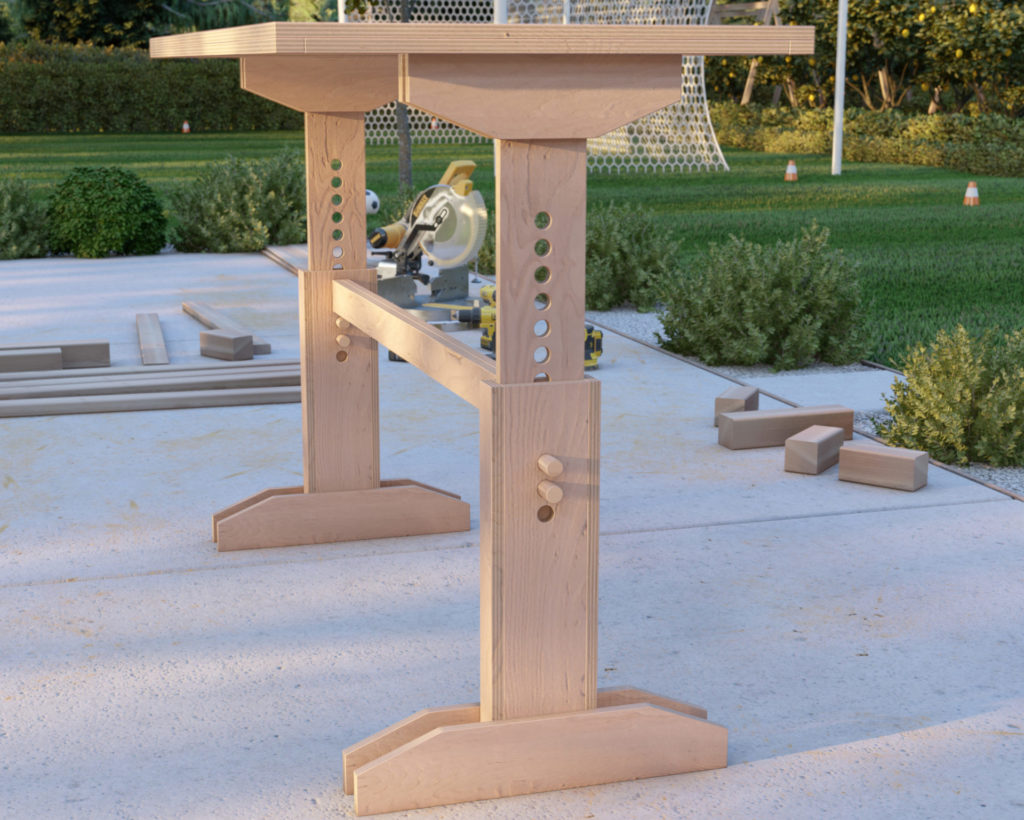
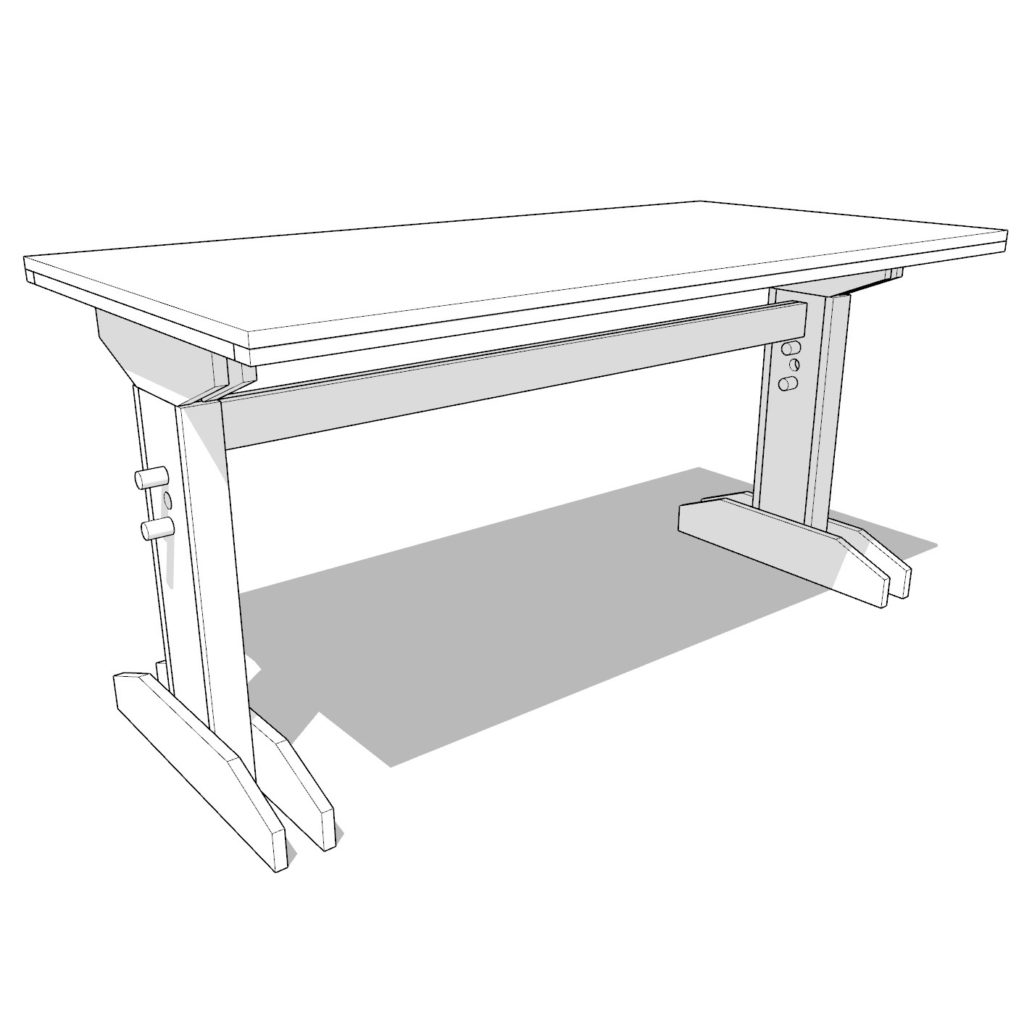
Welcome to the world of practical DIY, where efficiency meets your personal touch. This adjustable sit/stand desk plan is crafted for those who want a workspace that adjusts to their day without the hassle and high costs of retail alternatives.
Specifications:
- Utilizes a single sheet of 3/4-inch plywood for affordability and simplicity.
- Requires a standard 48-inch, 1-inch diameter dowel.
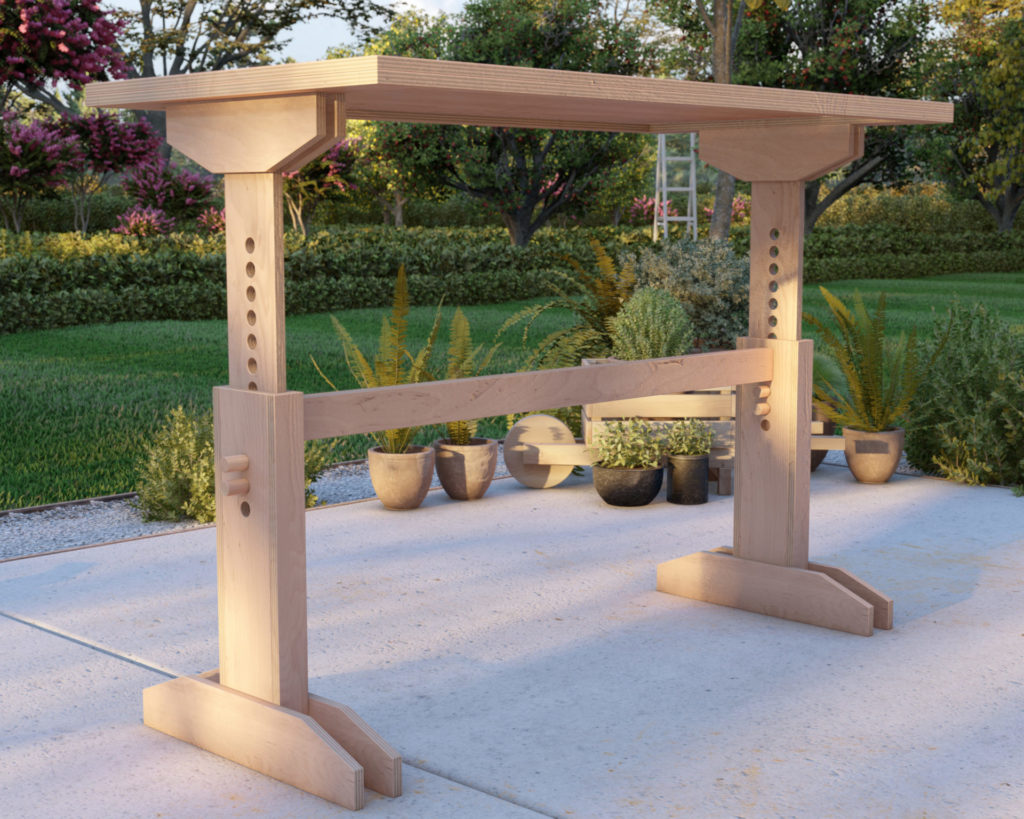
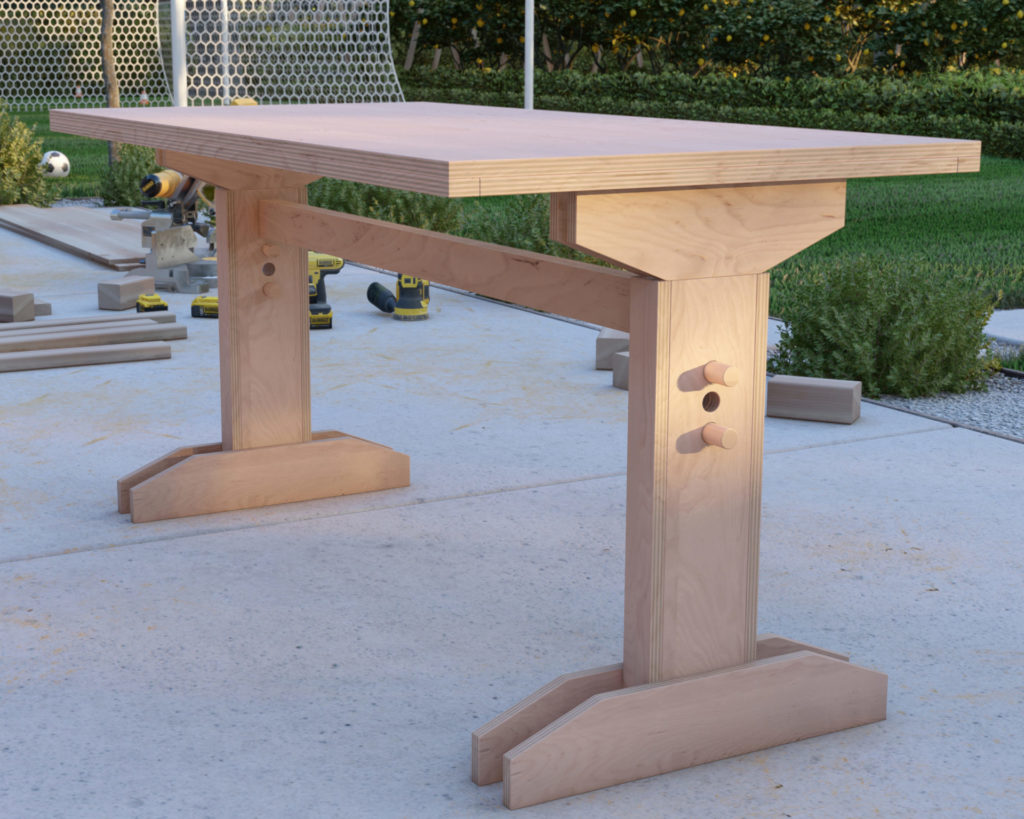
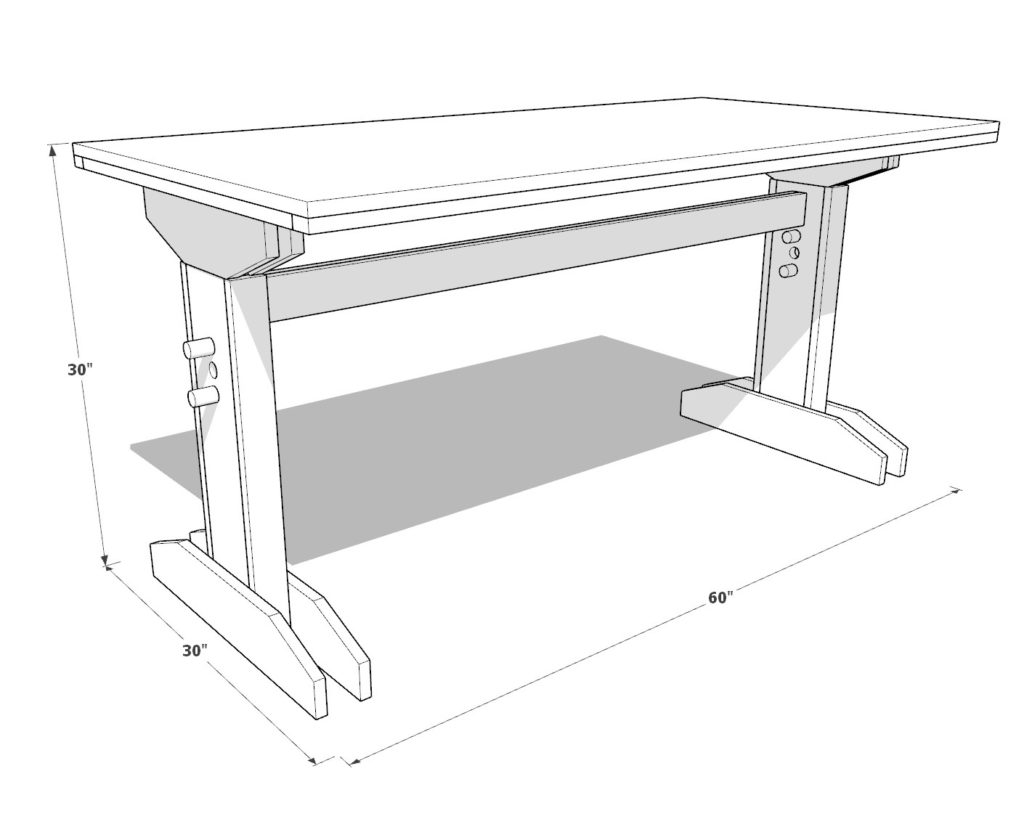
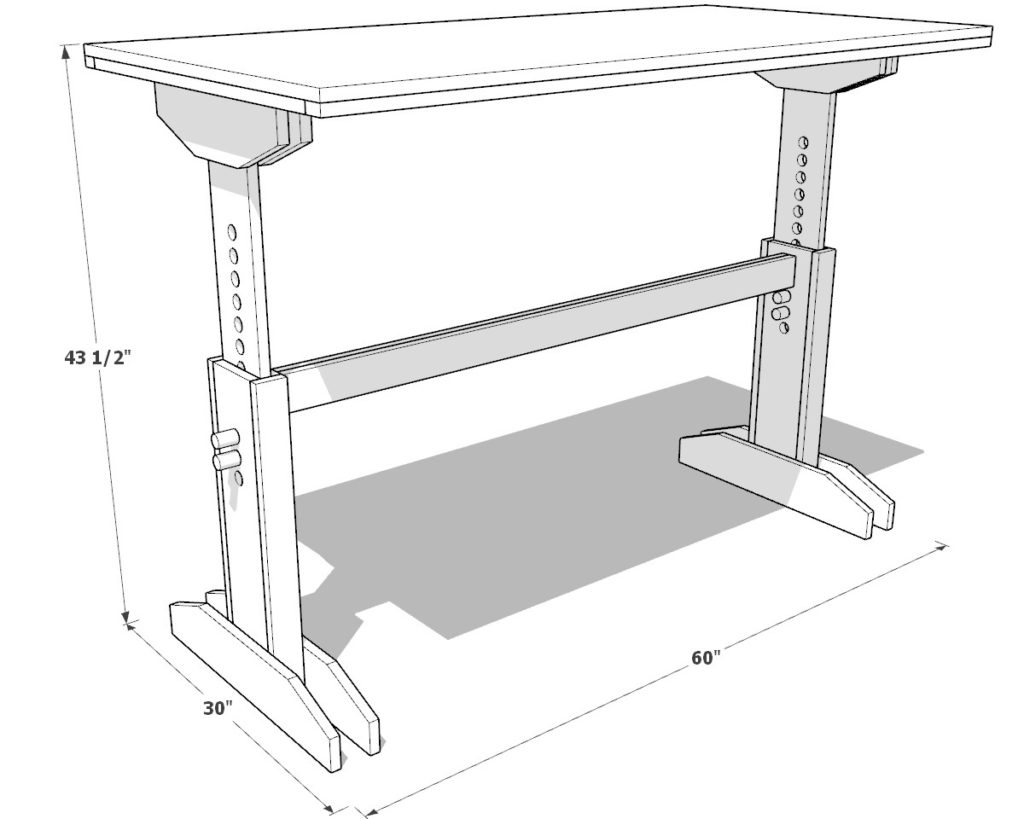
- Transforms between 30-inch seated to 43.5-inch standing heights.
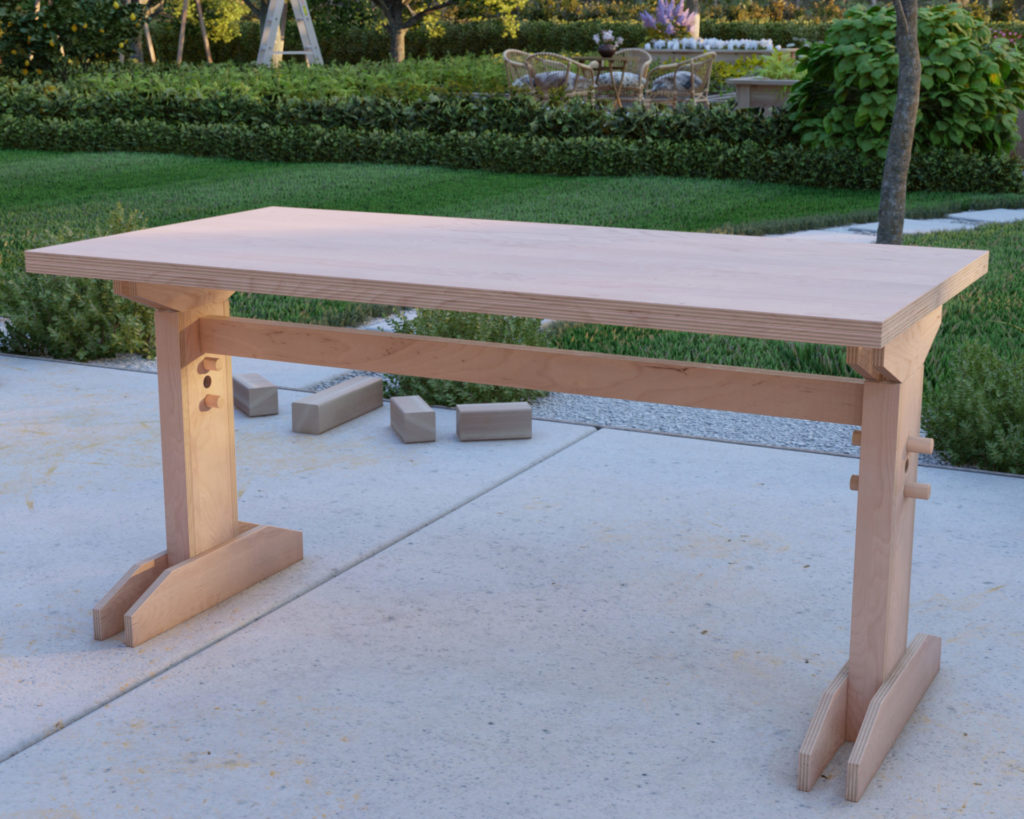
- Dimensions: 30 inches tall (lowered), 30 inches wide, and 60 inches long.
- Beginner-friendly construction: simple cuts, no complex joinery, just glue, and pin nails.
Who Can Build This Desk:
If you can handle a nail gun and follow a simple set of instructions, you can build this desk. It’s designed with beginners in mind, but even seasoned DIYers will appreciate the simplicity and effectiveness of the design.
Why Choose Our Plan:
Our DIY plan is more than just a set of instructions; it’s a comprehensive guide to building your personalized workspace. With colored illustrations, easy-to-follow descriptions, detailed diagrams, a cut list, and a shopping list, we ensure you have everything you need to succeed. Plus, our additional pro tips and links to tools can help enhance your building experience.
Conclusion:
Your ideal adjustable desk doesn’t have to come with a hefty price tag or a complicated construction process. With our DIY plan, you’re just a few steps away from a desk that caters to your needs and your budget. Dive into a project that will elevate your work-from-home experience and leave you with a sense of accomplishment.
Time
5 hours (varies with experience)
Cost
$50 (Costs may vary based on location and supplier.)
Skill level required
Beginner
Adjustable Desk DIY PDF Plan
What is included in the PDF download?
- Easy to read step by step instructions
- Material list
- Tools needed
- Helpful links to materials and tools needed
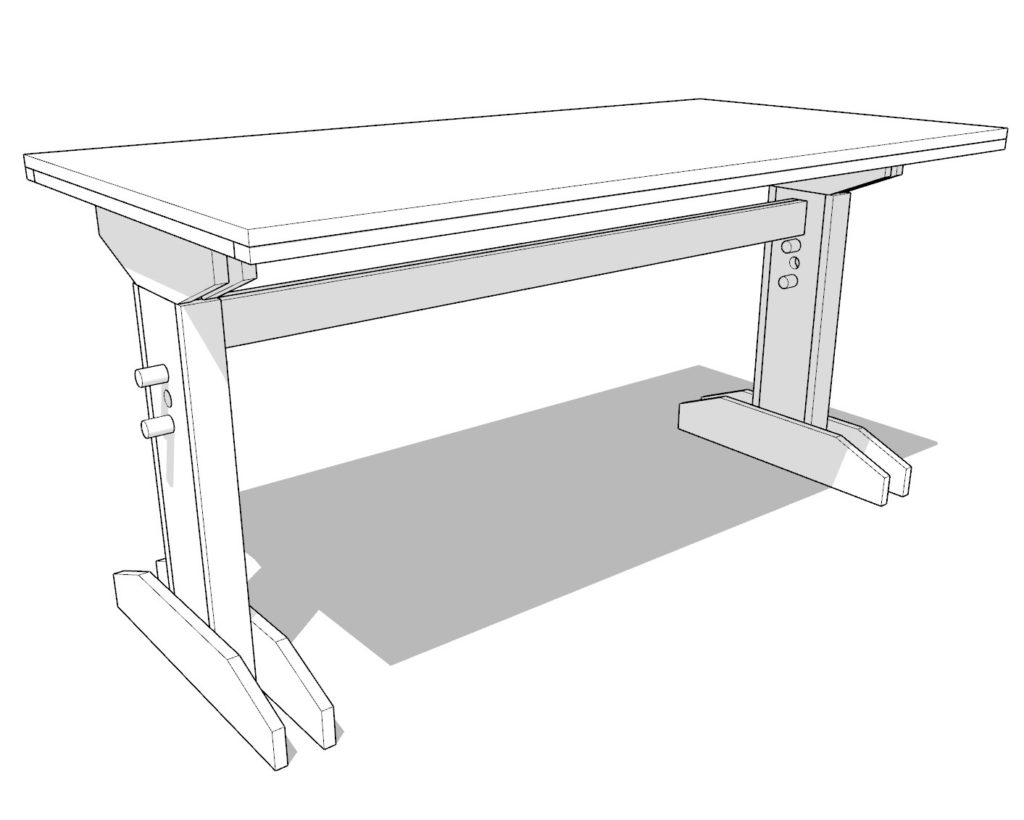
DIY Adjustable Desk Dimensions
Tools Needed for This Project:
Available with the purchase of the DIY plan PDF.
Lumber Shopping & Cut List
Available with the purchase of the DIY plan PDF.
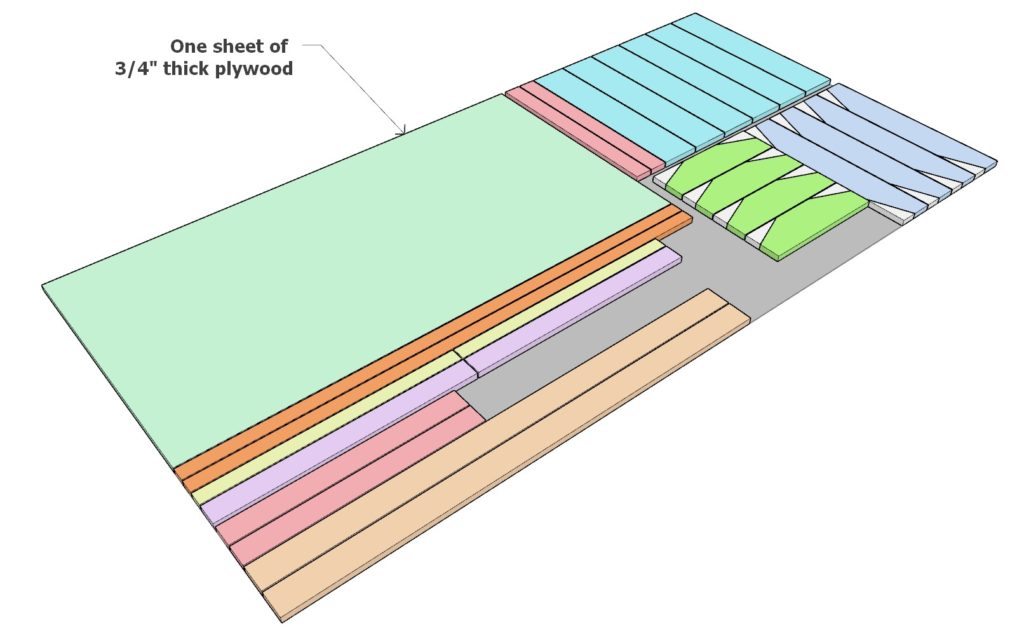
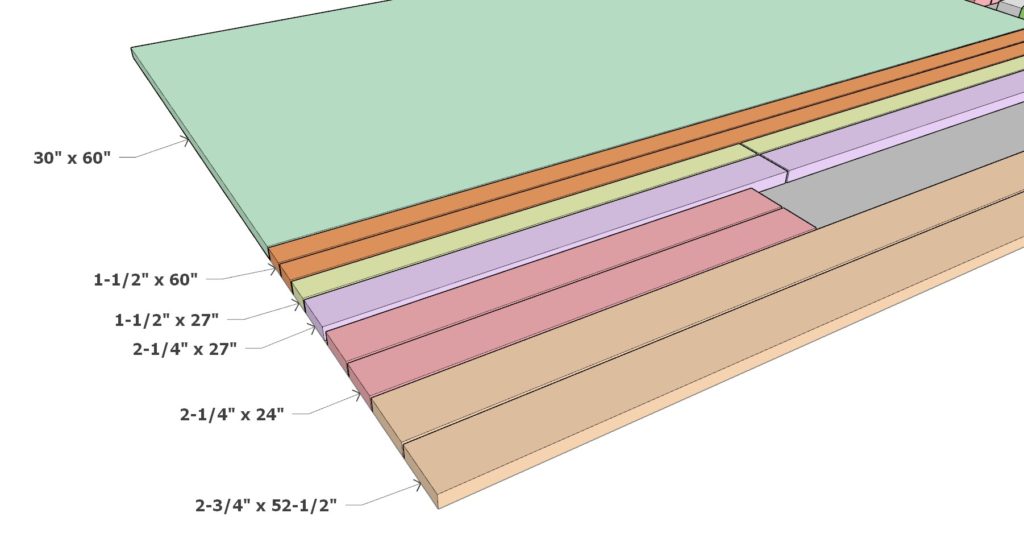
Step 1: Precise Plywood Panel Preparation
Begin your project by meticulously cutting out all the designated components from your single sheet of 3/4-inch plywood. Reference the first diagram to understand the layout for the cuts. The diagram showcases a color-coded strategy with each piece spaced precisely 1/8″ apart, accommodating the blade thickness of most standard saws.
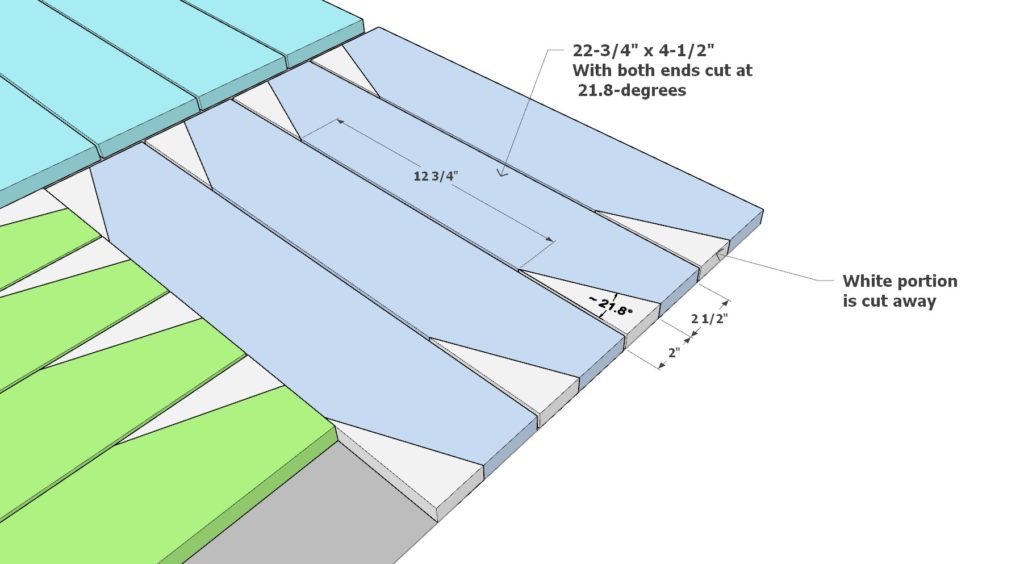
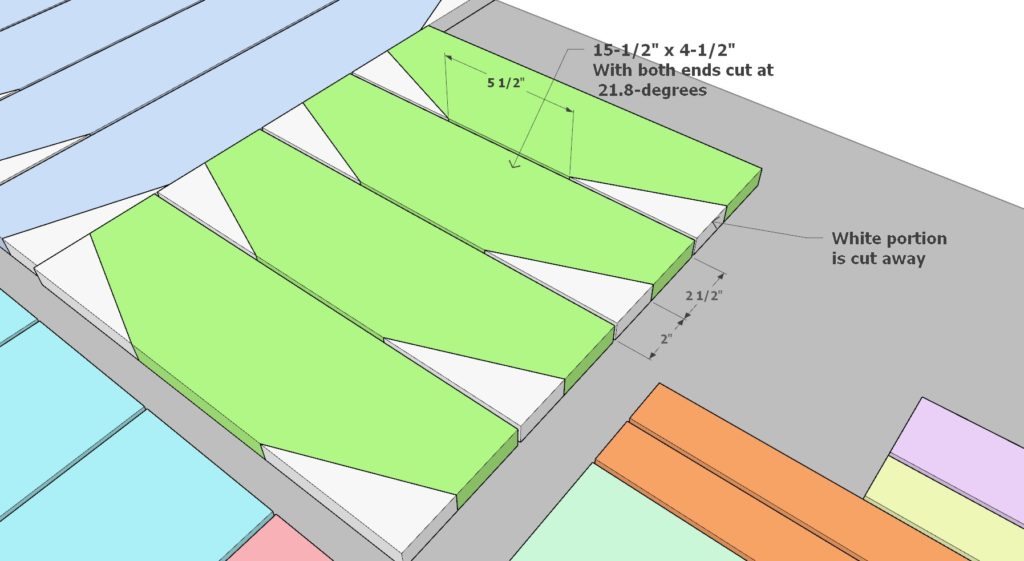
Pay special attention to the blue and lime green marked pieces. After the initial cut from the plywood sheet, these pieces require an additional 21.8-degree angle cut. For this, you’ll need to use a miter saw to achieve the accurate slope necessary for assembly.
Choosing Your Material: If your budget permits, opt for a furniture-grade plywood sheet for a finer finish. For those prioritizing cost, a less expensive sheet can still yield satisfactory results.
Cutting Tips:
- Proceed with cuts at a measured pace, aiming for clean, straight edges.
- For optimal results, use a fine-tooth saw blade specifically designed for plywood. This will minimize splintering and ensure a smooth, chip-free cut.

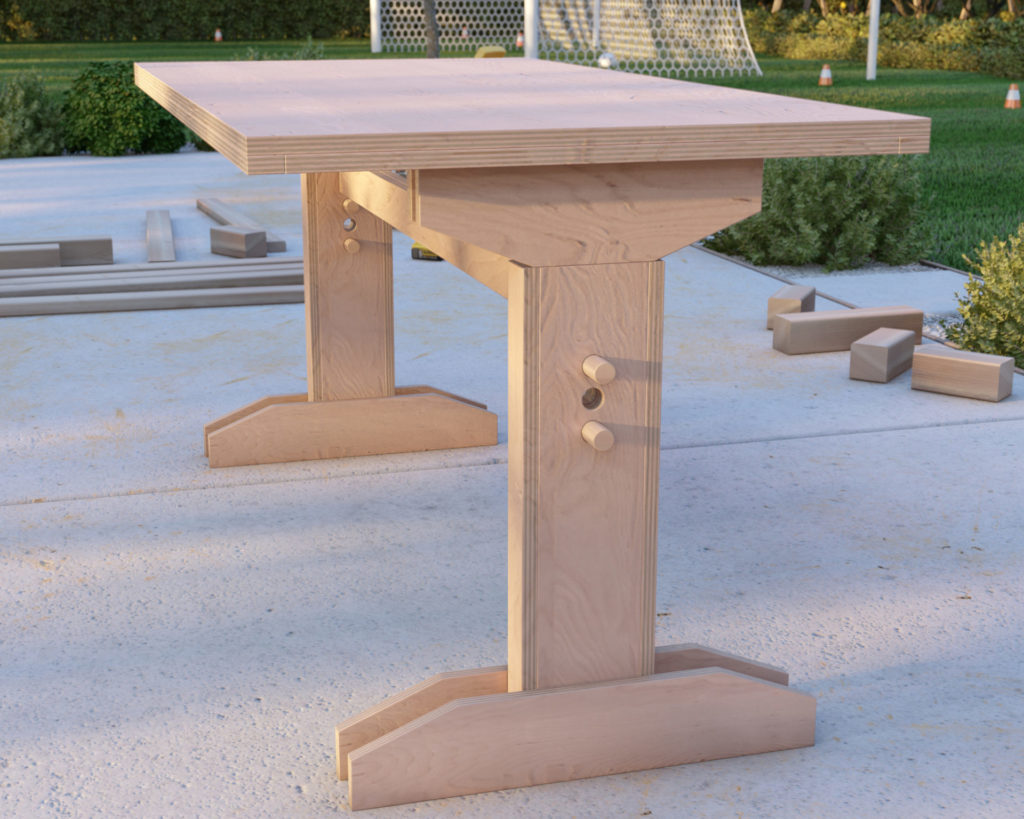
Step 2: Assembling the Desk's Core Structure
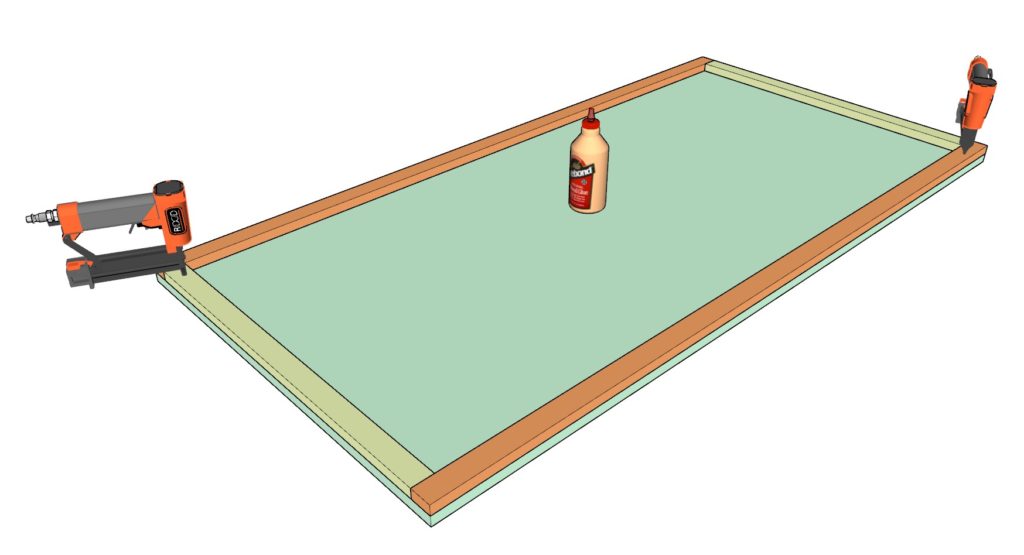
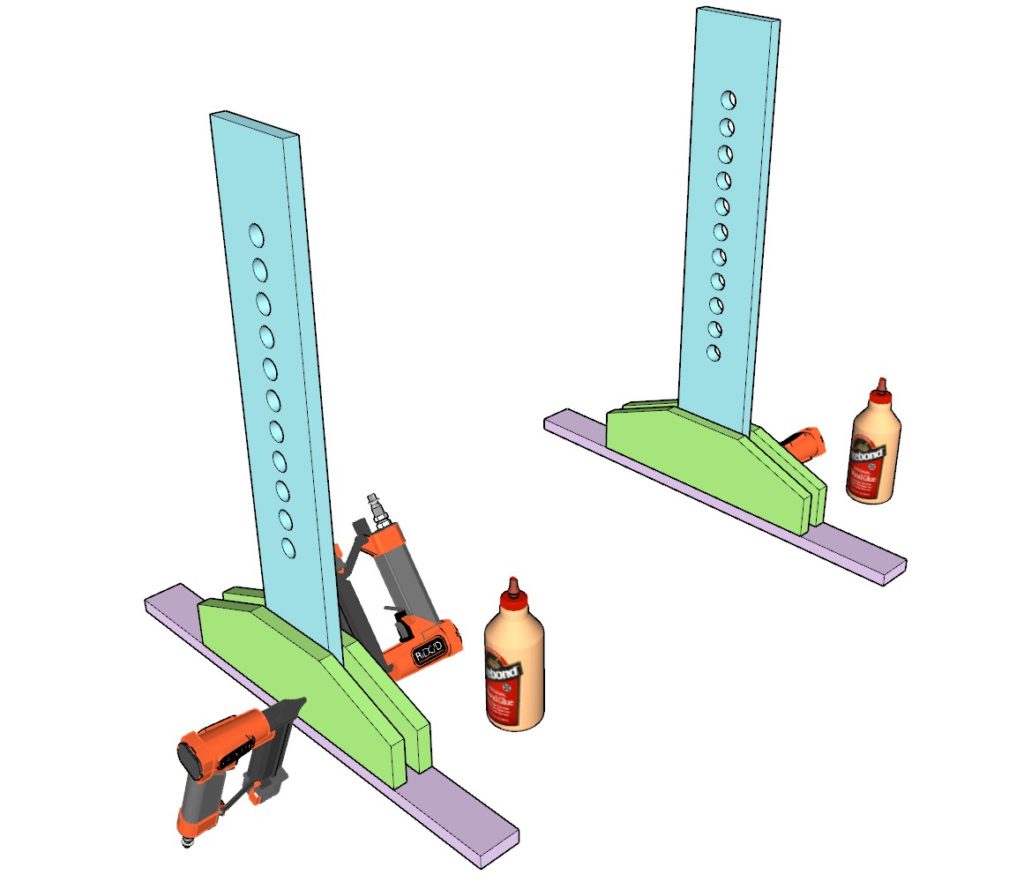
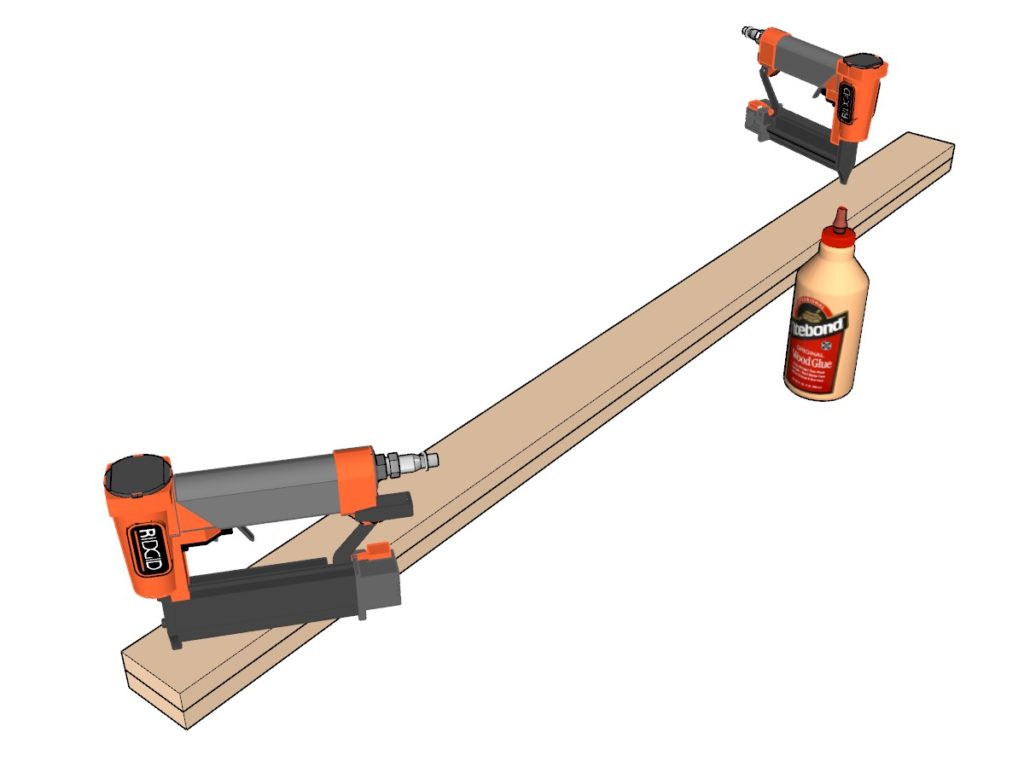
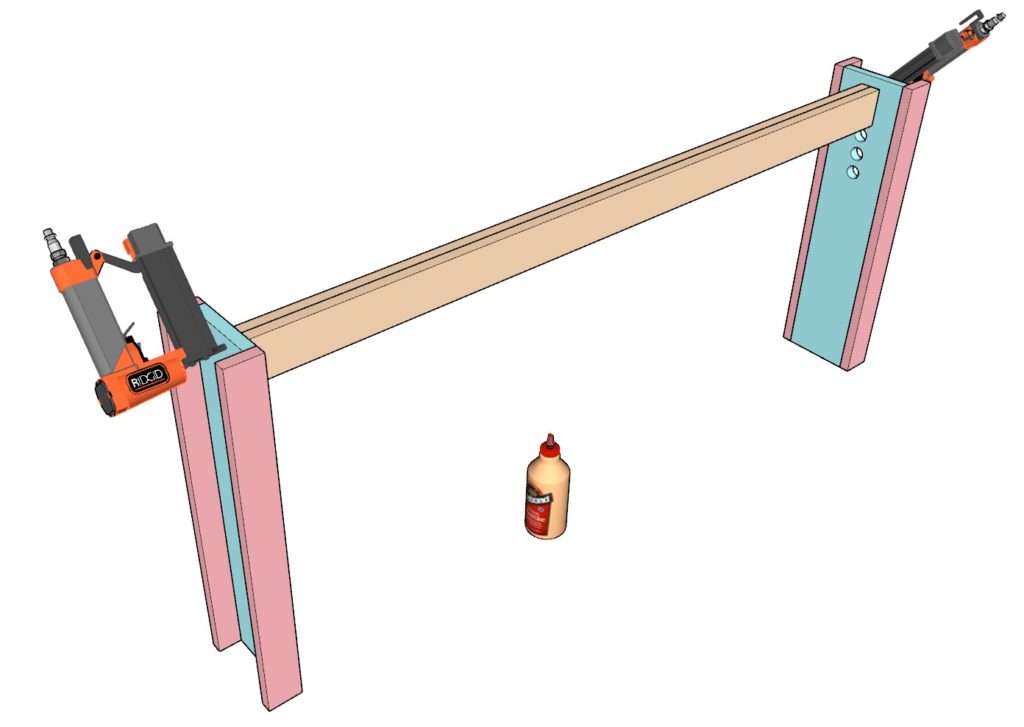
Initiate the assembly phase by focusing on the moss green desktop piece. Attach two yellow plywood strips along with two orange strips to the edges of the desktop. Adhere these using a strong wood glue and reinforce them with 1.25-inch pin nails for a sturdy bond.
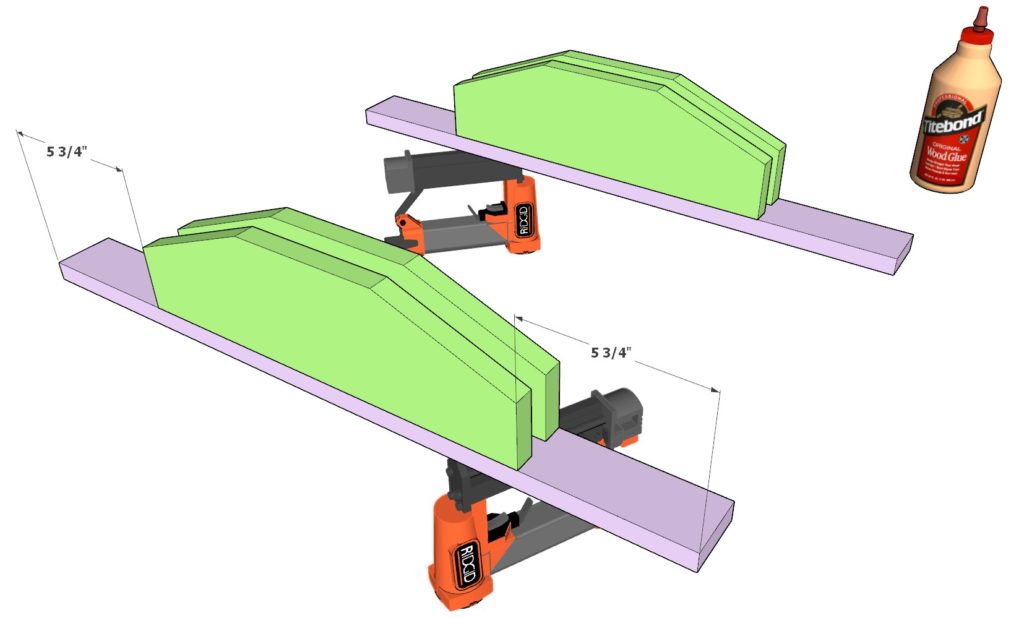
Building the Leg Brace: Next, construct the leg brace. Take the four lime green pieces and join them to the purple plywood pieces. The use of pin nails and wood glue will again be your method for ensuring a durable assembly.
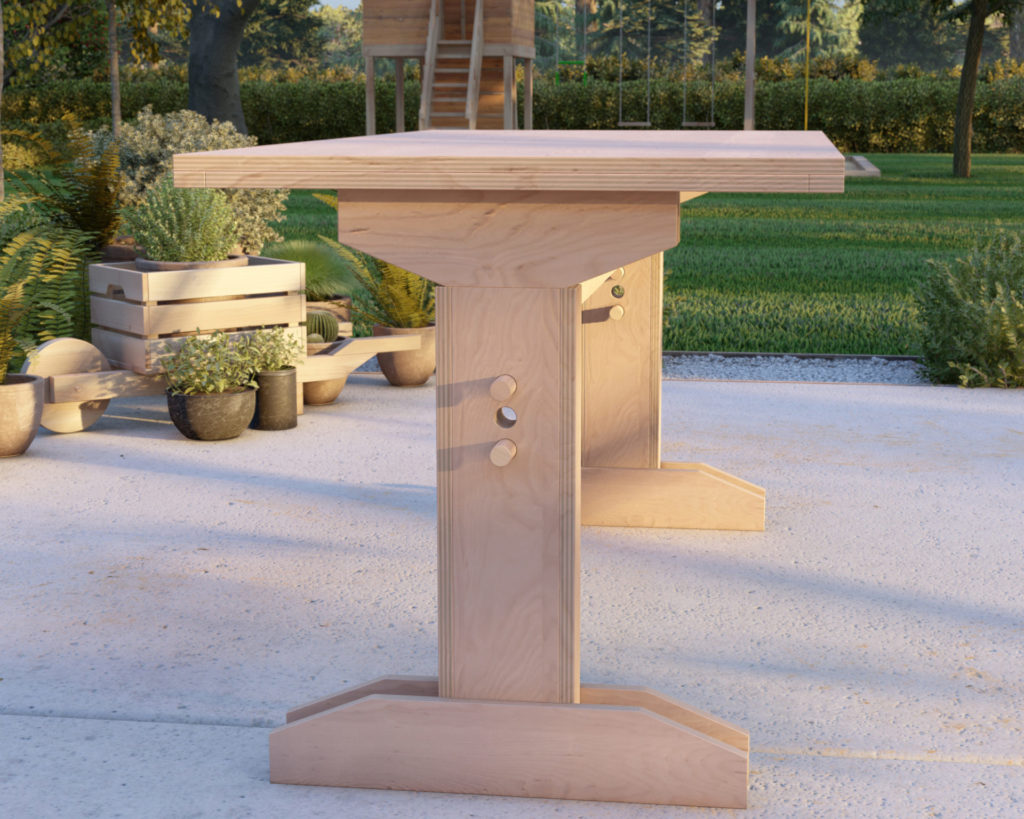
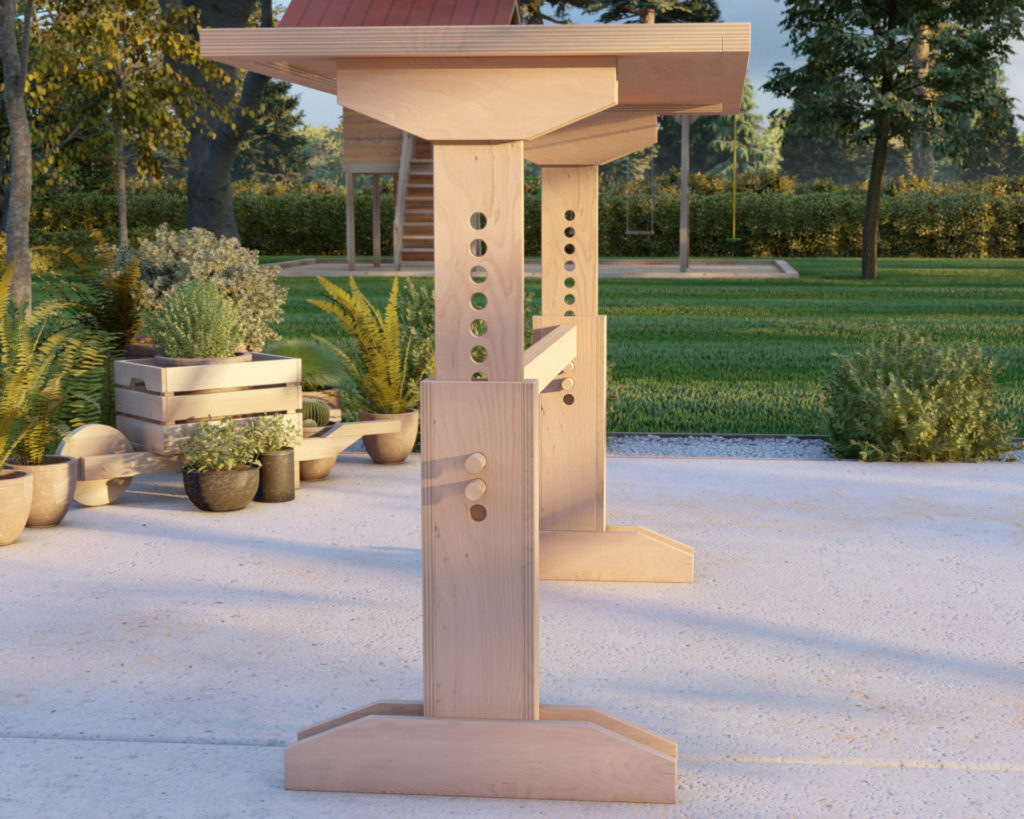
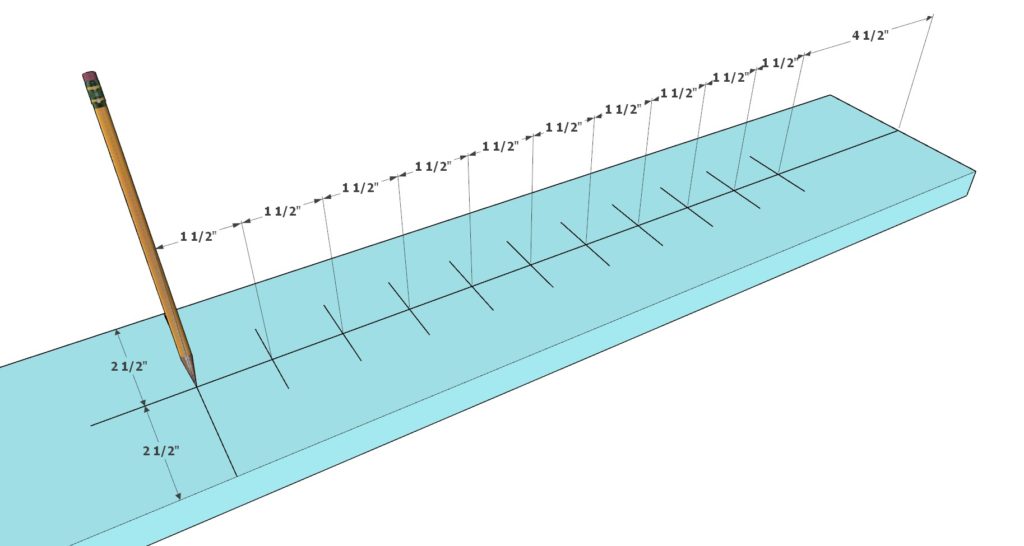
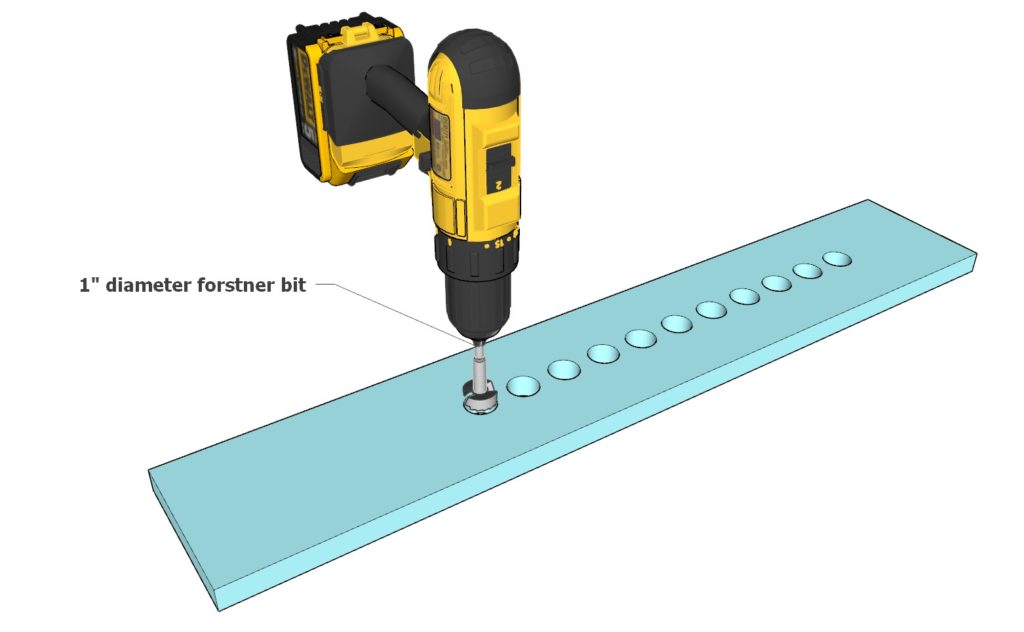
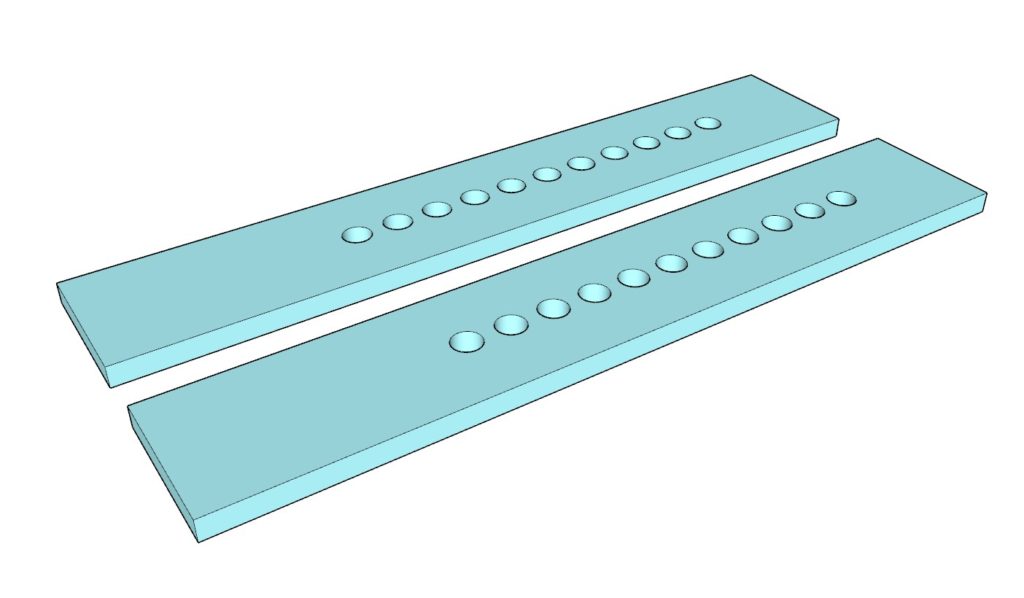
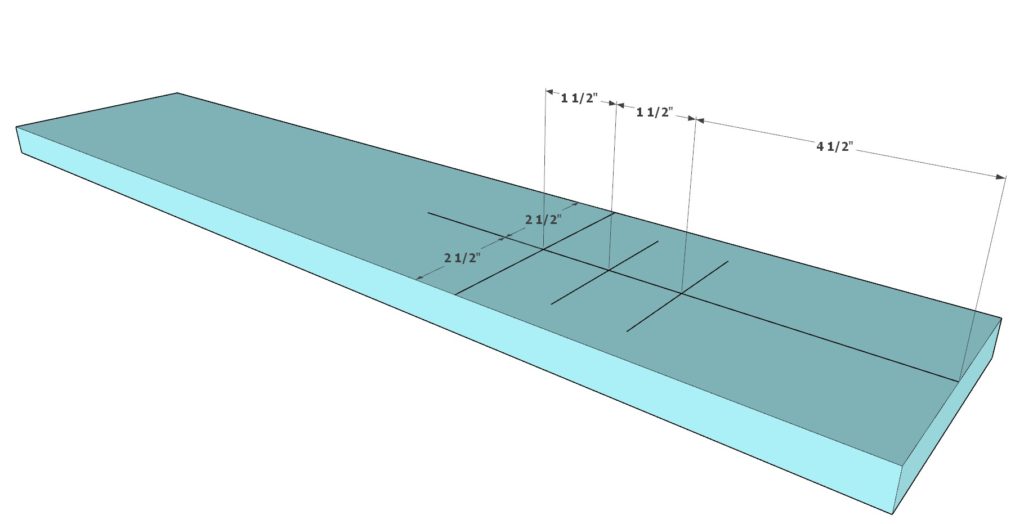
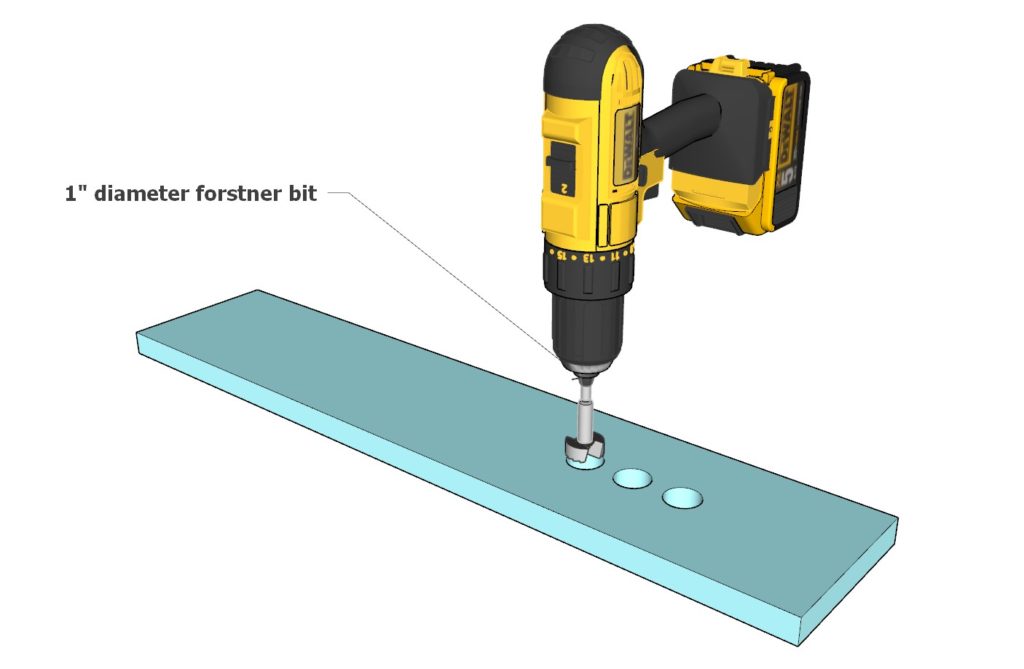
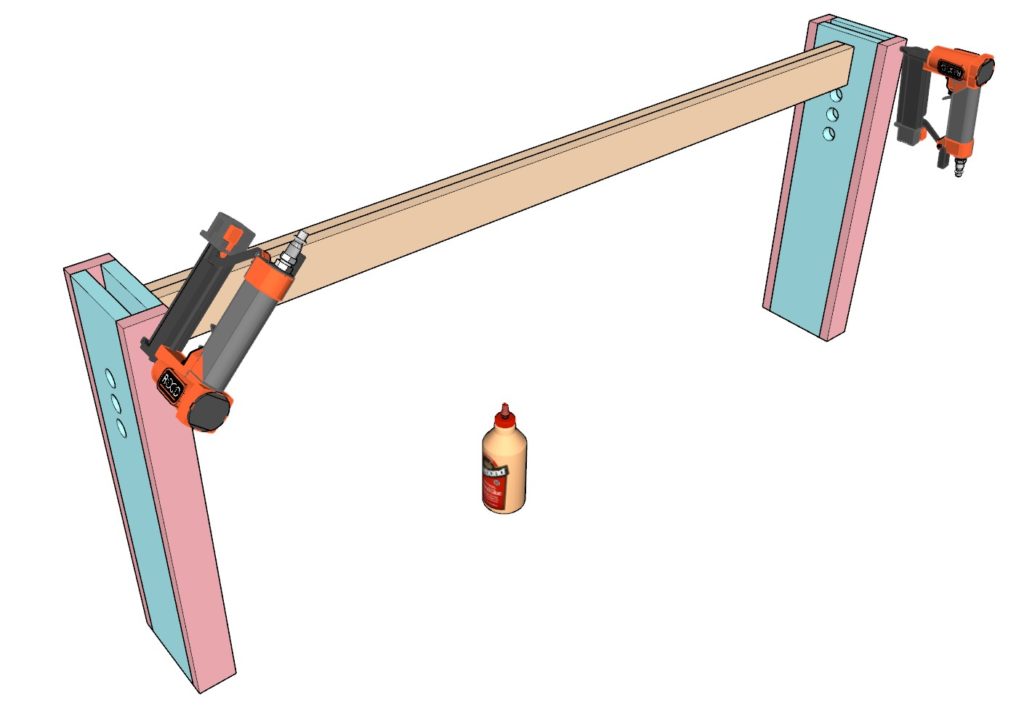
Precision Drilling: Now, grab a teal colored plywood piece. On its surface, mark out eleven “x” spots according to the provided diagram. These will guide you in drilling holes with a 1-inch diameter Forstner bit. Aim to maintain a near-perfect 90-degree angle for each hole to facilitate smooth operation of the desk’s adjustable features. Prepare two of these teal pieces with identical hole patterns.
Securing Teal Pieces: Once drilled, fasten these teal pieces to the previously assembled table leg braces. Consistent with previous steps, use wood glue and 1.25-inch pin nails for secure attachment.
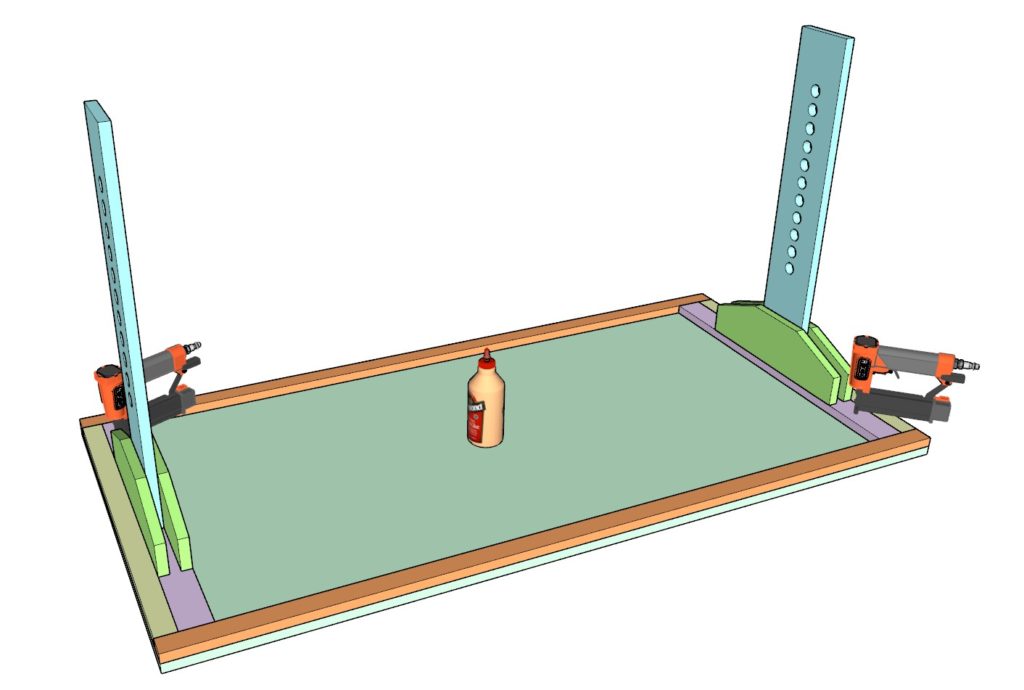
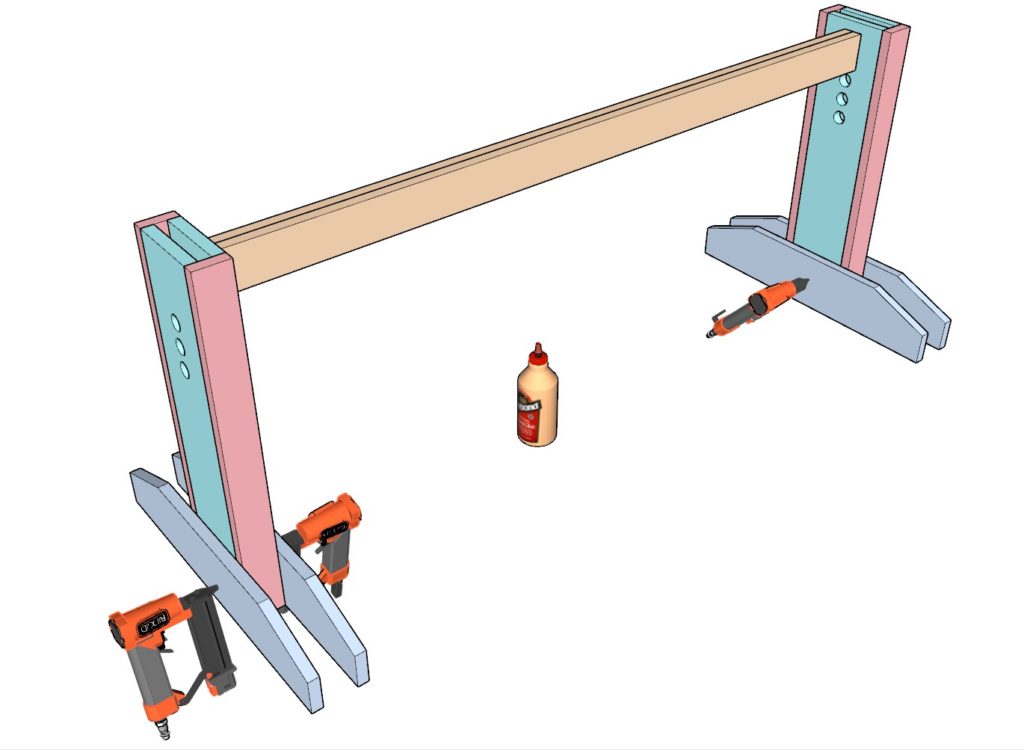
Finalizing the Base: Lastly, attach the completed table leg braces to the underside of the desk top. Apply wood glue for a primary hold, and use 1.25-inch pin nails to lock the components in place.
Handy Tips for Drilling:
- Consider using a drill press if available, to achieve clean, professional-looking holes.
- Place a scrap piece of wood beneath the teal plywood when drilling. This precaution helps prevent any damage or splintering on the underside as the Forstner bit exits the material.
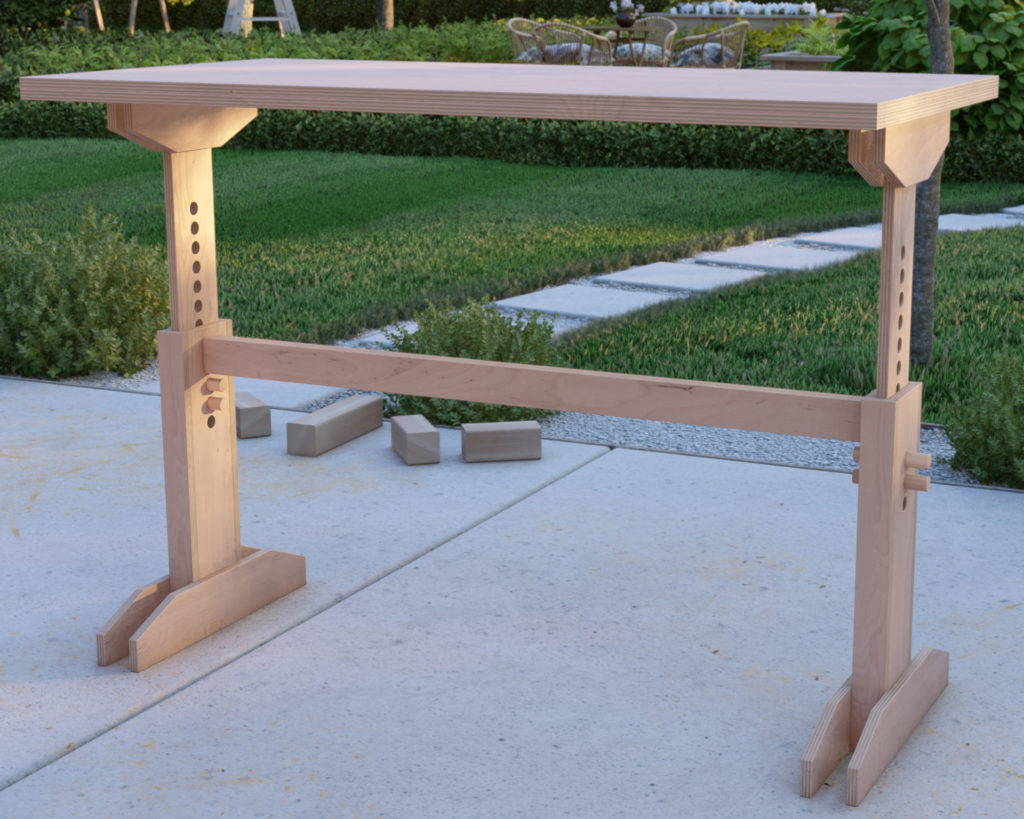
Step 3: Crafting the Adjustable Leg Housing
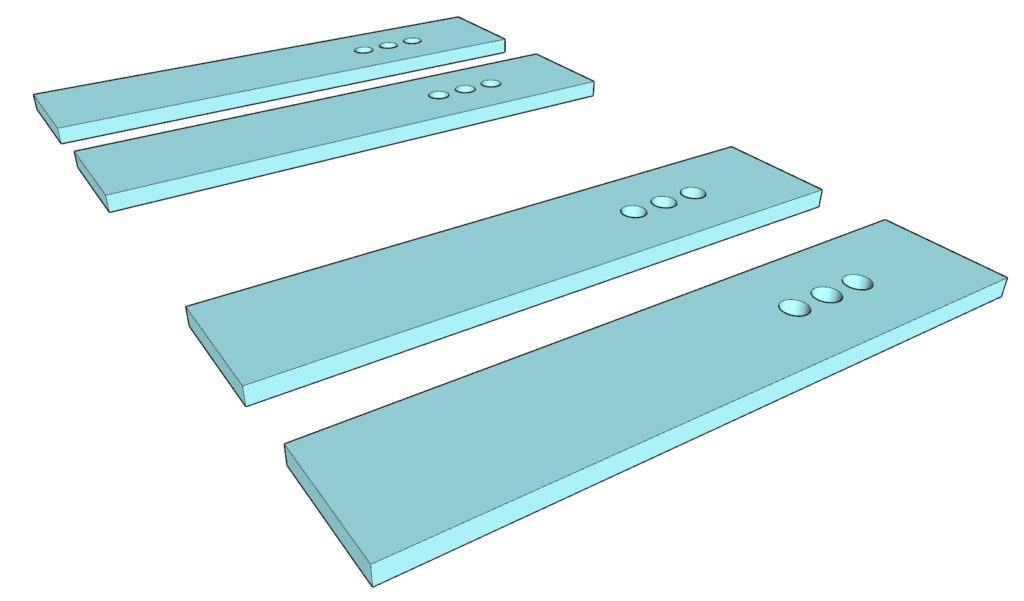
Next, build the adjustable leg housing by working with a teal colored plywood sheet. Accurately drill three holes into it using a 1-inch diameter Forstner bit. Ensure the precision of these holes as they are crucial for the adjustability of the desk. Replicate this process to create four identical teal pieces.
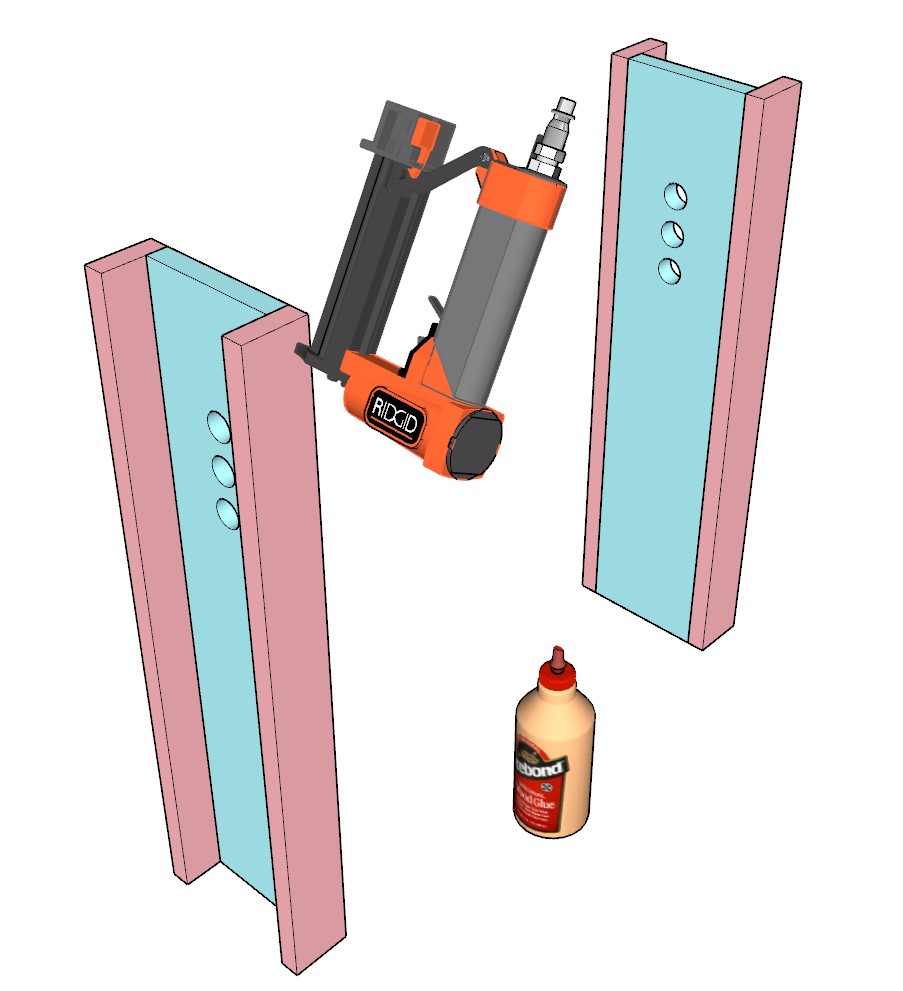
Joining Light Brown Pieces: Proceed by attaching the two light brown plywood pieces. This action is carried out using wood glue for initial adhesion, followed by 1.25-inch pin nails to secure the bond.
Teal and Pink Plywood Union: Next, unite the teal pieces with the pink colored plywood pieces. Employ both wood glue and 1.25-inch pin nails for this step to ensure a firm and lasting assembly.
Assembling the Leg Housing Components: The subsequent phase involves connecting the brown locked components to the leg housing units. You have the option to use 1.25-inch pin nails coupled with wood glue for this task. Alternatively, for enhanced durability, 3.5-inch screws can be used. If opting for screws, pre-drill with a countersink bit to prevent the plywood from cracking and to promote longevity. The plywood will not slide easily up and down if the screw is even slightly sticking out.
Completing the Leg Housing: After sealing up the leg housing components, affix four blue plywood pieces to construct the desk’s leg stands.
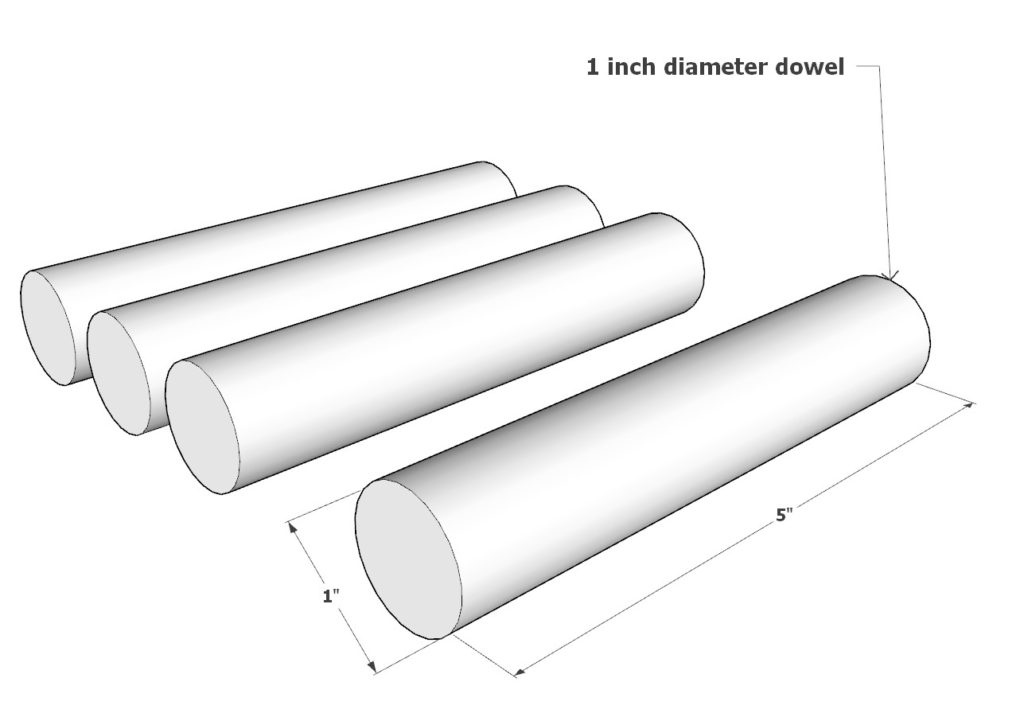
Dowel Preparation: Prepare four dowels, each 5 inches in length and 1 inch in diameter. These dowels will act as adjustable pegs to secure the desk at various heights.
Final Assembly: Finally, combine the tabletop with its legs to the base containing the leg housing. Adjust the desk to your desired height and lock it into place using the prepared pegs.
Useful Tips for Finishing:
- Smooth out the dowel edges to prevent splintering or potential damage to the plywood during adjustment.
- If the legs do not move smoothly, lightly sand any areas causing friction. Enhancing the desk with a wax finish can greatly improve the ease of leg adjustability. Apply wax generously on the legs to ensure smooth sliding action
Step 4: Finishing the Desk with Sanding, Staining, and Painting
When it comes to finishing your DIY adjustable desk, a smooth, professional look can be achieved through proper sanding, staining, and painting. This step is vital for both the aesthetic and functional longevity of your project.
Sanding the Plywood: Begin by sanding the desk components with a fine-grit sandpaper. It’s crucial to sand lightly and evenly to avoid removing too much material, especially with plywood, as sanding too aggressively can strip away the thin face layer, leaving an uneven and potentially unusable surface. Move in the direction of the grain, and progress from a coarser grit to a finer grit until the wood feels smooth to the touch.
Staining the Table: Prior to applying stain, consider using a pre-stain wood conditioner. This helps to even out the absorption of the stain and reduce blotchiness, especially important in plywood which can absorb stain unevenly due to its varied grains and layers. Once the conditioner has set, apply your stain of choice in even strokes, working with the grain. Allow the stain to penetrate into the wood for a few minutes, then wipe away any excess. The use of a wax finish or polyurethane can be applied after the stain has fully dried, providing a protective layer that enhances durability and the wood’s natural beauty.
Painting the Desk: If you opt for paint, select a non-sticky, furniture-grade type that’s designed for wood surfaces. Apply thin, even coats and be cautious not to overload the paintbrush or roller. Avoid painting the leg and leg housing areas; paint can create a sticky residue, hindering the smooth operation of the adjustable mechanism. If paint is necessary in these areas for design continuity, ensure that it is a type that dries with a hard finish and does not remain tacky. Always allow adequate drying time between coats as per the manufacturer’s instructions.
Final Touches: Post-staining or painting, review the movement of the adjustable legs. If you encounter any resistance or sticking, a fine-grade sandpaper can be gently used to smooth the area. A wax finish is particularly beneficial on moving parts; it provides lubrication that helps to maintain a smooth operation. Apply it sparingly to the legs and within the leg housing to encourage easy adjustment.