Introduction: Cultivating Tranquility in Your Backyard
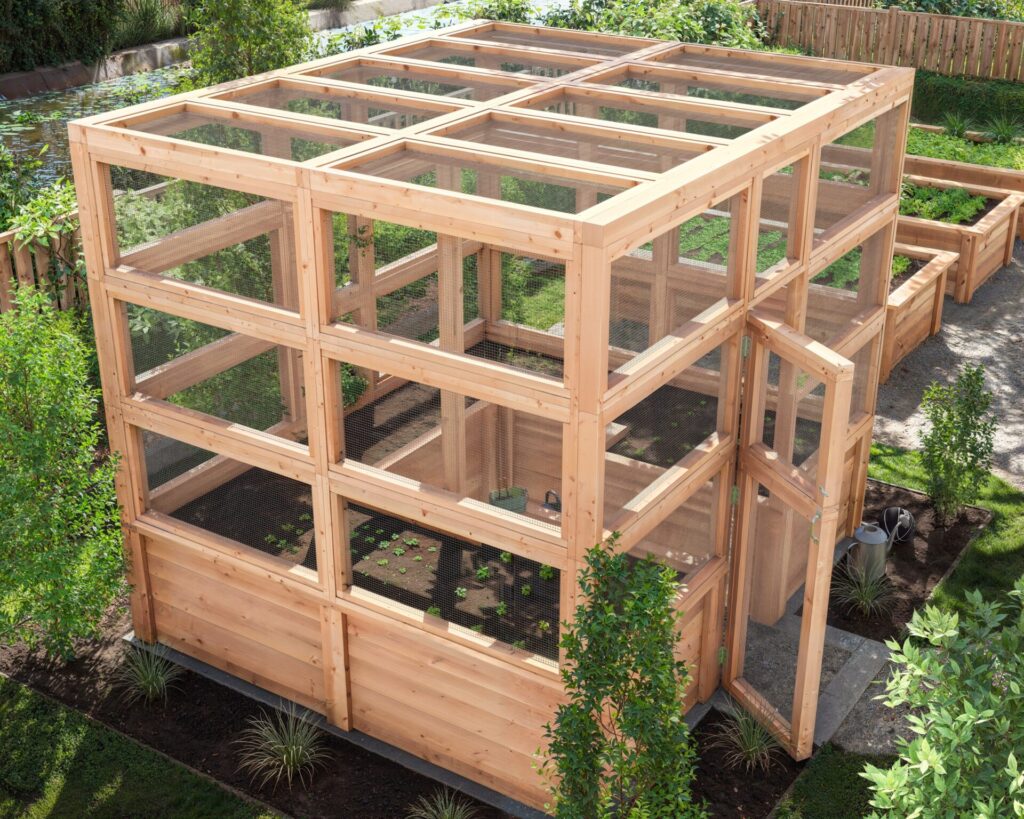
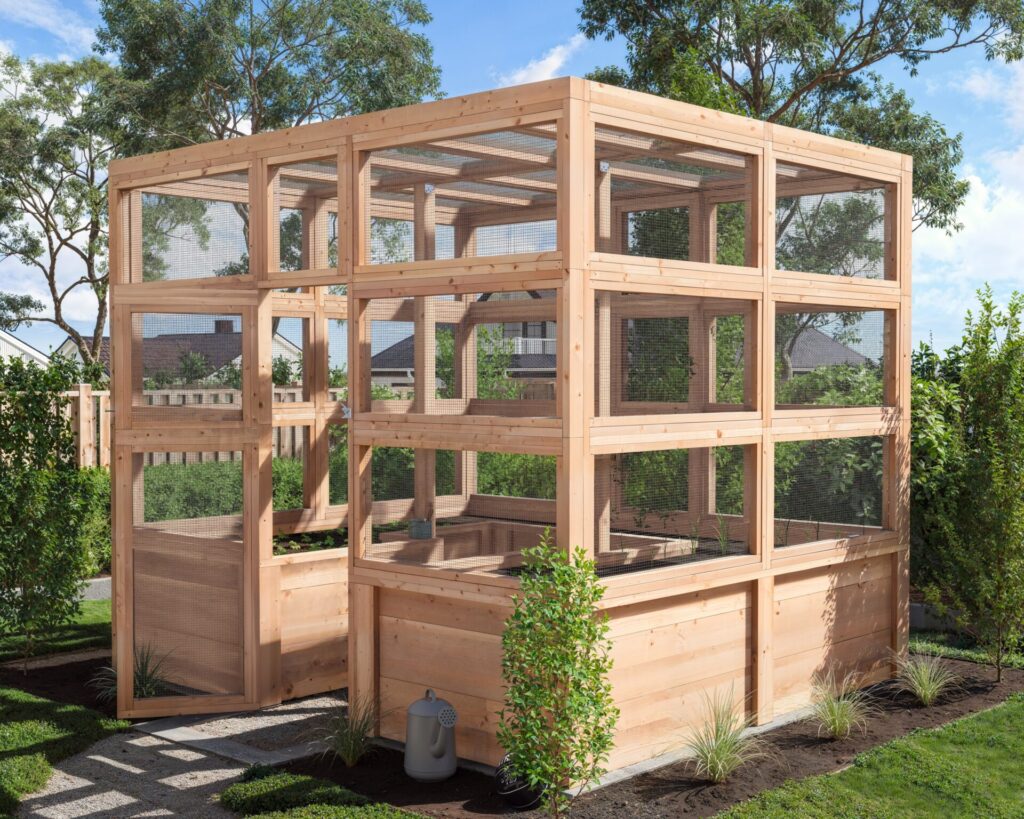
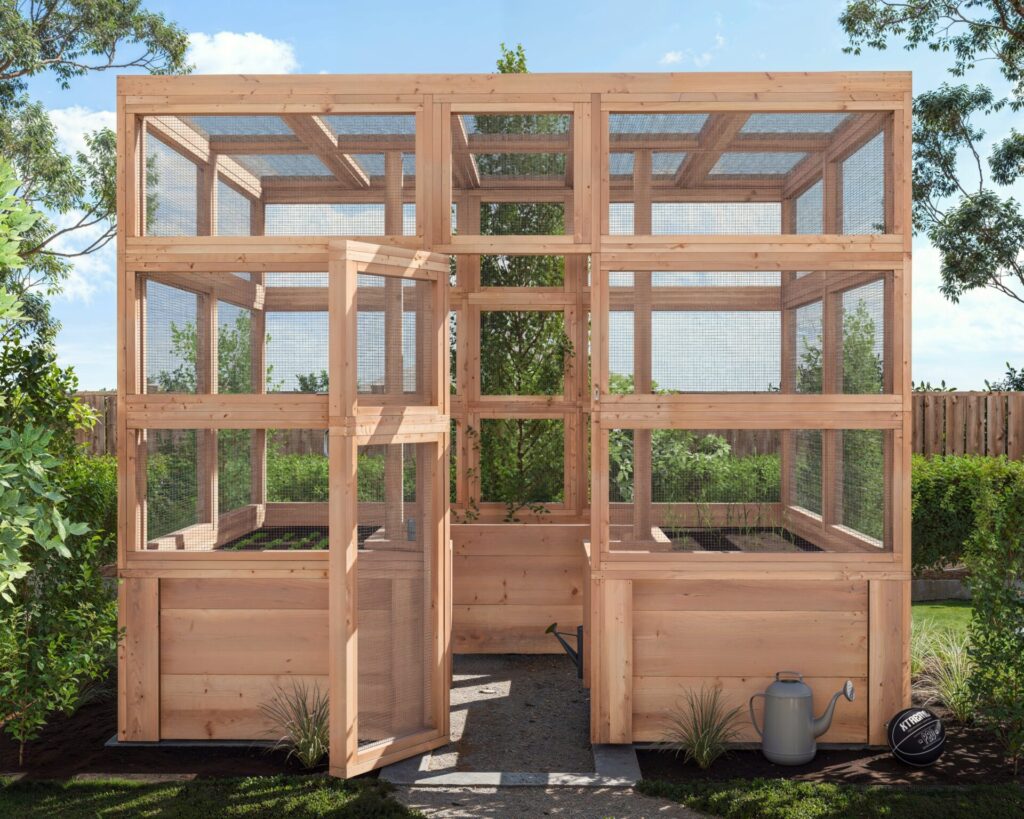
Welcome to the green revolution that fits snugly in your backyard—the DIY Garden Enclosure Plans that promise a blend of security and serenity. Whether you’re taking your first step into the world of gardening or you’re a seasoned green thumb, our plans offer a comprehensive guide to creating a sanctuary where pollinators buzz, but pests stay at bay.

Protective Peace: Specifications with Serenity
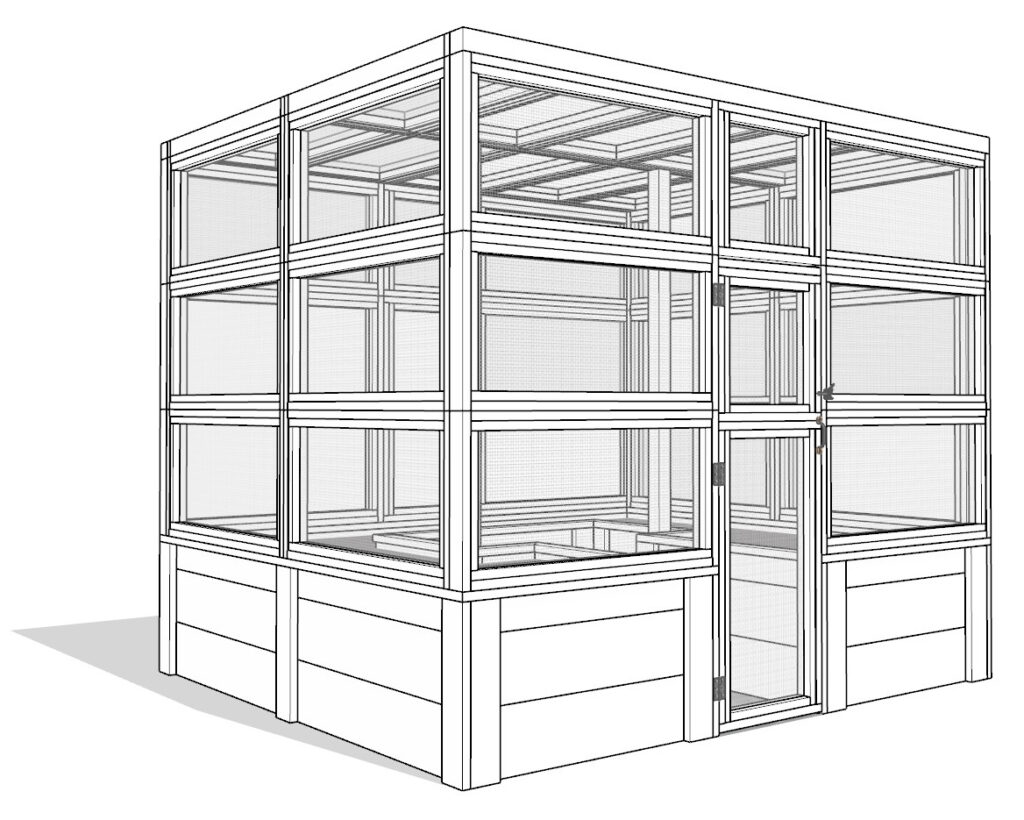
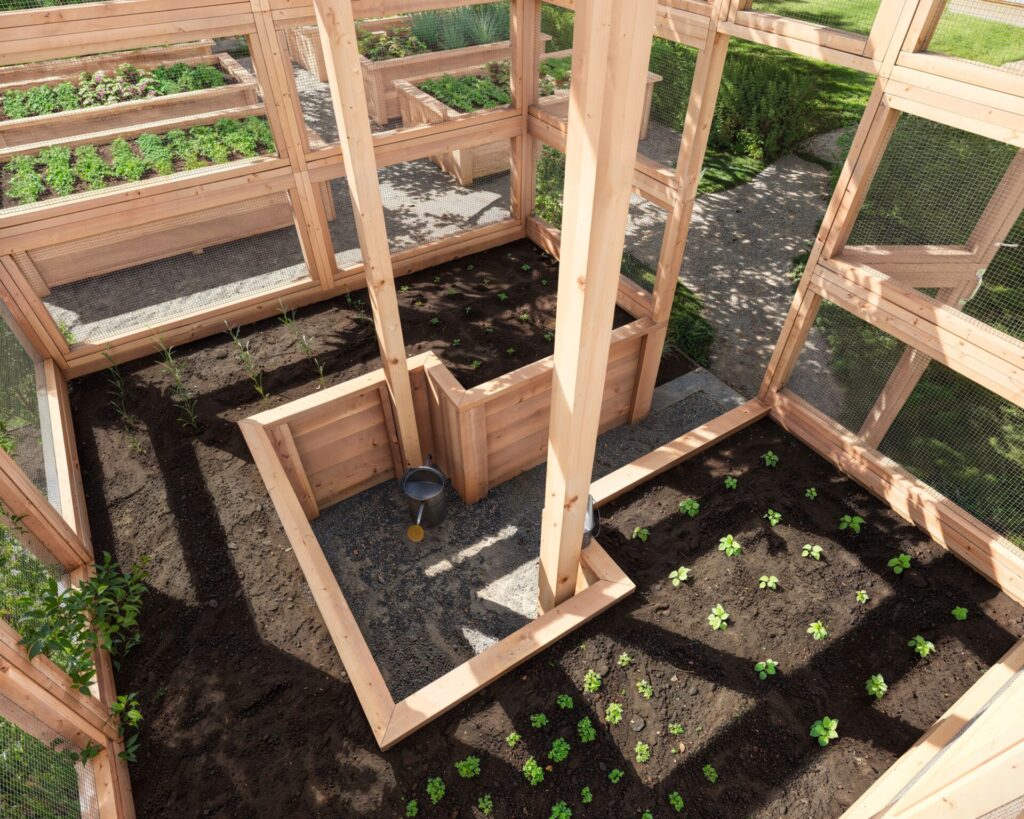
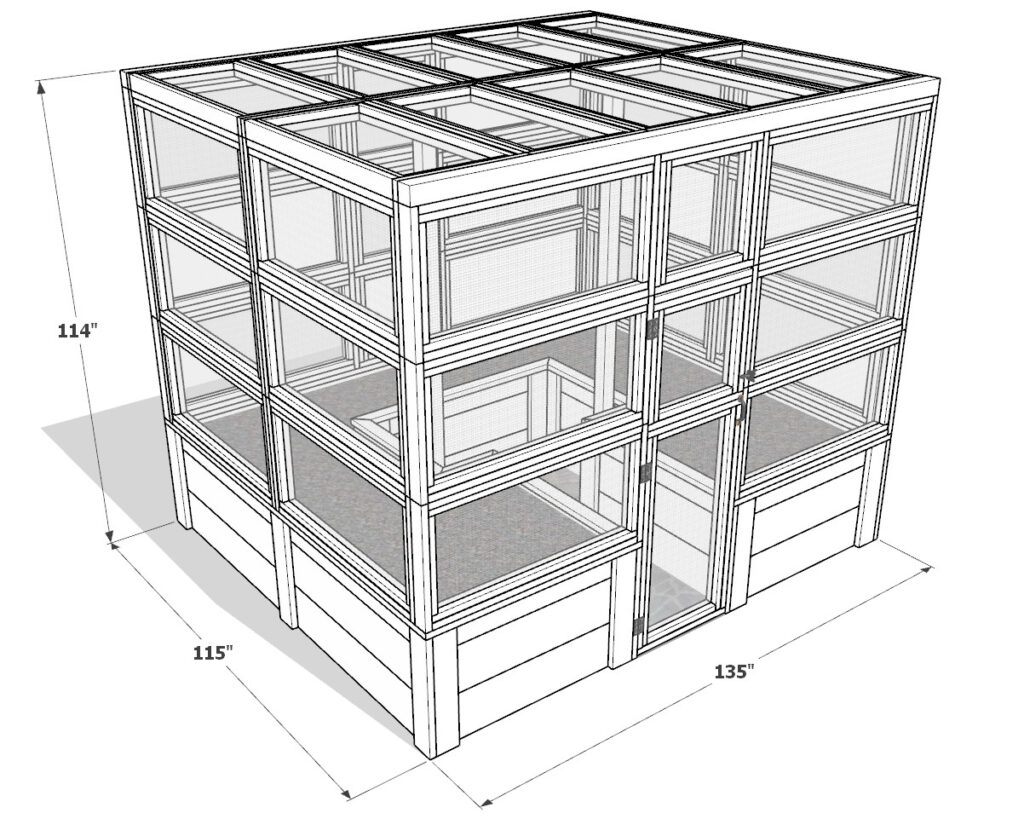
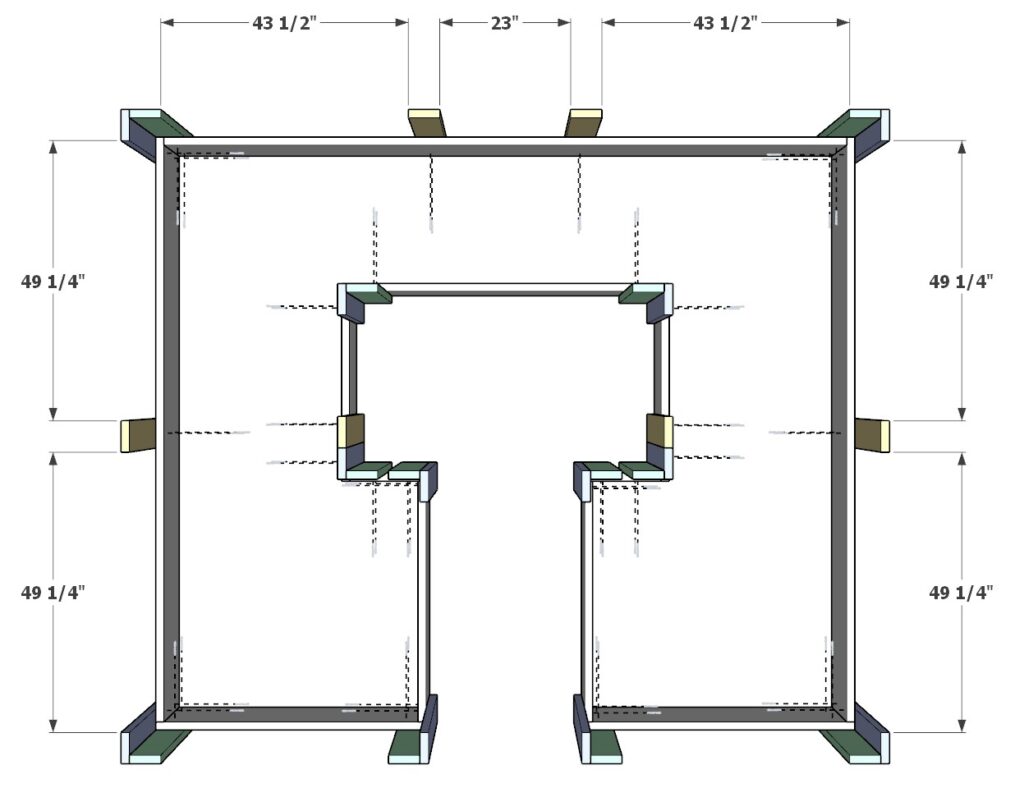
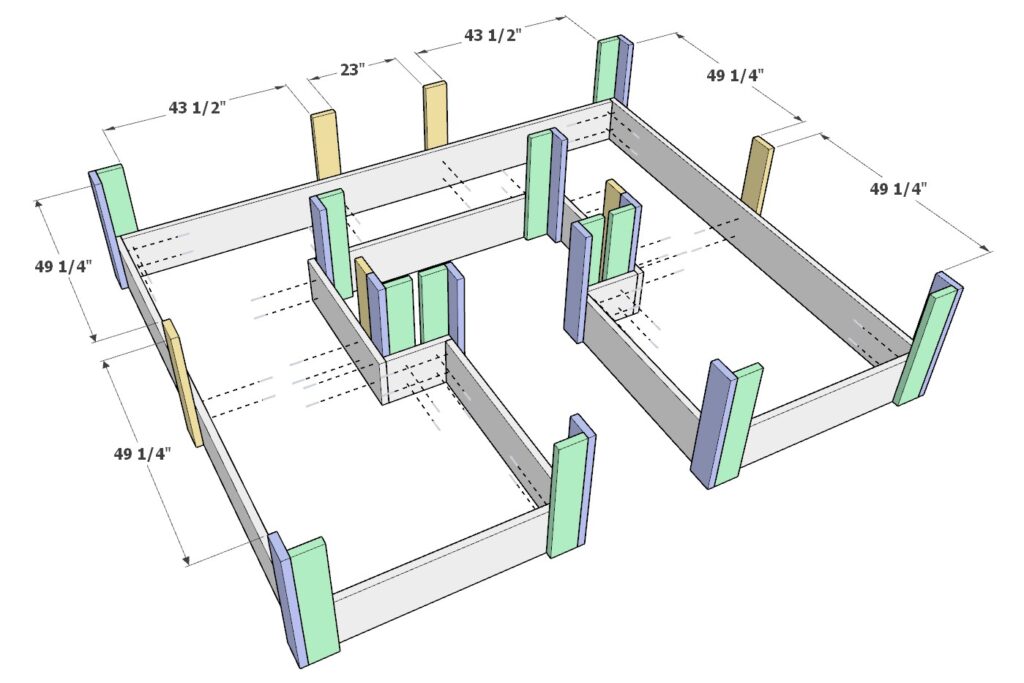
- Dimensions: Spanning 115 inches deep by 135 inches long and standing tall at 114 inches.
- Pollinator-Friendly: Our enclosure design includes a 1/2 in. mesh that welcomes beneficial pollinators, yet is fine enough to safeguard your greens from birds, deer, and rodents.
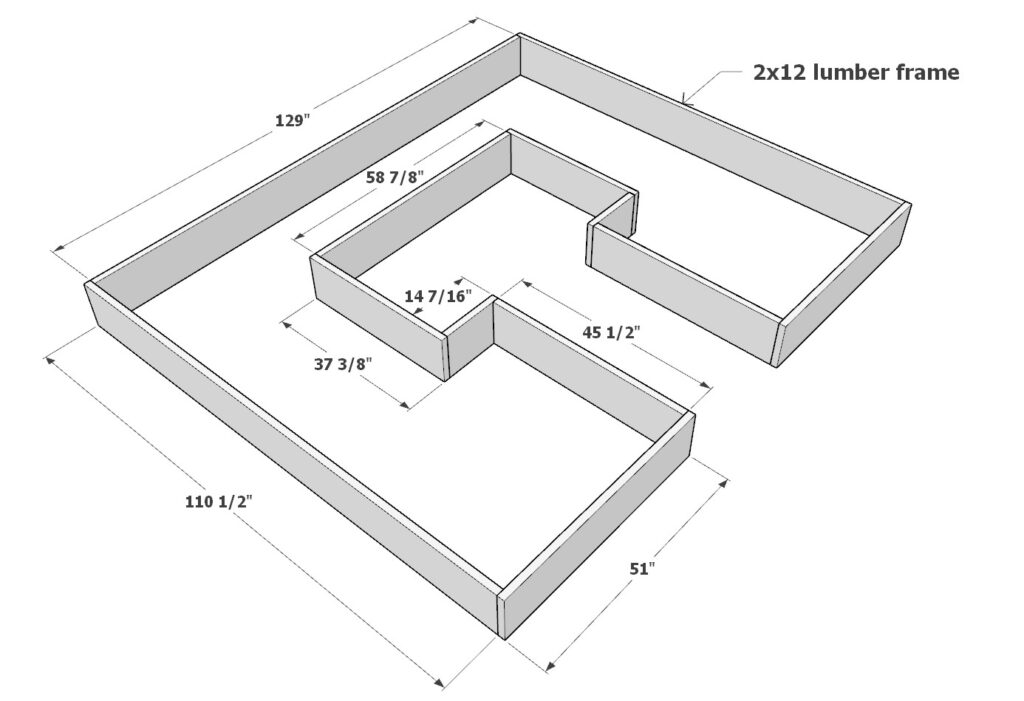
- Planter Area: With an ergonomic height of 29-1/2 inches, these planters are designed to enable easy, back-friendly gardening, allowing roots to delve directly into the earth.
- Sturdy Materials: Built from common lumber like 2x4s, 2x6s, and 2x12s, and shielded with the rust-resistant Everbilt Galvanized Steel Hardware Cloth for long-lasting resilience against the elements.
DIY Plans: Clear and Simple
Our DIY plans are beginner-friendly and take you through each stage of construction. You’ll get a detailed cut list, a shopping guide for materials, and a list of tools you’ll need. The instructions are straightforward, with diagrams and step-by-step guidance to make the process as simple as possible.
Conclusion:
Ready to transform lumber into a testament of your craftsmanship? Our Folding Event Table Plan is more than just instructions; it’s your gateway to bringing a convivial atmosphere to life. Whether it’s for a wedding feast, a special family occasion, or simply adding a touch of elegance to your home’s outdoor space, this table stands as a symbol of your DIY prowess. With comprehensive guidance from start to finish, embark on this wood-crafting journey to realize that joyous moment of unveiling a masterpiece you built with your own hands.
Time
(varies with experience)
Cost
Estimated Built Cost $1,500: (Note: Costs can vary by location and supplier.)
Skill level required
Beginner

DIY Garden Enclosure Plans
What is included in the PDF download?
- Easy to read step by step instructions
- Material list
- Tools needed
- Helpful links to materials and tools needed
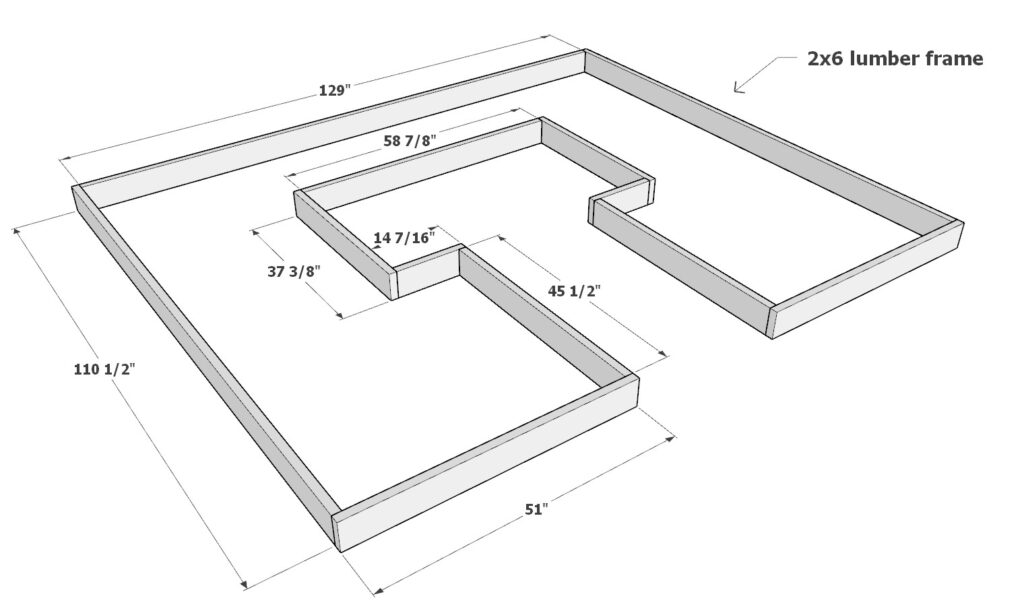
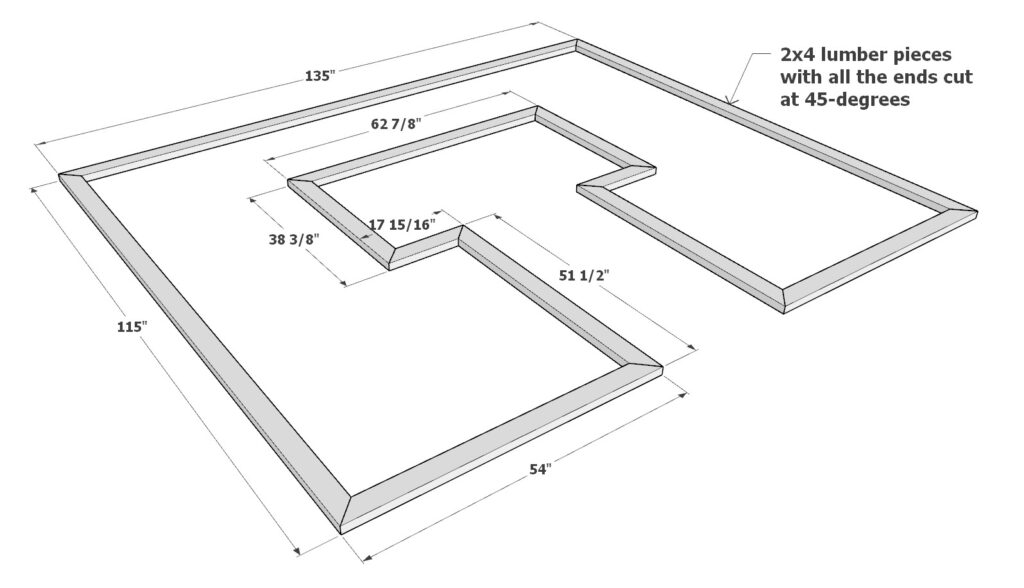
DIY Garden Enclosure Dimensions
Tools and Materials:
Available wit the purchase of the DIY plan PDF.
Lumber Shopping & Cut List:
Available wit the purchase of the DIY plan PDF.
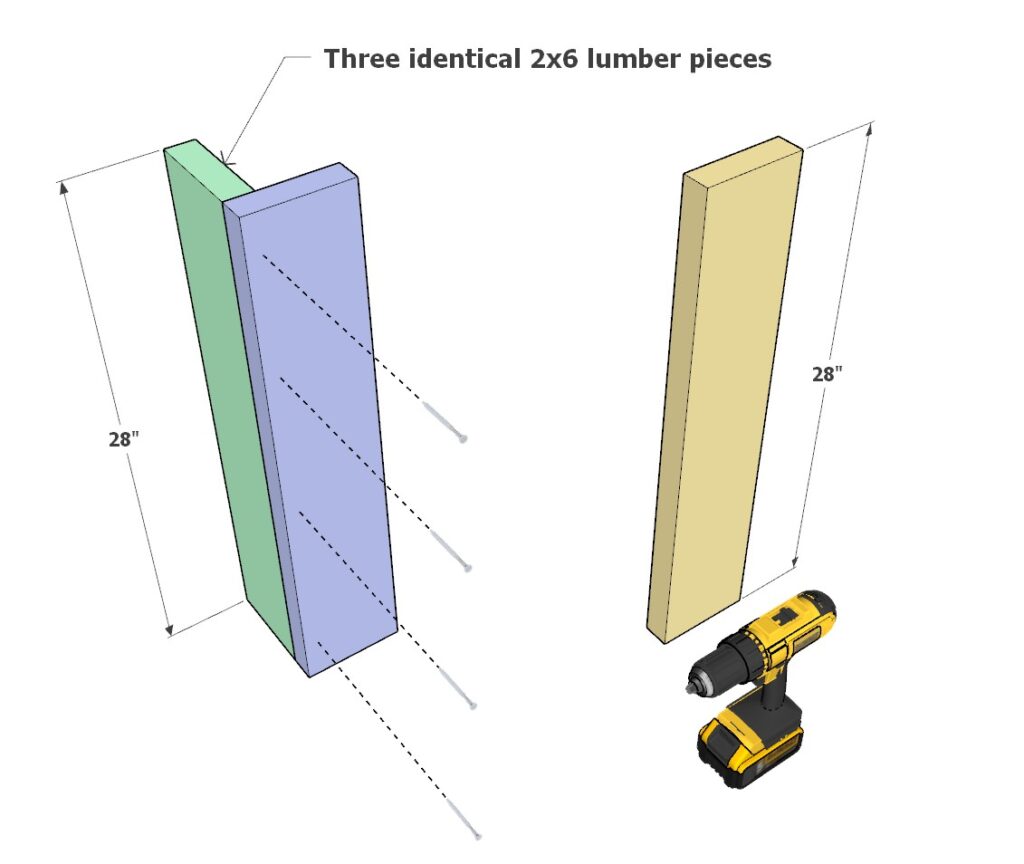
Step 1: Select and Prepare Your Lumber
1.1 Choosing the Right Wood: Selecting the ideal wood is crucial for building a durable and aesthetically pleasing table. Here are your primary options along with their pros and cons:
- Douglas Fir: Widely available and affordable, Douglas fir is a strong wood with a moderate hardness. It’s fairly resistant to warping but does have more knots. Ideal for sturdy constructions but may require careful selection to avoid knotty pieces.
- Pine: Pine is soft, inexpensive, and easy to work with, making it great for beginners. However, it’s prone to dents and scratches, so it’s less durable for heavy-duty use.
- Cedar: Naturally resistant to moisture, decay, and insect infestation, cedar is perfect for outdoor furniture. It is softer than Douglas fir, making it less ideal for heavy loads.
- Redwood: Highly durable and beautiful, redwood is excellent for outdoor/indoor use but can be more expensive and less readily available outside the Western USA.
For this project, you will need access to 2×4, 4×4, and 2×6 lumber sizes. Check availability and pricing in your area to make the best choice.

Step 2: Assemble and Finish the Tabletop
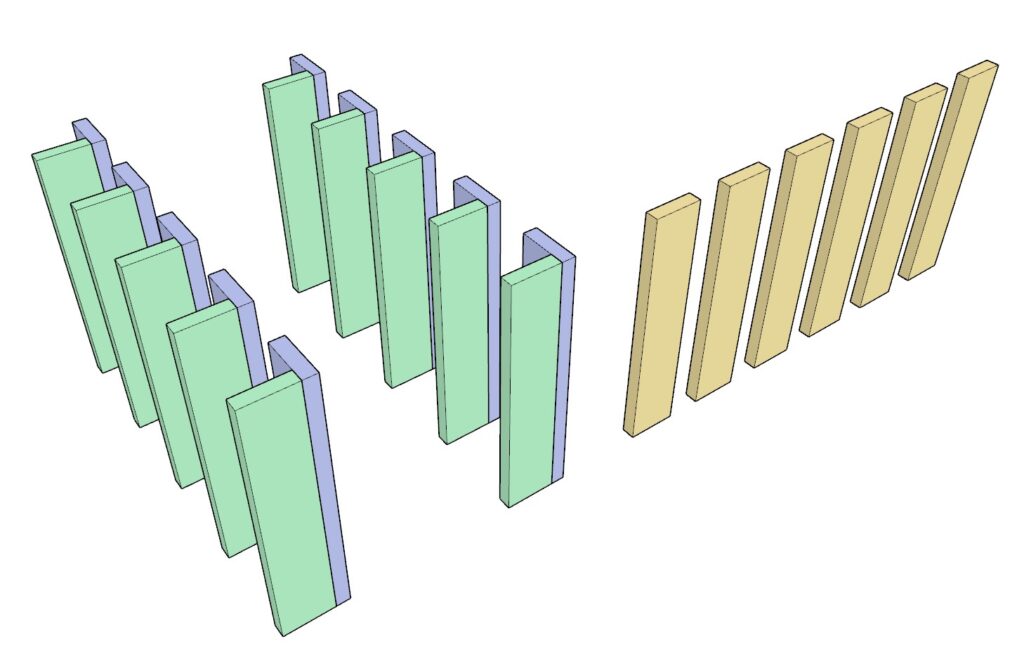
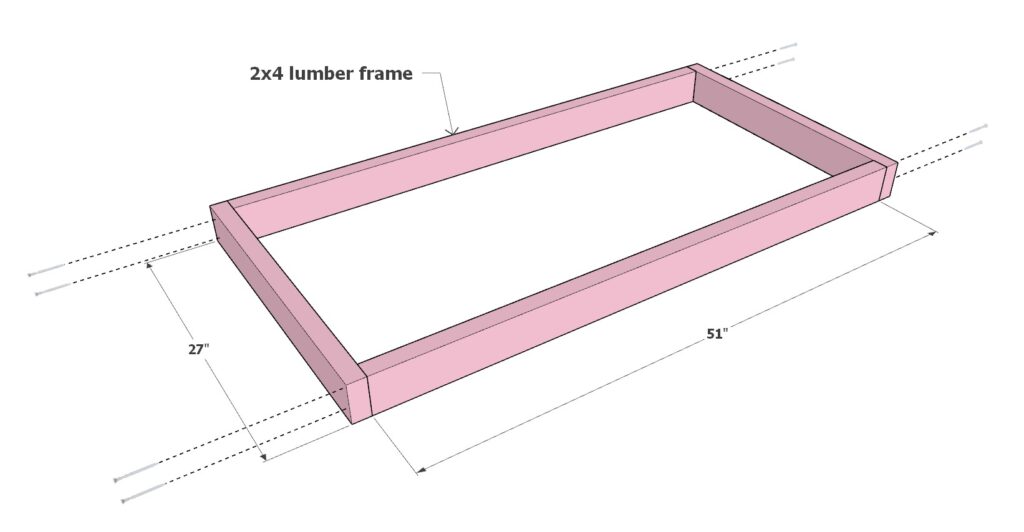
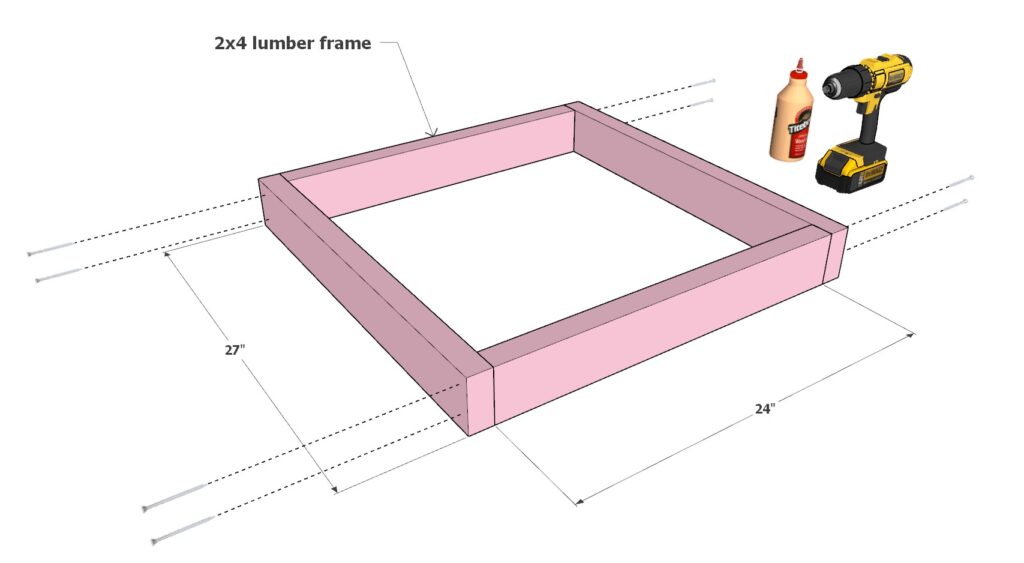
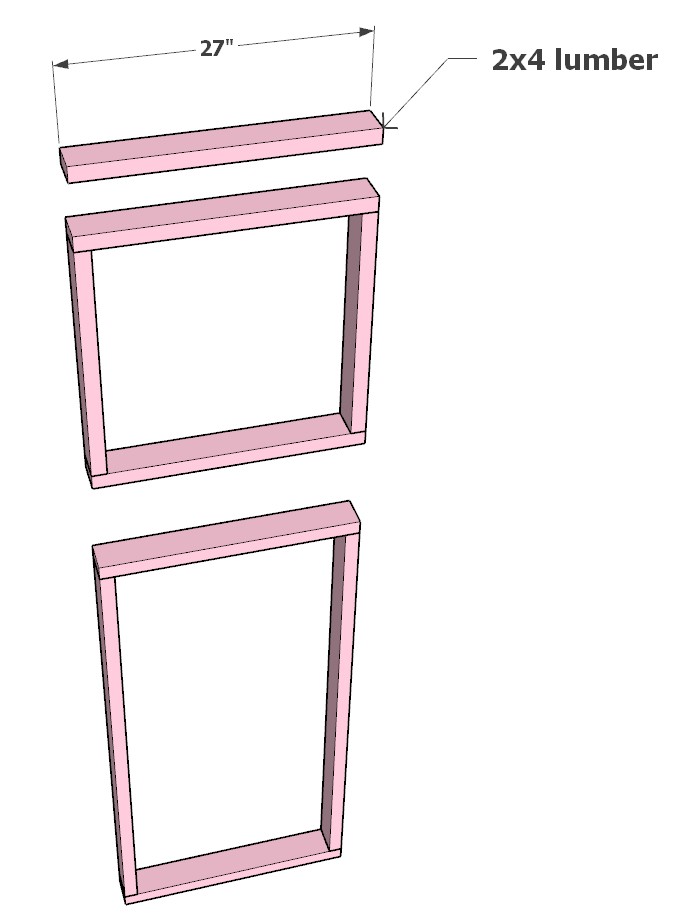
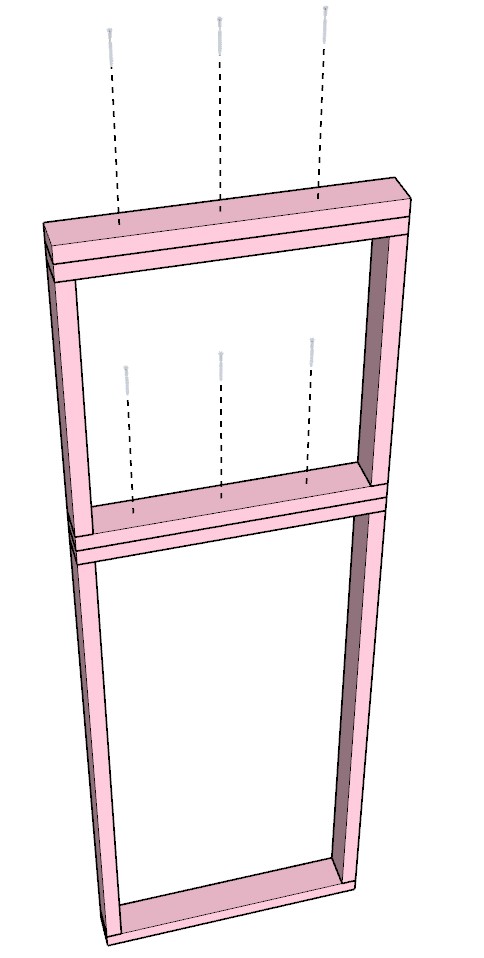
Sub-step 2.1: Building Rectangular Frames
Objective: Create the structural frames for the larger sections of the garden enclosure.
Materials:
- 2×4 lumber cut to:
- 51 inches (long sides)
- 27 inches (short sides)
Assembly Process:
- Forming the Frame: Arrange two 51-inch 2x4s parallel to each other, and place two 27-inch 2x4s between them at each end to form a rectangle.
- Securing the Joints: Apply wood glue at each joint for added stability. Pre-drill holes to prevent the wood from splitting, then secure each corner with 3.5-inch long screws.
- Finishing Touches: If any planing is necessary, ensure it is minimal (no more than 1/16 inch) to maintain the integrity of the planned dimensions.
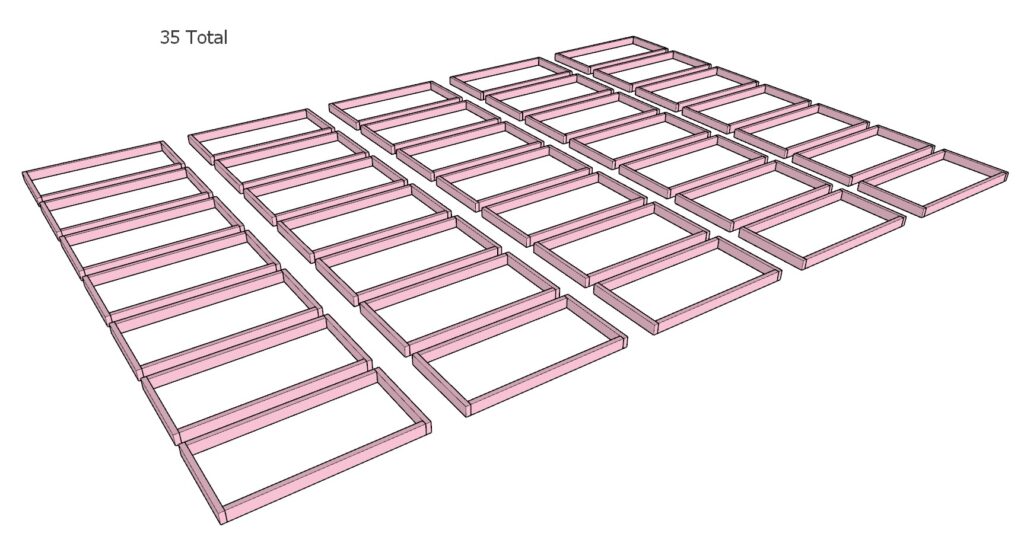
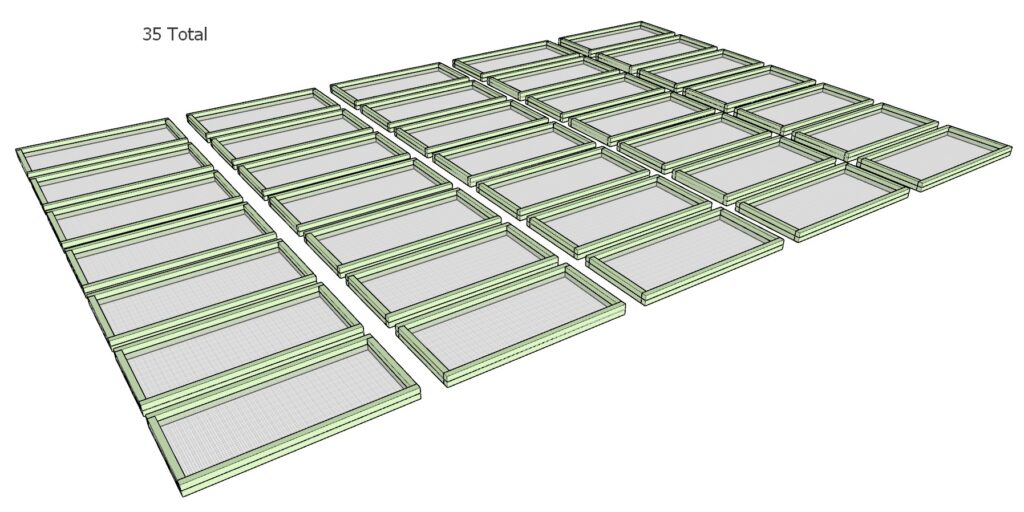
- Repeat: Construct a total of 35 rectangular frames.
Tip: Regularly check with a square tool to ensure all corners are right angles to maintain the frame’s shape.
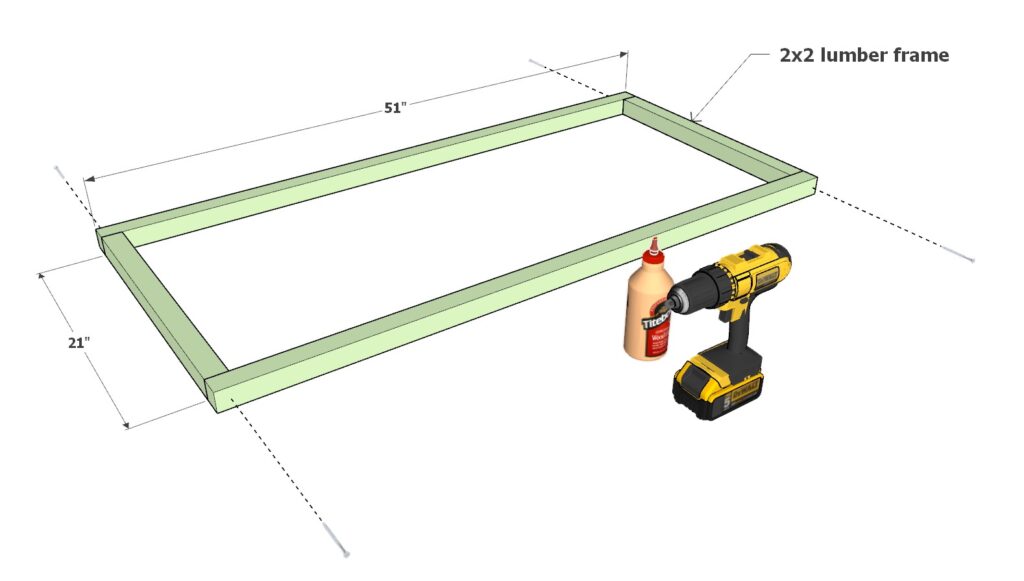
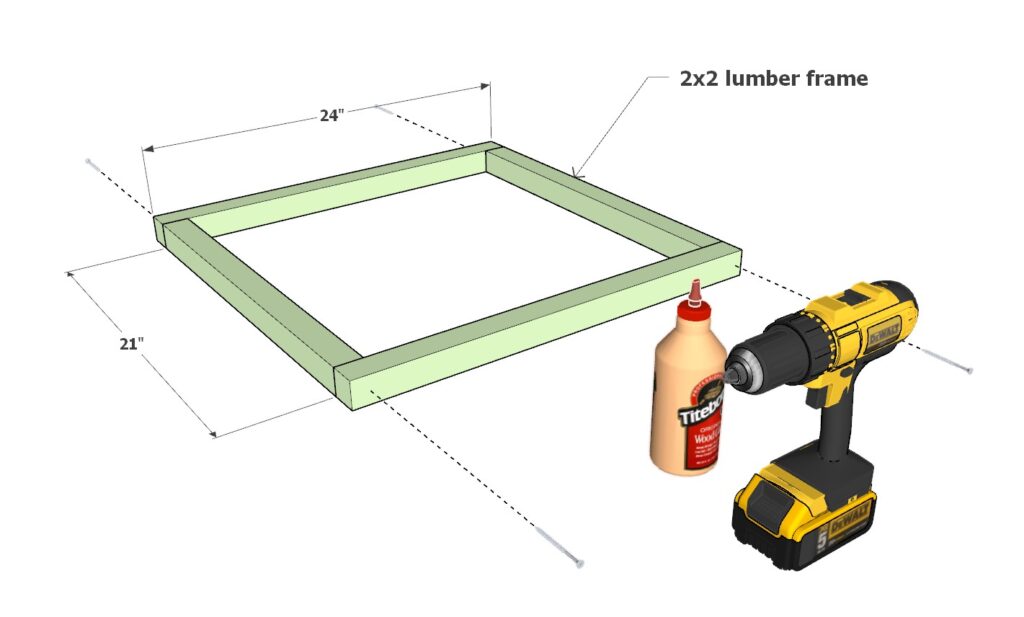
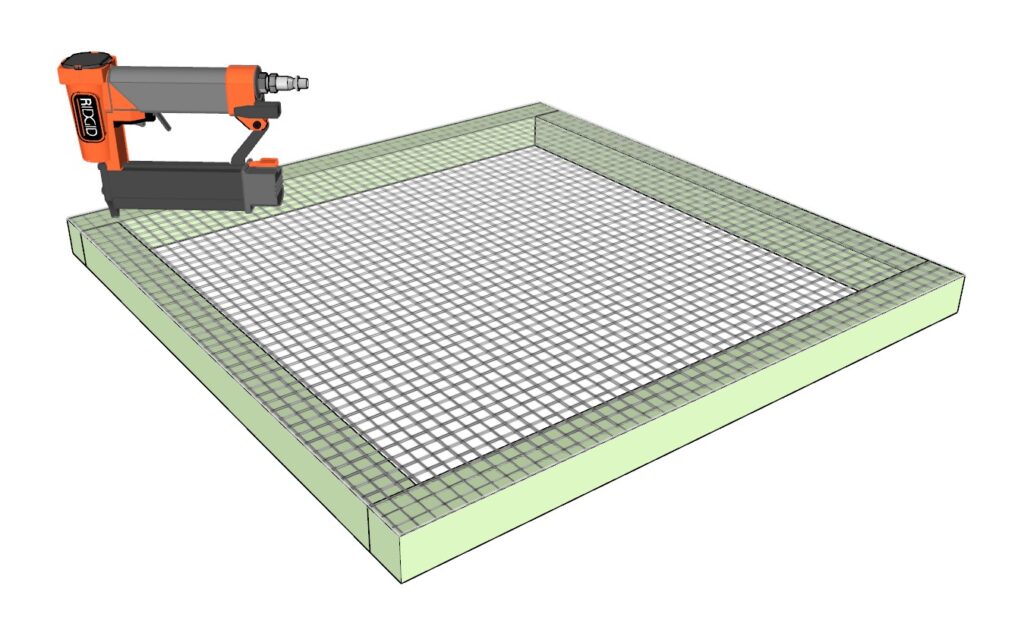
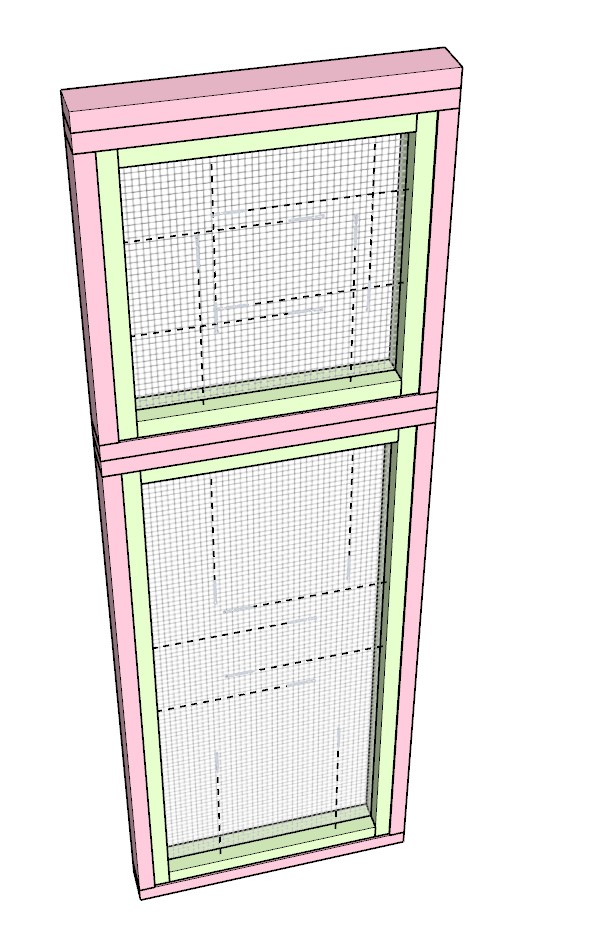
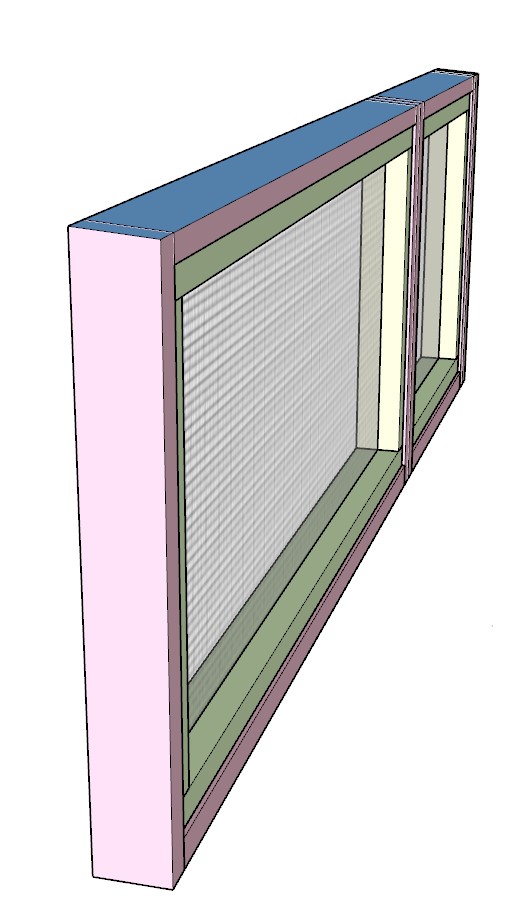
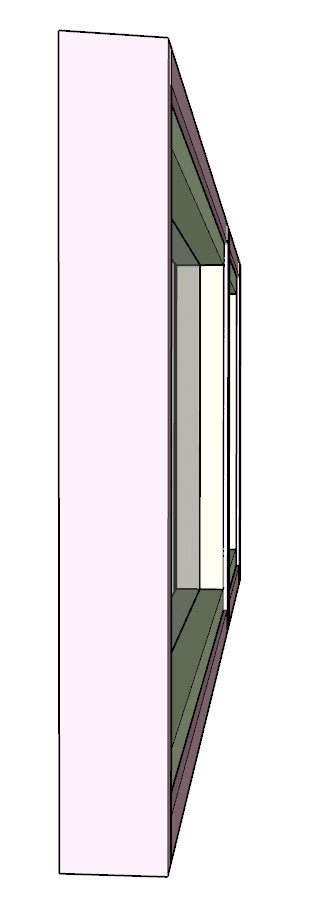
Sub-step 2.2: Creating Inserts for Rectangular Frames
Objective: Equip the rectangular frames with durable mesh for protection.
Materials:
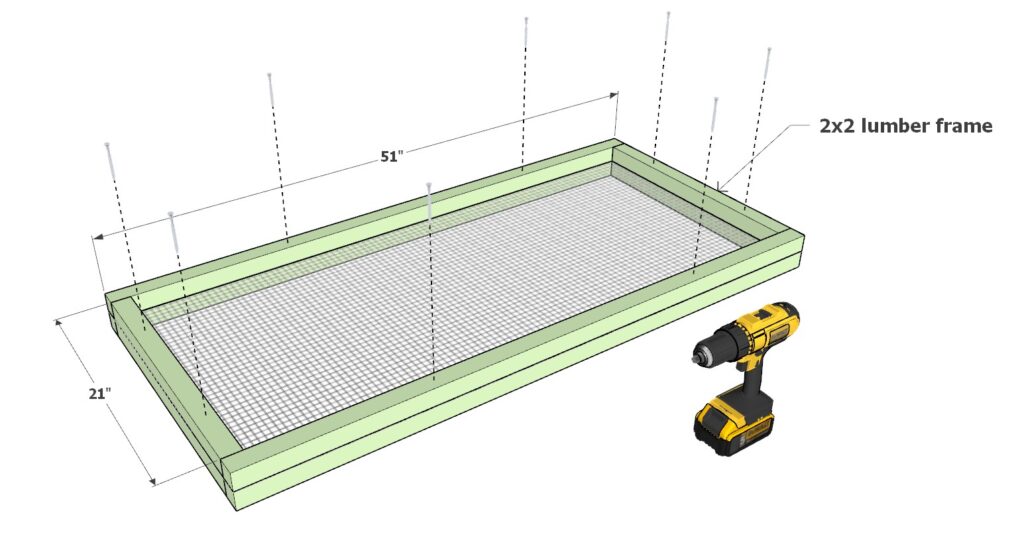
- 2×2 lumber cut to:
- 51 inches (long sides)
- 21 inches (short sides)
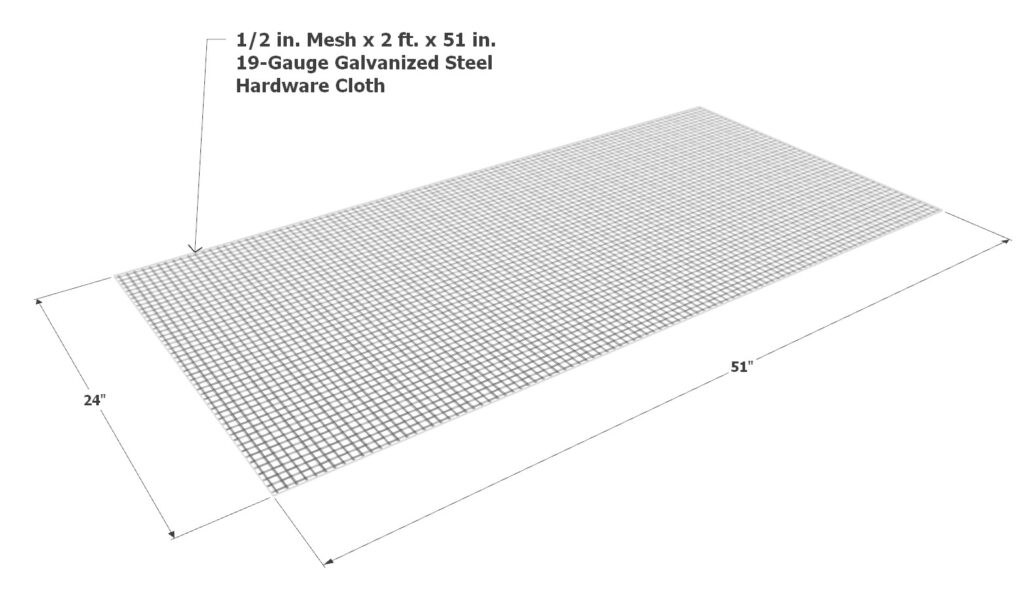
- 1/2 in. Mesh x 2 ft. x 5 ft. 19-Gauge Galvanized Steel Hardware Cloth
Insert Construction:
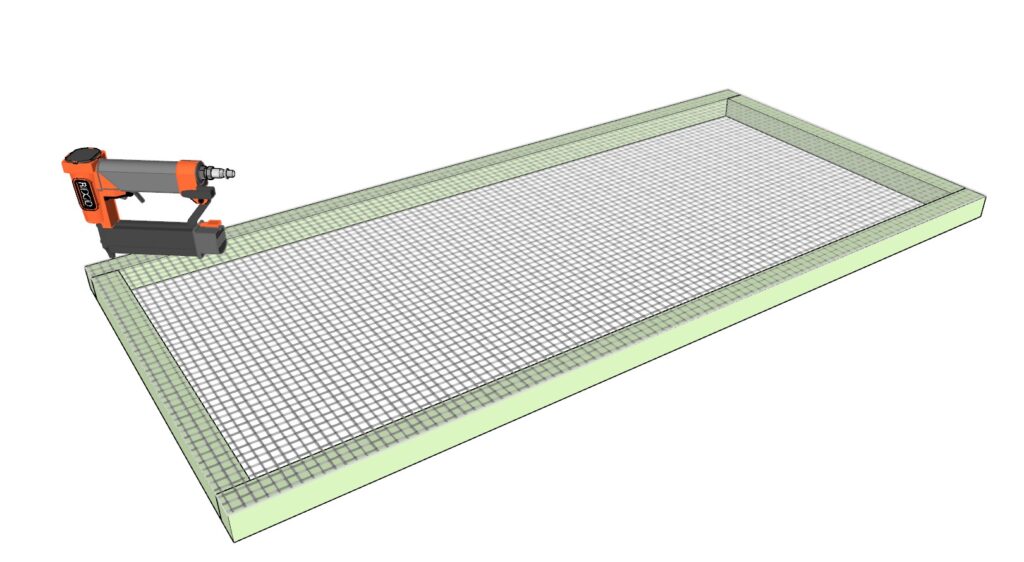
- Building the Small Frame: Construct a smaller frame using two 51-inch and two 21-inch 2×2 pieces. Secure with wood glue and 3.5-inch screws, pre-drilling as before.
- Attaching the Mesh: Lay the frame on a flat surface and stretch the hardware cloth across it. Start stapling at one corner and continue to the opposite corner, ensuring the mesh is taut. Place staples approximately every 2 inches along the frame.
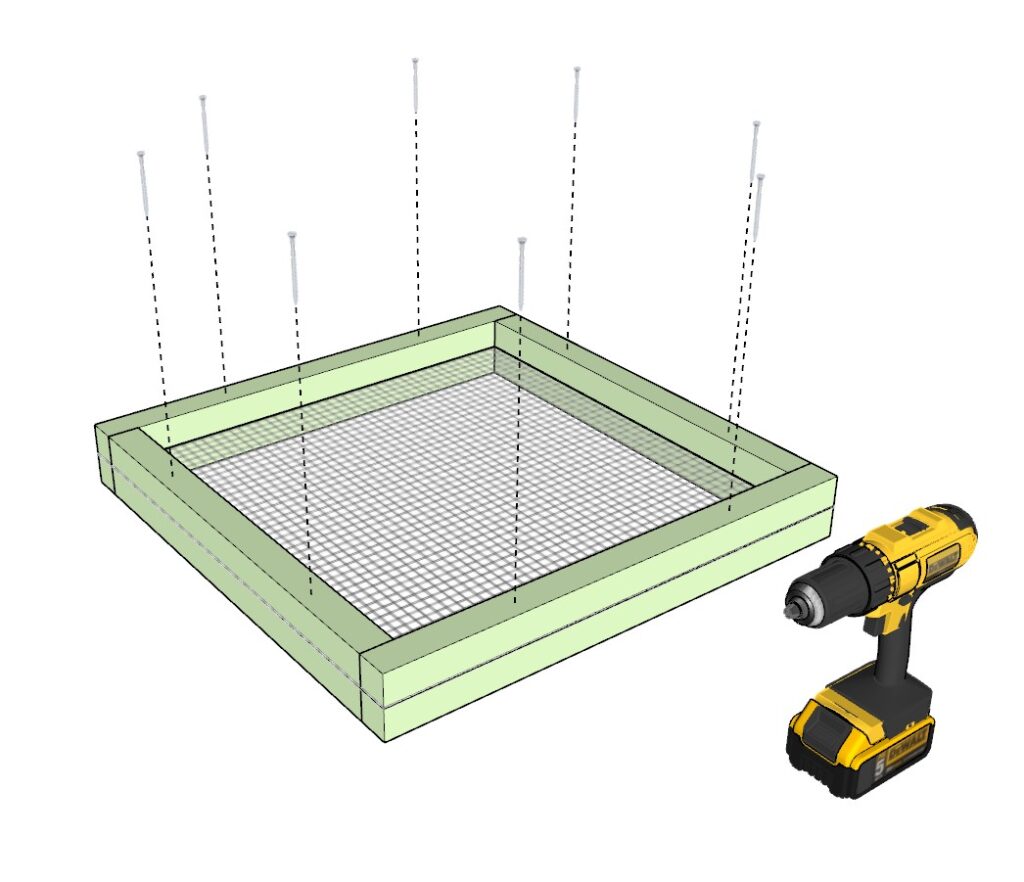
- Completing the Insert: Place another identical 2×2 frame on top of the mesh-covered frame. Align carefully and secure together with 2.5-inch screws, pre-drilling to avoid splitting.
- Repeat: Make 35 of these inserts.
Best Practices for Mesh: Ensure the mesh is uniformly tight to avoid sagging and give a neat finish. Use a heavy-duty staple gun for best results.
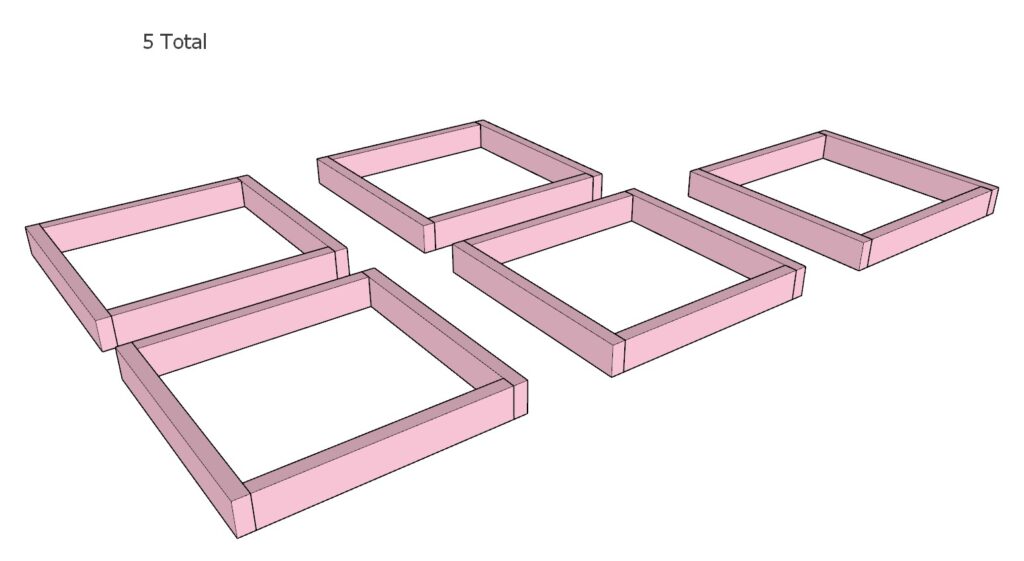
Sub-step 2.3: Building Square Frames
Objective: Construct smaller square frames for different sections of the enclosure.
Materials:
- 2×4 lumber cut to:
- 24 inches (sides)
- 27 inches (top and bottom)
Assembly Process:
- Forming the Square: Arrange two 24-inch 2x4s and two 27-inch 2x4s to form a square.
- Securing the Frame: Glue each joint and secure with 3.5-inch screws after pre-drilling.
- Quality Check: Use a square tool to ensure the frame is perfectly square.
- Repeat: Construct a total of 5 square frames.
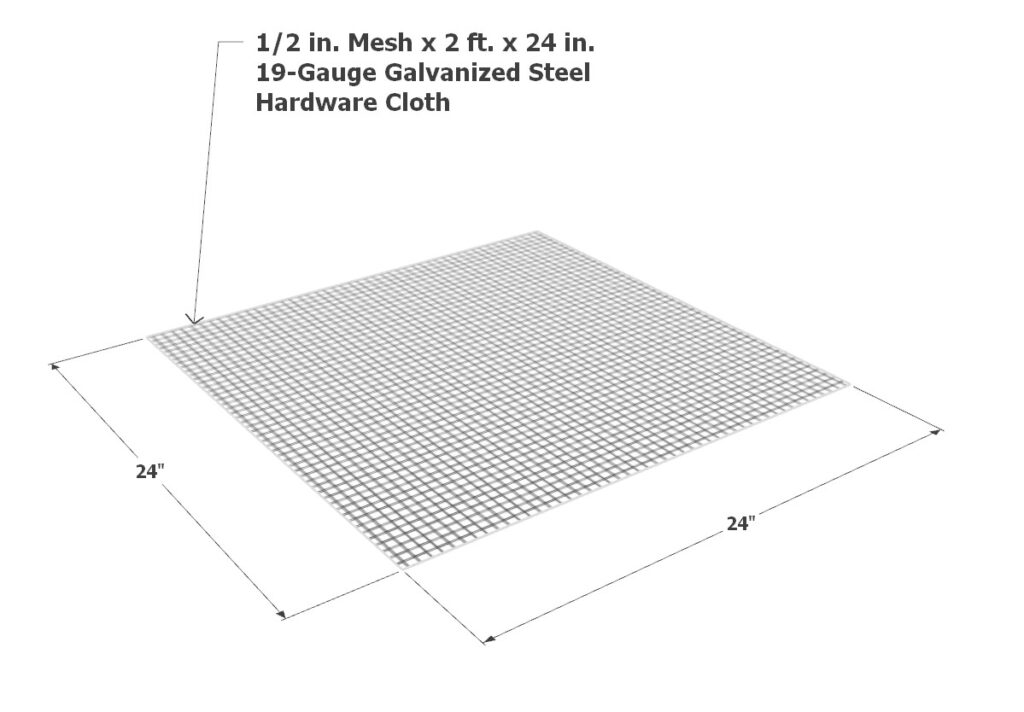
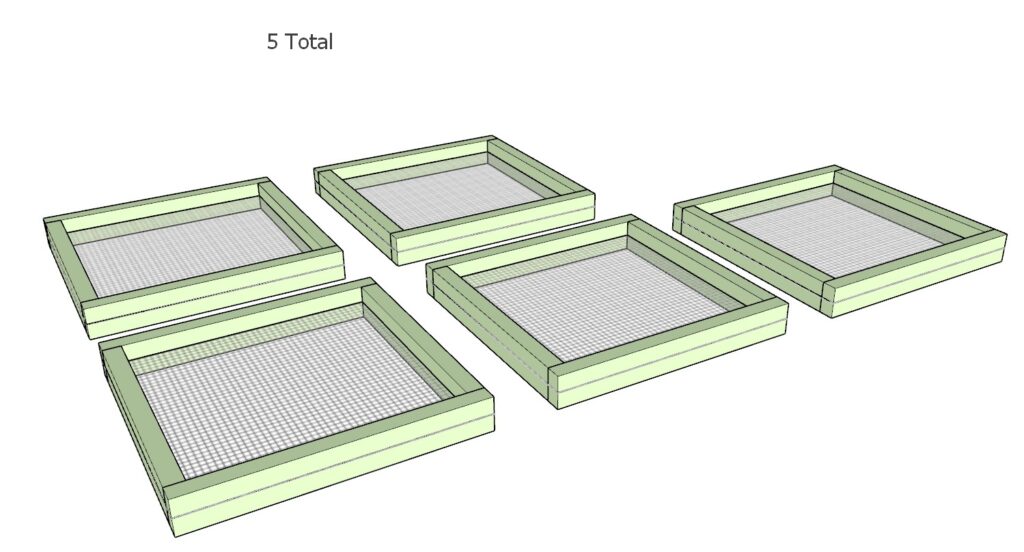
Sub-step 2.4: Creating Inserts for Square Frames
Objective: Equip the square frames with mesh for additional sections of the garden enclosure.
Materials:
- 2×2 lumber cut to:
- 21 inches (sides)
- 24 inches (top and bottom)
- 24-inch x 24-inch wire mesh
Insert Construction:
- Frame Assembly: Similar to the rectangular inserts, construct a square frame using the provided 2×2 dimensions.
- Mesh Application: Stretch and staple the mesh onto one frame, then cover with another frame, ensuring tightness and alignment.
- Securing the Assembly: Attach the two frames with the mesh sandwiched in between using 2.5-inch screws, pre-drilling first.
- Repeat: Make 5 of these inserts.
Final Note: These frames and inserts are crucial components of your garden enclosure, providing structure and protection. Ensure each piece is assembled with precision and care to guarantee longevity and functionality.
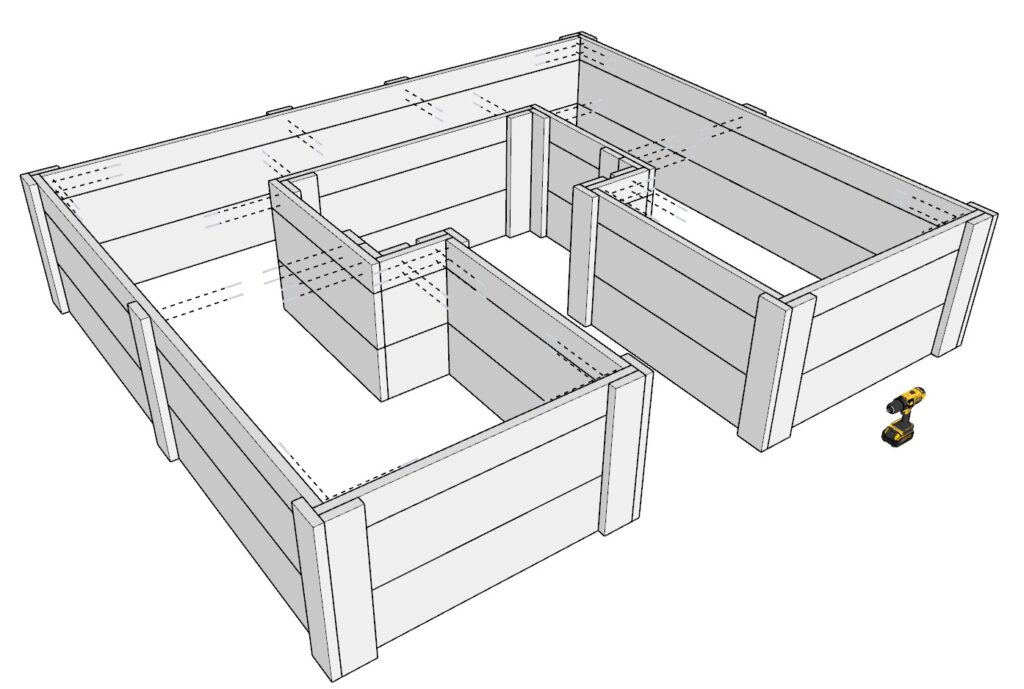
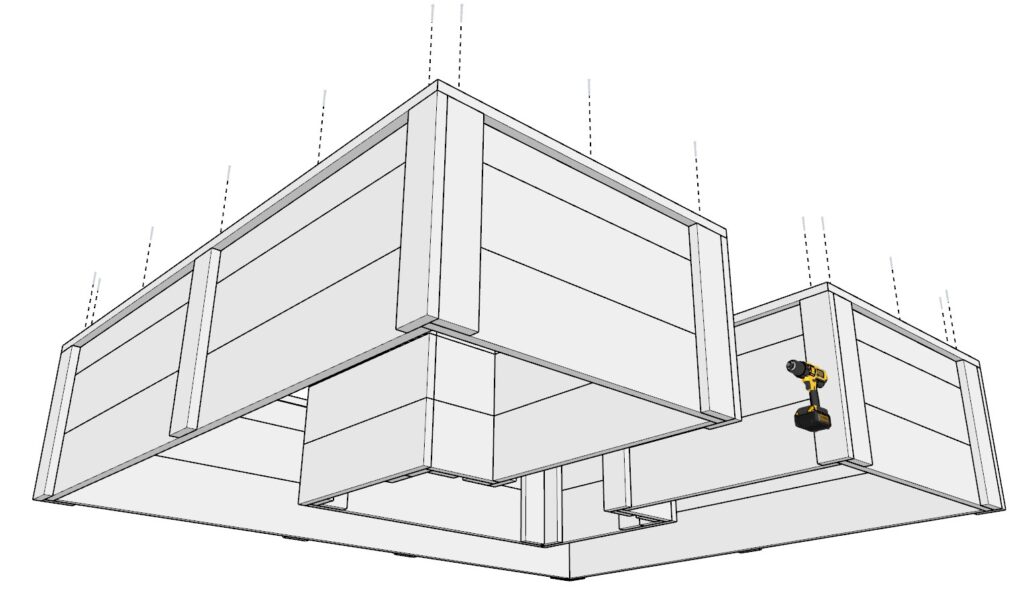
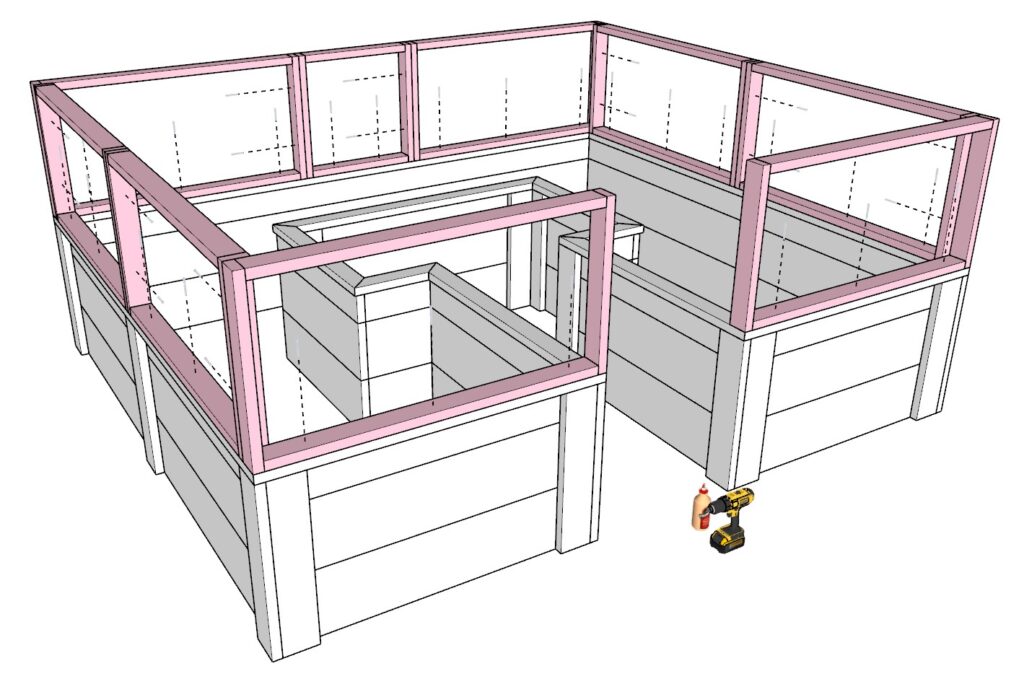
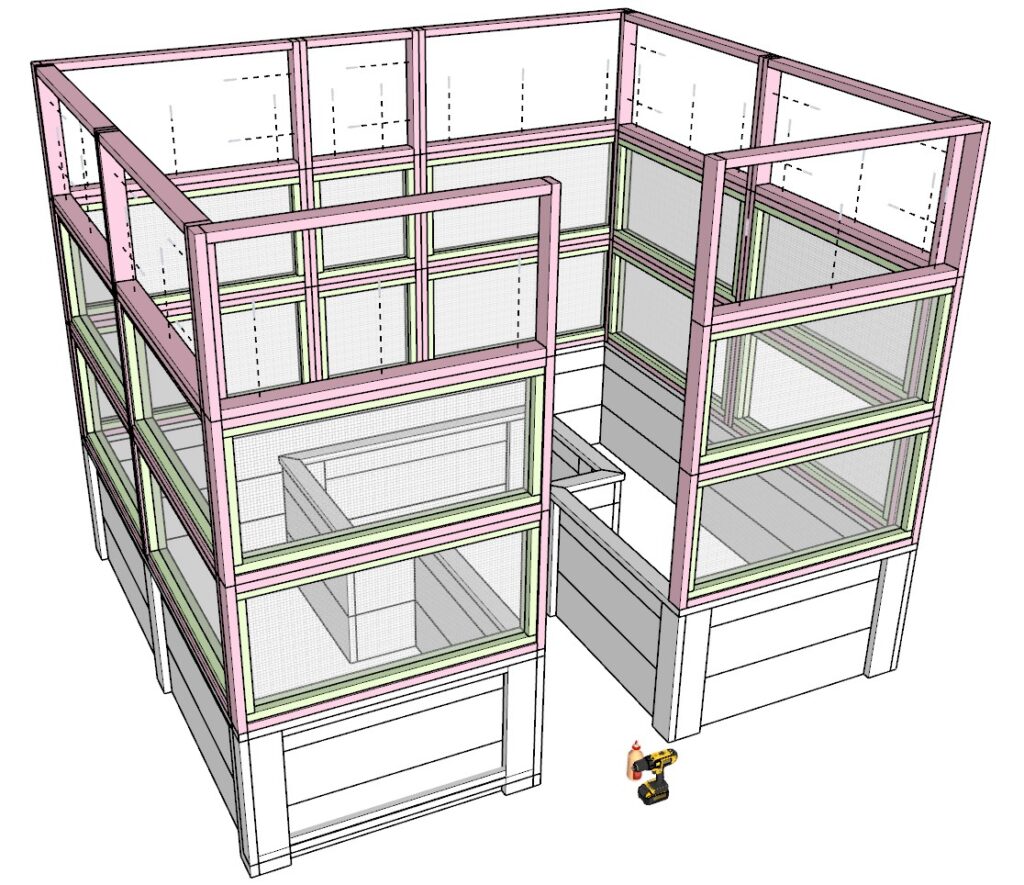
Step 3: Assembling the Walls of the Garden Enclosure
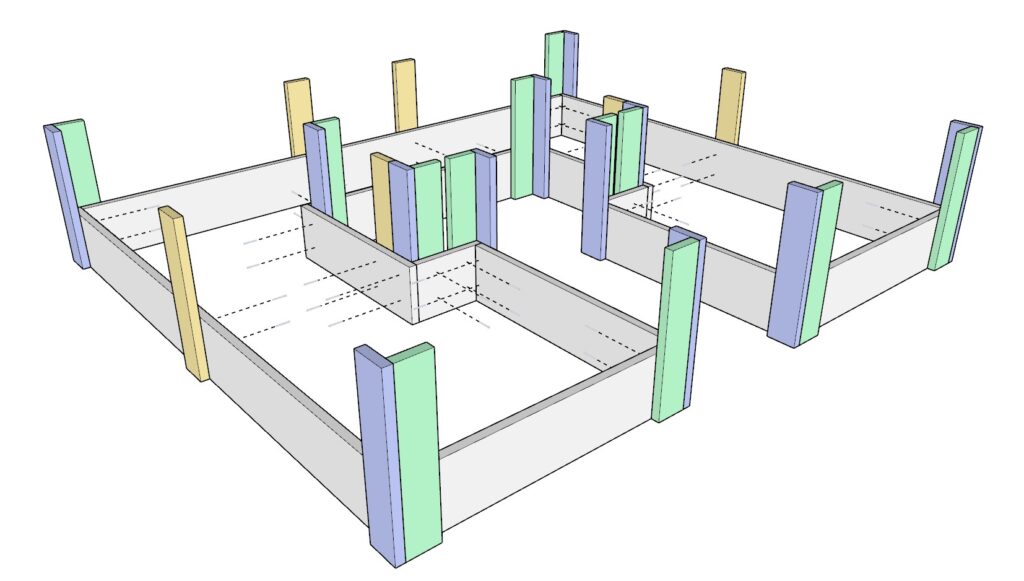
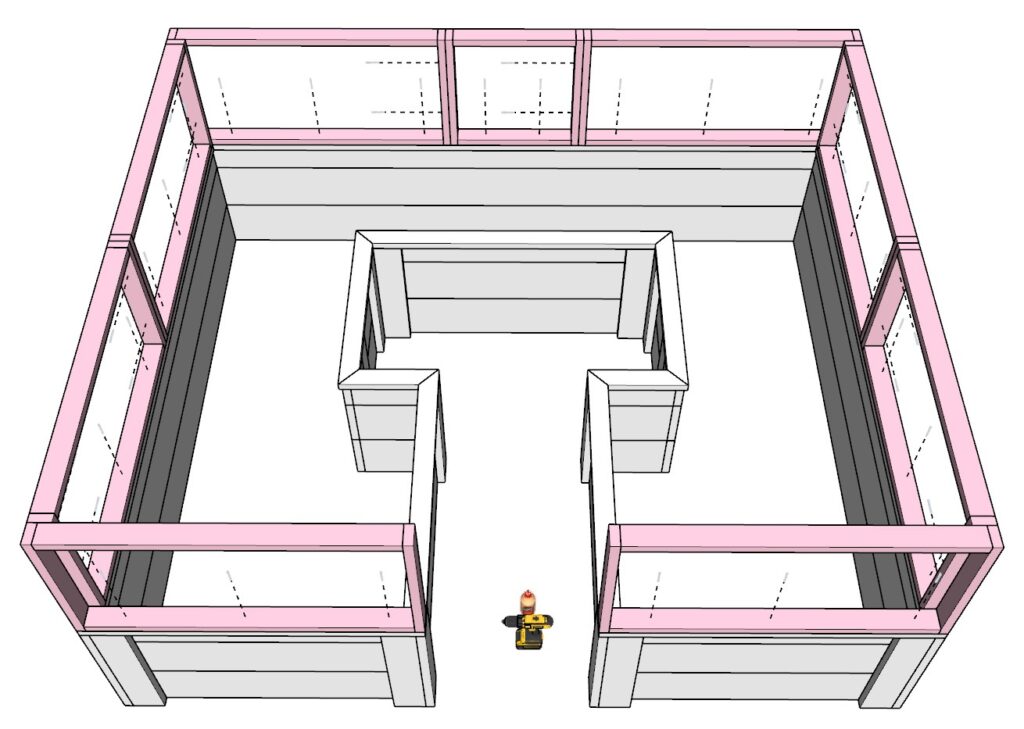
Sub-step 3.1: Establishing the First Layer of the Enclosure
Objective: Begin constructing the vertical structure by integrating frames and inserts to form the base layer of the enclosure.
Materials:
- Eight rectangular (pink-coded) frame pieces
- One square (pink-coded) frame piece
Construction Process:
- Aligning the Frames: Position the eight rectangular frames and one square frame onto the previously installed garden enclosure lip. Refer to the detailed diagram provided in the plans for precise placement.
- Securing the Frames: Attach each frame to the adjoining frame and to the lip using wood glue and 2.5-inch screws for a firm hold. Ensure all frames are aligned and level before finalizing the connections.
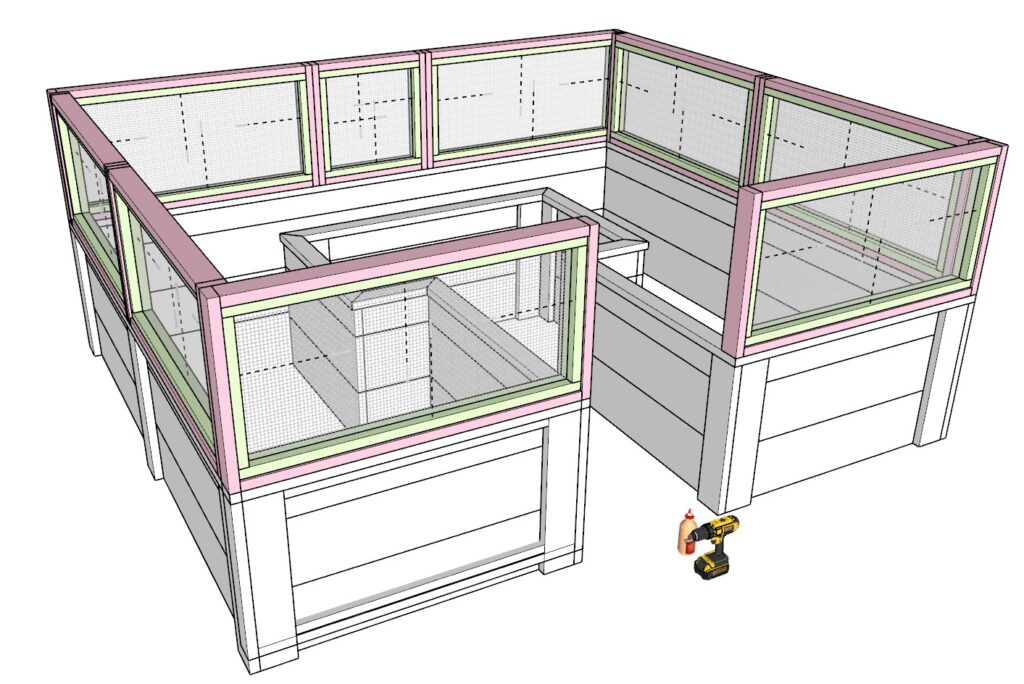
Sub-step 3.2: Inserting the Mesh Panels
Objective: Install the protective mesh inserts into the frames to secure the enclosed area.
Materials:
- Eight rectangular (lime green-coded) inserts
- One square (lime green-coded) insert
Installation Details:
- Placement of Inserts: Carefully slide each mesh insert into the corresponding frame, ensuring a snug fit.
- Securing Inserts: Once aligned, fix the inserts in place using 2.5-inch screws. Apply wood glue at the joints for added stability.
- Adjustments: If any inserts resist fitting smoothly, use a sander to lightly adjust the edges of the inserts for a better fit. Avoid excessive sanding to maintain structural integrity.
Note on Flexibility: Opt to use screws without glue for the frames if you anticipate needing to replace any damaged sections in the future. The mesh is durable, but having the option to replace frames individually could be beneficial.
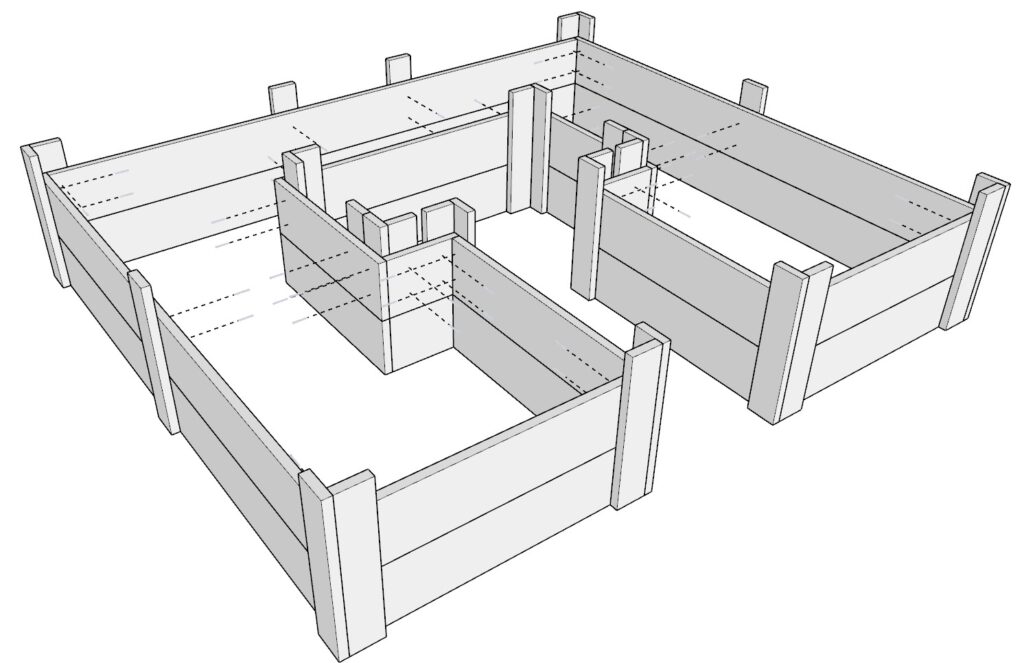
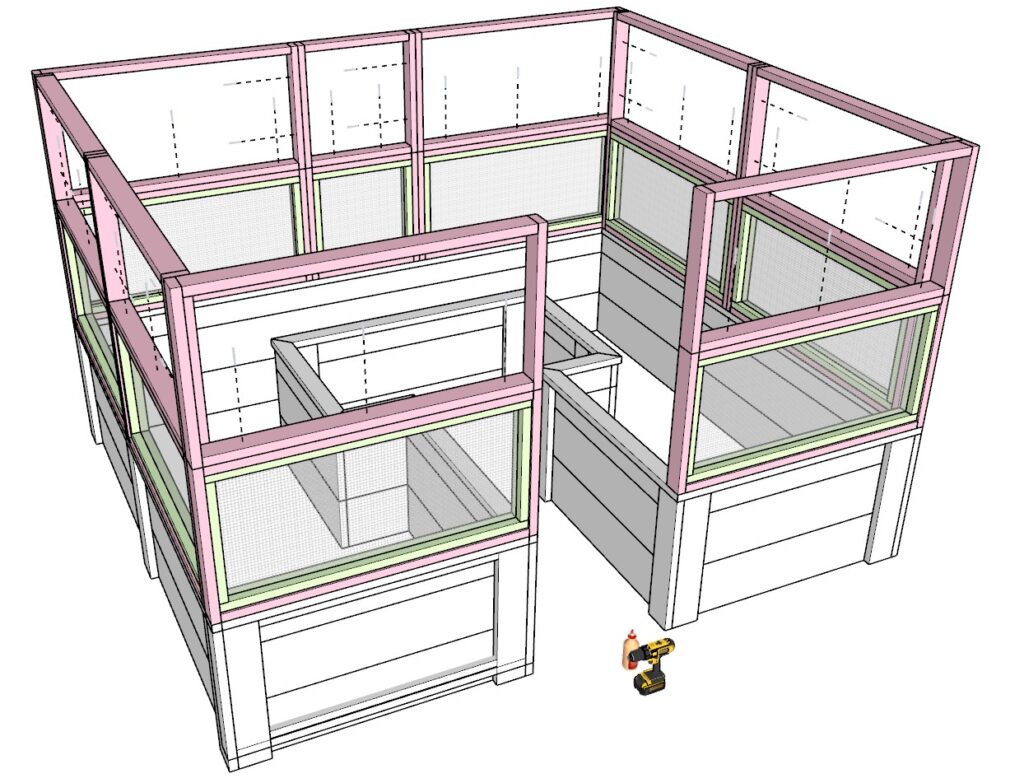
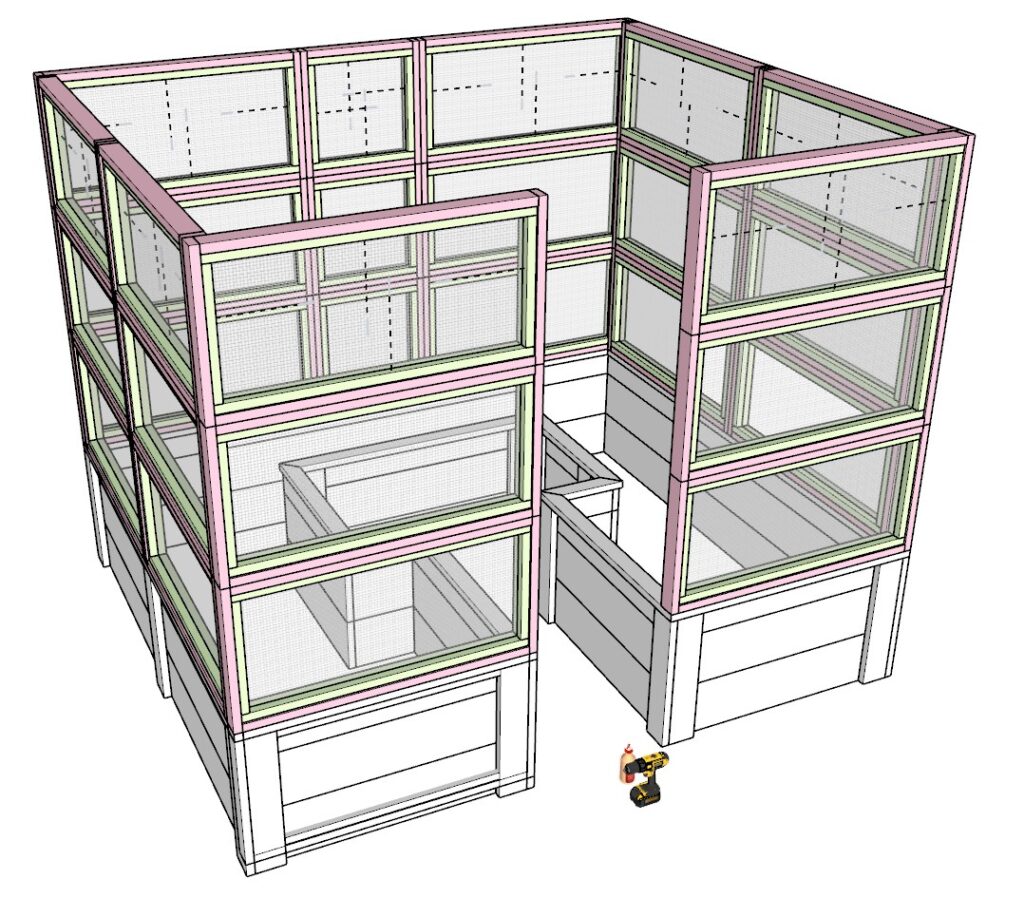
Sub-step 3.3: Constructing the Second Layer
Objective: Build upon the first layer by adding another set of frames and inserts.
Repeat the Process:
- Frame Placement: Position another set of eight rectangular frames and one square frame on top of the first layer, aligning them perfectly.
- Secure the Frames: Attach each frame to the layer below using wood glue and 2.5-inch screws, ensuring each joint is tightly fastened.
- Insert Installation: Slide the corresponding inserts into the new layer of frames and secure them as described in Sub-step 3.2.
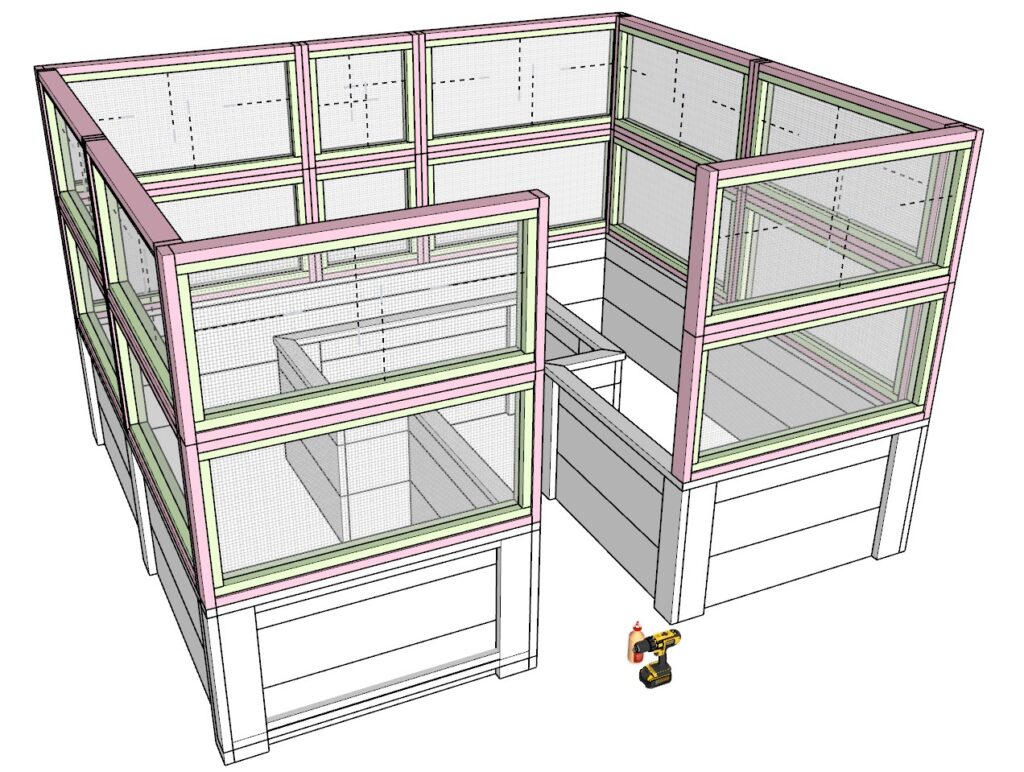
Sub-step 3.4: Adding the Third Layer
Objective: Complete the vertical extension of the enclosure walls by constructing the third and final layer.
Safety First:
- Use sturdy ladders to reach the upper layers safely.
- Always ensure ladders are stable and wear safety gear such as gloves and goggles during construction.
Construction Process:
- Frame and Insert Placement: Repeat the process of aligning and securing the frames and inserts for the third layer, following the same steps outlined for the first and second layers.
- Final Checks: As each layer is added, periodically check for alignment and stability, making any necessary adjustments before proceeding to the next step
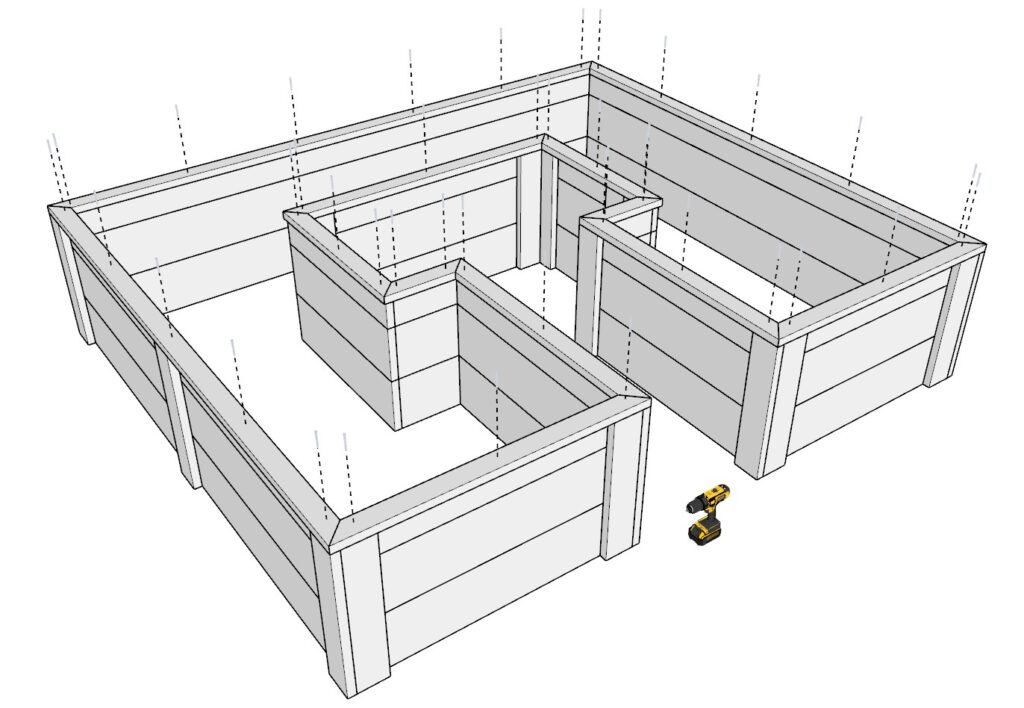
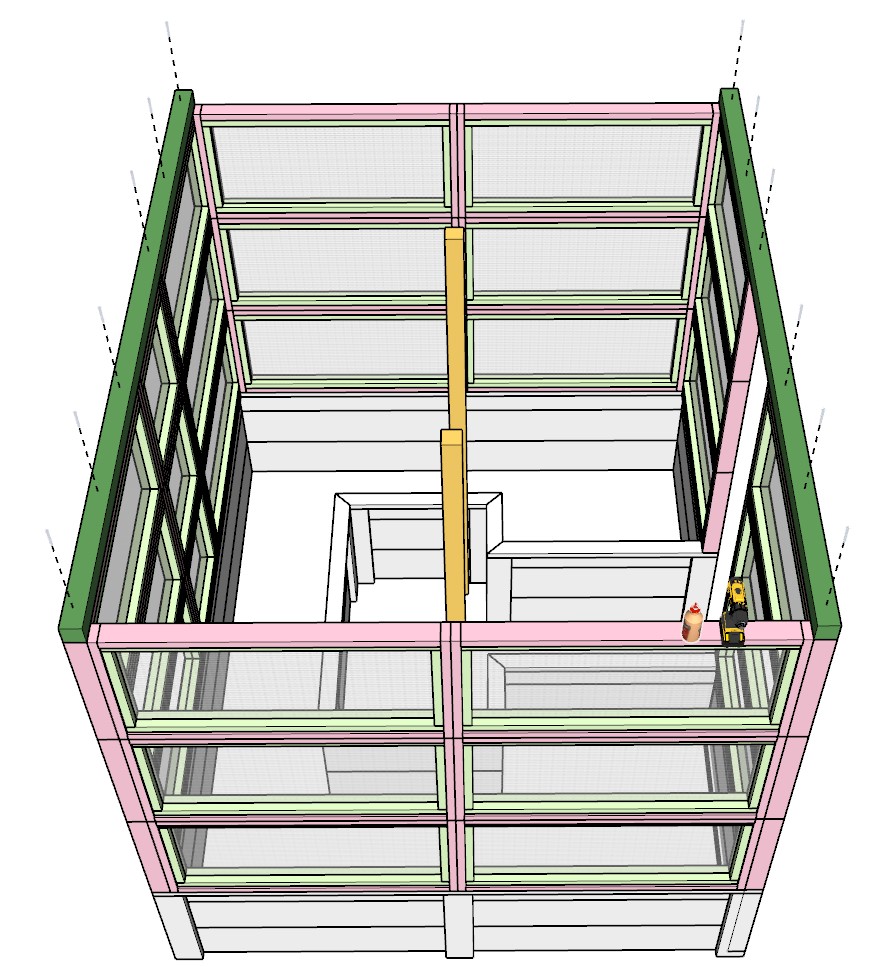
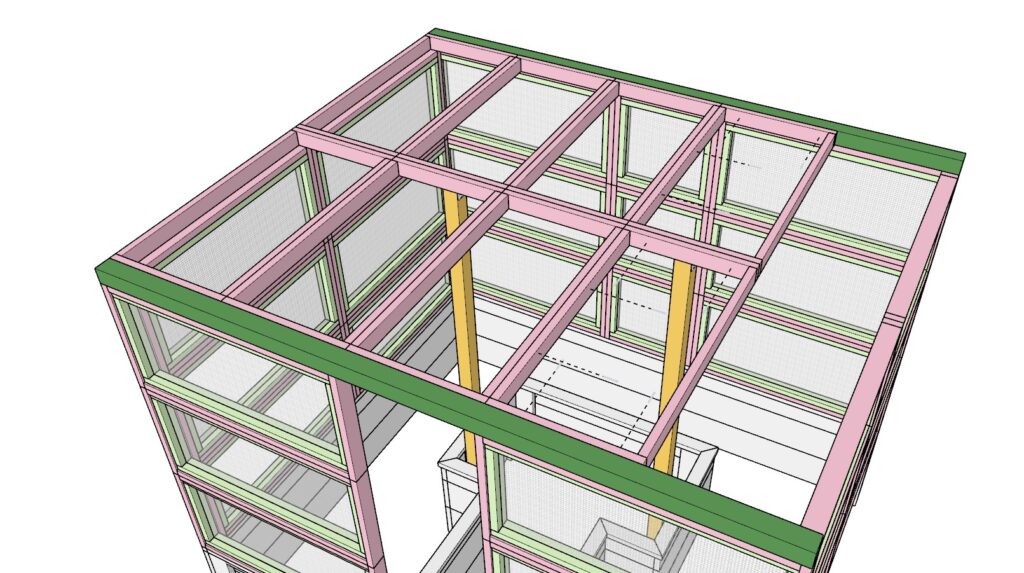
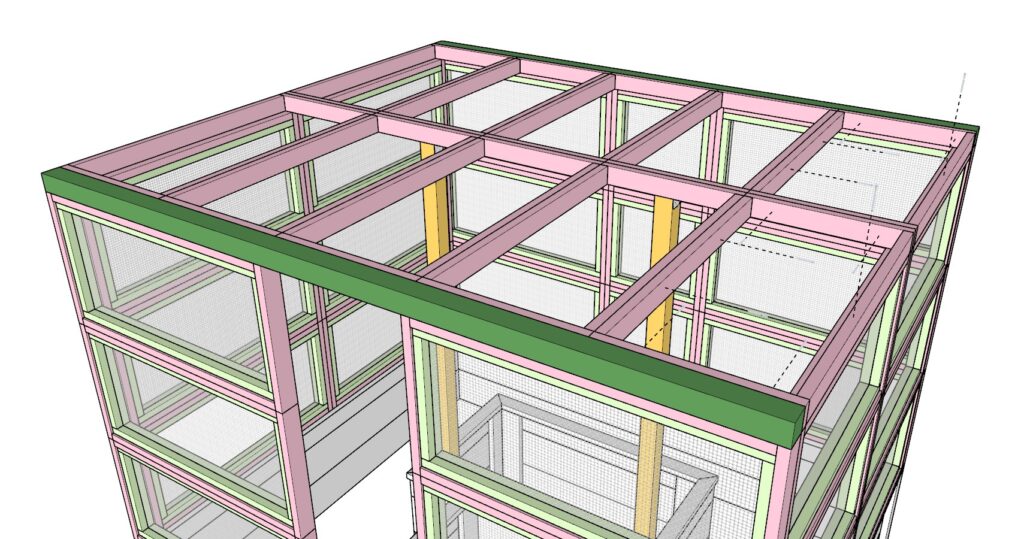
Step 4: Installing Support Pillars and Roof Reinforcement
Sub-step 4.1: Setting Up Support Pillars
Objective: Strengthen the structure by installing vertical support pillars that will support the roof panels.
Materials:
- Two 4×4 lumber posts, each 110-1/2 inches tall (color-coded in gold).
Installation Process:
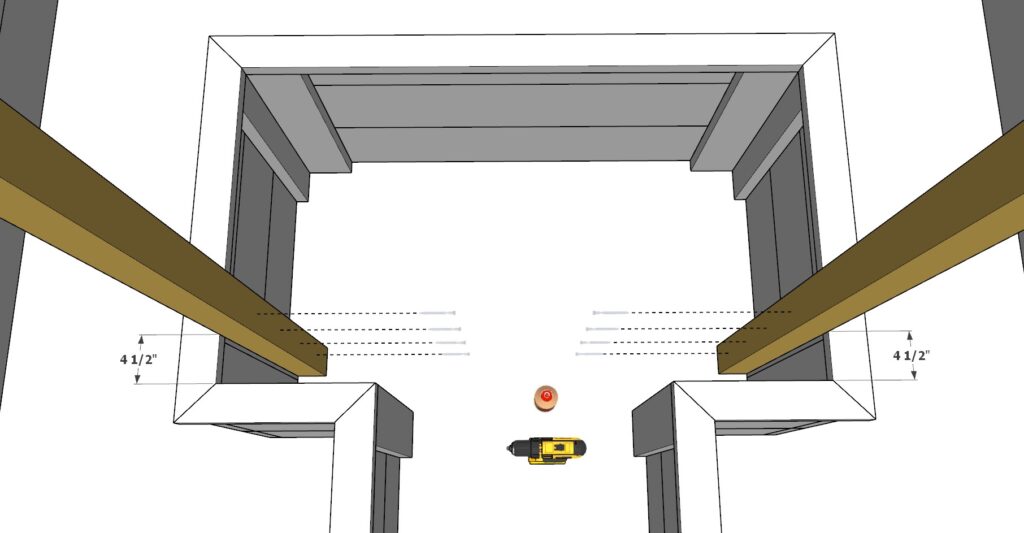
- Positioning the Pillars: Position the 4×4 posts within the planter box frame as per the diagram. These posts should be strategically placed to evenly distribute the weight of the roof and enhance structural integrity.
- Securing the Posts: Use 6-inch long screws to anchor the pillars firmly to the base of the planter box. If access allows, screw from the inside of the planter box to hide the screw heads and provide a cleaner finish.
- Alignment Check: Use a level to ensure the posts are perfectly vertical before fully securing them. Proper alignment is critical for the overall stability of the enclosure.

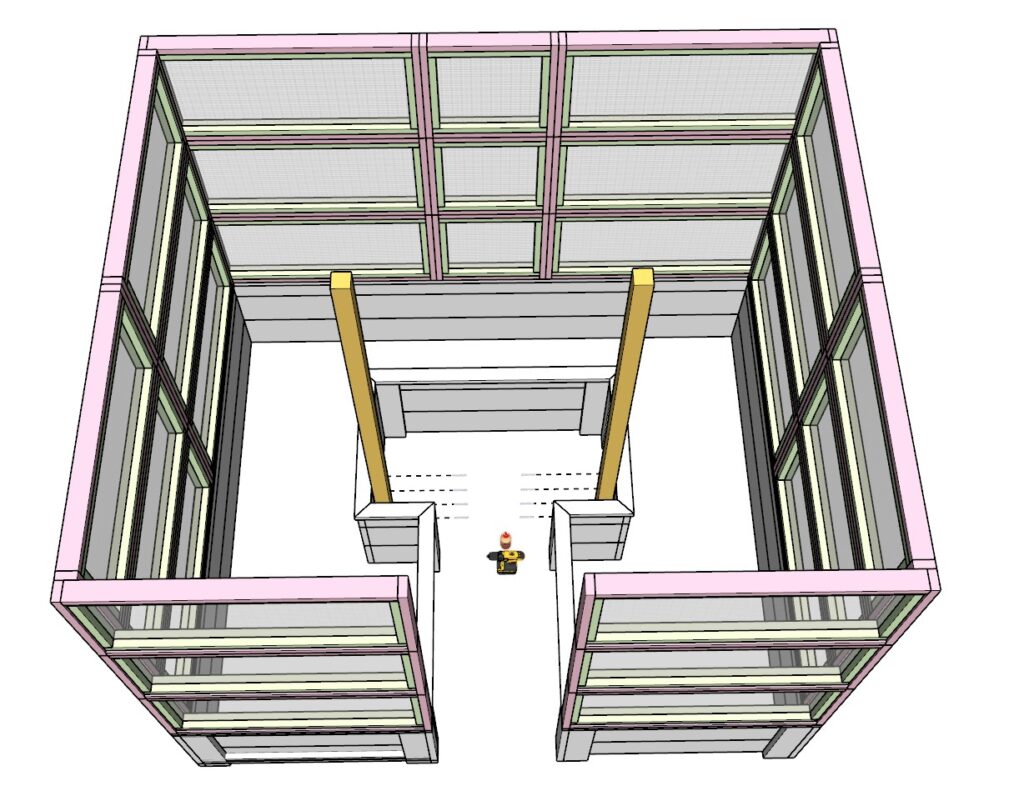
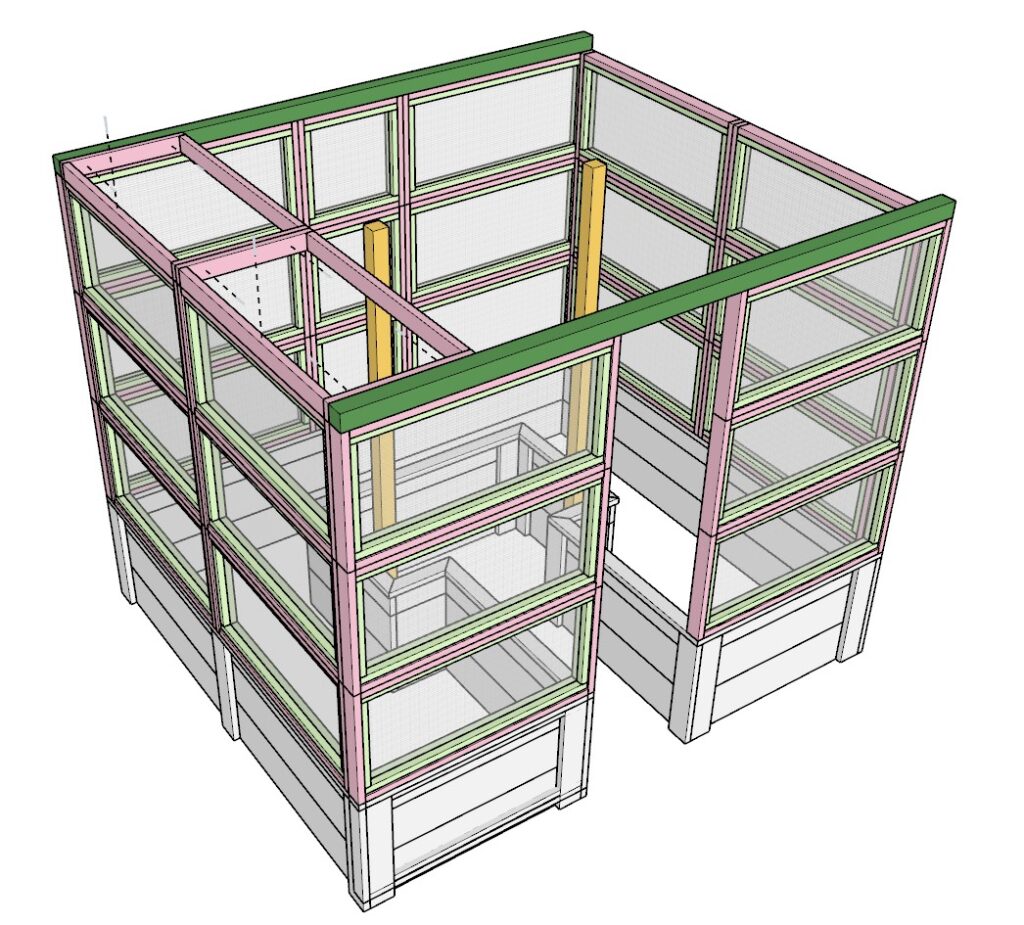
Sub-step 4.2: Adding Roof Reinforcement Components
Objective: Add horizontal support beams to the top of the structure to prepare for roof panel installation.
Materials:
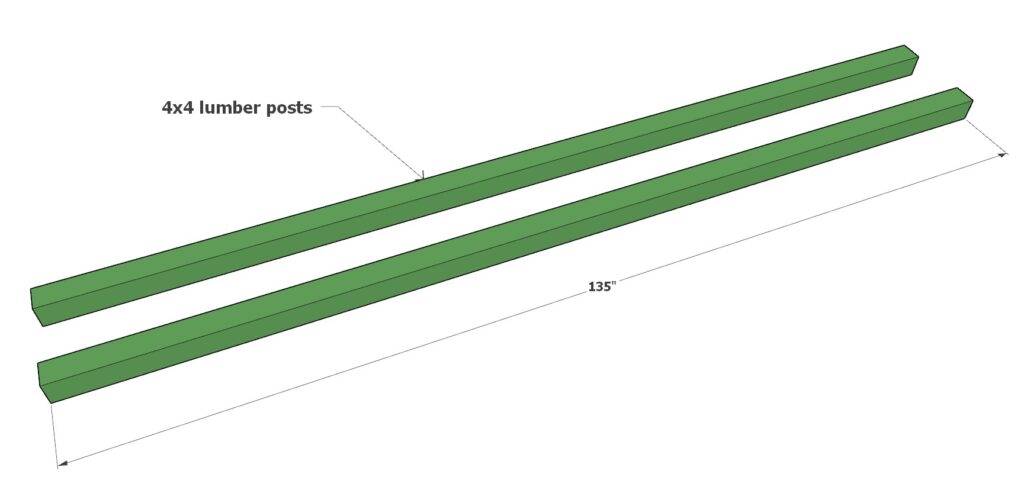
- Two 4×4 lumber posts, each 135 inches long (color-coded in forest green).
Installation Details:
- Placement of Roof Beams: Lay the 135-inch beams across the topmost layer of the rectangular frames and inserts. One beam should be positioned directly above the door frame, and the other along the back wall of the enclosure, aligning with the edges of the structure as indicated in the diagram.
- Securing the Beams: Attach each beam to the structure using 4.5-inch long screws combined with wood glue for extra strength. Ensure the screws are evenly spaced, approximately every 12 inches, to maintain uniform support across the length of the beam.
- Ensuring Structural Integrity: Double-check that each beam is flush with the top of the enclosure and securely fastened to prevent any movement or sagging.
Tips for Effective Installation:
- Pre-drilling: Always pre-drill holes for the screws to prevent splitting the wood, especially when working with thicker posts like 4x4s.
- Safety First: When working at height, use appropriate safety equipment and stable platforms or ladders. Never overreach and ensure you have a helper to steady ladders and pass materials.
- Weather Considerations: If possible, choose a calm day for this step, as working at height can be more challenging in windy conditions.
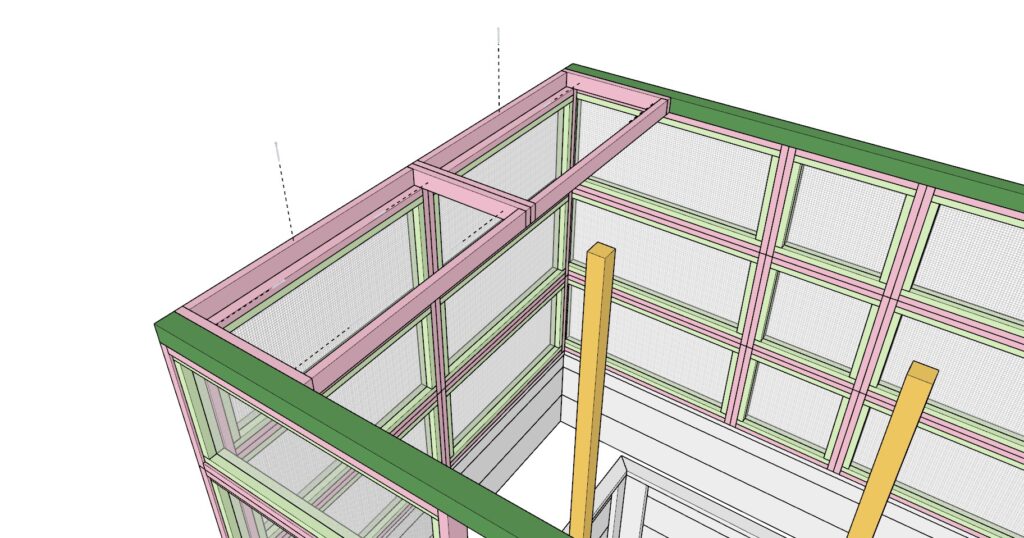
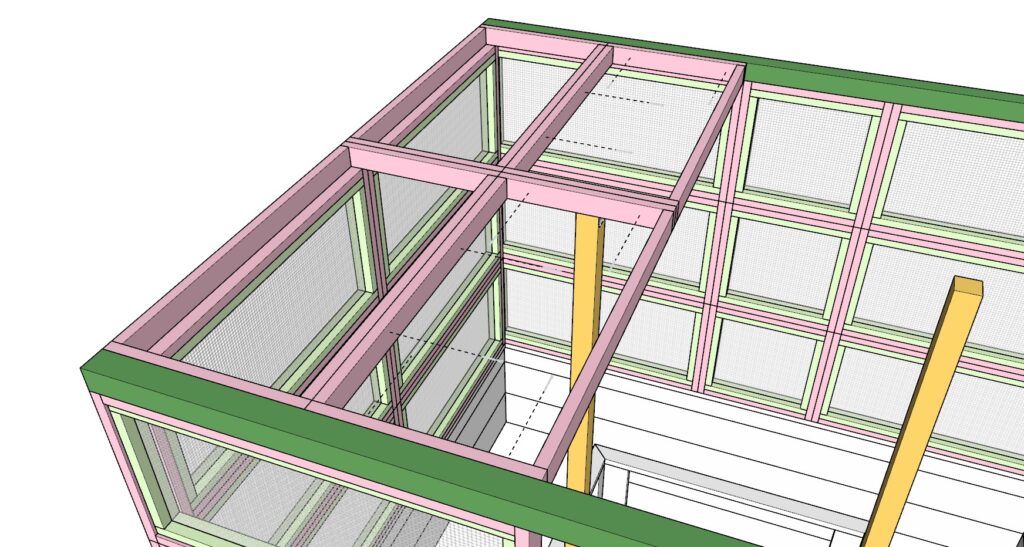
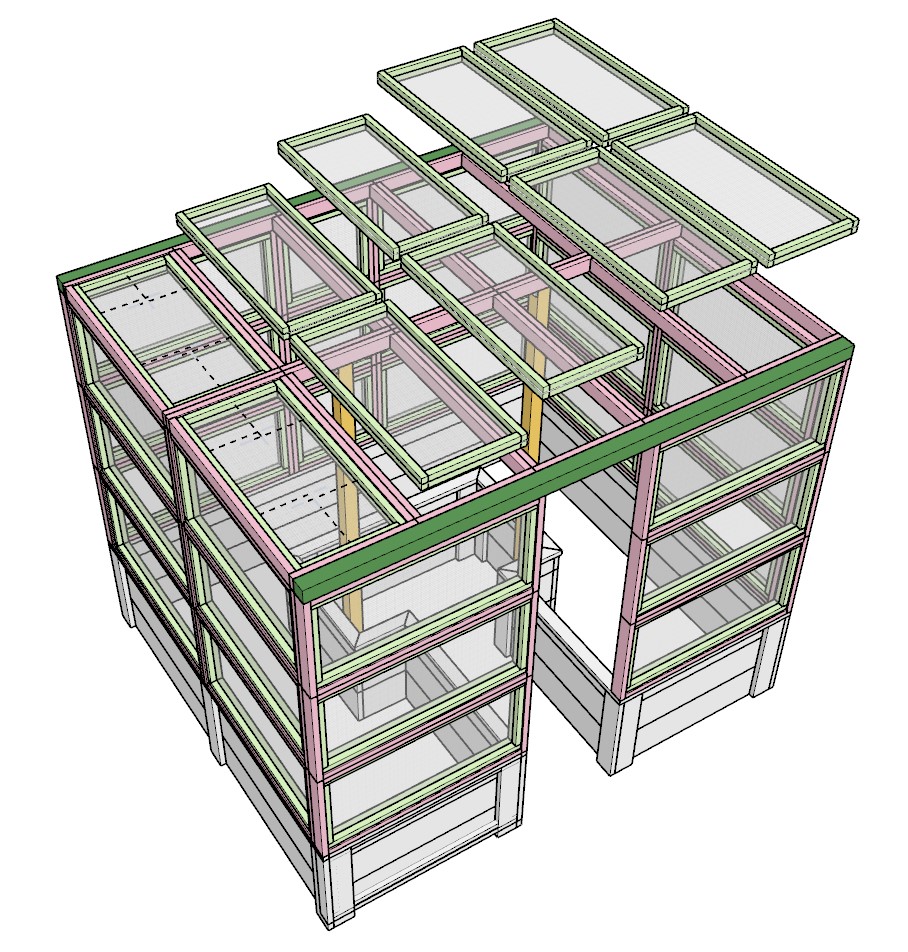
Step 5: Assembling the Roof Structure of the Garden Enclosure
Sub-step 5.1: Installing the Initial Roof Frames
Objective: Begin the construction of the roof by securely attaching the first set of rectangular frame pieces.
Materials:
- Two rectangular frames (previously constructed, pink-coded)
- 2.5-inch and 4-inch long screws
- Wood glue
Installation Process:
- Joining Frames: Apply wood glue to the ends of two rectangular frames and align them as indicated in the diagram. Screw them together using 2.5-inch screws for initial stability.
- Attaching to Structure: Secure these joined frames to the edge of the enclosure using 4-inch long screws. Use at least two screws at each junction to ensure a robust attachment to the underlying structure.
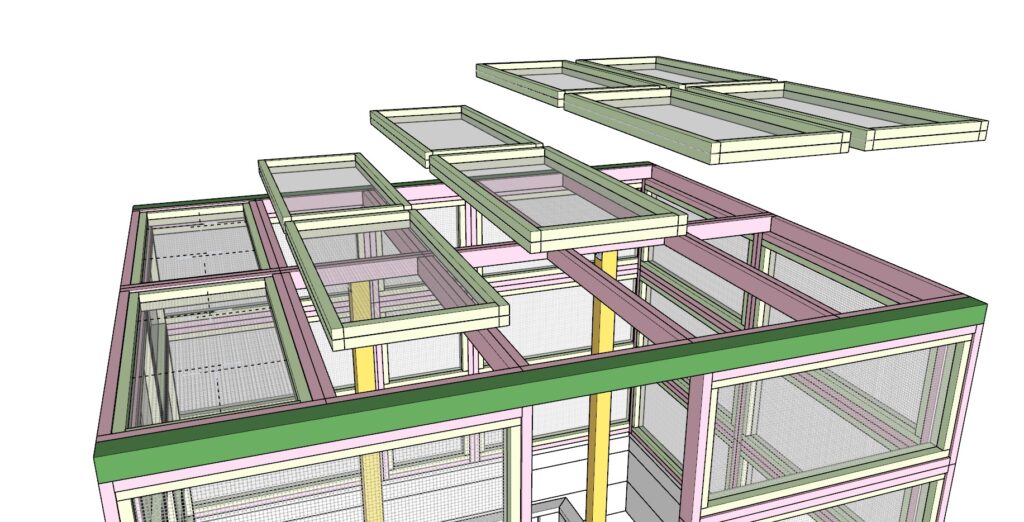
Sub-step 5.2: Adding Additional Roof Frame Layers
Objective: Continue building the roof by adding more rectangular frame layers and securing them to the main structure.
Materials:
- Additional rectangular frames (pink-coded)
- L-brackets for additional support
- 4-inch screws
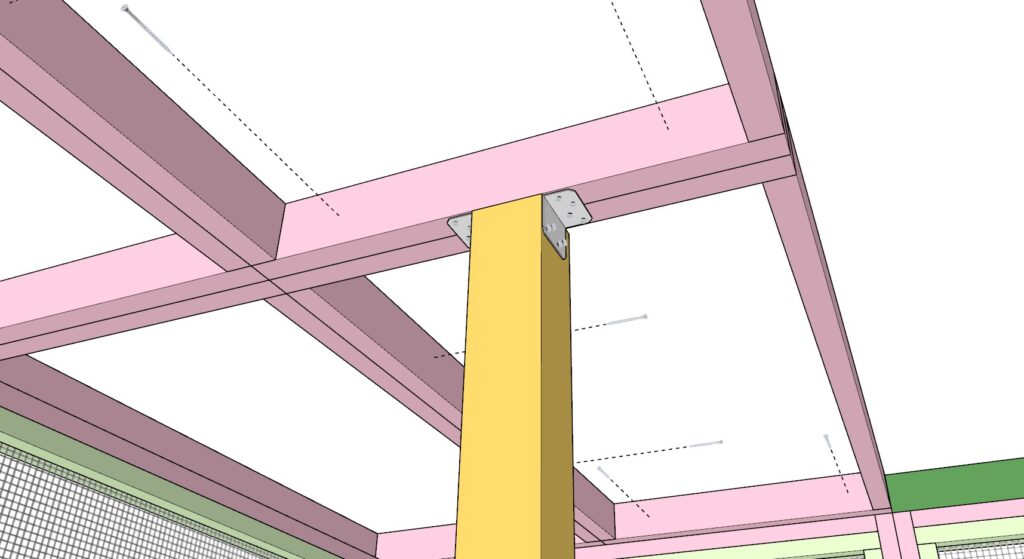
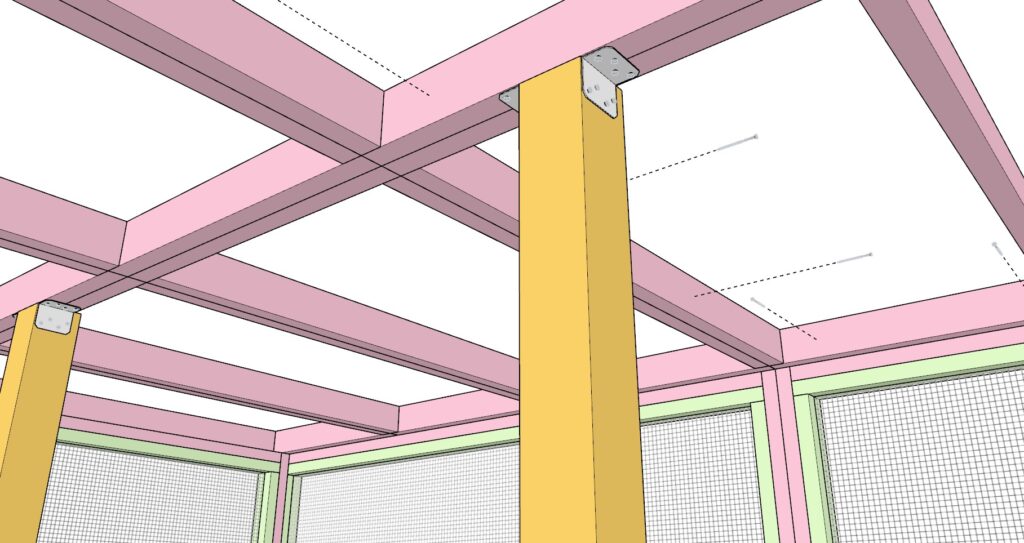
Construction Details:
- Layering Frames: Continue adding pairs of rectangular frames, securing each pair to the previous one with wood glue and 2.5-inch screws.
- Securing to Support Posts: As you add each layer, connect the frames to the forest green 4×4 lumber posts and the gold-coded posts using L-brackets for enhanced stability.
- Repeat Process: Proceed with adding the third, fourth, and fifth layers of frame pieces, securing them as outlined. Ensure that the second gold-colored post is also integrated using L-brackets, and firmly attach the end of the frame layers to the enclosure’s edge with 4-inch screws.

Sub-step 5.3: Installing the Roof Inserts
Objective: Fill in the roof framework with lime green-coded inserts to complete the enclosure.
Materials:
- Ten lime green-coded mesh inserts
- 2.5-inch screws
- Wood glue
Installation Process:
- Placing Inserts: Position each of the remaining ten lime green-coded mesh inserts within the pink-coded frame sections that were just installed. Make sure each insert fits snugly within its frame.
- Securing Inserts: Use wood glue for an initial layer of adhesion, then secure each insert with 2.5-inch screws. Distribute the screws evenly around the frame to maintain tension and prevent sagging of the mesh.
- Final Adjustments: After all inserts are placed and secured, go over each connection point to ensure everything is tightly fastened and there are no loose areas.
Completion Check: Once all steps are completed, inspect the entire roof structure for any potential weak spots or misalignments. Adjust as necessary to ensure everything is sturdy and aligned correctly.
Safety Reminder: Throughout the assembly, particularly when working on higher sections, use appropriate safety gear and stable platforms. It’s recommended to work with at least one assistant to manage the larger pieces and ensure safety.
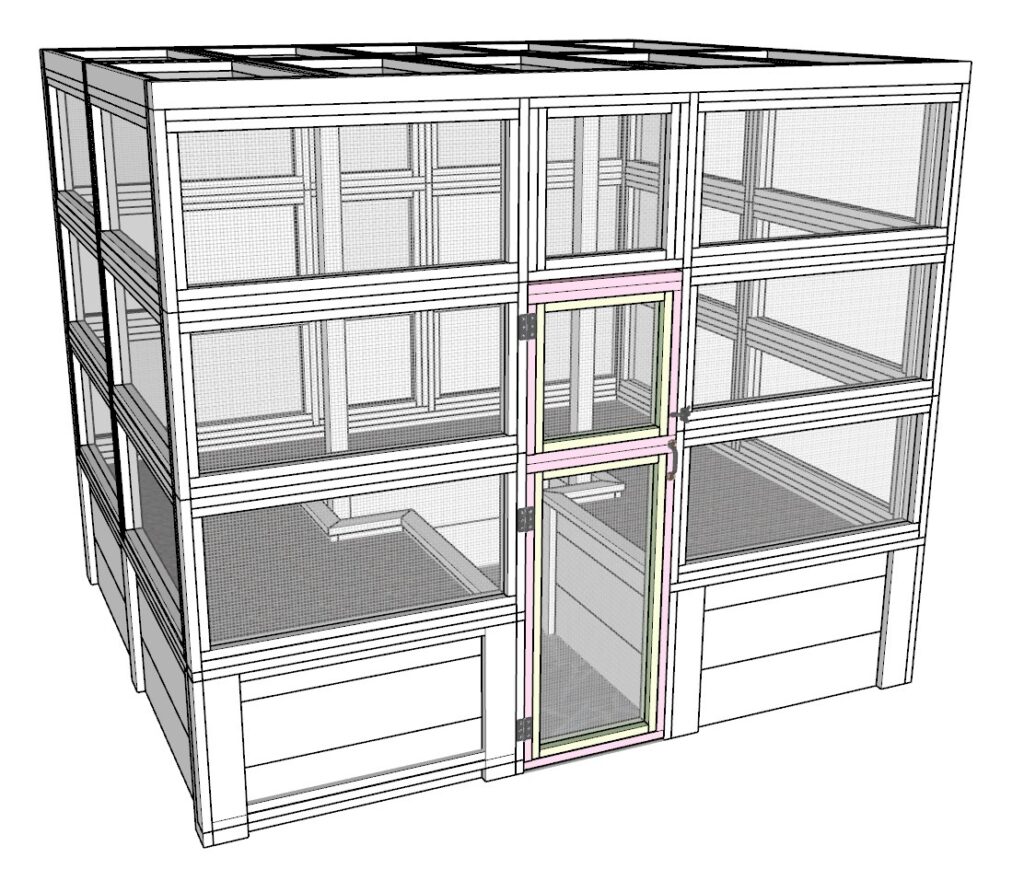
Step 6: Constructing and Installing the Door for the Garden Enclosure
Sub-step 6.1: Constructing the Door
Objective: Create a sturdy door for the enclosure by combining different frame pieces.
Materials:
- One square pink-coded frame
- One rectangular pink-coded frame
- One 27-inch long 2×4 lumber piece
- 2.5-inch long screws
- Wood glue
Construction Process:
- Assembling the Door Framework: Start by stacking the square frame at the top, the rectangular frame below it, and the 27-inch 2×4 at the top to form the door structure. Align all edges smoothly.
- Securing the Components: Apply wood glue between each joining surface for added strength. Use 2.5-inch screws to fasten the pieces together, ensuring each screw is driven in straight and flush with the wood surface.
Sub-step 6.2: Adding Inserts and Final Assembly
Objective: Insert the mesh panels into the door frame and prepare it for installation.
Materials:
- One lime green square insert
- One lime green rectangular insert
- Wood glue
- 2.5-inch screws
Installation Process:
- Placing the Inserts: Fit the lime green square insert into the square frame section and the rectangular insert into the rectangular frame section of the door.
- Securing the Inserts: Use wood glue and 2.5-inch screws to attach the inserts firmly within the frames, ensuring they are snug and secure without any gaps.
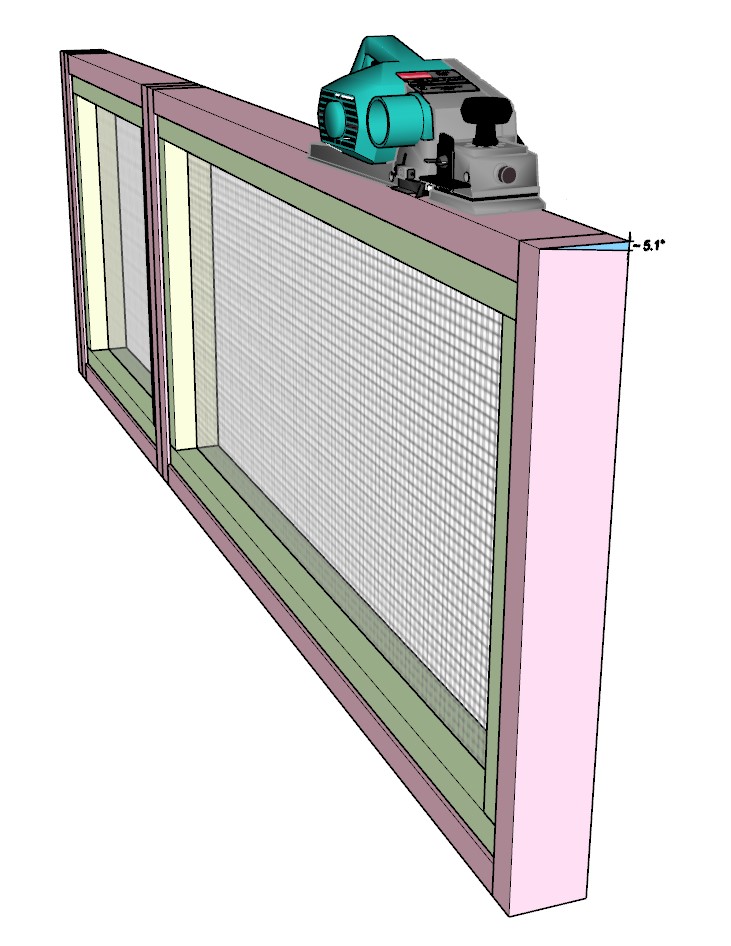
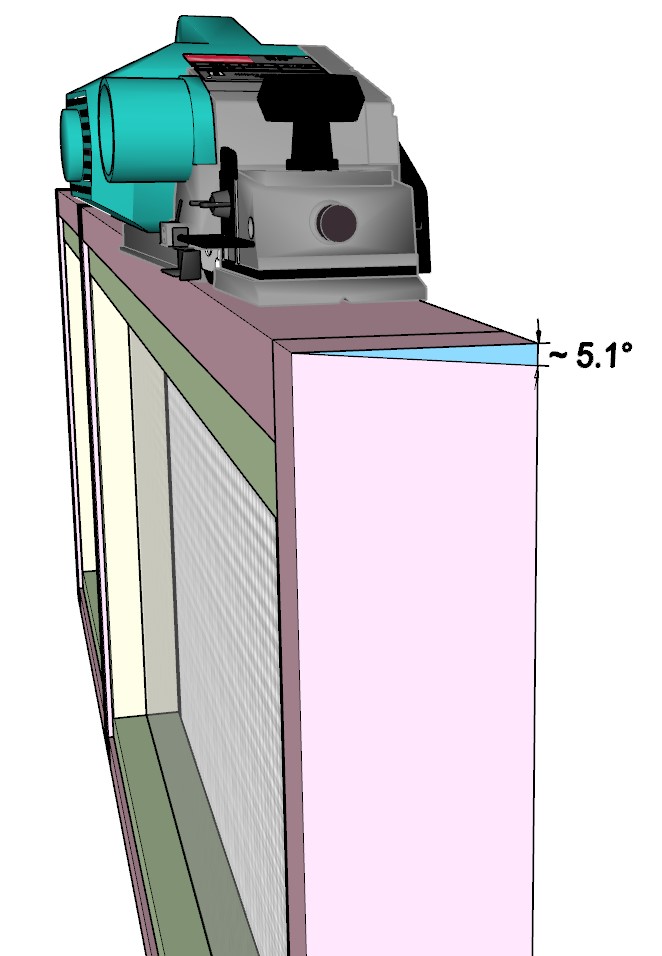
Sub-step 6.3: Ensuring the Door Fits Perfectly
Objective: Adjust the door to ensure it opens and closes smoothly, without any resistance.
Materials:
- Planer
- Tape measure
Adjustment Process:
- Initial Test Fit: Before planing, physically hang the door using temporary hinges to check the fit in the actual frame of the enclosure.
- Measuring for Adjustments: If the door catches or shows resistance, use a planer to shave off a 5.1-degree angle from the edge where it catches. Measure the exact amount needed based on the real-life alignment and behavior of the door.
- Fine-Tuning: Make gradual adjustments, checking the fit after each pass with the planer to avoid over-adjusting.
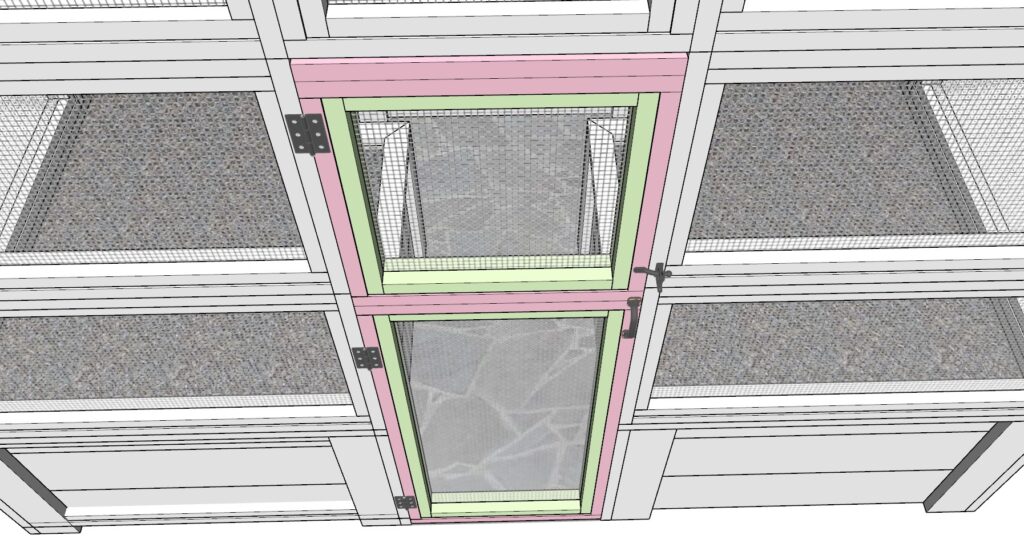
ub-step 6.4: Installing Hinges, Handle, and Lock
Objective: Securely attach the door to the enclosure with hardware for functionality and security.
Materials:
- Hinges
- Door handle
- Locking latch
- Screws suitable for the hardware
Installation Details:
- Attaching Hinges: Install at least three hinges along the vertical edge of the door, spaced evenly. Use screws that are long enough to anchor into the door and frame securely.
- Handle and Lock Installation: Attach the handle at a comfortable height. Install a locking latch on the opposite side to ensure the door can be securely closed and locked.
Final Checks:
- Operation Test: Open and close the door several times to ensure smooth operation and check that the lock engages properly.
- Security Check: Ensure all hardware is tightened and the door aligns neatly without sagging or misalignment.
Step 7: Preparing and Protecting Your Garden Enclosure
Sub-step 7.1: Applying Wood Sealer and Varnish Primer
Objective: Ensure the longevity of the wood by sealing it properly before final finishes are applied.
Importance of Wood Sealer:
- Surface Preparation: A quality wood sealer will fill the grain, seal wood fibers, and level the surface, ensuring a smooth and uniform application of subsequent varnish or paint.
- Protection from Elements: Sealer acts as a barrier against moisture, UV rays, and environmental damage, crucial for outdoor structures.
- Efficiency: Using sealer can reduce the amount of more expensive topcoat varnish needed, as it prevents excessive absorption.
Application Instructions:
- Clean the Wood: Ensure all wood surfaces are clean, dry, and free from dirt and debris.
- Apply Sealer: Use a brush, roller, or spray to apply the wood sealer evenly. Focus on exterior surfaces to avoid contact with the soil and plants inside the planter boxes.
- Drying Time: The sealer dries quickly, allowing for recoat in just 2 hours in temperatures above 72°F. No sanding is required between coats, simplifying the process.
- Repeat Application: Apply at least two coats for optimal protection, ensuring the wood is completely covered and sealed.
Sub-step 7.2: Installing a Protective Barrier in the Planter Boxes
Objective: Protect the interior wooden surfaces of the planter boxes that come into direct contact with soil.
Best Practices:
- Barrier Options: Consider using a heavy-duty landscape fabric, pond liner, or a food-safe plastic liner to protect the wood from moisture and soil contact.
- Installation: Line the interior walls of the planter boxes, ensuring the barrier material extends above the soil line and is securely attached to the wood using staples or small nails.
- Overlap Seams: Make sure any seams in the barrier material overlap by several inches and are sealed with appropriate tape or adhesive to prevent soil and water seepage.
Sub-step 7.3: Adding Soil and Decorative Elements
Soil Preparation:
- Soil Type: Use a high-quality garden soil mix that includes compost for nutrients. For better drainage and aeration, mix in perlite or vermiculite at a ratio of 3:1 (soil to additive).
- Filling the Boxes: Fill the planter boxes with soil up to a few inches from the top to allow space for mulching and prevent overflow when watering.
Adding Decorative Rocks:
- Path Creation: For paths inside the enclosure, lay a base layer of crushed stone for drainage, followed by a layer of landscape fabric to prevent weed growth, and top with decorative rocks or pebbles.
- Best Practice: Ensure the base layer is compacted and level before adding the top decorative layers to maintain the integrity and appearance of the paths.
Sub-step 7.4: Regular Inspection and Maintenance
Objective: Conduct regular inspections and perform necessary maintenance to ensure the structure remains sound and the appearance stays pristine.
Maintenance Schedule:
- Monthly Check: Inspect wood surfaces for signs of wear or damage. Look for any loose screws or hardware, and tighten as needed.
- Annual Treatment: Reapply wood sealer and check the integrity of the protective barriers inside the planter boxes.
- Seasonal Adjustments: Before winter, ensure that the soil and drainage systems are not compacted or blocked.
Long-Term Care:
- Structural Integrity: Regularly check the structural components, especially the roof and support pillars, for any signs of weakening or damage.
- Cosmetic Upkeep: Touch up paint or varnish as needed to keep the enclosure looking new and to provide continuous protection from the elements.
By following these detailed steps, you not only ensure that your garden enclosure is built to last but also maintain its functionality and aesthetic appeal over time. This comprehensive approach addresses all aspects of installation, protection, and long-term care, providing you with a robust and beautiful garden space.