Introduction: Why a Multipurpose Cart?
Have you ever wished you had an extra set of hands or an extra table when serving guests? How about a portable counter space when your kitchen seems too crowded? Or perhaps a stylish way to display your favorite wines? If you’re nodding in agreement, our Multipurpose Cart is the solution you’ve been searching for.
It’s a revolutionary DIY project that lets you combine all these benefits into one elegant and highly functional design. With its range of uses and easy-to-follow plan, it’s the perfect DIY project for beginners who want to dip their toes into the world of woodworking and create something truly amazing.
The Versatility of a DIY Multipurpose Cart
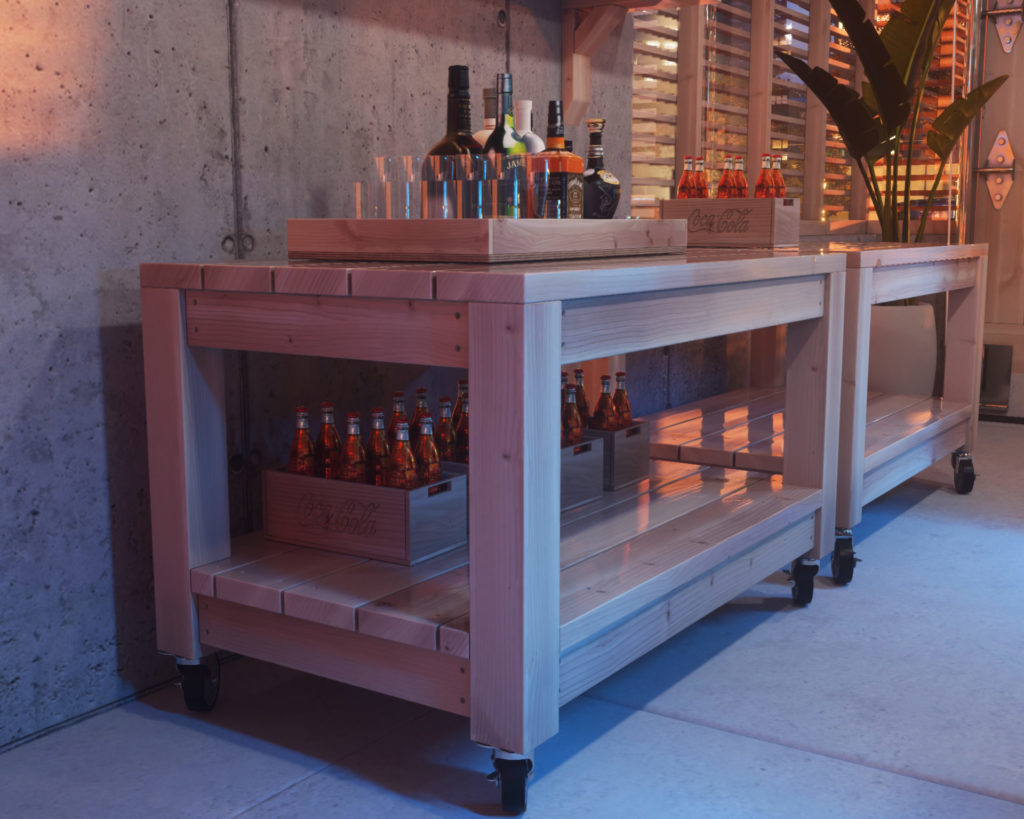
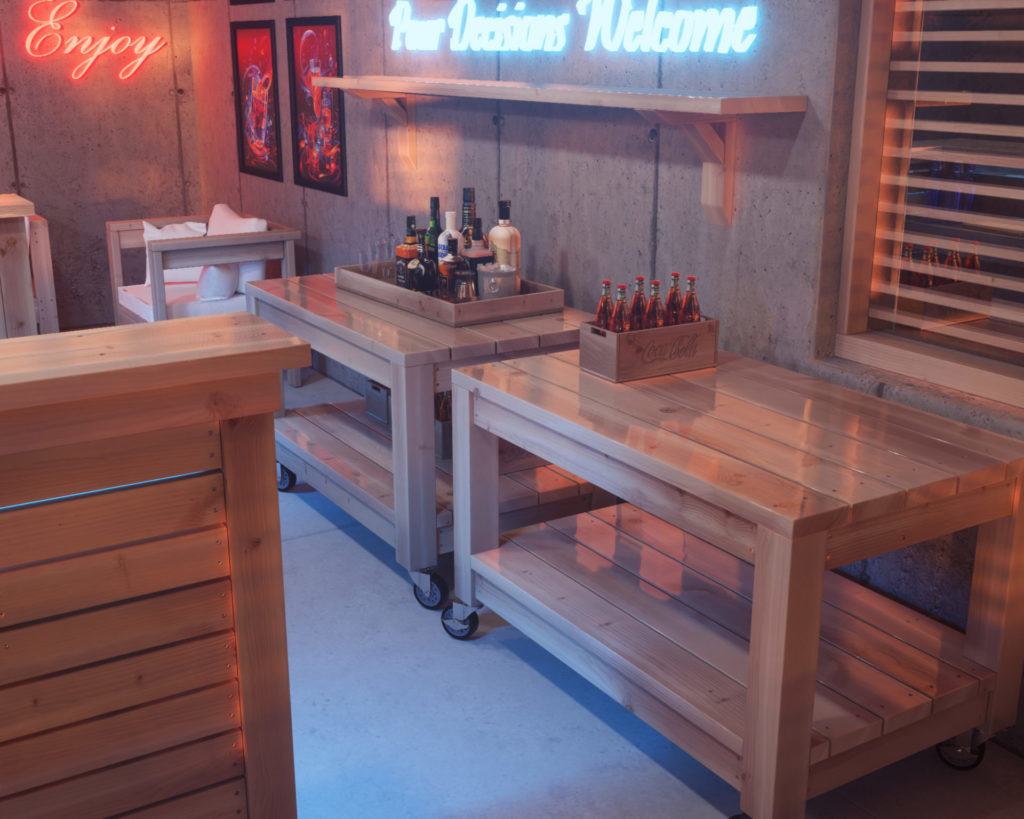
One of the key aspects that make our Multipurpose Cart unique is its sheer versatility. When we say ‘multipurpose’, we genuinely mean it. This cart has the potential to serve multiple functions within your home. It can be a serving cart for your parties, a portable bar cart for your home, a rolling kitchen cart for convenient cooking, or even a chic display rack for your prized collection of wines. Its uses are only limited by your imagination!
Our Simple Yet Elegant Design: No Fancy Woodworking Skills Needed!
What if you’re a beginner in woodworking and have never built anything before? No worries! Our design doesn’t call for any complicated joints or advanced woodworking skills. All you need is common construction lumber and some basic tools that you probably already own. With our comprehensive and easy-to-follow PDF guide, you’ll be amazed at what you can achieve.
Perfect Dimensions for Versatility and Convenience
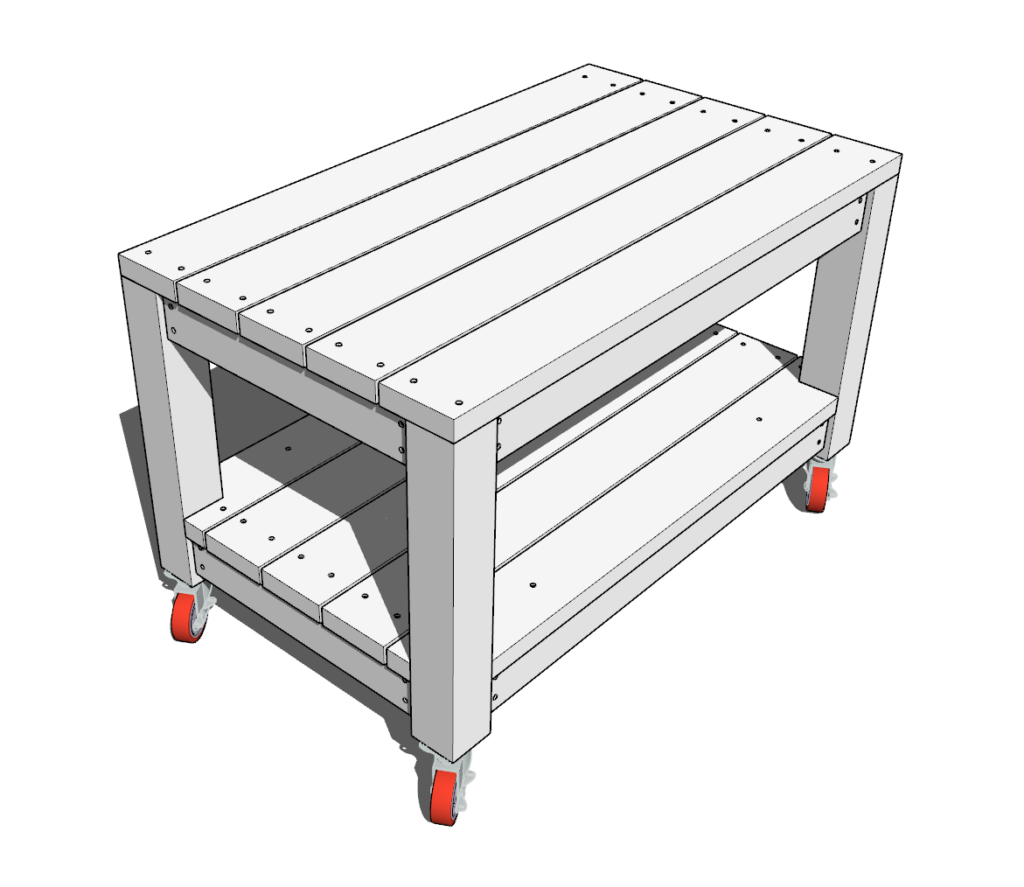
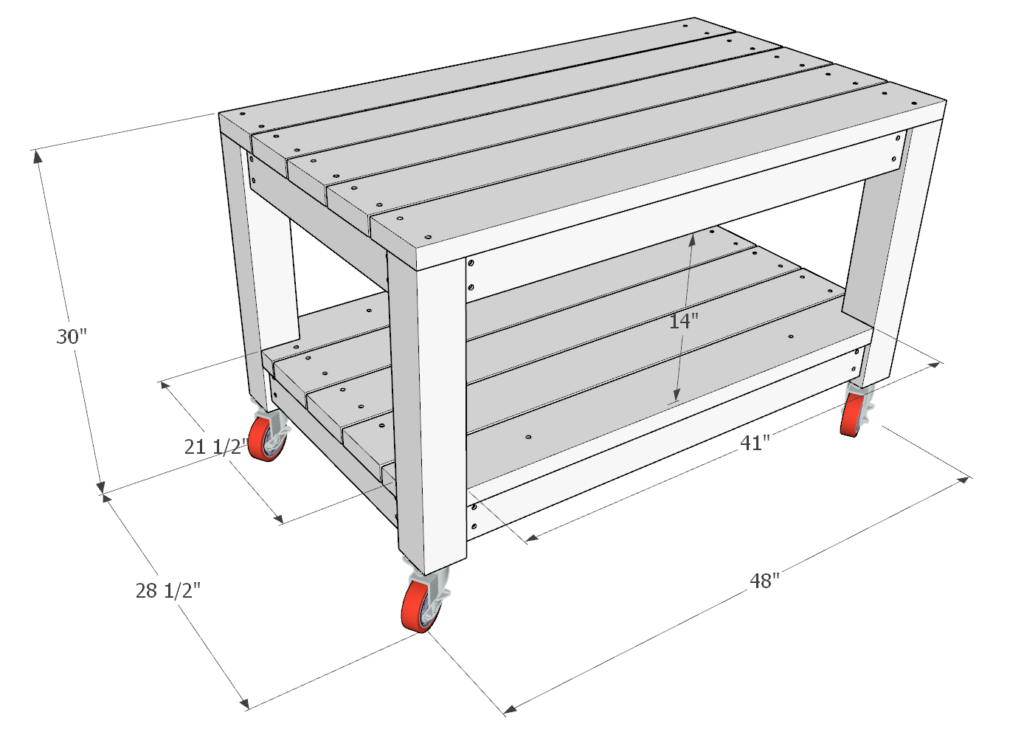
With its optimal size, our Multipurpose Cart is designed to seamlessly fit into your life. The table is 48 inches long, 28-1/2 inches wide, and 30 inches tall, which makes it suitable for a variety of applications. Whether it’s serving food and drinks at a party or providing additional counter space in your kitchen, our cart is always ready to serve.
Features & Functions of Our Multipurpose Cart Design
Our cart isn’t just versatile; it’s also incredibly functional. We’ve added thoughtful features like a spacious tabletop, a bottom shelf, and lockable wheels for added convenience and ease of use. The height between the top shelf and the bottom shelf is 14 inches, giving you plenty of room to store your essentials.
Spice Up Your Outdoor Gatherings with Your DIY Cart
Not only is our cart perfect for indoor use, but it also shines in the great outdoors. Thanks to its lockable wheels and durable construction, it can easily be used as an outdoor serving cart. Whether you’re hosting a barbecue party or a pool party, your DIY cart will surely be a hit among your guests.
A Rolling Kitchen Cart: The Organizational Solution You Need
Having trouble organizing your kitchen essentials? Our Multipurpose Cart doubles as a rolling kitchen cart, providing additional storage space for your kitchen tools and ingredients. And the best part? The wheels come with locks, so you can easily keep it in place when you’re using it.
Add Counter Space with Our Portable Kitchen Island
Speaking of kitchens, our Multipurpose Cart can also function as a portable kitchen island. If you’re frequently finding yourself running out of counter space, this cart can serve as a lifesaver. Thanks to its mobile nature, you can move it around to wherever you need extra counter space.
Lockable Wheels: Convenience at Your Fingertips
Our DIY Multipurpose Cart is not just another piece of furniture; it’s a mobile solution to a plethora of your needs. Equipped with 4 swivel casters, it easily moves through different rooms and spaces. The casters rotate 360 degrees, making navigation a breeze. Best of all, the wheels are lockable. This feature provides both mobility and stability, ensuring the cart stays put when you need it to.
Quality Material for Long-lasting Service
When it comes to creating something for your home, quality should never be compromised. That’s why we’ve designed this cart with a sturdy wood and metal frame. The solid wood construction not only promises longevity but also brings a touch of classic elegance to the design. We chose these materials for their durability, so you can trust that your multipurpose cart will serve you well for years to come.
Make It Your Own: Customizing Your DIY Cart
Another beauty of DIY is the customization it allows. Our DIY Multipurpose Cart can be tailored to your preferences. Whether it’s the finish on the wood, the color of the frame, or the type of wheels, you can make it uniquely yours. This customization empowers you to create a cart that seamlessly fits your décor and personal style.
How You Will Benefit from Our Detailed Step-by-Step PDF Guide
With our comprehensive guide, you won’t be left guessing or making mistakes. We’ve created a step-by-step PDF guide that takes you through the entire process of building your DIY Multipurpose Cart. This guide ensures a smooth build process, providing you with helpful tips, instructions, and visuals along the way. It’s like having a seasoned woodworker guiding you through each step.
Investment vs. Benefits: The Cost-effectiveness of DIY
One might think that creating a multifunctional piece of furniture like our Multipurpose Cart would be an expensive venture. However, that’s far from the case! When you compare the cost of purchasing a similar ready-made piece of furniture, building your own turns out to be a much more cost-effective solution. Plus, there’s the added benefit of learning new skills and experiencing the satisfaction of building something with your own two hands.
Conclusion: Unleashing Your Inner Craftsman with Our DIY Multipurpose Cart
It’s amazing how a single piece of furniture can serve a multitude of purposes, and the satisfaction of building it yourself is truly unparalleled. Our DIY Multipurpose Cart offers you that unique opportunity to blend functionality with elegance while also honing your crafting skills.
With this project, you’re not just creating a piece of furniture; you’re creating an experience. The simple pleasure of working with your hands, the anticipation of seeing the finished product, and the joy of using something you’ve created yourself – all these make the DIY journey worthwhile.
The step-by-step guide, along with our comprehensive PDF plan, ensures you’re well-equipped to take on this project, even if you’re a beginner in woodworking. The result is a stunning, multifunctional cart that fits perfectly into your lifestyle, serving your needs and adding charm to your space.
We hope this article has sparked your interest in DIY and our multipurpose cart. We invite you to take that first step, pick up your tools, and join the community of DIY enthusiasts who find joy, satisfaction, and empowerment through creating. Unleash your inner craftsman with our DIY Multipurpose Cart and experience the magic of creation!
In closing, we hope you’ll join us on this DIY journey. Let’s start building!


Time to build
3 hours
Total cost of build
About $150
Skill level required
Beginner
Download the PDF plans
Plans for how to build the DIY Multipurpose Cart.
What is included in the PDF download?
- Easy to read step by step instructions
- Material list
- Cut list
- Tools needed
- 3D illustrations
- Helpful links to tools and materials needed for the project
Recommend tools for this project
- Saw (miter saw recommended for precision cuts)
- Drill
- Impact driver with bit for screws
- Sander
- wood countersink drill bit
- measuring tape
- Ratchet straps
- about 10lbs of 3.5 in long screws (highly recommend T25 Star Drive screws)
- Wood glue
- Sand paper
- 4 inch caster wheels (Many other options work just fine as well)
- 5 inch screws for attaching the wheels and wheel support
Affiliate links
Wood purchase list and cut list
Available with purchase of PDF plans.
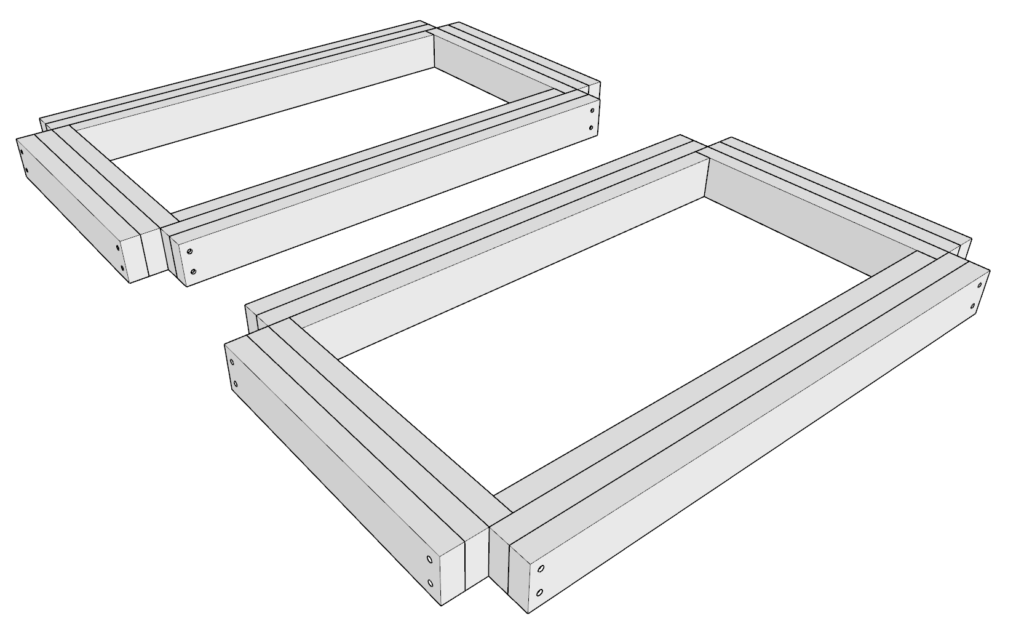
Step 1
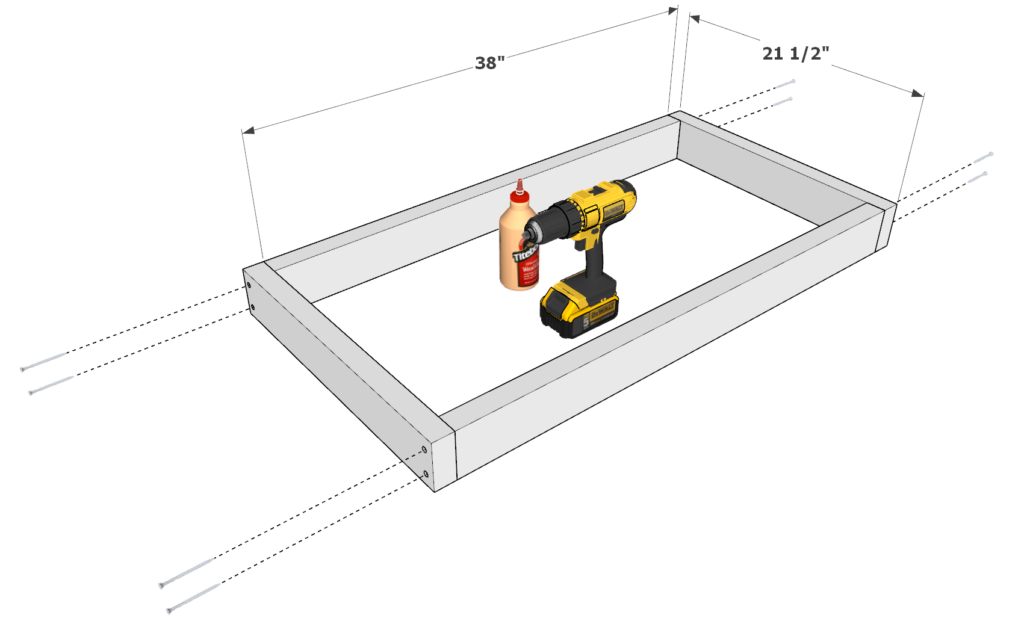
First, we will build up the frame of the multi-functional cart.
Take two 21-1/2 inch 2×4 lumber pieces and two 38 inch 2×4 lumber pieces and arrange them as shown in the first image below.
Join the lumber pieces by adding glue to all areas that are making contact, predrill the holes for the screws to prevent wood from splitting, and add 3.5 inch screws.
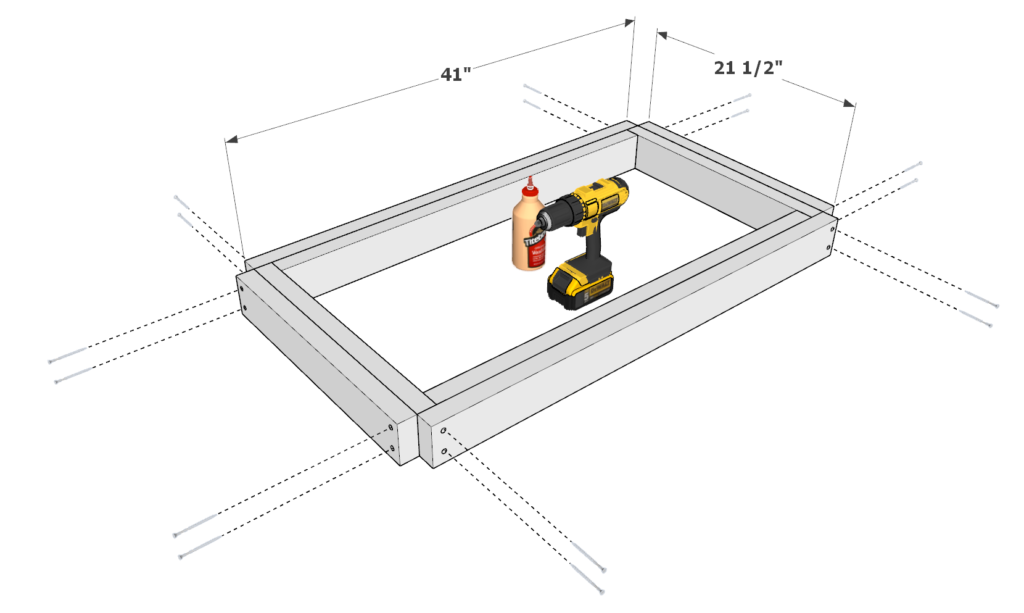
Next, build up the second layer of the frame. Take two 21-1/2 inch 2×4 lumber pieces and two 41 inch 2×4 lumber pieces and arrange them as shown in the second image below.
Join these in the same way as before but don’t forget to add glue to ALL areas that will be making contact. This means gluing the entire sides of the 2×4 faces that are touching.
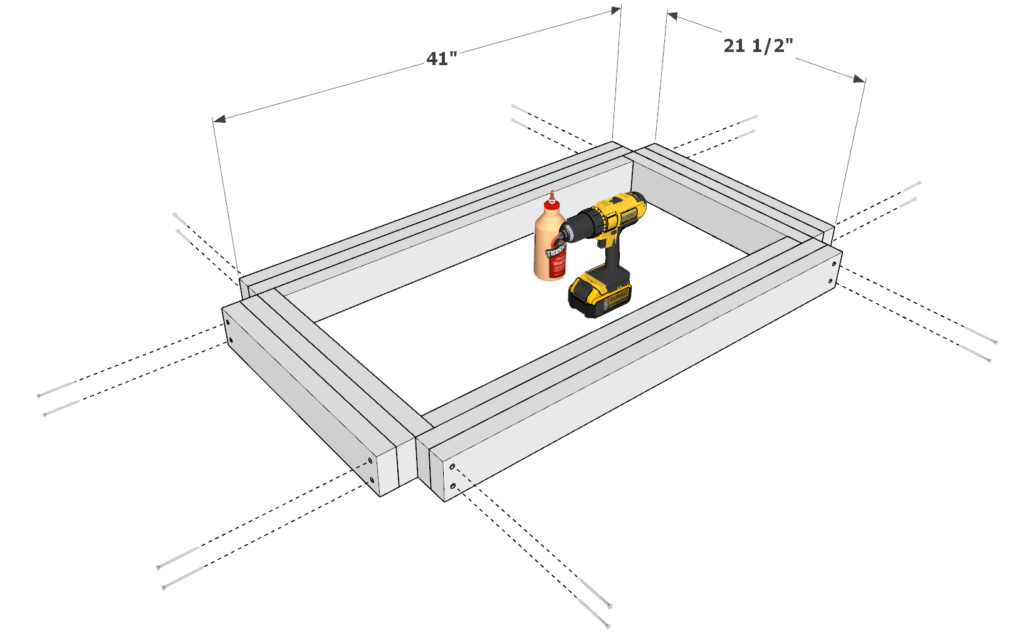
Next build the final layer of the frame. Take two 21-1/2 inch 2×4 lumber pieces and two 41 inch 2×4 lumber pieces and arrange them as shown in the second image below. Join these in the same way as before.
Make two identical frames.
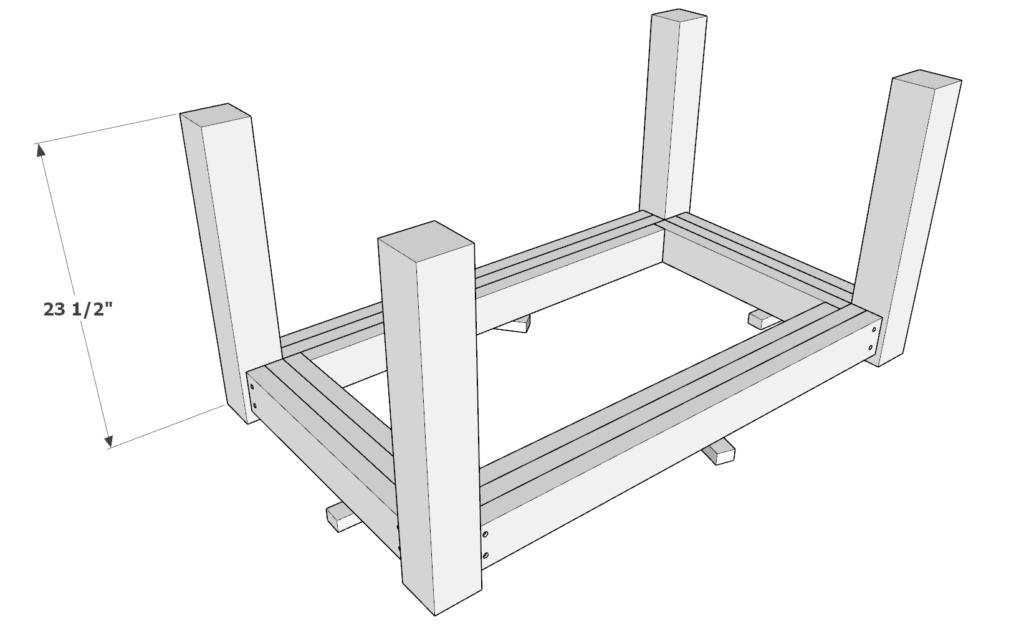
Step 2
Next we will be attaching the legs to the frame.
Take one of the frames you built in the previous step and lay it on top of some 1 inch spacers. These spacers can be cut from scrap wood.
Next, add four 24-1/2 inch 4×4 lumber pieces to the frame. Add generous amounts of glue to all areas that will be joined together.
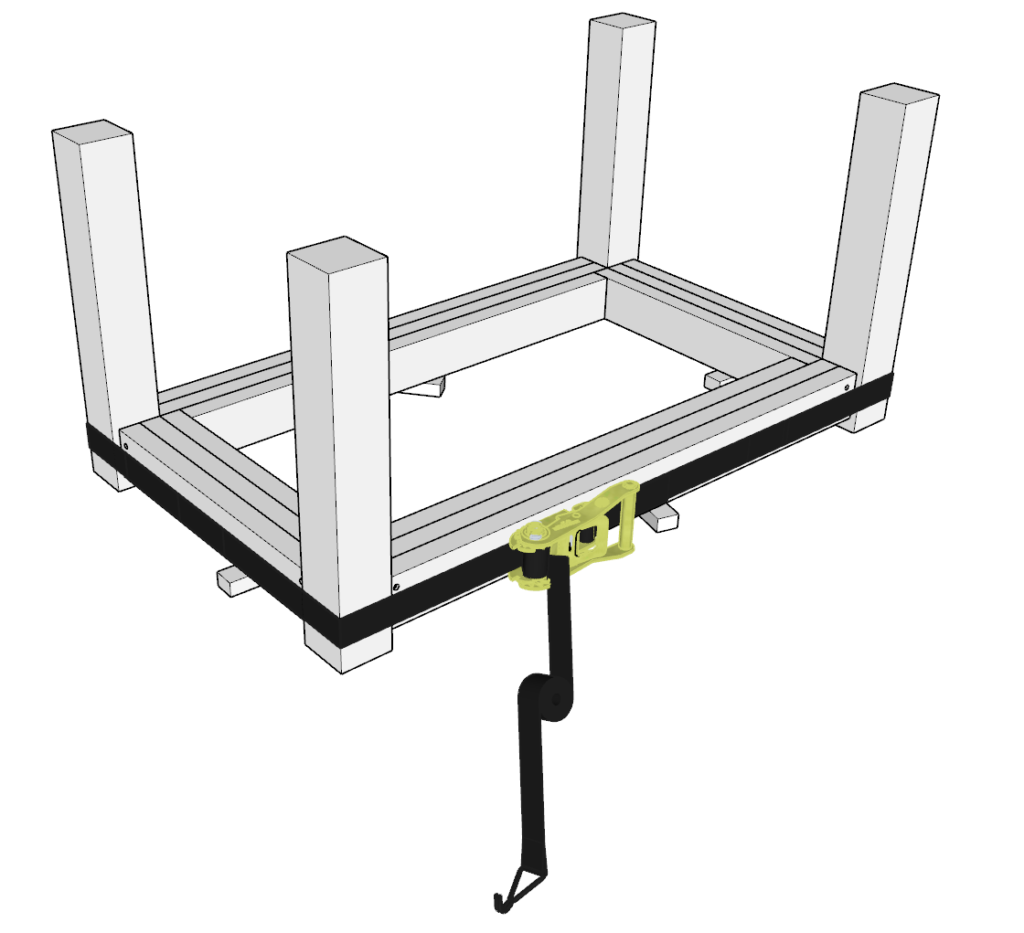
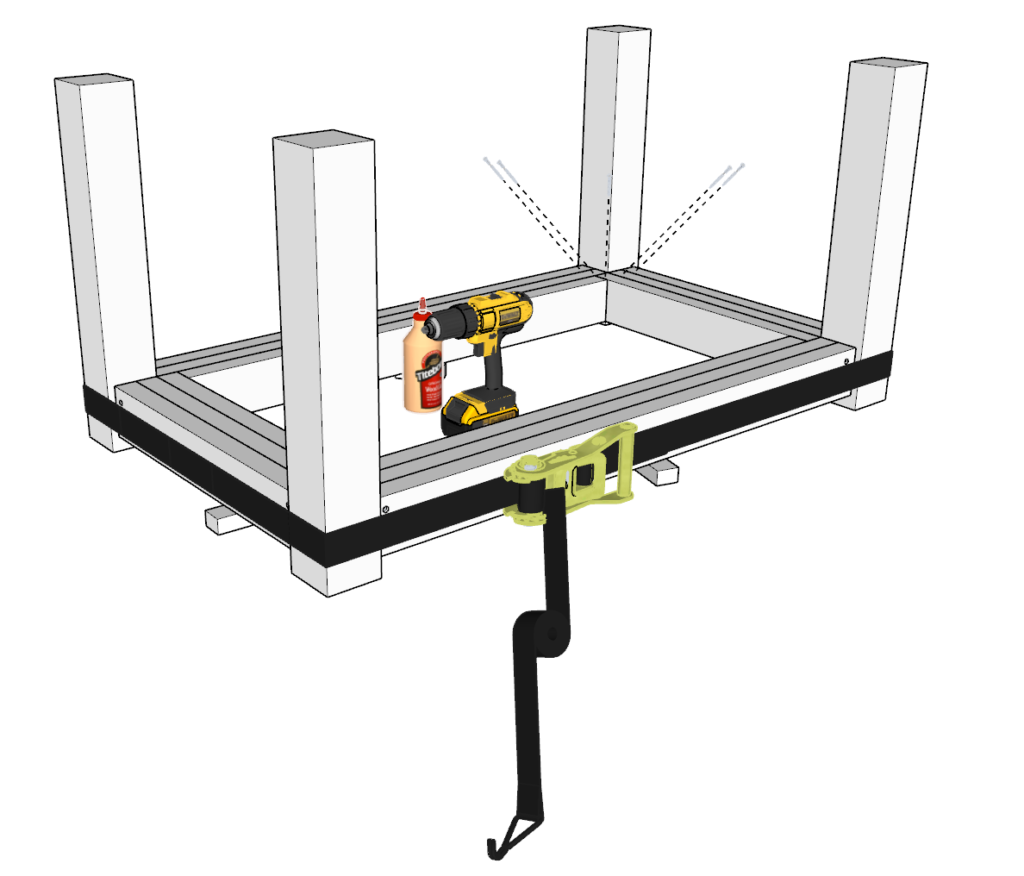
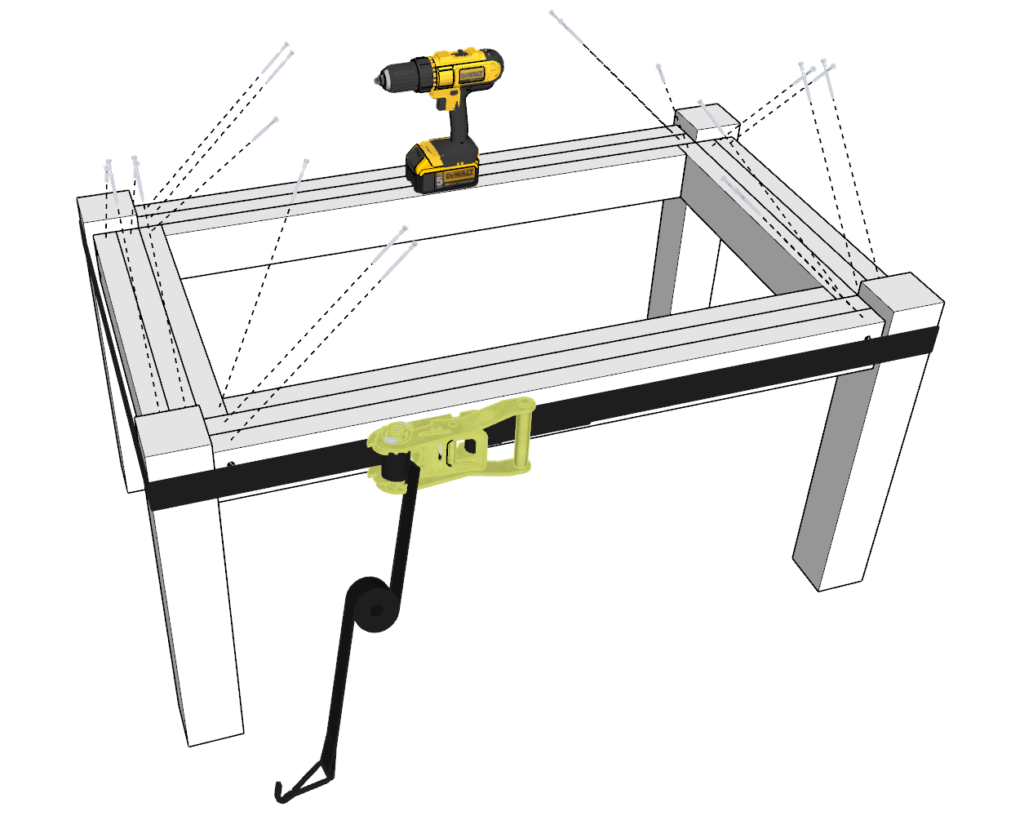
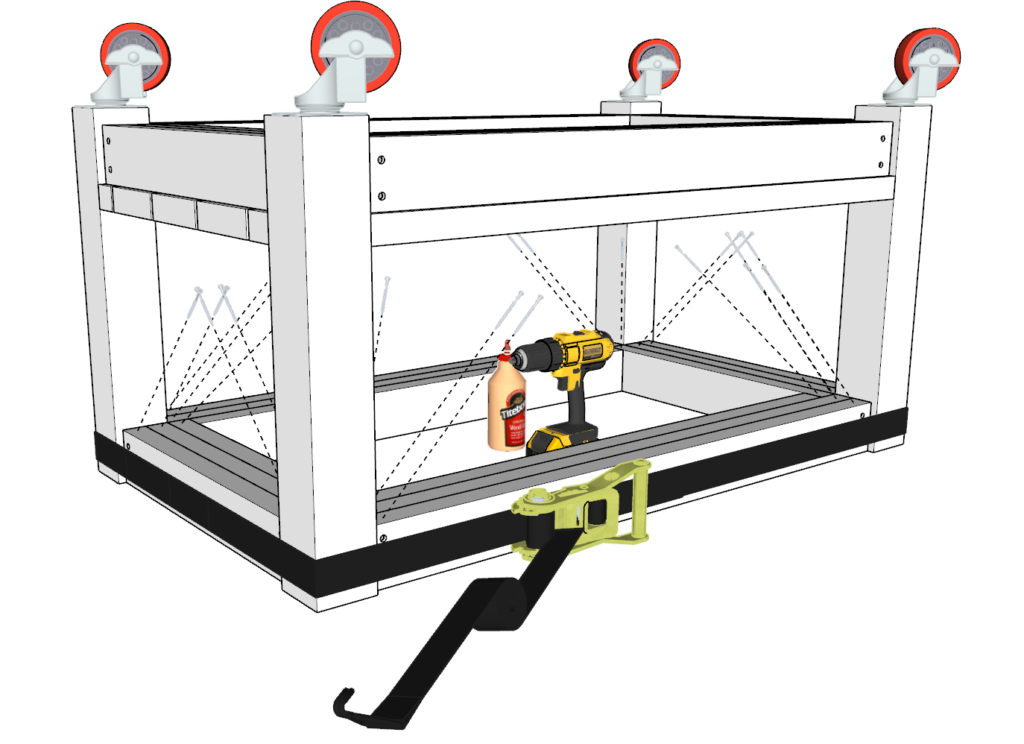
Next, take a ratchet strap and loop it around the island table legs as shown below. Tighten the straps well but not “all the way.” At this step “hammer” into place any stubborn legs or frame part that are not lining up. Once you have the perfect alignment, tighten the straps very tightly so that the 4x4s can not move.
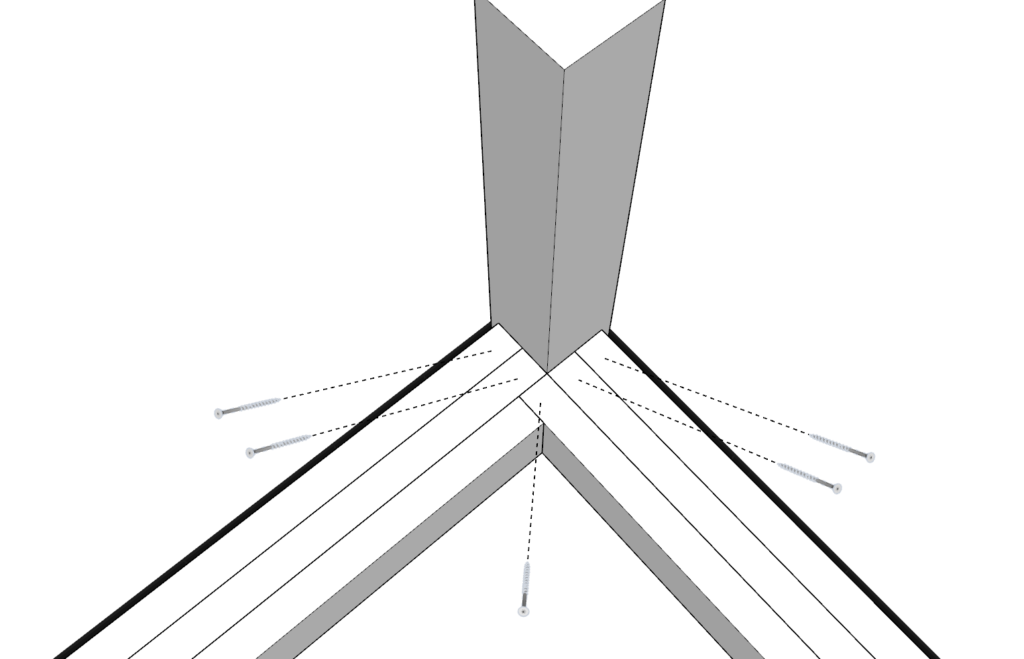
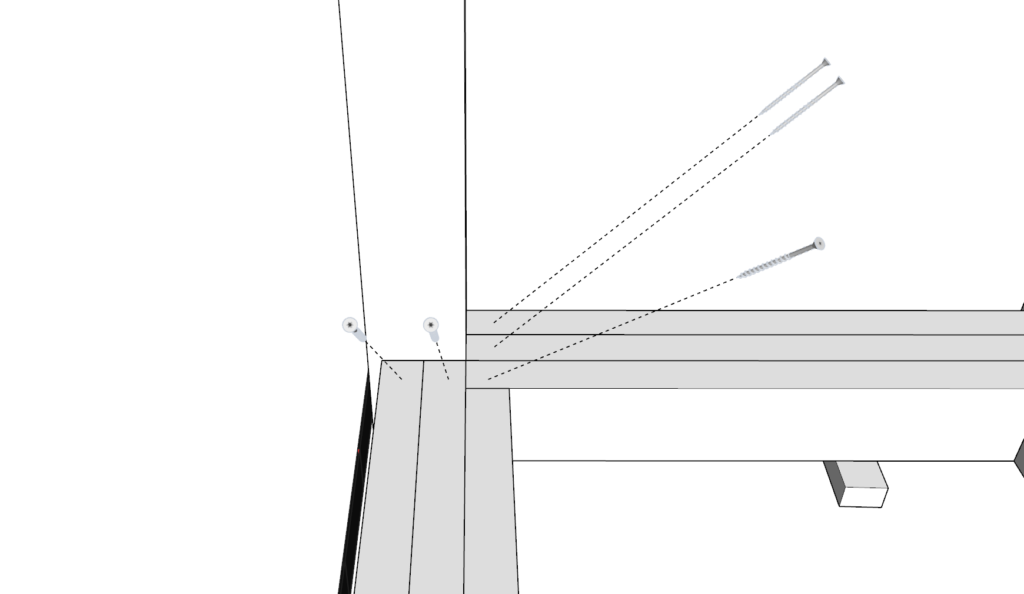
Next, add 3.5 inch screws as shown below. Predrill, and add the screws deep so that they make a good connection with the 4x4s. Repeat this for all four legs.
Step 3
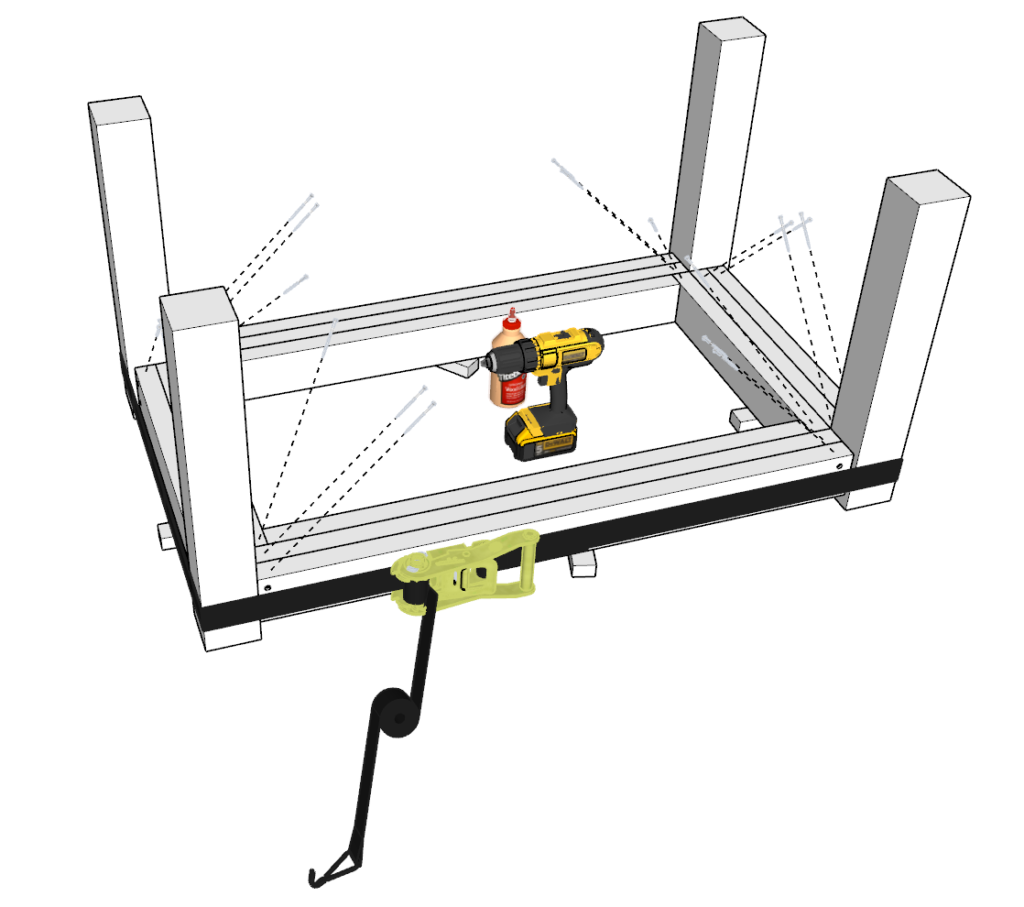
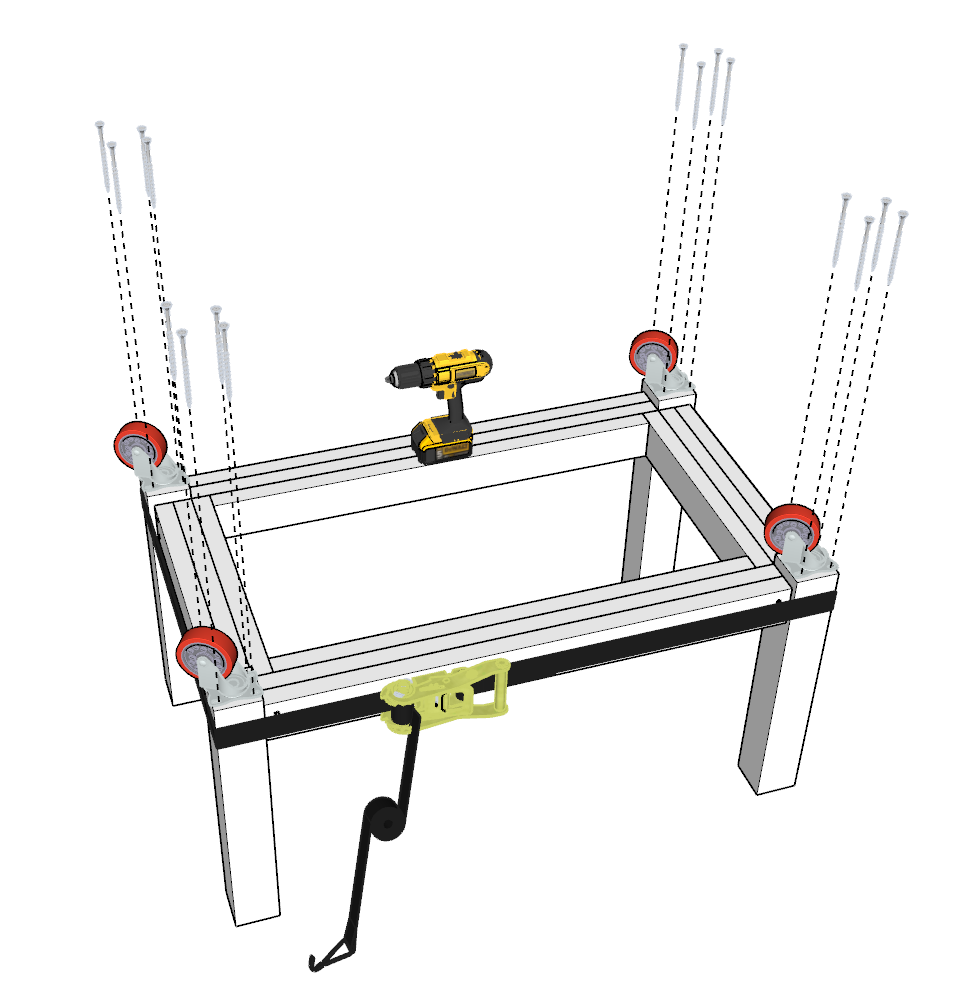
Next, flip the multi-functional cart and over and add 3.5 inch screws in the same pattern as in the previous step.
Make sure you have someone to flip the table with. DONT PUT PRESSURE ON THE TABLE LEGS UNTILL THEY ARE FULLY ATTATHED. Pressure before that can cause the leg joints to be weak.
Next, attach the four wheels to the grill table. Predrill using a wide drill bit to accommodate the larger 5 inch screws. Predrilling here is VERY important to prevent the 4x4s from splitting.
Step 4
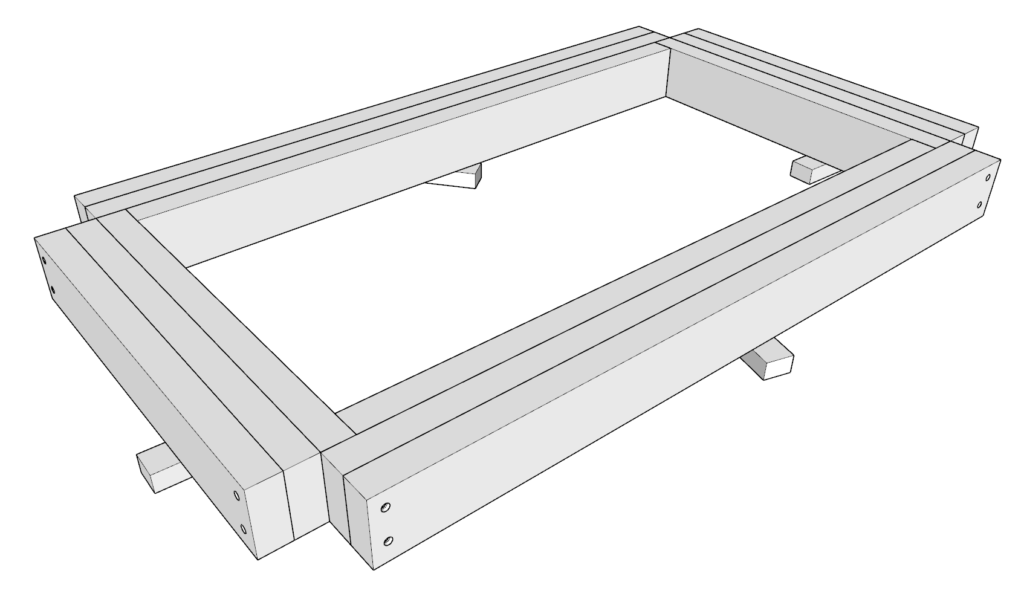
Next, attach the bottom shelf decking pieces to the main frame of the multi-functional cart.
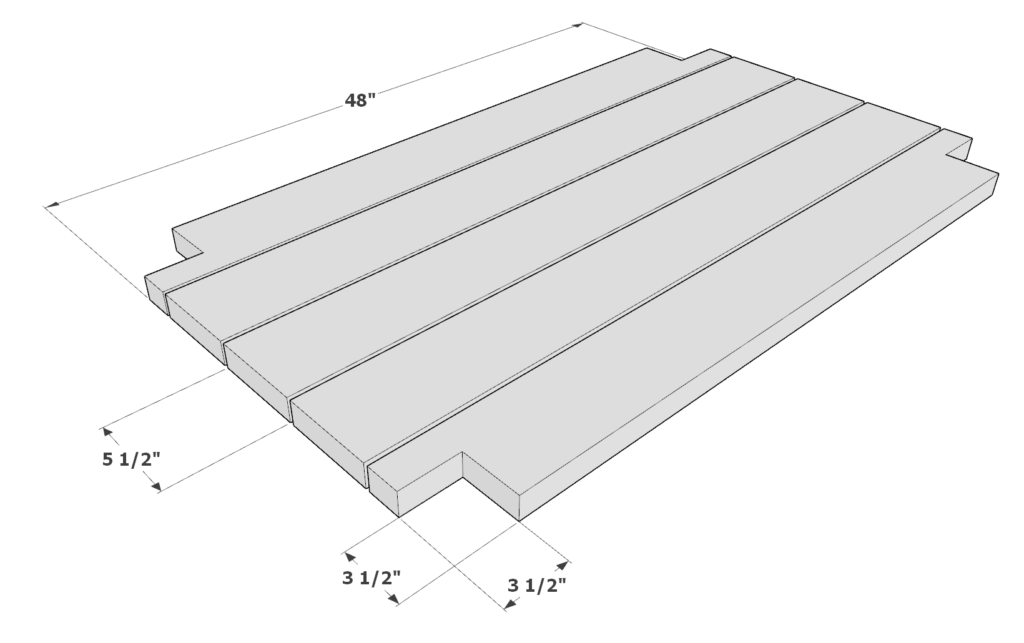
Take five 48 inch 2×6 lumber pieces. Cut 3.5 in x 3.5 in indents in two of the 2×6 lumber pieces on both sides as shown below.
Next, insert all the 2×6 decking pieces and attach them with glue, and 3.5 inch screws. These boards should be about 1/4 inches apart. Make sure you predrill.

Step 5
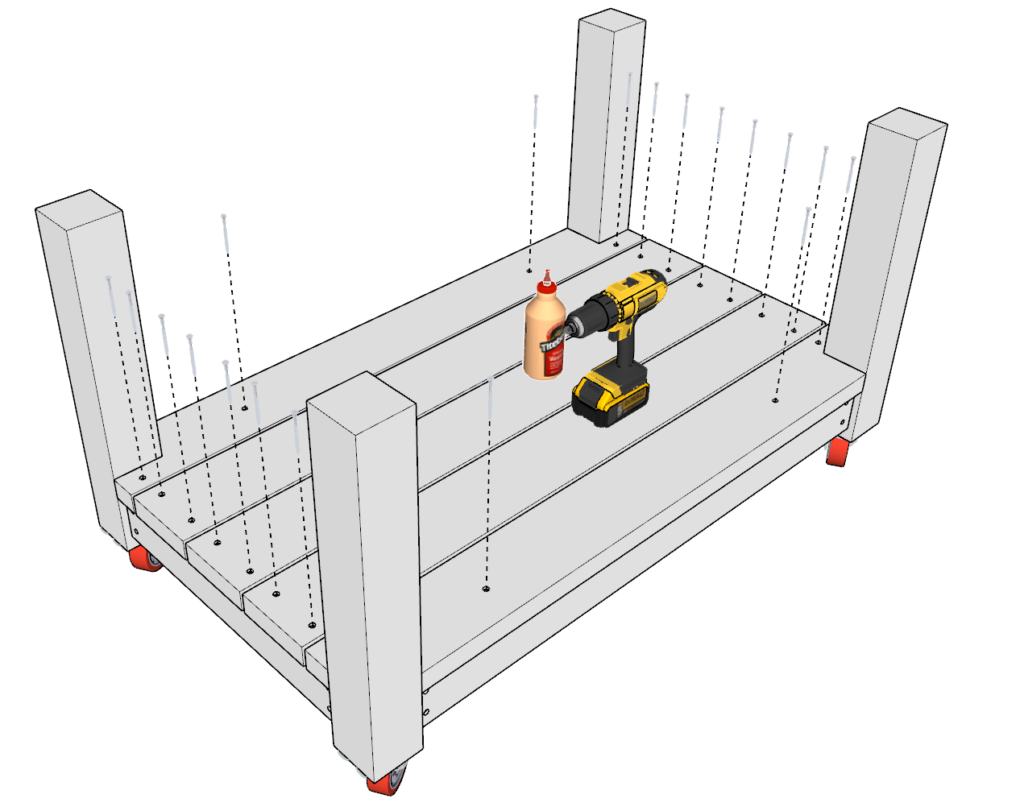
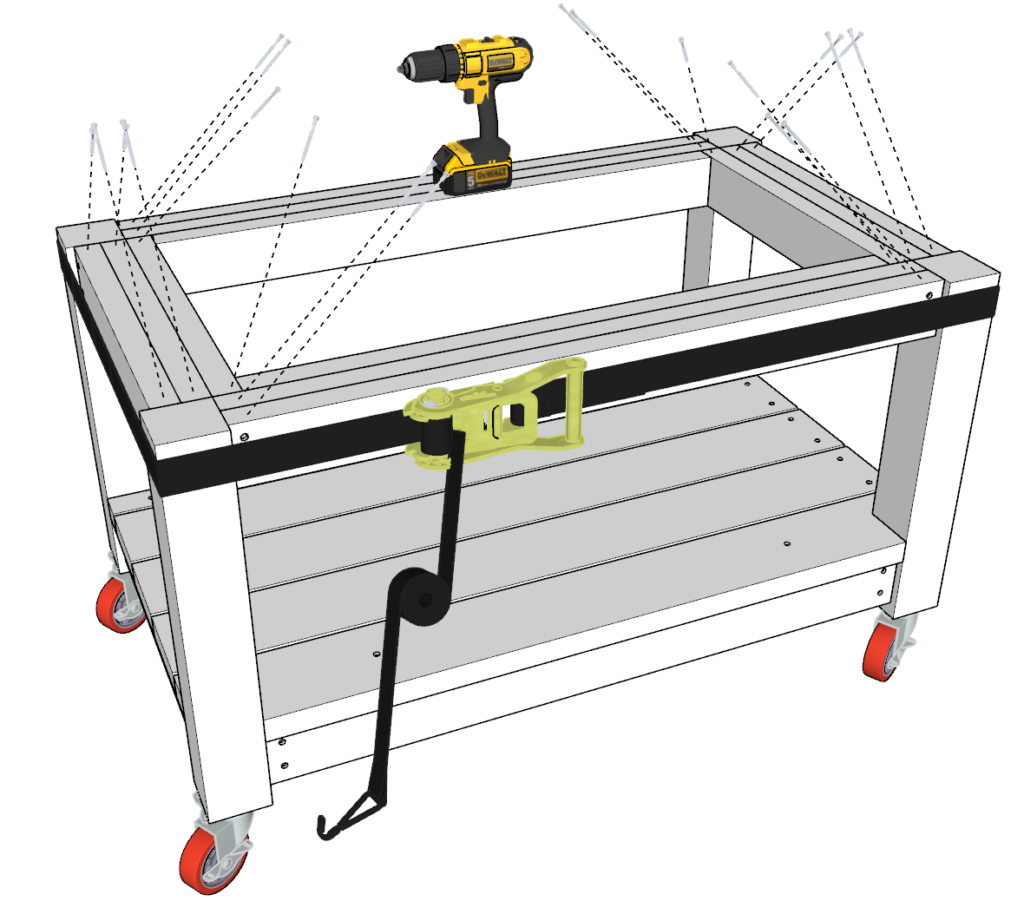
Next, attach the second frame piece you built in the first step to the main frame of the multi-functional cart.
Ad before, add glue, add straps, “hammer” into place any stubborn parts, tighten straps all the way, add 3.5 inch screws, flip the rolling table, add 3.5 inch screws to the top as well.
Step 6
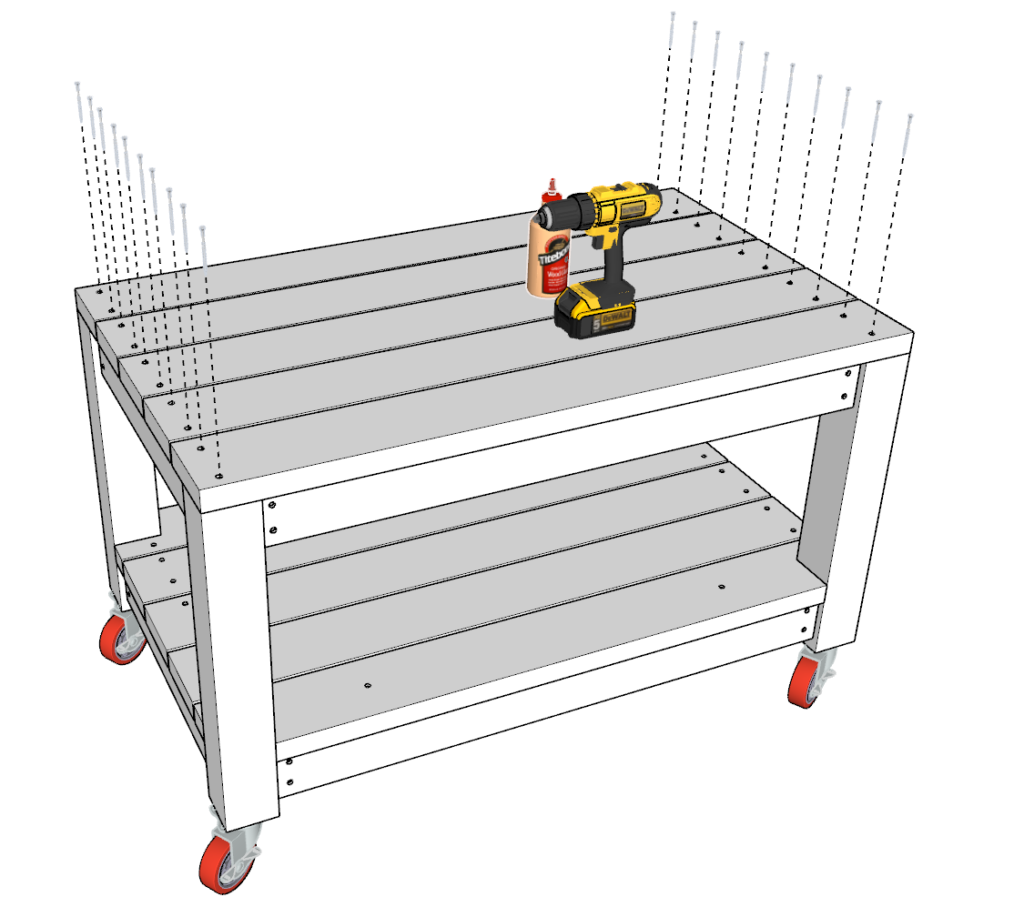
Next, attach the table top boards and perform finishing touches on the multi-functional cart.
Take five 48 inch 2×6 lumber pieces and arrange them as shown below. Space them out again about 1/4 inches apart and attach them using glue, predrilling, and 3.5 inch screws.
Lastly sand down the whole table. I start with a 80-grit sand paper to take out all major imperfections, next I follow with a 220 grit sandpaper to ensure a smooth surface that is ready for staining or painting. I use an orbital sander to speed up the process of sanding.