Introduction: Creating Space with Style - The Full Over Full Bunk Bed
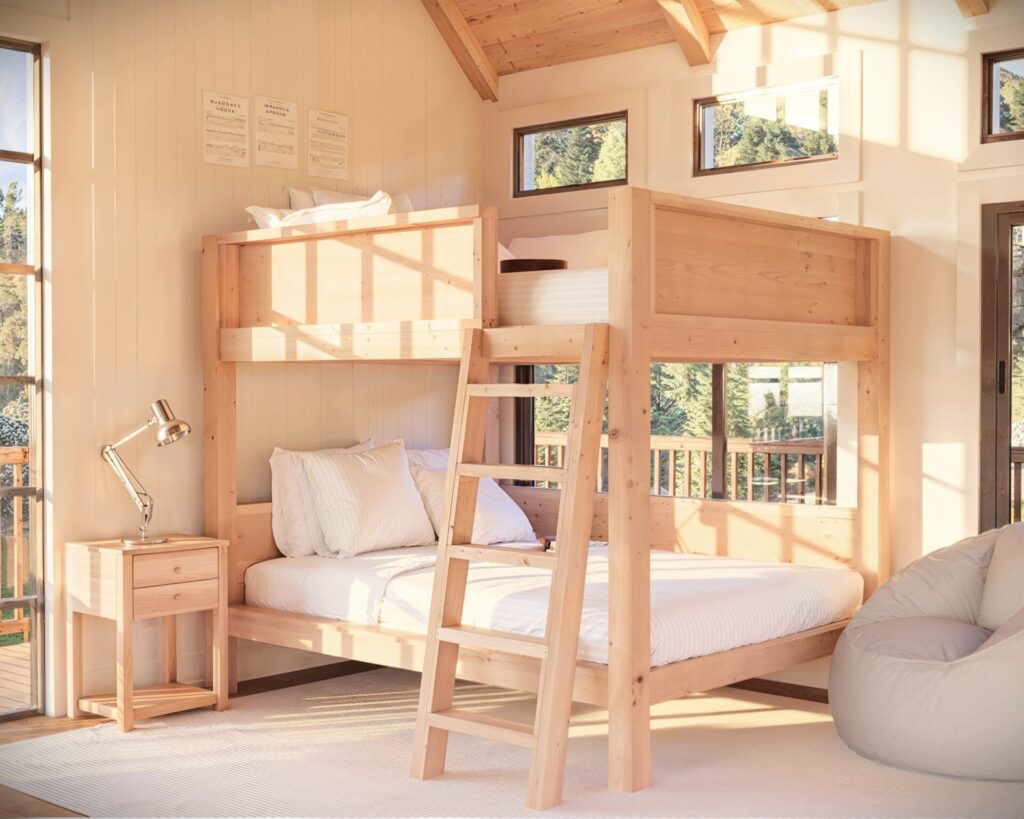
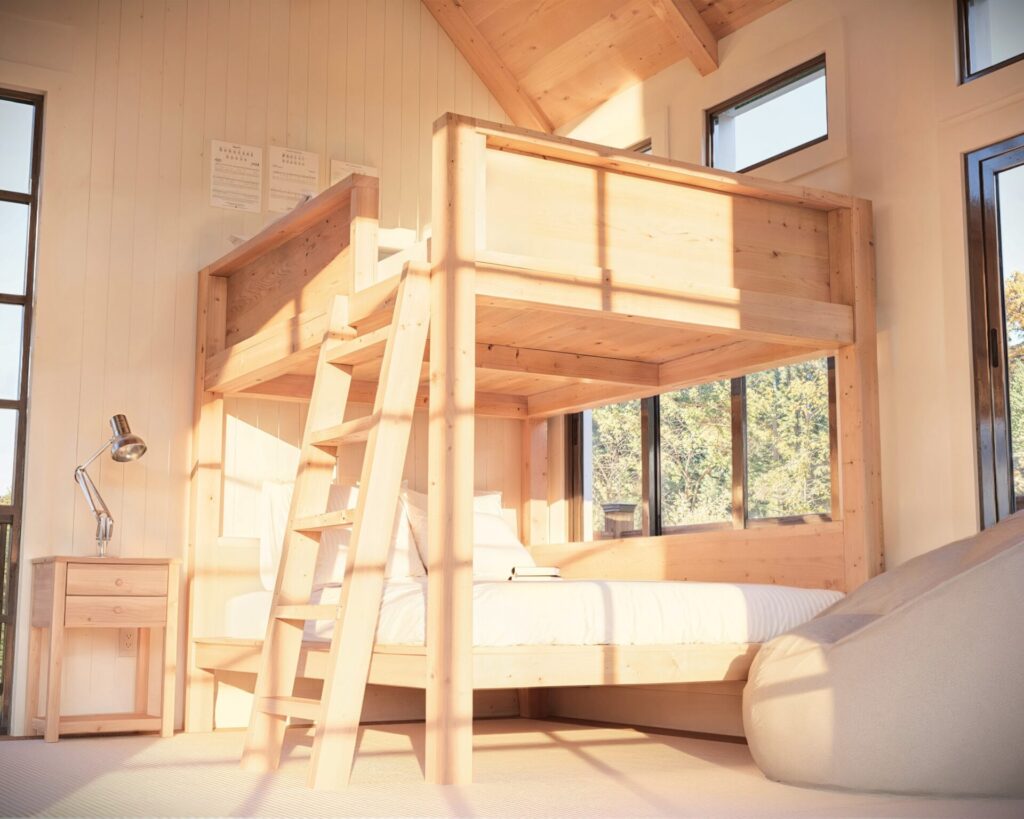
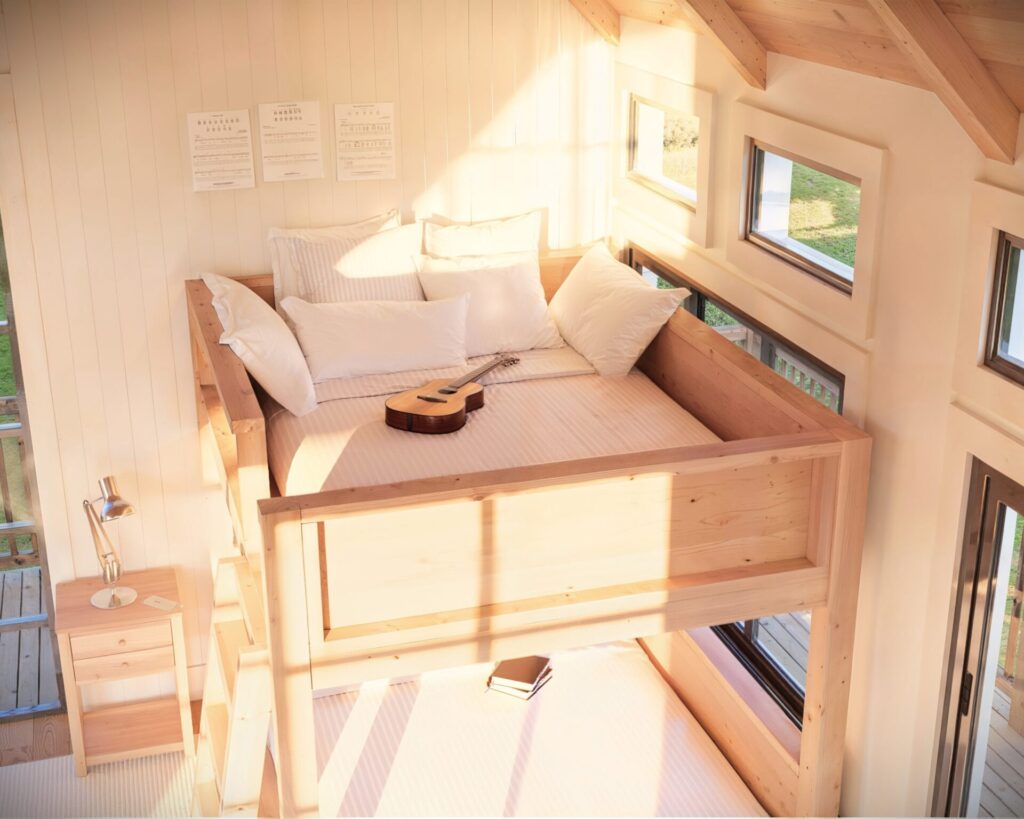
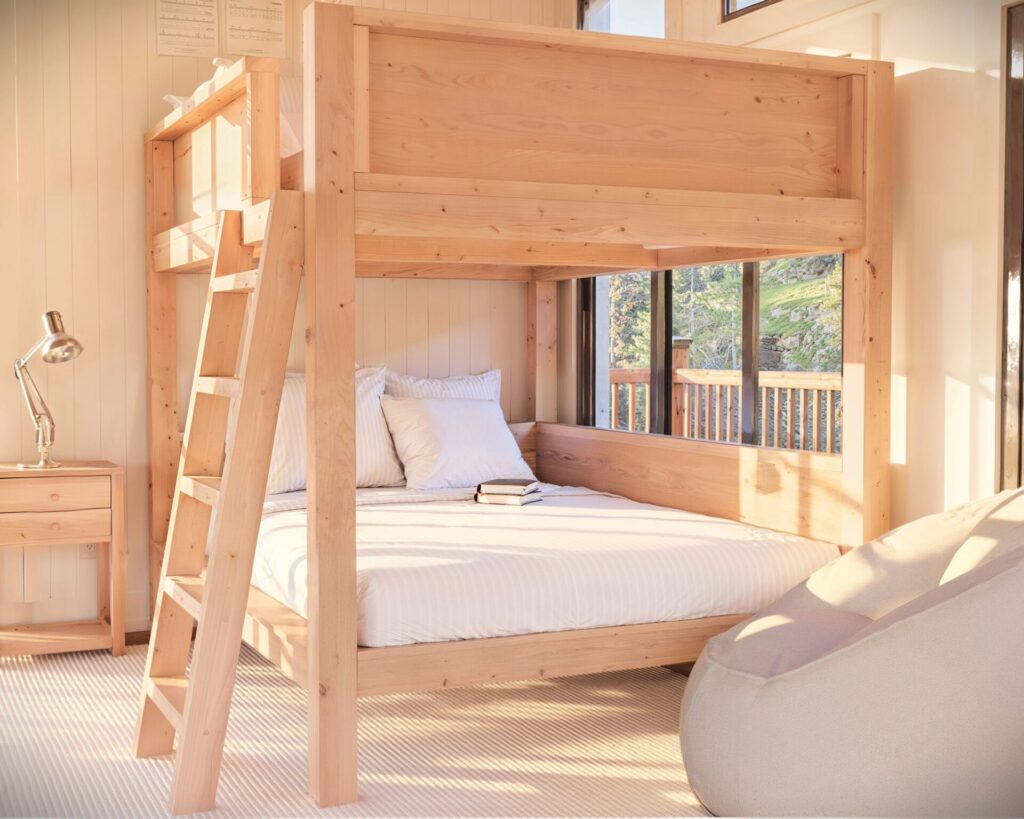
Welcome to the innovative solution that fits perfectly into your bedroom—the DIY Full Over Full Bunk Bed Plans. Whether you’re looking to save space in a shared children’s room or preparing a comfortable guest sleeping area, our plans offer a detailed guide to crafting a durable and stylish bunk bed. This project not only maximizes vertical space but also enhances the functionality and aesthetics of any room.

Specifications: Design Details and Material Choices
Dimensions:
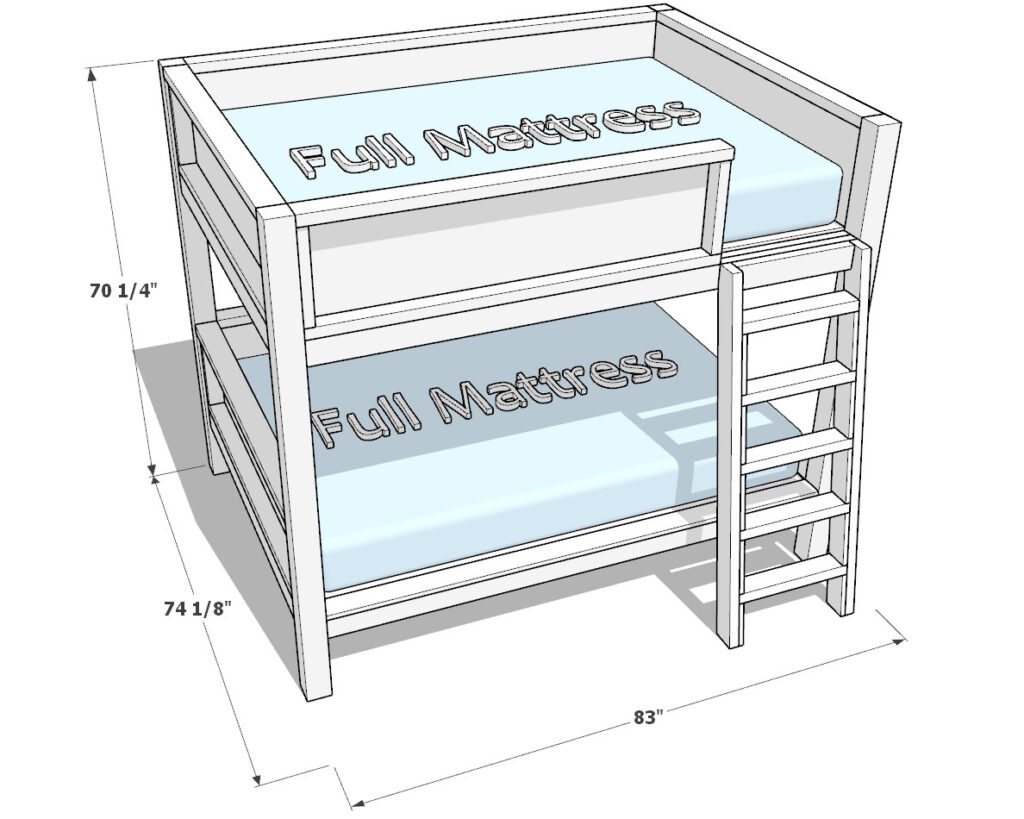
- Overall Size: 83 inches long, 74 1/8 inches wide, and 70 1/4 inches high.
- Mattress Fit: Designed to accommodate two full-size mattresses.
Materials:
- Dimensional Lumber and Plywood: Provides the sturdy framework and secure mattress support.
- Wood Options:
- Redwood: Offers a beautiful natural look with a warm tone, ideal for creating a visually appealing interior piece.
- Cedar: Light and easy to work with, it has a pleasant aroma that adds to its indoor appeal, though it is softer and may scratch more easily.
- Pine: Economical and highly versatile, easy to paint or stain, though it can be prone to dents and scratches due to its softer nature.
- Douglas Fir: Known for its strength and durability, making it a great choice for a robust structure, but its harder surface can be more challenging to work with.
Components:
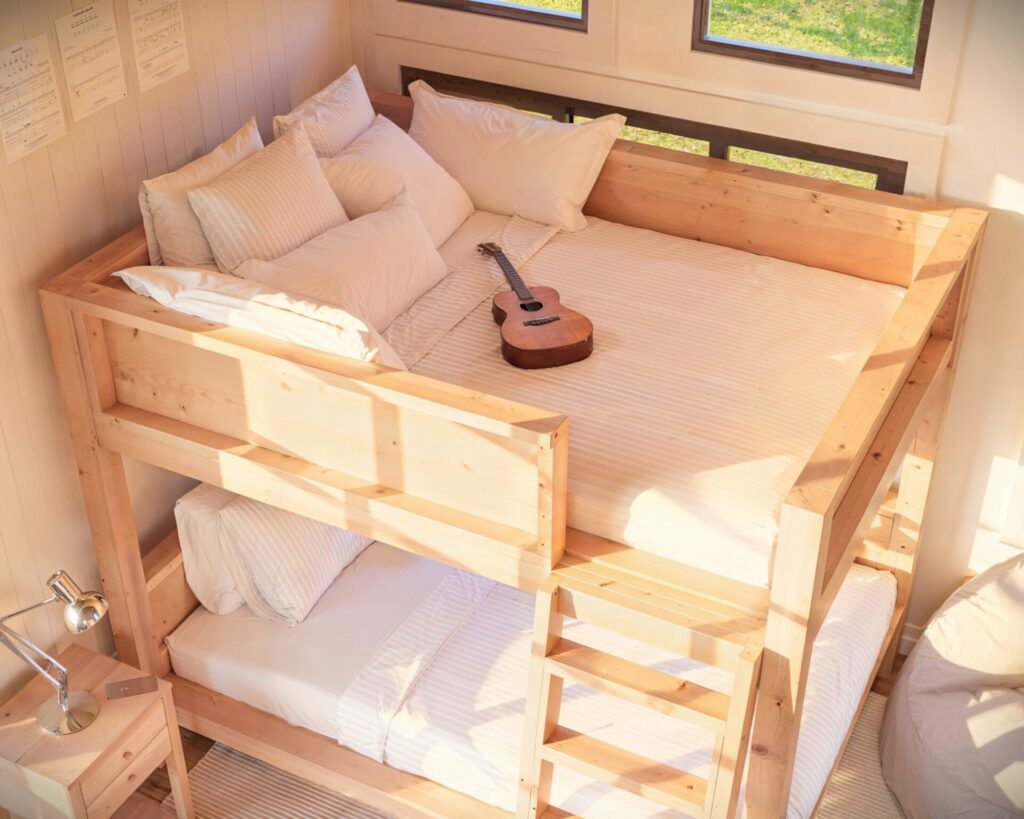
- Bed Frames: Two full bed areas for ample sleeping space.
- Ladder: Securely attached for safe access to the upper bunk.
- Safety Railing: Runs along the upper bunk for added safety during sleep.
What You Get with the PDF Plan Download
Comprehensive Guide:
- Visual Diagrams: Clear, detailed images to guide each step of the assembly.
- Written Instructions: Easy-to-follow instructions that simplify the building process.
- Cut List: Precise measurements for cutting the lumber, ensuring minimal waste and accuracy.
- Shopping List: A detailed list of all materials and tools needed, organized for convenience.
- Materials List: Specific recommendations for the best materials to use for longevity and aesthetics.
Conclusion
Ready to enhance your living space? Building this full over full bunk bed is more than just a weekend project; it’s an opportunity to create a functional and beautiful piece of furniture that will serve your family for years to come. With our detailed plans, even first-time builders can confidently tackle this project, resulting in a practical and attractive addition to your home.
Join a community of DIY enthusiasts who have transformed their homes and maximized their space with our easy-to-follow plans. Begin your DIY journey today and enjoy the satisfaction of building something truly special for your home.
Time
(varies with experience)
Cost
Estimated Built Cost $500:(Note: Costs can vary by location and supplier.)
Skill level required
Beginner
DIY Full Over Full Bunk Plans
What is included in the PDF download?
- Easy to read step by step instructions
- Material list
- Tools needed
- Helpful links to materials and tools needed
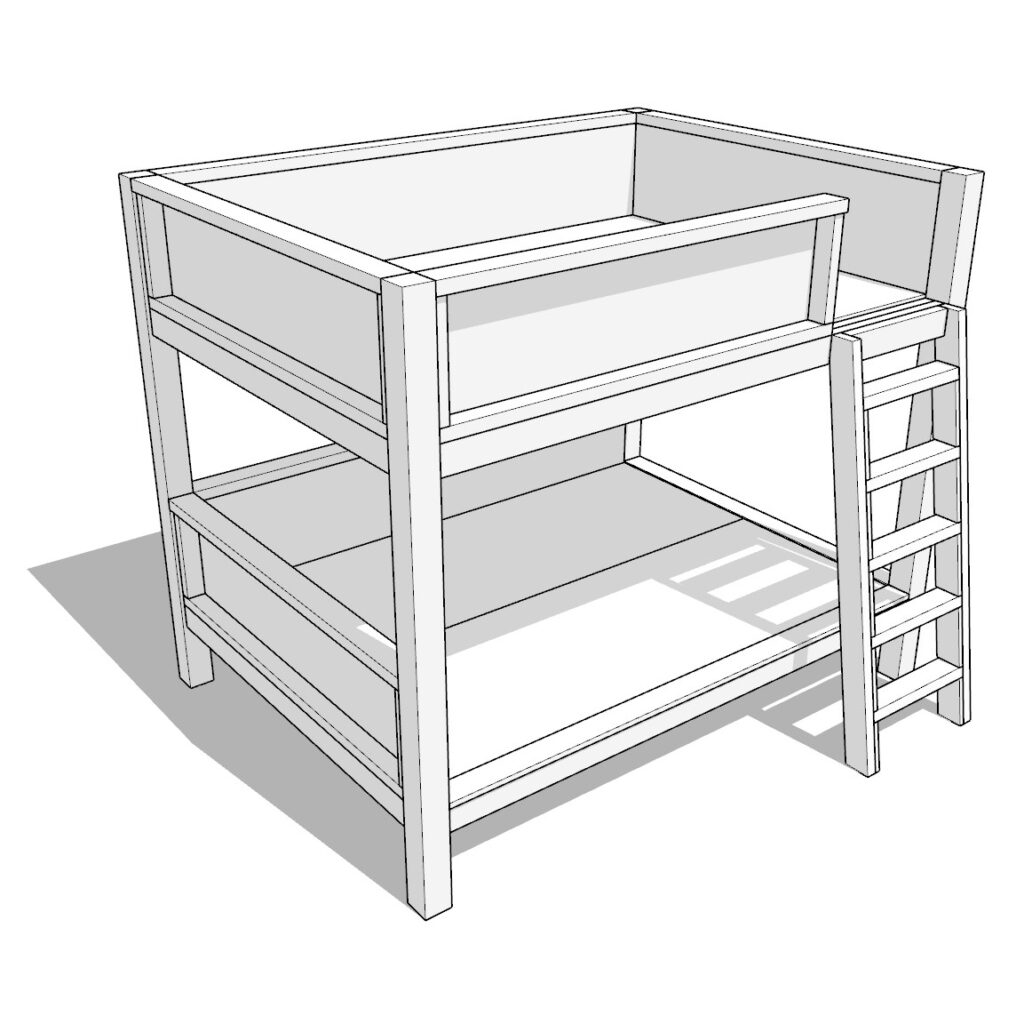
DIY Full over Full Bunk Bed Dimensions
Tools and Materials:
Available with the purchase of the DIY plan PDF.
Lumber Shopping & Cut List:
Available with the purchase of the DIY plan PDF.
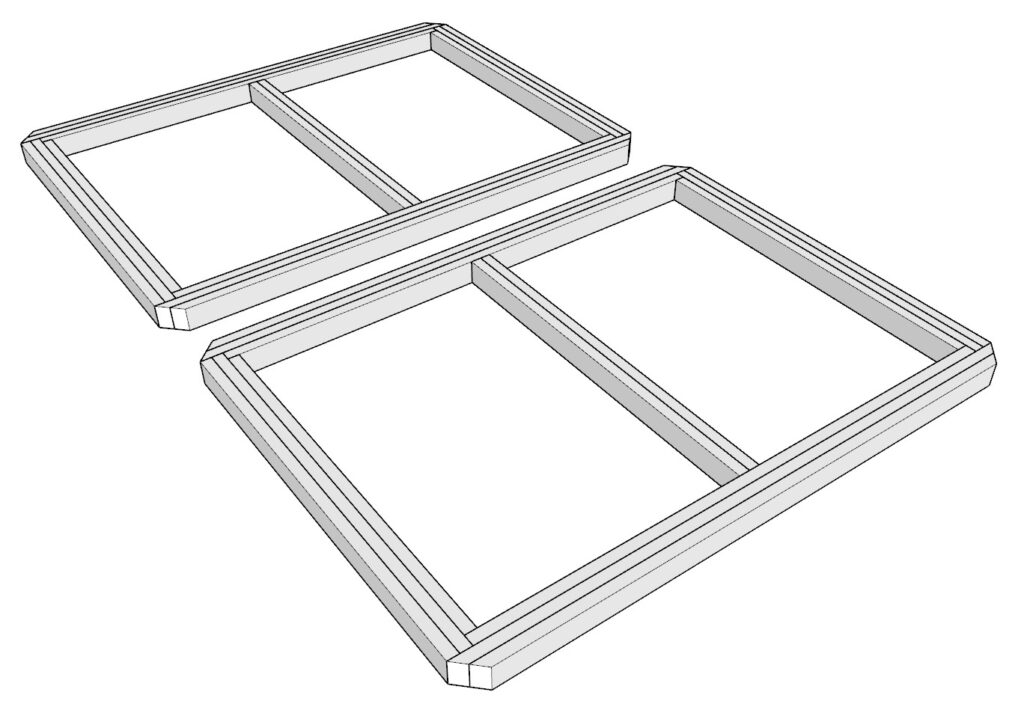
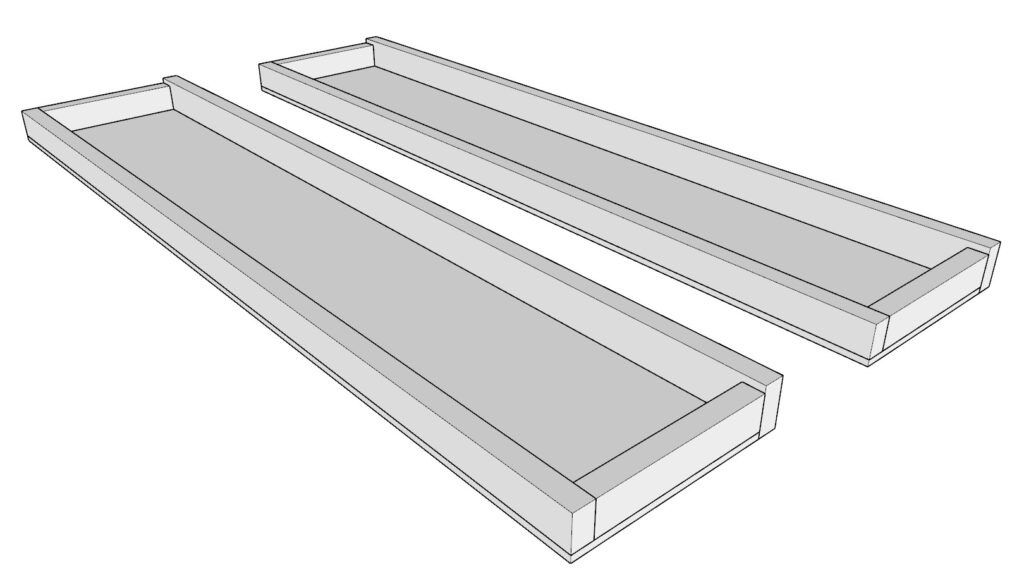
Step 1: Building the Bunk Bed Frames
In this step, you’ll construct the frames that will support the mattresses. This foundation is crucial for the stability and durability of your bunk beds.
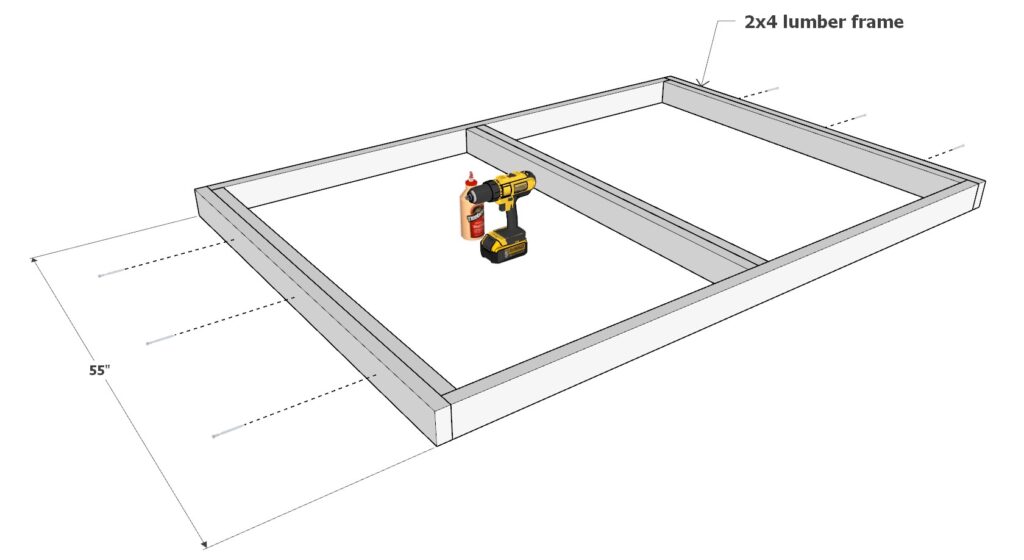
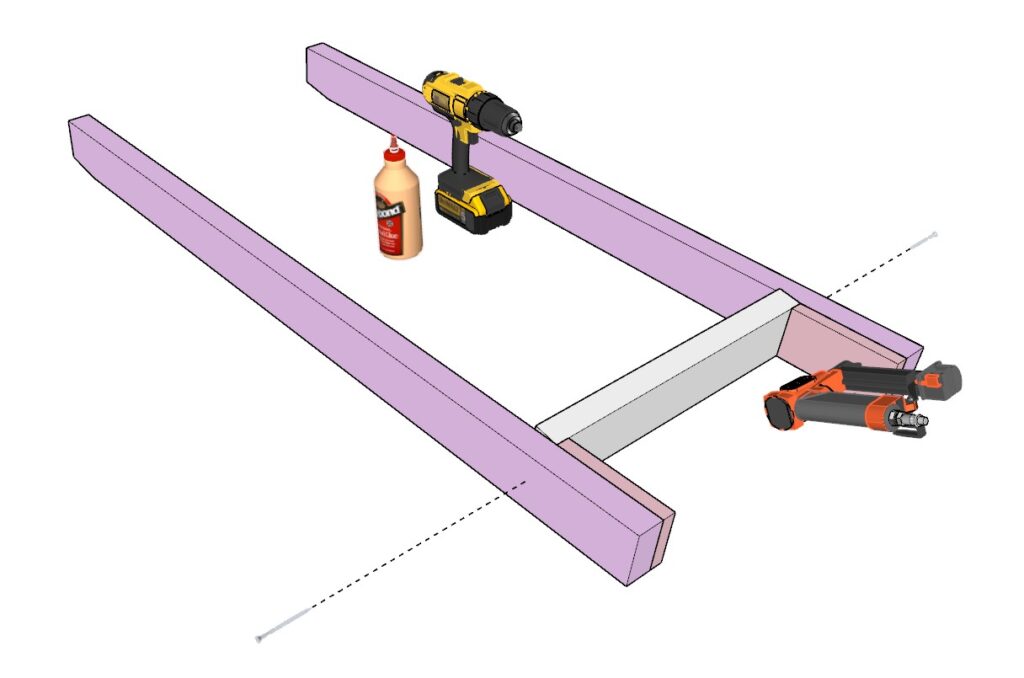
Sub-Step 1.1: Assemble the Base Frame
- Gather Your Materials: Start with two 76-inch 2×4 lumber pieces and four 52-inch 2×4 lumber pieces.
- Arrange the Lumber: Lay out the pieces to form a rectangle. Place the 76-inch pieces as the longer sides and two 52-inch pieces at each end of the rectangle. The other two 52-inch pieces will go in the center, spaced evenly.
- Secure the Pieces: Use 3.5-inch screws and wood glue to attach the pieces together at each joint. Ensure the corners are square for a solid frame.

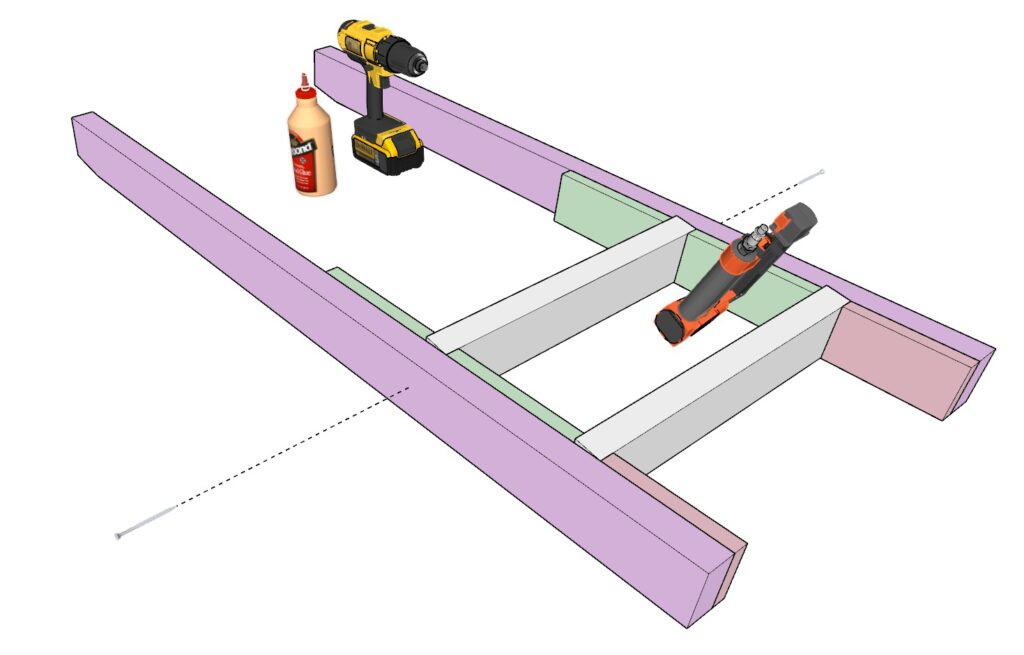
Sub-Step 1.2: Build Up the Frame
- Add External Supports: Position two 55-inch 2×4 pieces along the outer sides of the 52-inch end pieces of the rectangle.
- Secure with Screws: Fasten these with 2.5-inch screws to avoid protruding through the other side. Apply wood glue for additional stability.
- Check Screw Placement: Ensure that screws are positioned in areas that will not interfere with later cuts.
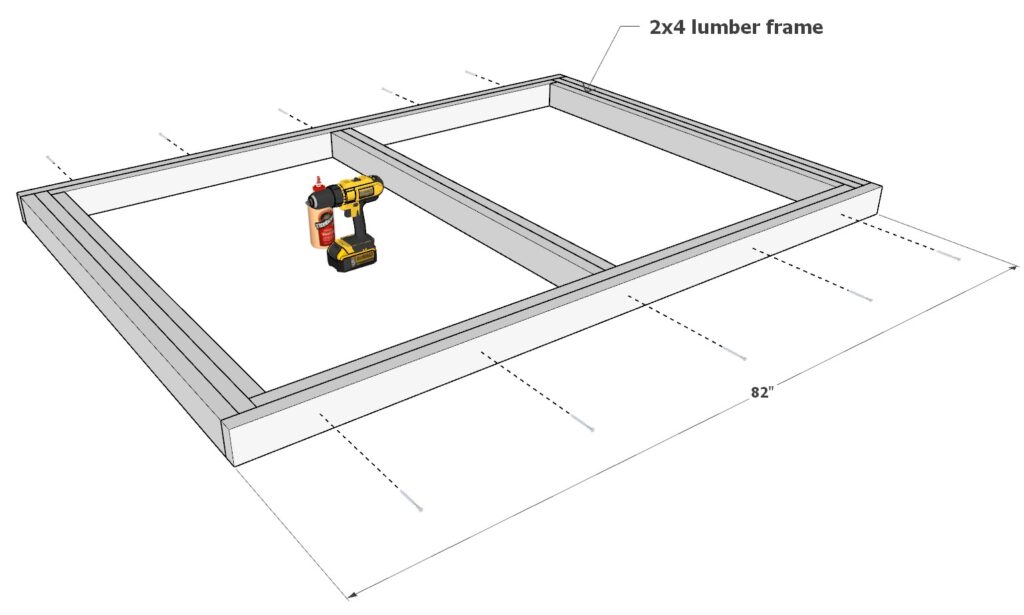
Sub-Step 1.3: Reinforce the Frame
- Add Additional Layers: Place another set of 55-inch 2×4 pieces directly on top of the first set you installed on the sides.
- Secure the Pieces: Use 3.5-inch screws and wood glue to strengthen this part of the frame.

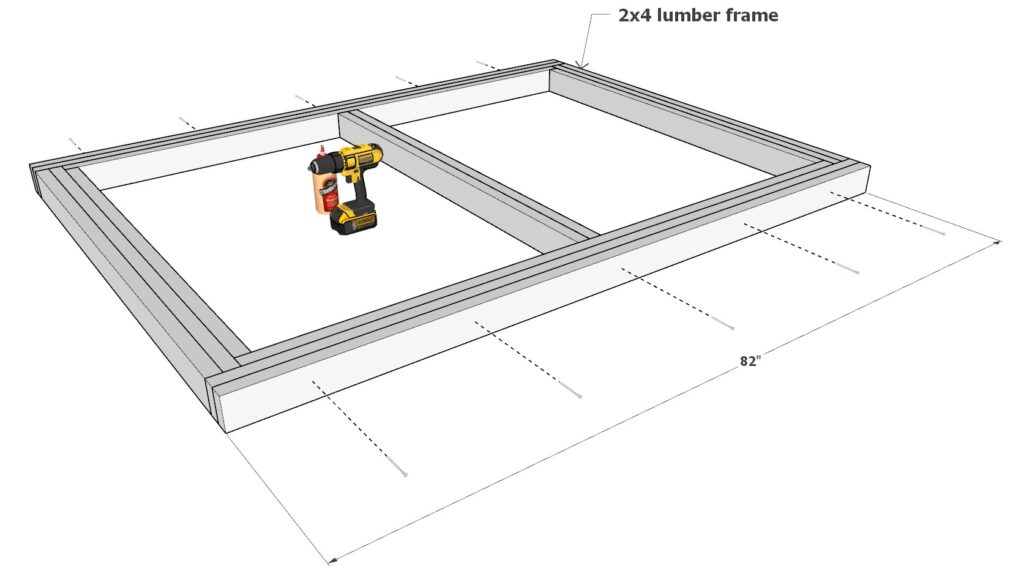
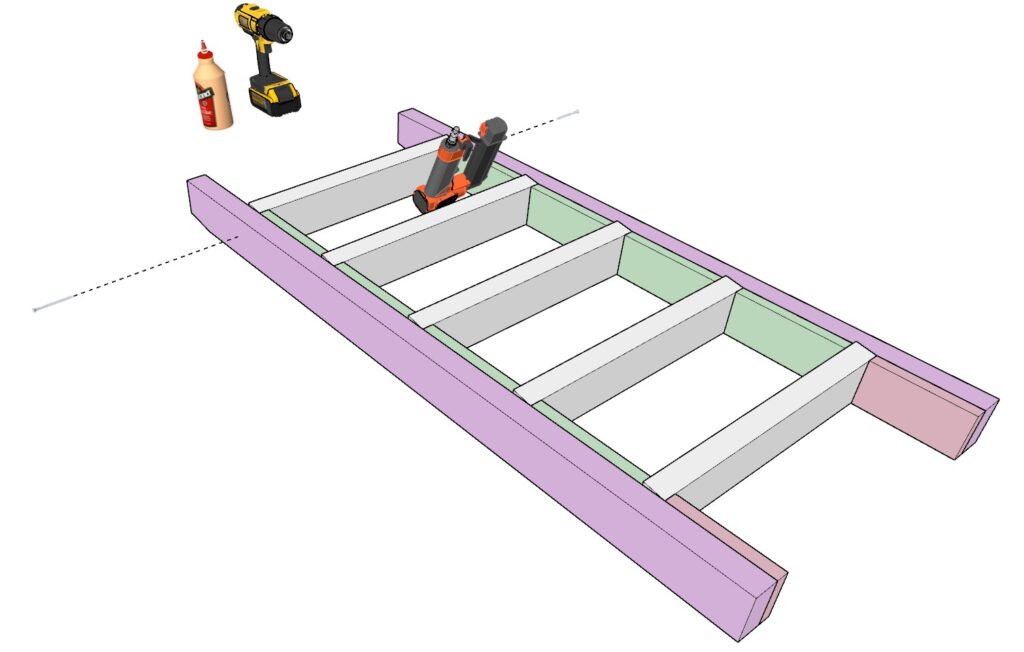
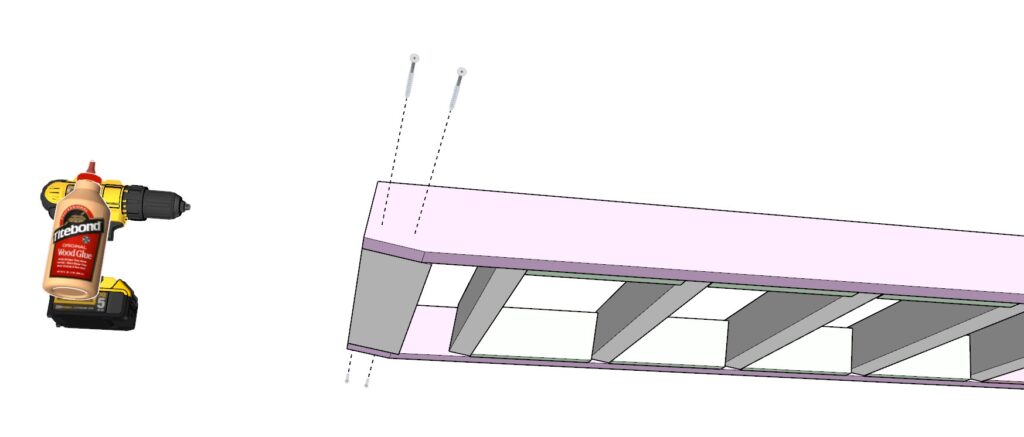
Sub-Step 1.4: Extend the Frame Length
- Attach Longer Supports: Add two 82-inch 2×4 layers along the lengthier side of the rectangle to complete the frame’s perimeter.
- Secure with Screws and Glue: Use 2.5-inch screws and wood glue to ensure these are firmly attached.
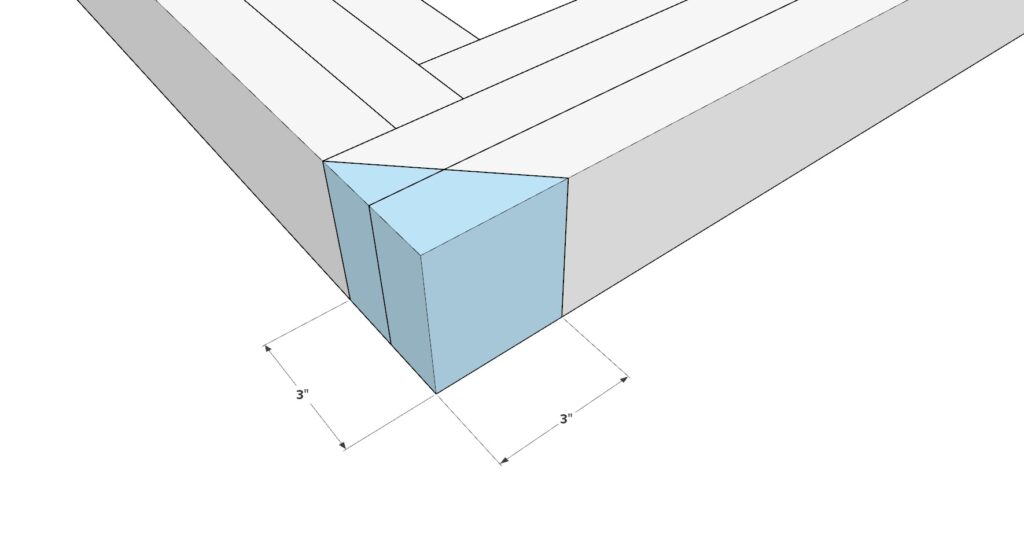
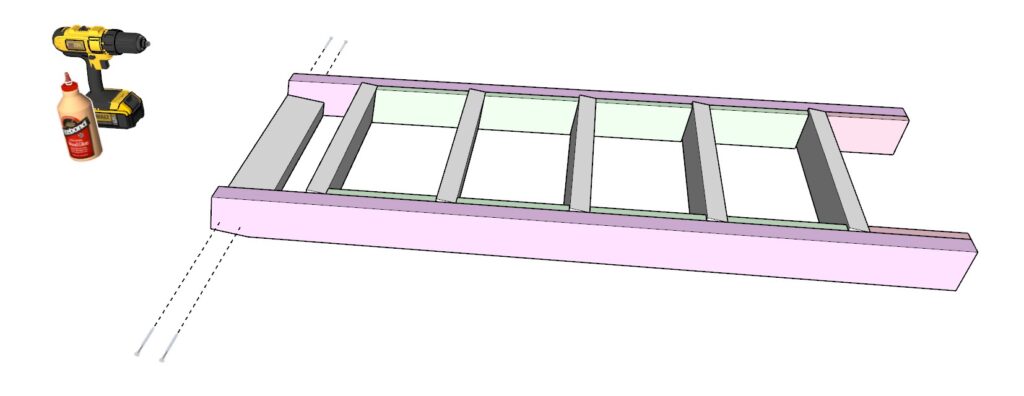
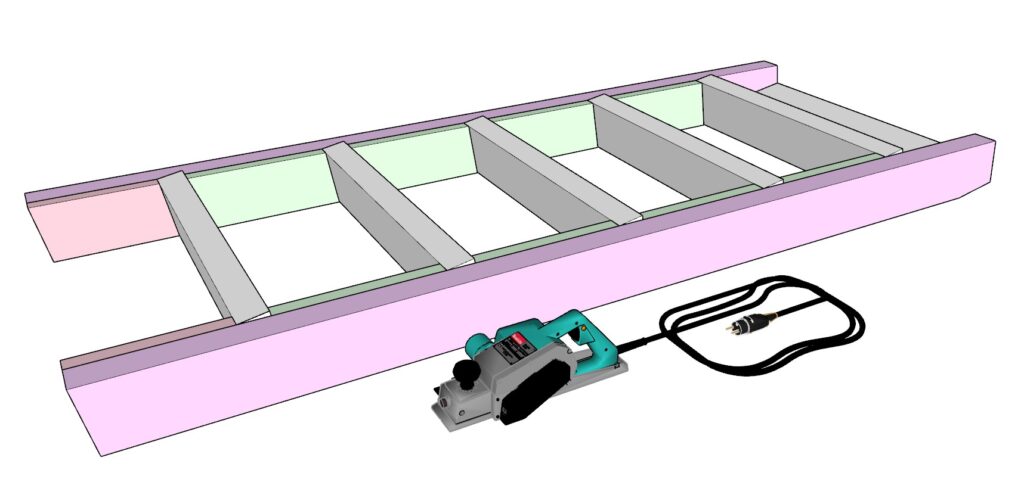
Sub-Step 1.5: Trim the Edges
- Cut at 45 Degrees: Trim the ends of the frame to 45 degrees as indicated in the color-coded blue sections of your diagram.
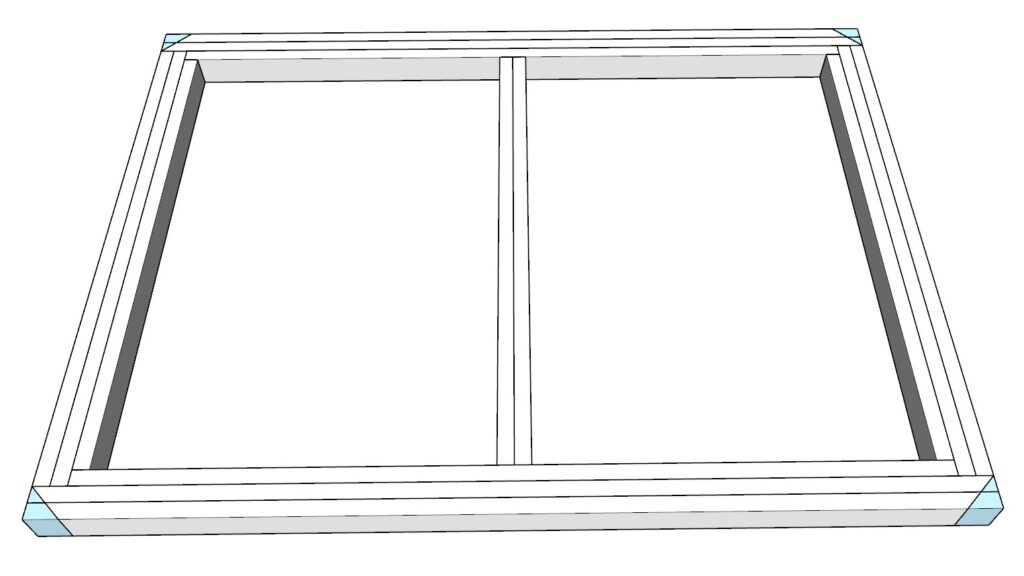
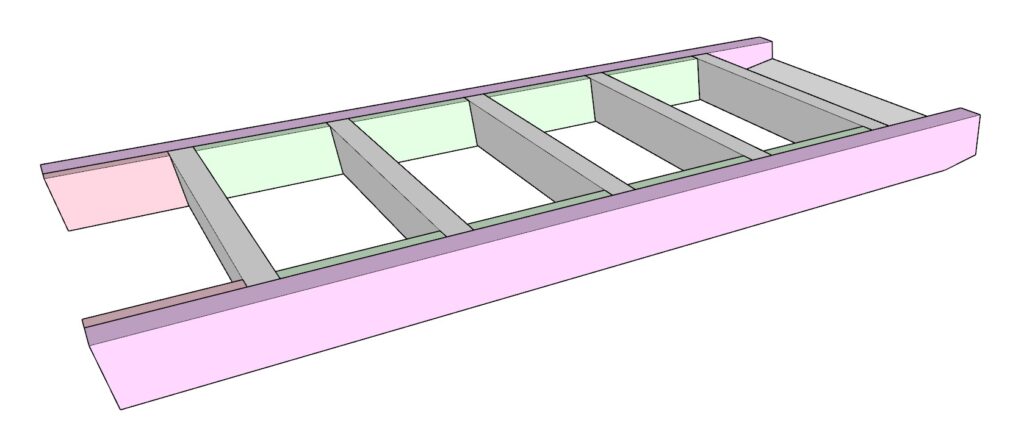
Sub-Step 1.6: Duplicate the Frame
- Repeat the Process: Construct a second frame following the same steps to ensure both are identical. This will be used for the other bunk.
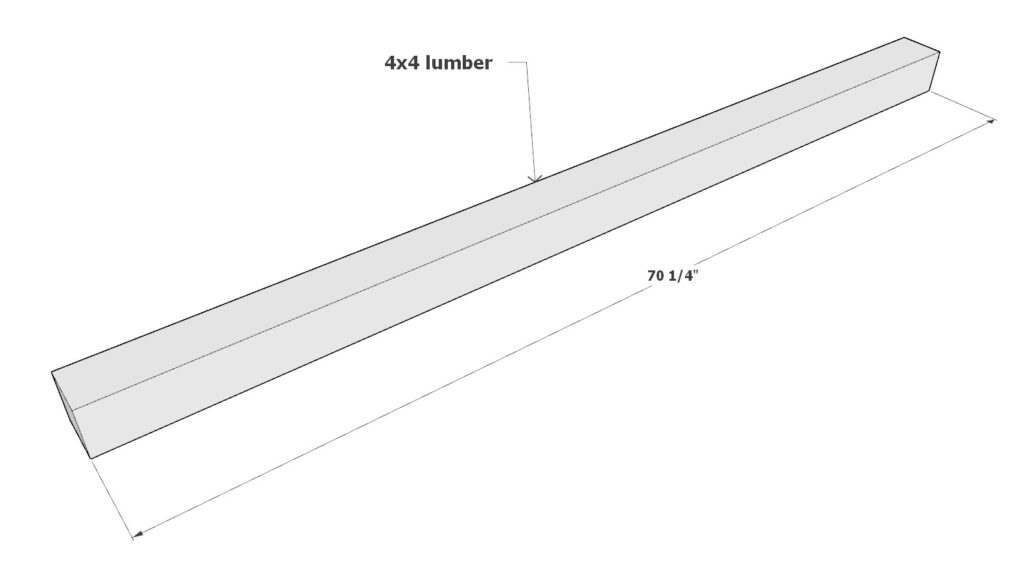
Step 2: Preparing the 4x4 Support Posts
In this step, you will prepare the 4×4 lumber posts, which will act as the main support pillars for your bunk bed.
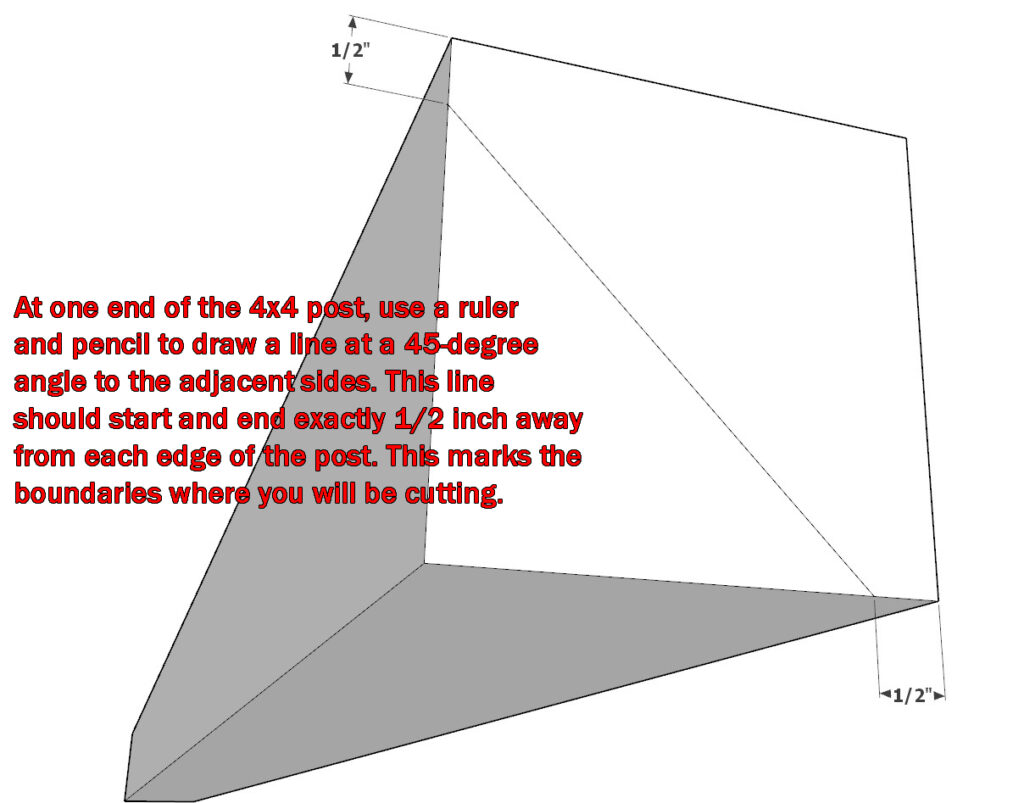
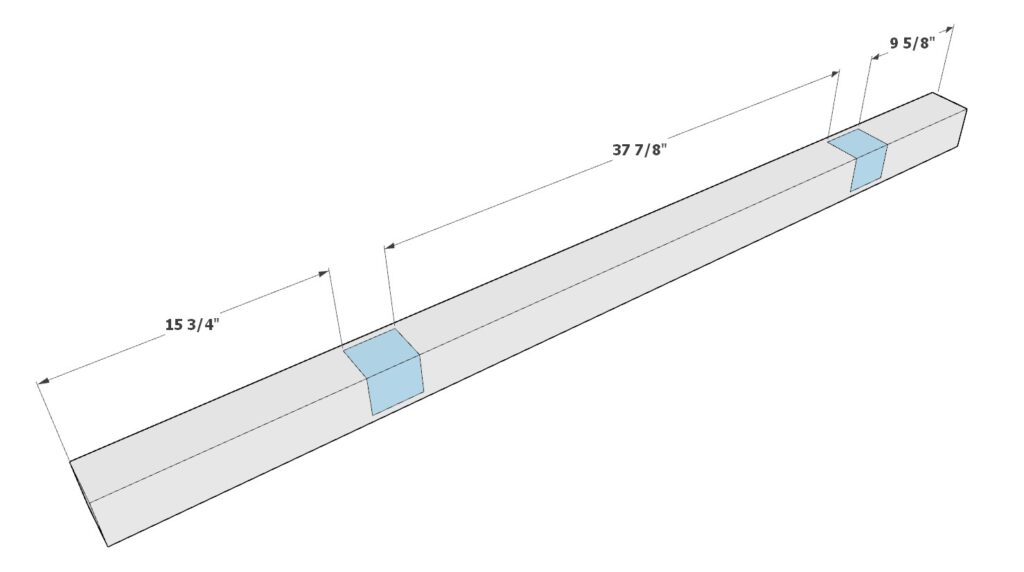
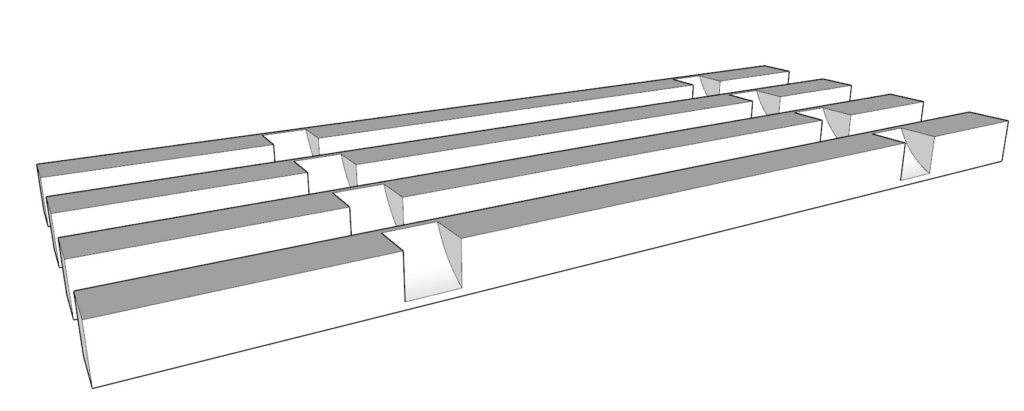
Sub-Step 2.1: Marking the Groove Boundaries
- Measure and Mark: Start with a 70-1/4 inch long 4×4 post. At one end of the post, use a ruler and pencil to draw a line at a 45-degree angle to the adjacent sides. Ensure each line starts and ends exactly 1/2 inch from each edge of the post. These marks define where you will be cutting.
Sub-Step 2.2: Marking the Grooves for Cutting
- Identify Groove Locations: Refer to the blue-highlighted areas in your diagram to mark the grooves on the post. These grooves should match the thickness of the bunk bed frames built in Step 1.
- Precision is Key: Be precise with your measurements to ensure the grooves are not too large, which would result in a loose fit for the bed frames.
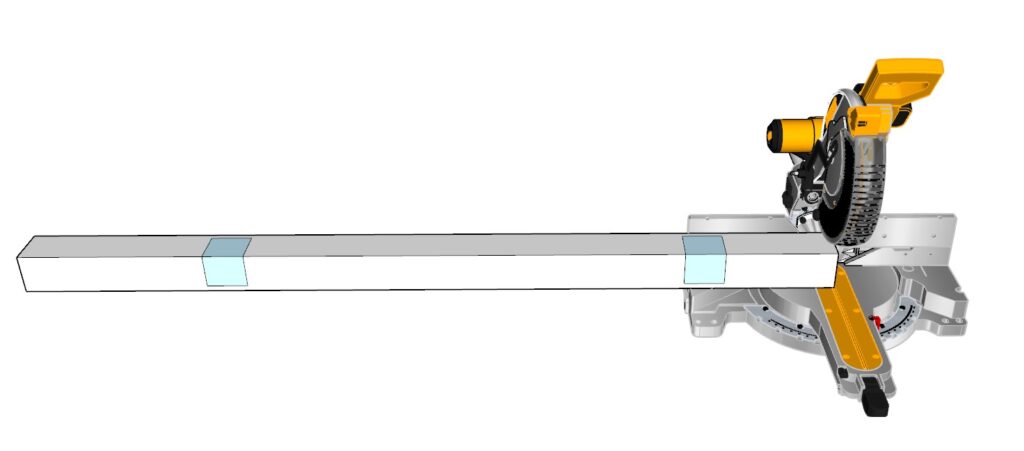
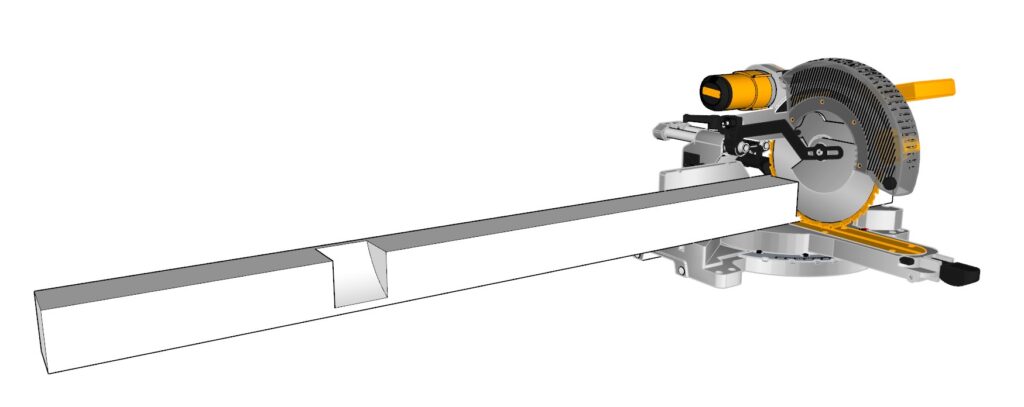
Sub-Step 2.3: Setting Up the Miter Saw
- Calibrate the Saw: Place the 4×4 post on the miter saw. Adjust the saw’s depth stop and sliding features so the blade aligns perfectly with the 1/2 inch boundary marks.
- Test the Setup: Before cutting, test the saw by spinning the blade briefly to make a shallow impression on the post end. This check ensures your setup is correct.
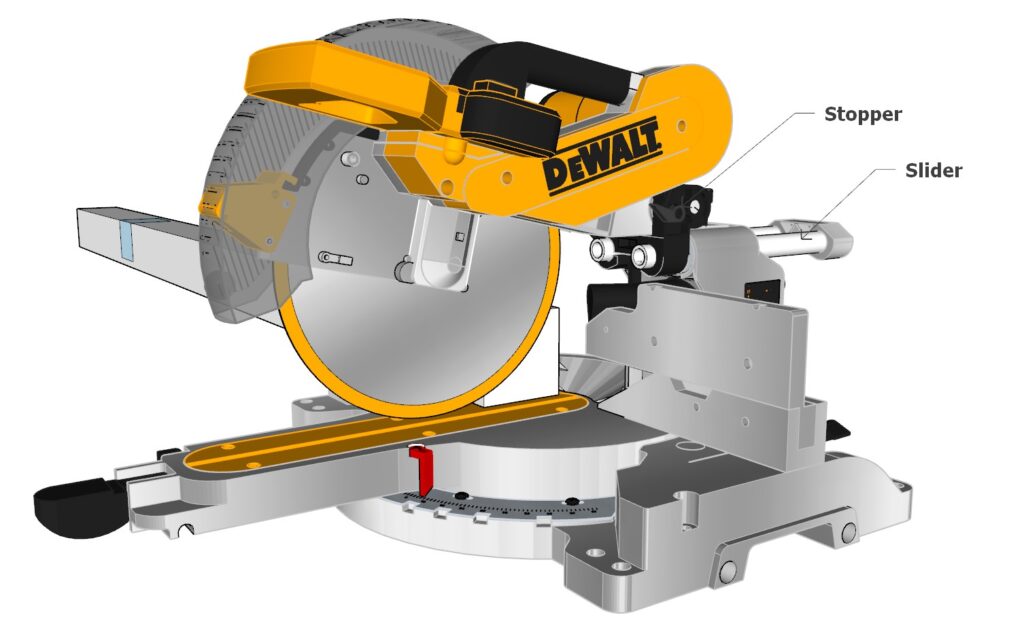

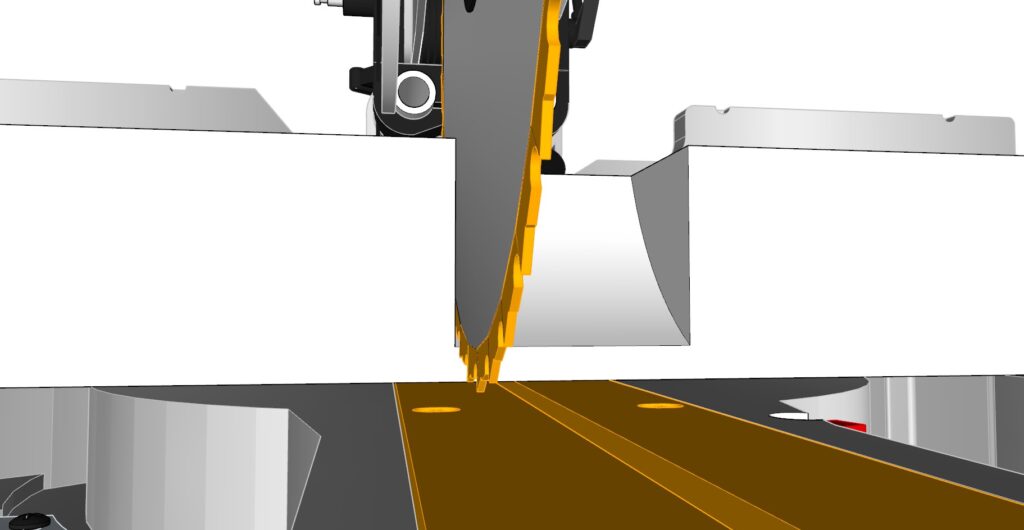
Sub-Step 2.4: Cutting the Grooves
- Secure and Cut: Once the saw is calibrated, lock the depth stop and lock the slider. Position the post according to your marked lines. Use the saw’s chop feature to make the cuts, forming semi-circular grooves with each chop of the saw at each marked location.
- Consistency Check: Make sure the grooves are consistently sized. A too-large groove can undermine the stability of the bed frame.

Sub-Step 2.5: Four posts total
- Repeat the Process: Cut a total of four identical posts with semi-circular grooves.
Tip:
- Avoid Oversizing the Groove: It’s crucial that the semi-circular grooves are not too large. If a groove is mistakenly oversized, it’s better to start with a new 4×4 post than to compromise the bed’s stability.
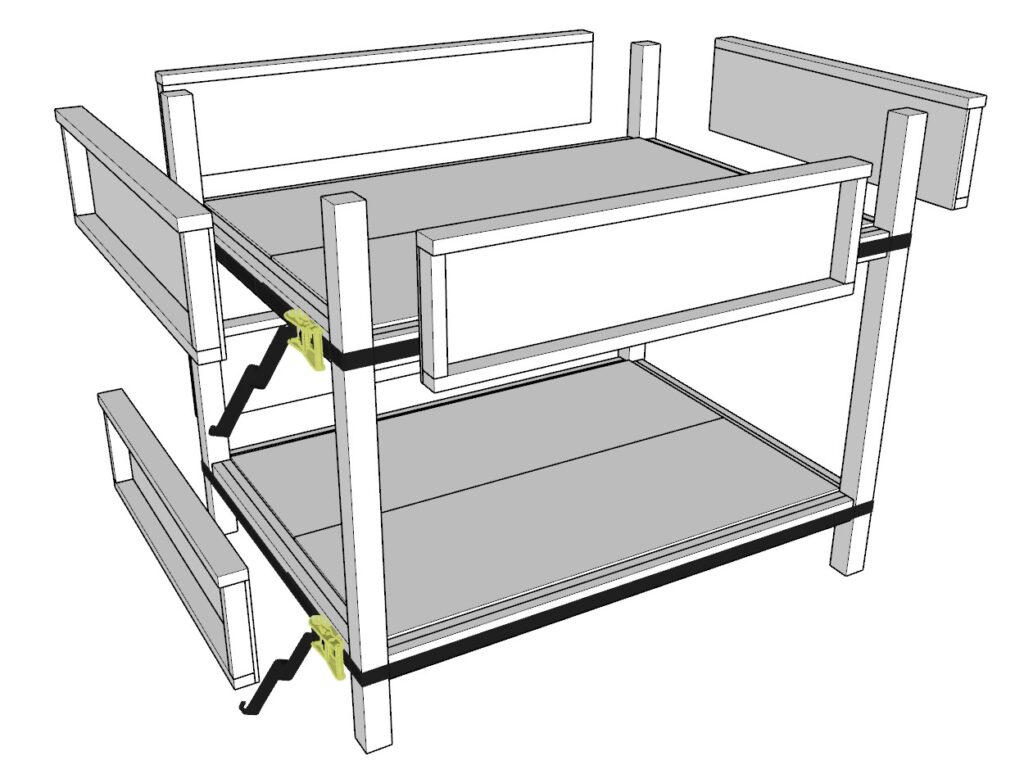
Step 3: Assembling the Bunk Bed Structure
This step involves precisely assembling the bed frames with the support posts, ensuring that everything fits perfectly before permanently securing the components.
Sub-Step 3.1: Preparing for Assembly
- Room Setup: Assemble the bed in the room where it will be used since the fully assembled bed may be too large to move through doorways easily.
Sub-Step 3.2: Fit Testing Frames and Posts
- Dry Fit Test: Before applying any glue, align the bed frames from Step 1 with the grooves cut into the posts from Step 2. Ensure all pieces fit snugly together.
- Adjustments: If adjustments are necessary for a perfect fit, make them now before proceeding to glue. This ensures the frames and posts will align correctly without gaps.

Sub-Step 3.3: Applying Glue and Joining Components
- Apply Glue: Once a perfect fit is confirmed, apply wood glue to all joints and contact areas where the frames will connect with the posts.
- Assemble: Carefully place the bed frames into the grooves of the posts.
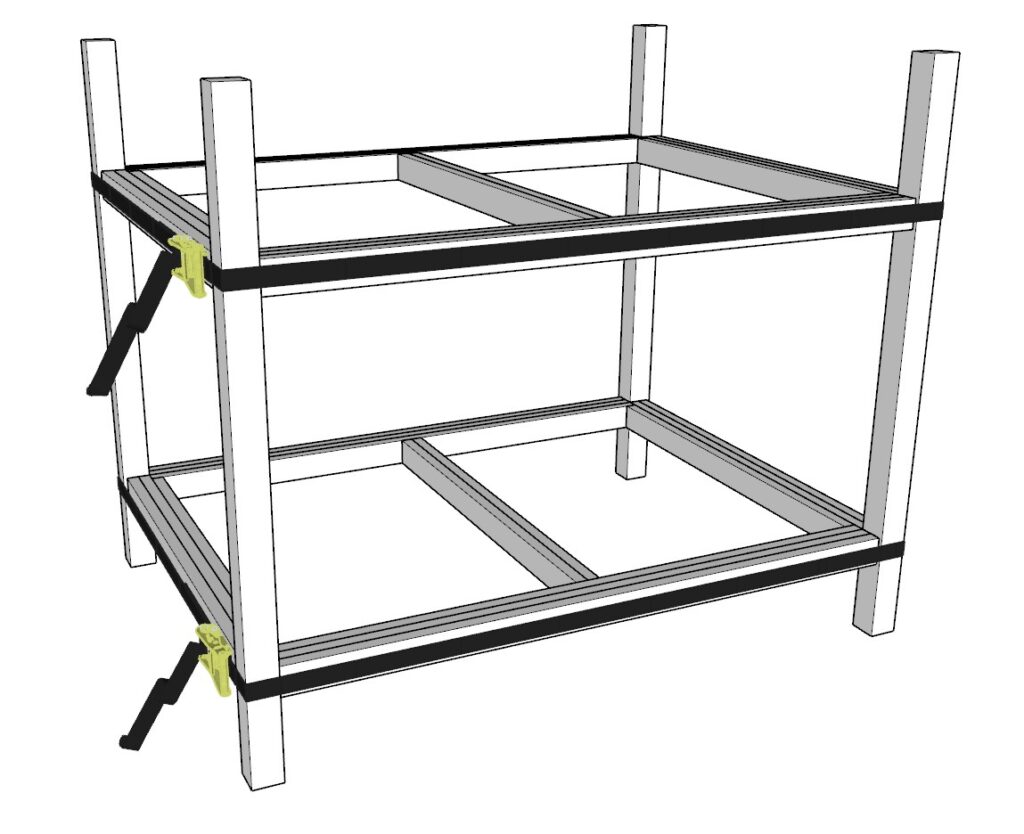
Sub-Step 3.4: Securing the Structure
- Apply Ratchet Straps: Use ratchet straps around the top and bottom of the bunk bed frames to hold everything tightly together while the glue sets. Tighten the straps securely.
- Protect Surfaces: To prevent damage from the ratchet straps, place thick cloth or an old t-shirt under the straps at the contact points on the wood.
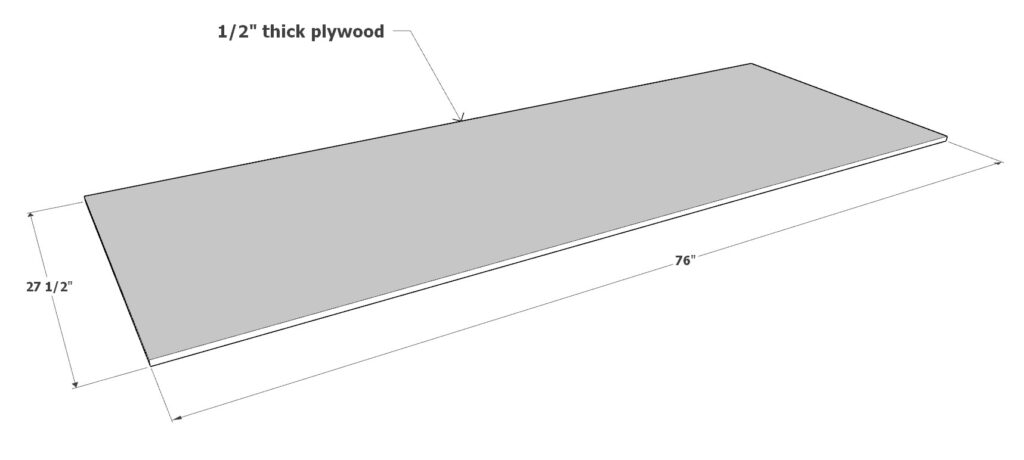
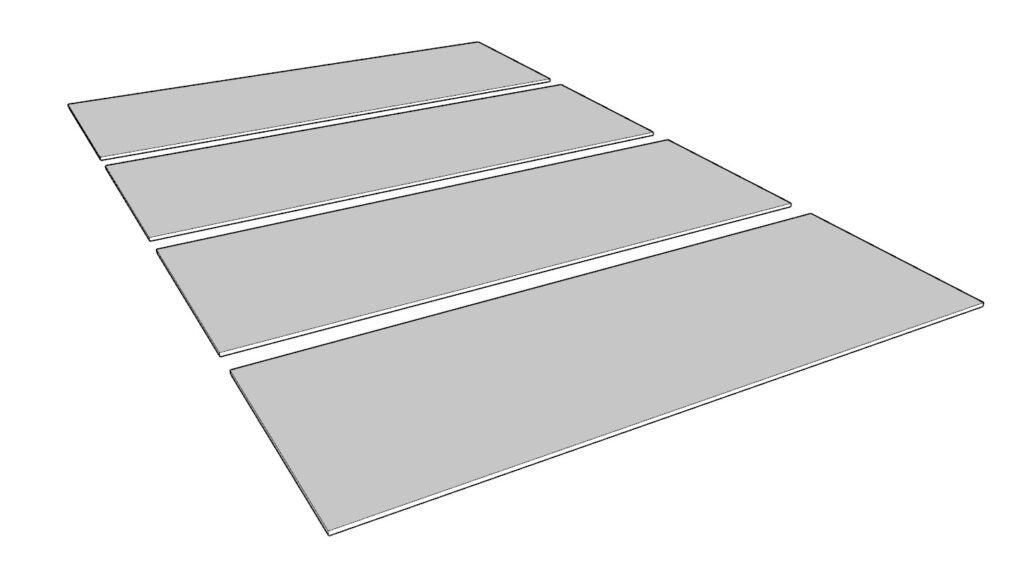
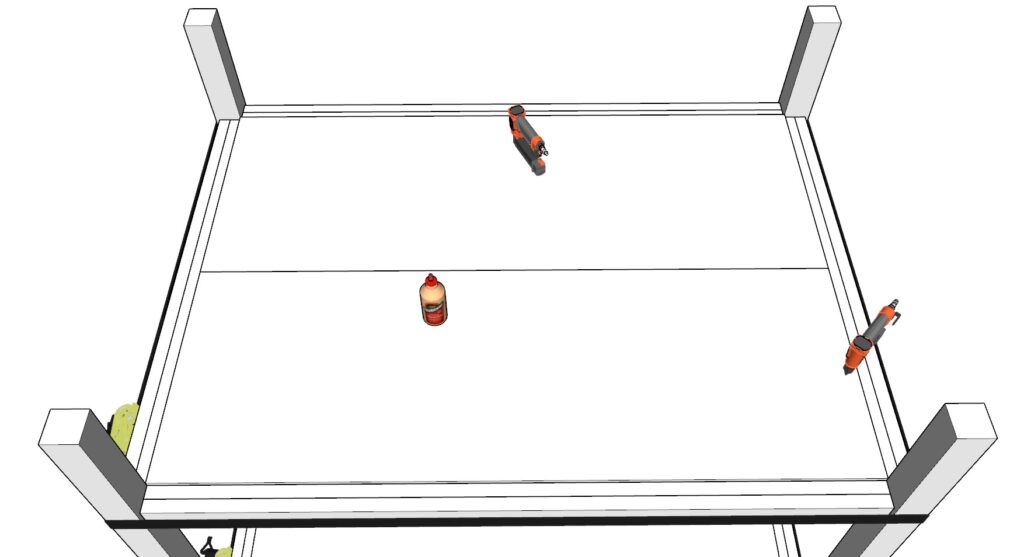
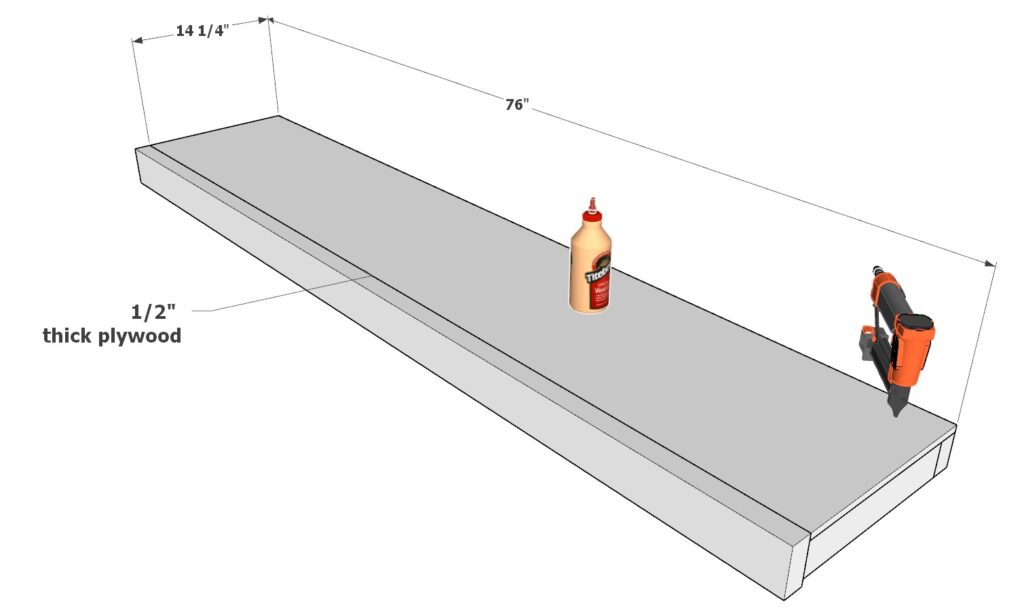
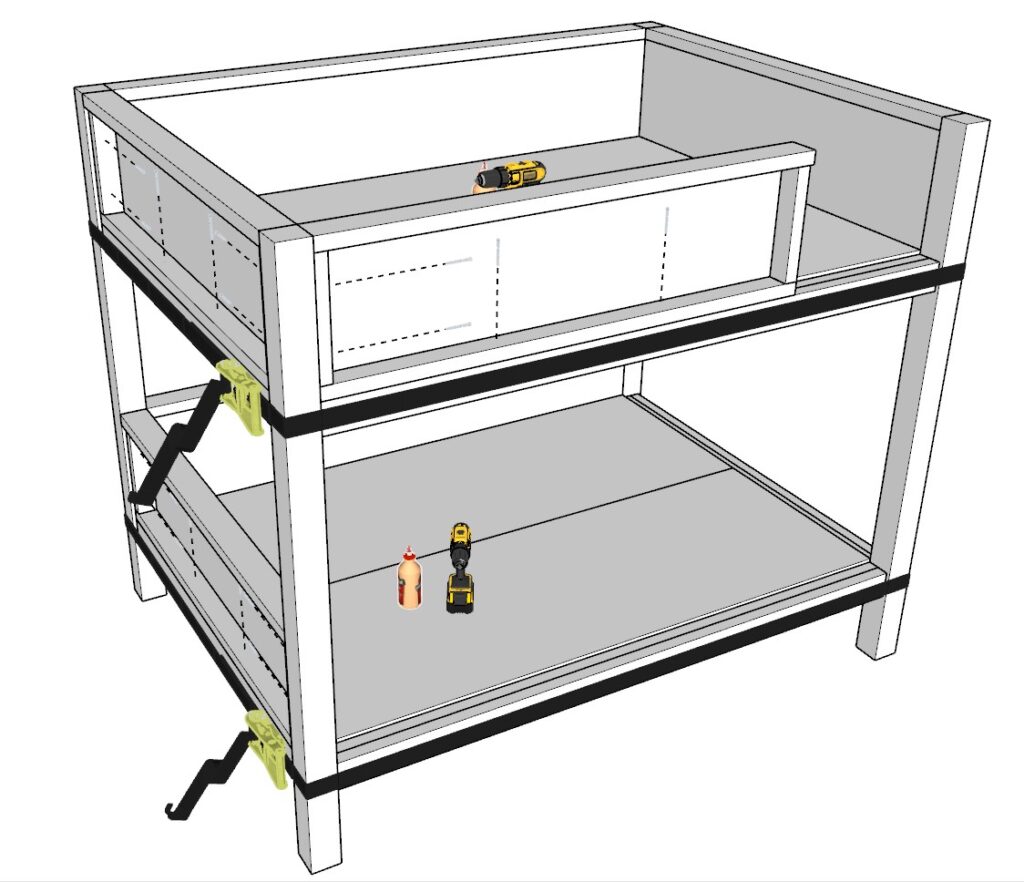
Sub-Step 3.5: Adding the Bed Platforms
- Place Plywood Sheets: Position four 76″ x 27 1/2″ sheets of 1/2″ thick plywood on top of each bed frame to serve as the mattress supports.
- Secure Plywood: Attach the plywood to the frames using wood glue and 1-inch pin nails for additional stability. Keep the ratchet straps on during this process to maintain pressure.
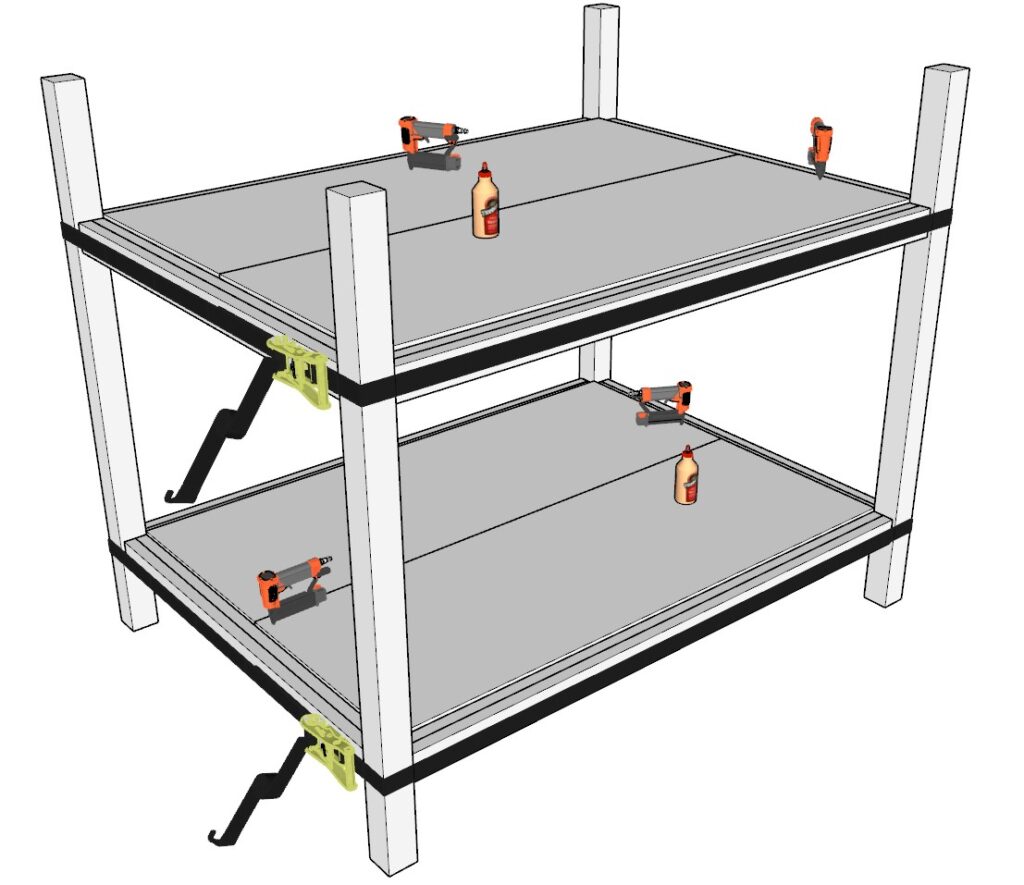
Tips:
- Maintain Tension: Keep the ratchet straps in place throughout the entire assembly process to ensure the frames and posts remain tightly secured as the glue dries.
- Distribute Pressure: If possible, use wider ratchet straps to evenly distribute pressure and prevent indentations or damage to the wood.
Step 4: Building the Railing Pieces
This step involves constructing two types of railing pieces for the bunk bed, shorter side railings, and longer end railings. Each railing will enhance the safety and aesthetics of the bed.
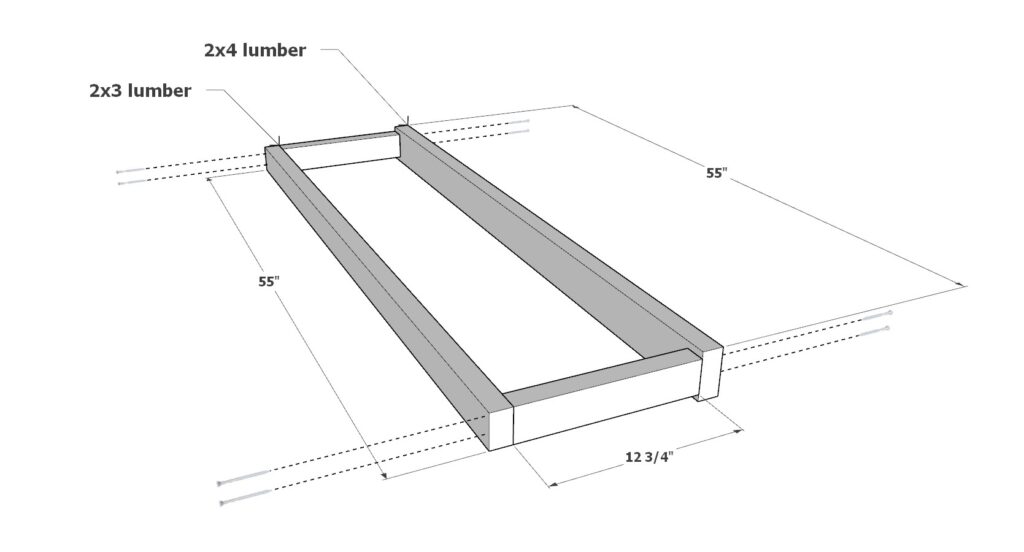
Sub-Step 4.1: Constructing Shorter Side Railings
Prepare the Materials:
- One 55-inch 2×4 lumber piece
- Two 12-3/4 inch 2×3 lumber pieces
- One 55-inch 2×3 lumber piece
Assemble the Frame:
- Arrange the lumber to form a rectangle with the 2×4 as the top rail and the 2x3s as the sides and bottom rail.
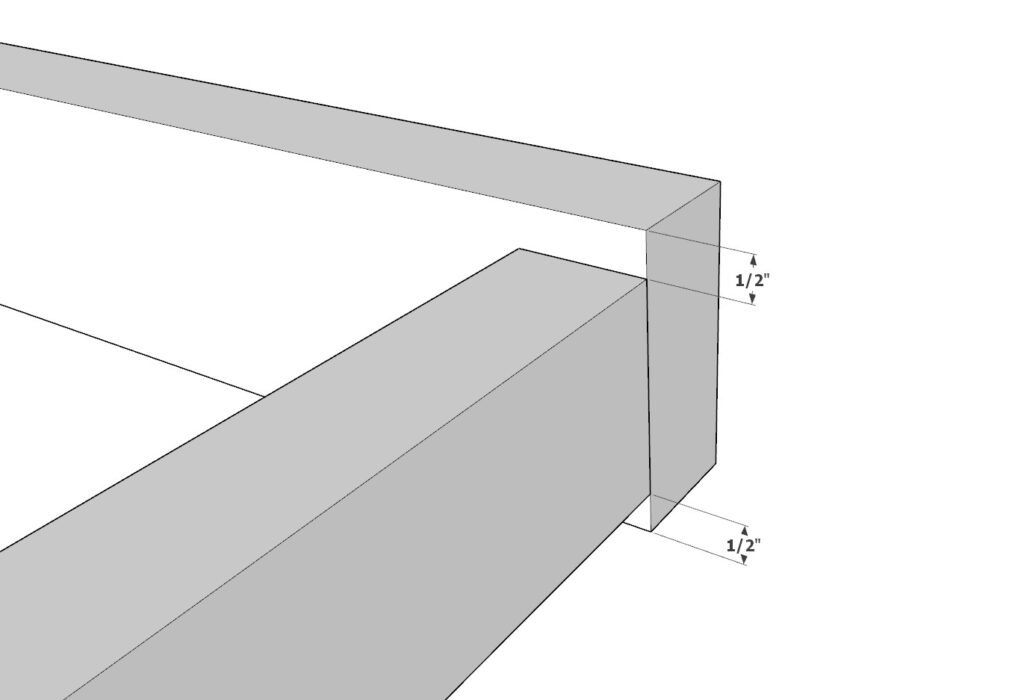
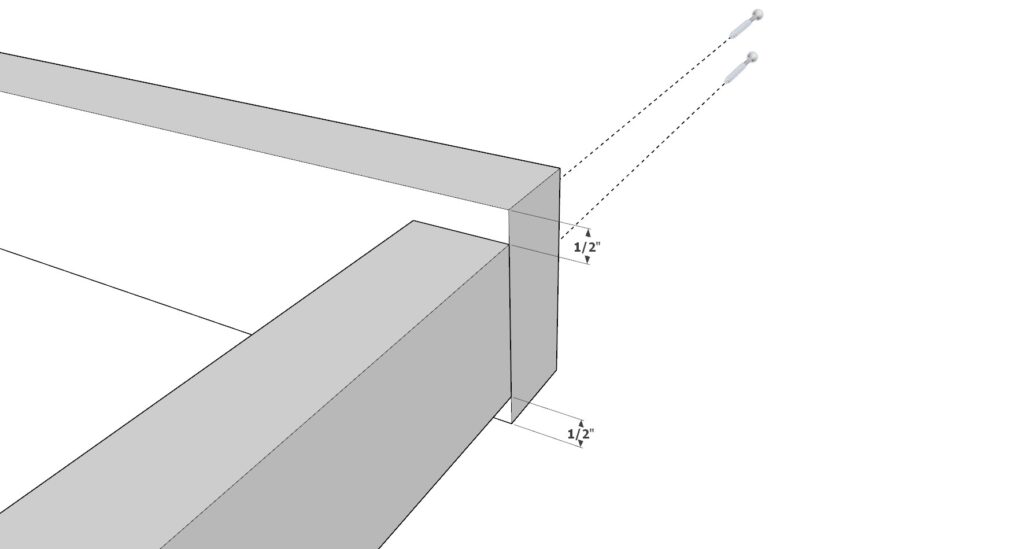
- Ensure the 2×4 is centered directly over the 2x3s, leaving a 1/2-inch overhang on both ends.
- Secure the pieces together using 3.5-inch screws and wood glue.
Attach the Plywood:
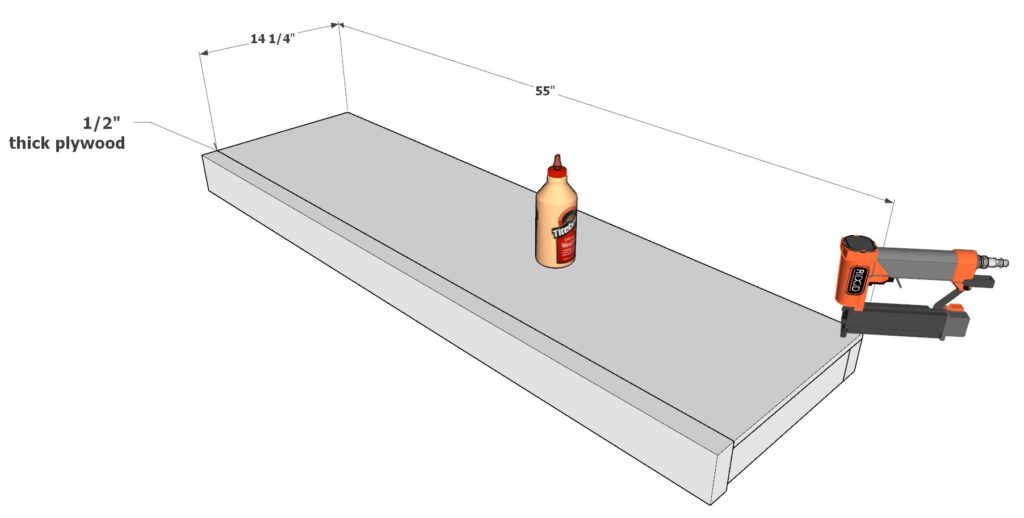
- Place a 1/2-inch thick plywood sheet measuring 55 inches by 14-1/4 inches on top of the assembled frame.
- The plywood should align with the 1/2-inch overhangs to create a flush edge.
- Secure the plywood with wood glue and 1-inch pin nails.
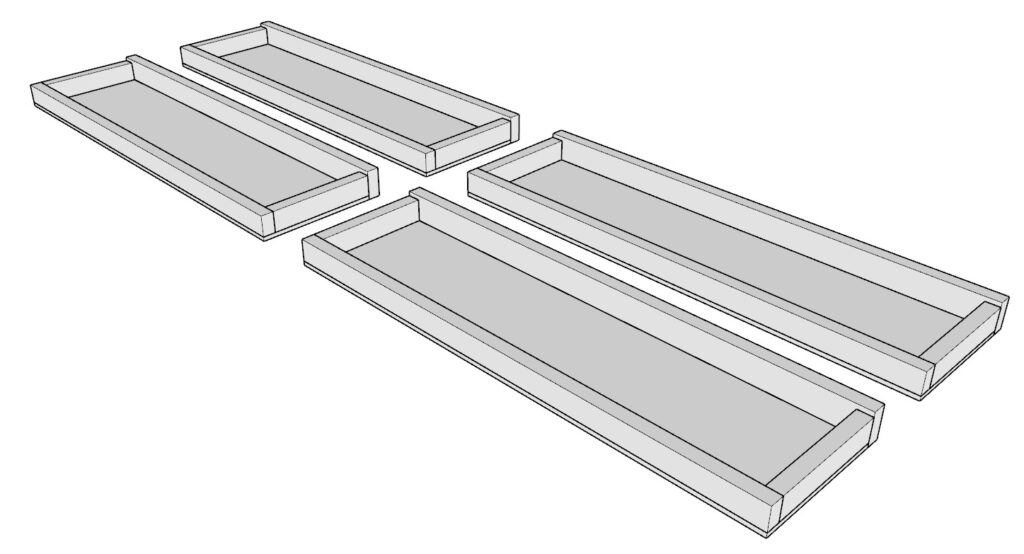
Repeat for Quantity:
- Make a total of four of these shorter railing frames.
Sub-Step 4.2: Constructing Longer End Railings
Prepare the Materials:
- One 76-inch 2×4 lumber piece
- Two 12-3/4 inch 2×3 lumber pieces
- One 76-inch 2×3 lumber piece
Assemble the Frame:
- Arrange the lumber in the same manner as the shorter side railing, with the 2×4 centered and 2x3s forming the sides and bottom of the frame.
- Ensure the 2×4 overhangs by 1/2-inch on each side to accommodate the plywood.
- Secure with wood glue and 3.5-inch screws.
Attach the Plywood:
- Place a 76-inch by 14-1/4-inch 1/2-inch thick plywood sheet on top of the frame.
- The plywood should cover the frame completely, matching the overhangs on each side.
- Secure with wood glue and 1-inch pin nails.
Repeat for Quantity:
- Make a total of two of these larger railing frames.

Step 5: Installing Railing and Decorative Concealment
This step involves securing the railing to the bunk bed and adding decorative pieces that serve both aesthetic and functional purposes.
Sub-Step 5.1: Attaching the Railings
Prepare the Bed:
- Ensure that the straps from previous steps are still applying pressure to keep the structure securely aligned.
Attach the Railings:
- On the top bunk, attach three shorter railing pieces and one longer railing piece.
- On the bottom bunk, attach one longer railing piece and one shorter railing piece.
- Secure these railings to the pillars and to the frame constructed in Step 1 using 3.5-inch screws. Apply wood glue to the joints for additional stability.
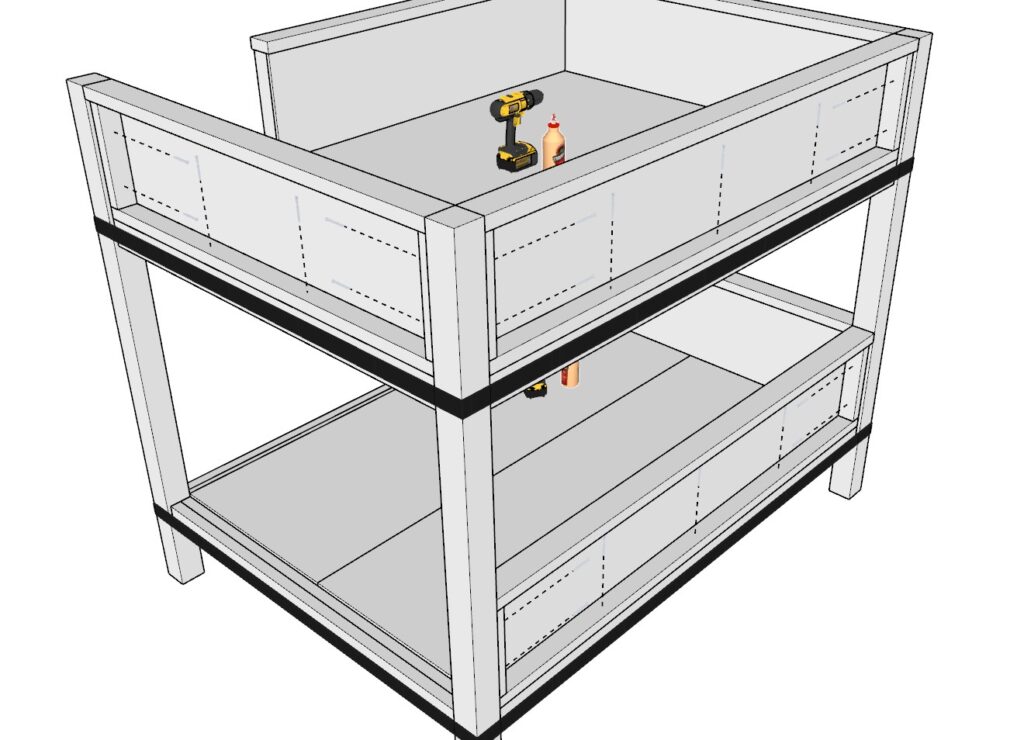
Sub-Step 5.2: Adding Decorative Concealment
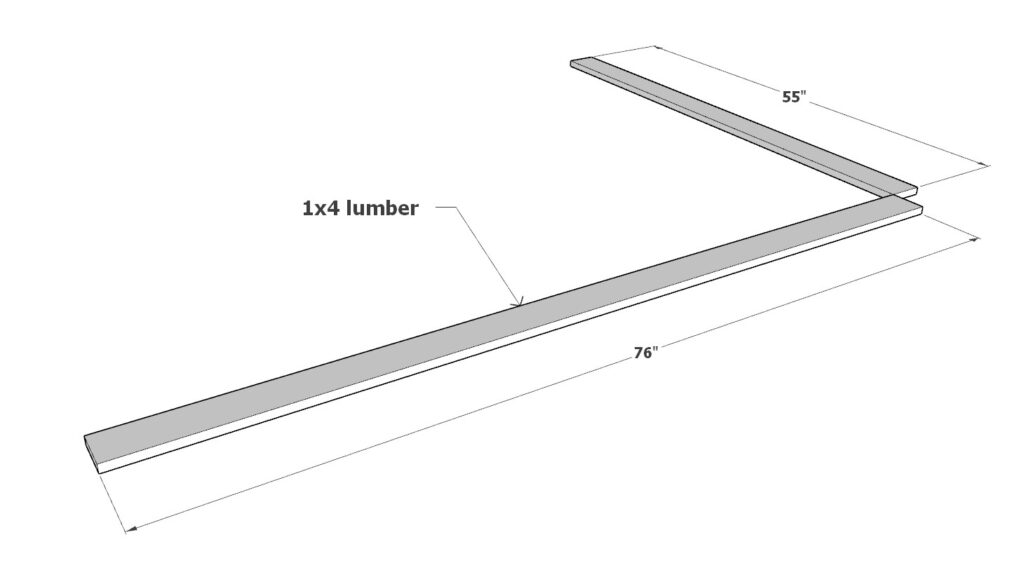
Prepare the Lumber:
- Cut one 55-inch long 1×4 lumber piece and one 76-inch long 1×4 lumber piece.
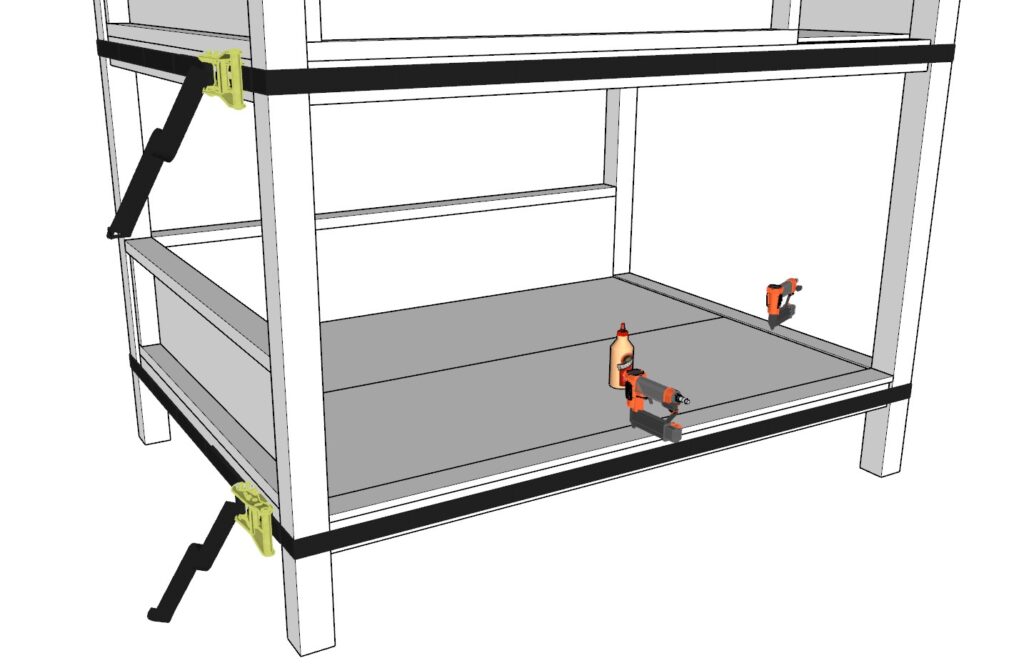
Install the Lumber:
- Attach these 1×4 pieces to the bottom bunk to conceal the frame from Step 1. This not only enhances the appearance but also creates a small ledge that helps to keep the mattress in place.
- Secure these boards with 1-inch pin nails and apply wood glue to ensure they adhere firmly.
Finishing Touches:
- Ensure all parts are securely attached and the wood glue has set properly before removing the straps.
- Check that the mattress area is slightly recessed by the 1×4 boards, providing a snug fit for the mattress.
Tips:
- Continuous Pressure: Keep the ratchet straps on until all components are fully installed and the glue has dried to maintain the integrity of the structure.
- Final Inspection: Once all elements are secured, conduct a thorough inspection to ensure everything is solid and there are no loose screws or unstable parts.
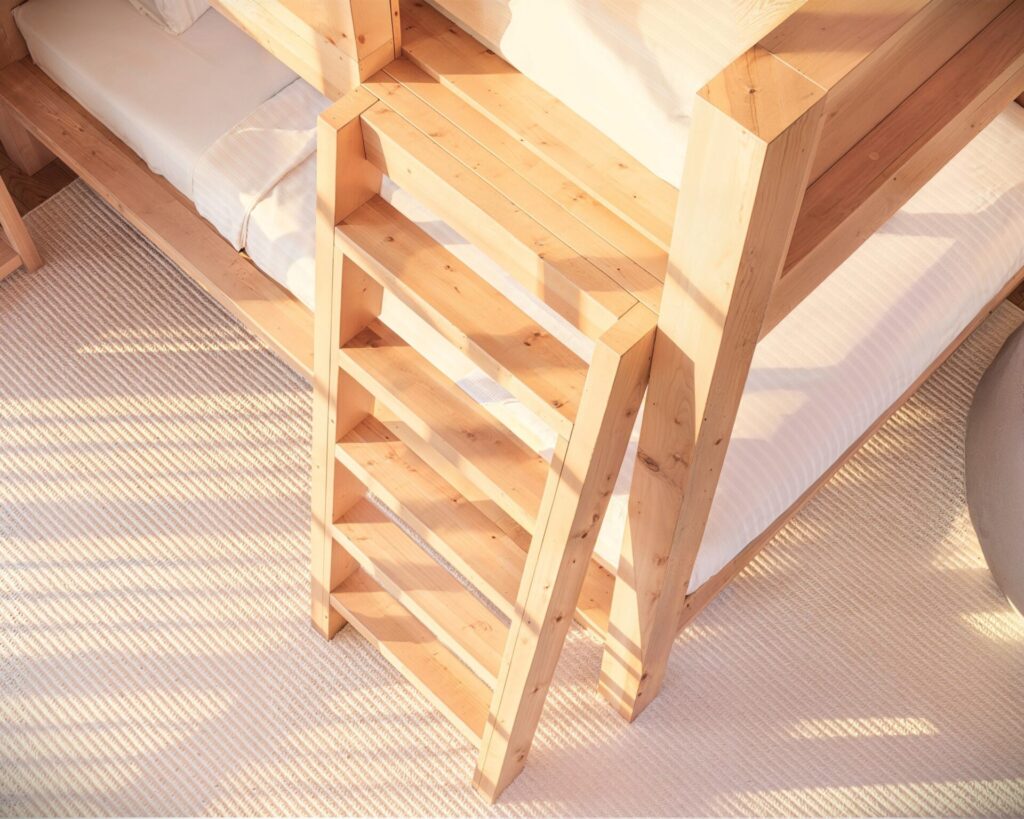
Step 6: Building and Installing the Ladder
This step involves constructing a sturdy and safe ladder for the bunk bed. The angled design ensures ease of climbing and enhances the stability of the structure.
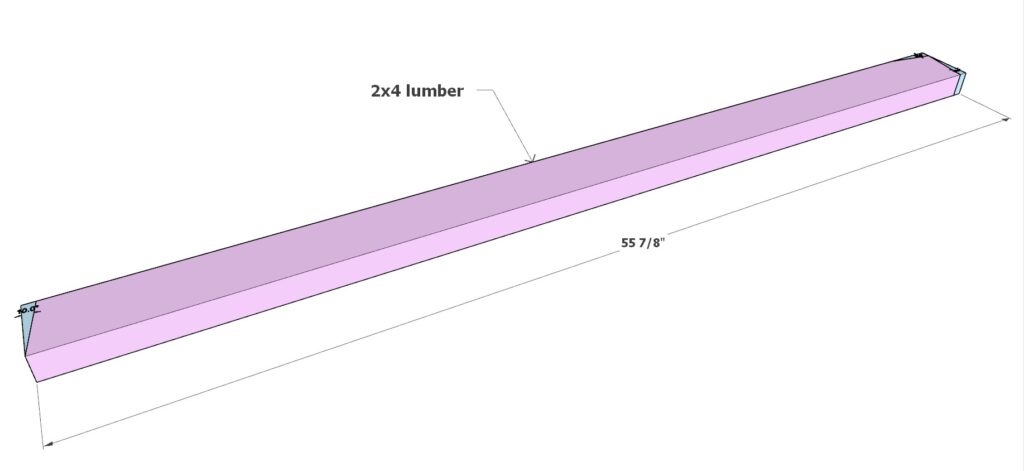
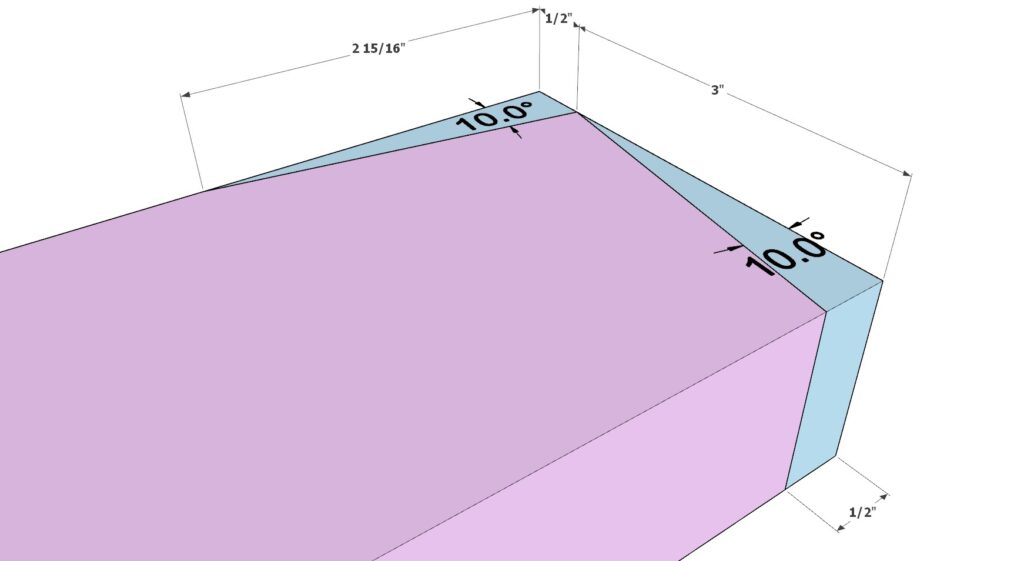
Sub-Step 6.1: Preparing the Side Rails
- Cutting the Lumber:
- Take two pieces of 2×4 lumber each measuring 55-7/8 inches. These pieces are colored hot pink for easy identification.
- Cut one end of each piece at a 10-degree angle. This angle allows the ladder to lean against the bunk bed, reducing strain and enhancing stability.
- Repeat the 10-degree cut on the opposite end (2x) of each piece.


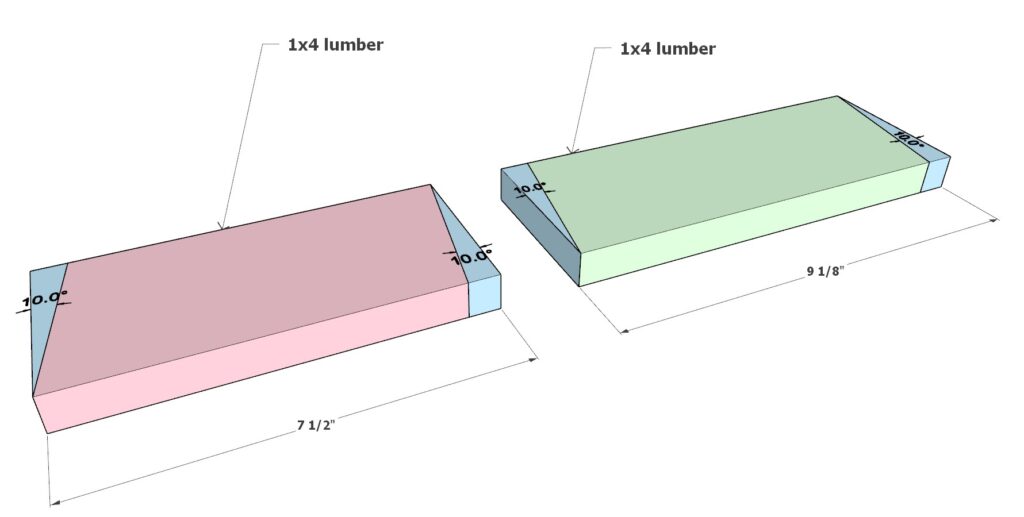
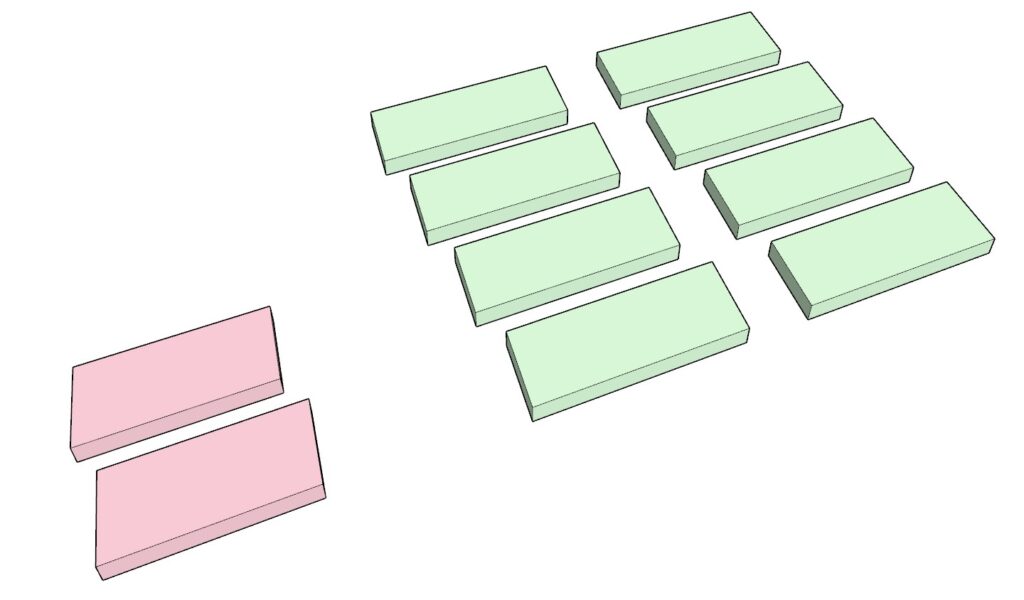
Sub-Step 6.2: Preparing Step Supports
- Salmon Pieces:
- Cut two pieces of 1×4 lumber to 7-1/2 inches long, with both ends cut at 10 degrees. These will support the steps at the lower end.
- Mint Green Pieces:
- Cut eight pieces of 1×4 lumber to 9-1/8 inches long, with both ends also cut at 10 degrees. These will support the upper steps and ensure proper alignment with the side rails.
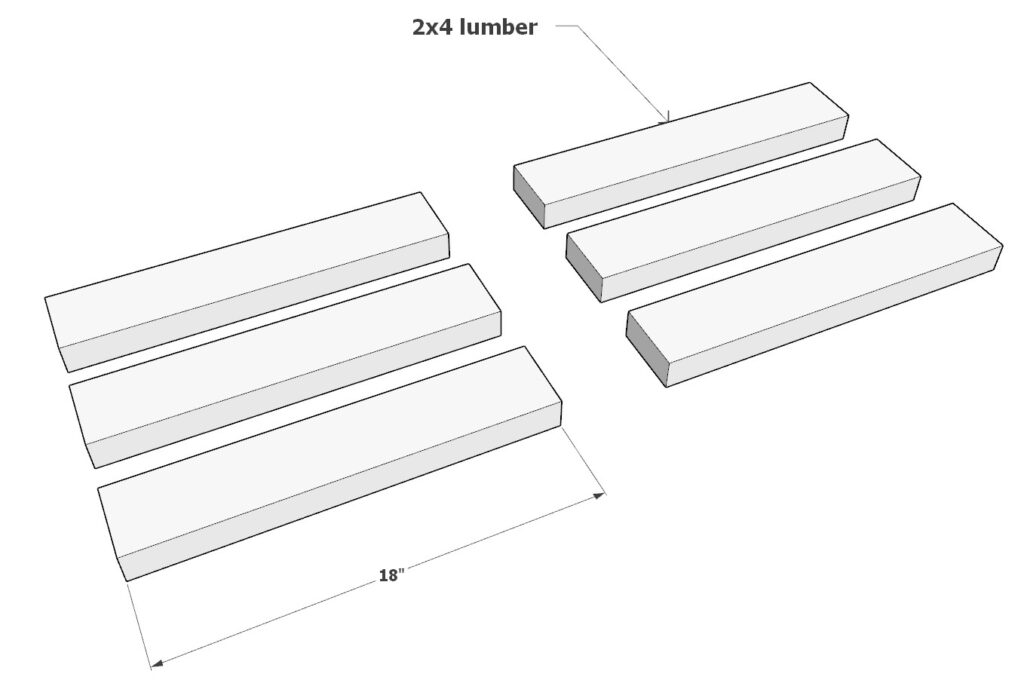
- Prepare Steps:
- Cut six pieces of 2×4 lumber to 18 inches each. These will serve as the horizontal steps of the ladder.
Sub-Step 6.3: Assembling the Ladder
Start Assembly:
- Begin by attaching a salmon piece and an 18-inch long 2×4 lumber piece (as the first step) between the two hot pink side rails.
- Secure the structure with 3.5-inch screws, pin nails (1 inch), and wood glue for added strength.
Adding Steps:
- Continue building the ladder by adding mint green pieces and more 18-inch steps. Use the same fastening method as before to maintain consistency and strength.
Top Connection:
- Attach the final 18-inch 2×4 step at the top of the ladder, ensuring it matches the 10-degree angle of the top bed frame.
Sub-Step 6.4: Finishing and Mounting
Smoothing Edges:
- Smooth any protruding edges of the 2×4 lumber using a sander or planer to create a seamless appearance.
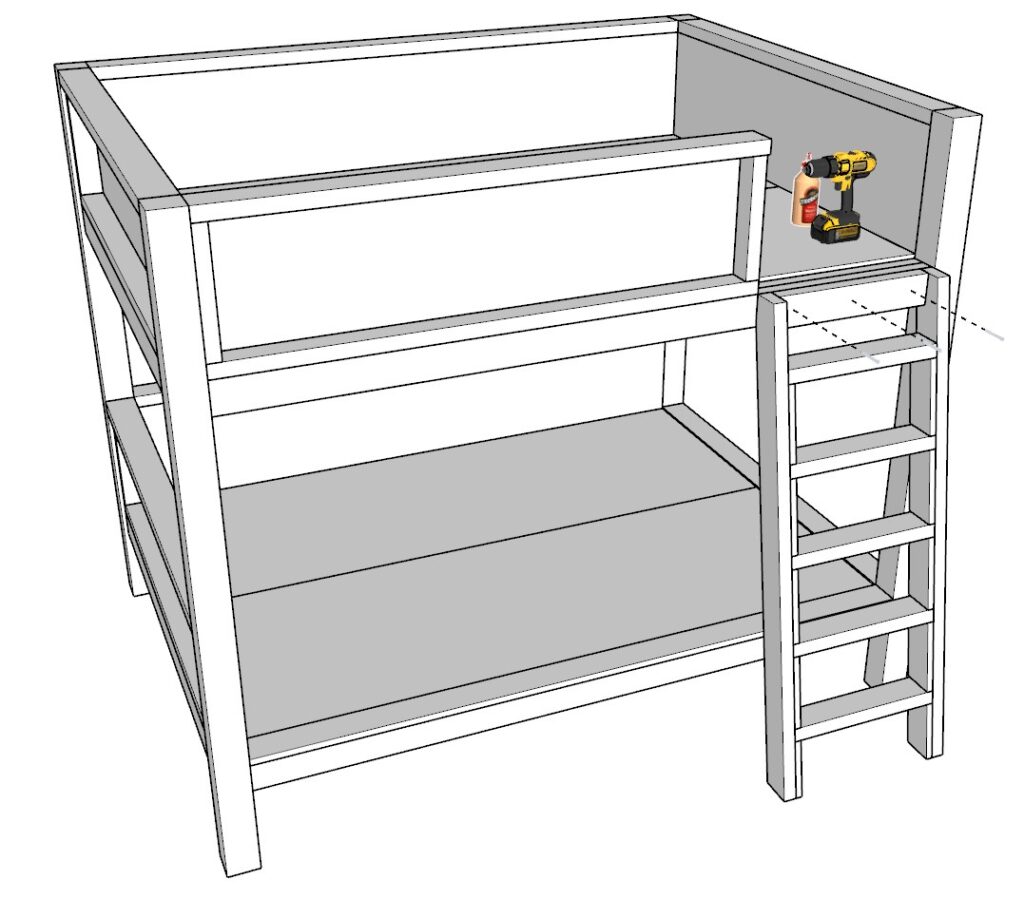
Mounting the Ladder:
- Securely attach the ladder to the frame of the bed with 3.5-inch screws and wood glue, ensuring it is firmly in place.
Adding Stability:
- Attach rubber pads to the bottom of the ladder to prevent slipping and to protect the floor. This enhances the overall stability and safety of the ladder.
Preparing the Bunk Bed for Staining or Painting
Proper preparation is crucial for achieving a high-quality finish, whether you’re staining or painting the bunk bed. Here’s how to prepare the bed meticulously:
Step 1: Sanding
- Sanding the Surface:
- Start with coarse-grit sandpaper (around 80-100 grit) to remove any rough spots and major imperfections.
- Progress to medium-grit sandpaper (150-180 grit) to smooth the surface further.
- Finish with fine-grit sandpaper (220-240 grit) to create a smooth finish that will accept stain or paint evenly.
- Ensure all surfaces are uniformly smooth, paying extra attention to edges and corners where hands will frequently touch.
Step 2: Cleaning
- Remove Dust:
- After sanding, thoroughly wipe down the entire bunk bed with a tack cloth to remove all sanding dust, which could impair the finish.
Step 3: Concealing Screw Holes
- Options for Concealing Screw Holes:
- Wood Putty: Easy to apply and sand, putty is ideal for painting as it can be made flush with the wood and painted over seamlessly. Not ideal for staining as it does not absorb stain like wood.
- Dowels and Dowel Plugs: Provide a wood-like finish that can be cut flush and sanded, making them suitable for both staining and painting. They tend to be more work-intensive but offer a more uniform wood grain pattern.
- Leaving Natural: Sometimes screw holes are left as is for a rustic look, especially if the project aims for a more ‘handmade’ feel. This is less labor-intensive but may not provide as refined a finish.
Staining or Painting the Bunk Bed
Step 1: Applying Stain
- Choosing the Stain:
- Select a stain that complements the wood type and matches your desired final look.
- Applying Stain:
- Use a natural bristle brush or a clean rag to apply the stain. Work in manageable sections.
- Follow the grain of the wood, and apply a consistent, even coat.
- Wipe off excess stain with a clean rag to prevent blotchiness or uneven color.
- Allow the stain to dry completely according to the manufacturer’s instructions before applying a second coat if deeper color is desired.
Step 2: Applying Paint
- Priming:
- Apply a wood primer to seal the wood and ensure even paint application. Let it dry completely.
- Painting:
- Use a high-quality brush or a foam roller to apply the first coat of paint. Choose a semi-gloss or gloss finish for durability and easy cleaning.
- Let the first coat dry completely, then lightly sand with fine-grit sandpaper to remove any imperfections.
- Apply a second coat to achieve a more solid, even color.
Maintaining the Bunk Bed
Regular Maintenance
- Cleaning:
- Wipe the bed regularly with a soft, damp cloth. Avoid harsh chemicals that can damage the finish.
- Check for Wear:
- Periodically inspect the bed for any loose screws or wear and tighten or replace hardware as needed.
- Look for any chips or scratches in the paint or stain and touch up as necessary to prevent moisture from seeping into the wood.
Long-term Care
- Protect from Moisture:
- Ensure the room is well-ventilated to avoid excessive moisture that could lead to wood swelling or mold.
By following these detailed steps, you ensure that the bunk bed is not only visually appealing but also durable and safe for long-term use. Regular maintenance and careful preparation for painting or staining will keep the bunk bed in excellent condition, making it a lasting piece of furniture in your home.