Introduction
Embrace the spirit of the holiday season by adding a twist to the classic Christmas decor. Crafting a nested wooden Christmas tree is not just about creating a unique centerpiece; it’s about engaging in a project that brings warmth and innovation to your festive traditions. This year, let the layers of a thoughtfully designed, self-made tree symbolize the layers of cherished holiday memories you’re yet to create.


Delving Into the DIY Plan:
Dimensions and Specifications:
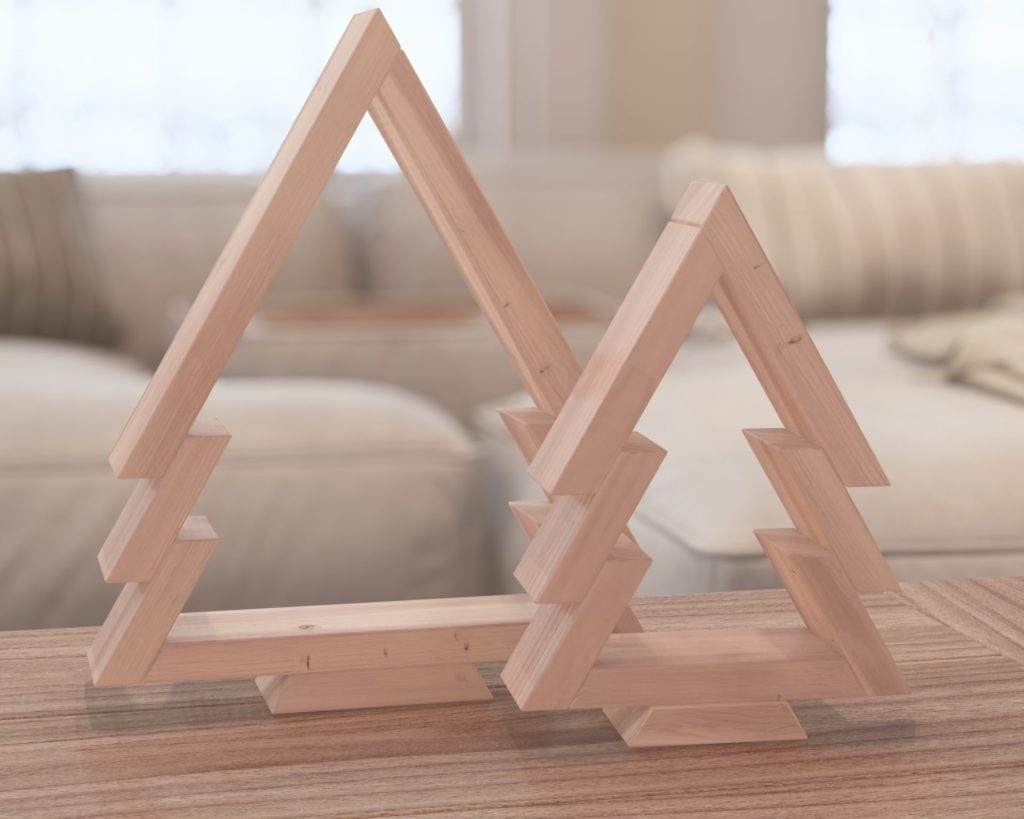
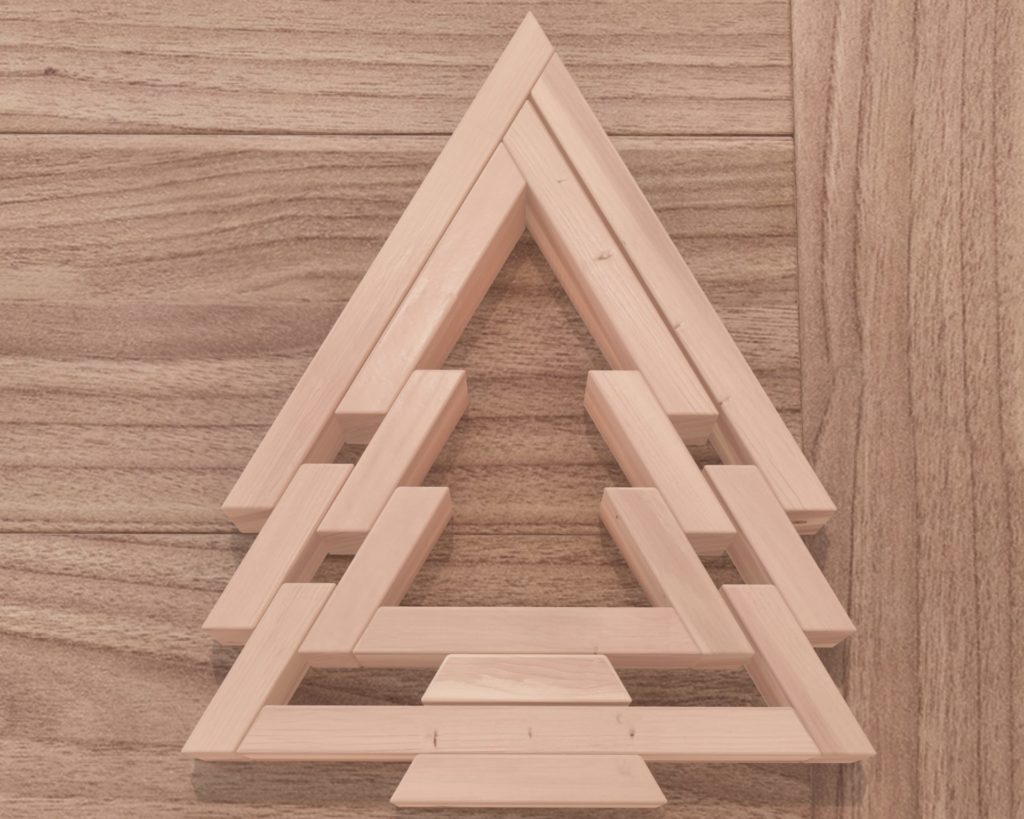
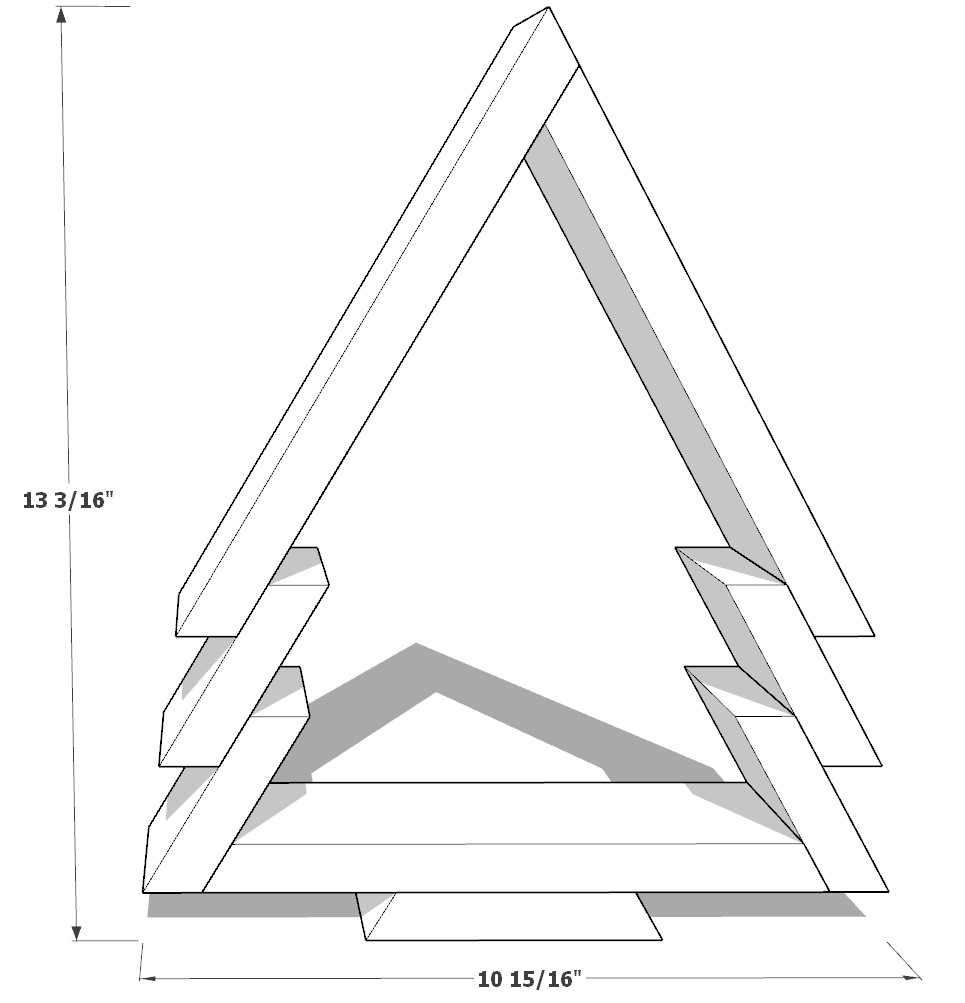
Our nested Christmas tree design is the perfect balance of art and architecture, intended to nestle seamlessly into your holiday setting. The multi-tiered silhouette stands out with elegance, designed to catch the eye without overwhelming your festive space.
Materials:
Our plan is as flexible as it is distinctive. Choose from various woods, from the soft allure of pine to the robustness of maple, to match your holiday aesthetic. The nested design is particularly accommodating for those with spare lumber looking to repurpose with purpose. It’s an eco-friendly choice that makes this project not just a statement of beauty but also of environmental consciousness.
Here's why our plan stands out:
- Clear, Concise Instructions: Each step is broken down for ease and enjoyment.
- Material Adaptability: Embrace the beauty of any wood, from fresh cuts to reclaimed pieces.
- Budget-Friendly: An excellent project for utilizing offcuts and spare wood.
- Modern Design: Our nested tree is a stylish departure from traditional holiday decor.
- Sustainability: Perfect for upcycling and reducing waste.
- Personalized Journey: Choose your wood, your finish, your decoration.
- Inclusivity: Designed for crafters of all skill levels, from novices to experts.
- Ongoing Support: We’re with you every step of the way, from sawing to celebrating.
As the winter festivities approach, dare to add a DIY masterpiece to your celebrations. Our nested wooden Christmas tree plan isn’t just about building something new; it’s about building memories. Are you ready to create your own?
Time
30 minutes (varies with experience)
Cost
$3 (Costs may vary based on location and supplier.)
Skill level required
Beginner

DIY Christmas Décor PDF Plan
What is included in the PDF download?
- Easy to read step by step instructions
- Material list
- Tools needed
- Helpful links to materials and tools needed
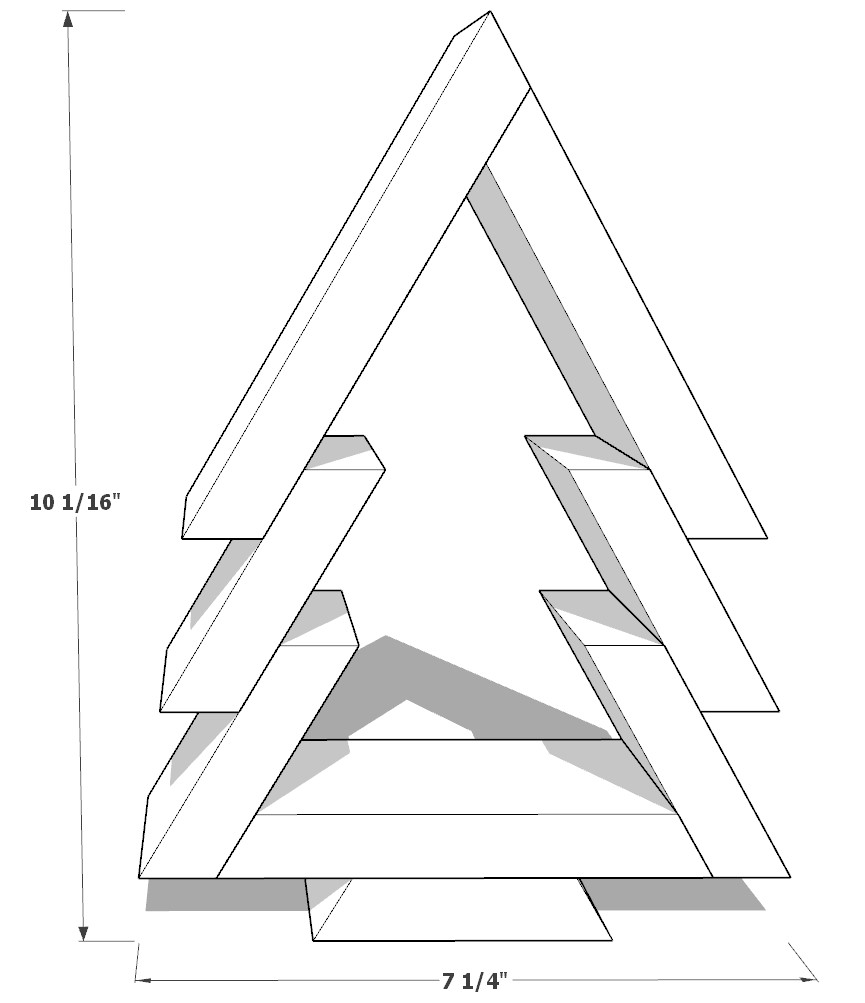
DIY Christmas Décor Dimensions (Smaller Tree)
Tools Needed for This Project:
Available with the purchase of the DIY plan PDF.
Lumber Shopping & Cut List
Available with the purchase of the DIY plan PDF.
Step 1: Lumber Preparation (Smaller Tree)
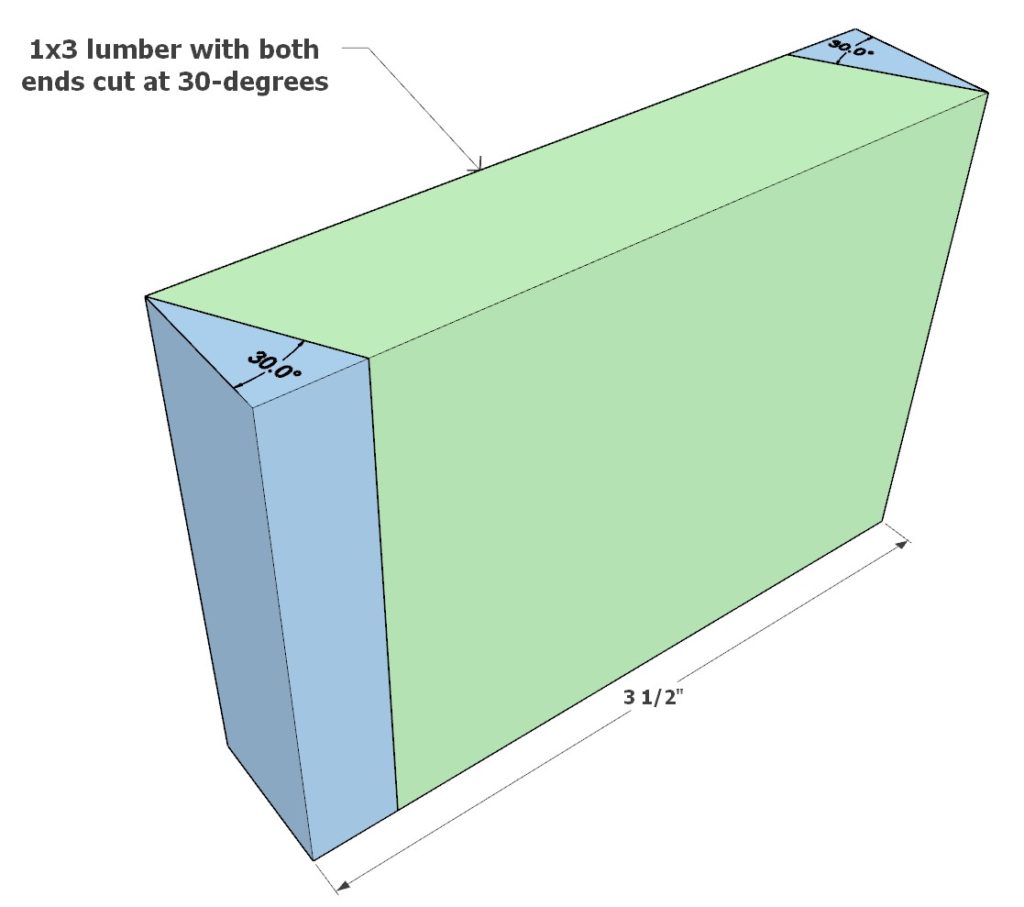
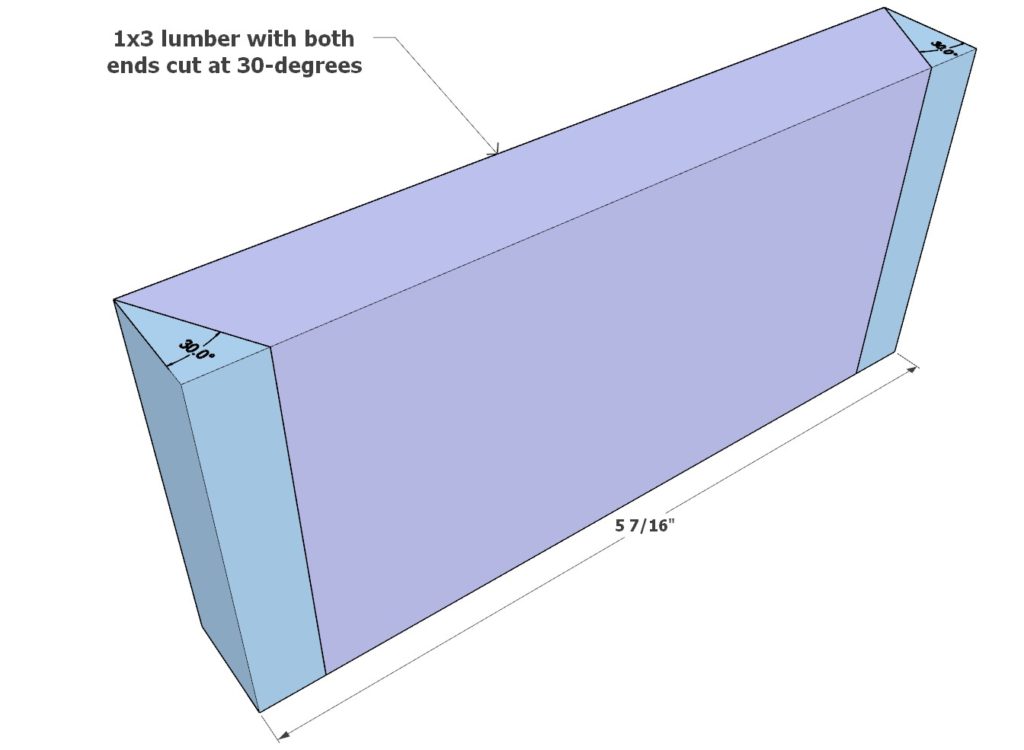
Begin by sourcing and preparing your wood. This design is optimized for 1×3 lumber, but feel free to modify the dimensions if you’re working with different sizes.
Cutting List:
- Green Pieces: Cut four pieces of 1×3 lumber to 3-1/2 inches in length, with both ends at 30-degree angles.
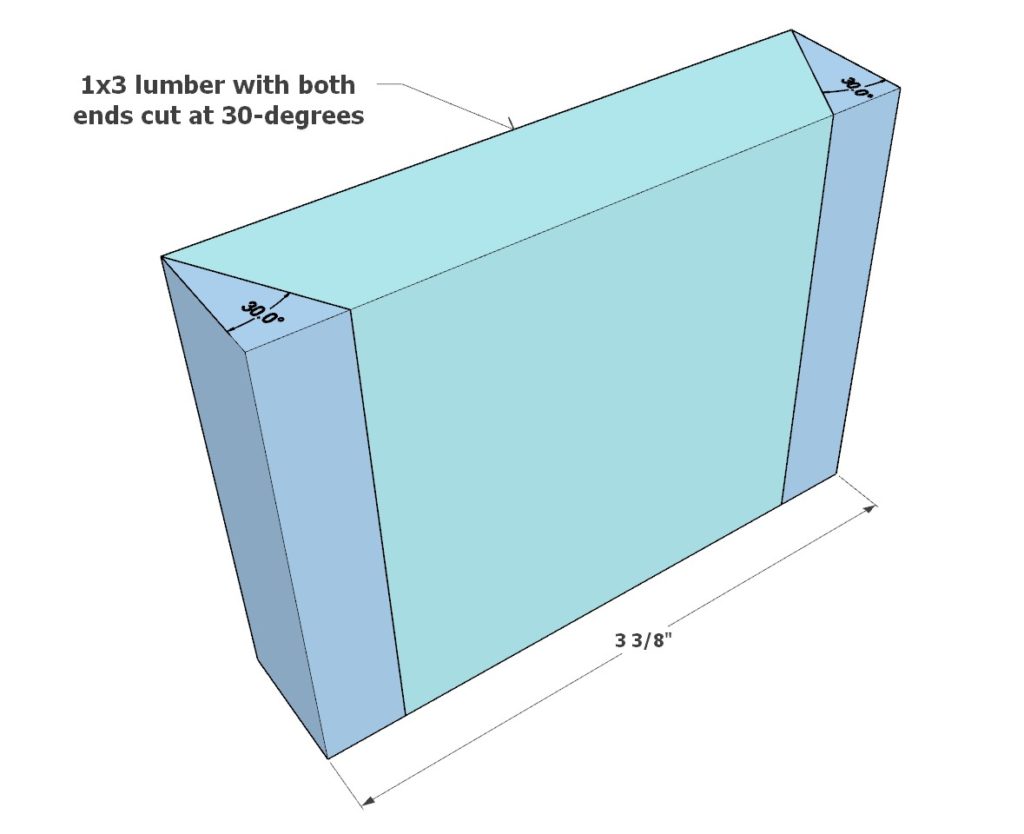
- Teal Piece: Cut one piece of 1×3 lumber to 3-3/8 inches in length, with both ends at 30-degree angles.
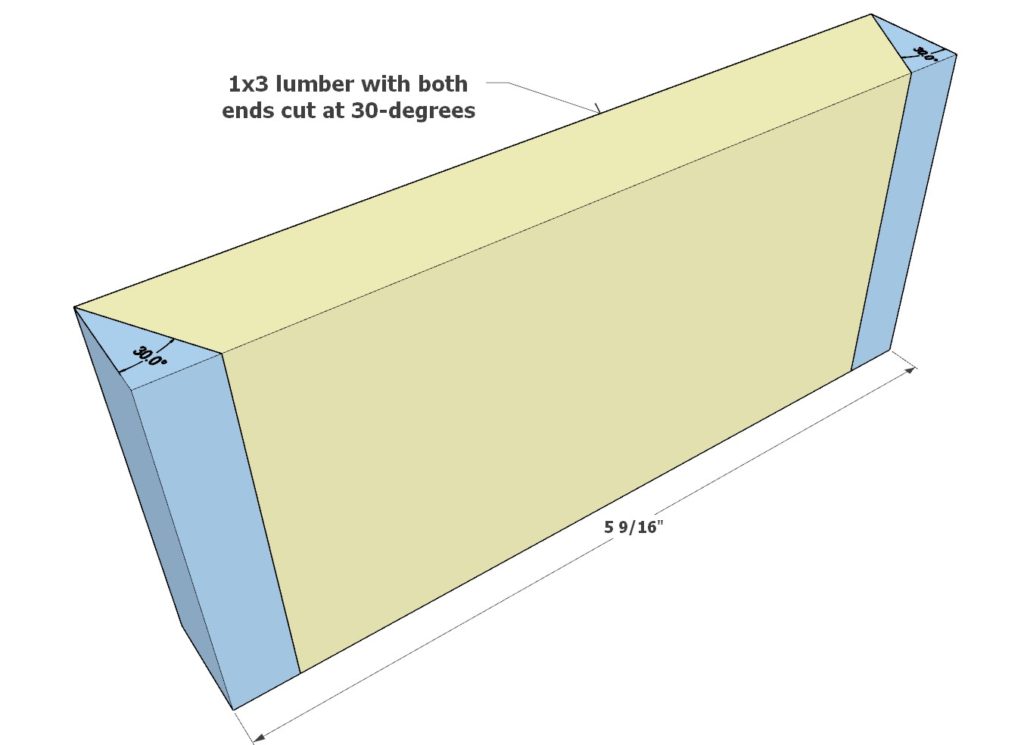
- Yellow Piece: Cut one piece of 1×3 lumber to 5-9/16 inches in length, with both ends at 30-degree angles.
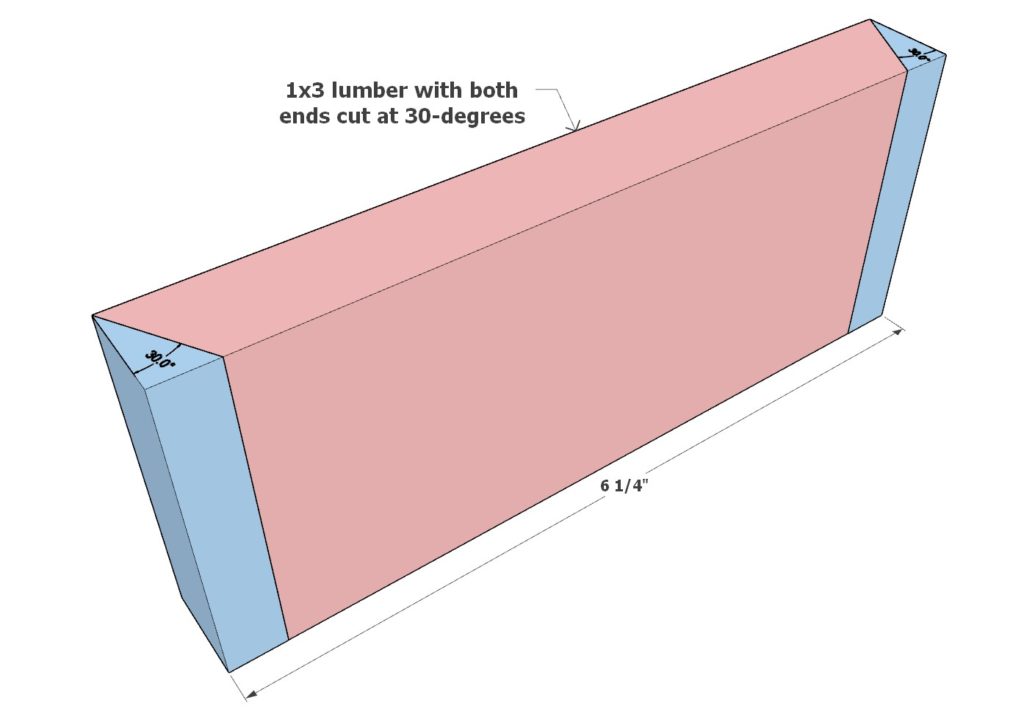
- Pink Piece: Cut one piece of 1×3 lumber to 6-1/4 inches in length, with both ends at 30-degree angles.
- Lavender Piece: Cut one piece of 1×3 lumber to 5-7/16 inches in length, with both ends at 30-degree angles.
Pro Tips:
- Sand all pieces prior to assembly for a smooth finish.
- Apply paint or stain before assembly to ensure an even coverage and minimize touch-up work.

Step 2: Assembling the Tree Structure (Smaller Tree)
Begin assembling your tree from the top down, starting with the smallest pieces.
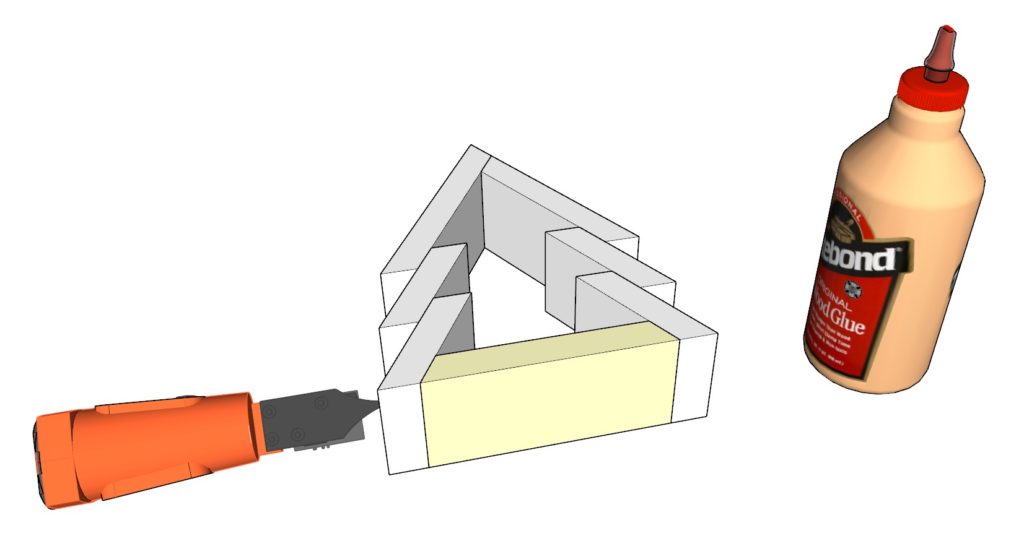
Top Assembly:
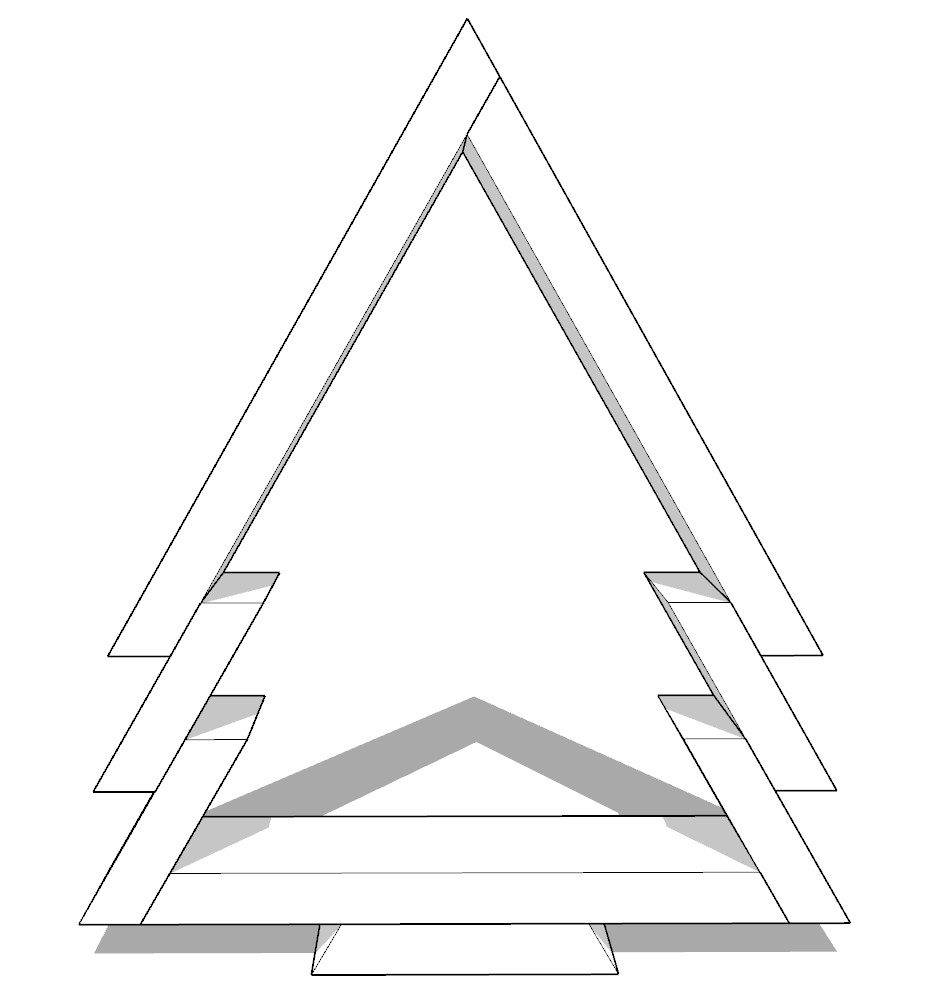
- Join the Lavender and Pink pieces as indicated in the first diagram to form the apex of the tree.
- Use 1-inch pin nails and wood glue for a firm attachment.
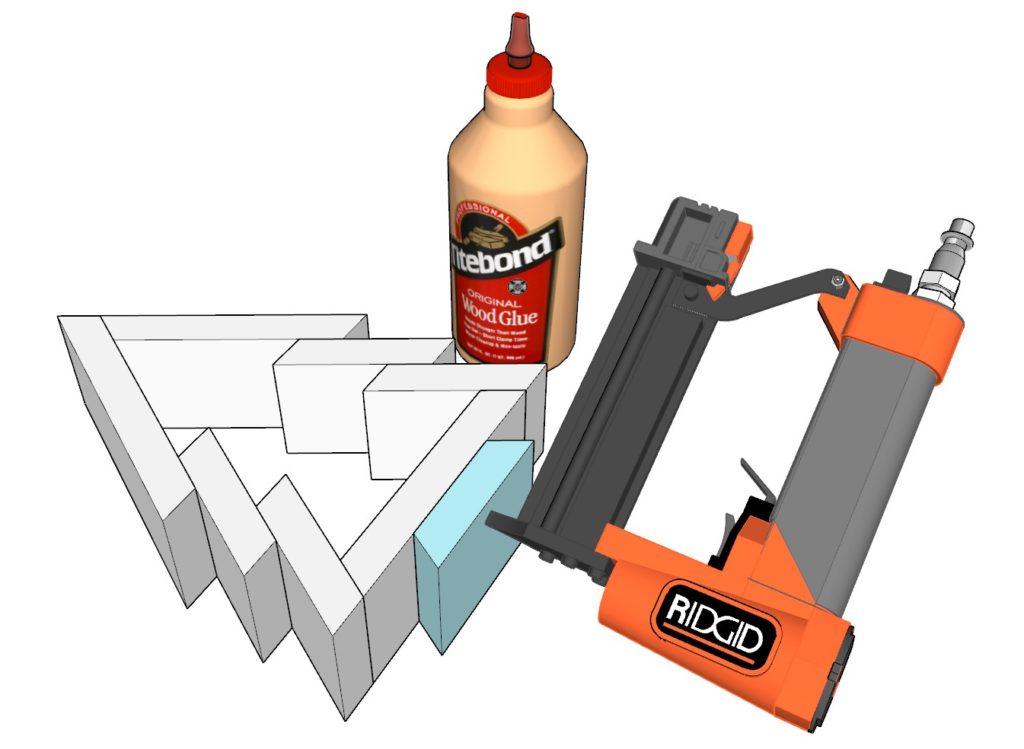
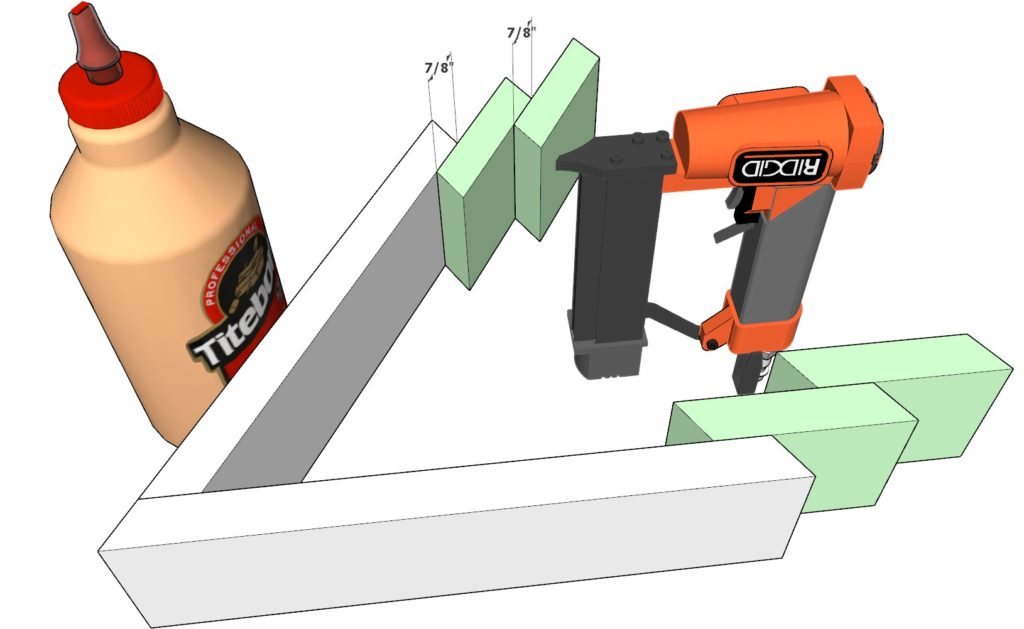
Middle Assembly:
- Add the four Green pieces according to the spacing shown in the second diagram.
- Secure each piece with wood glue and pin nails.
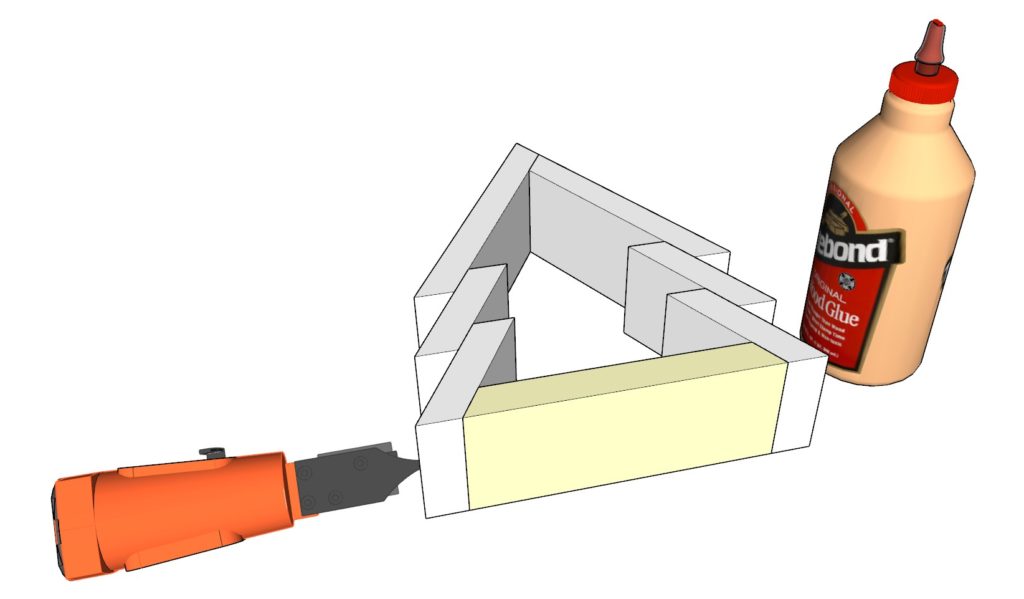
Bottom Assembly:
- Place the Yellow piece at the bottom to establish the tree’s base.
- Attach using the same combination of pin nails and wood glue.
Trunk Integration:
- Finally, fit the Teal piece at the bottom as the tree’s trunk.
- Adhere with pin nails and wood glue, ensuring it’s properly aligned.
Pro Tips:
- Choose fine pin nails to minimize wood splitting and maintain a clean look.
- If staining is part of your plan and hasn’t been done yet, promptly clean off any glue spills with a damp cloth to avoid staining issues later.


DIY Christmas Décor Dimensions (Larger Tree)
Tools Needed for This Project:
Available with the purchase of the DIY plan PDF.
Lumber Shopping & Cut List
Available with the purchase of the DIY plan PDF.
Step 1: Lumber Preparation (Larger Tree)
Begin by sourcing and preparing your wood. This design is optimized for 1×3 lumber, but feel free to modify the dimensions if you’re working with different sizes.
Cutting List:
- Green Pieces: Cut four pieces of 1×3 lumber to 3-1/2 inches in length, with both ends at 30-degree angles.
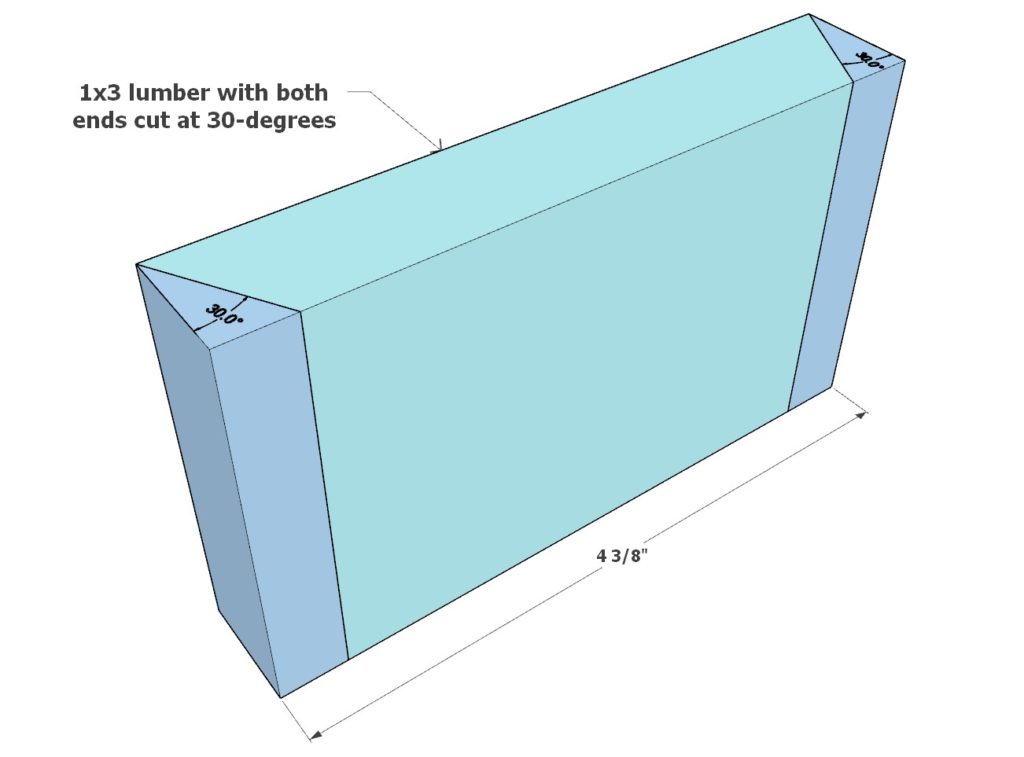
- Teal Piece: Cut one piece of 1×3 lumber to 4-3/8 inches in length, with both ends at 30-degree angles.
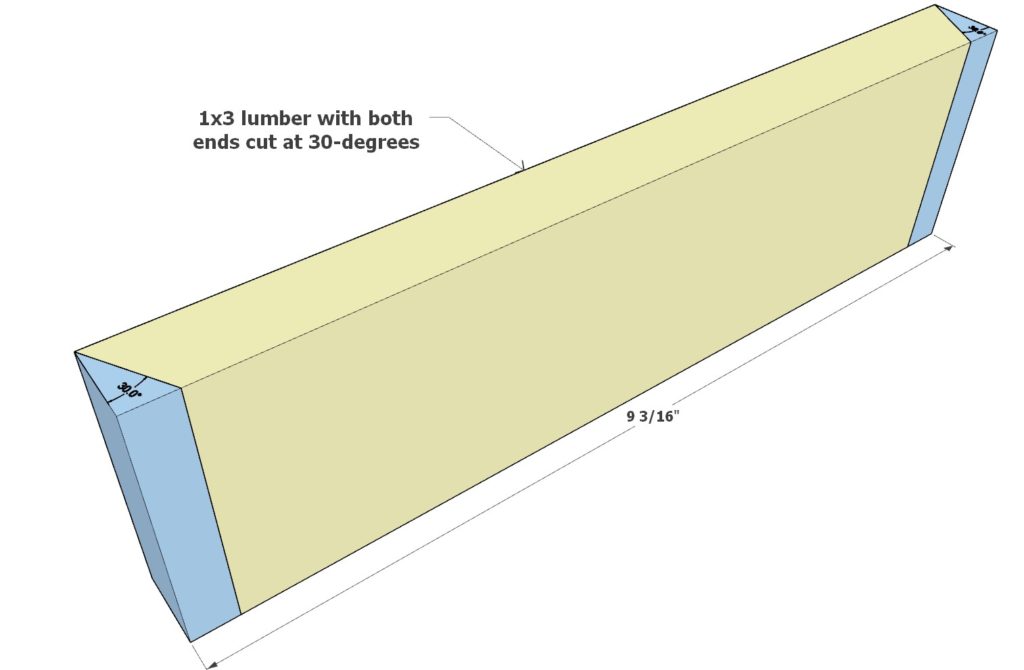
- Yellow Piece: Cut one piece of 1×3 lumber to 9-3/16 inches in length, with both ends at 30-degree angles.
- Pink Piece: Cut one piece of 1×3 lumber to 9-15/16 inches in length, with both ends at 30-degree angles.
- Lavender Piece: Cut one piece of 1×3 lumber to 9-1/16 inches in length, with both ends at 30-degree angles.
Pro Tips:
- Sand all pieces prior to assembly for a smooth finish.
- Apply paint or stain before assembly to ensure an even coverage and minimize touch-up work.


Step 2: Assembling the Tree Structure (Larger Tree)
Begin assembling your tree from the top down, starting with the smallest pieces.
Top Assembly:
- Join the Lavender and Pink pieces as indicated in the first diagram to form the apex of the tree.
- Use 1-inch pin nails and wood glue for a firm attachment.
Middle Assembly:
- Add the four Green pieces according to the spacing shown in the second diagram.
- Secure each piece with wood glue and pin nails.
Bottom Assembly:
- Place the Yellow piece at the bottom to establish the tree’s base.
- Attach using the same combination of pin nails and wood glue.
Trunk Integration:
- Finally, fit the Teal piece at the bottom as the tree’s trunk.
- Adhere with pin nails and wood glue, ensuring it’s properly aligned.
Pro Tips:
- Choose fine pin nails to minimize wood splitting and maintain a clean look.
- If staining is part of your plan and hasn’t been done yet, promptly clean off any glue spills with a damp cloth to avoid staining issues later.


Step 3: Finishing Touches – Sanding, Staining, and Painting
Sanding the Christmas Tree:
- Before sanding, always wear safety goggles and a dust mask to protect your eyes and lungs.
- Choose a medium-grit sandpaper to start, and sand the entire structure in the direction of the wood grain.
- To access tight spots or intricate areas, consider using a sanding block or folded sandpaper.
- Once the initial sanding is done, repeat the process using a fine-grit sandpaper to achieve a smooth finish.
- Wipe away all the dust using a soft cloth before proceeding to staining or painting.
Staining the Christmas Tree:
- Always use gloves to protect your hands and work in a well-ventilated area.
- Prepare your wood by ensuring it’s free from dust and debris.
- Use a brush or rag to apply the stain, moving in the direction of the wood grain.
- Allow the stain to penetrate the wood; the longer you leave it on, the deeper the color will be.
- Wipe away any excess stain with a clean cloth.
- Allow the stain to dry according to the manufacturer’s recommendations.
Painting the Christmas Tree:
- Begin by priming the wood to ensure an even and lasting paint application.
- Once the primer is dry, apply your chosen paint color using a paintbrush or foam brush for a smoother finish.
- Remember to paint in the direction of the wood grain and to apply thin, even coats.
- Depending on the paint type and color choice, you may need multiple coats. Always allow sufficient drying time between coats.
- Once done, let the final coat dry thoroughly before displaying or using your Christmas tree.
Safety Tips:
- Always work in a well-lit and well-ventilated space, especially when using paints and stains which can emit fumes.
- Keep children and pets away from your workspace.
- Store paints, stains, and other chemicals out of reach and in a safe place.