Why Build the 4-Tote Shelf Overhead Rack Add-On?
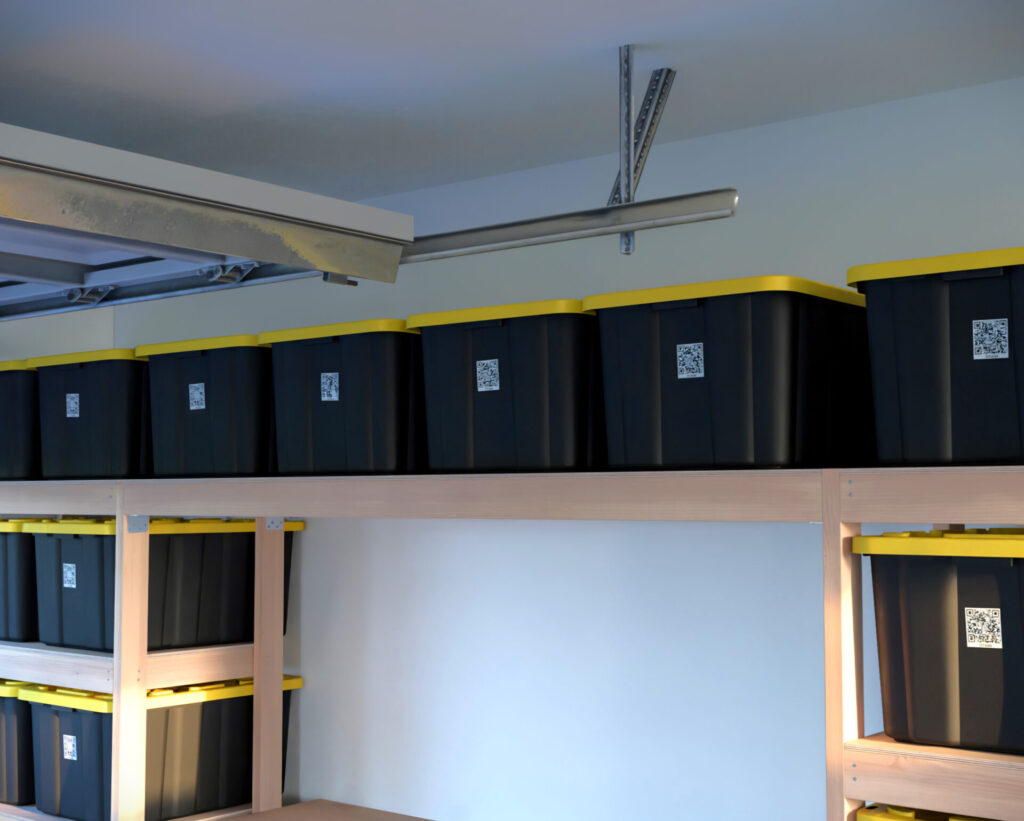
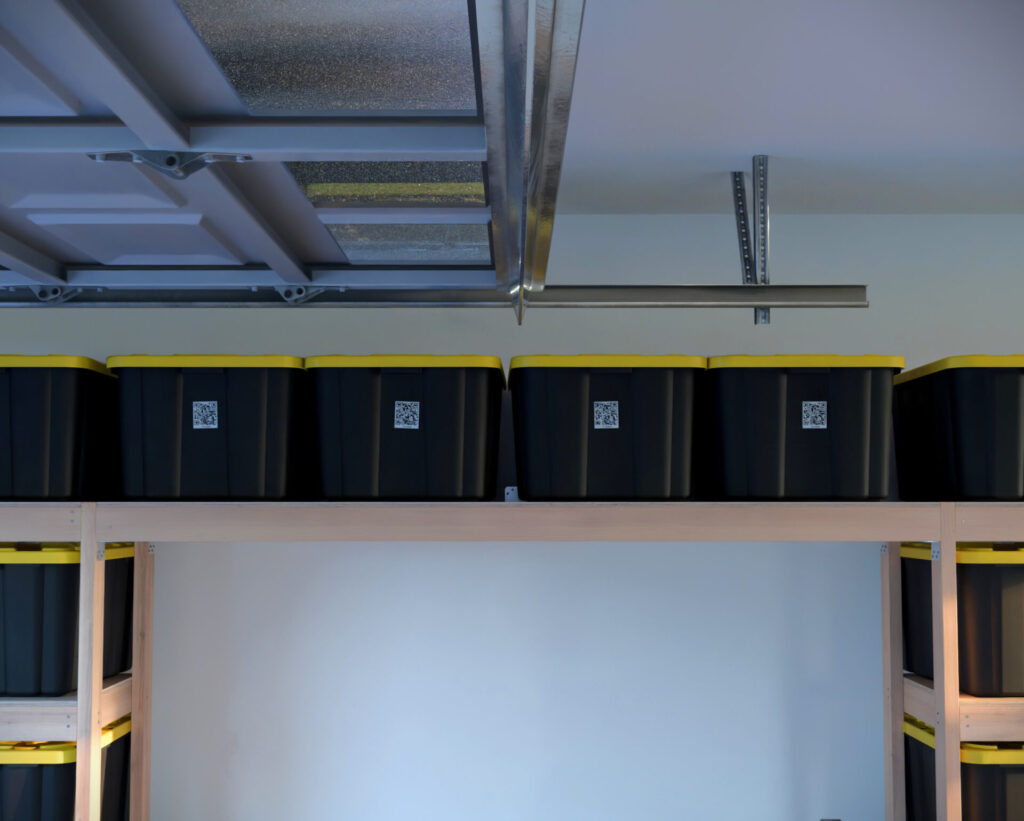
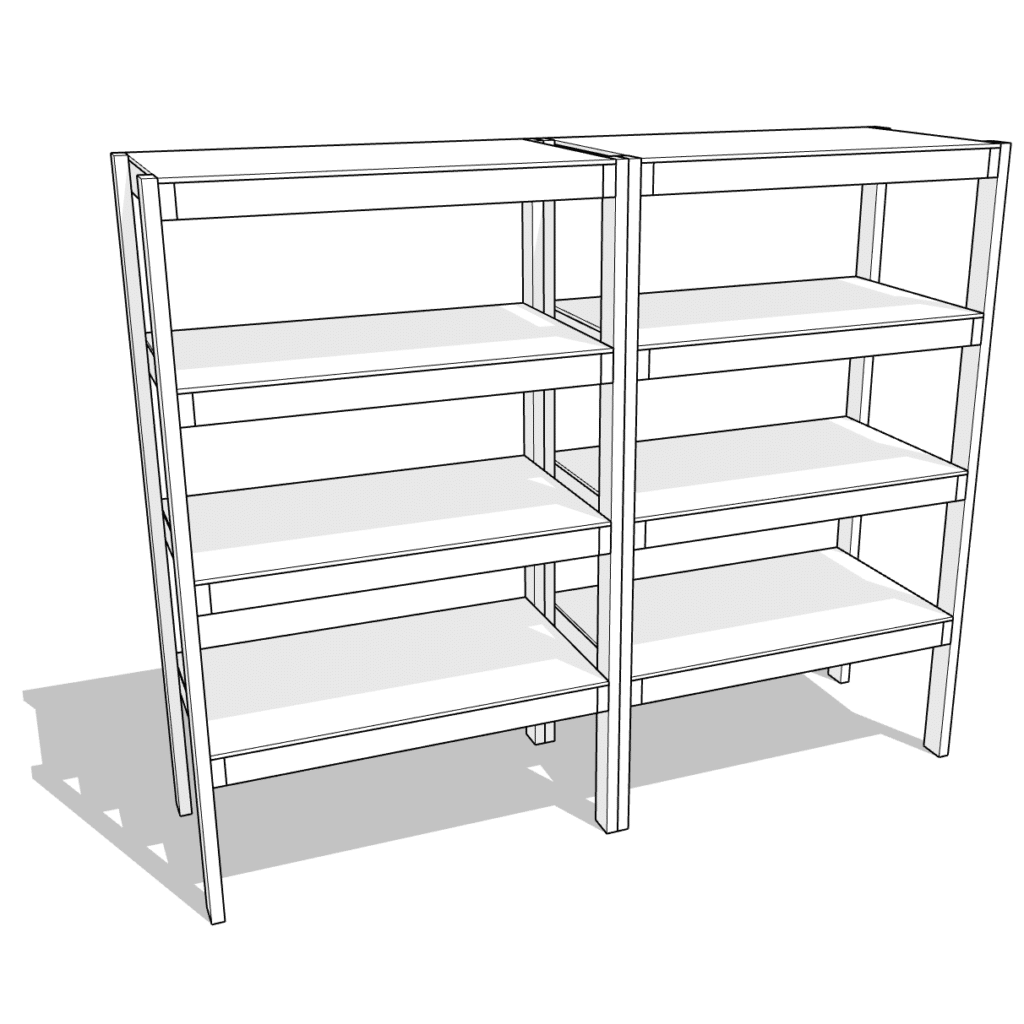
Maximize vertical storage in your garage with this 4-Tote Shelf Overhead Rack Plan—a modular add-on designed to seamlessly connect and extend your existing 27-gallon tote racks. This add-on is perfect for utilizing overhead space, whether above your washer and dryer, refrigerator, or other garage furniture. Transform wasted vertical areas into efficient, accessible storage with a design that integrates smoothly into your existing shelving setup.
This add-on helps you achieve:
- Overhead Organization: Store less-frequently-used items up high, freeing up floor space.
- Custom Configuration: Extend and connect two tote racks or use it as a standalone addition.
- Versatility in Placement: Ideal for overhead storage above appliances or furniture, or as a bridge between two racks for a cohesive look.
Key Features and Specifications
- Holds 27-Gallon Totes: Designed to fit standard totes from brands like Costco, Home Depot, and Walmart.
- Sturdy and Safe: Built from durable 2×4 lumber and ½-inch plywood to ensure maximum stability, even with heavy loads.
- Beginner-Friendly Build: Easy enough for novice DIYers while delivering a professional-grade result.
- Customizable Placement: Install overhead or connect two racks together for extended functionality.
- Optimized for Space: Perfect for garages, utility rooms, or spaces with appliances needing overhead storage.
What’s Included in the DIY Plan PDF?
With this purchase, you’ll receive a detailed guide to build the 4-Tote Shelf Overhead Rack, designed to complement your tote shelving system. Here’s what’s inside:
- Step-by-Step Written Instructions
Perfect for beginners and experienced builders alike, with clear directions for assembly. - Color-Coded Diagrams
Easy-to-follow visuals showing precise placements of all components. - Tools and Materials Lists
Know exactly what you need to start, from screws to lumber and plywood. - Lumber Shopping & Cut Lists
Streamline your trip to the hardware store with pre-calculated measurements.
Why Choose This Plan?
- Practical Design: Use vertical space without sacrificing accessibility or style.
- Budget-Friendly: Build your own overhead storage at a fraction of the cost of pre-made options.
- Adaptable Applications: Whether for totes, tools, or seasonal items, this add-on fits seamlessly into any storage strategy.
Get Started Today!
Download the 4-Tote Shelf Overhead Rack Plan now and unlock the potential of your garage or utility room. This beginner-friendly project is an excellent way to make the most of vertical space while keeping your items safe and organized.
Time
(varies with experience)
Cost
{{$230}} (Varies by location and supplier.)
Skill level required
Beginner
DIY Garage Shelving Plan for 27-Gallon Totes
What’s Included in the PDF Download?
- Step-by-step instructions
- Detailed materials list
- Comprehensive tools list
- Links to materials and tools
Tools and Materials List
Note: The materials list will yield two shelves, as it is more efficient to build two units rather than one.
Tools
- Miter Saw – For precise and square cuts.
- Circular Saw – for cutting the plywood.
- Screwdriver/Drill – Drives screws easily and efficiently; used in most steps.
- Drill – Needed for pre-drilling holes to prevent wood splitting.
- Countersink Drill Bit (Optional) – Allows screws to sit flush and prevents splitting for a cleaner finish.
Materials
- 3.5″ Screws – Approximately ({96 pieces}); used for structural connections.
- 2.5″ Screws – Approximately ({128 pieces}); primary fasteners throughout the build.
- 1″ Screws – For attaching brackets to units.
- Wood Glue – Provides additional strength at joints; optional but recommended.
- 2×4 L-Shaped Brackets (like Simpson Strong Ties) – Reinforces connection to wall for stability.
- Shims or Scrap Wood – Levels base on uneven floors to prevent wobbling.
- Stud Finder – Identifies wall studs for secure mounting.
- Level (Optional) – Checks for plumb and level during installation.
Affiliate Link Notice
I recommend tools and materials I trust and use. Purchasing through my affiliate links supports my work at no extra cost to you. Thank you for your support!
Lumber Shopping & Cut List
Note: The lumber shopping list and cut list will yield materials for two shelves, as it is more efficient to build two units rather than one.
Lumber Shopping List:
- ({24 pieces}) – ({2x4x8ft}) dimensional lumber
- ({3 pieces}) – ({1/2″ plywood, 4×8 sheet})
Cut List:
Dimensional Lumber (2x4s)
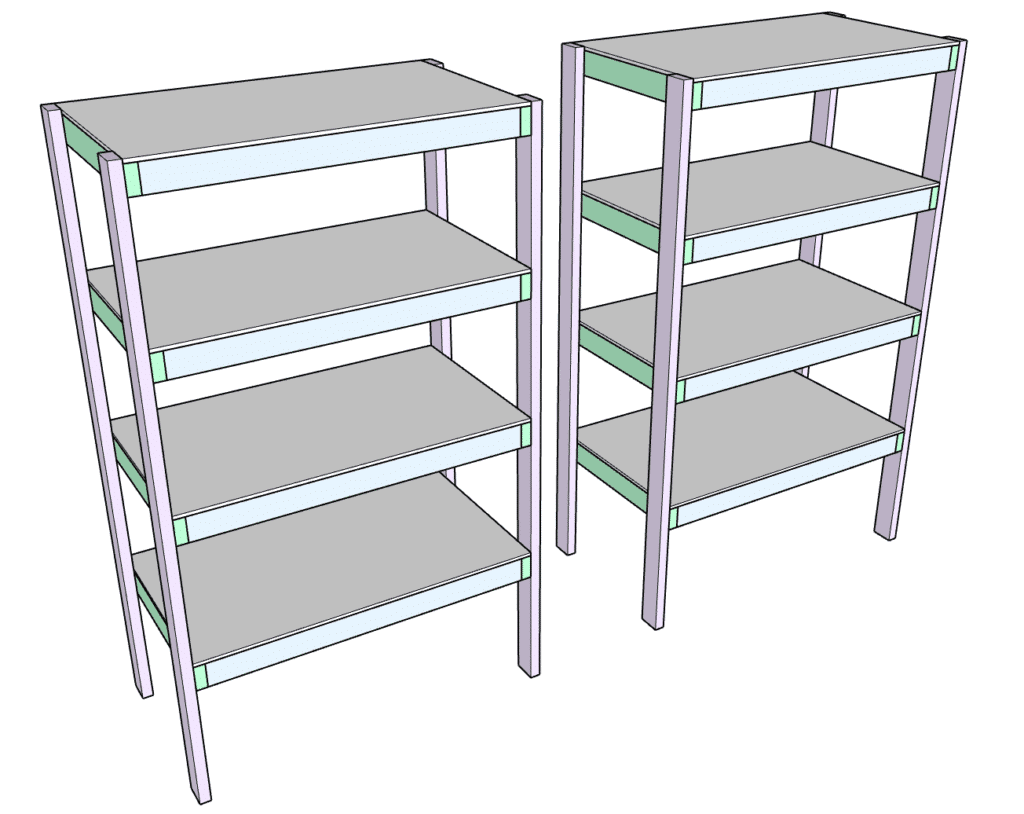
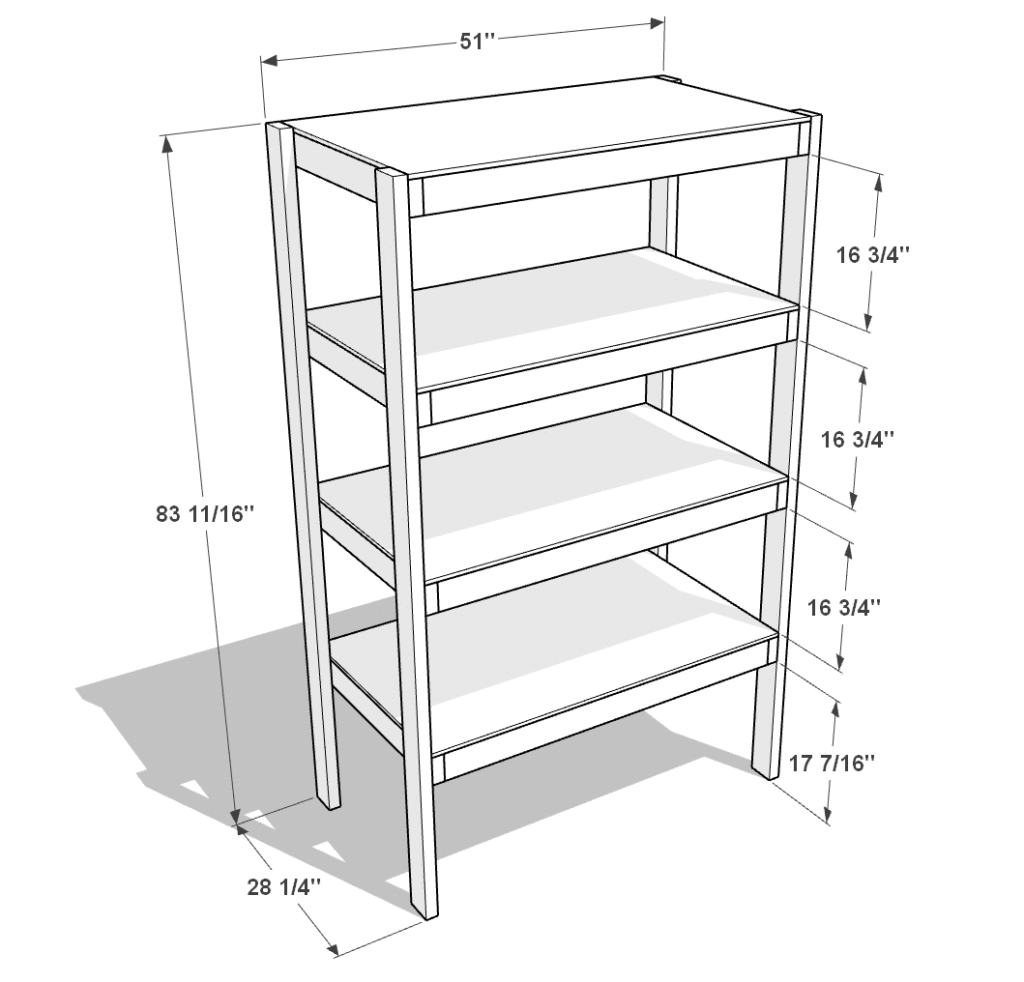
- ({4 pieces}) – ({83-11/16″}) vertical legs (purple)
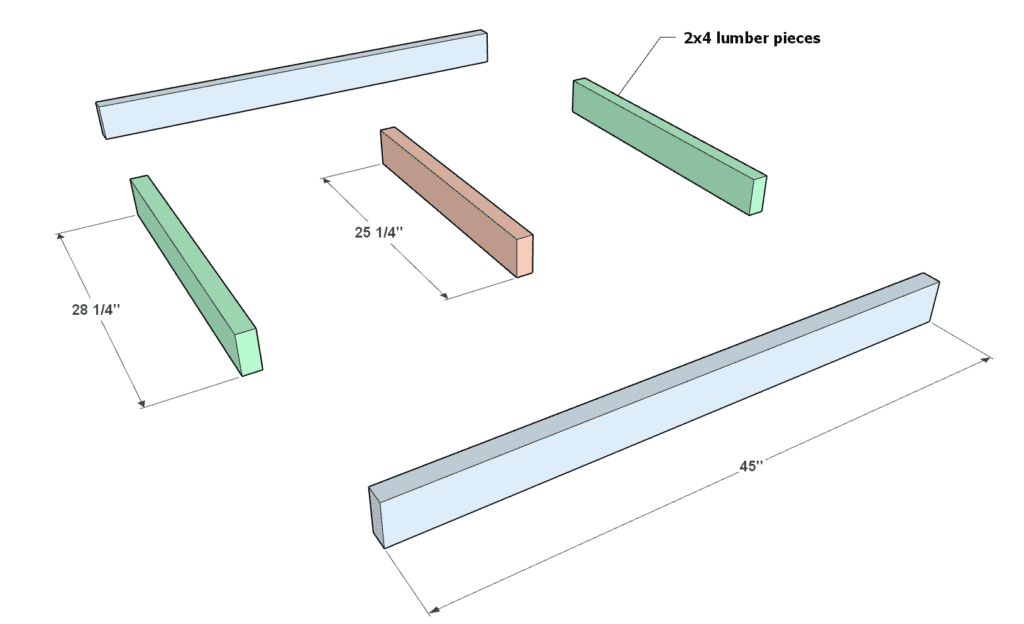
- ({16 pieces}) – ({45″}) frame sides (blue)
- ({16 pieces}) – ({28-1/4″}) frame ends (green)
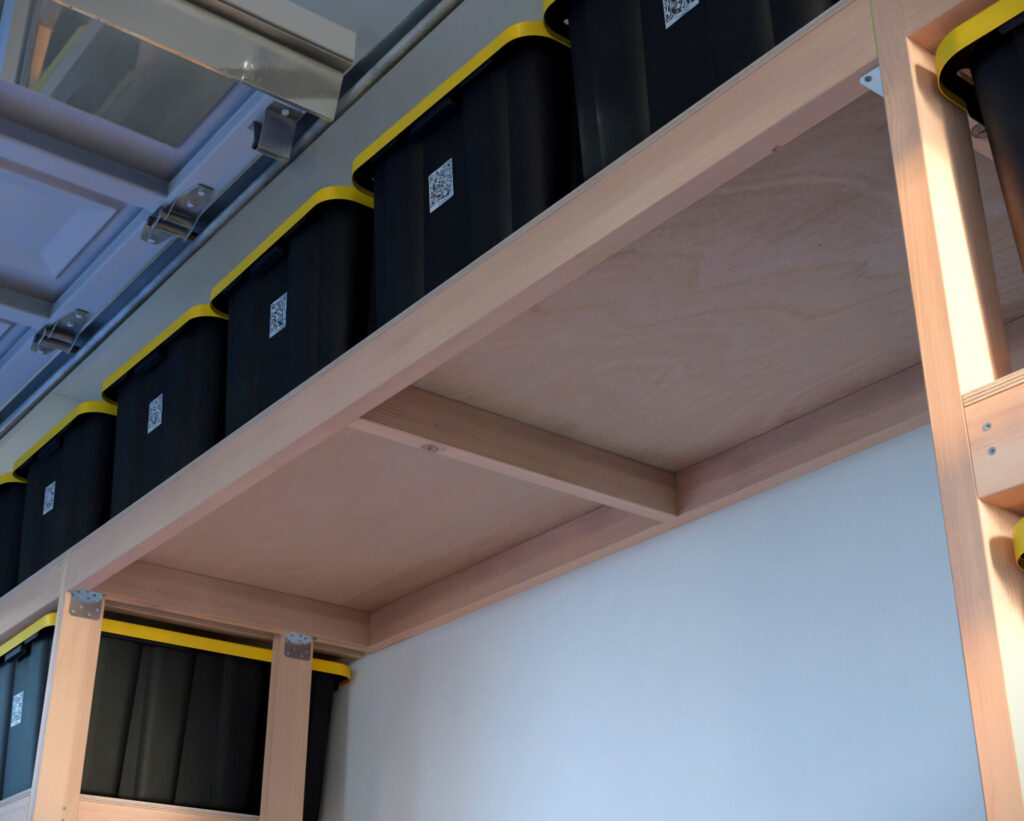
- ({8 pieces}) – ({25-1/4″}) center supports (peach)
Plywood
- ({8 pieces}) – ({48″ × 28-1/4″}) shelf tops
Step 1: Gather Materials and Build Shelf Frames
This step covers materials and assembly of the shelf frames. These attach to the tote rack for extra storage.
Materials:
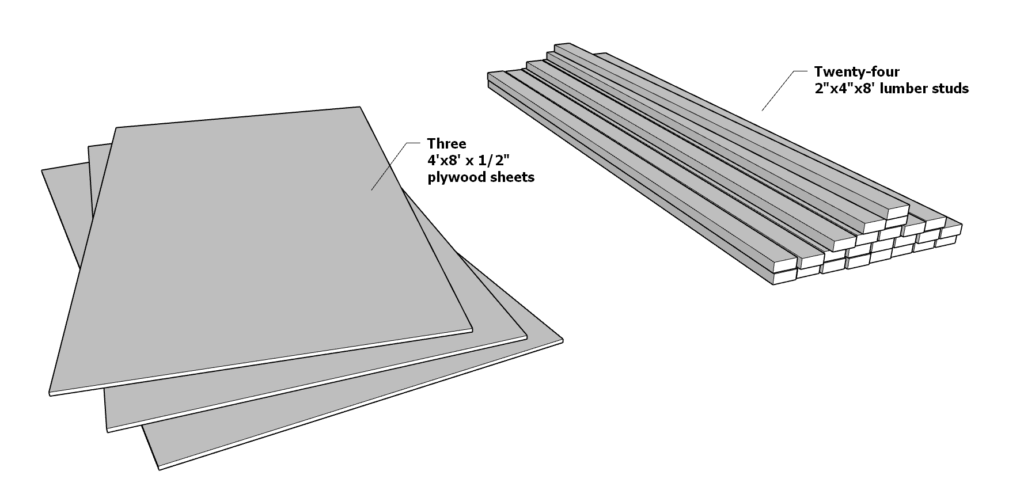
- 3 plywood sheets: 4 ft x 8 ft (48 in x 96 in), 1/2 in thick. (Other thicknesses possible; 1/2 in balances strength and cost.)
- 24 pieces of 2×4 lumber: Each 8 ft (96 in) long.
1.1 Assemble Each Frame
- Lay two 45 in (blue) pieces parallel as sides.
- Attach two 28-1/4 in (green) pieces at ends to form rectangle.
- Center 25-1/4 in (peach) piece in middle.
- Pre-drill holes at joints.
- Countersink for flush screws.
- Fasten with 3-1/2 in screws. Use wood glue for stronger hold (optional).
1.2 Verify Frame
- Match diagram layout.
- Ensure square corners.
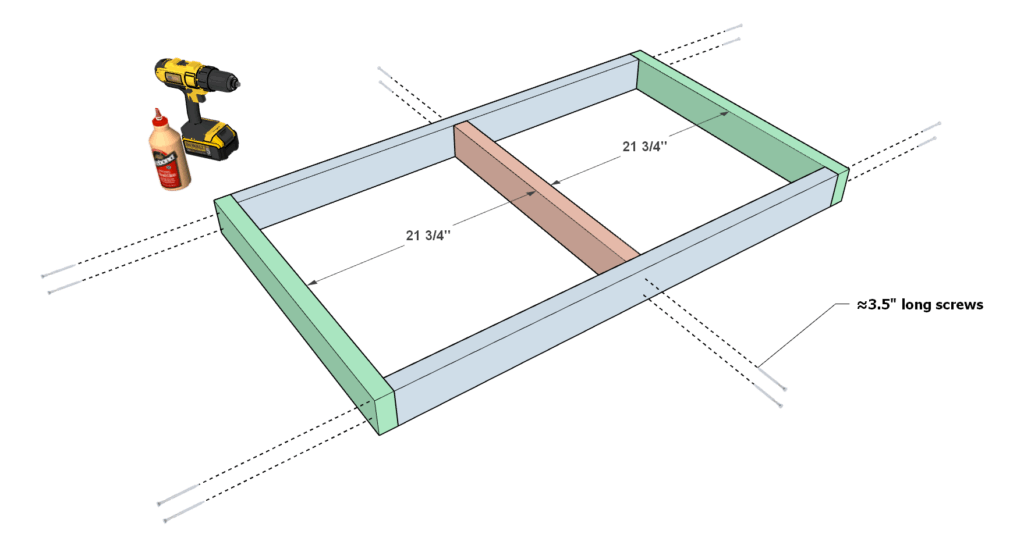
Step 2: Add Plywood to Shelf Frames
This step adds plywood tops to the frames from Step 1.
2.1 Cut Plywood
- Cut the plywood sheets into three pieces, each 48 in x 28-1/4 in.
- Use a circular saw for straight cuts. Measure carefully to fit the frames.
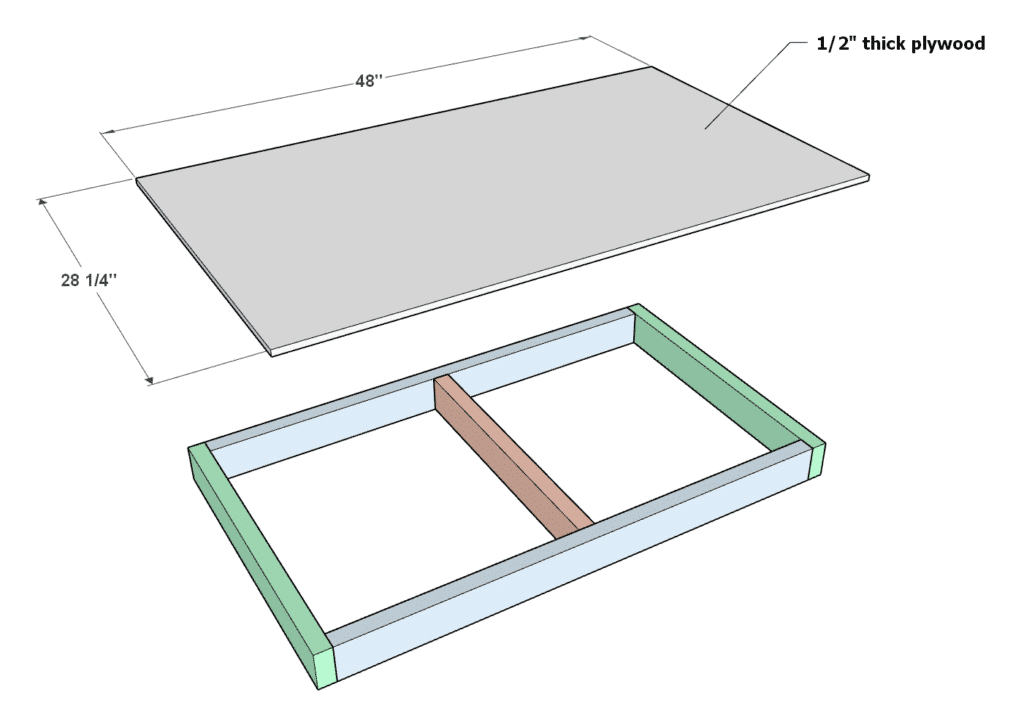
2.2 Attach Plywood
- Place a plywood piece on top of a frame, aligned with edges.
- Pre-drill holes through plywood into frame.
- Countersink for flush screws.
- Secure with 2-1/2 in screws along edges and center support. Use wood glue under plywood for stronger bond (optional).
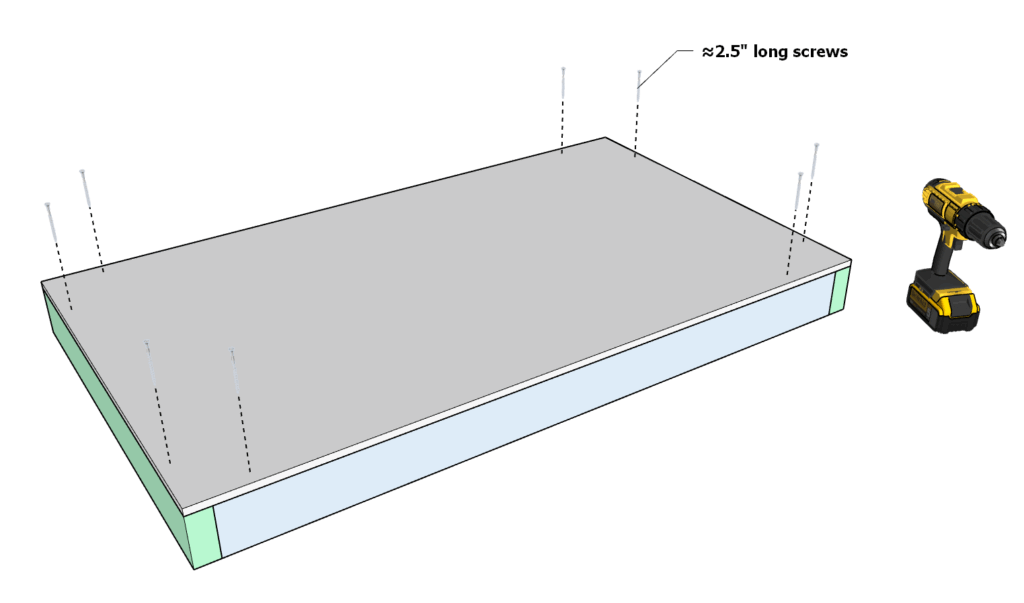
2.3 Repeat for All
- Build seven more shelves the same way.
- Match diagram for layout.
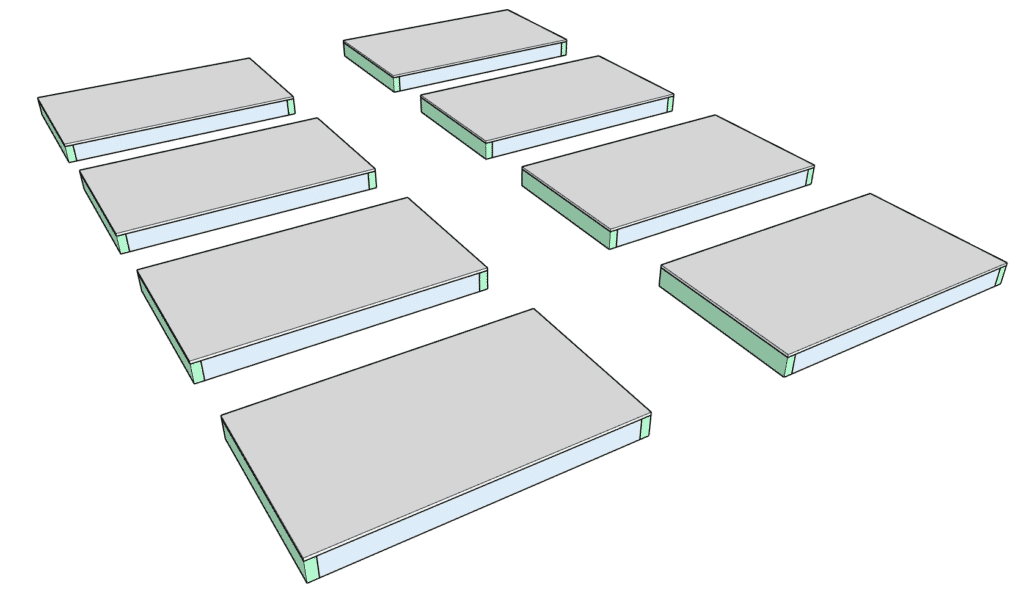
Step 3: Assemble Shelf Unit with Legs
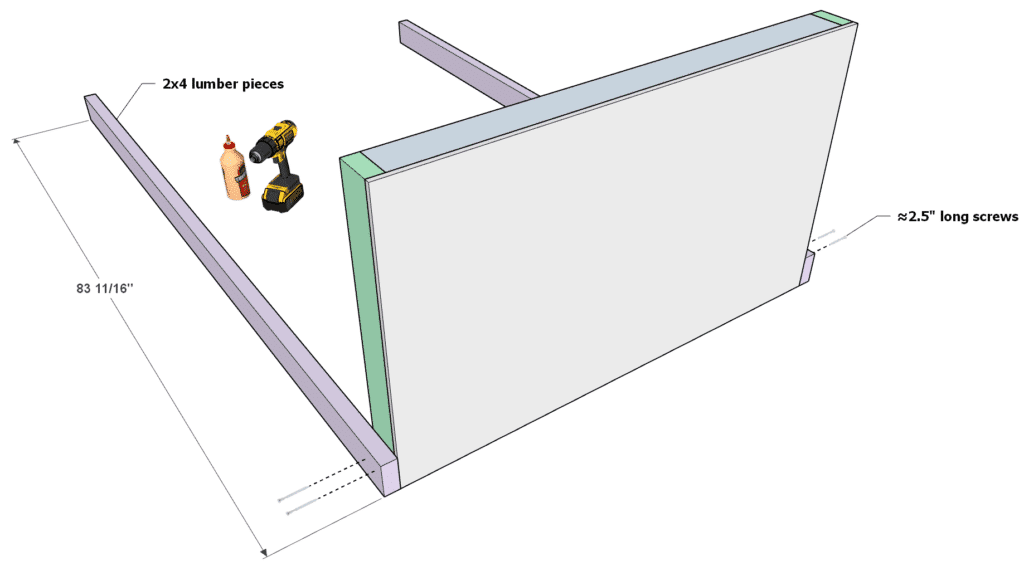
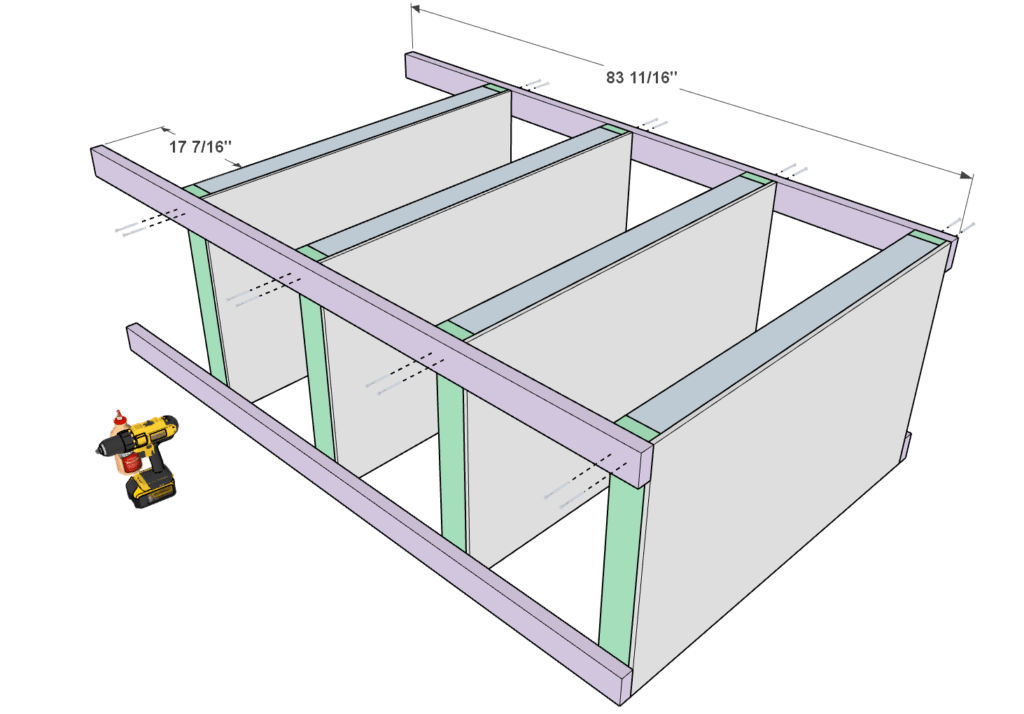
This step connects the four shelves from Step 2 to four vertical 2×4 legs (83-11/16 in long, purple in diagram) for the full structure.
3.1 Attach First Shelf to Two Legs
- Place one shelf flat.
- Position two purple legs at one end of the shelf, aligned with corners.
- Pre-drill holes at joints.
- Countersink for flush screws.
- Fasten with 2-1/2 in screws. Use wood glue for stronger hold (optional).
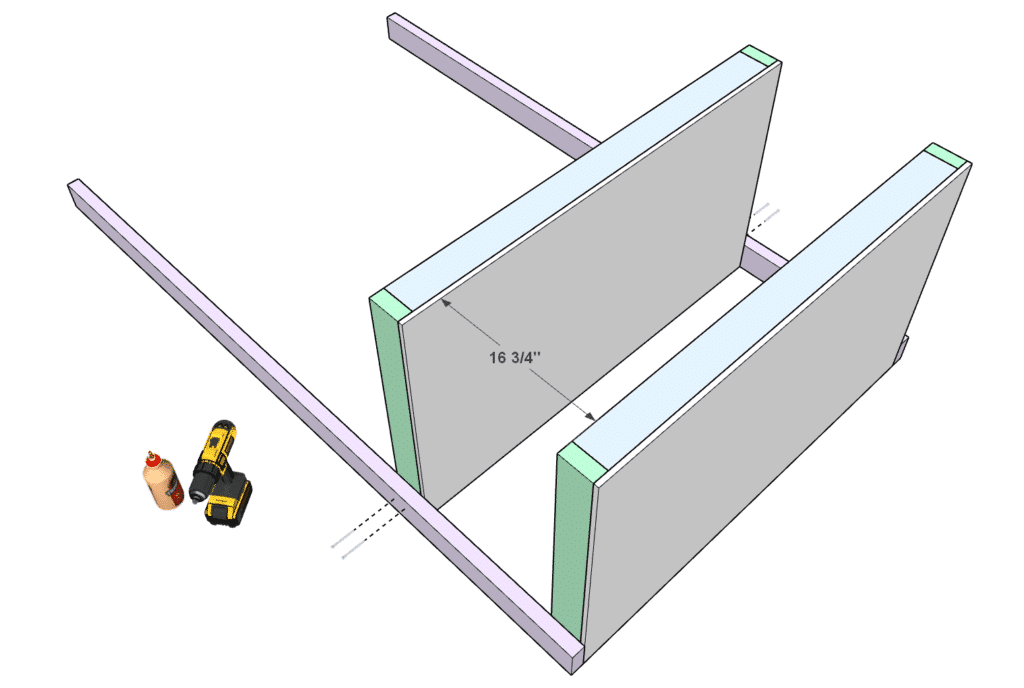
3.2 Attach Second Shelf
- Position the second shelf 16-3/4 in away from the bottom of the first shelf.
- Align with the legs.
- Pre-drill holes at joints.
- Countersink for flush screws.
- Fasten with 2-1/2 in screws. Use wood glue (optional).
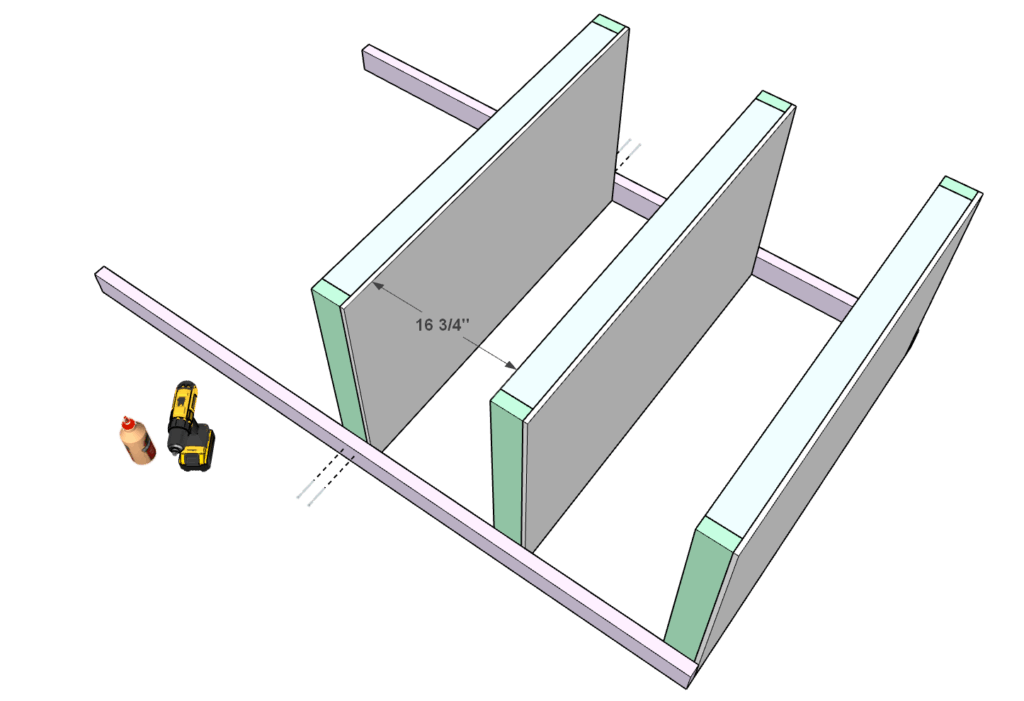
3.3 Attach Third Shelf
- Position the third shelf 16-3/4 in away from the bottom of the second shelf.
- Align with the legs.
- Pre-drill holes at joints.
- Countersink for flush screws.
- Fasten with 2-1/2 in screws. Use wood glue (optional).
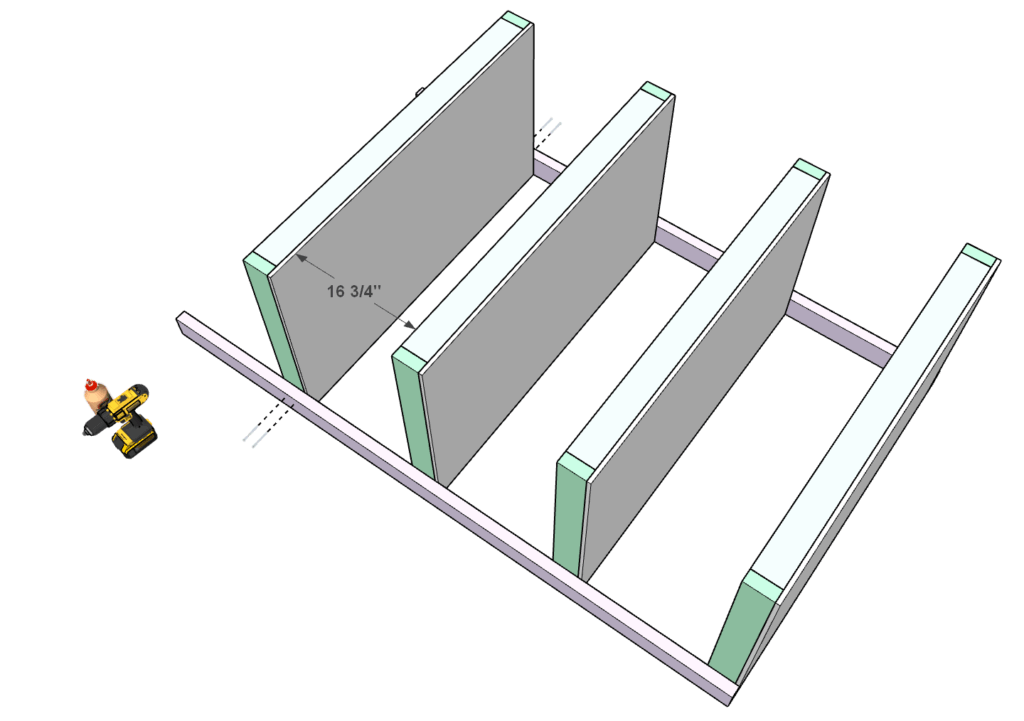
3.4 Attach Fourth Shelf
- Position the third shelf 16-3/4 in away from the bottom of the third shelf.
- Align with the legs.
- Pre-drill holes at joints.
- Countersink for flush screws.
- Fasten with 2-1/2 in screws. Use wood glue (optional).
3.5 Attach Remaining Legs
- Position the other two legs (represented in purple) as shown in the diagram, aligned with corners.
- Pre-drill holes at joints.
- Countersink for flush screws.
- Fasten with 2-1/2 in screws. Use wood glue (optional).
- Match diagram for placement.
- Use clamps to hold the lets in place while attaching.
Step 4: Securing the Shelf Unit to the Wall
This shelf units are designed with specific dimensions and layout to integrate seamlessly with the Home Depot 27 Gallon Tote Storage Rack, allowing for combined storage. If using them as a standalone shelves, follow these steps to attach them securely to wall studs for stability and to prevent tipping.
4.1 Prepare and Locate Studs
- Use a stud finder to find wall studs (typically 16 in apart; confirm based on your wall).
- Slide the stud finder horizontally until it signals; mark both edges of each stud.
- Avoid areas near outlets, switches, or wiring; turn off power if unsure and consult a pro.
- Select screws: 1 in for brackets to unit; 3.5 in or longer for wall (test for secure grip).
4.2 Install Brackets
- Position bracket to align with a stud and the unit’s top or side.
- Attach bracket to unit first with 1 in screws.
- Secure to wall stud with longer screws.
- Repeat for additional brackets, spacing about 16 in apart.
- Check level as you go; add shims under base for uneven floors to eliminate wobble.
4.3 Final Check
- Push and pull gently to test stability; add more brackets if needed.
- Ensure units can support weight without tipping; do not skip studs.
4.4 Sanding Tip
- If sanding for a smooth finish, sand lightly, especially on plywood to avoid damaging thin layers.
