Why Build Your Own Garage Shelving?
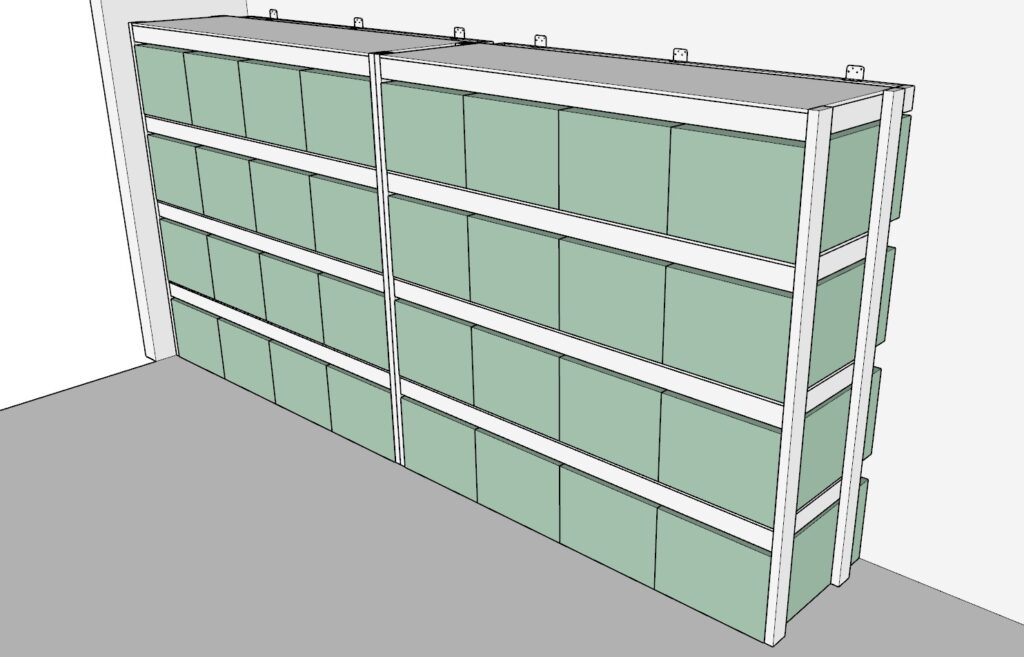
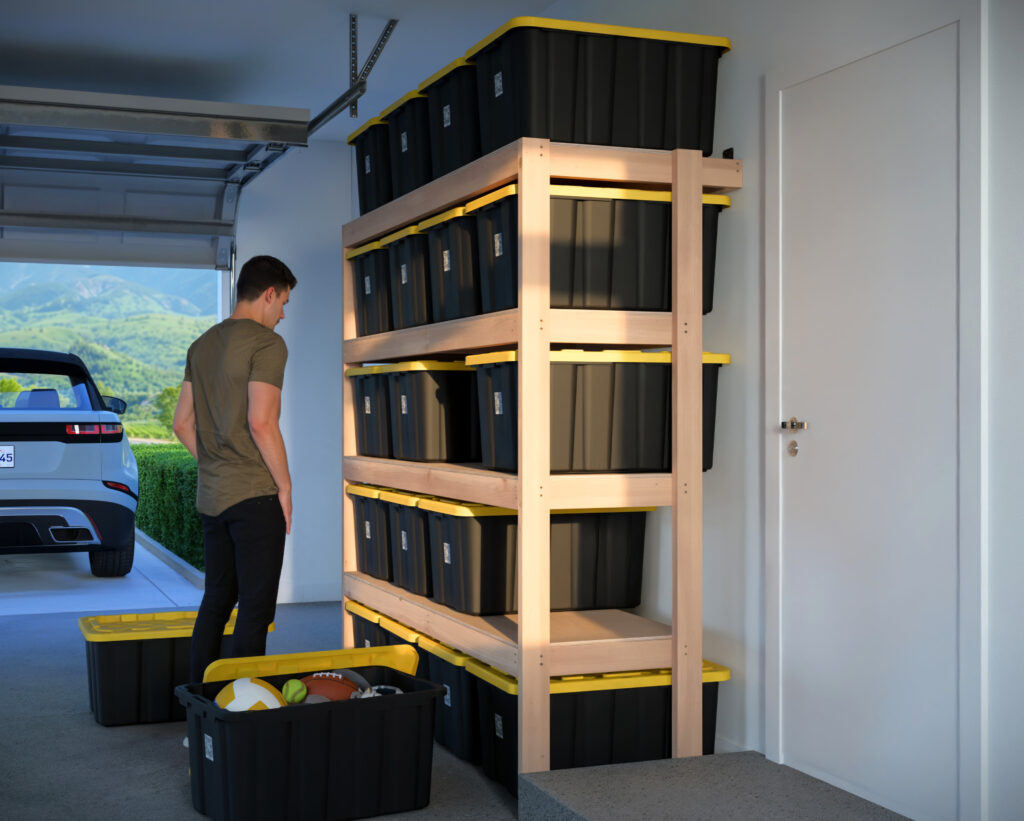
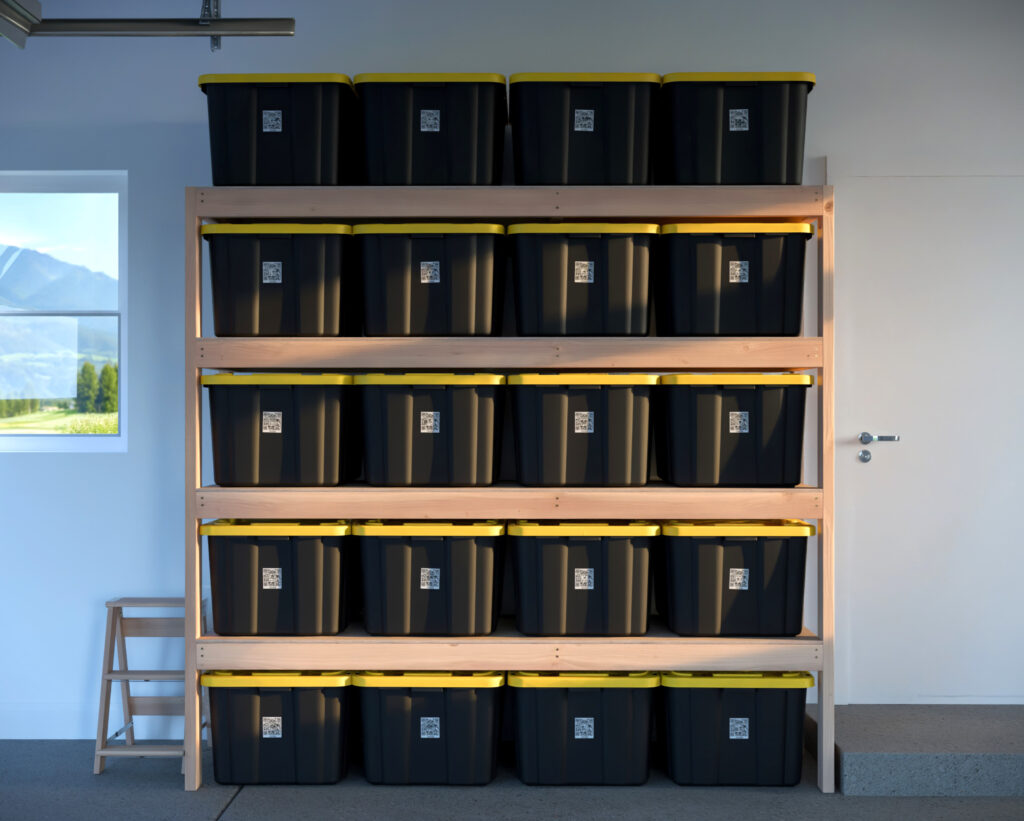
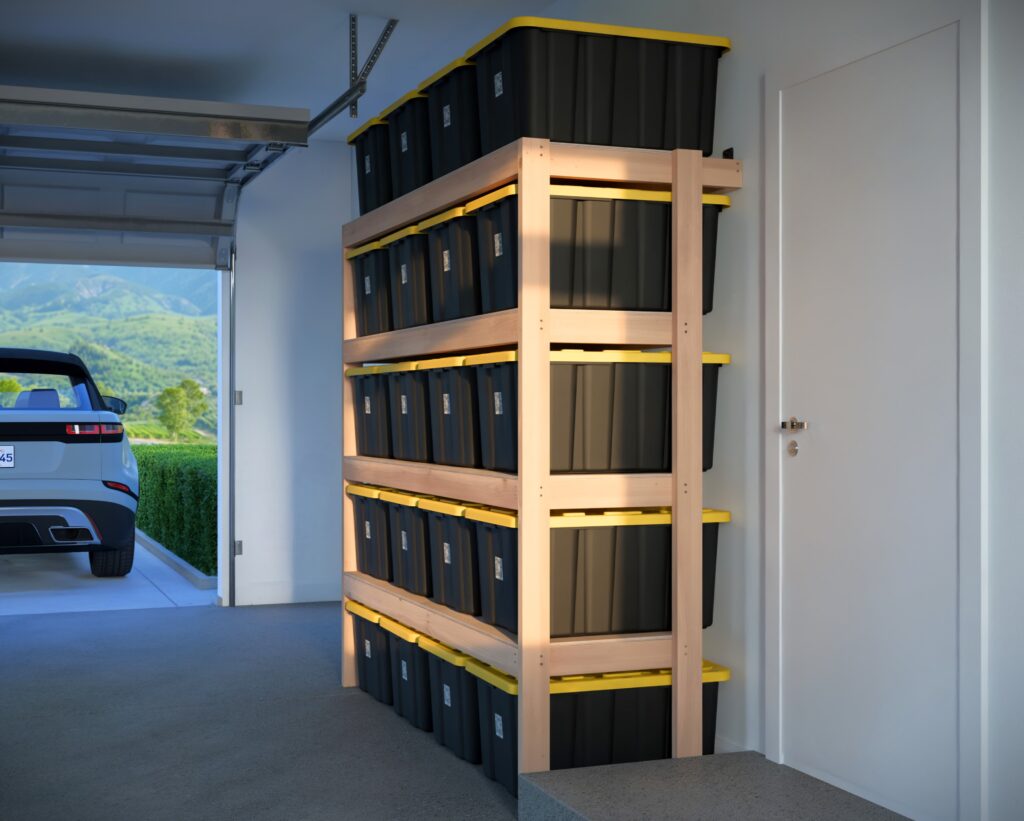
Transform your garage into a functional, organized space with this DIY shelving plan specifically designed for 27-gallon totes. Whether you’re tackling clutter, maximizing storage, or simply looking for a weekend project, this shelving unit is the ultimate solution.
Imagine having a dedicated place for all your tools, holiday decorations, sports equipment, or seasonal items—neatly tucked away in sturdy totes that are easily accessible. With this project, you’re not just building shelves; you’re reclaiming your space.
The Design: Engineered for Efficiency
These garage shelves are carefully designed to strike the perfect balance between simplicity, durability, and adaptability. Here’s what makes them special:
Made for 27-Gallon Totes
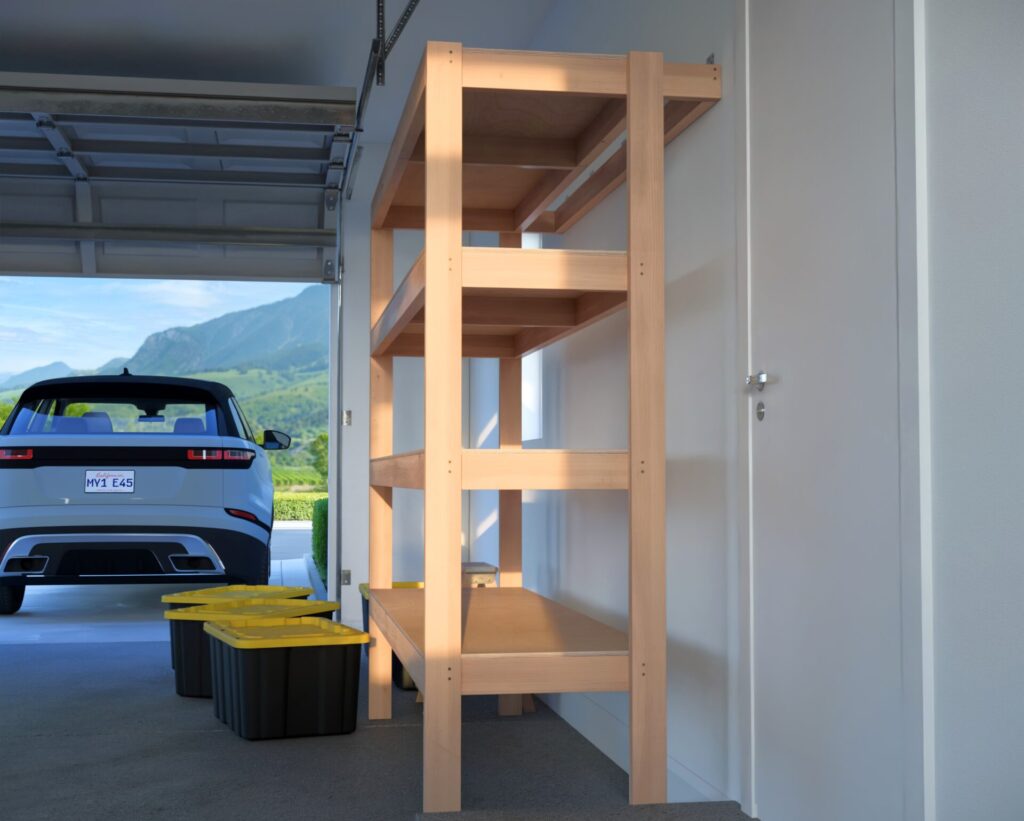
Specifically tailored to popular 27-gallon totes like those from Costco, Home Depot, and Walmart, these shelves keep your bins off the floor and fully supported. The design avoids resting totes on their lids, which helps preserve their structural integrity and prolongs their lifespan.Optimized Material Usage
The shelves are crafted using 2×4 lumber and ½-inch plywood, ensuring maximum stability with minimal waste. Each sheet of plywood is used efficiently, reducing costs while creating a sturdy and reliable frame.Beginner-Friendly Build
Whether you’re an experienced woodworker or new to DIY, this project is for you. The straightforward design ensures ease of assembly, with every detail meticulously planned to simplify the process.Customizable Configurations
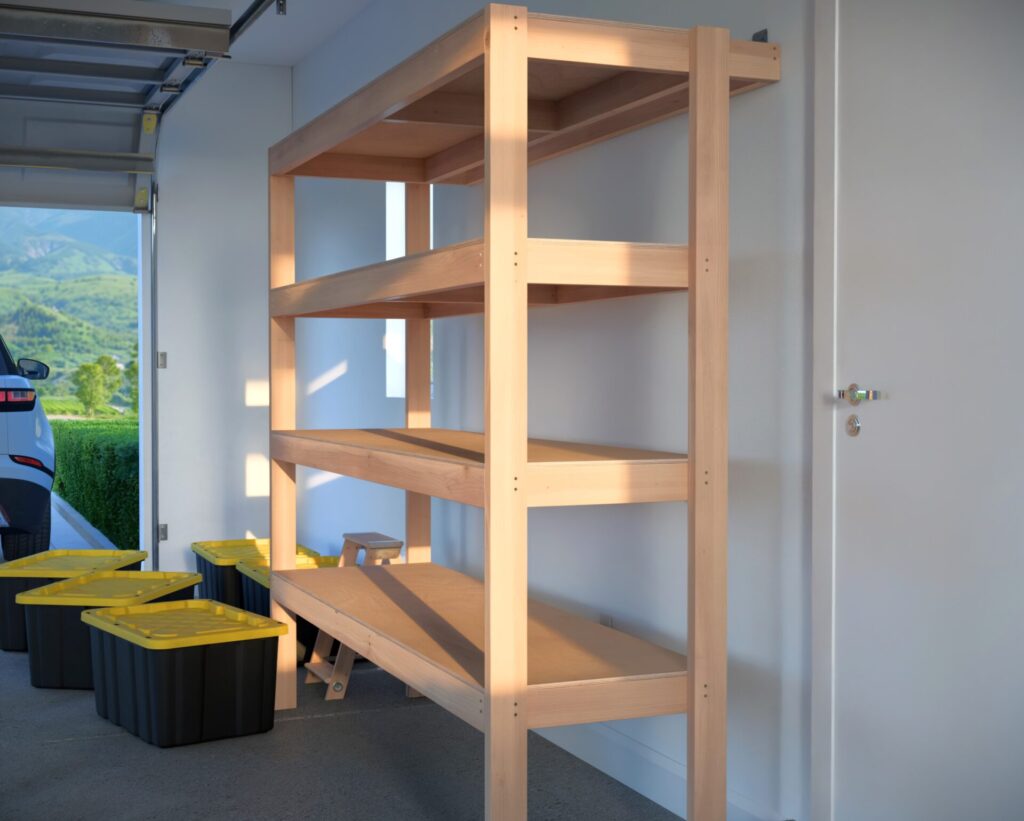
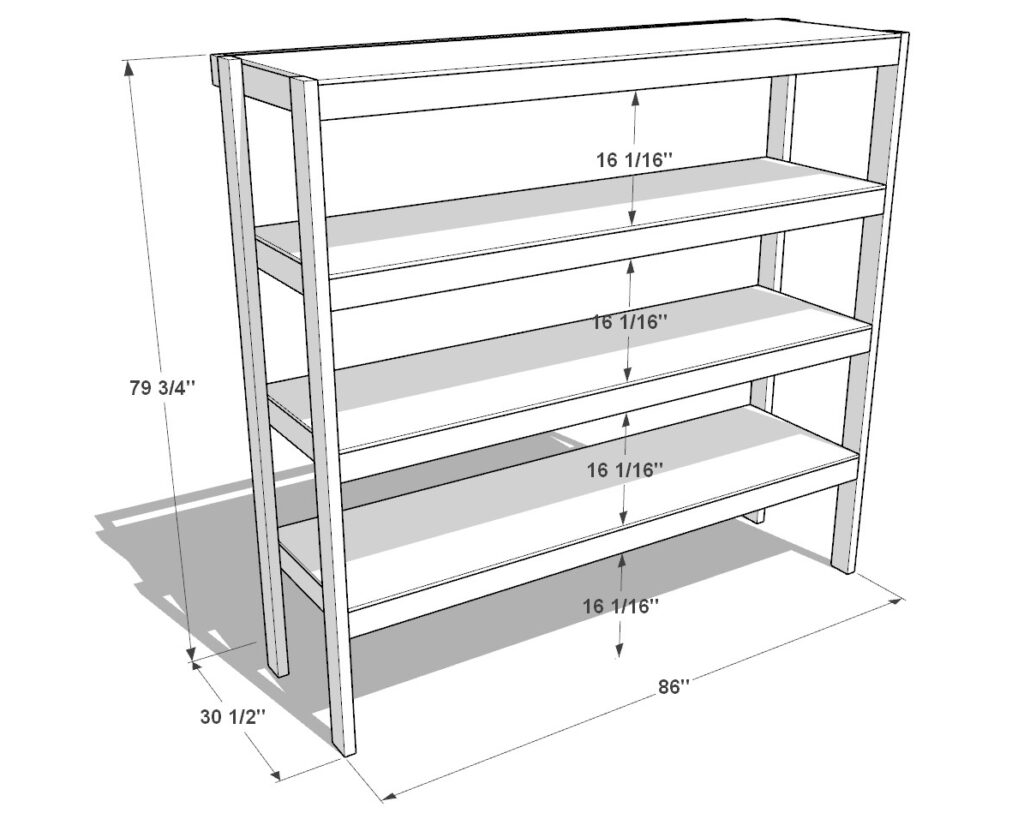
Choose the size that works best for your space! The plan includes options to build shelves in various widths and heights, making it easy to adapt to your garage’s unique layout.Multipurpose Use
These shelves aren’t just for totes. Use them as general-purpose storage for bins, tools, or supplies. Some configurations even include a counter-height workspace, adding extra utility to your garage.
Key Features and Specifications
- Materials: Built with durable, widely available 2×4 lumber and plywood.
- Dimensions: Fully customizable to fit your space and storage needs.
- Durability: Designed to support heavy loads while preventing tote sagging or damage.
- Accessibility: Easy-to-reach shelves make it simple to pull totes in and out without strain.
- Aesthetic Appeal: Clean lines and natural wood tones create a polished look that complements any garage.
What’s Included in the DIY Plan PDF?
When you purchase the DIY Garage Shelving Plan PDF, you’re not just getting a set of instructions—you’re gaining access to a professional, beginner-friendly guide designed to ensure your success. Here’s what you’ll receive:
Step-by-Step Written Instructions
Each step is clearly explained, making it easy to follow along at your own pace. The instructions are written with beginners in mind, avoiding technical jargon and focusing on clarity.Color-Coded Diagrams
Visual learners will love the detailed, color-coded diagrams that show exactly where every piece fits. These diagrams make it simple to visualize the project and ensure accuracy at every step.Tools List
Know exactly what you’ll need before you start. The tools list is comprehensive but concise, ensuring you’re prepared without being overwhelmed.Materials List
From screws to plywood, the materials list ensures you won’t miss a thing.Lumber Shopping List
Save time at the hardware store with a pre-calculated shopping list tailored to the shelving dimensions you choose.Lumber Cut List
Avoid mistakes with a detailed cut list that outlines every measurement. This ensures optimal use of your materials and a smooth assembly process.Precision Down to the Screws
Placement of screws and fasteners is specified to ensure stability and durability, even for heavy loads.
Why This Plan Stands Out
Accessible for Beginners
Many DIY plans can feel overwhelming, but this one is designed with first-time builders in mind. Clear instructions, detailed diagrams, and practical tips make it a stress-free experience.Cost-Effective Solution
With affordable materials and efficient design, this shelving unit provides a high-end result without breaking the bank. It’s a practical investment in both your home and your skills.Organizational Bliss
Declutter your garage and enjoy the satisfaction of a well-organized space. With everything in its place, you’ll save time and avoid frustration every time you look for an item.Multi-Functional Design
Need a workspace? This plan has you covered. Want shelves for tools, totes, or a combination of both? It’s all possible with this adaptable design.
Get Started Today
If you’re ready to tackle clutter and transform your garage, this DIY plan is your next step. Purchasing the DIY Garage Shelving Plan PDF gives you everything you need to build a professional-grade shelving unit at a fraction of the cost of pre-made options.
Click below to download your guide and take the first step toward a more organized, functional garage. You’ll love the sense of accomplishment that comes from building something both practical and beautiful.
Time
(varies with experience)
Cost
{{$180}} (Excludes totes; varies by location and supplier.)
Skill level required
Beginner
DIY Garage Shelving Plan for 27-Gallon Totes
What’s Included in the PDF Download?
- Step-by-step instructions
- Detailed materials list
- Comprehensive tools list
- Links to materials and tools
Tools and Materials List
Available with the purchase of the DIY plan PDF.
Lumber Shopping & Cut List
Available with the purchase of the DIY plan PDF.
Everything You Need to Know About Totes for DIY Garage Shelves
Q: What totes work with this shelving design?
A: These shelves fit all major 27-gallon totes, including those from Costco, Sam’s Club, Home Depot, Lowe’s, Walmart, Office Depot, and Amazon.
Q: Are all the totes the same size?
A: Yes, they’re almost identical in size, so they all fit perfectly. The Home Depot totes are about 1 inch taller, but the shelves are designed to accommodate this.
Q: Which totes are compatible?
A: Here’s a quick list of compatible totes:
- Costco: Greenmade 27-Gallon Storage Bin
- Sam’s Club: Member’s Mark 27-Gallon Tote
- Home Depot: HDX 27-Gallon Tote
- Lowe’s: Commander 27-Gallon Tote
- Walmart: TOUGH BOX 27-Gallon Tote
- Office Depot: GreenMade Professional Tote
- Amazon: CX BLACK & YELLOW 27-Gallon Tote
Q: How do I know if my totes will fit?
A: If your totes are 27-gallon models like the ones listed, they will fit perfectly.
Q: What makes these totes a good choice?
A: They’re durable, stackable, and easy to carry with ergonomic handles. Their secure lids and weather resistance make them ideal for all kinds of storage.
Q: Are there any special features I should know about?
A: Yes! Most of these totes have tie-down slots, lockable lids, and smooth exteriors that are easy to clean.
Q: Can these totes be used outdoors?
A: Definitely. Their tough, weather-resistant design makes them great for outdoor storage.
Step 1: Build the Shelving Frames
In this step, you’ll create the frames for the garage shelves using 2×4 lumber and finish them with a plywood top to form sturdy shelving units. Before starting, keep these Pro Tips in mind to make the process smoother and ensure a professional result:
- Pre-Drill Holes: Prevent splitting by pre-drilling with a countersink drill bit ([link here]) or a regular drill bit. Countersinking also ensures screws sit flush.
- Work on a Flat Surface: A level surface keeps your frame square and stable during assembly.
- Use Clamps for Warped Wood: Clamps make it much easier to secure warped or stubborn pieces and ensure proper alignment.
- Optimize Your Workspace: Use a workbench or shop table for better ergonomics—it’s far easier than working on the ground.
- Sand Before Assembly: Sanding pieces before assembly saves time and effort later. Avoid over-sanding plywood, as it can strip the top layers.
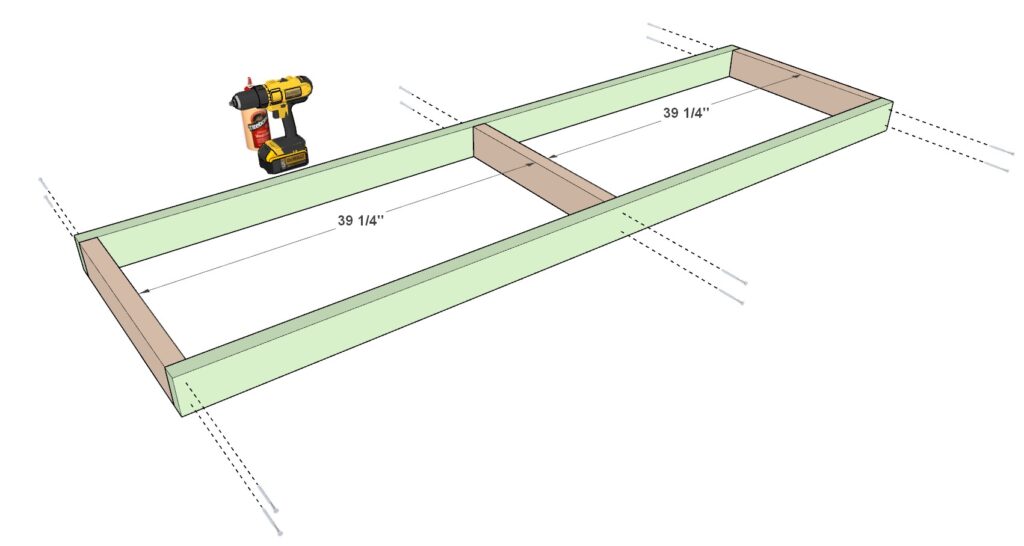
1.1: Assemble the Frame
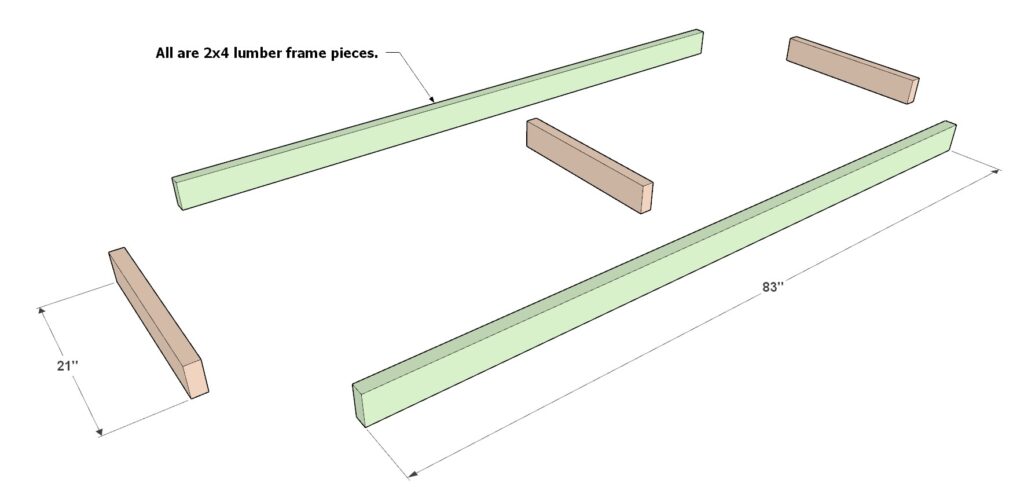
- Gather the following materials:
- {{Two 83-inch 2×4 lumber pieces}} (color-coded in green).
- {{Three 21-inch 2×4 lumber pieces}} (color-coded in brown).
- Lay out the lumber as shown in the diagram, ensuring proper alignment.
- Optional: Apply wood glue at the joints for added strength before securing.
- Use screws (2.5–3.5 inches) to fasten the pieces together.
- Tip: Longer screws provide a more secure hold.
1.2: Attach the Plywood Top
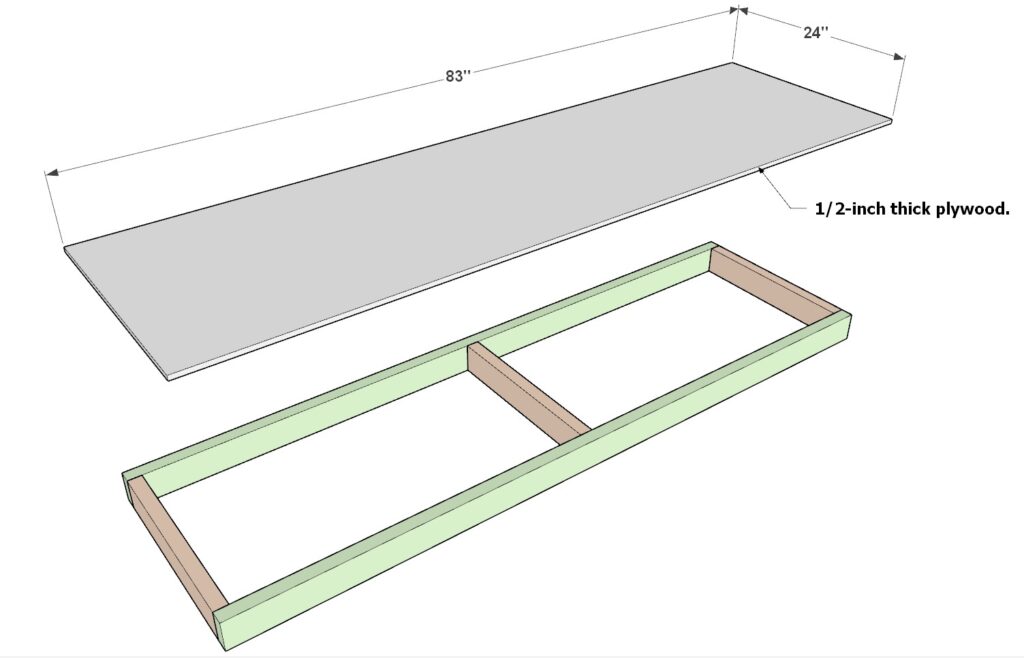
- Cut a {{83-inch x 24-inch plywood sheet}} to fit the frame.
- Recommendation: Use plywood that is at least ½-inch thick. For thinner plywood or particleboard, add extra brown 2×4 lumber pieces underneath for support.
- Place the plywood sheet on top of the frame.
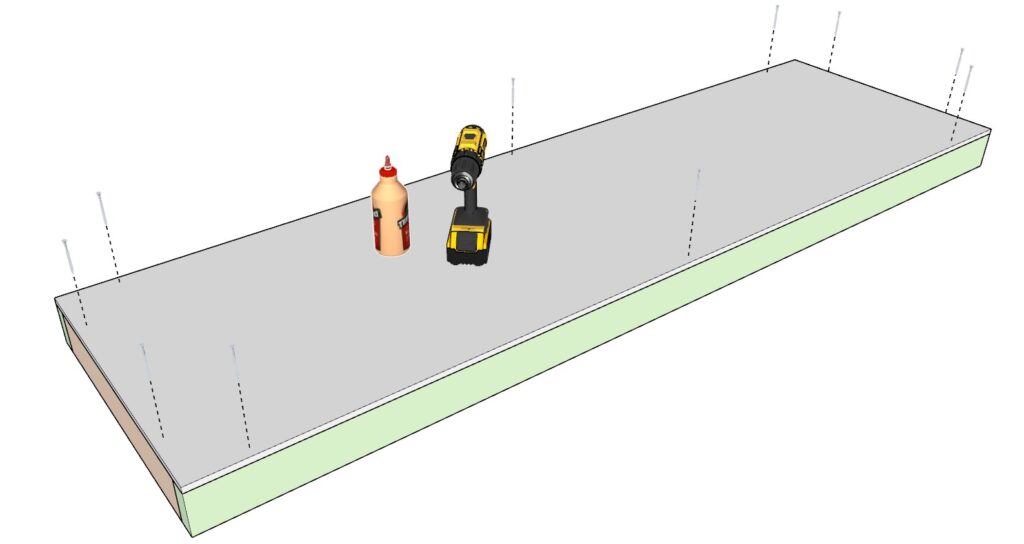
- Optional: Apply wood glue between the plywood and frame for extra strength.
- Use screws (1–3 inches) to secure the plywood to the frame. No need for oversized screws here.
1.3: Repeat for Additional Shelves
- Make a total of {{3}} shelving units following the same steps above.
- Tip: Double-check dimensions and alignments to ensure consistency across all units.
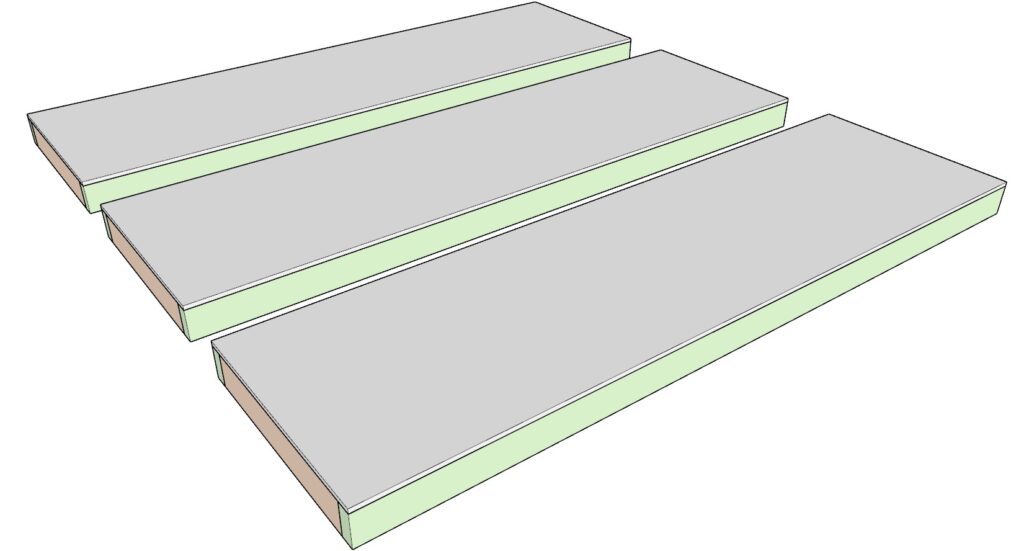
Step 2: Build the Top Shelf
In this step, you’ll create the topmost shelf of the garage shelf unit. This shelf is slightly different from the others due to its configuration and additional components.
2.1: Gather Materials
- Required Lumber:
- {{One 83-inch 2×4 lumber piece}} (color-coded in green).
- {{One 21-inch 2×4 lumber piece}} (color-coded in brown).
- {{Two 29-inch 2×4 lumber pieces}} (color-coded in teal).
- {{Two 80-inch 2×4 lumber pieces}} (color-coded in lavender).
- Plywood Sheet:
- {{One 83-inch x 24-inch plywood sheet}}, at least ½-inch thick.
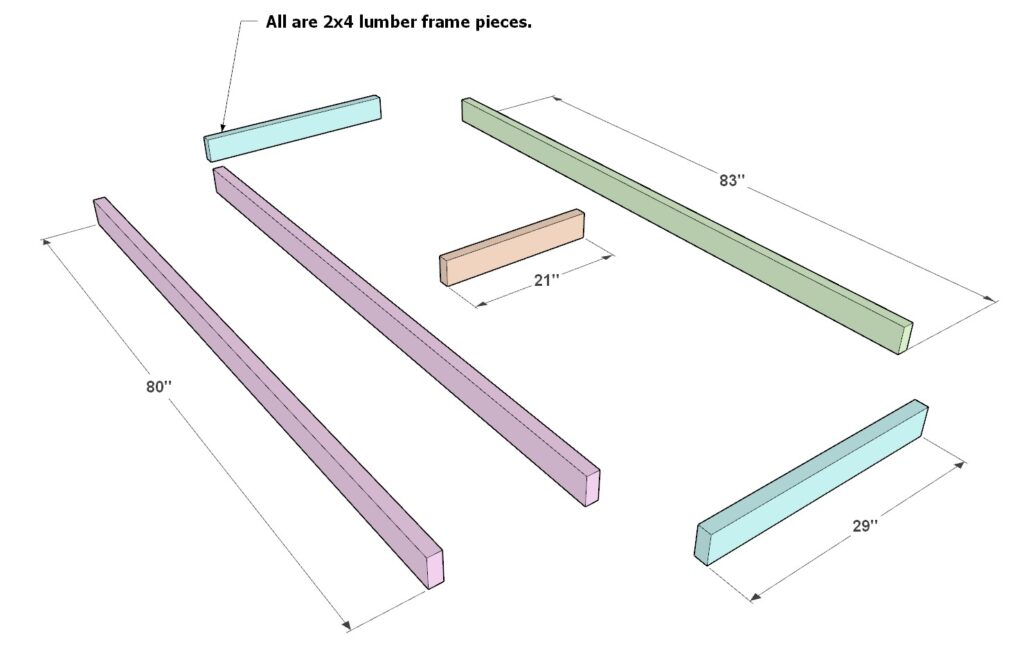
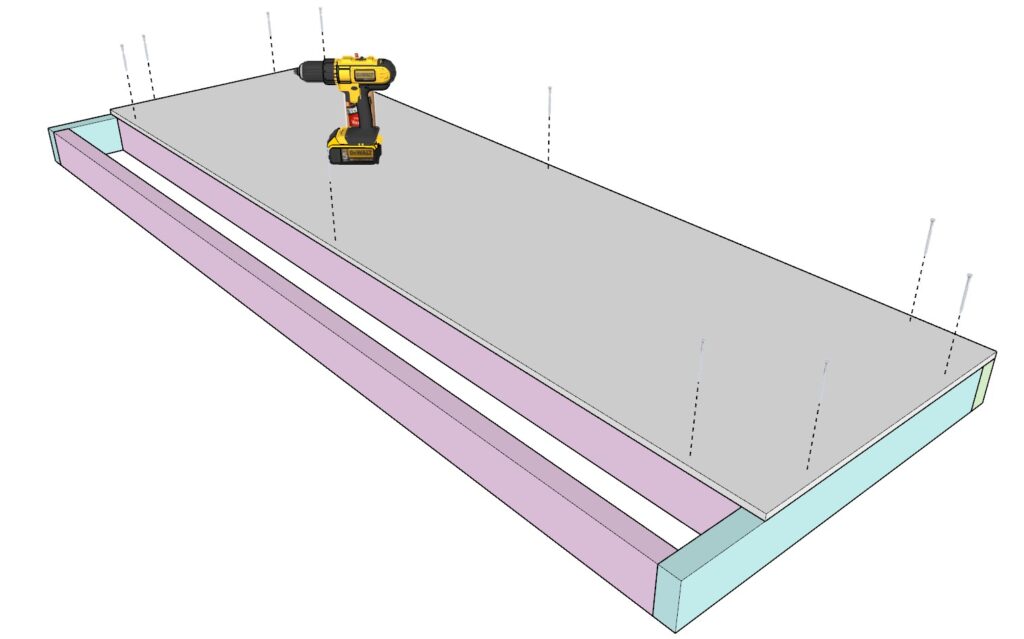
2.2: Assemble the Frame
- Arrange the lumber pieces as shown in the diagram.
- Optional: Apply wood glue to the joints for added strength.
- Secure the components with screws (2.5–3.5 inches).
- Tip: Pre-drill holes to prevent splitting, and use a countersink drill bit ([link here]) to ensure screws sit flush.
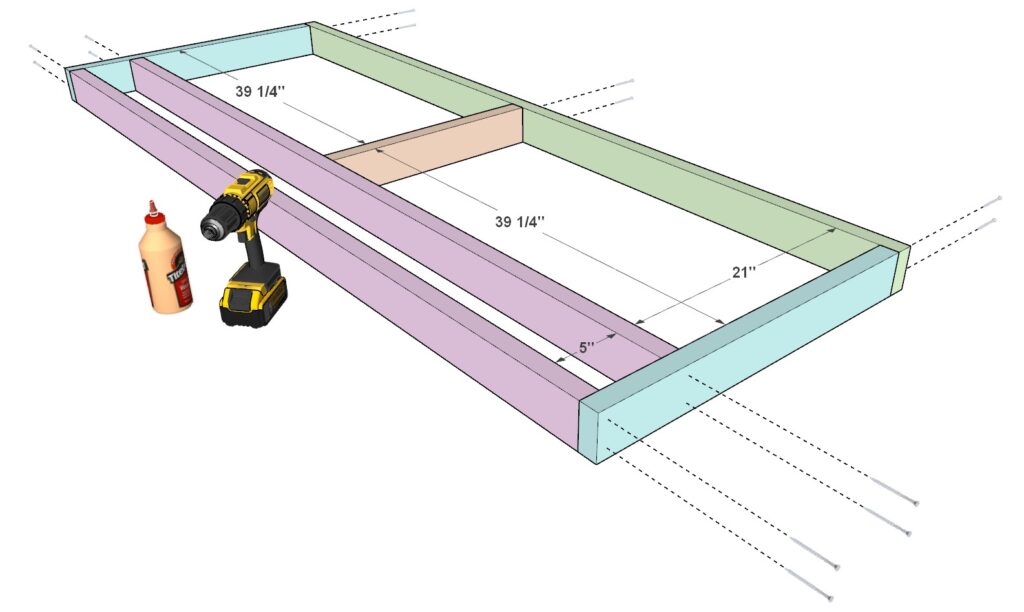
2.3: Attach the Plywood Top
- Place the {{83-inch x 24-inch plywood sheet}} on top of the assembled frame.
- Optional: Apply wood glue between the plywood and the frame for better adhesion.
- Secure the plywood with screws (1–3 inches).
- Tip: Ensure screws are spaced evenly around the edges and through the middle for maximum stability.
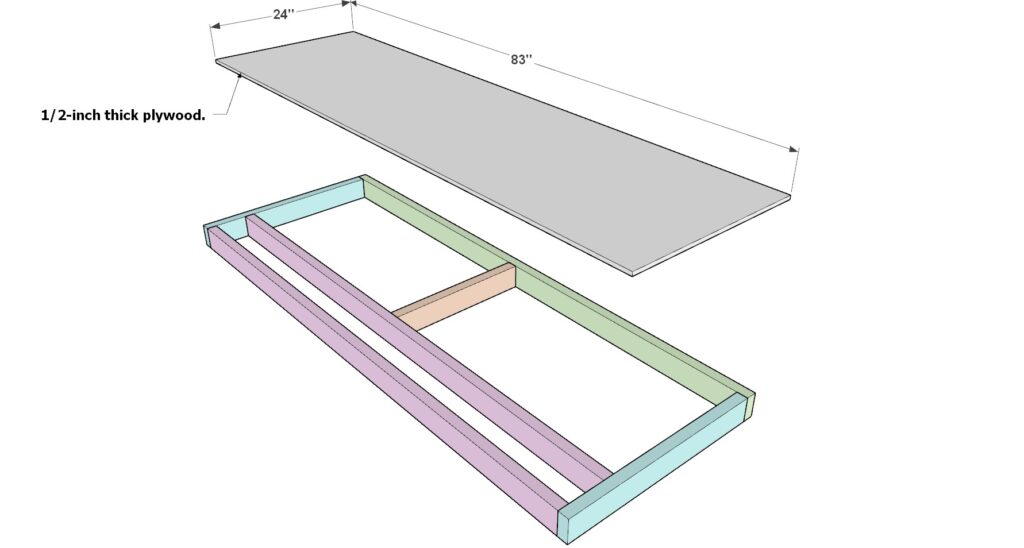
Step 3: Attach the Legs and Integrate the Shelf Units
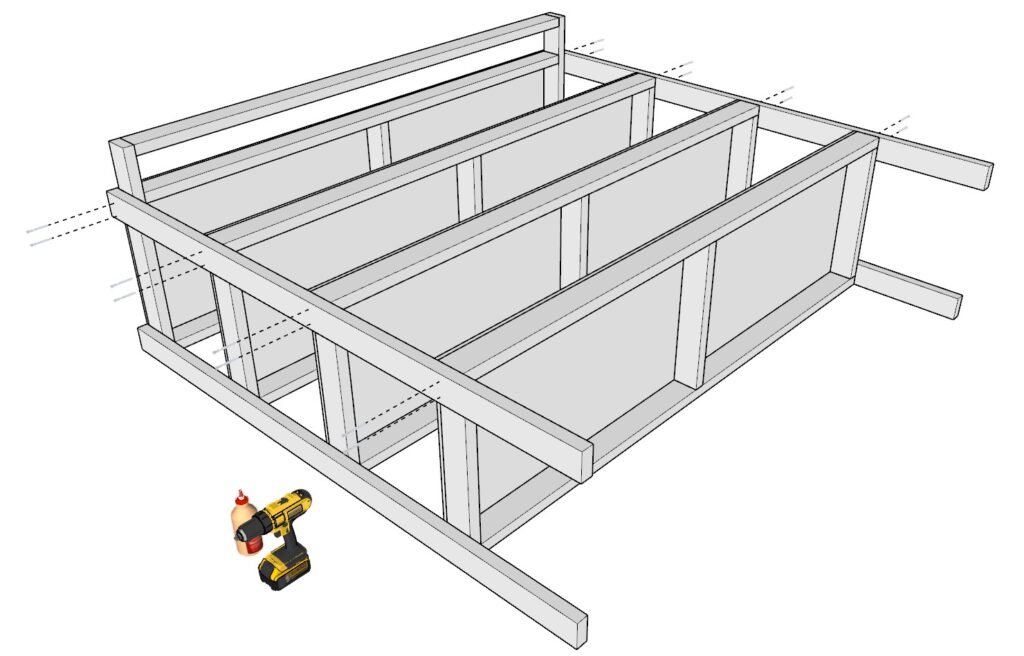
In this step, you will attach the legs to the shelving unit and secure all the shelf components together for a sturdy, finished structure.
3.1: Gather Materials
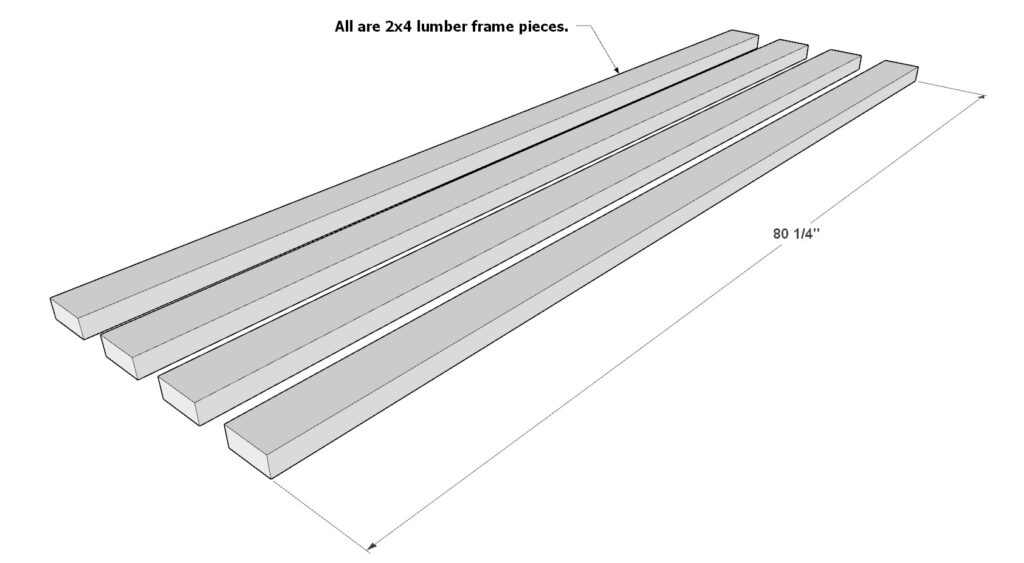
- Legs:
- {{Four 80-1/4 inch 2×4 lumber pieces}} (these will serve as the legs).
- Shelf Components:
- Use the completed shelves from the previous steps.
3.2: Attach the First Pair of Legs
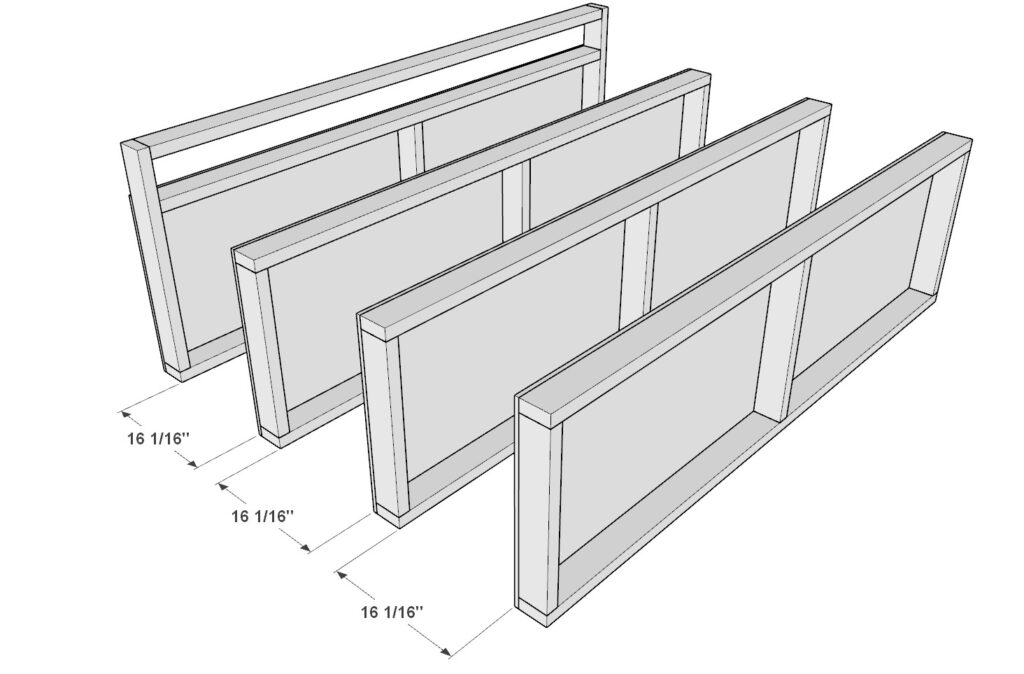
- Lay out the shelf components as shown in the diagram, ensuring alignment and stability.
- Take two of the {{80-1/4 inch 2×4 lumber pieces}} and position them as shown.
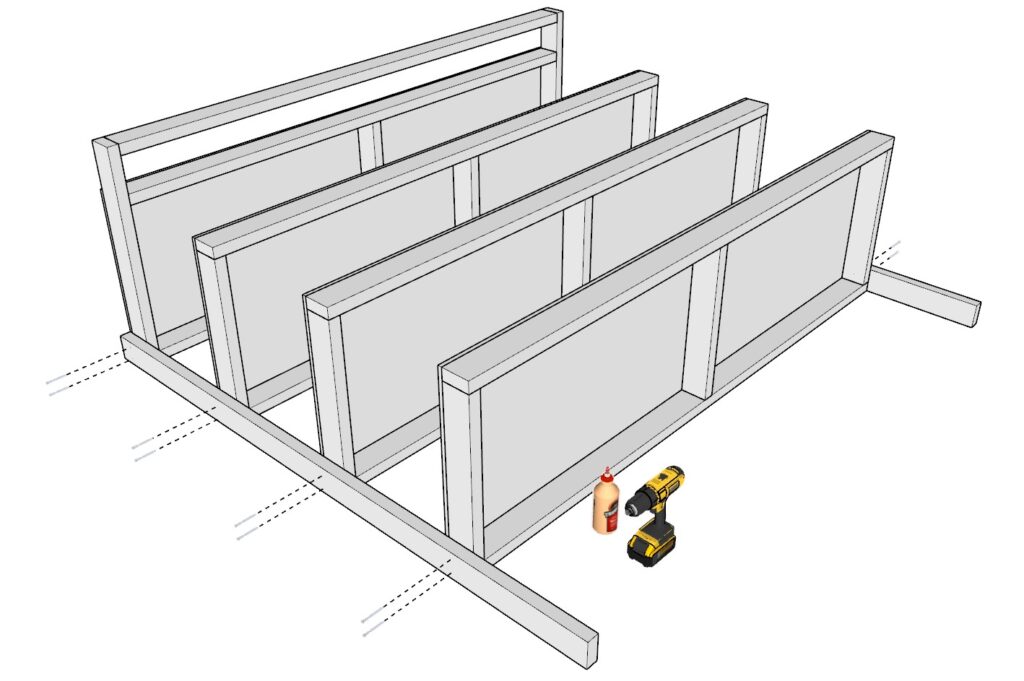
- Secure the Legs:
- Apply wood glue (optional for added strength) to the contact points between the legs and shelves.
- Fasten the legs to the shelves using 2.5-inch screws.
- Important: Use 2.5-inch screws to avoid screws poking through the wood.
3.3: Attach the Second Pair of Legs
- Position the remaining two {{80-1/4 inch 2×4 lumber pieces}} as shown in the diagram.
- Tip: Use clamps to hold the legs in place while you work. This makes the process easier, keeps everything aligned, and reduces strain on your hands.
- Repeat the steps:
- Apply wood glue (optional).
- Secure the legs using 2.5-inch screws.
Step 4: Connect Shelf Units and Secure to Garage Studs
In this step, you will learn how to connect multiple shelf units together and properly secure the shelving system to your garage wall studs for maximum stability.
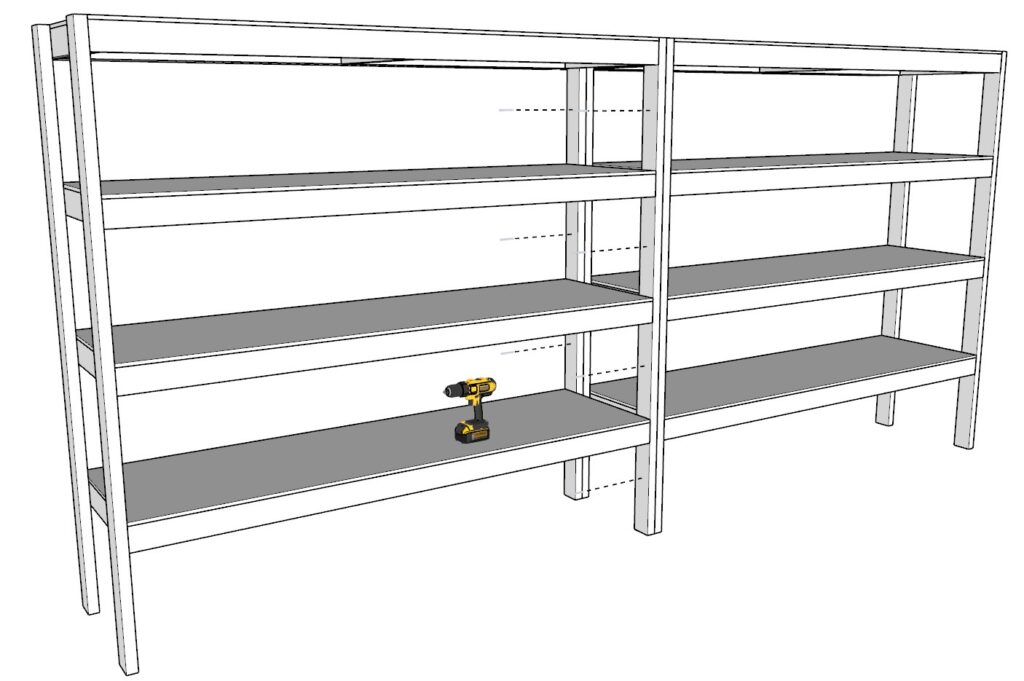
4.1: Connecting Two Shelf Units Together
Position the Units:
- Place the two shelving units side by side, ensuring they are level and aligned.
- This method works for connecting shelves of the same size or different sizes.
Secure the Legs:
- Use 2.5-inch screws to connect the legs of the two units together as shown in the diagram.
- Tip: Use screws with a wide cap, such as cabinet screws, for better grip and strength.
- Avoid Glue: Do not use wood glue here, as you may need to disassemble the units later (e.g., for moving).

4.2: Securing the Shelves to Garage Studs
- Locate the Wall Studs:
- Use a stud finder to identify the positions of the garage wall studs.
- Attach Using Brackets:
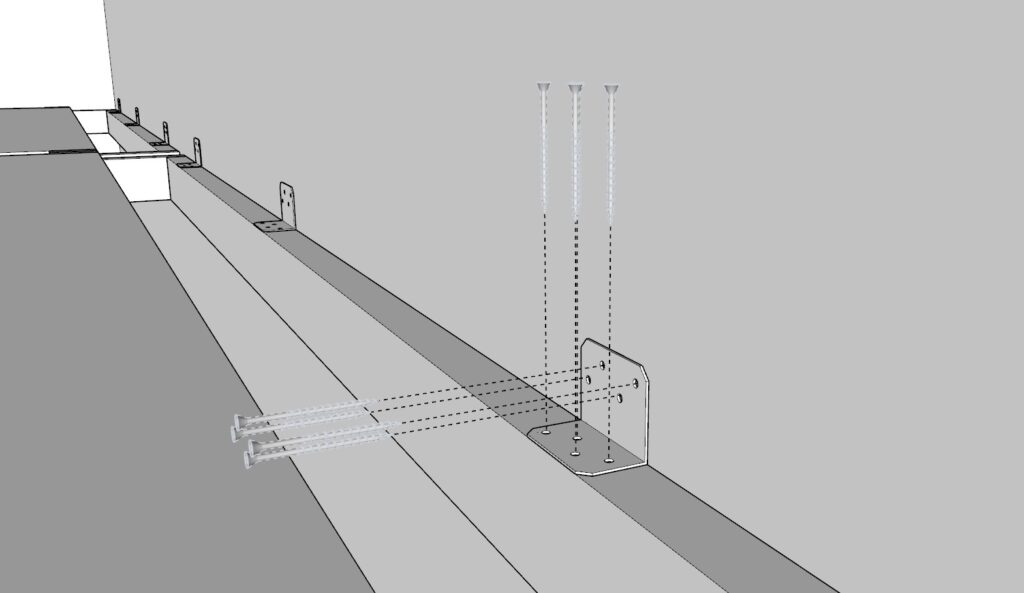
- Use L-shaped brackets to secure the backmost 2×4 of the top shelf to the garage wall studs.
- Fasten the brackets tightly using screws.
- Ensure Stability:
- Double-check all connections to ensure the shelves are firmly secured and cannot tip over during use.
- If needed, add additional brackets for extra reinforcement.
