Introduction
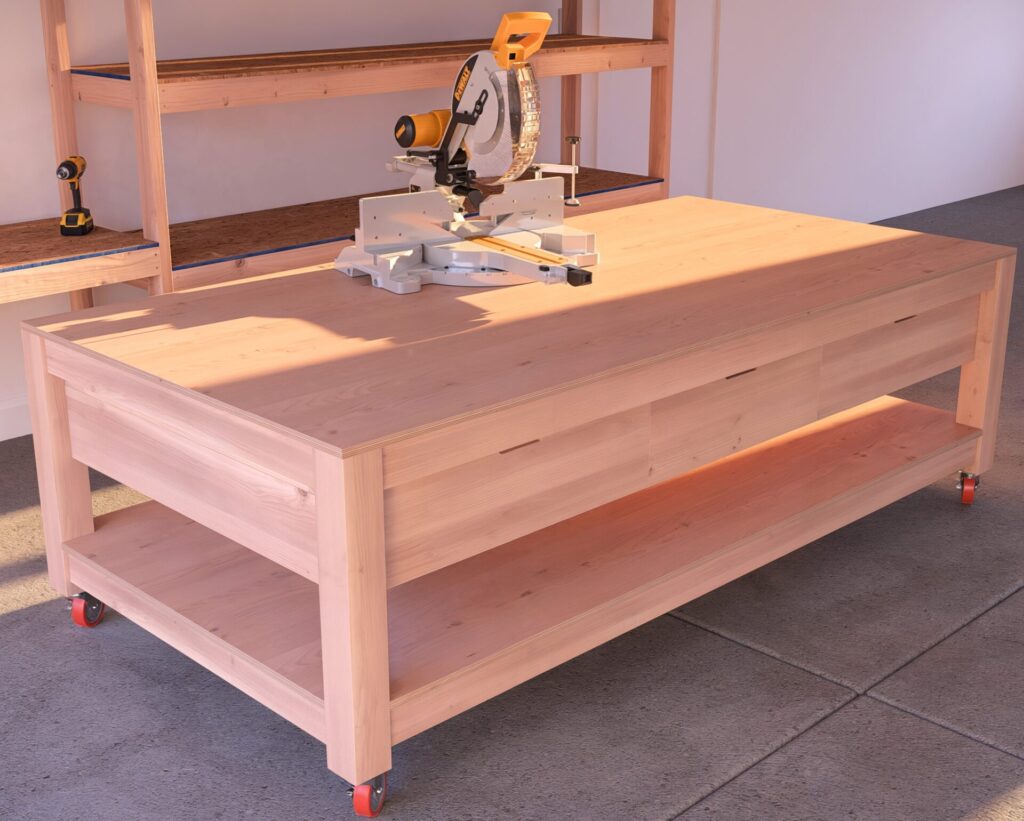
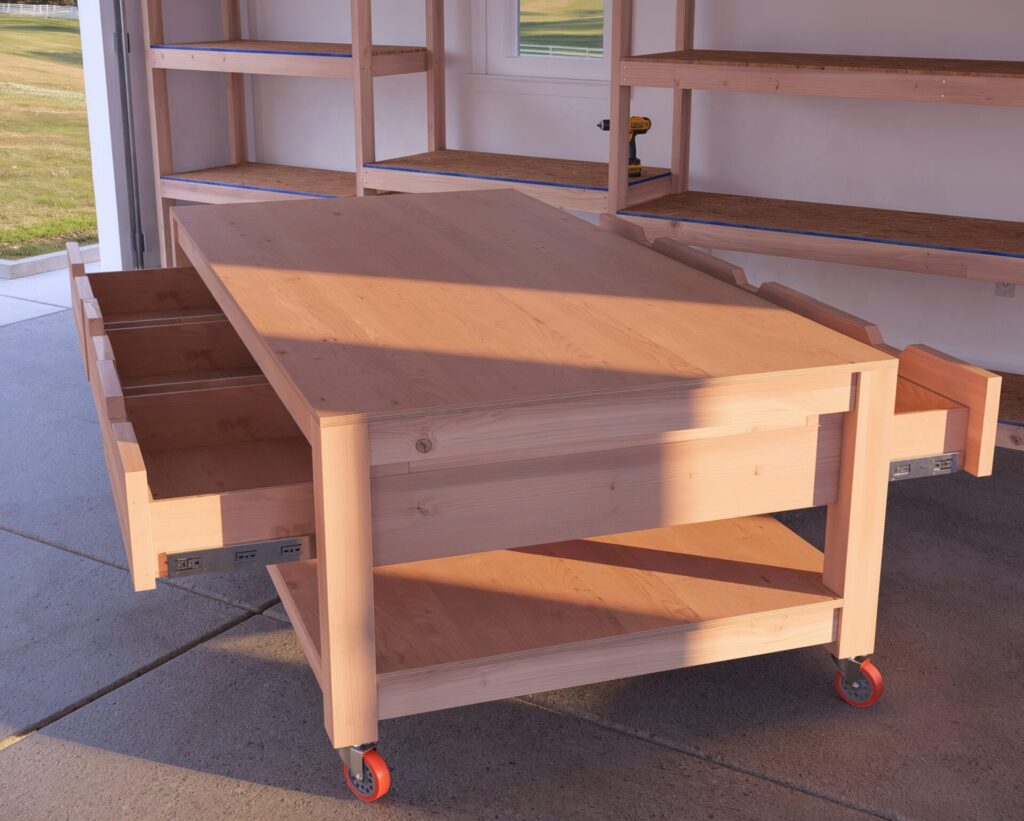
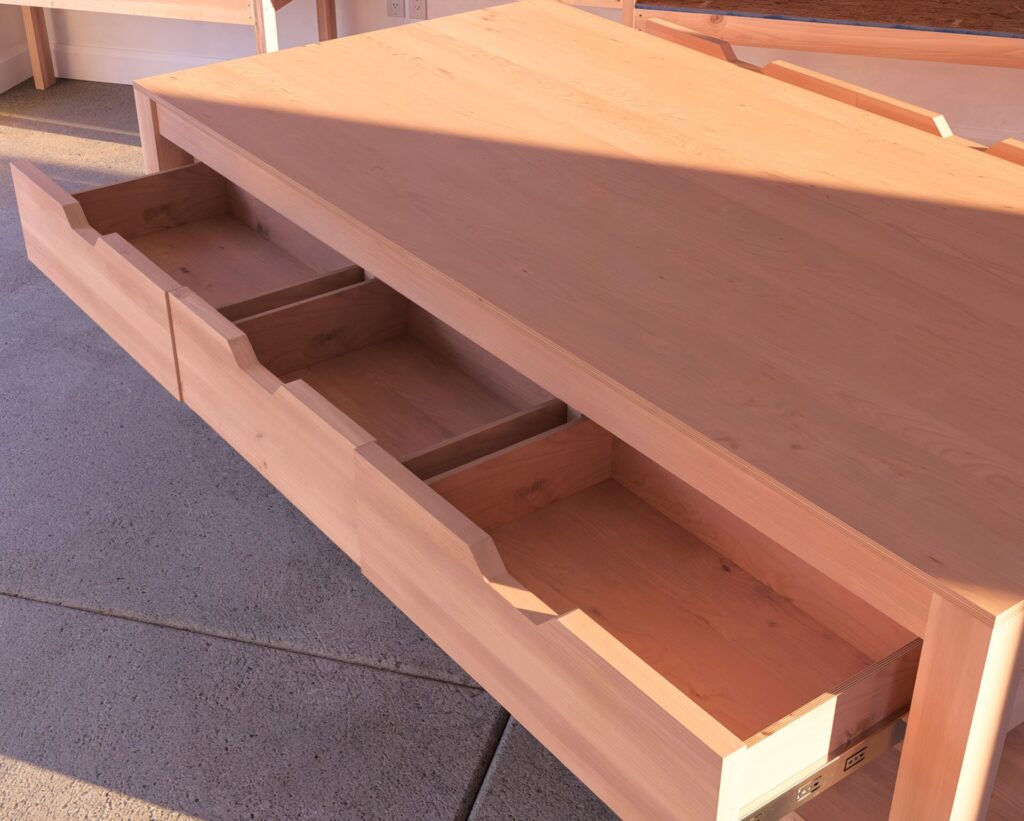
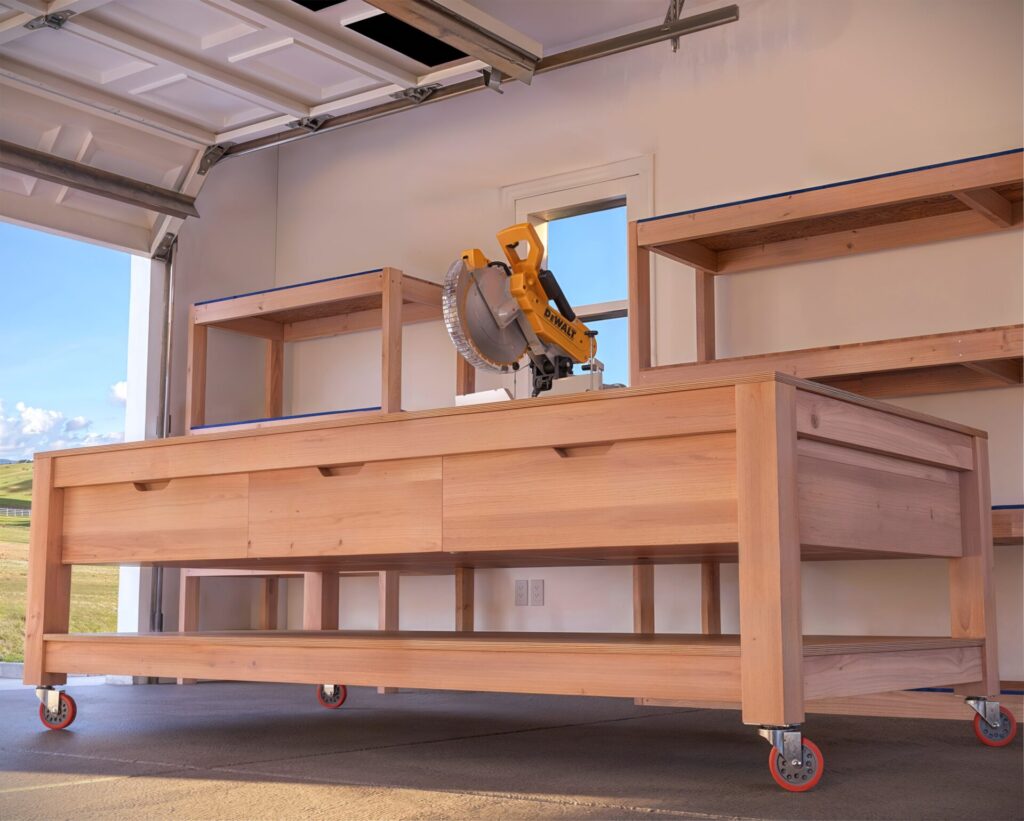
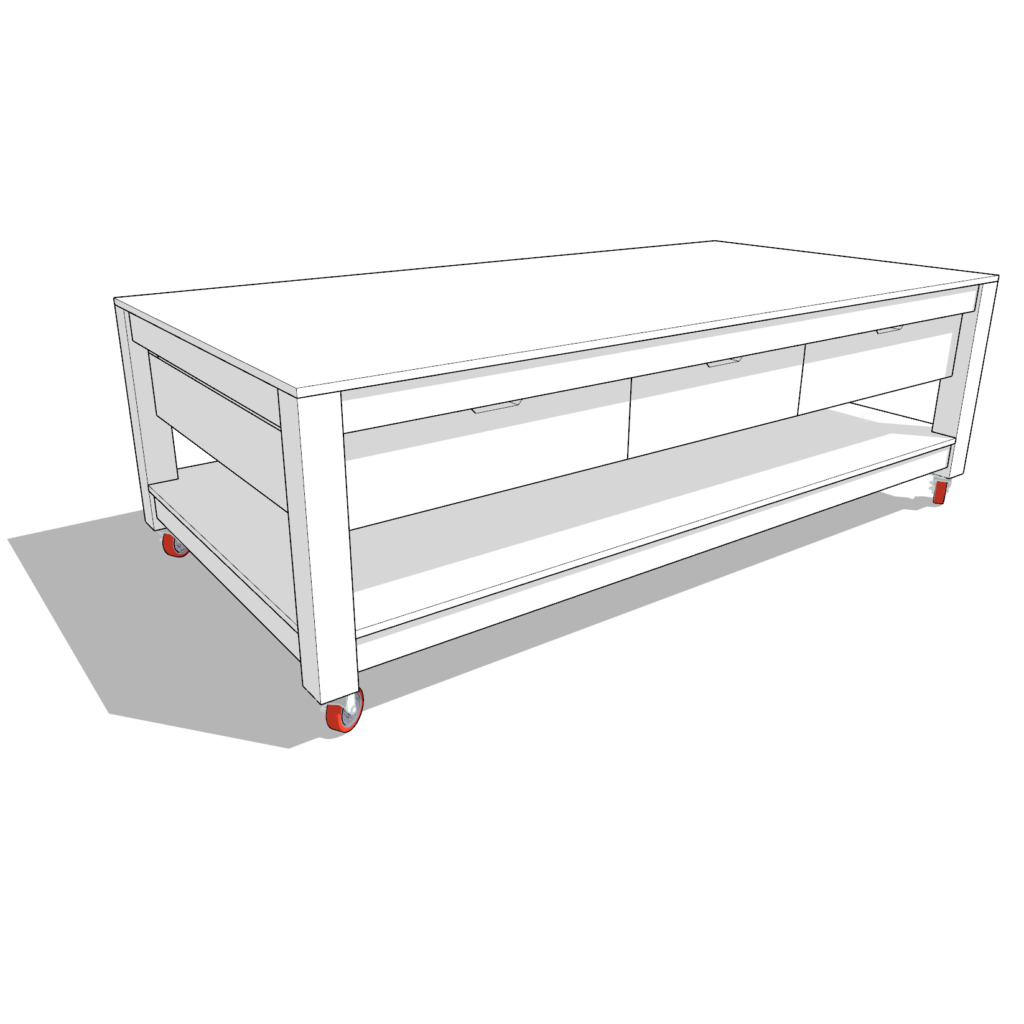
Are you tired of clutter in your garage, with tools and lumber scattered everywhere? Imagine a workspace that not only organizes your tools but also stores your lumber efficiently. Our custom DIY garage workbench solves these problems, providing a sturdy, multifunctional workspace with six spacious drawers and an additional lumber storage shelf. This workbench, crafted from common dimensional lumber and plywood, is designed to make your woodworking projects more enjoyable and efficient. Whether you’re a seasoned DIYer or just starting out, this workbench is the perfect addition to your garage.
Specifications
This workbench is built with practicality and durability in mind. Here are the detailed specifications:
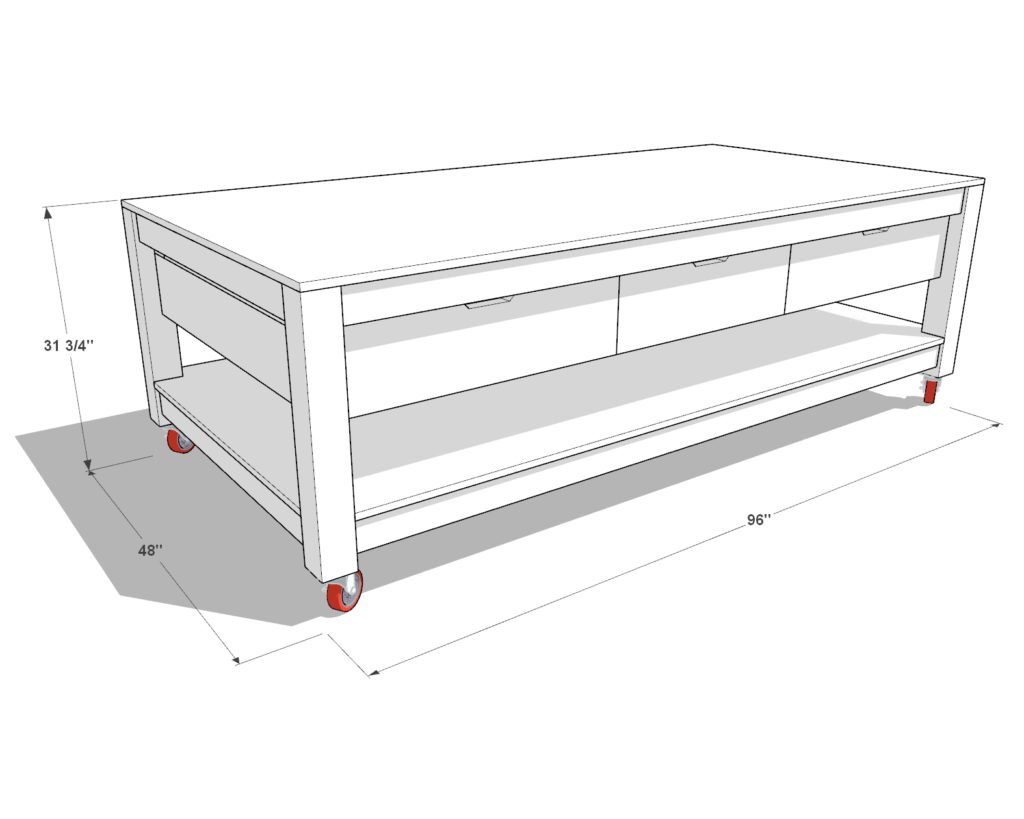
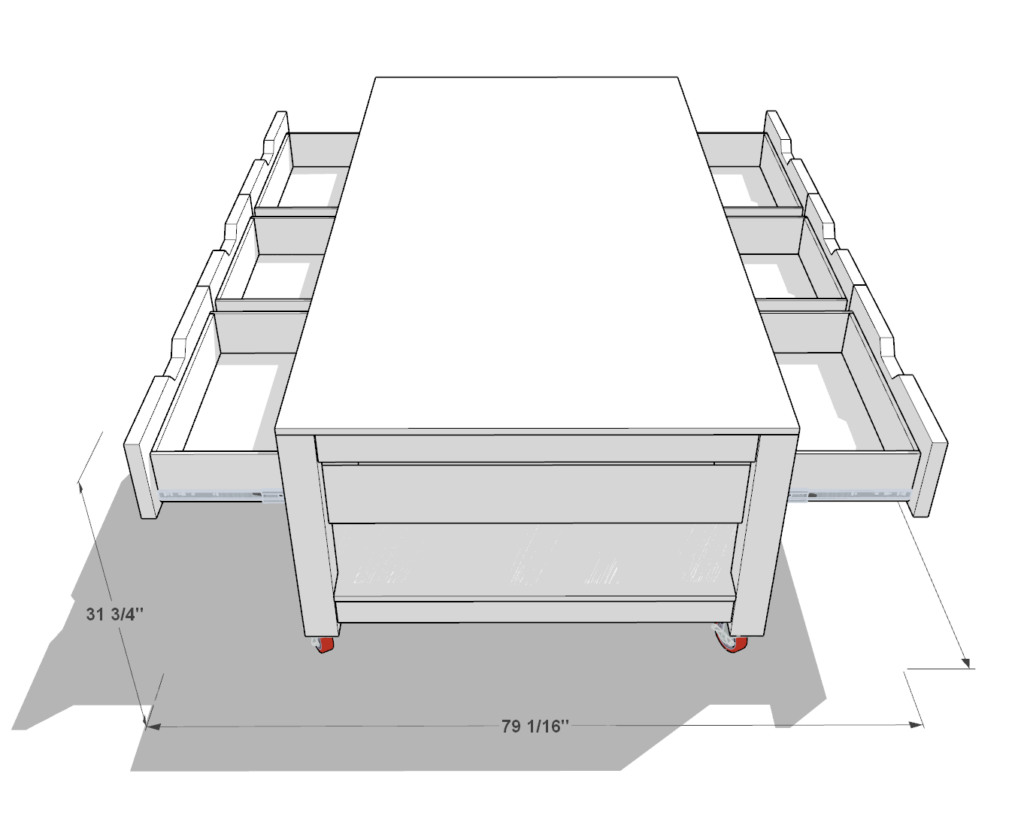
- Dimensions: 96″ long, 48″ wide, and 31 3/4″ high.
- Materials: Constructed from common dimensional lumber and plywood sheets.
- Drawers: Six spacious drawers that provide ample storage for tools and accessories.
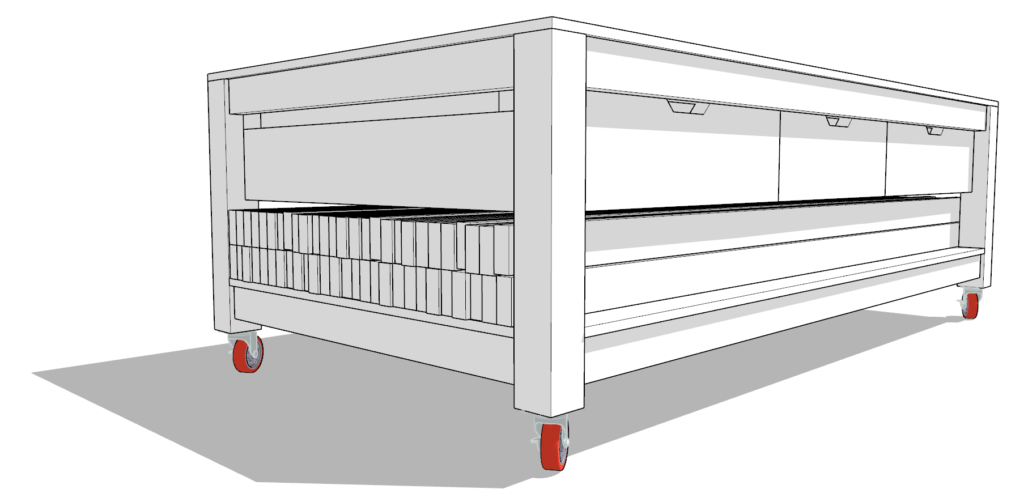
- Lumber Storage: A lower shelf designed to hold up to 54 pieces of 2×4 lumber, each 8 feet long.
- Mobility: Equipped with heavy-duty casters for easy movement around the garage.
- Sturdiness: Reinforced frame for maximum stability and durability.
- Customization: The design allows for adjustable height and additional modifications to suit your specific needs.
Conclusion
Investing in this DIY garage workbench plan is a smart choice for anyone looking to enhance their workspace. By purchasing our comprehensive PDF guide, you’ll receive:
- Step-by-Step Written Instructions: Clear and concise directions to ensure you build your workbench correctly.
- Detailed Images: Visual aids to guide you through each step of the construction process.
- Cut List: A precise list of all the cuts you need to make.
- Lumber Shopping List: A complete list of the materials required, saving you time at the store.
- Materials List: All the additional items you’ll need to complete your workbench.
- Tools List: A list of tools required to build the workbench.
- Project Estimates: Time and cost estimates to help you plan your project effectively.
Don’t miss out on the opportunity to create a functional and organized workspace. Purchase our DIY garage workbench plan today and transform your garage into a well-organized haven for all your woodworking projects.
Time to build
(varies with experience)
Cost
Estimated cost: $650 (material prices may fluctuate; verify current costs for accuracy)
Skill level required
Beginner
DIY Garage Work Bench PDF plan
What is included in the PDF download?
-Step-by-Step Written Instructions
-Detailed Images
-Cut List
-Lumber Shopping List
-Materials List
-Tools List
-Project Estimates
Recommend Tools & Materials
Available with the purchase of the DIY plan PDF.
Lumber Shopping/Cut List
Available with the purchase of the DIY plan PDF.
Step 1: Building the Structural Frames
In this step, you will construct two main structural frames for the workbench. These frames provide the primary support and stability for the entire bench.
Materials Needed:
- (12) 89-inch 2×4 lumber pieces
- (12) 38-inch 2×4 lumber pieces
- (8) 41-inch 2×4 lumber pieces
- Wood glue
- 3.5-inch screws
- 2.5-inch screws
Sub-Steps:
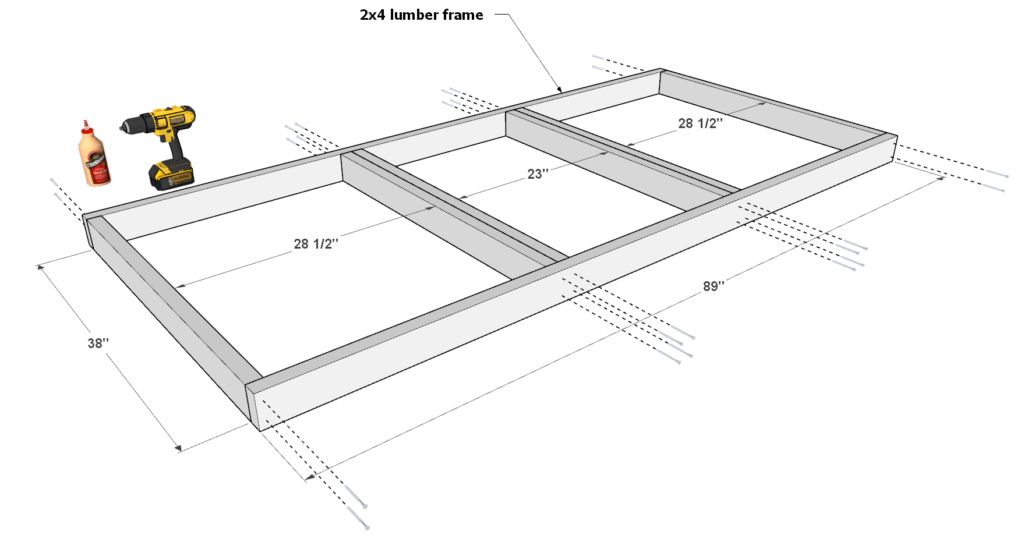
Step 1.1: Construct the First Frame
- Assemble the Base Frame:
- Lay out two 89-inch pieces parallel to each other.
- Place six 38-inch pieces perpendicularly between the 89-inch pieces, spacing them as indicated.
- Apply wood glue to the ends of the 38-inch pieces.
- Secure the 38-inch pieces to the 89-inch pieces using 3.5-inch screws. Ensure the joints are tight and square.
Step 1.2: Add the Second Layer
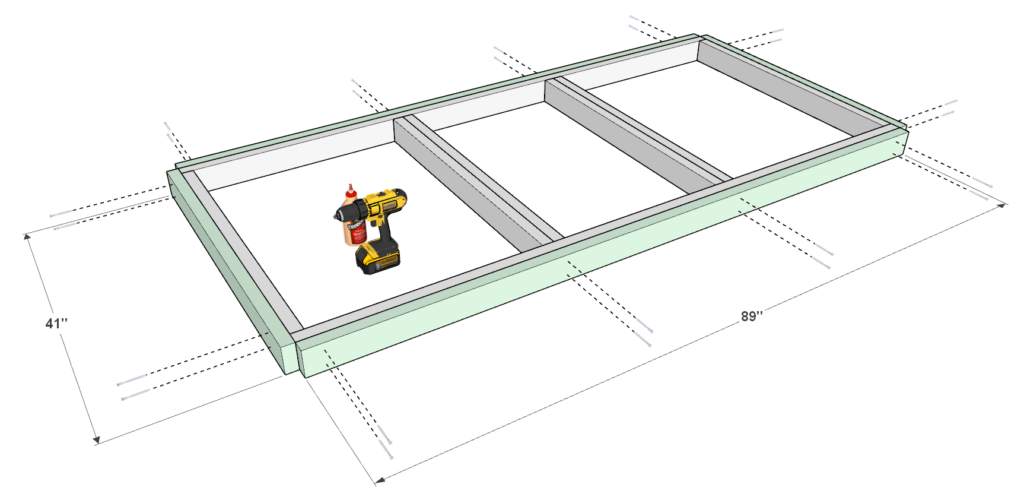
- Assemble the Second Layer:
- Place two additional 89-inch pieces on top of the base frame, aligning them with the existing 89-inch pieces.
- Place two 41-inch pieces at the ends, perpendicular to the 89-inch pieces.
- Apply wood glue to the top surface of the base frame.
- Secure the 41-inch pieces to the 89-inch pieces using 2.5-inch screws. Be careful not to let the screws penetrate through to the other side.
Step 1.3: Add the Final Layer
- Assemble the Final Layer:
- Place two more 89-inch pieces on top of the second layer, aligning them with the existing 89-inch pieces.
- Place two more 41-inch pieces at the ends, aligning them with the existing 41-inch pieces.
- Apply wood glue to the top surface of the second layer.
- Secure the 41-inch pieces to the 89-inch pieces using 3.5-inch screws.
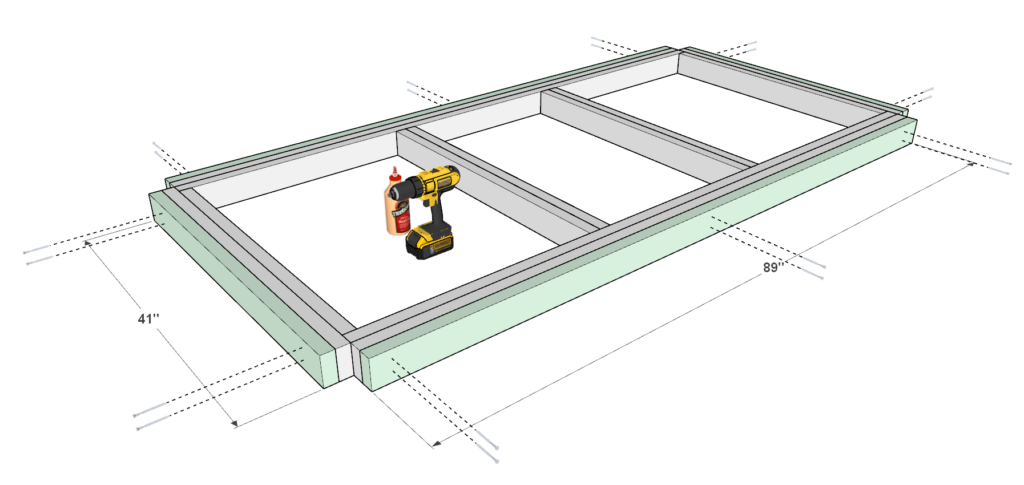
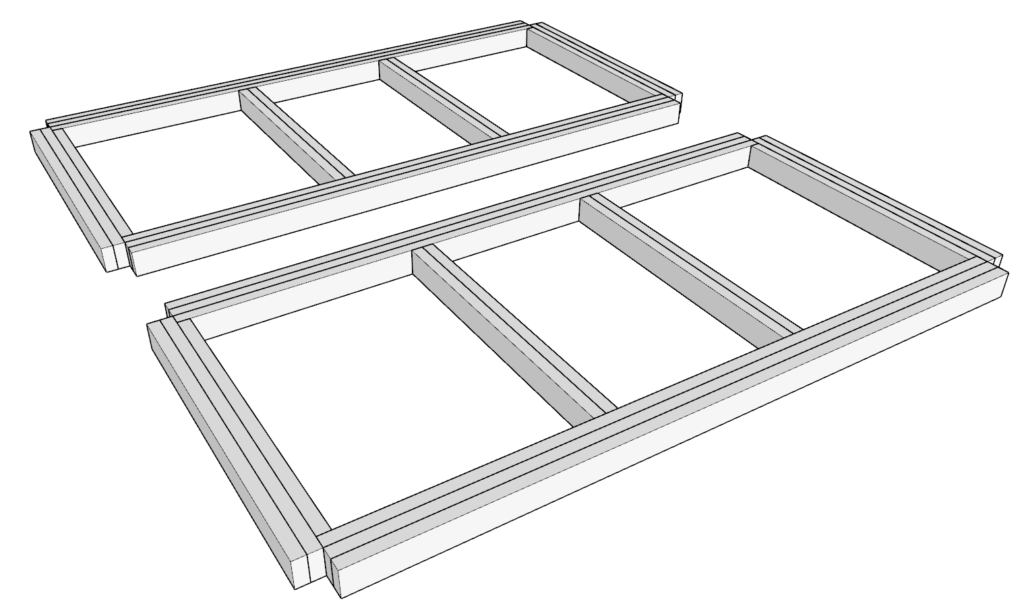
Step 1.4: Repeat the Process
- Repeat Steps 1.1 through 1.3 to construct the second frame.
Tips:
- For a more professional finish, consider lightly planing the boards before assembly. Be cautious not to over-plane, as it may alter the dimensions and cause misalignment.
- Sand the wood as you go to ensure a smooth finish. It’s easier to sand individual pieces than the entire assembled frame.
- Use clamps to hold pieces in place while screwing for better alignment and stability.
Step 2: Attaching the Legs
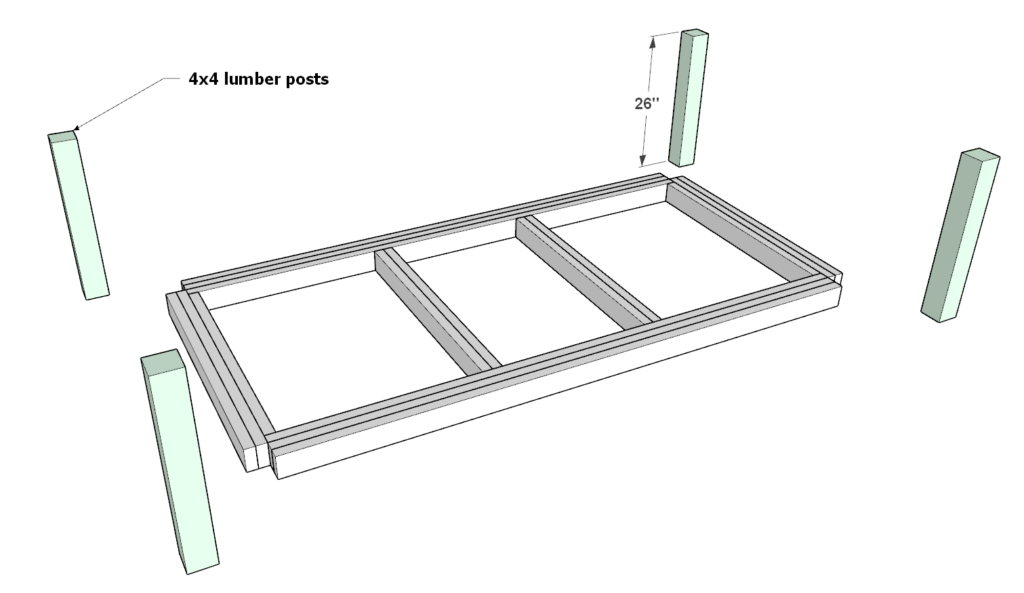
In this step, you will attach the legs to one of the frames constructed in Step 1.
Materials Needed:
- (4) 26-inch 4×4 lumber pieces
- Wood glue
- 3.5-inch screws
- Ratchet straps
Sub-Steps:
Step 2.1: Positioning the Legs
Apply Wood Glue:
- Take the four 26-inch long 4×4 lumber pieces.
- Apply a generous amount of wood glue to all the areas that will be joined together.
Align the Legs with the Frame:
- Place each 4×4 post at the corners of one of the frames from Step 1.
- Ensure that the legs are aligned properly with the frame.
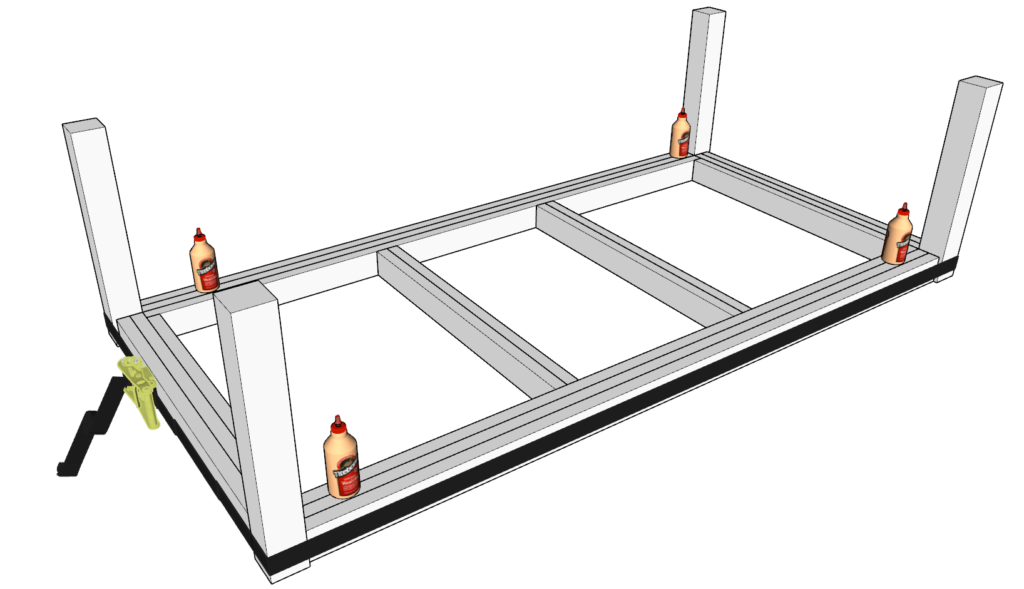
Step 2.2: Securing with Ratchet Straps
Attach Ratchet Straps:
- Loop or lasso a ratchet strap around the frame and legs.
- If one strap is not long enough, use two straps connected together.
Tighten the Straps:
- Initially tighten the straps just enough to hold the legs in place.
- Use a hammer and a scrap wood piece to gently tap the legs into perfect alignment without damaging the wood.
- Once everything is aligned, tighten the straps very securely. Nothing must move.
Protect the Wood (Optional):
- Use cloth pieces at the ends of the 4×4 lumber posts to protect the wood from the pressure of the straps.
Step 2.3: Securing the Legs with Screws
- Drill and Screw the Legs:
- Using 3.5-inch screws, secure the legs to the frame diagonally as indicated in the diagram.
- Ensure the screws are driven in securely to hold the legs in place.
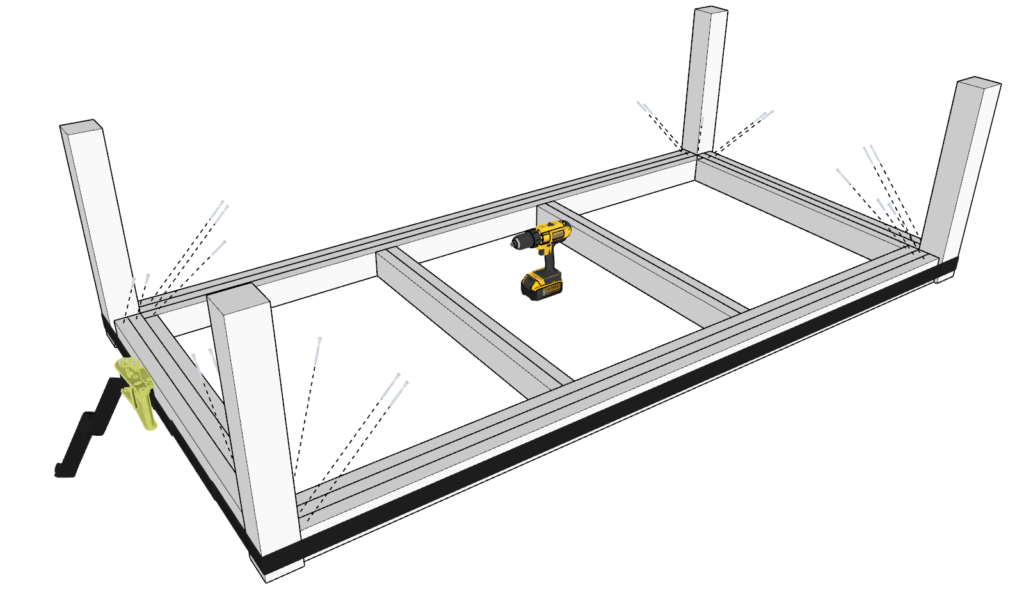
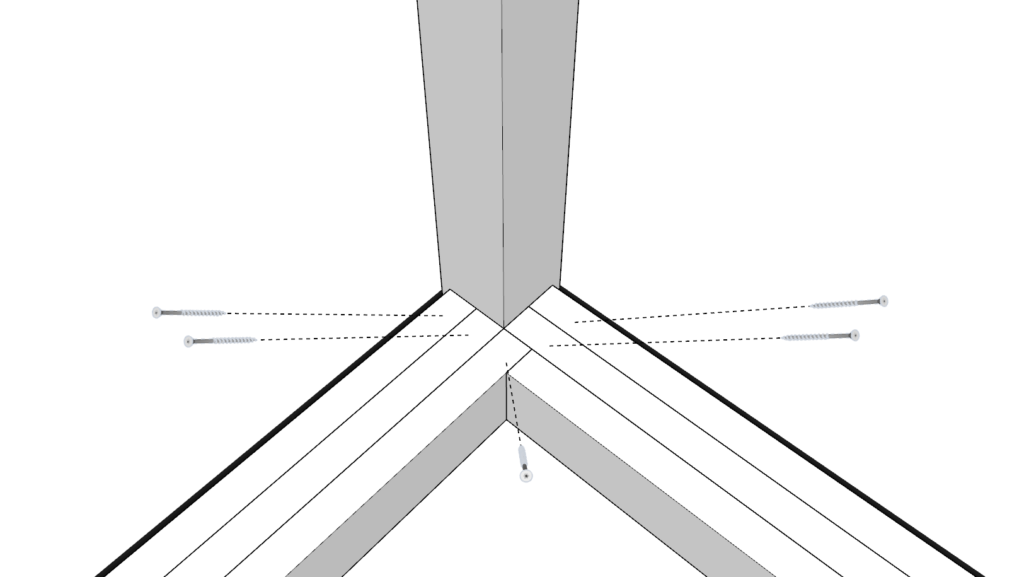
Step 2.4: Flipping the Workbench
Flip the Bench:
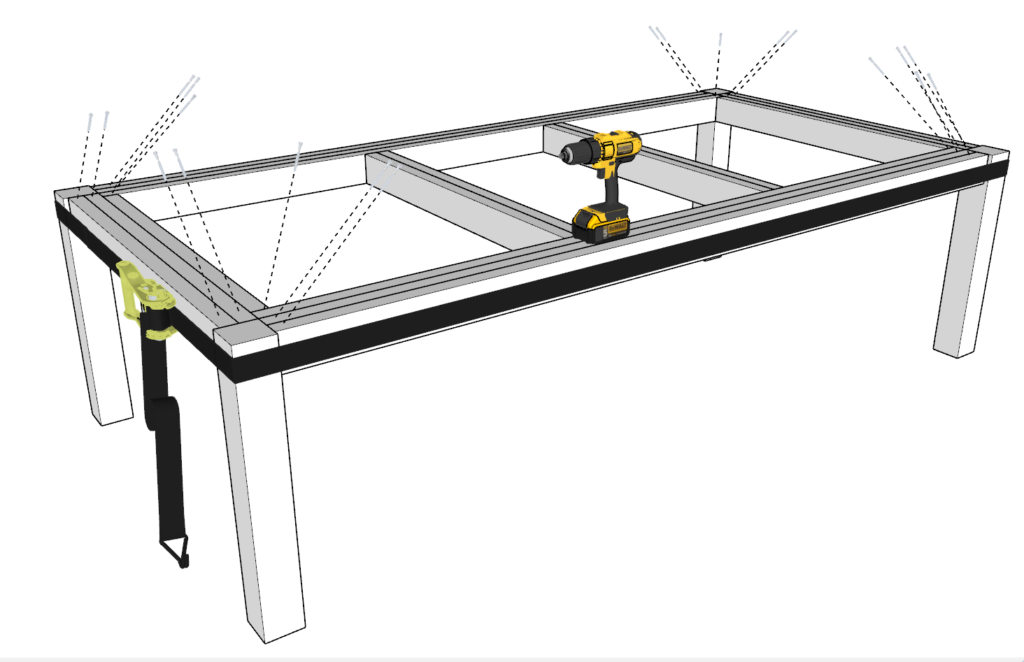
- Carefully flip the bench over with the help of another person. Do not attempt to do this alone as the legs are not be strong enough to support the weight yet.
- Flip the bench mid-air to avoid putting pressure on the legs.
Secure the Screws Again:
- Once the bench is flipped, secure the legs again with 3.5-inch screws in a diagonal pattern.
- Keep the ratchet straps in place.
Step 3: Build and Attach the Drawer Housing
In this step, you will construct the drawer housing frame and attach it to the frame and leg assembly from Step 2.
Materials Needed:
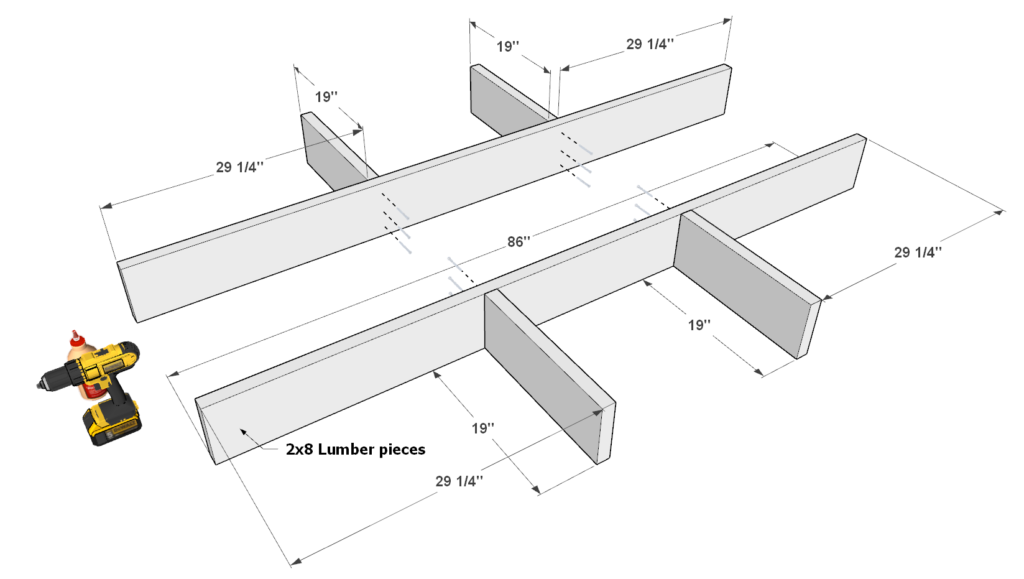
- 2 pieces of 86-inch long 2×8 lumber
- 4 pieces of 19-inch long 2×8 lumber
- 4 pieces of 41-inch long 2×8 lumber
- 2 pieces of 92-inch long 2×4 lumber
- 4 pieces of 34-inch long 2×4 lumber
- Wood glue
- 2.5-inch screws
- 3.5-inch screws
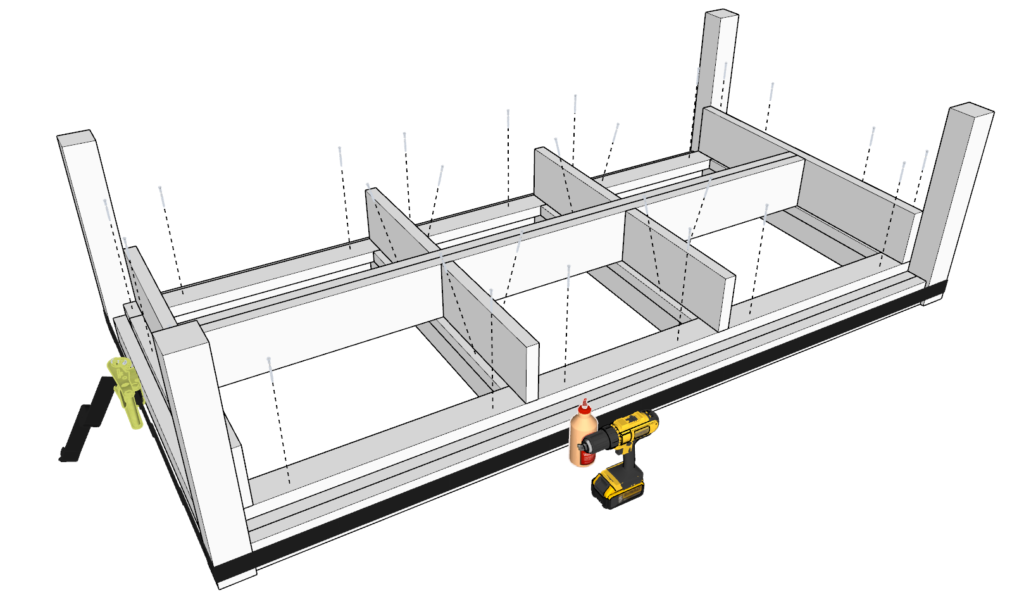
3.1 Build Drawer Housing Frames
- Assemble Two Drawer Housing Frames:
- Attach 3 pieces of 19-inch long 2×8 lumber perpendicularly to the 86-inch piece at the indicated intervals using wood glue and 3.5-inch screws.
- Repeat the process to create the second frame identical to the first one.
3.2 Connect the Frames
- Attach the End Pieces:
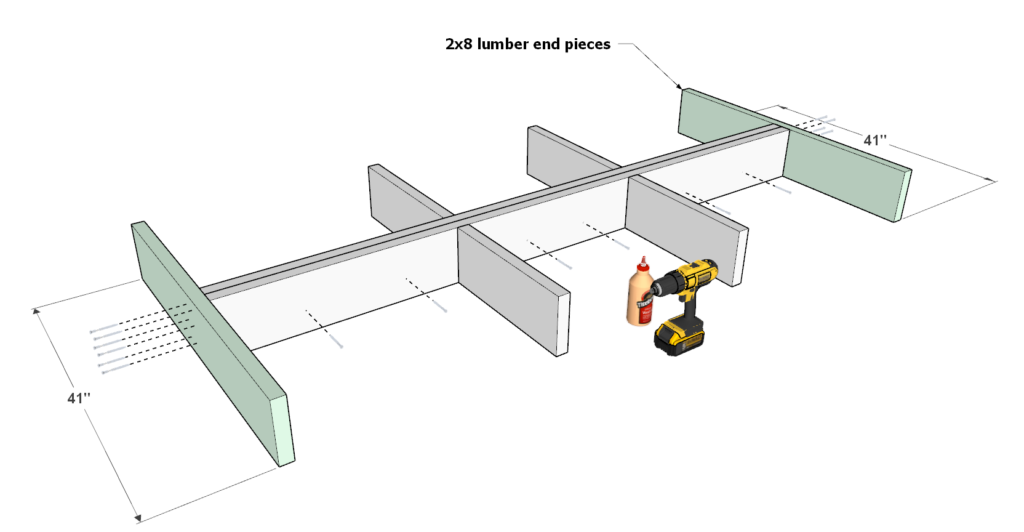
- Take the two assembled drawer housing frames and position them parallel to each other. Secure them together with 2.5 inch screws and wood glue.
- Center and attach 2 pieces of 41-inch long 2×8 lumber to each end of the frames using wood glue and 3.5-inch screws. Ensure the edges are flush, and the corners are square.
3.3 Add the Upper 2×4 Frame
Construct the Upper 2×4 Frame:
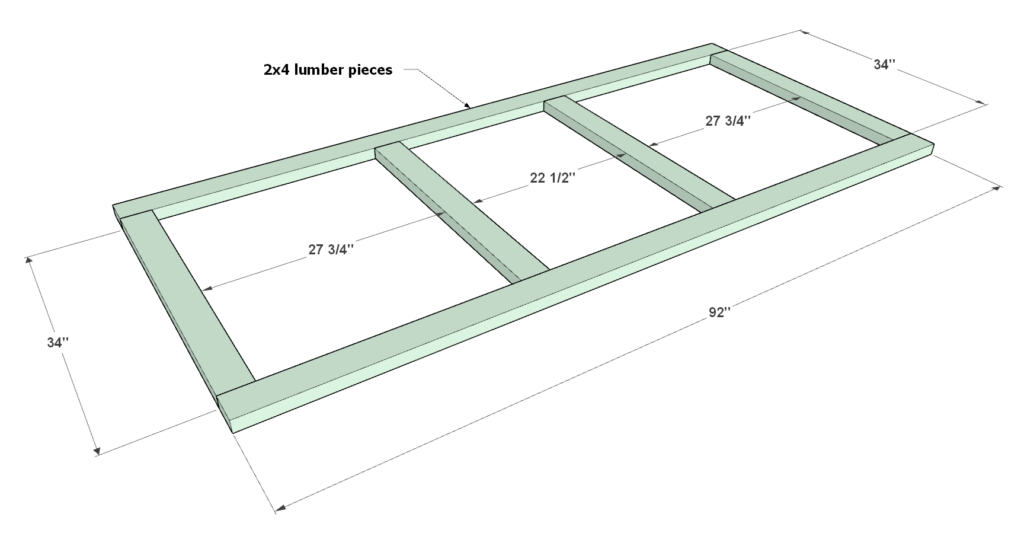
- Lay out 2 pieces of 92-inch long 2×4 lumber parallel to each other.
- Lay out 4 pieces of 34-inch long 2×4 lumber perpendicularly between them.
Attach the 2×4 Frame to the Drawer Housing:
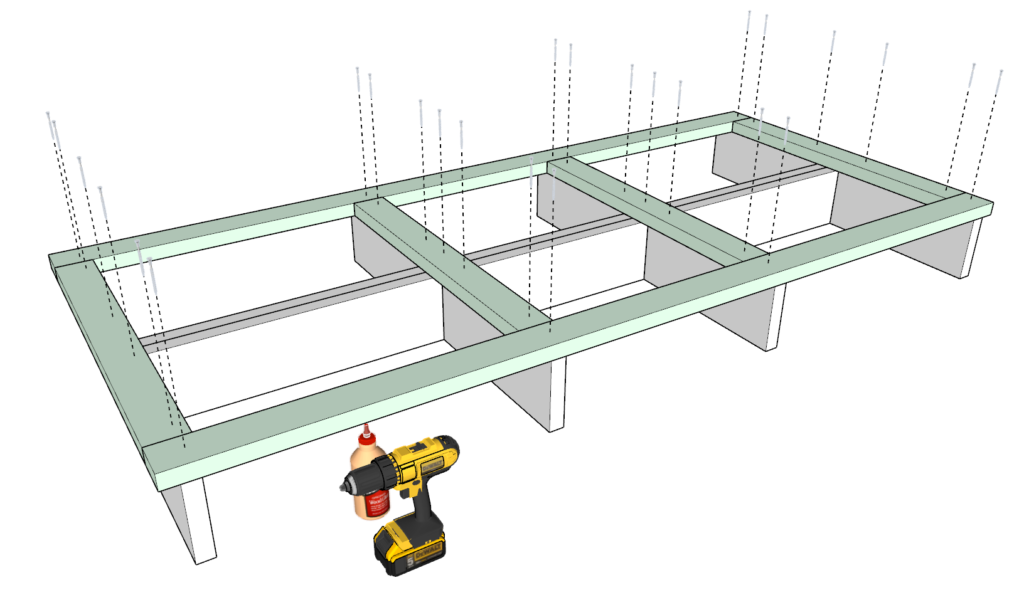
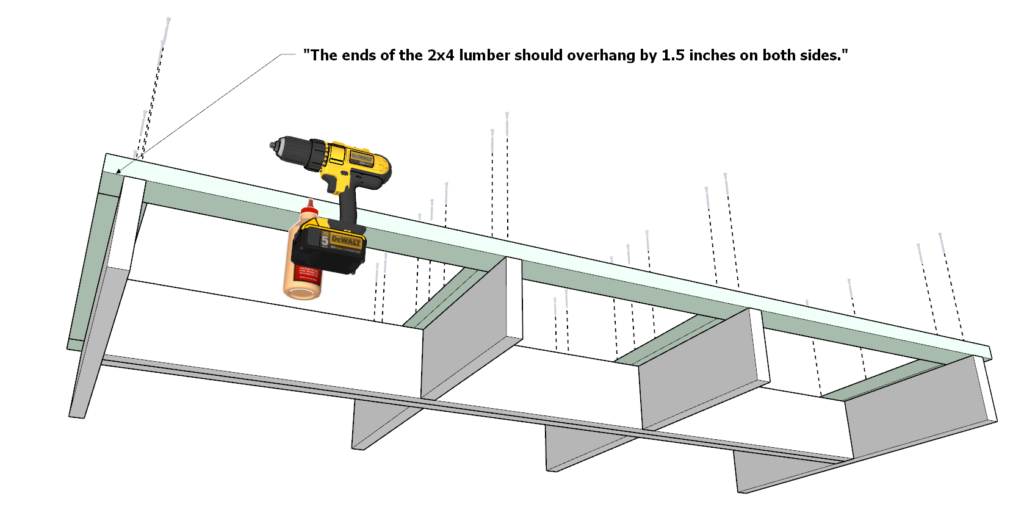
- Position the constructed 2×4 frame on top of the drawer housing assembly.
- Secure the frame to the drawer housing using wood glue and 3.5-inch screws. Ensure it is properly aligned and secured.
3.4 Attach the Drawer Housing to the Frame and Legs
- Secure Drawer Housing to Frame/Leg Assembly:
- Place the drawer housing assembly on top of the frame and leg assembly from Step 2.
- Secure it with wood glue and 3.5-inch screws at multiple points as shown in the diagrams.
3.5 Final Touches
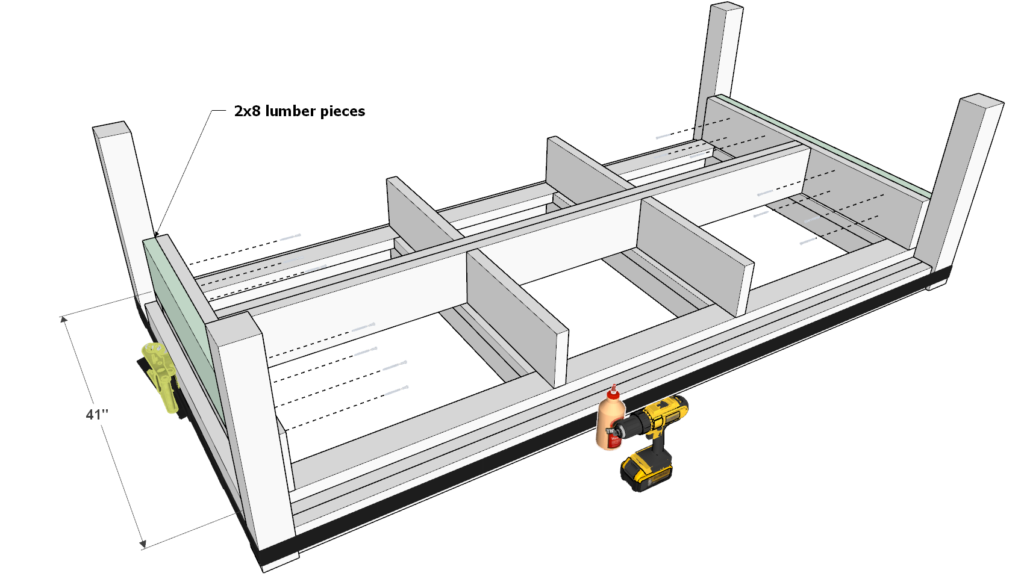
- Add Additional End Pieces:
- Attach 2 pieces of 41-inch long 2×8 lumber to the ends of the entire assembly using wood glue and 2.5-inch screws for added structural support and a clean finish.
Step 4: Adding the Shelf Components and Casters
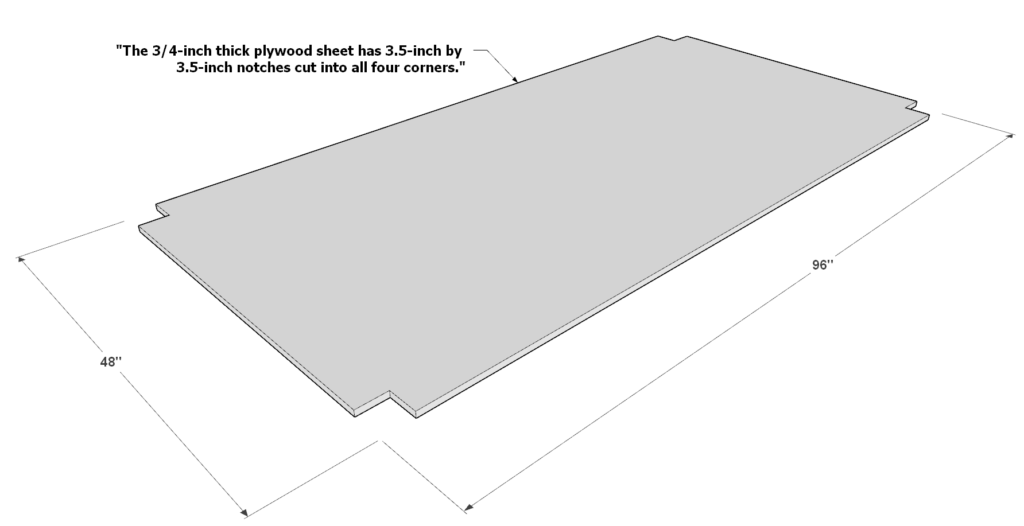
4.1 Prepare the Plywood Shelf Surface
- Take a full-sized 3/4-inch thick plywood sheet (48 inches x 96 inches).
- Cut 3.5-inch by 3.5-inch notches into all four corners of the plywood sheet.
4.2 Temporarily Secure the Plywood Shelf
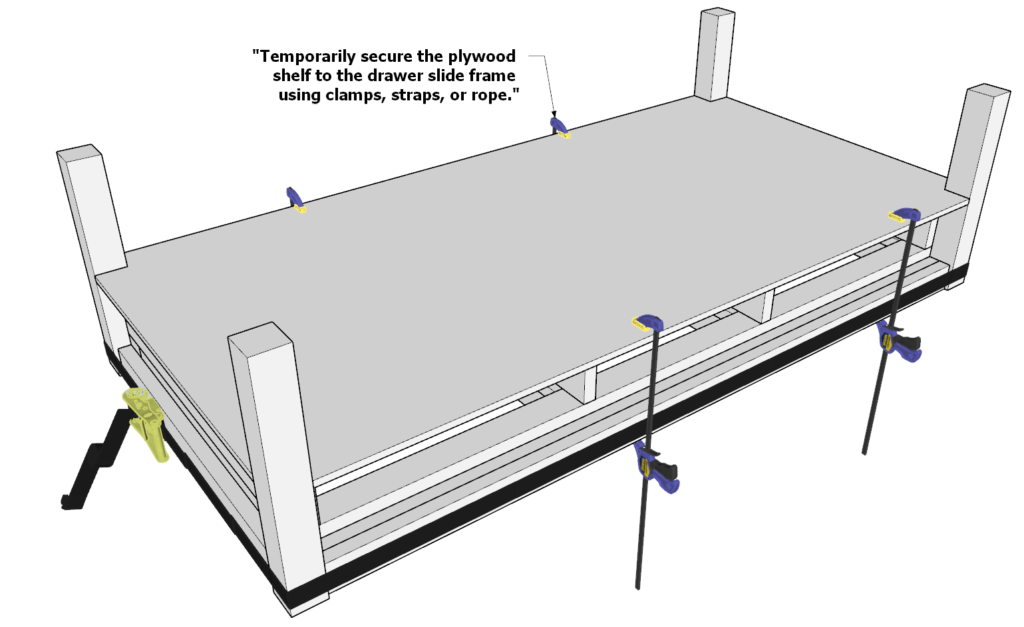
- Place the notched plywood sheet (shelf surface) on top of the drawer slide frame.
- Temporarily secure the plywood shelf to the drawer slide frame using clamps, straps, or rope. Do not use glue or screws at this stage.
4.3 Positioning the Workbench
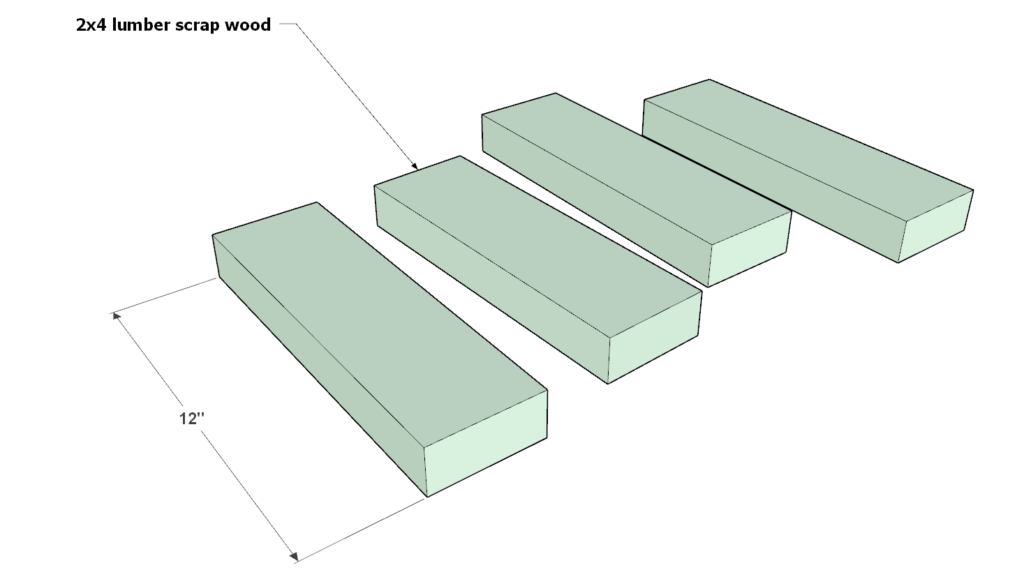
- Take four 12-inch long 2×4 lumber scrap pieces.
- Carefully place the entire workbench assembly on the ground, with the scrap wood pieces as shown in the diagram.
4.4 Add the Remaining Frame from Step 1
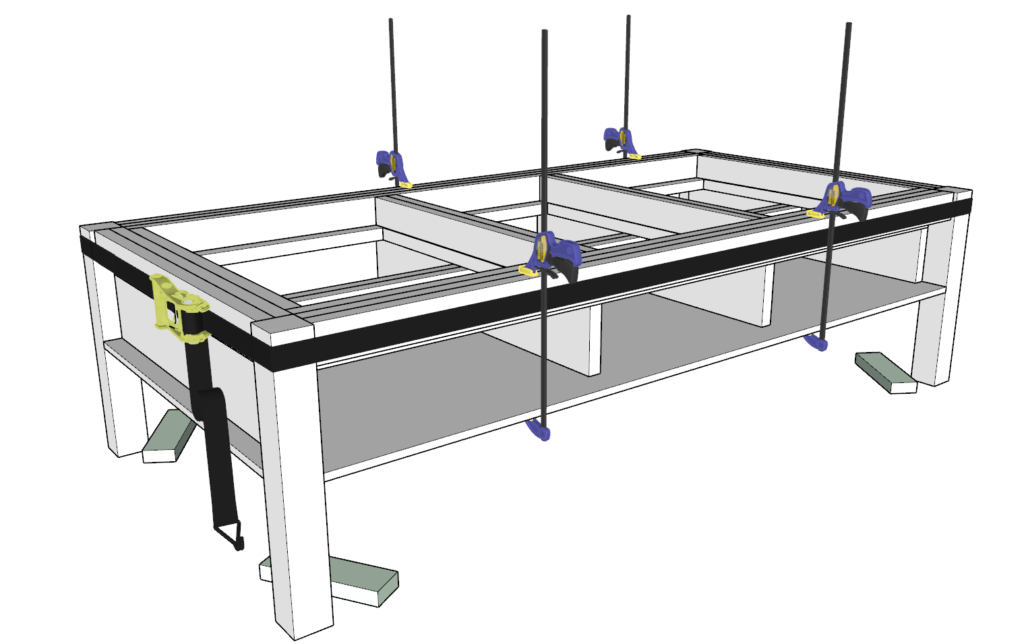
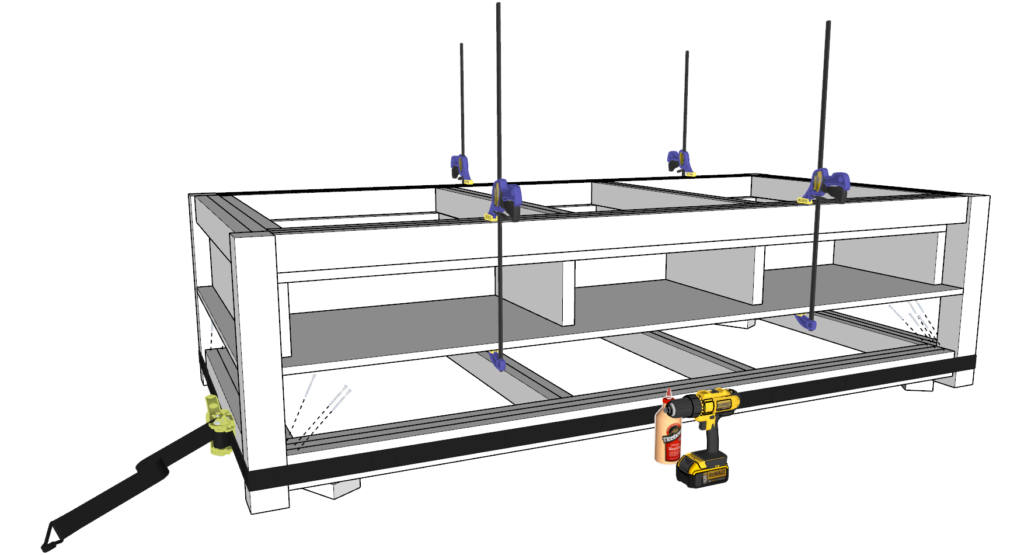
- Add glue to all the areas that will be secured together.
- Position the remaining frame from Step 1 as indicated in the diagram.
- Ensure the frame is elevated by 1.5 inches on all sides.
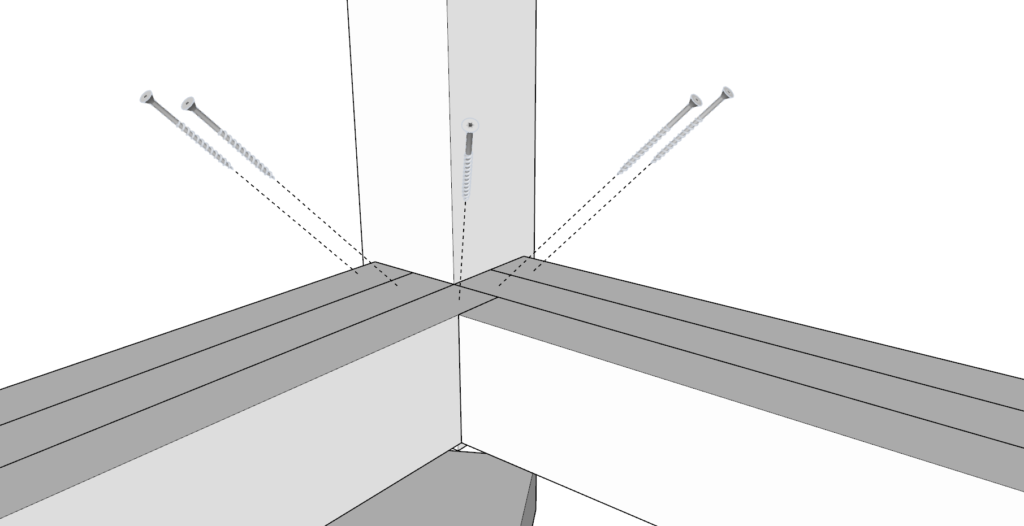
- Secure the frame with wood glue and 3.5-inch screws.
- Attach the frame to the legs from both the top and bottom by tilting the workbench on its side.
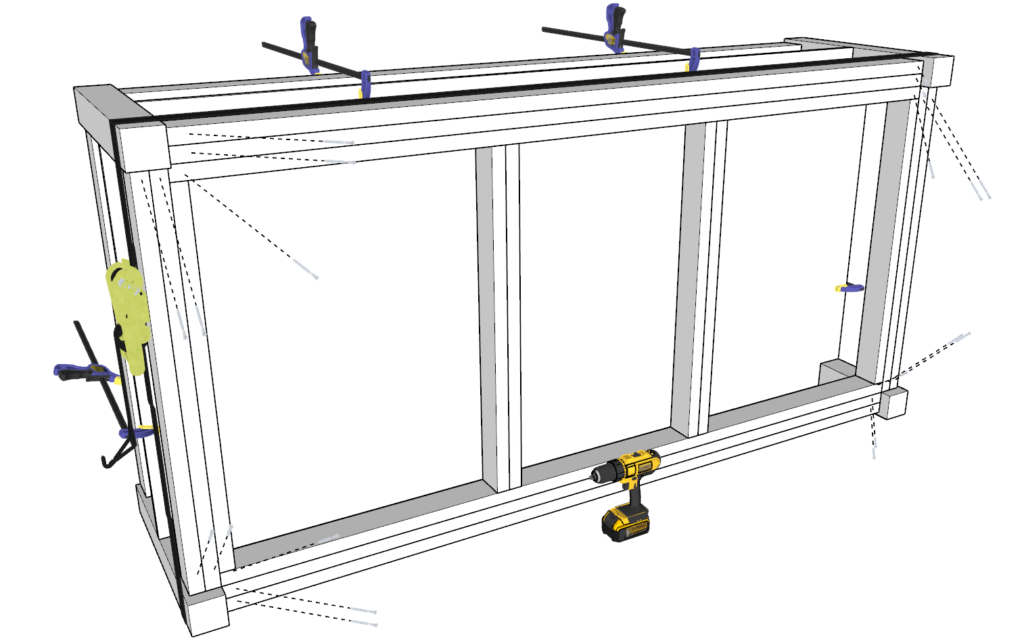
4.5 Attach the Casters
- While the workbench is tilted on its side, attach the 5-inch heavy-duty 360-degree swivel casters with brakes to the 4×4 table legs.
- Use long 4 or 5-inch screws to secure the casters.
- It is essential to pre-drill holes to accommodate the screws due to the Thickness of longer screws. If you don’t then you risk the wood splitting
- Use an old or sacrificial drill bit to avoid damaging a good bit in case of screw collisions.
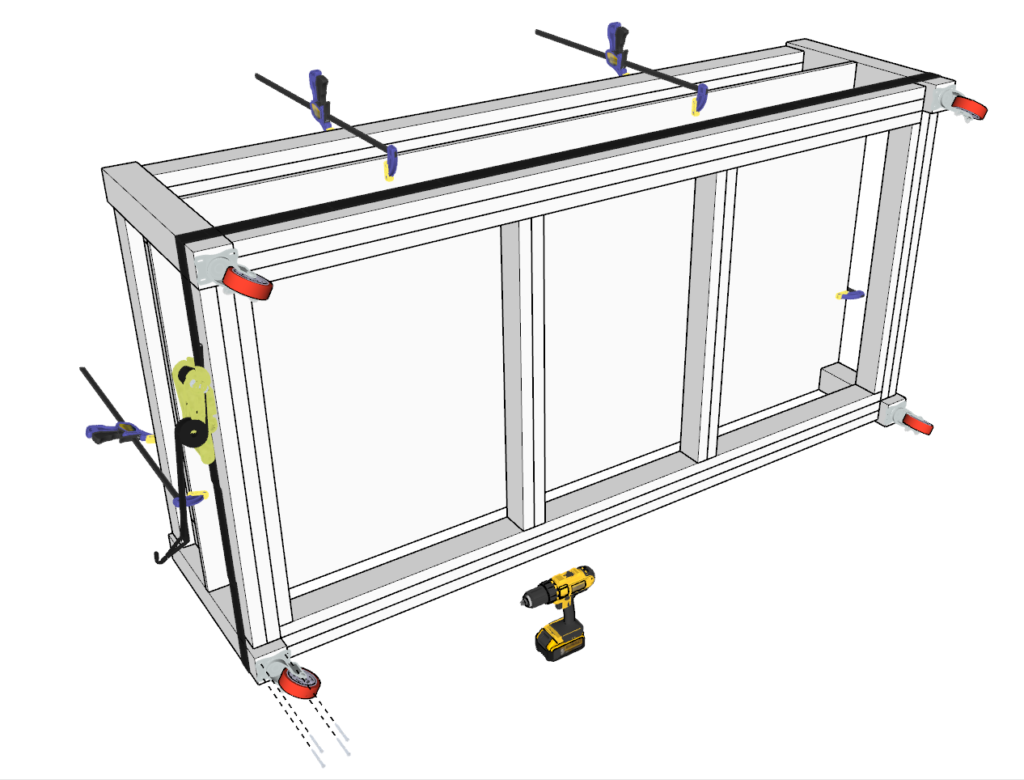
4.6 Secure the Plywood Shelf
- With the casters attached, flip the workbench back to its upright position with help. It will be heavy at this point.
- Secure the plywood shelf to the shelf frame using wood glue and screws, ensuring it is firmly attached and level.
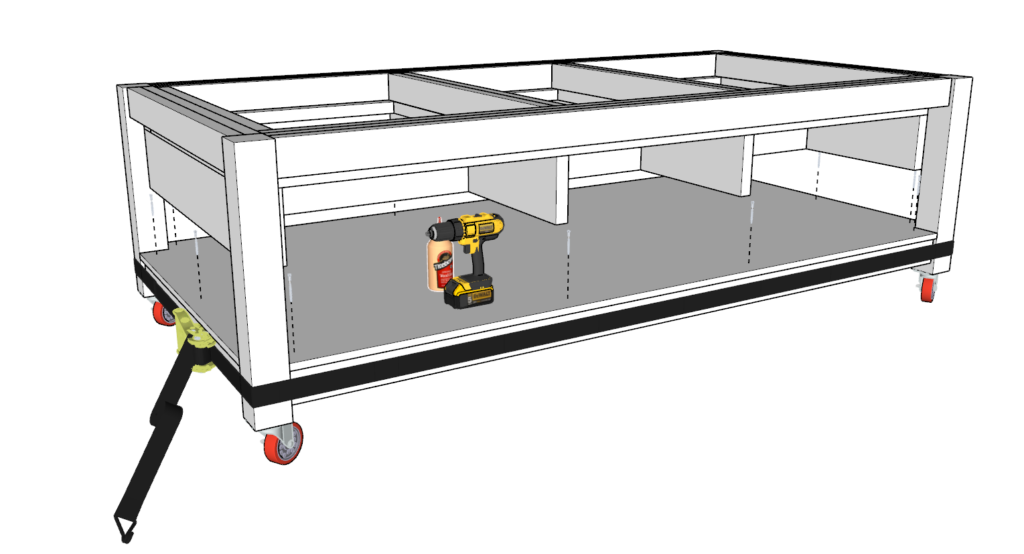
Step 5: Assemble and Install Drawers
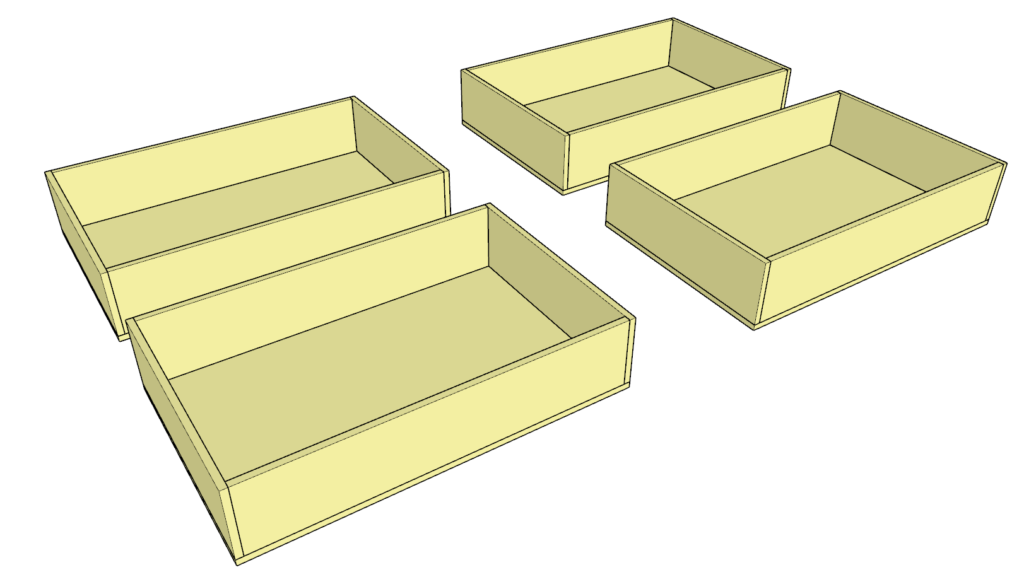
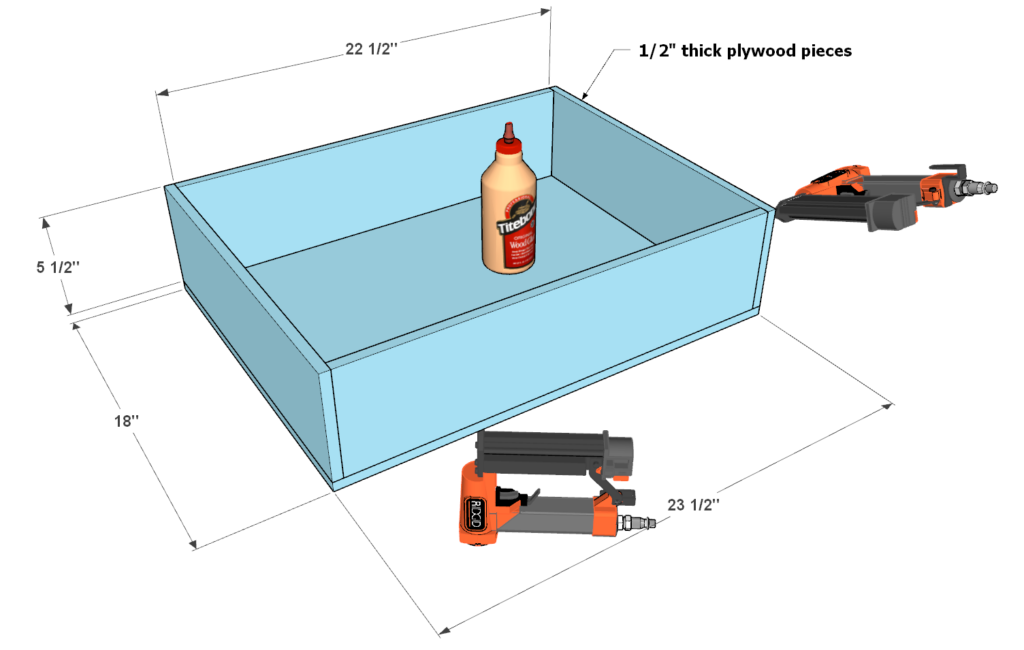
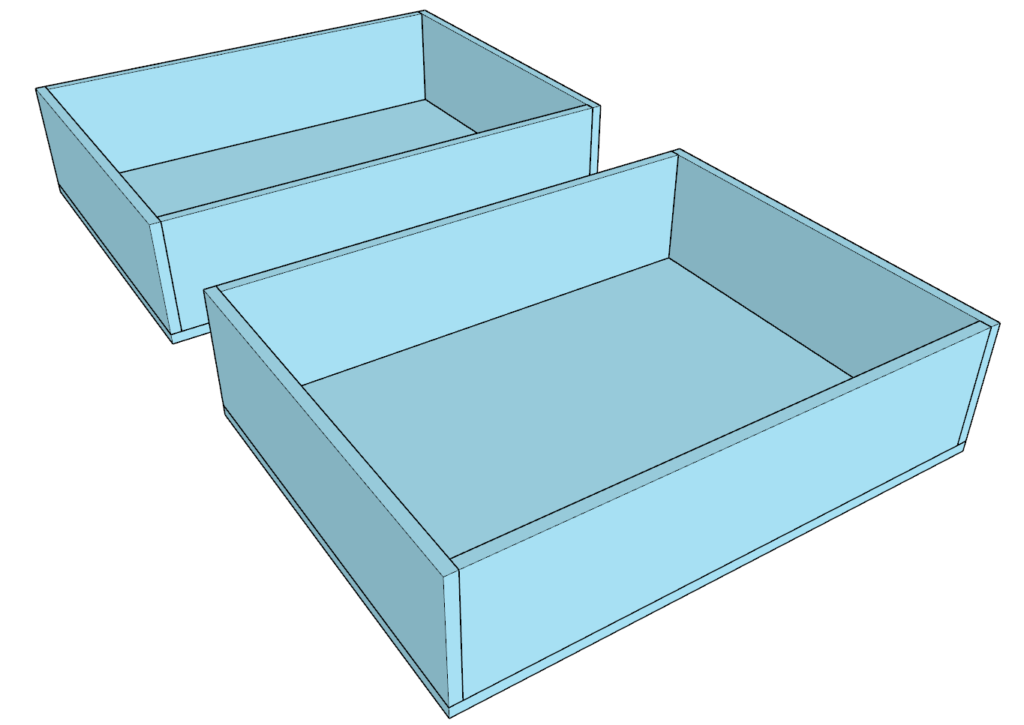
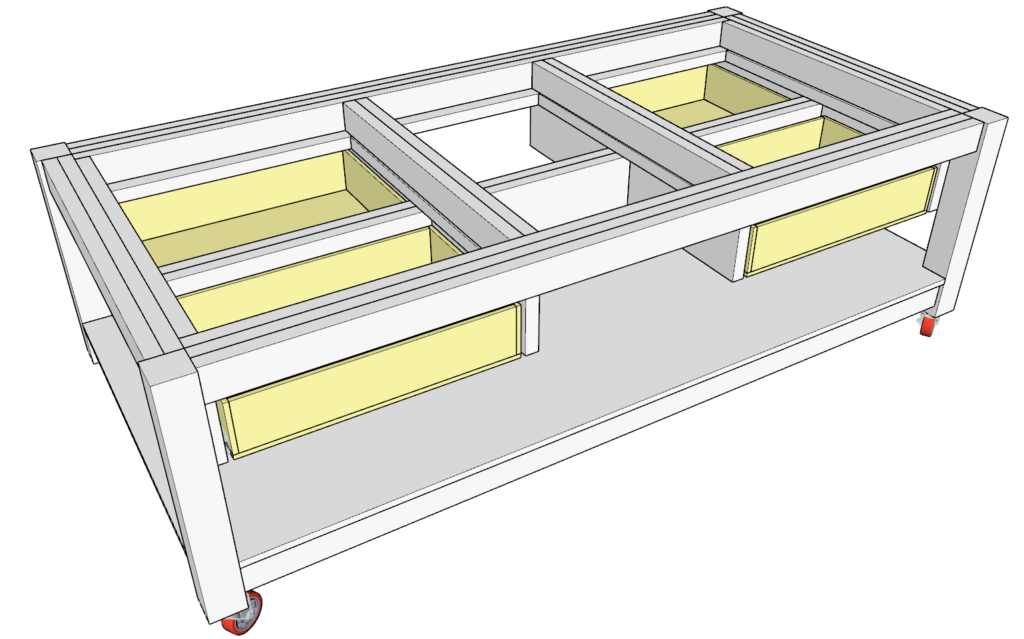
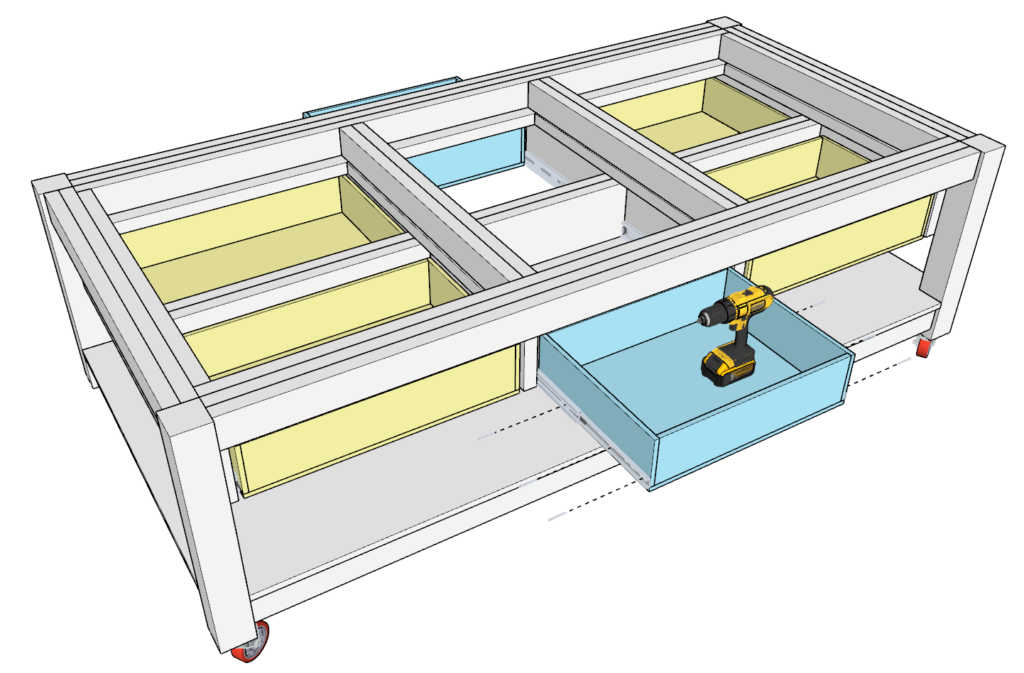
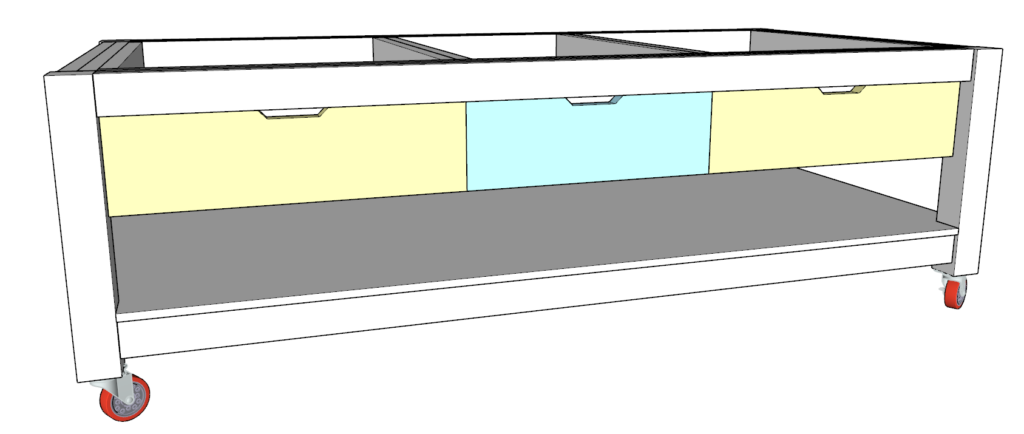
In this step, you will be assembling the drawers and installing them. You will have two types of drawers: one slightly shorter than the other. They are color-coded for clarity. The larger ones will be color-coded yellow, and the shorter ones will be color-coded blue.
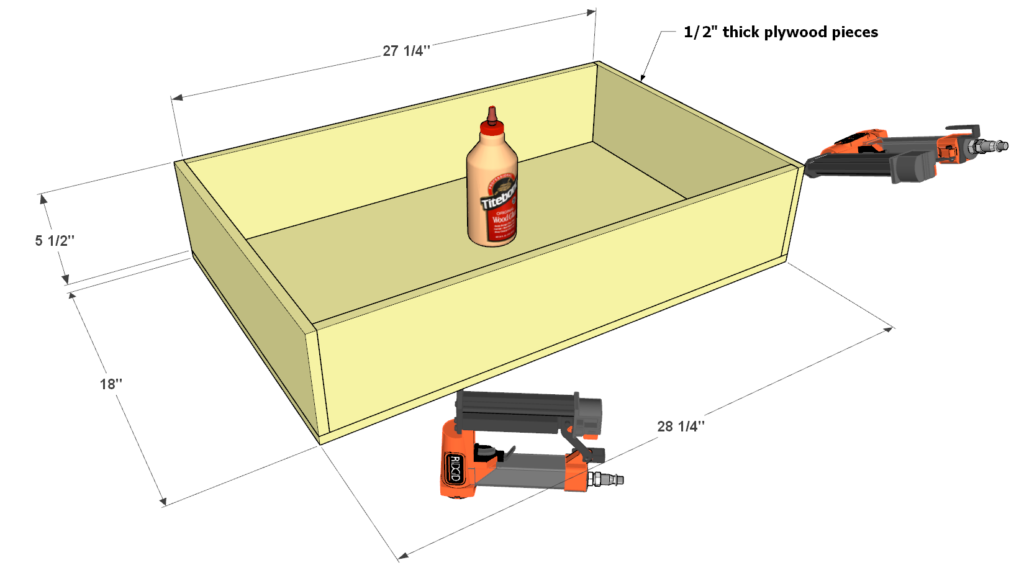
Assemble Yellow Drawers
Cut Plywood Pieces
- For each yellow drawer, you will need the following cuts from a 1/2″ thick plywood sheet:
- (2) pieces of 5.5 in x 18 in
- (2) pieces of 5.5 in x 27.25 in
- (1) piece of 18 in x 28.25 in
- For each yellow drawer, you will need the following cuts from a 1/2″ thick plywood sheet:
Assemble the Drawer
- Use pin nails and wood glue to secure everything together.
- Use clamps to hold the pieces together while the glue sets.
Repeat
- Make a total of four yellow drawers.
Assemble Blue Drawers
Cut Plywood Pieces
- For each blue drawer, you will need the following cuts from a 1/2″ thick plywood sheet:
- (2) pieces of 5.5 in x 18 in
- (2) pieces of 5.5 in x 22.5 in
- (1) piece of 18 in x 23.5 in
- For each blue drawer, you will need the following cuts from a 1/2″ thick plywood sheet:
Assemble the Drawer
- Use pin nails and wood glue to secure everything together.
- Use clamps to hold the pieces together while the glue sets.
Repeat
- Make a total of two blue drawers.
Install Drawers
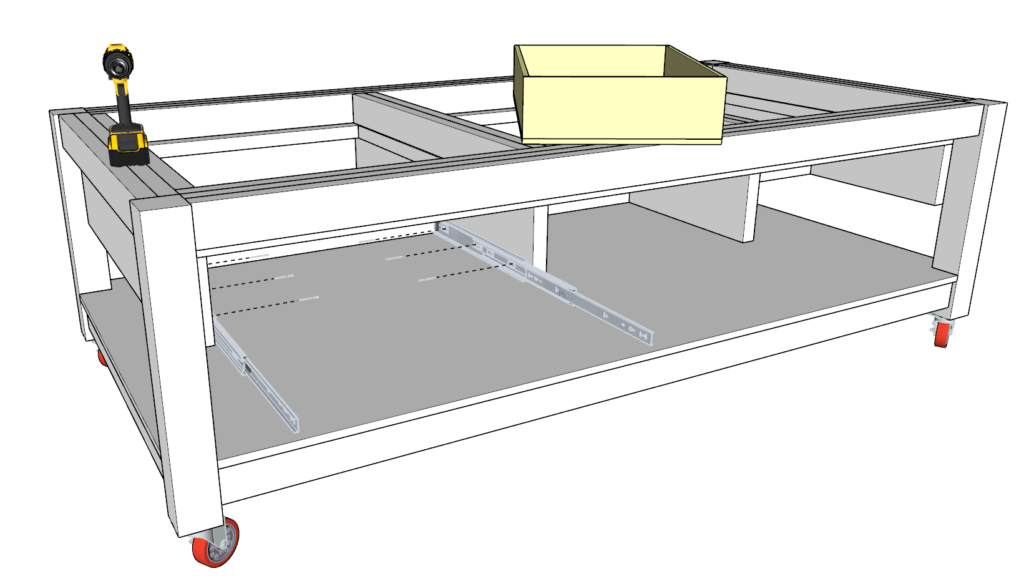
Install Yellow Drawers
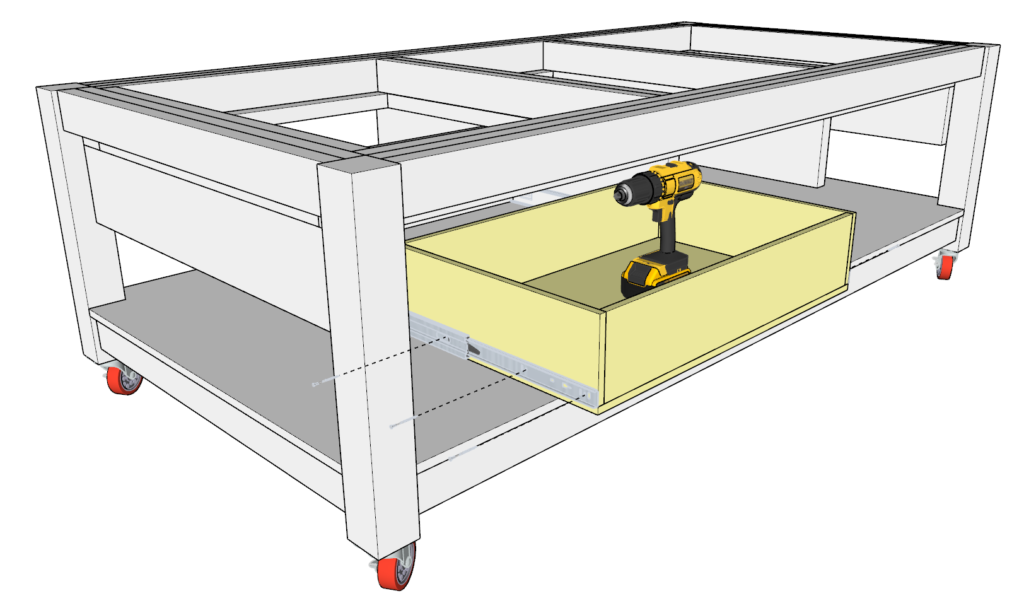
- You will need a pair of 18-inch drawer slides, Plusmart Soft Close Drawer Slides, for each drawer.
- Install the slides as indicated in the diagram and follow the manufacturer’s instructions. Note that some drawer slide might have slightly different instructions. Follow the manufacturers instructions
- The Slides we are using have the following Dimensions: 18″L x 0.5″W x 1.77″Th
- Attach the drawer to the slides and secure it as per the manufacturer’s instructions.
- Make sure to test that the drawers fully close and do not stick out. It is better if the drawers go too deep rather than not deep enough. The drawer face will stop the drawer from going too deep.
Install Blue Drawers
- Follow the same process as for the yellow drawers to install the blue drawers.
Step 6: Making and Installing Drawer Faces
In this step, you will make and install the drawer faces. These faces are color-coded to match the drawers: yellow faces for the yellow drawers and blue faces for the blue drawers.
Materials Needed:
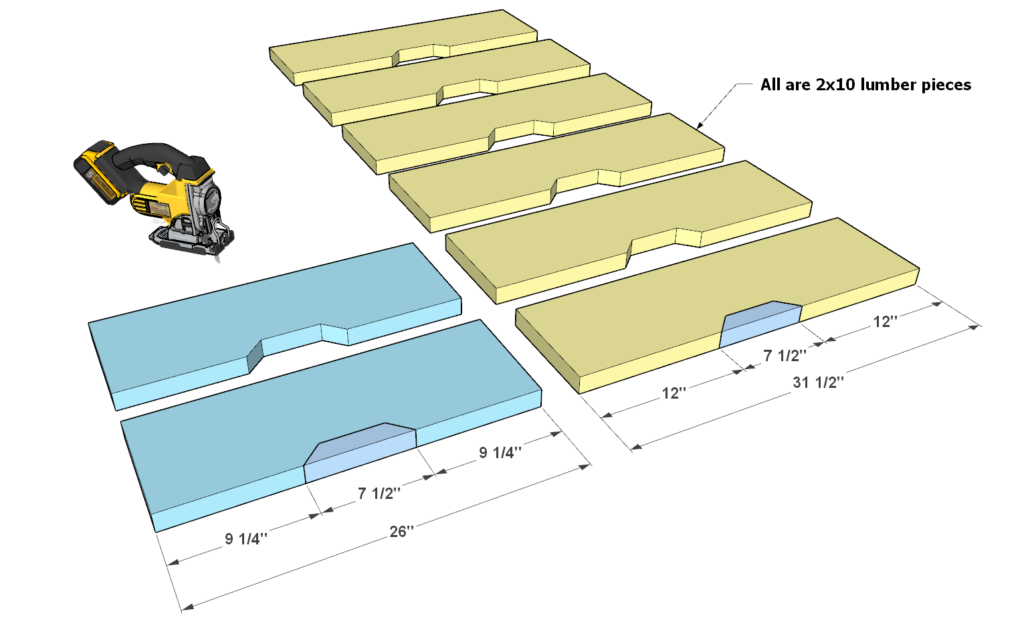
- (6) Yellow Drawer Faces: 31-1/2 inches long, 2×10 lumber pieces
- (2) Blue Drawer Faces: 26 inches long, 2×10 lumber pieces
- Handles (optional: either purchased or custom-made)
- Wood glue
- Pin nails
Sub-Steps:
Step 6.1: Prepare the Drawer Faces
6.1.1: Cutting Yellow Drawer Faces
- Cut six pieces of 2×10 lumber, each 31-1/2 inches long.
6.1.2: Cutting Blue Drawer Faces
- Cut two pieces of 2×10 lumber, each 26 inches long.
Step 6.2: Creating Handles (Optional)
If you are making your own handles:
6.2.1: Cutting Trapezoidal Notches
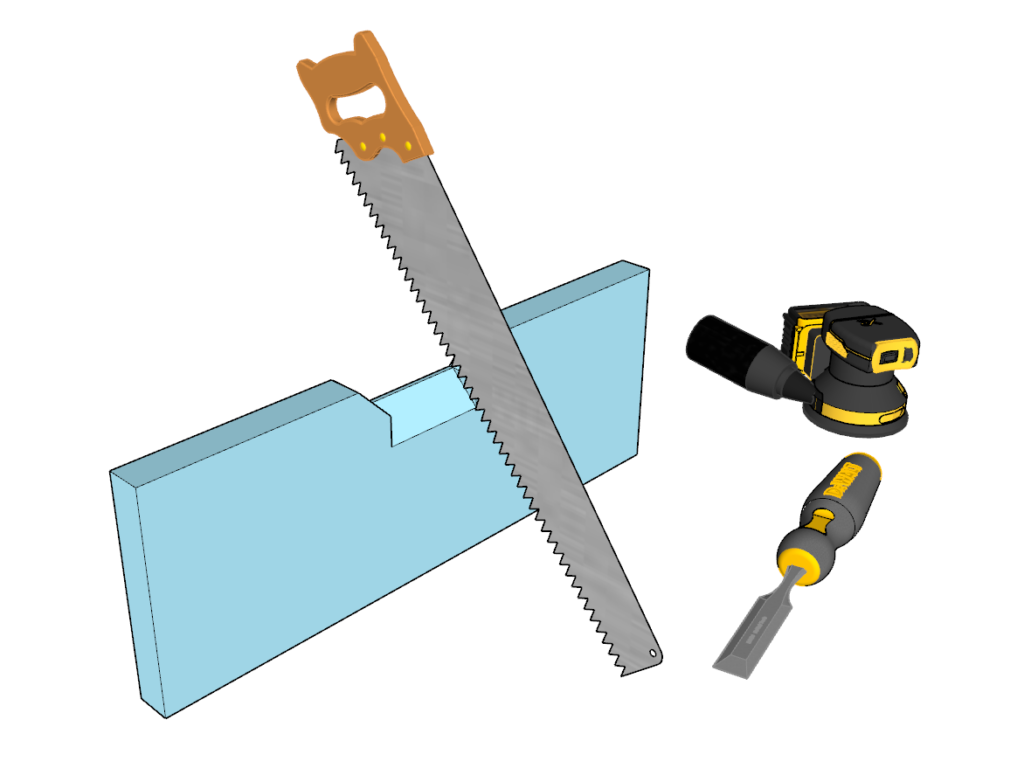
- Cut 7-1/2 inch long trapezoidal notches into the lumber pieces.
- Use a jig saw, scroll saw, band saw, hand saw and chisel, or hammer and chisel.
- Adjust the width of the notches based on your hand size if needed.
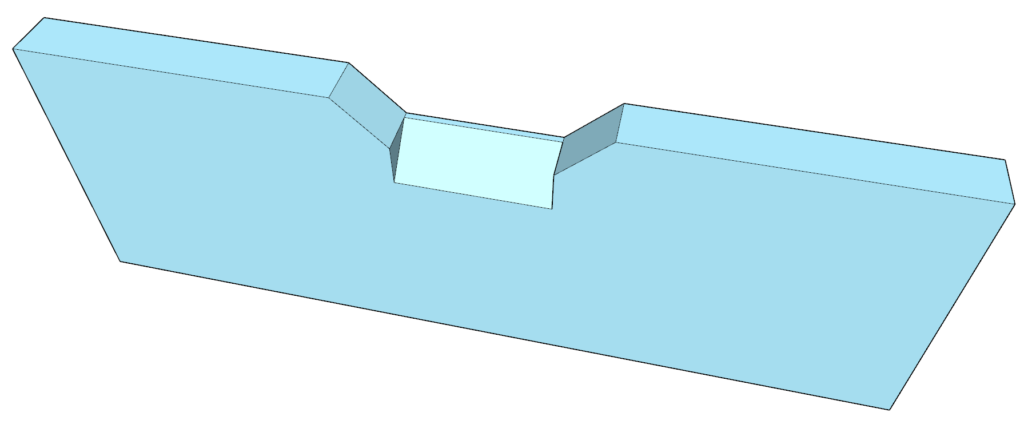
6.2.2: Shaping the Handles
- Modify the trapezoidal openings to form handles you can pull.
- Use a hand saw, chisel, and sander to achieve the desired shape, as shown in the diagram.
Step 6.3: Attaching the Drawer Faces
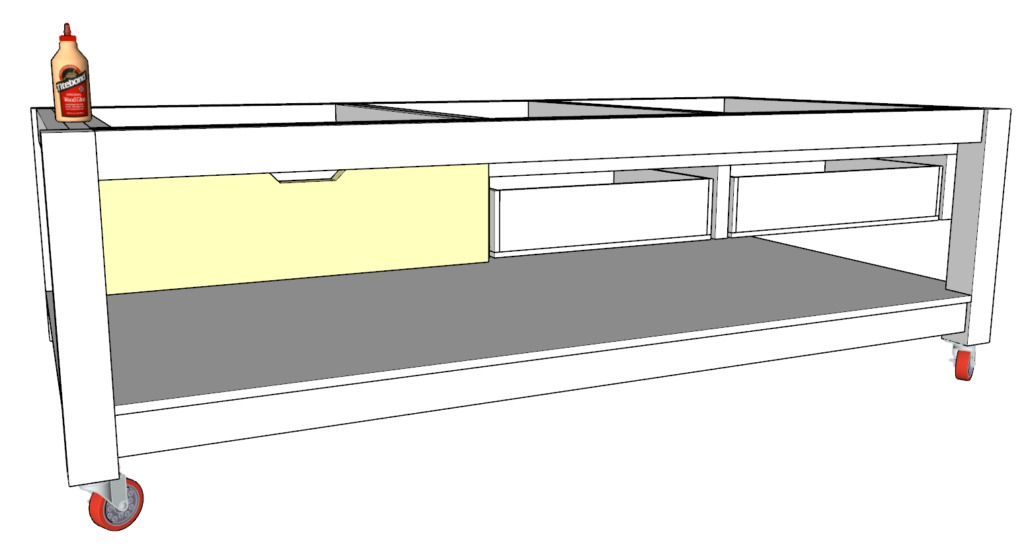
- Align the face with a corresponding color drawer.
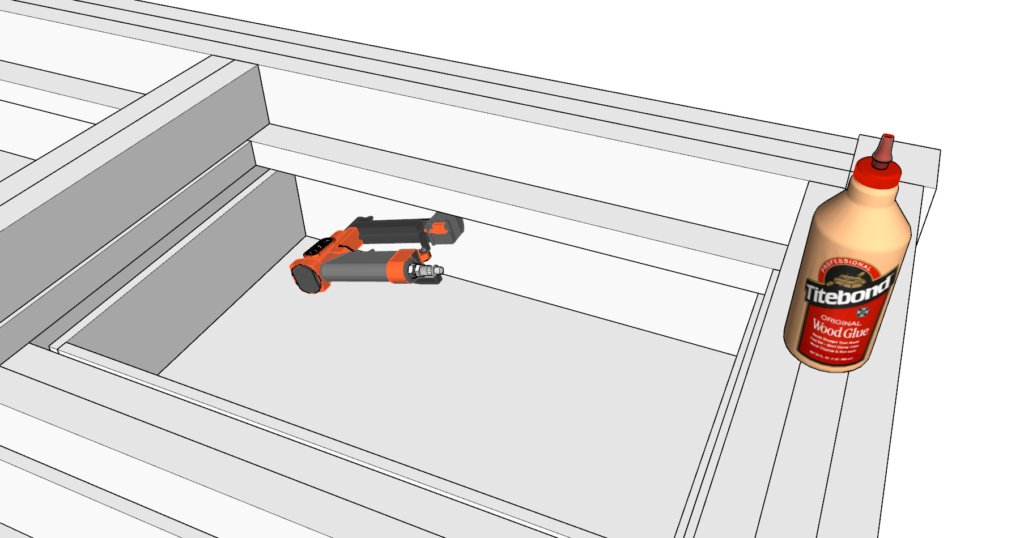
- Apply wood glue to the contact surfaces.
- Secure the face to the drawer using pin nails.
- Repeat for all drawers.
Step 6.4: Adjusting Drawer Faces
Ensuring Smooth Operation
- Ensure the drawer faces open and close easily without catching on each other.
- Sand down any faces that are too close to each other if necessary.
Step 6.5: Installing the Work Surface
6.5.1: Preparing the Work Surface
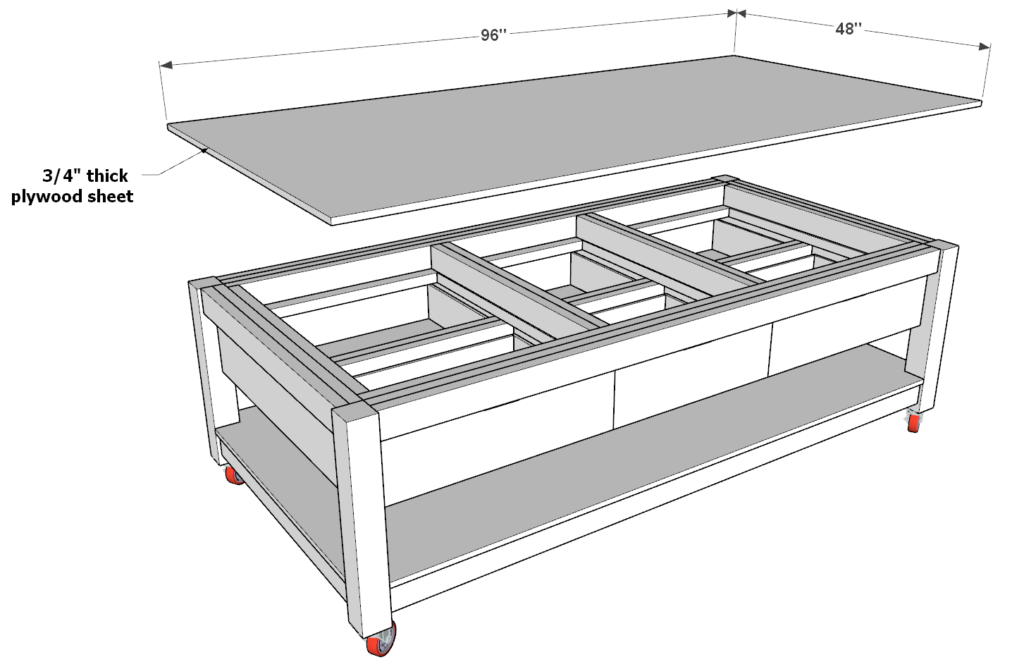
- Obtain a 3/4 inch thick plywood sheet, 96 inches by 48 inches.
6.5.2: Attaching the Work Surface
- Place the plywood sheet on top of the bench frame.
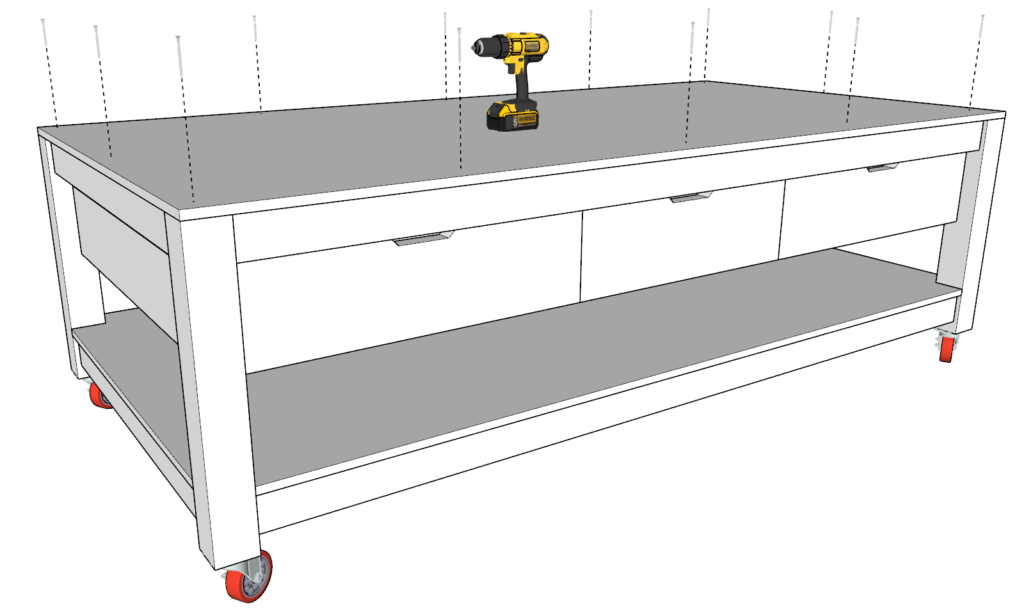
- Secure it to the frame using screws.
- Note: Do not use glue. The work surface can be flipped over when worn out. For additional wear over the years, replace it with a new sheet.
