Introduction
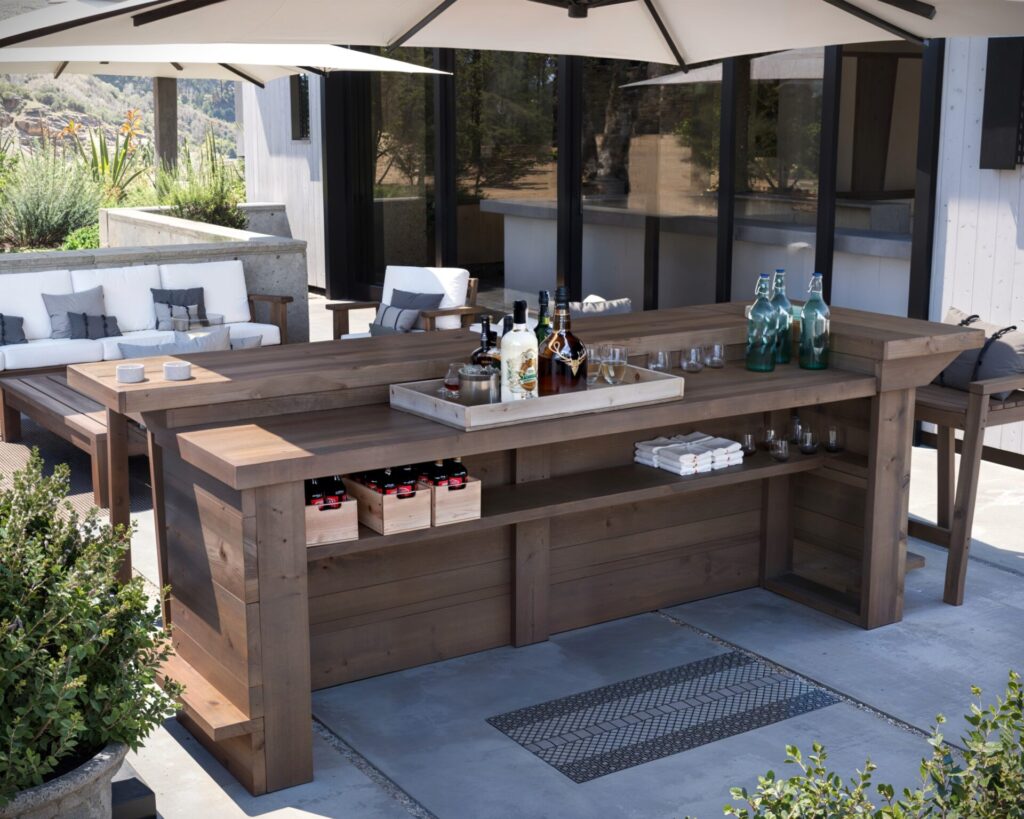
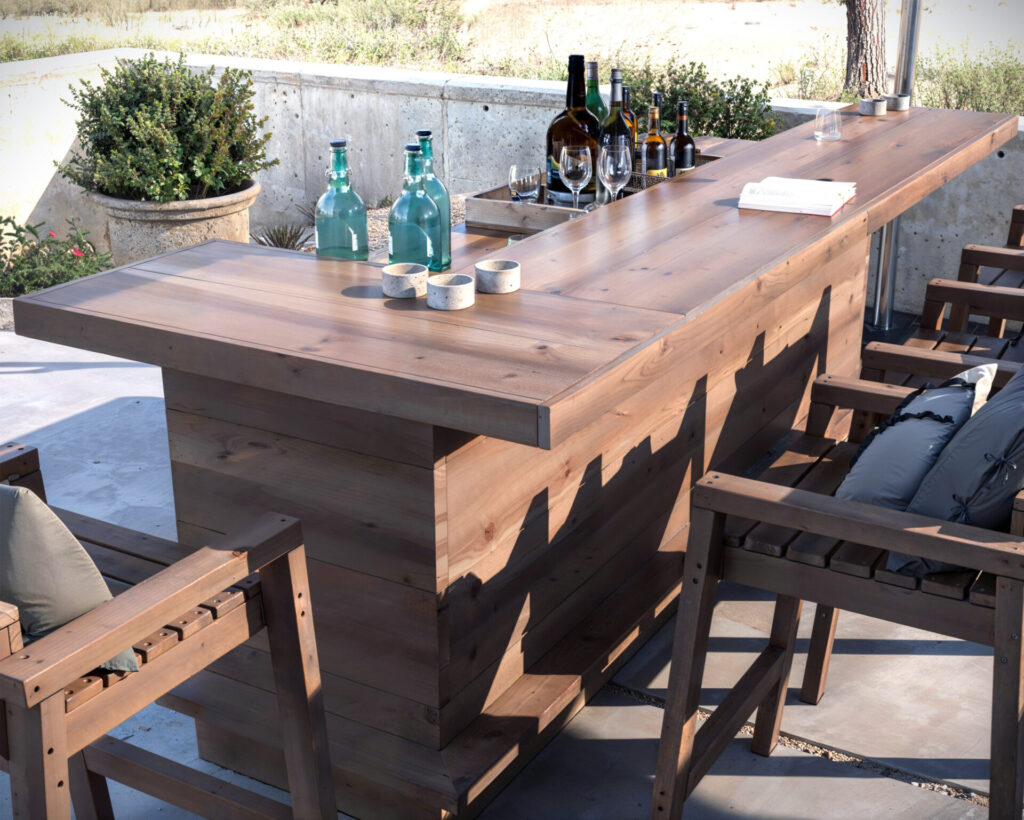
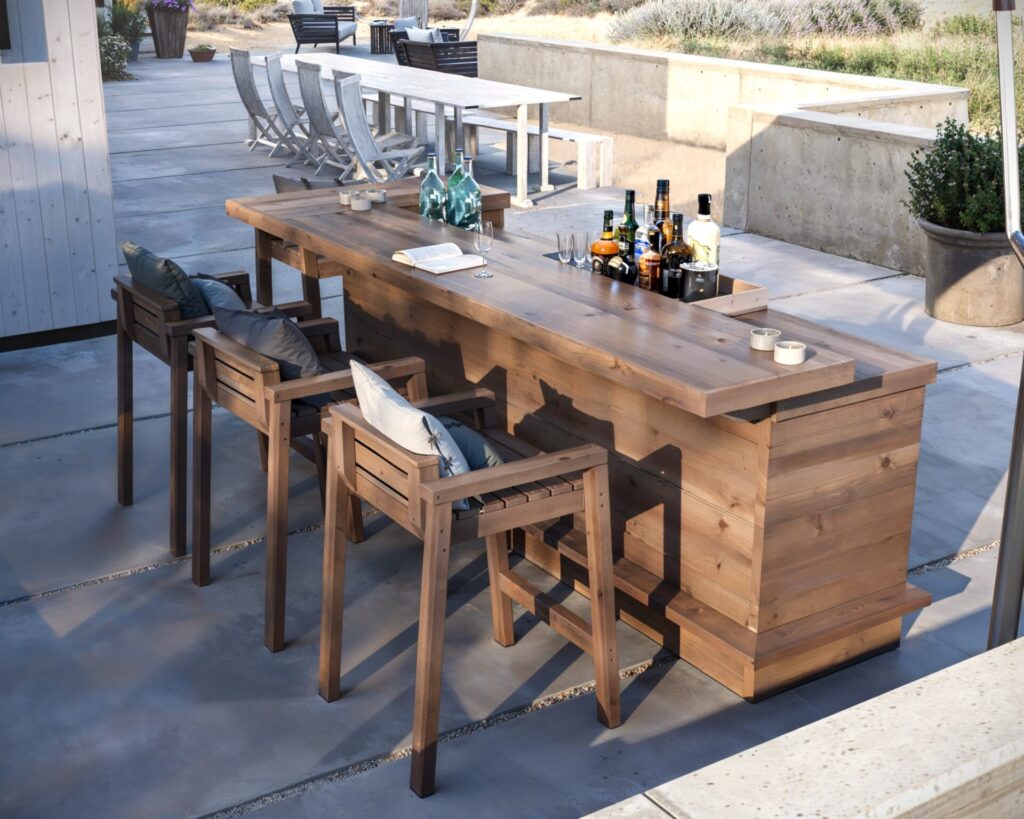
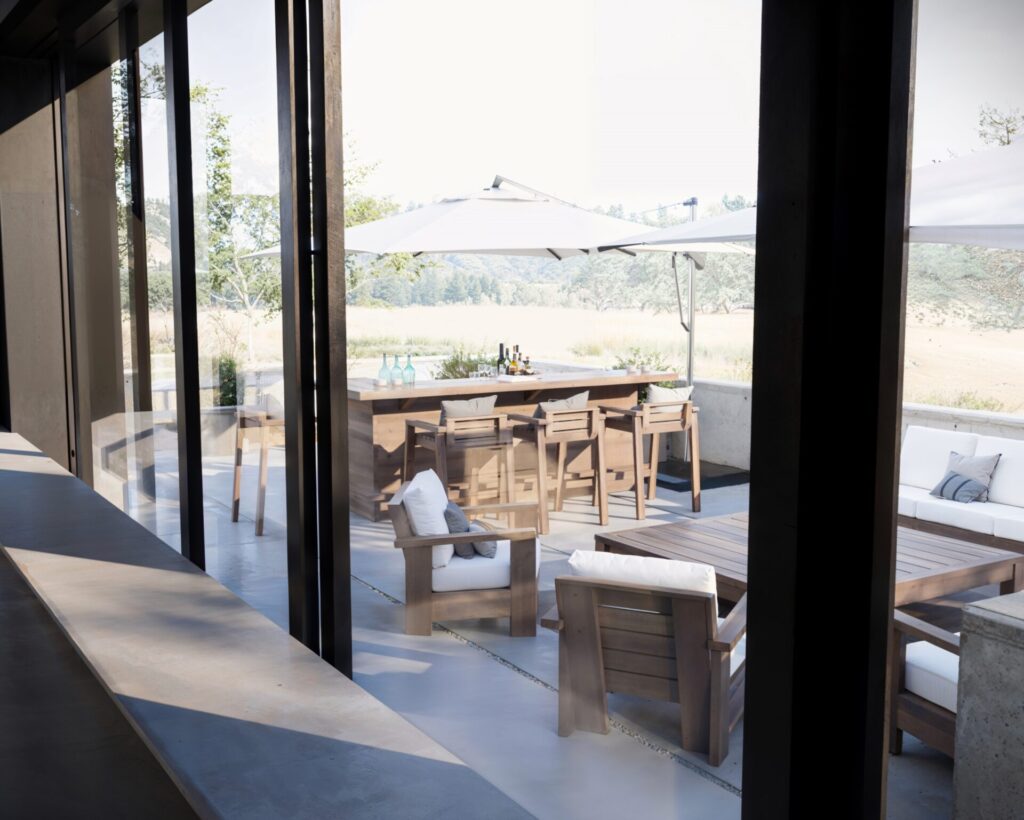
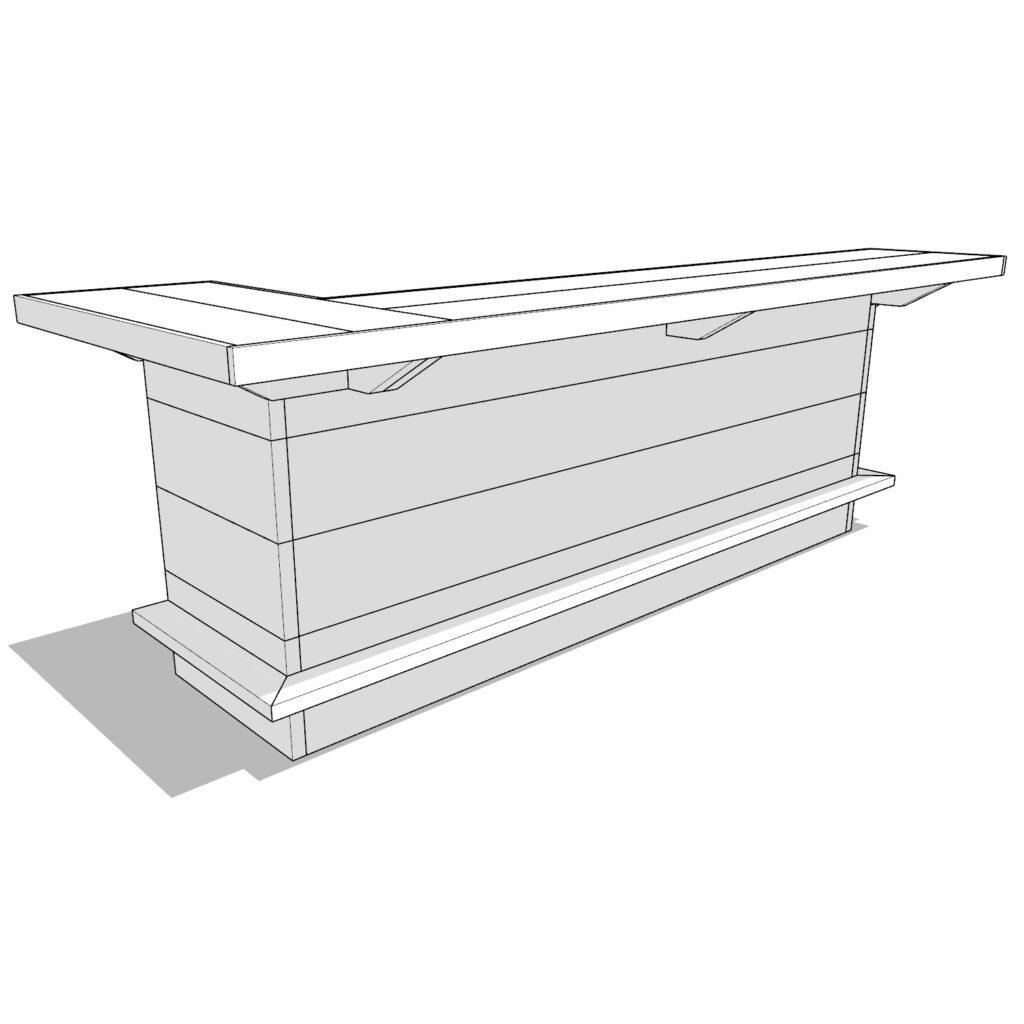
Creating a personal oasis in your backyard is easier than you think. Imagine having a beautiful, functional outdoor bar where you can entertain guests, enjoy a quiet evening drink under the stars, or simply add a stylish element to your outdoor space. This DIY blueprint for an L-shaped outdoor home bar solves several common problems faced by homeowners:
- Lack of Outdoor Entertainment Space: Many homes have underutilized outdoor areas. This bar transforms your backyard into a perfect spot for social gatherings, making your home the go-to place for parties and summer celebrations.
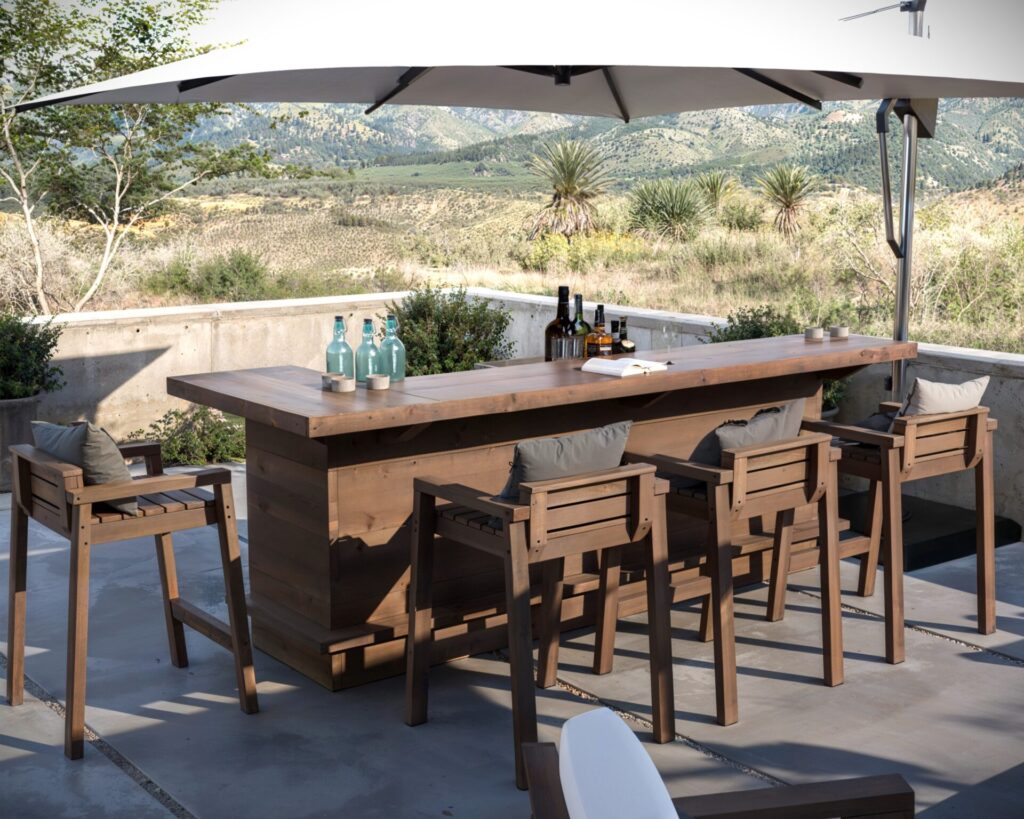
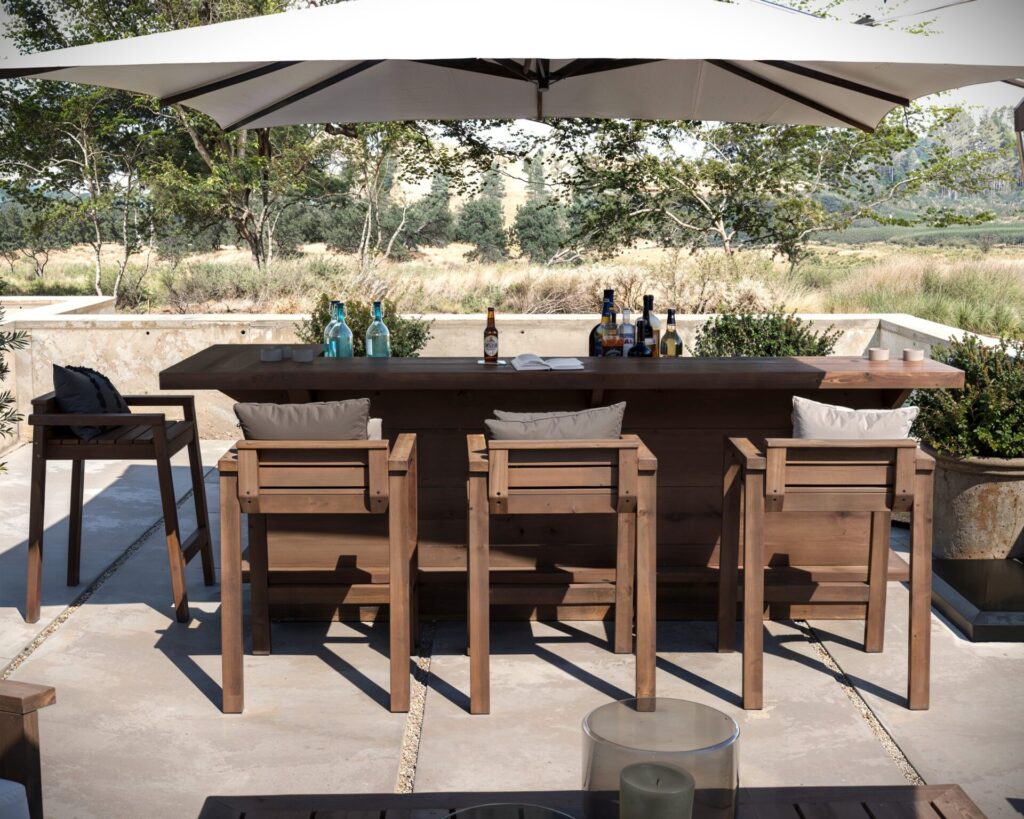
- Limited Seating Options: Finding enough seating for guests can be a challenge. This bar comfortably seats up to four people, providing ample space for everyone to relax and enjoy.
- High Costs of Outdoor Furniture: Custom outdoor furniture can be prohibitively expensive. This DIY project offers a cost-effective alternative without sacrificing style or functionality.
- Lack of Customization: Store-bought outdoor bars often fail to meet specific needs. This DIY bar allows you to customize the bar and design to fit your unique space and preferences.
- Difficulty Finding Beginner-Friendly Projects: Many DIY projects are too complex for beginners. This bar is designed with simplicity in mind, using common dimensional lumber and straightforward construction techniques.
Features and Specifications
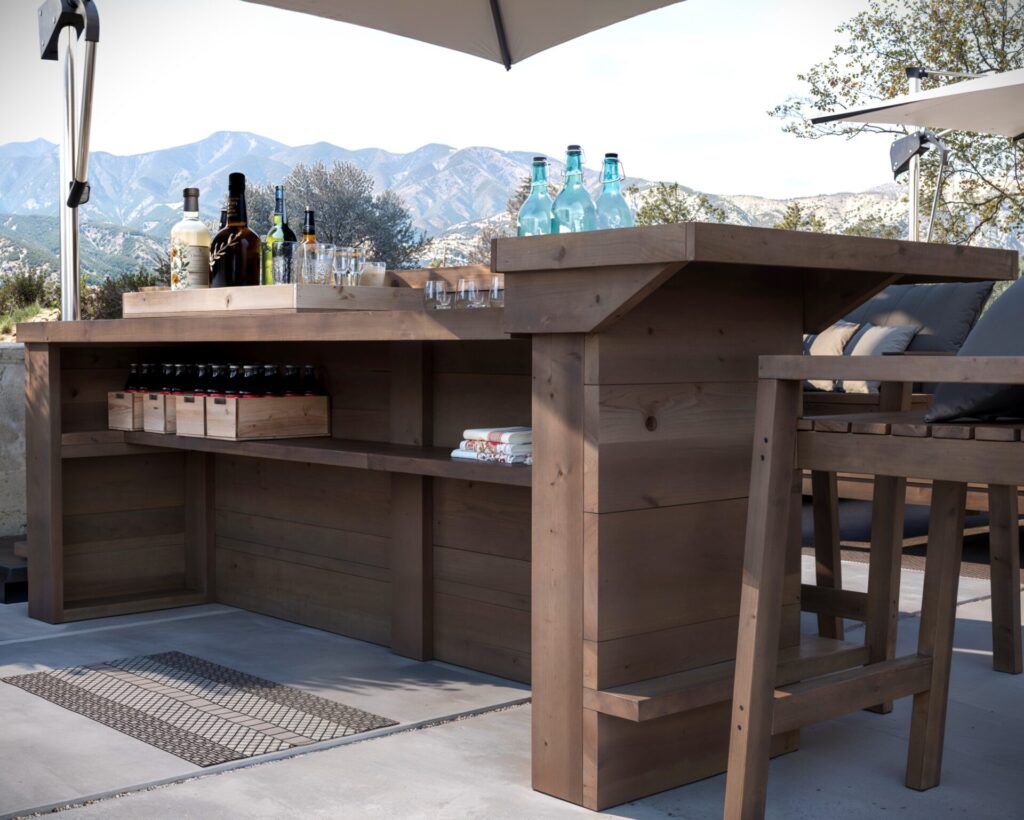
This L-shaped outdoor home bar is thoughtfully designed to be both functional and attractive. Here are the key features and specifications:
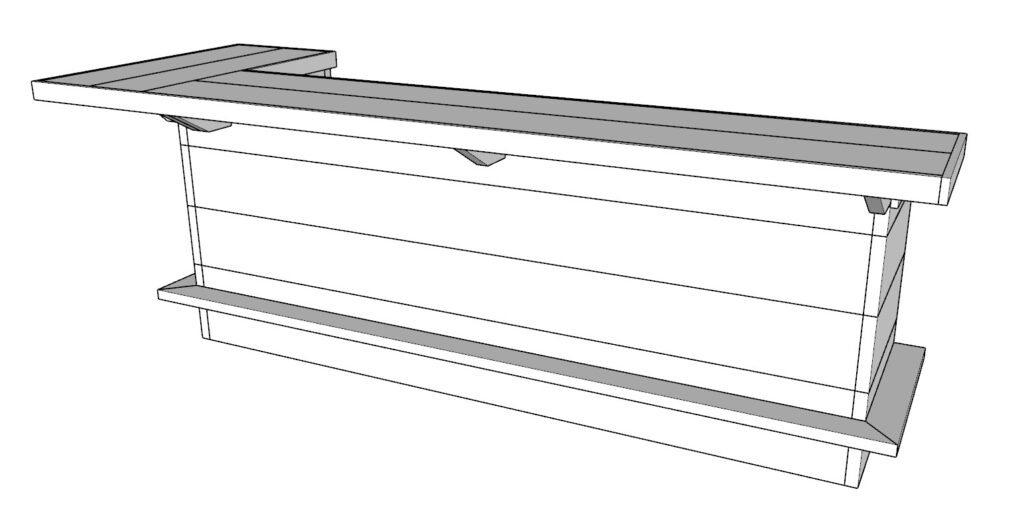
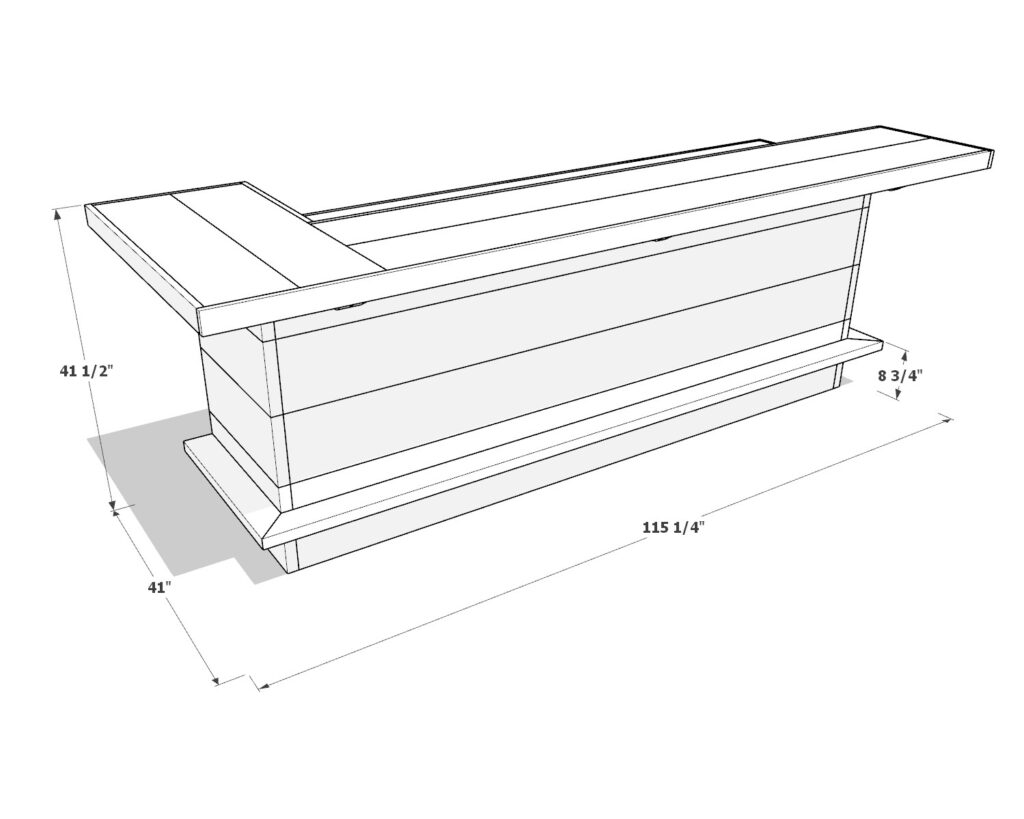
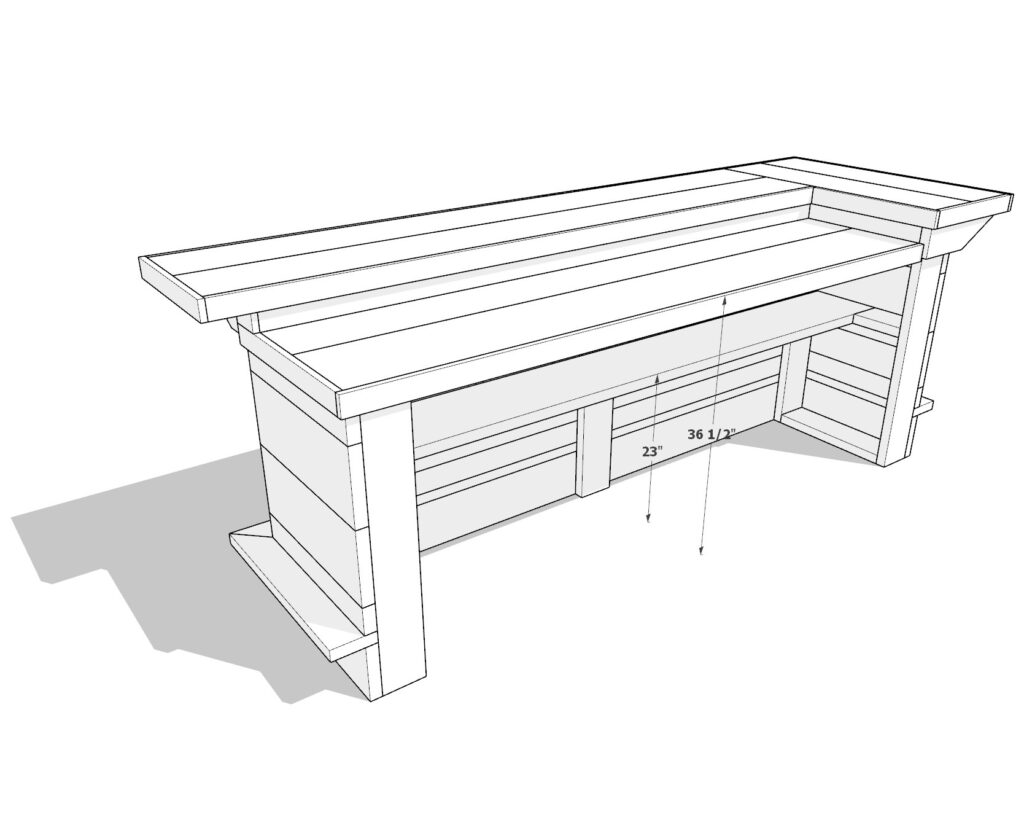
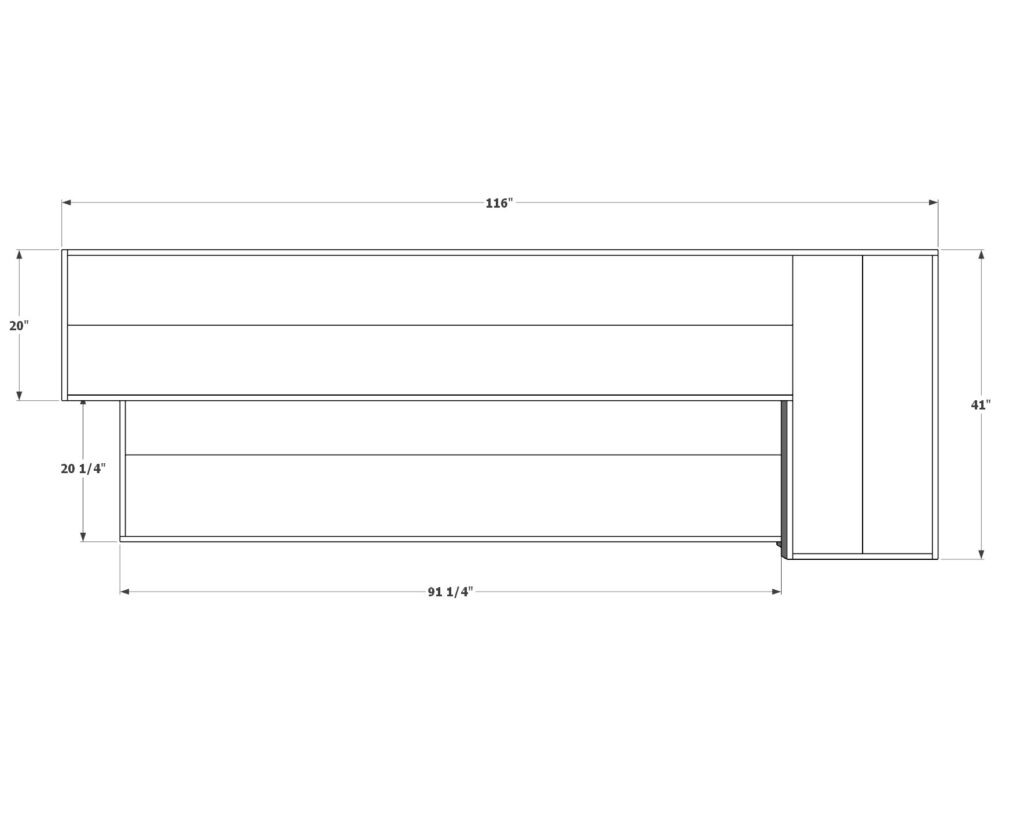
- Dimensions: The bar serving counter is 41 1/2 inches tall, 41 inches wide, and 115 1/4 inches long. The work counter is 36 1/2 inches tall, providing a comfortable height for standing.
- Materials: Made from common dimensional lumber, making it accessible and affordable.
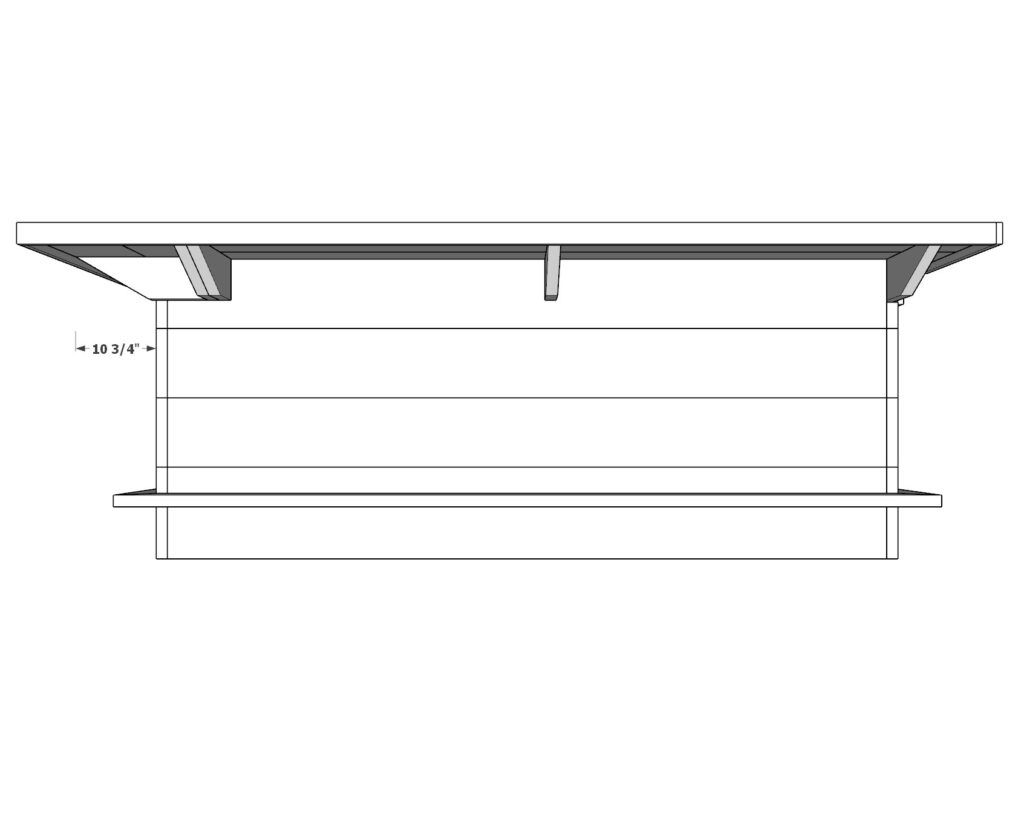
- Design: Two surfaces – a working counter and a serving countertop. The overhang is 10 3/4 inches, perfect for sliding chairs under and relaxing.
- Footrest: Positioned at 8 3/4 inches off the ground, providing comfort for guests.
- Adjustable Shelf: The shelf height can be customized during construction to fit your storage needs.
- Seating Capacity: Comfortably seats up to four people.
- Ergonomics: Designed for comfort and functionality, making it ideal for both casual and formal outdoor settings.
Key Benefits
This DIY L-shaped outdoor home bar offers several key benefits that make it an excellent addition to any home:
- Cost-Effective: Building this bar yourself saves money compared to purchasing a custom-made outdoor bar.
- Customizable: Adjust the shelf height and design features to meet your specific needs and preferences.
- Beginner-Friendly: Simple construction techniques make this project accessible for woodworking novices.
- Space-Saving: Provides a dedicated area for entertaining without taking up too much space in your backyard.
- Enhanced Home Value: Adds a stylish, functional element to your outdoor space, potentially increasing your home’s value.
Conclusion
Investing in this DIY L-shaped outdoor home bar blueprint means you’ll receive a detailed step-by-step guide with both images and written instructions. The plan includes a comprehensive lumber shopping list, a lumber cut list, and a tools and materials list, along with cost estimates for the project. This beginner-friendly build is easy to follow, ensuring you can create a stunning and functional outdoor bar with confidence. Enhance your outdoor living space and your entertaining experience by making this bar your next DIY project.
Time
(varies with experience)
Cost
Estimated Built Cost $300:(Note: Costs can vary by location and supplier.)
Skill level required
Beginner
DIY Full Over Full Bunk Plans
What is included in the PDF download?
- Easy to read step by step instructions
- Material list
- Tools needed
- Helpful links to materials and tools needed
Materials and Tools List
Available with the purchase of the DIY plan PDF.
Lumber Shopping & Cut List:
Available with the purchase of the DIY plan PDF.
Step 1: Building the Main Frames, Installing the Shelf, and Adding the Bar Top
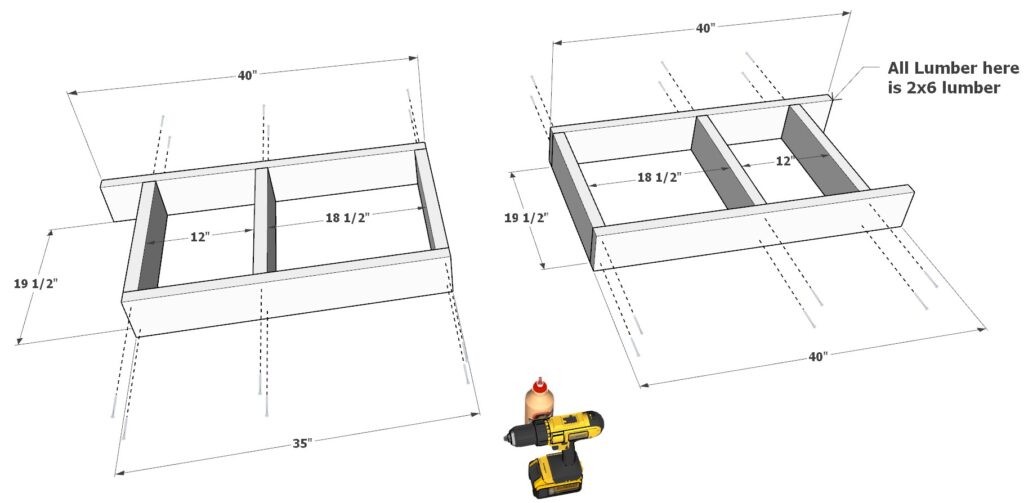
Sub-Step 1: Assemble the First Frame
- Prepare the Lumber:
- Take one 40-inch 2×6 board, one 35-inch 2×6 board, and three 19 1/2-inch 2×6 boards.
- Construct the Frame:
- Arrange the boards as shown in the diagram.
- Secure the boards together with 3.5-inch screws and wood glue.
- Refer to sub-step 3 of step 1 if you wish to adjust the height of the shelf.
Sub-Step 2: Assemble the Second Frame
- Prepare the Lumber:
- Take two 40-inch 2×6 boards and three 19 1/2-inch 2×6 boards.
- Construct the Frame:
- Arrange the boards as shown in the diagram.
- Secure the boards together with 3.5-inch screws and wood glue.
- Refer to sub-step 3 of step 1 if you wish to adjust the height of the shelf.
Sub-Step 3: Install the Shelf
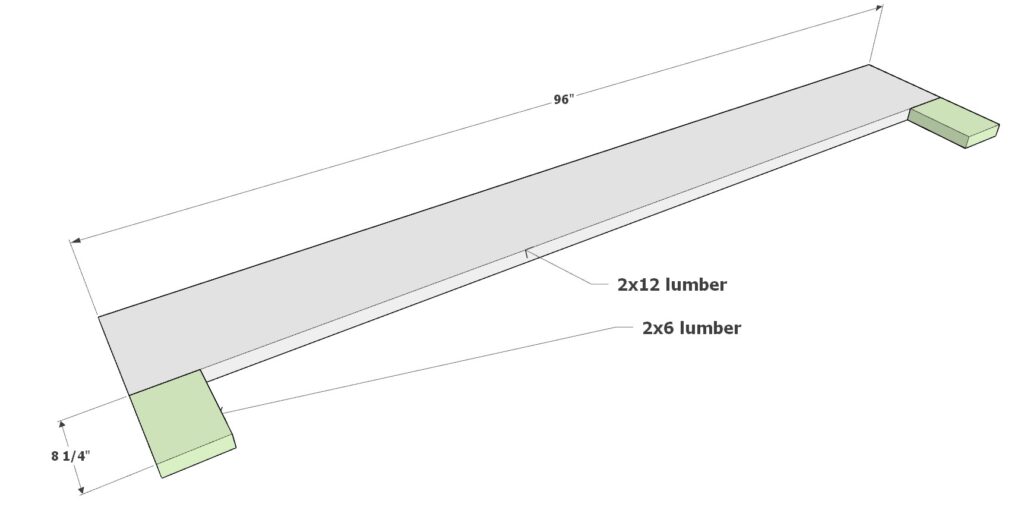
- Prepare the Shelf:
- Take one 96-inch 2×12 board and two 8 1/4-inch 2×6 boards.
- Adjust the Height:
- Before installing, decide on the shelf height based on your storage needs.
- Ensure there is enough space for any items you plan to store underneath, such as a mini refrigerator or wine cooler.
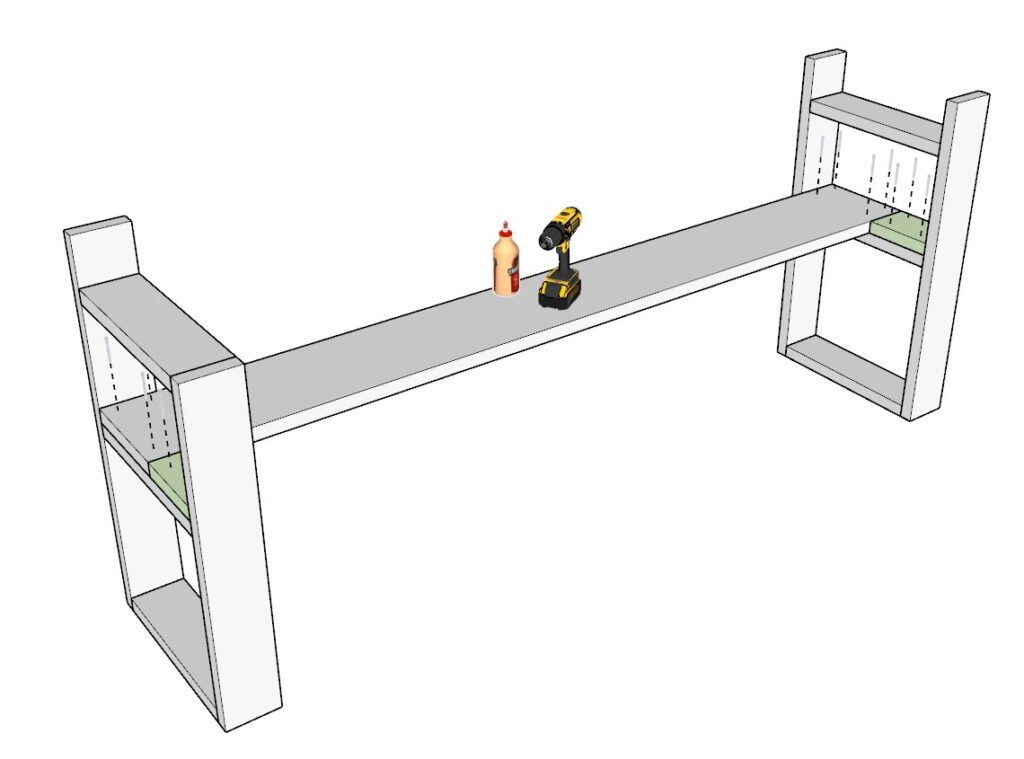
- Attach the Shelf:
- Secure the shelf boards to the two main frame pieces using wood glue and 2.5-inch screws.
Sub-Step 4: Add the Bar Top Boards
- Prepare the Bar Top:
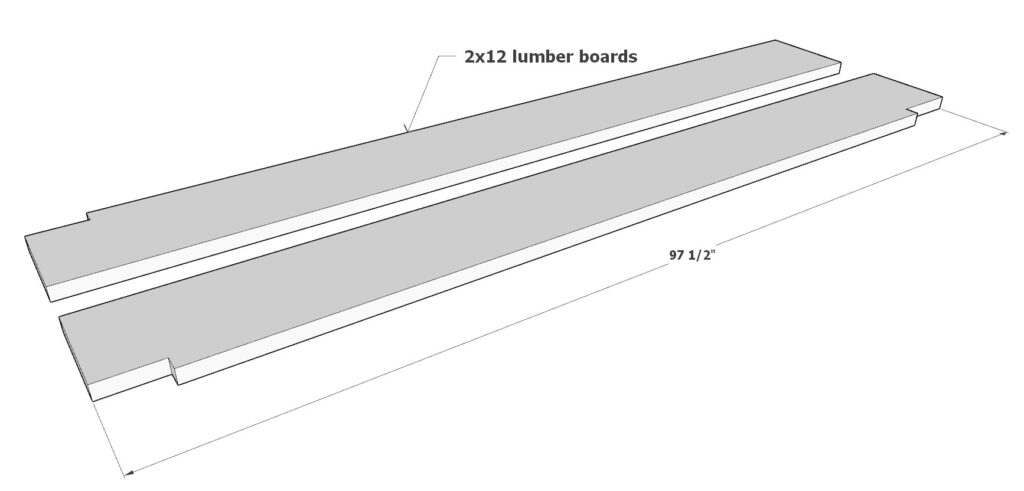
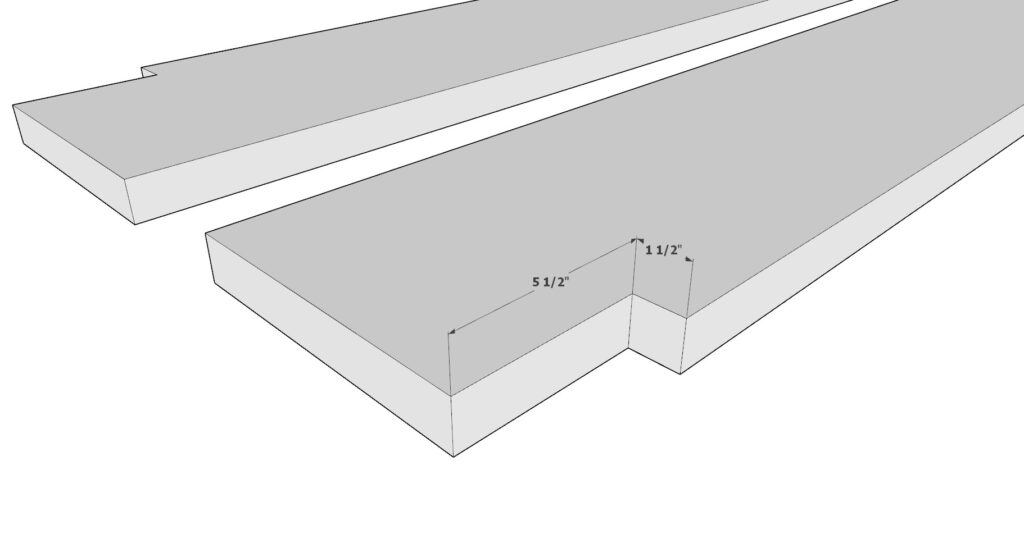
- Take the two 97 1/2-inch 2×12 boards.
- Ensure one board has two notches (1 1/2 x 5 1/2 inches) and the other has one notch (1 1/2 x 5 1/2 inches).
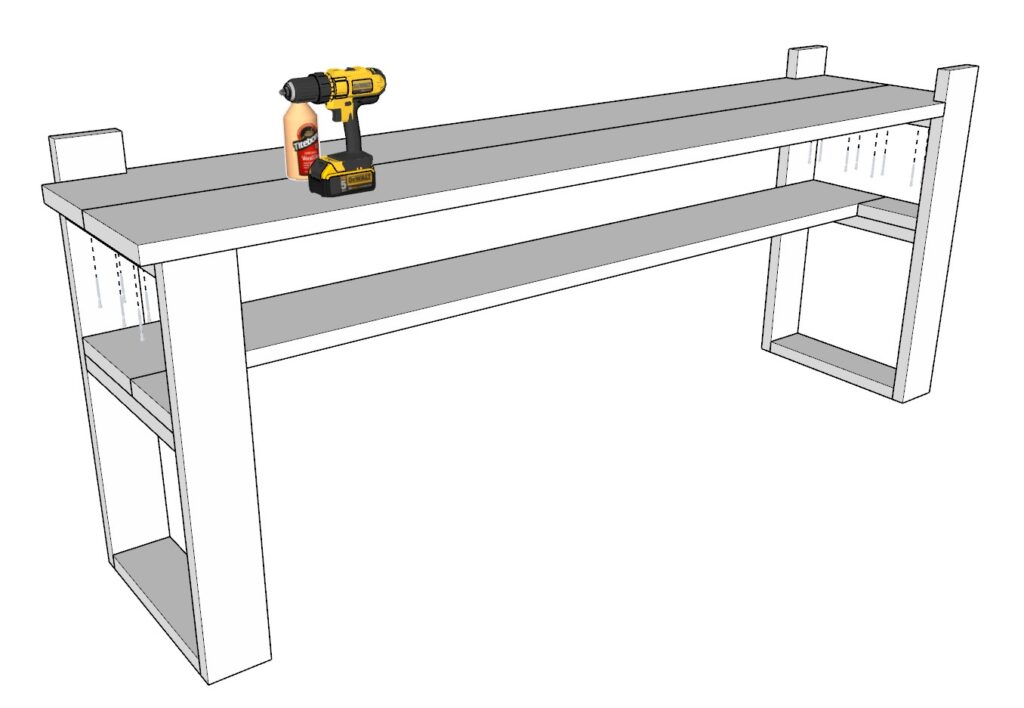
- Attach the Bar Top:
- Secure the boards to the frame pieces using 2.5-inch screws.
Sub-Step 5: Add the Final 35-inch Board
- Prepare the Board:
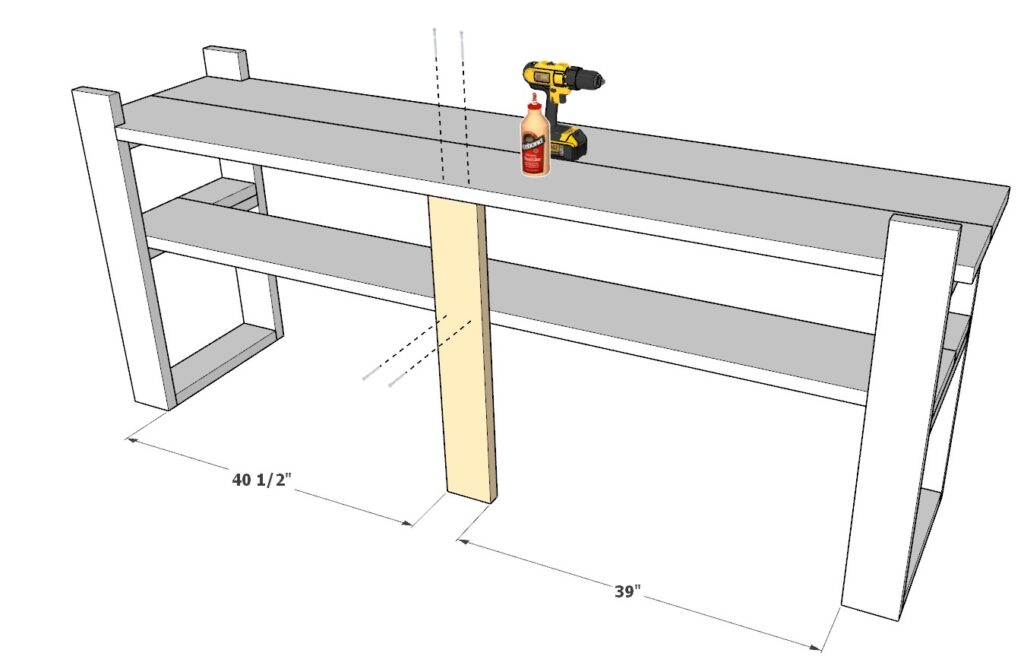
- Take one 35-inch 2×6 board.
- Attach the Board:
- Secure the board to the bar frame as indicated in the diagram using wood glue and 3.5-inch screws.

Tips for a Professional Finish
- Plane the Boards: Lightly plane the boards for a more professional finish.
- Pre-Sand: Pre-sand your pieces before installation for a neater finish.
- Pre-Drill Holes: Use a countersink wood drill bit to pre-drill holes and prevent the wood from splitting.
- Wipe Excess Glue: If you plan to stain the bar, ensure no glue is left or seeping out, as it does not stain well. Use a wet rag to wipe off extra glue.
Step 2: Reinforcing the Bar Serving Countertop and Adding Supports
Sub-Step 1: Seal Off the Work Countertop
- Prepare the Lumber:
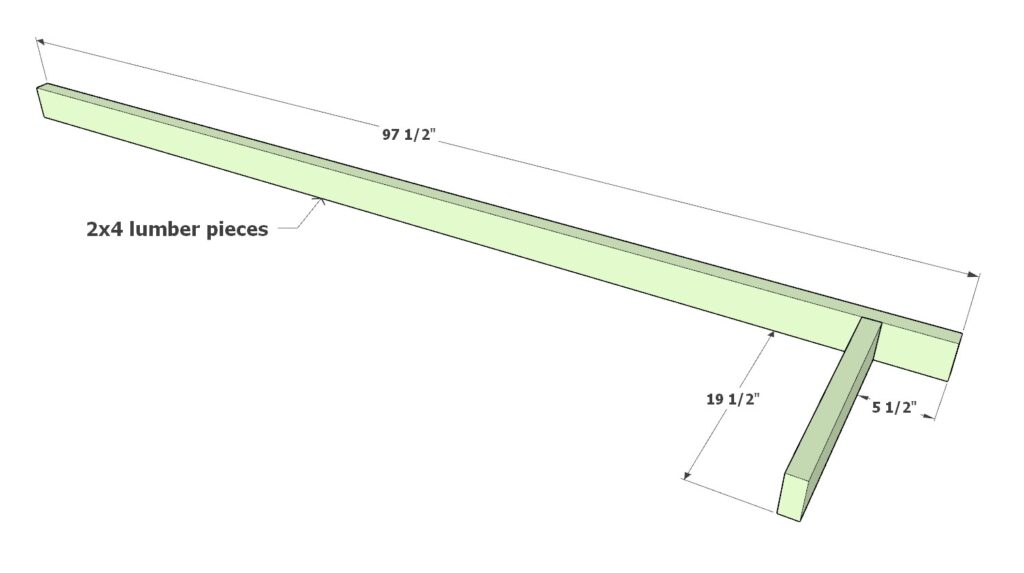
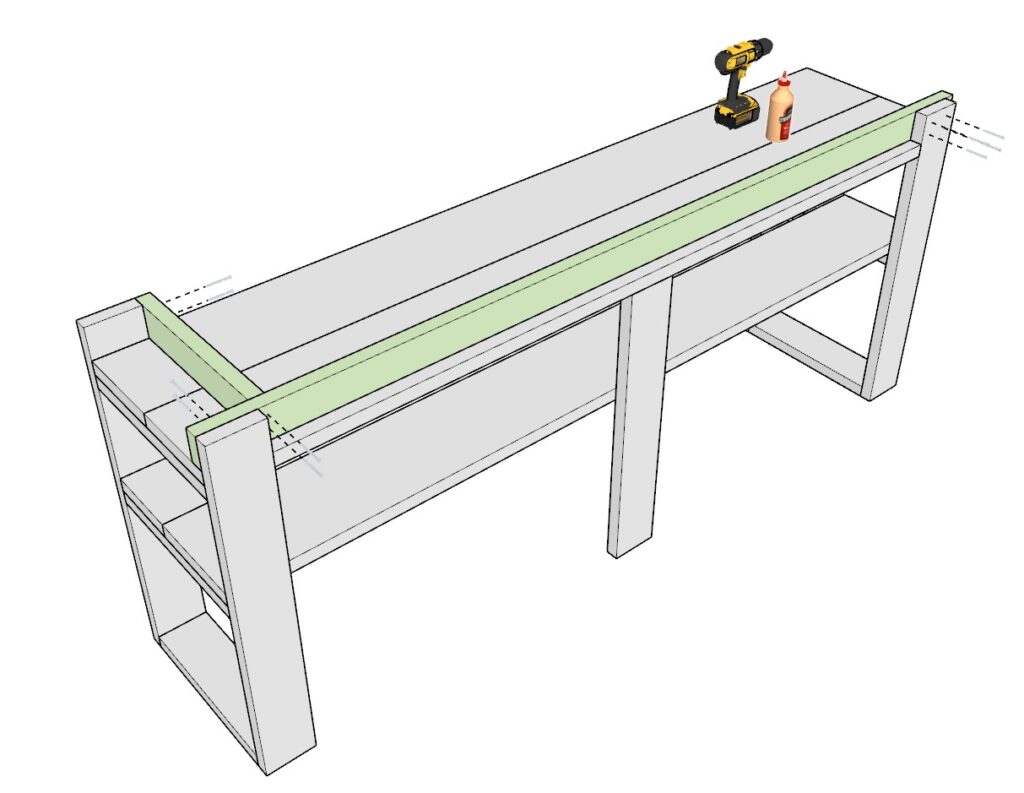
- Take one 97 1/2-inch 2×4 board and one 19 1/2-inch 2×4 board.
- Attach the Boards:
- Secure these boards to the frame as shown in the diagram to neatly seal off the work countertop.
- Use 2.5-inch screws and wood glue to ensure the screws don’t poke through.
Sub-Step 2: Build the Serving Countertop Support System
- Prepare the Lumber:
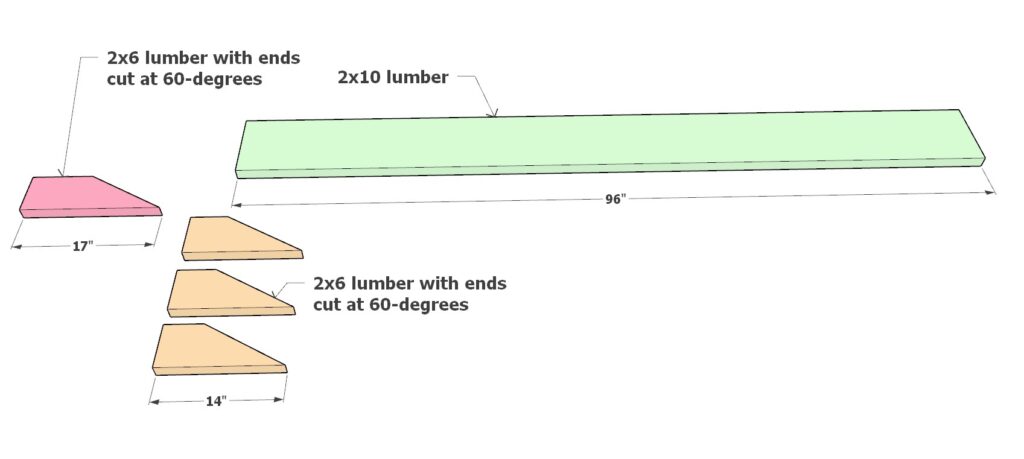
- Take one 96-inch 2×10 board (shown in green in the diagram).
- Take three 14-inch 2×6 boards with ends cut at 60 degrees (shown in peach in the diagram).
- Take one 17-inch 2×6 board with one end cut at 60 degrees (shown in pink in the diagram).
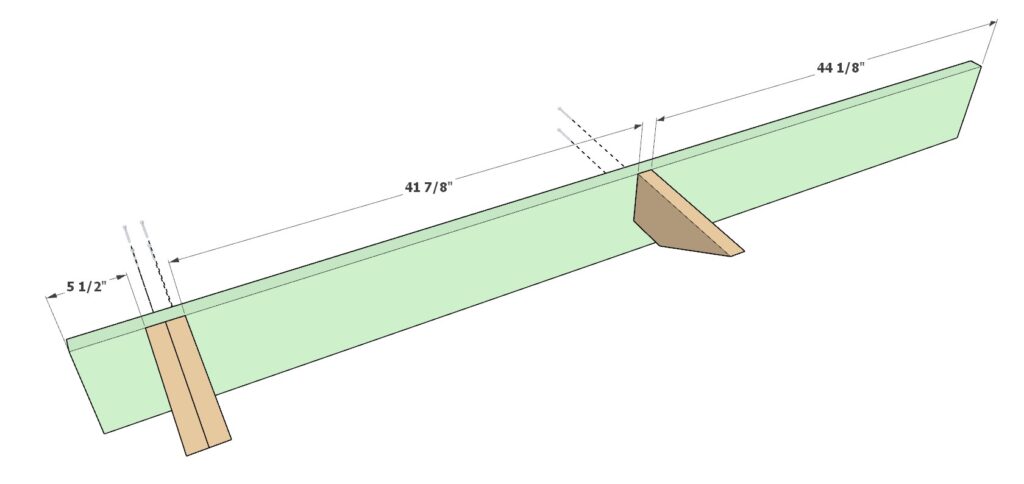
- Assemble the Supports:
- Secure the three peach boards to the green 2×10 board as indicated in the diagram.
- Use wood glue and 3.5-inch screws for secure attachment.
- Attach the Pink Board:
- Secure the 17-inch pink board to the bar support frame using 3.5-inch screws and wood glue.
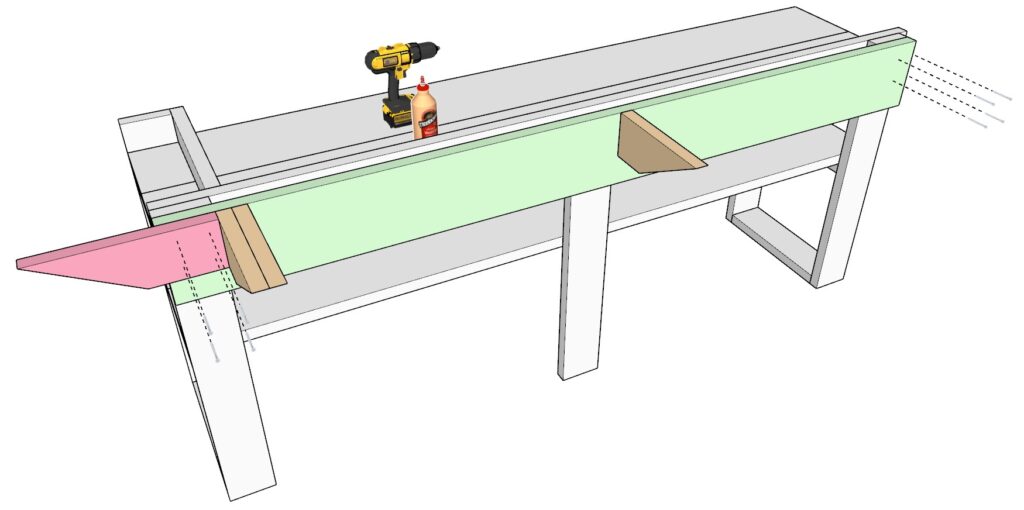
Sub-Step 3: Add Additional Supports
- Prepare the Lumber:
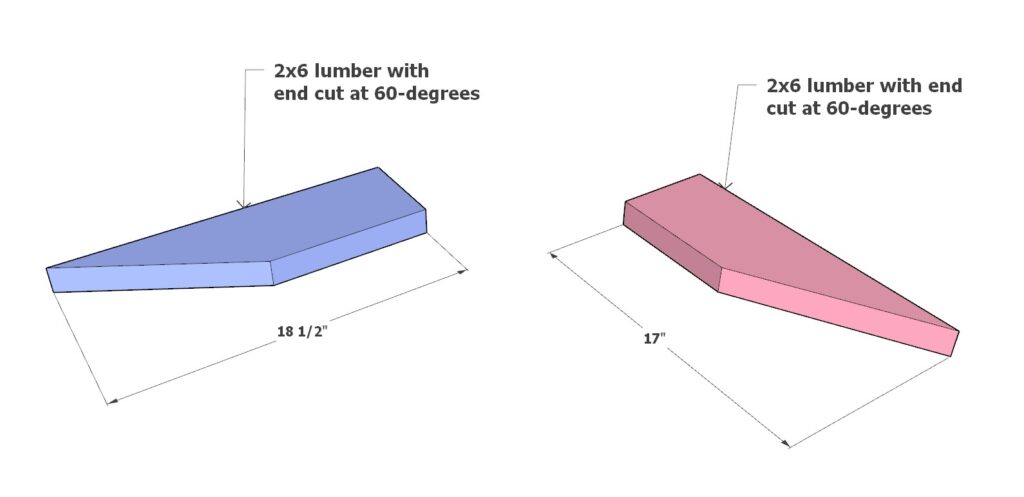
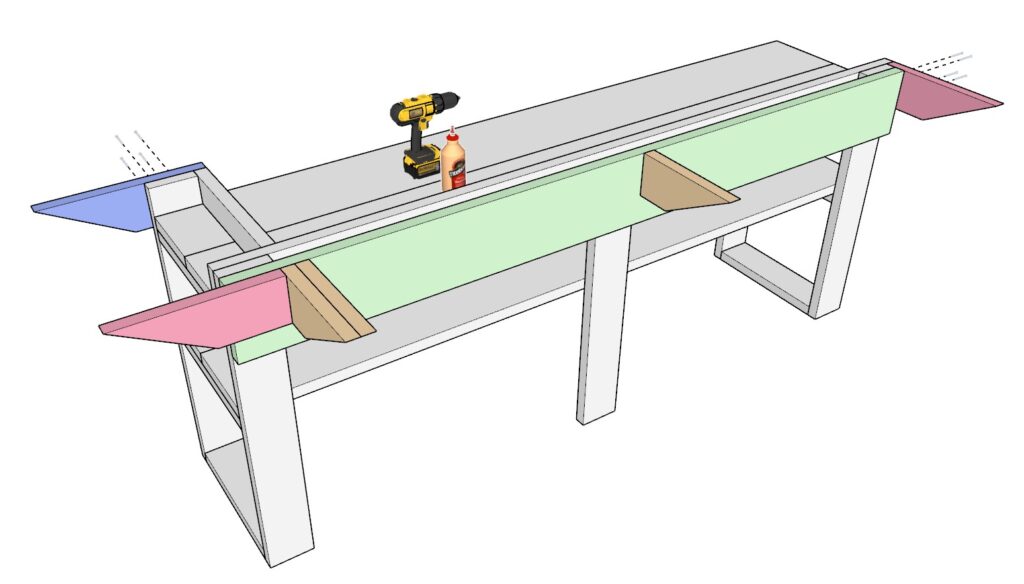
- Take one 17-inch 2×6 board with one end cut at 60 degrees (pink).
- Take one 18 1/2-inch 2×6 board with one end cut at 60 degrees (blue).
- Attach the Supports:
- Secure the pink and blue supports to the bar frame as shown in the diagram.
- Use 2.5-inch screws and wood glue for secure attachment.
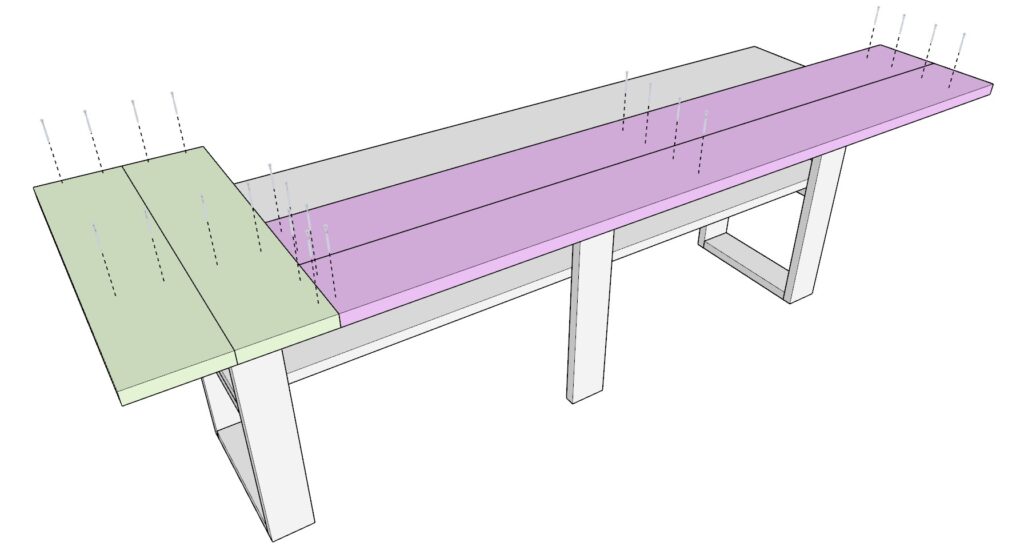
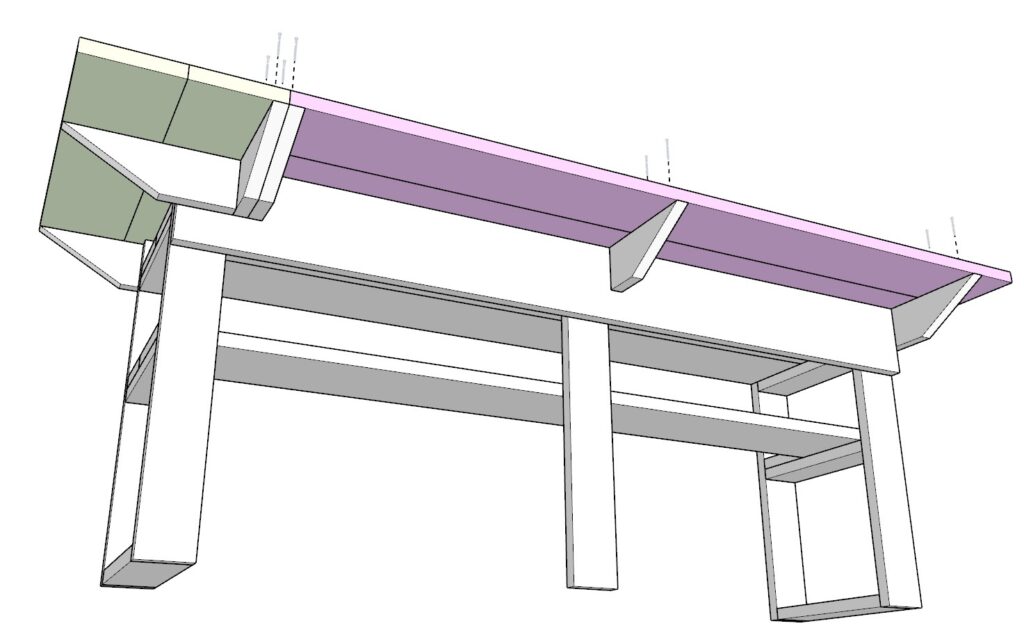
Step 3: Adding the Bar Serving Top Boards
Sub-Step 1: Prepare the Lumber
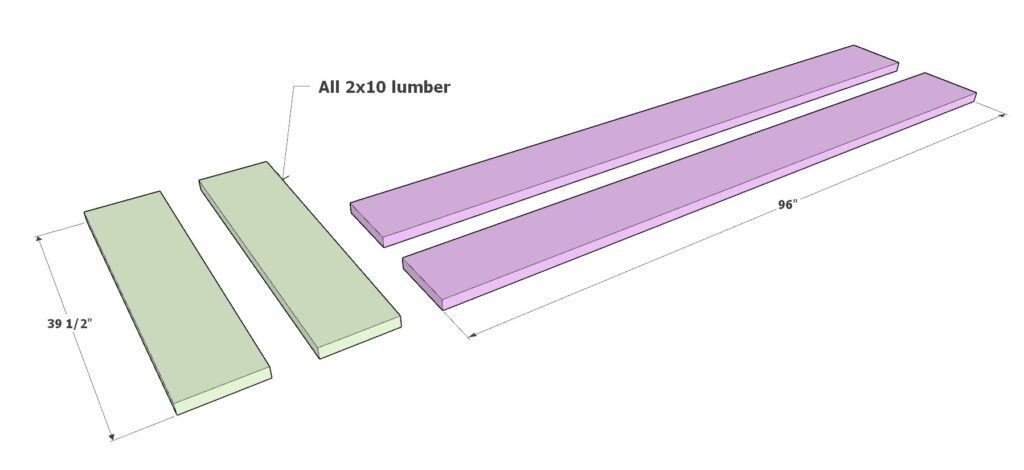
- Lumber Needed:
- Two 39 1/2-inch 2×10 boards (moss green)
- Two 96-inch 2×10 boards (purple)
Sub-Step 2: Attach the Boards
Options for Joining Boards:
- Pocket Holes: Drill pocket holes and use pocket screws to join the boards together for a stronger connection.
- Biscuit Joints: Use a biscuit joiner to align the boards and add biscuits with glue for stability.
- Dowel Joints: Use dowels to connect the boards, providing a durable and professional finish.
Beginner-Friendly Method:
- If you are a beginner, ensure the boards are flush together.
- Secure the boards directly to the bar supports and frame using a mixture of 3.5-inch and 2.5-inch screws.
Sub-Step 3: Secure the Boards
Flush Alignment:
- Make sure all boards are properly aligned and flush before securing them.
Screwing the Boards:
- Attach the boards to the bar serving counter supports and frame.
- Use 3.5-inch screws to secure the boards to the main frame.
- Use 2.5-inch screws for securing the boards to the supports to avoid screws poking through.
Step 4: Adding the Bar Siding and Foot Rest
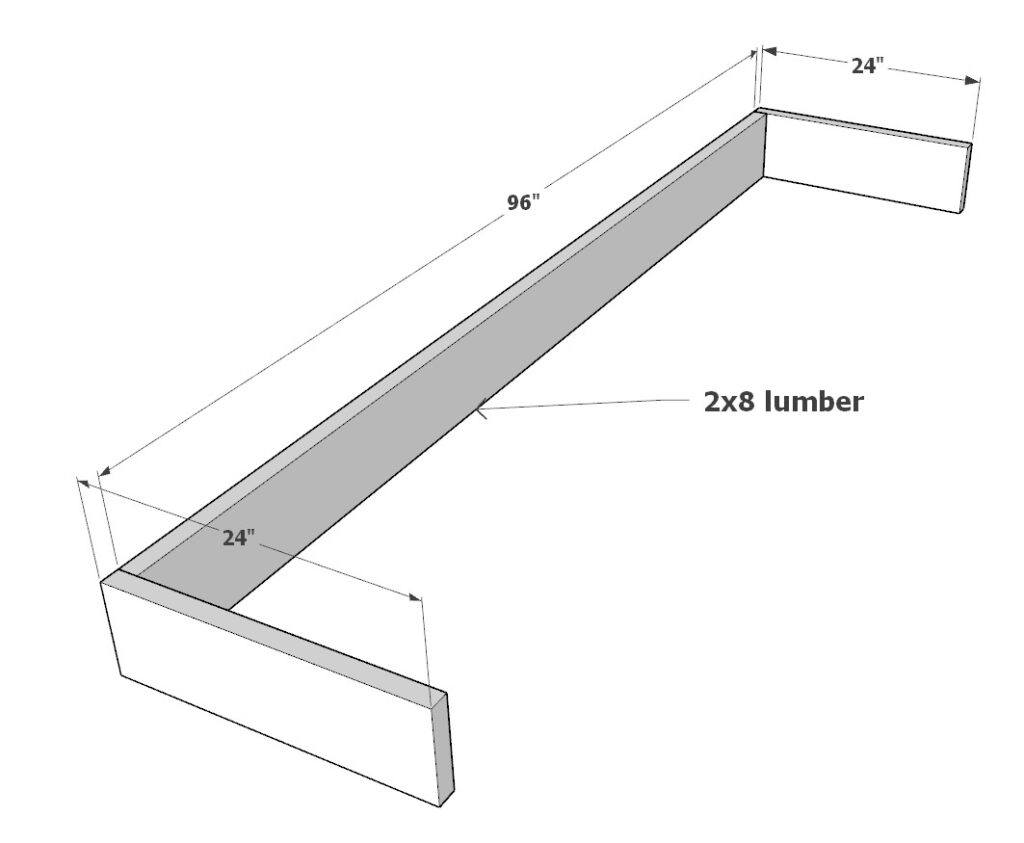
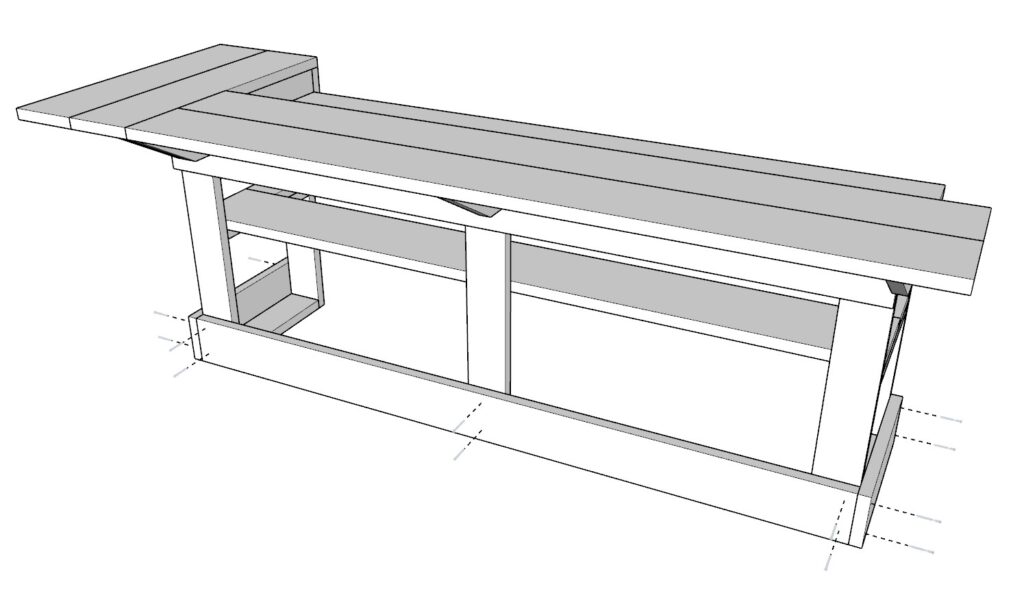
Sub-Step 1: Add the First Layer of Bar Siding
Materials Needed:
- One 96-inch long 2×8 lumber board
- Two 24-inch long 2×8 lumber boards
Instructions:
- Attach the 96-inch 2×8 board horizontally to the front of the bar frame.
- Secure the 24-inch 2×8 boards to the sides of the bar frame.
- Use 2.5-inch screws and wood glue to secure these boards to the bar frame.
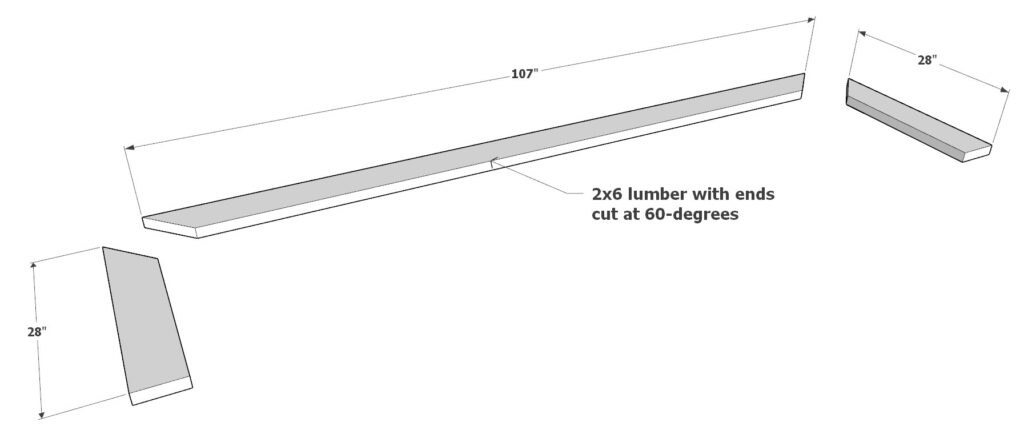
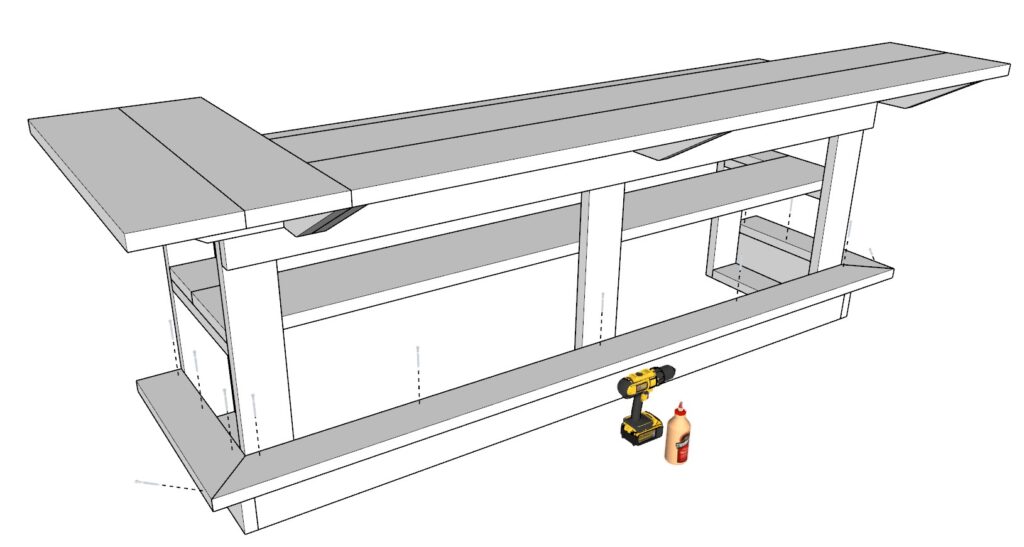
Sub-Step 2: Add the Foot Rest
Materials Needed:
- One 107-inch long 2×6 lumber board (both ends cut at 45 degrees)
- Two 28-inch long 2×6 lumber boards (one end cut at 45 degrees)
Instructions:
- Position the 107-inch 2×6 board on top of the 2×8 siding board along the front.
- Secure the 28-inch 2×6 boards to the sides on top of the 2×8 siding boards.
- Use 3.5-inch screws and wood glue to attach these boards.
Sub-Step 3: Add the Remaining Siding Pieces
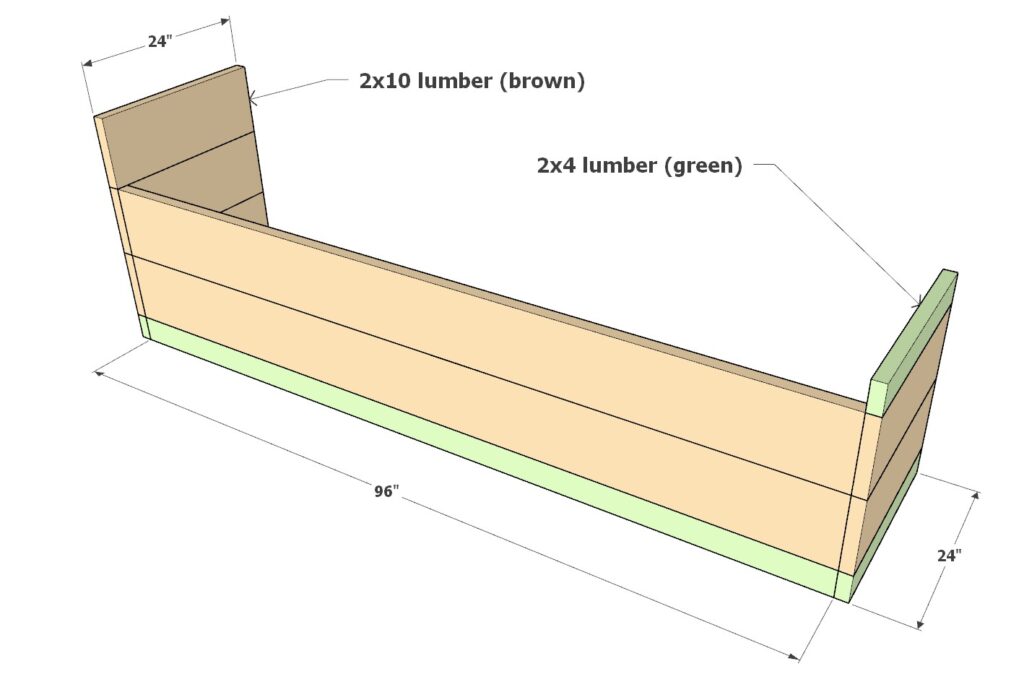
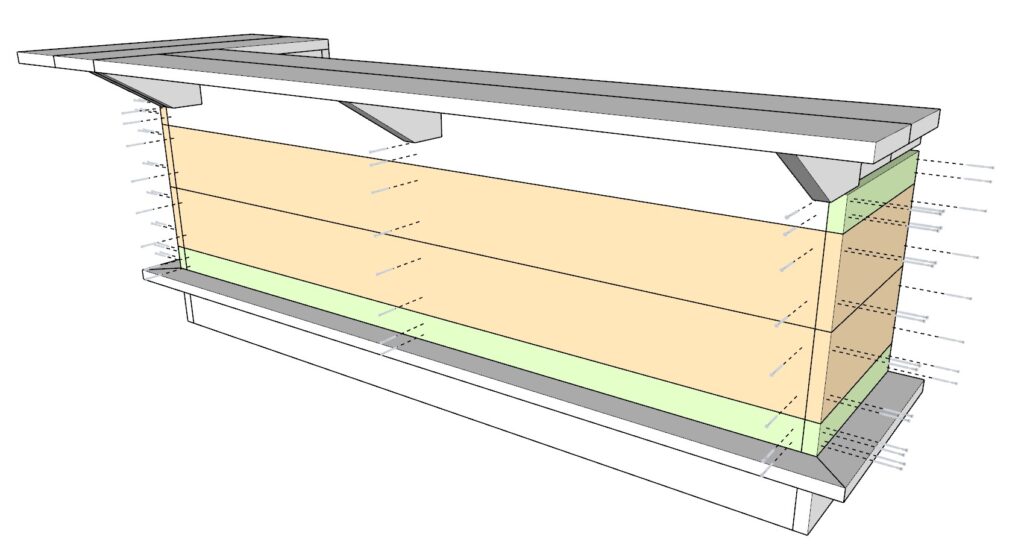
Materials Needed:
- Three 24-inch long 2×4 lumber boards (green in diagram)
- One 96-inch long 2×4 lumber board (green in diagram)
- Five 24-inch long 2×10 lumber boards (brown in diagram)
- Two 96-inch long 2×10 lumber boards (brown in diagram)
Instructions:
- Secure the 2×4 and 2×10 boards to the bar frame as shown in the diagrams.
- Use 2.5-inch screws and wood glue to attach all boards securely.
Step 5: Adding the Decorative Lip Around the Bar Serving Counter Top and Bar Work Top
Sub-Step 1: Prepare the Decorative Lip for the Bar Serving Counter Top
- Gather the Lumber:
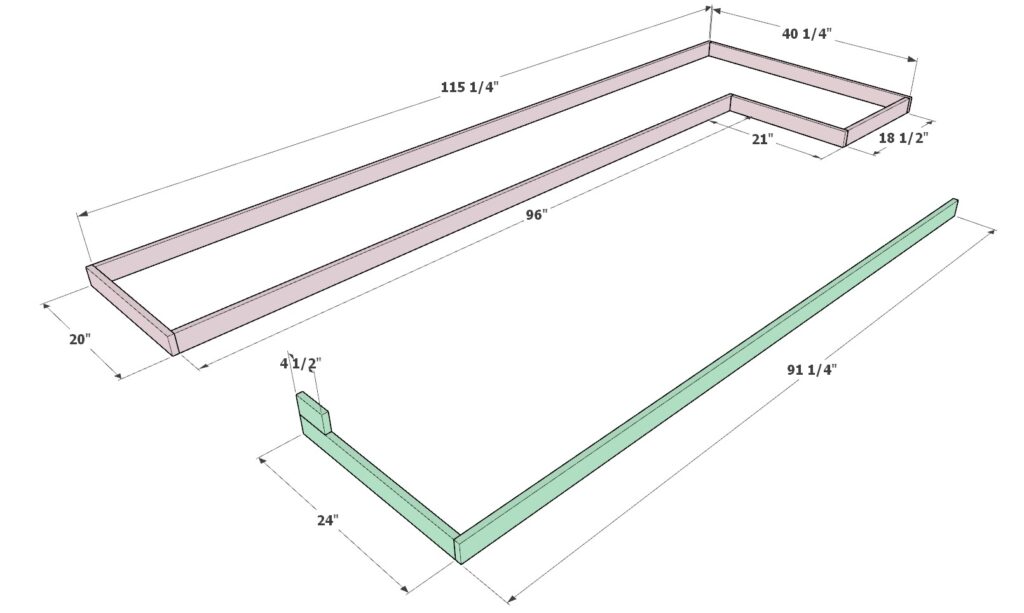
- 20-inch long 1×2 lumber board (pale pink)
- 40-1/4-inch long 1×2 lumber board (pale pink)
- 96-inch long 1×2 lumber board (pale pink)
- 21-inch long 1×2 lumber board (pale pink)
- 18-1/2 inch long 1×2 lumber board (pale pink)
- 115-1/4 inch long 1×2 lumber board (pale pink)
- Note: You may need to break this into two pieces if a single piece this long is not available.
Sub-Step 2: Attach the Decorative Lip to the Bar Serving Counter Top
- Position and Secure:
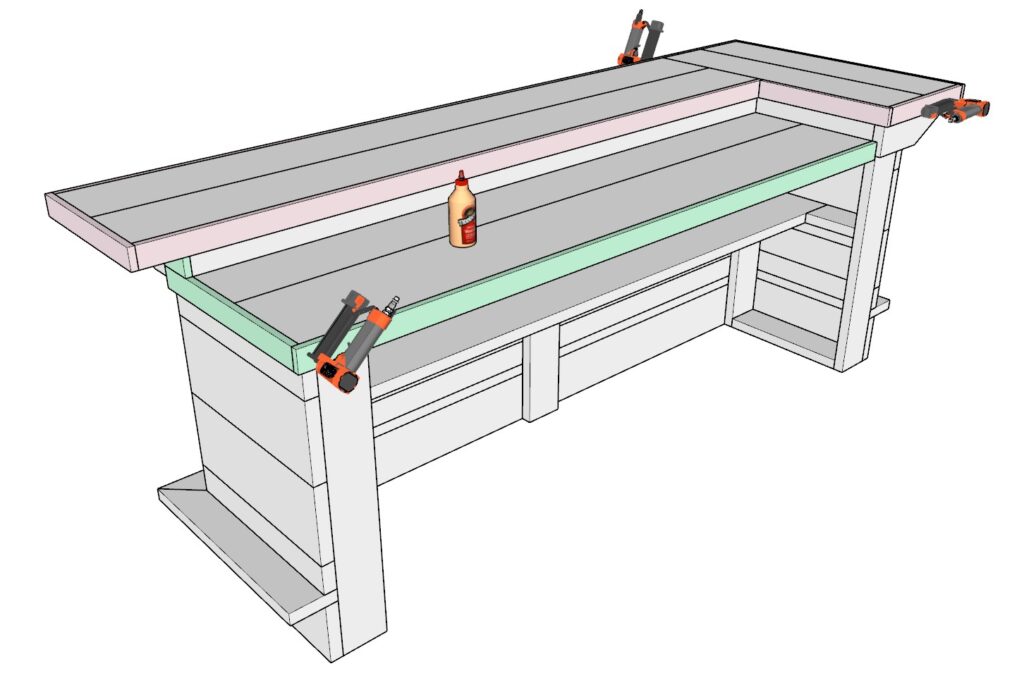
- Secure the lumber pieces to the bar serving counter top using wood glue and pin nails.
Sub-Step 3: Prepare the Decorative Lip for the Bar Work Top
- Gather the Lumber:
- 4-1/2 inch long 1×2 lumber board (teal)
- 24-inch long 1×2 lumber board (teal)
- 91-1/4 inch long 1×2 lumber board (teal)
Sub-Step 4: Attach the Decorative Lip to the Bar Work Top
- Position and Secure:
- Secure the lumber pieces to the bar work top using wood glue and pin nails.
Step 6: Applying the Finishing Touches
Sub-Step 1: Sanding the Bar
Initial Sanding:
- Start with a coarse-grit sandpaper (60-80 grit) to remove any rough spots and imperfections. Use a power sander for larger surfaces and hand sandpaper for edges and corners.
- Sand all surfaces of the bar, including the top, sides, and any shelves.
Intermediate Sanding:
- Move to a medium-grit sandpaper (120-150 grit) to smooth out the surface. This step helps to even out the initial sanding scratches and prepares the wood for the final sanding.
- Again, sand all surfaces thoroughly.
Final Sanding:
- Use a fine-grit sandpaper (220 grit) for the final sanding pass. This step ensures the wood is smooth and ready for staining or painting.
- Wipe down the entire bar with a damp cloth to remove any sanding dust.
Sub-Step 2: Routing the Edges
Prepare the Router:
- Choose a suitable router bit for the edge profile you desire (e.g., round-over, chamfer, or ogee).
- Install the bit in the router and set the depth according to the manufacturer’s instructions.
Routing the Edges:
- Secure the bar to prevent movement during routing.
- Rout the edges of the bar top and any other exposed edges to create a smooth, decorative finish.
- Routing the edges helps to prevent splintering and adds a professional touch to the bar.
Sub-Step 3: Sealing Holes
Using Wood Putty:
- Apply wood putty to any holes or gaps using a putty knife.
- Allow the putty to dry completely and then sand smooth.
- Pros: Easy to use, good for painting.
- Cons: Does not stain well; may stand out against stained wood.
Using Wood Dowels:
- Cut dowels to fit the holes, apply wood glue, and insert them.
- Trim the excess and sand smooth once dry.
- Pros: Provides a strong, seamless finish; stains well.
- Cons: Requires precise cutting and fitting.
Using Wood Plugs:
- Cut or purchase wood plugs to fit the holes, apply wood glue, and insert them.
- Sand smooth once the glue is dry.
- Pros: Provides a strong, seamless finish; stains well.
- Cons: Requires precise cutting and fitting; may be more visible than dowels.
Sub-Step 4: Staining the Bar
Pre-Staining:
- Apply a wood conditioner to prevent blotchiness and ensure even staining. Follow the manufacturer’s instructions for drying times.
Applying the Stain:
- Choose a stain color and apply it with a brush or clean cloth.
- Apply in the direction of the wood grain and wipe off any excess stain with a clean cloth.
- Allow the stain to dry completely before applying additional coats, if desired.
Clear Coating:
- Apply a clear coat to protect the stain and wood. Options include marine-grade sealant or regular polyurethane.
- Marine-Grade Sealant:
- Pros: Extremely durable, water-resistant, UV protection.
- Cons: More expensive, longer drying time.
- Regular Polyurethane:
- Pros: Durable, available in various finishes (gloss, satin, matte), more affordable.
- Cons: Less water and UV resistance compared to marine-grade sealant.
Sub-Step 5: Painting the Bar
Priming:
- Apply a primer suitable for wood surfaces. Use a brush or roller to cover all areas evenly.
- Allow the primer to dry completely and lightly sand with fine-grit sandpaper to smooth any rough spots.
Painting:
- Choose a high-quality paint for wood surfaces. Options include latex or oil-based paint.
- Apply the first coat of paint with a brush or roller, following the direction of the wood grain.
- Allow the first coat to dry completely, then lightly sand with fine-grit sandpaper.
- Apply a second coat of paint for a smooth, even finish.
Clear Coating:
- Once the paint is dry, apply a clear coat to protect the finish. Options include water-based or oil-based polyurethane.
- Pros and Cons:
- Water-Based Polyurethane:
- Pros: Dries quickly, low odor, easy cleanup with water, less yellowing.
- Cons: Less durable than oil-based, may raise wood grain.
- Oil-Based Polyurethane:
- Pros: Extremely durable, richer finish.
- Cons: Longer drying time, strong odor, cleanup requires mineral spirits.
- Water-Based Polyurethane:
