Introduction:
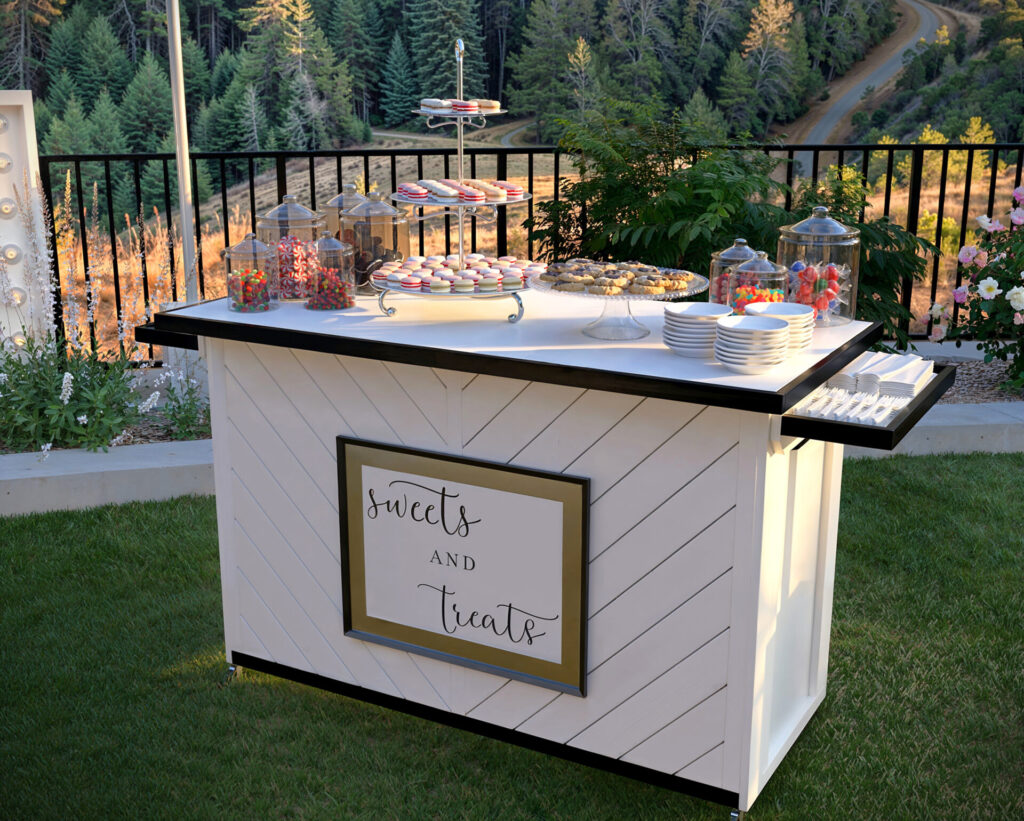
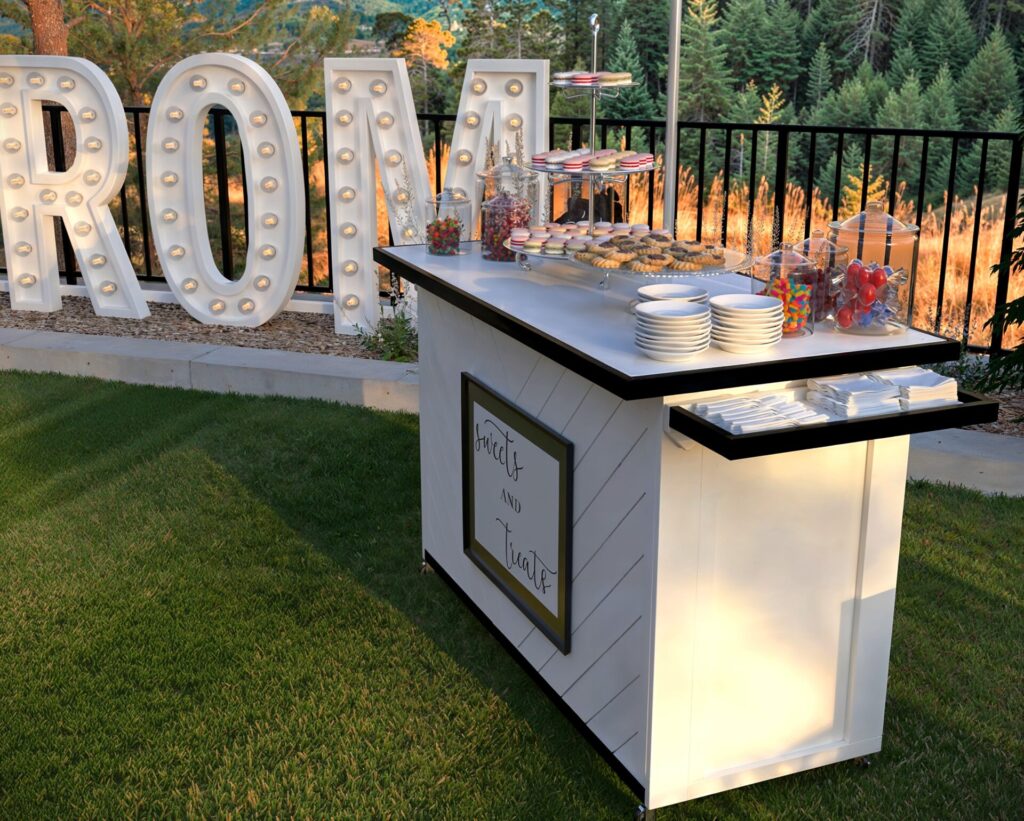
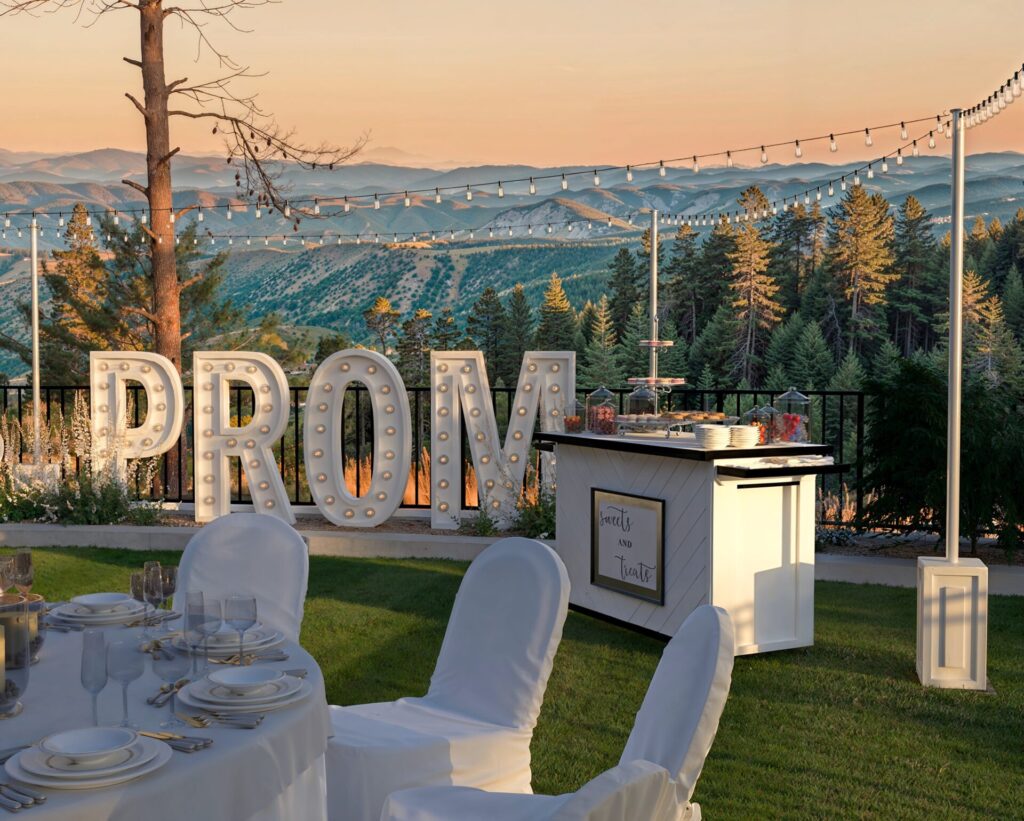
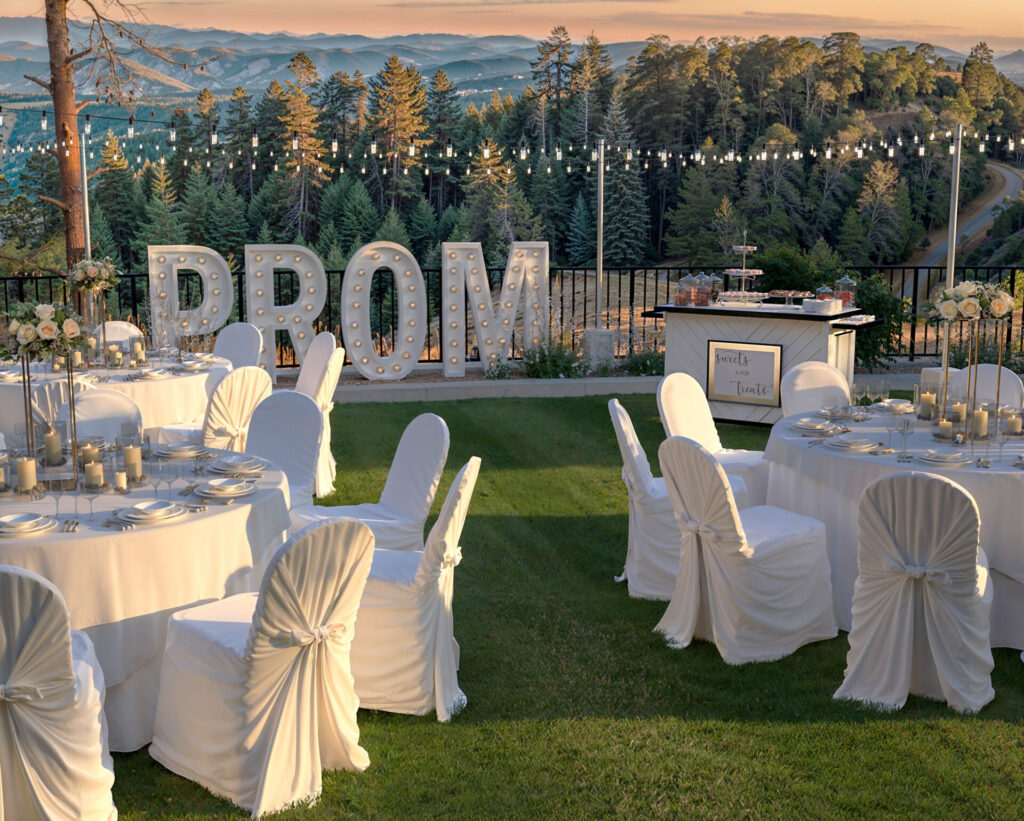
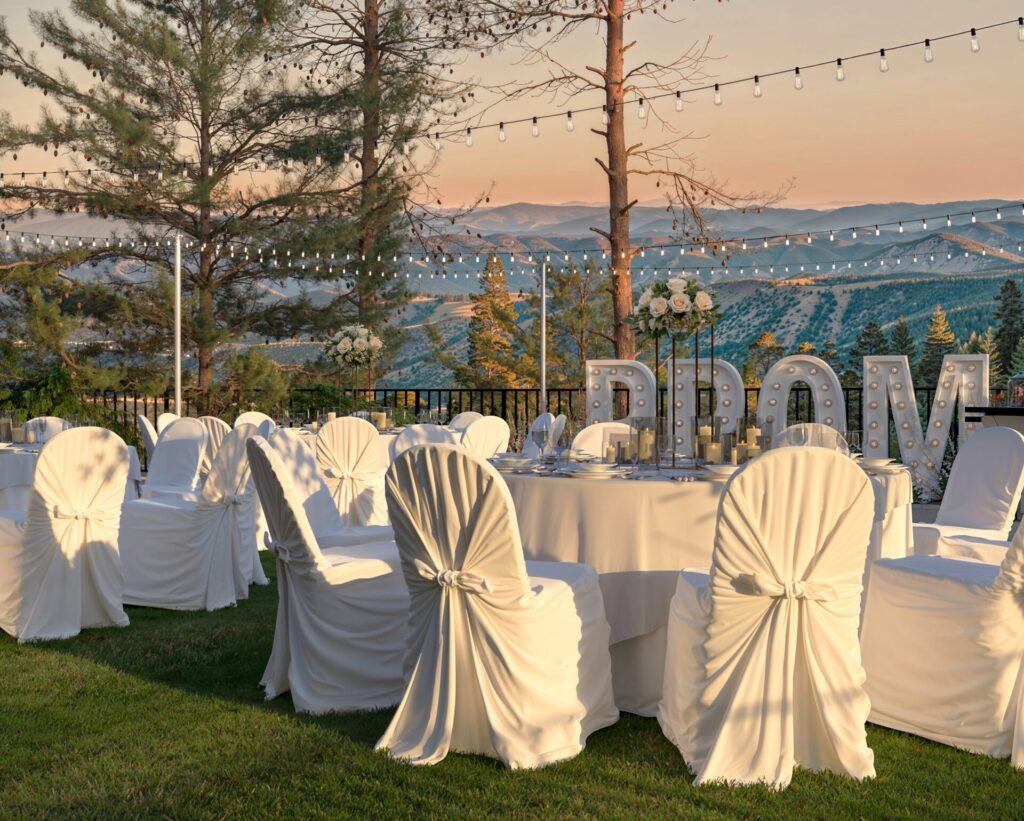
Imagine hosting a party with a stunning bar that catches everyone’s eye, then effortlessly folding it away for easy storage. Whether you’re looking to impress guests with a stylish wine bar, create a self-serve event station, or set up a dessert table for special occasions, our collapsible event bar is the perfect solution. With its portability, ease of setup, and customizable design, it’s more than just a piece of furniture—it’s a game-changer for any host. Picture yourself enjoying the compliments as your guests admire your handiwork, then easily storing the bar until your next event. The versatility and convenience of this bar make it an essential addition to your home, ready to adapt to any occasion.
Features and Specifications:
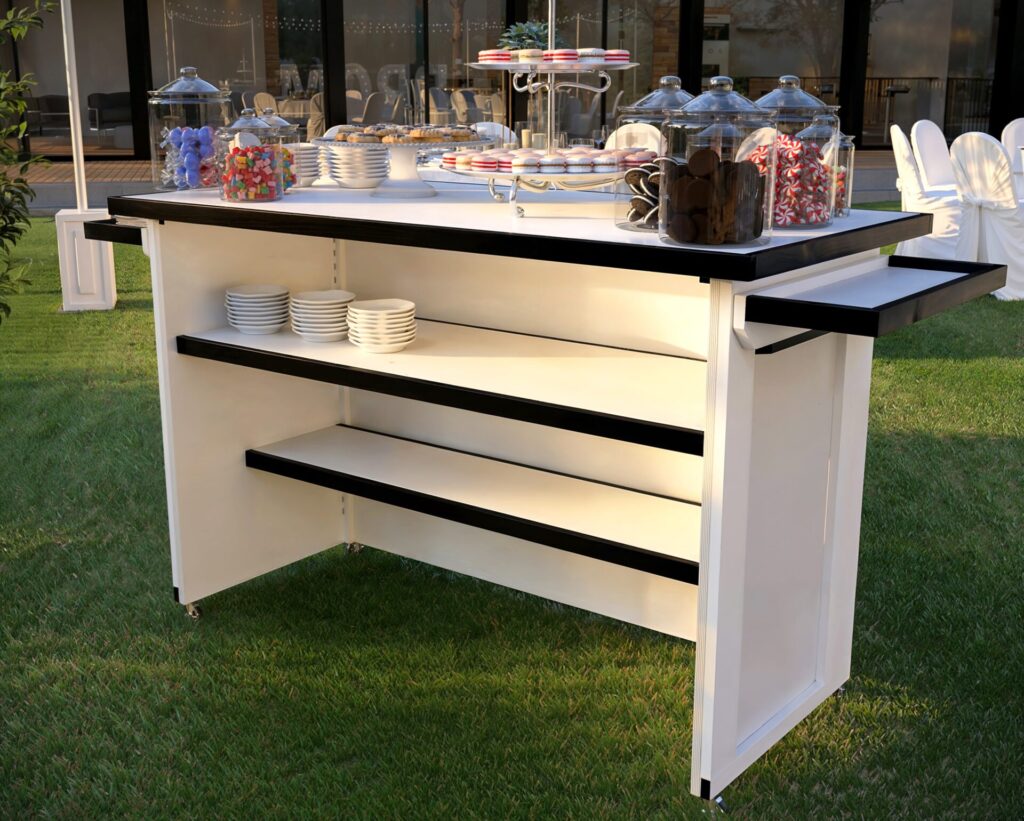
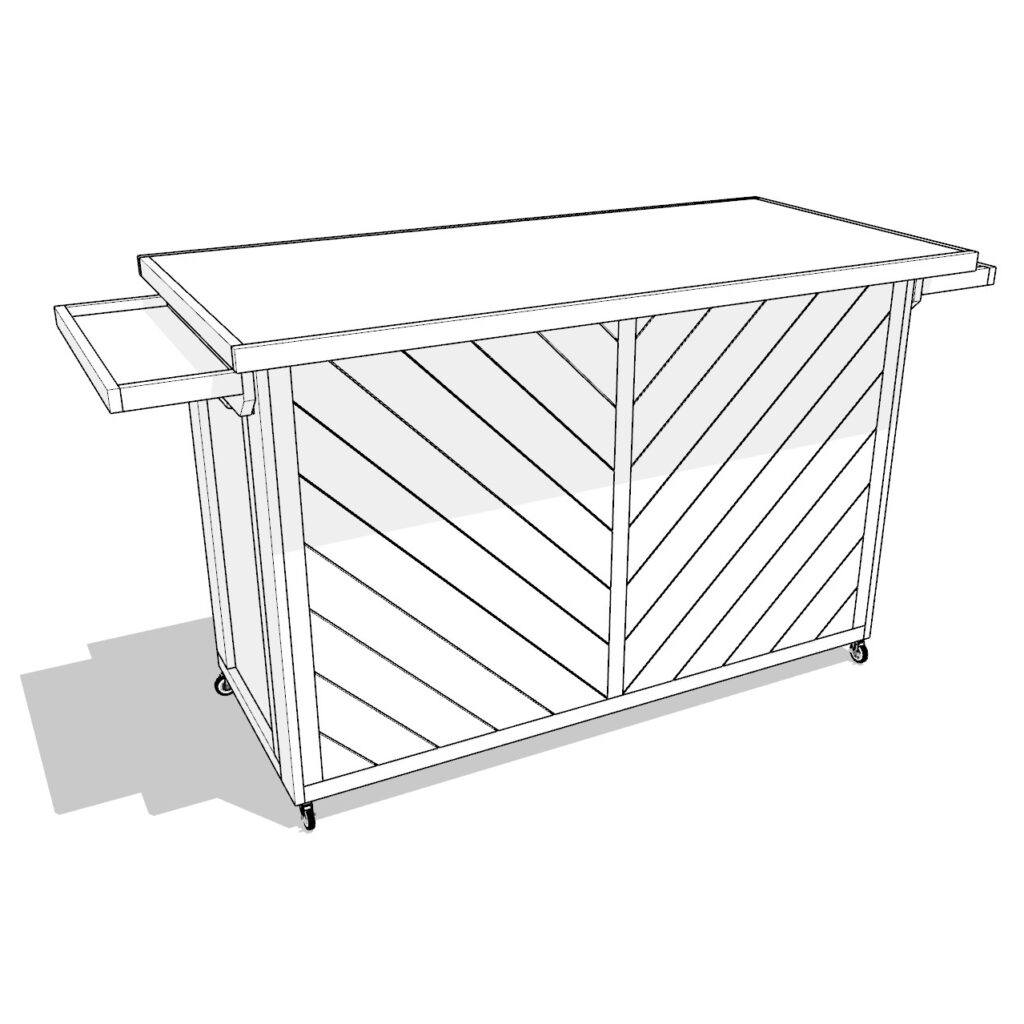
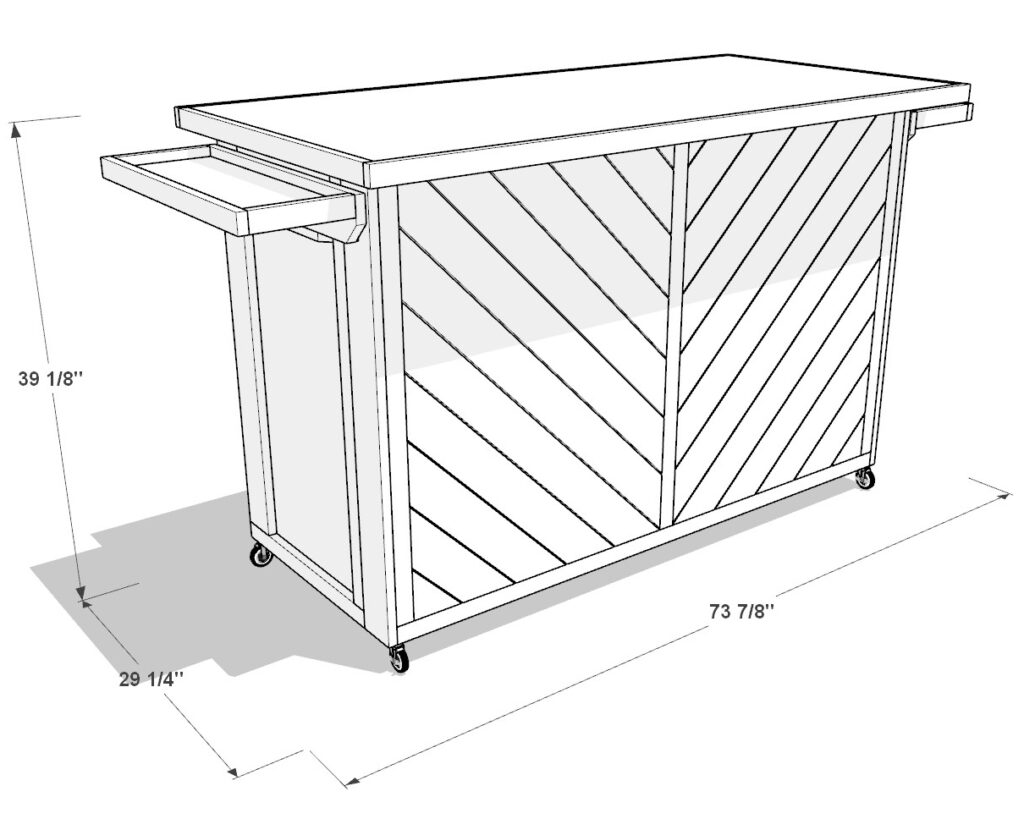
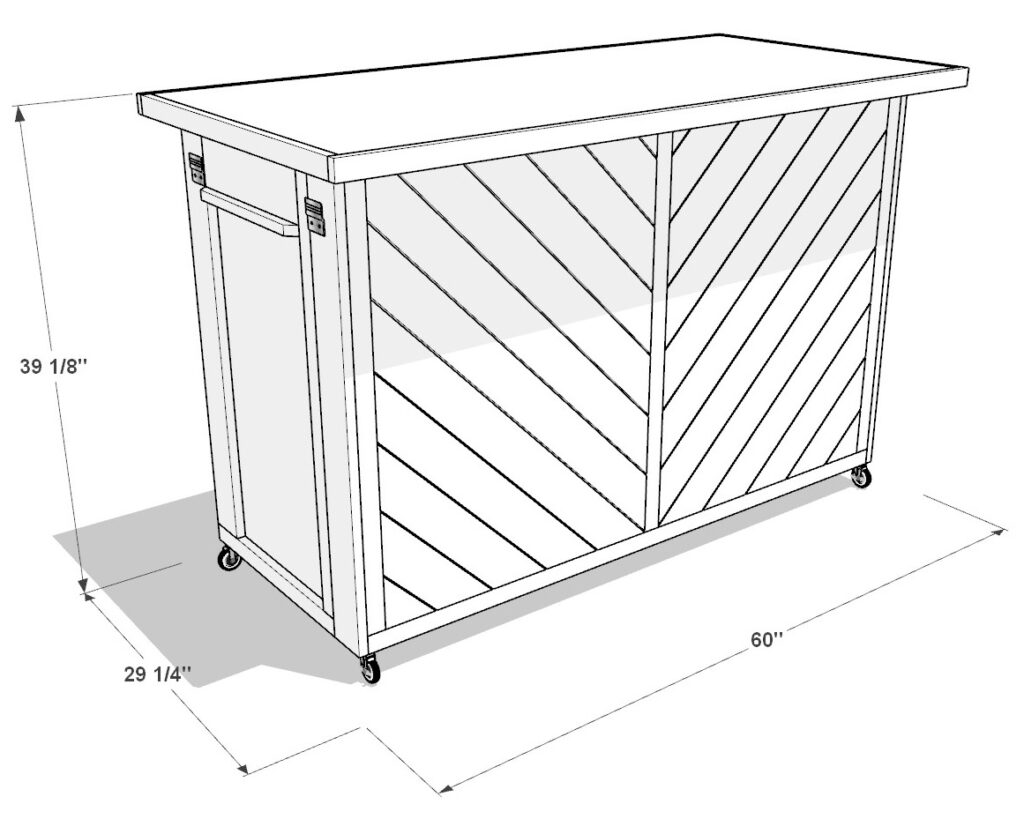
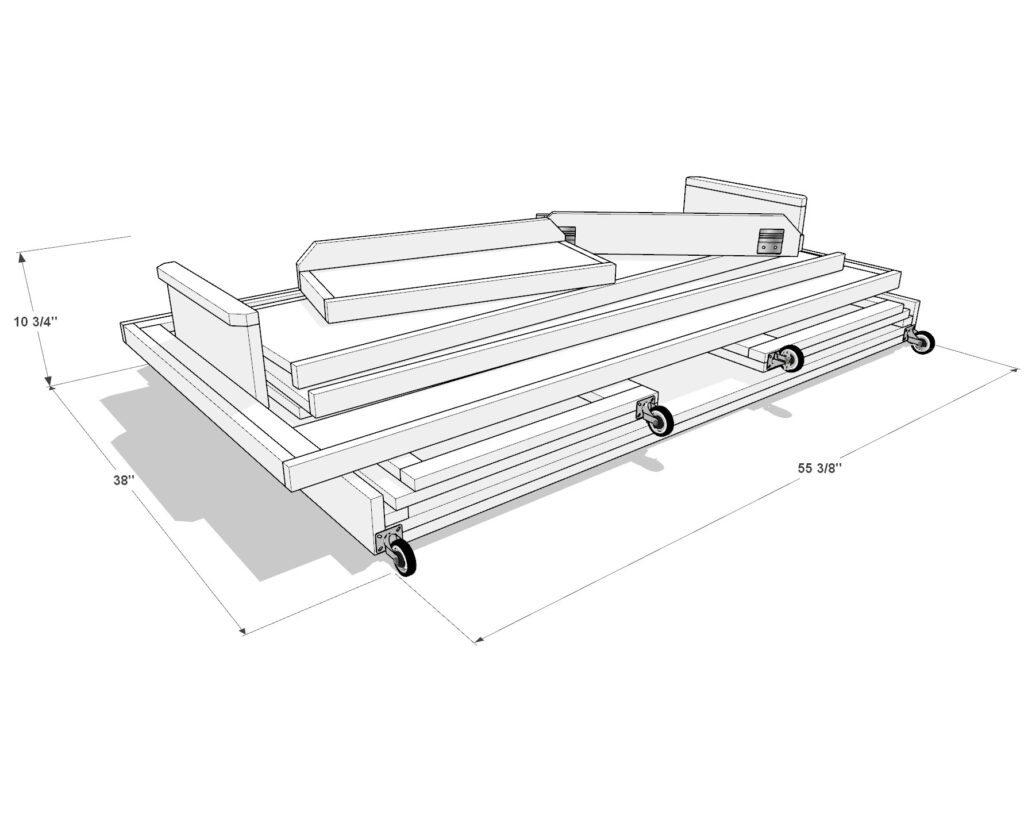
Crafted from 3/4″ thick plywood and common 1×2 and 1×4 lumber boards, our event bar combines durability with a sleek design. The use of piano leaf hinges makes it collapsible, ensuring it’s easy to set up and break down. When disassembled, it breaks down into four compact pieces that can be easily stored without taking up much space.
Ease of Transport and Stability
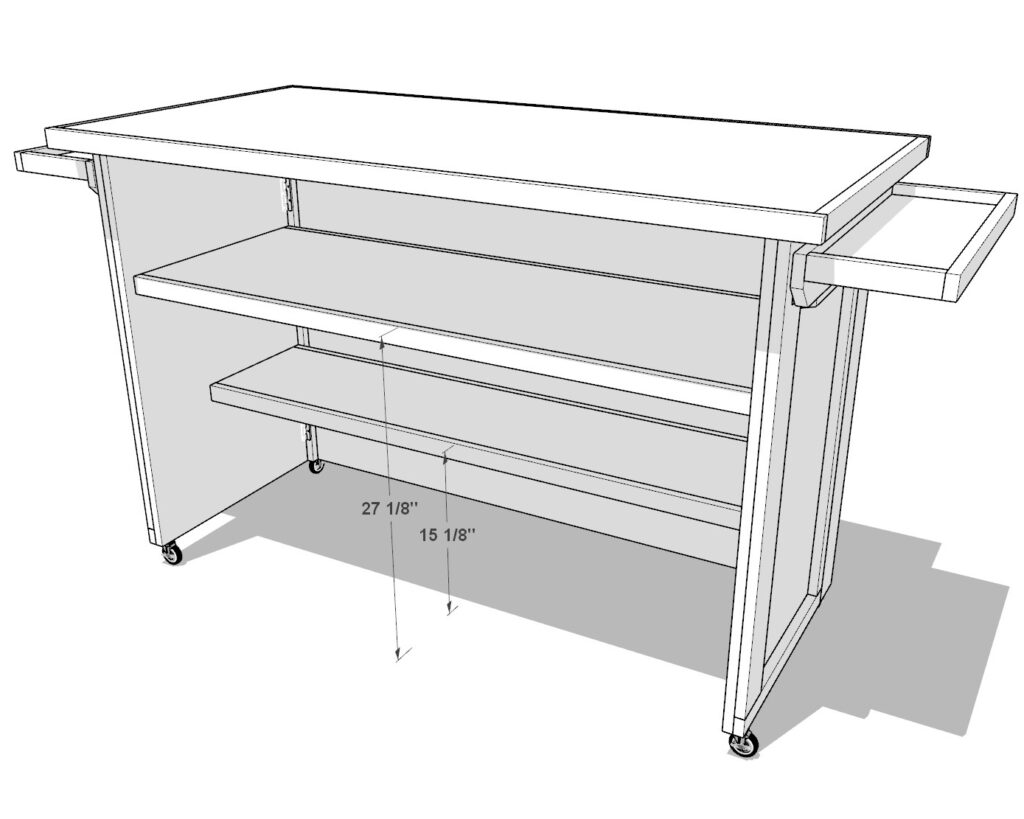
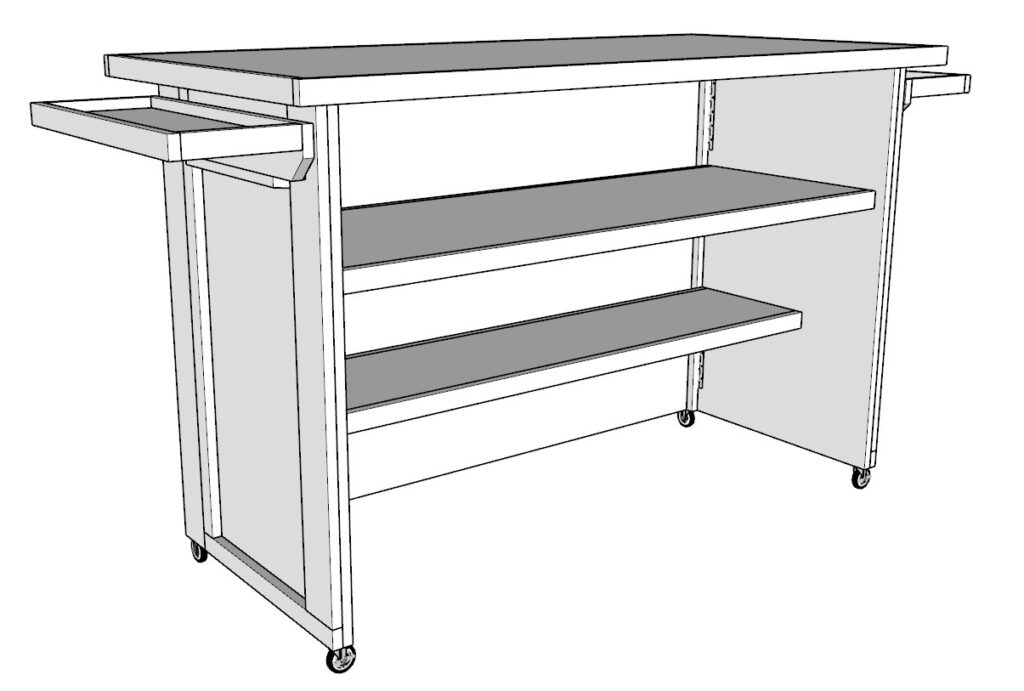
Designed with portability in mind, this event bar is easy to transport, making it perfect for various events. The sturdy event bar top locks into place, providing a stable surface for serving. The shelves are equally robust, locking into place to ensure they remain secure during use. Assembled using glue and pin nails, the structure is both strong and reliable.
Key Benefits
- Versatility: Use it as a dessert table, event bar, serving table, wine bar, or self-serve station.
- Customization: Easily customize with your favorite paint or finishes to match your decor.
- Portability: Compact and lightweight design for easy transport and storage.
Conclusion
Ready to build your own versatile and stylish event bar? Our DIY plan is your ultimate guide, featuring visual color-coded diagrams, detailed step-by-step instructions, a cut list, a lumber shopping list, a tools list, and a materials list. With cost estimates and imperial dimensions included, you’ll have everything you need to create this stunning piece. Whether you’re a seasoned DIY enthusiast or a beginner, our plan makes the process straightforward and enjoyable. Build your event bar today and enjoy the satisfaction of having a custom, functional, and beautiful addition to your home. Ready to get started? Grab your comprehensive DIY plan now and transform your gatherings with a one-of-a-kind event bar.
Time
(varies with experience)
Cost
Estimated Built Cost $250:(Note: Costs can vary by location and supplier.)
Skill level required
Beginner
DIY Collapsible Event Bar Plans
What is included in the PDF download?
- Easy to read step by step instructions
- Material list
- Tools needed
- Helpful links to materials and tools needed
Tools and Materials:
Available with the purchase of the DIY plan PDF.
Lumber Shopping & Cut List:
Available with the purchase of the DIY plan PDF.
Step 1: Building the Front Face of the Folding Event Bar
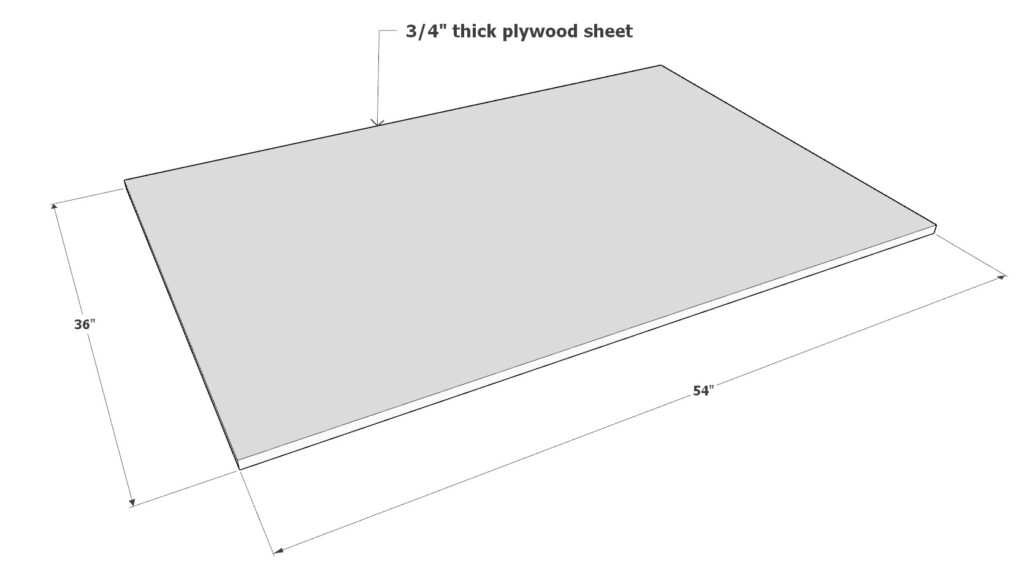
Sub-step 1: Prepare the Foundation
- Foundation Setup:
- Take a 54 inch x 36 inch, 3/4 inch thick plywood sheet. This will serve as the foundation for the face of the bar.
Sub-step 2: Construct the Frame
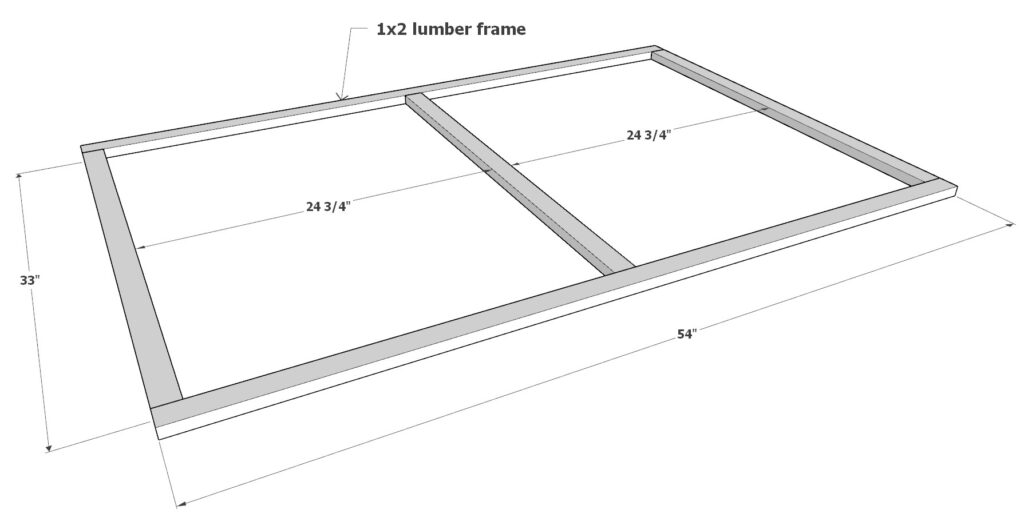
- Assemble the Frame:
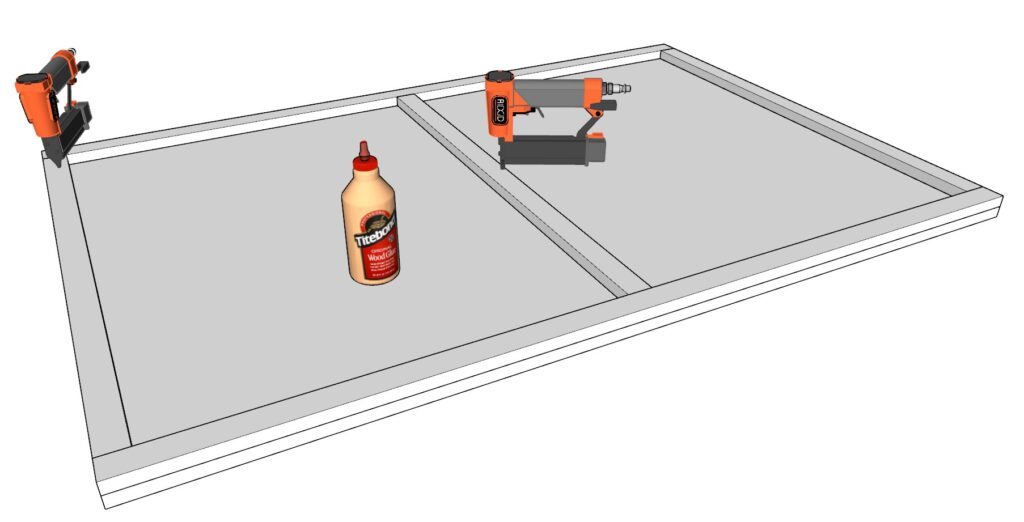
- Arrange two 54 inch 1×2 lumber pieces and three 33 inch 1×2 lumber pieces into a rectangle. Place one 33 inch piece in the center as a divider.
- Secure these pieces to the plywood sheet with wood glue and 1.25 inch pin nails.
Sub-step 3: Attach End Pieces
- End Pieces Attachment:
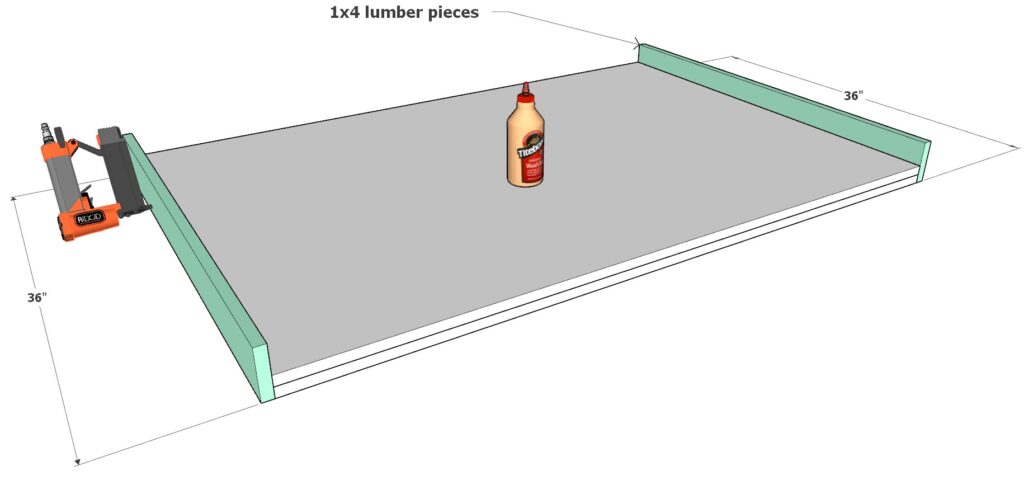
- Flip the assembled frame upside down.
- Attach two 36 inch 1×4 lumber pieces to the ends of the rectangle. Use wood glue and 1.25 inch pin nails (these pieces are color-coded in green in the diagram).
Sub-step 4: Secure Adjacent Pieces
- Adjacent Pieces Addition:
- Attach two 36 inch 1×2 lumber pieces adjacent to the 1×4 pieces. Secure with wood glue and 1.25 inch pin nails.
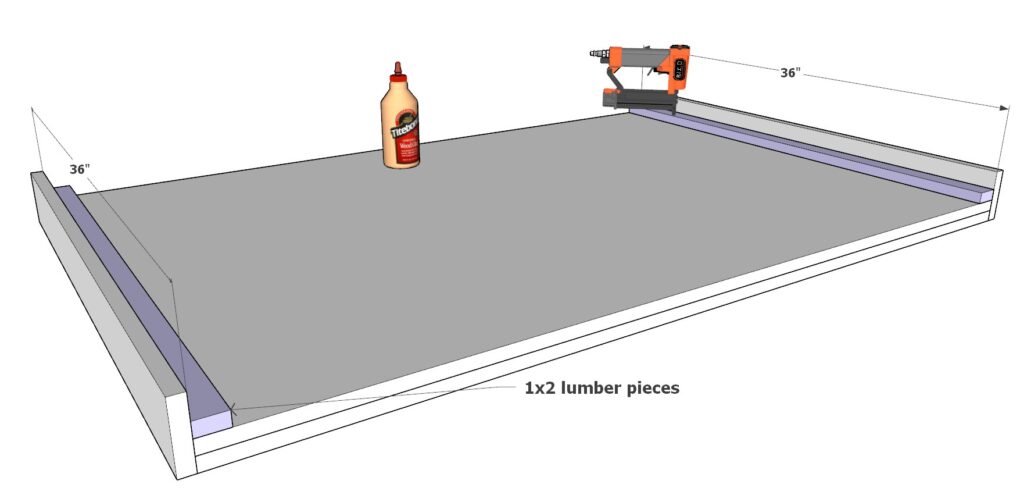
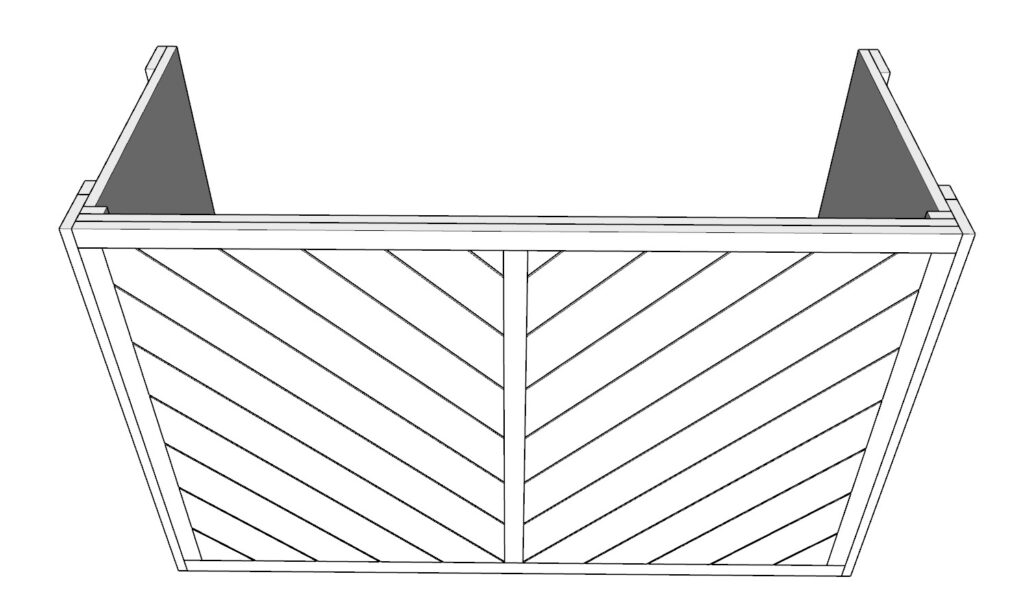
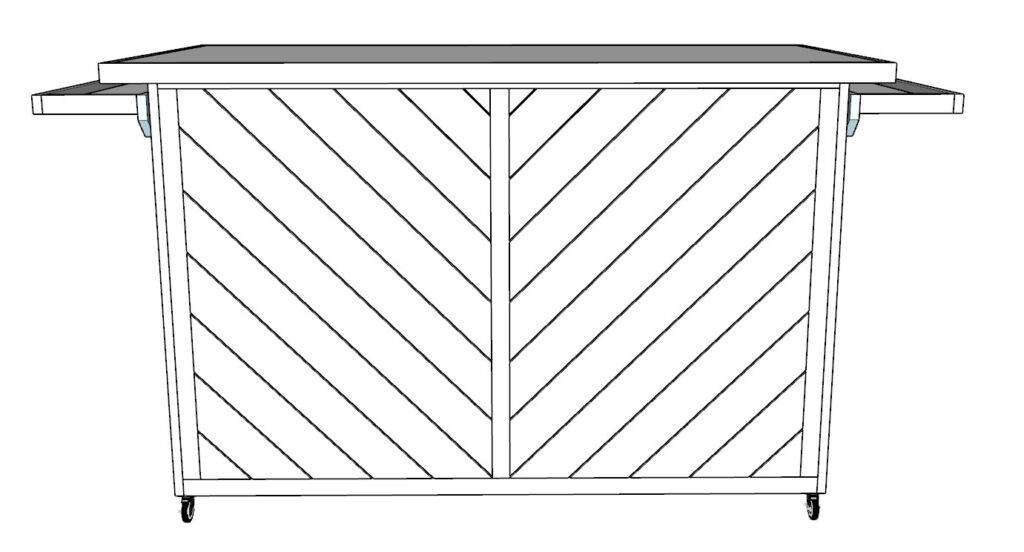
Sub-step 5: Create the Decorative Face
Decorative Lumber Preparation:
- Prepare various sizes of 1×4 lumber cut at 45 degrees on both ends:
- Two 38-1/2 inch
- Two 35 inch
- Two 27-3/4 inch
- Two 20-1/2 inch
- Two 13-1/4 inch
- Two 6 inch
- Two 10-3/16 inch
- Two 17-7/16 inch
- Two 24-11/16 inch
- Two 31-15/16 inch
- Two 37-1/16 inch
- Prepare various sizes of 1×4 lumber cut at 45 degrees on both ends:
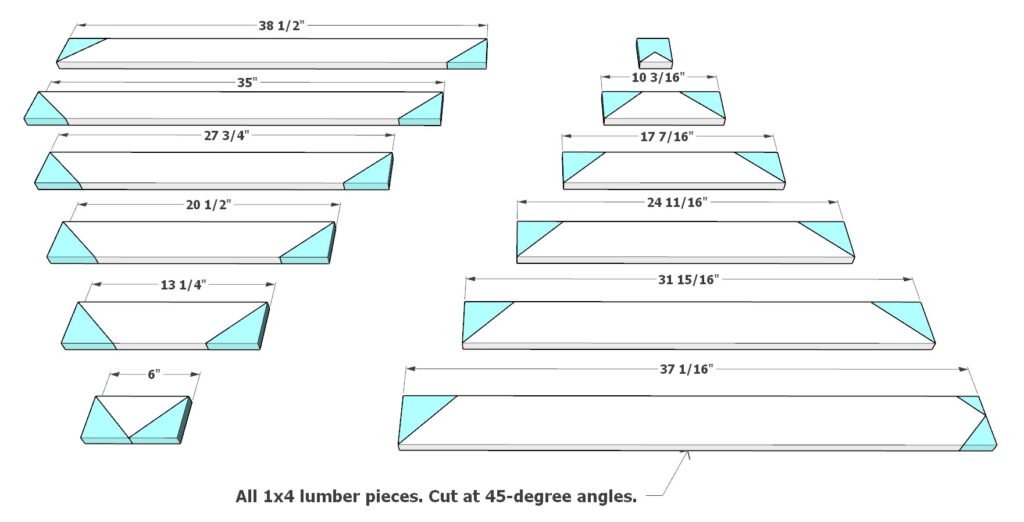
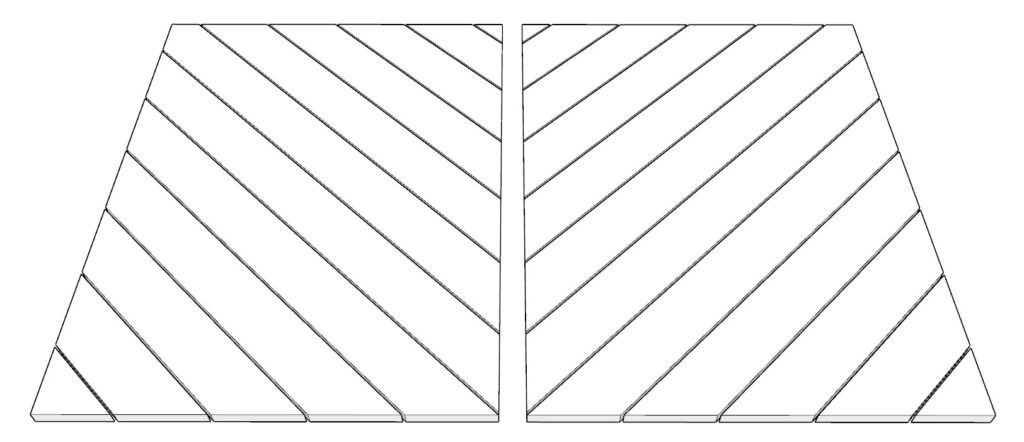
Assemble Decorative Face:
- Arrange the cut pieces diagonally to form the decorative face of the bar, maintaining a 1/8 inch gap between each piece.
- Secure these pieces to the bar face using wood glue and 1.25 inch pin nails.
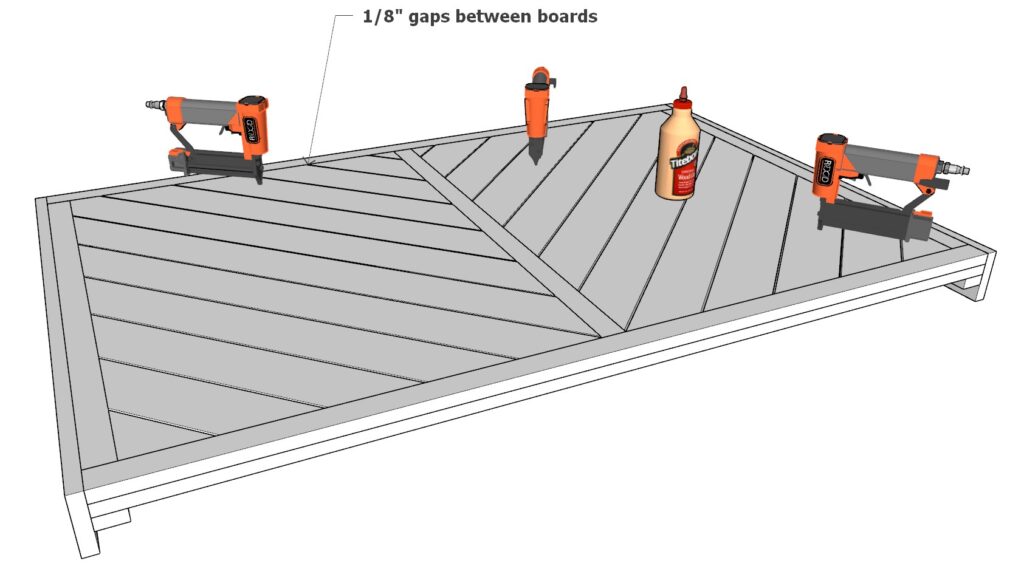
Step 2: Building the Bar Sides
Sub-step 1: Prepare the Side Panels
- Foundation Setup:
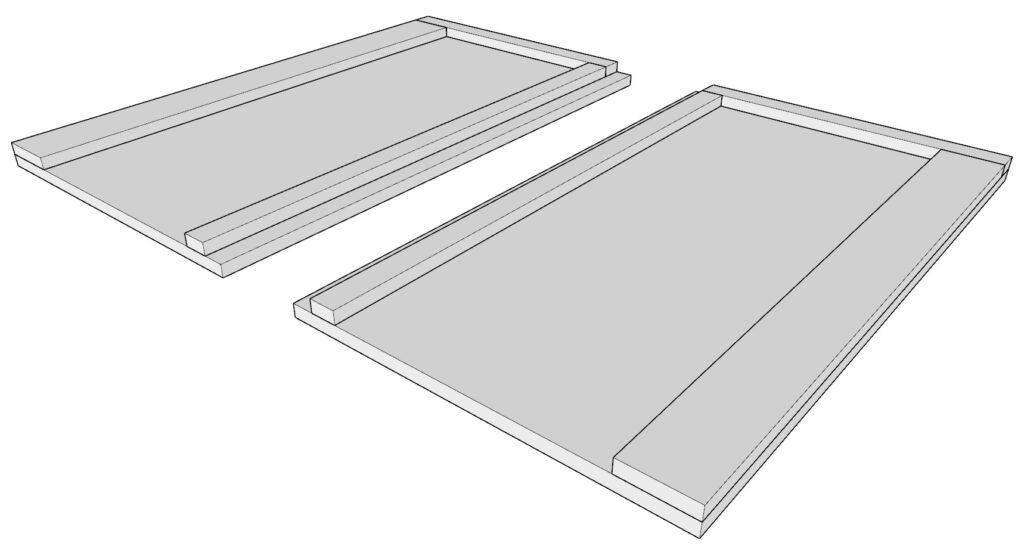
- Take two 36 inch x 20-1/2 inch, 3/4 inch thick plywood sheets. These will serve as the foundations for the sides of the bar.
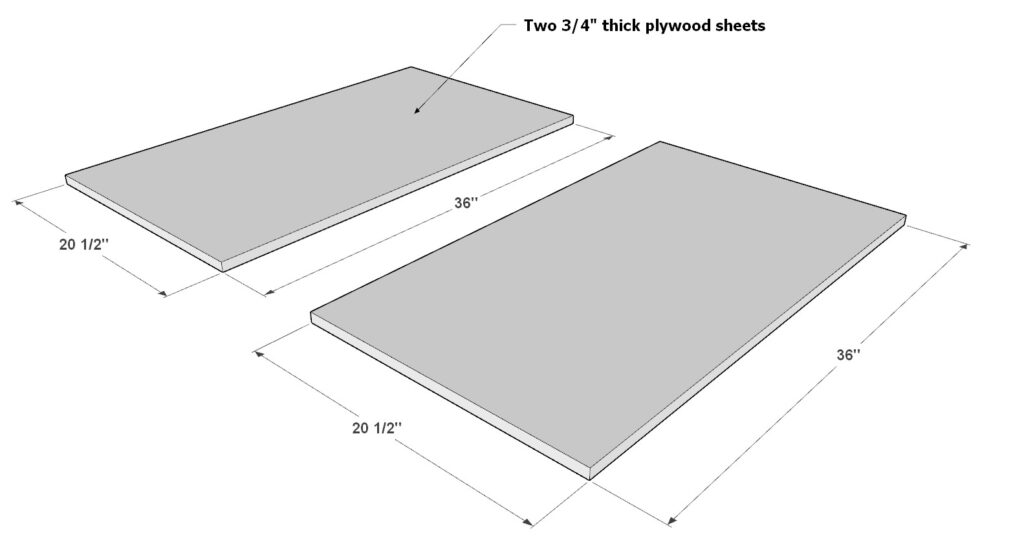
Sub-step 2: Construct the Frame
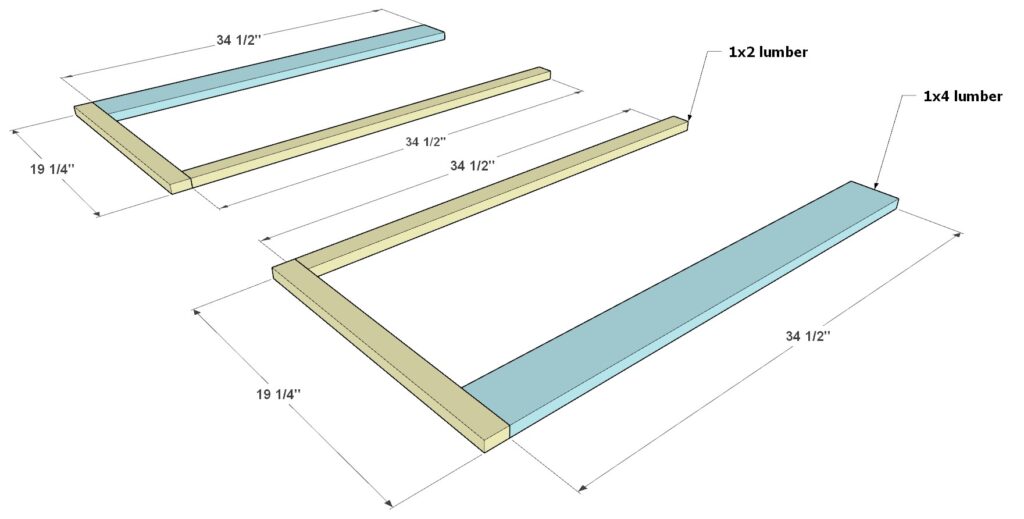
- Assemble the Frame for Each Side:
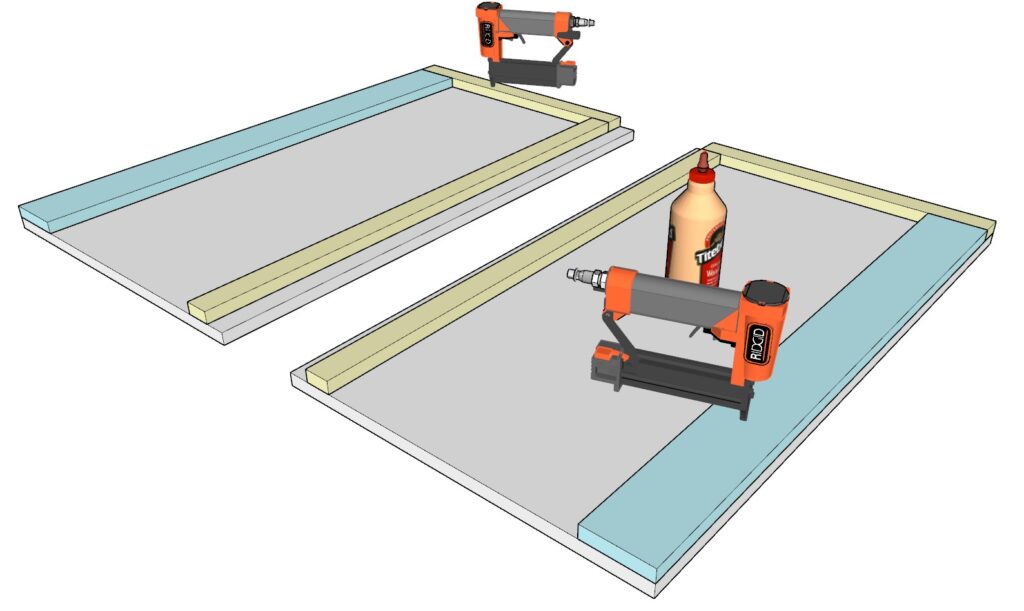
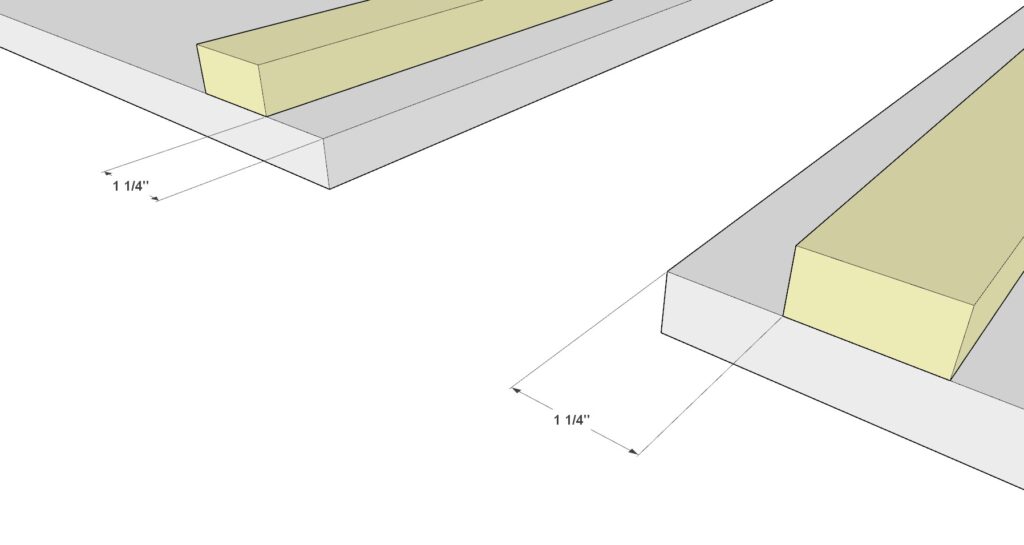
- For each plywood sheet, arrange one 34-1/2 inch 1×2 lumber piece, one 19-1/4 inch 1×2 lumber piece, and one 34-1/2 inch 1×4 lumber pieces as shown in the diagram.
- Secure these lumber pieces to the plywood sheet with wood glue and 1.25 inch pin nails.
Sub-step 3: Construct Both Sides
- Create Two Mirror Sides:
- In the end you should have created a total of two mirror side panels.
Step 3: Building the Shelves of the Bar
Sub-step 1: Create the Smaller Shelf
Prepare the Smaller Shelf Foundation:
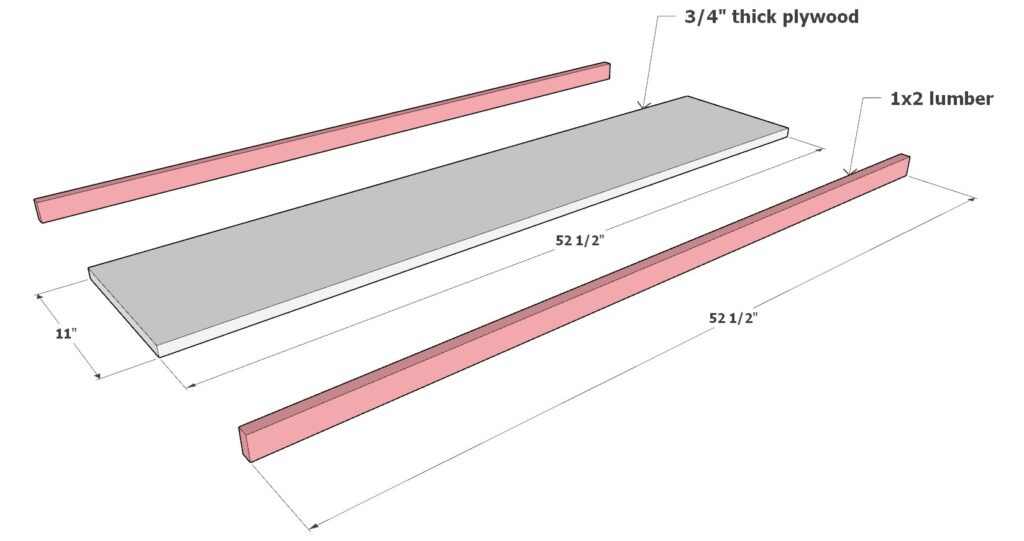
- Take a 52-1/2 inch x 11 inch, 3/4 inch thick plywood sheet.
Attach End Pieces:
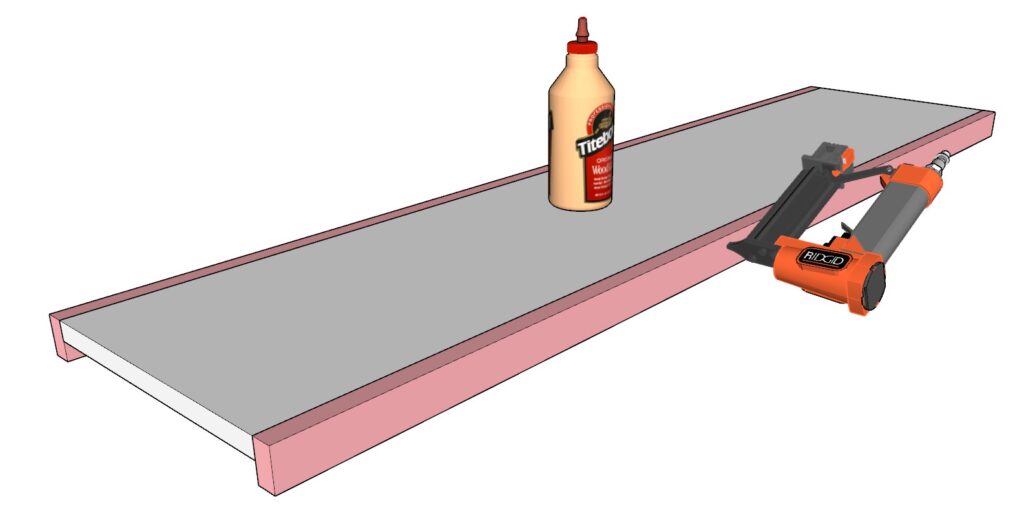
- Attach two 52-1/2 inch long 1×2 lumber pieces to the ends of the plywood (color-coded in salmon pink in the diagram).
- Secure these pieces with wood glue and 1.25 inch pin nails.
Sub-step 2: Create the Larger Shelf
Prepare the Larger Shelf Foundation:
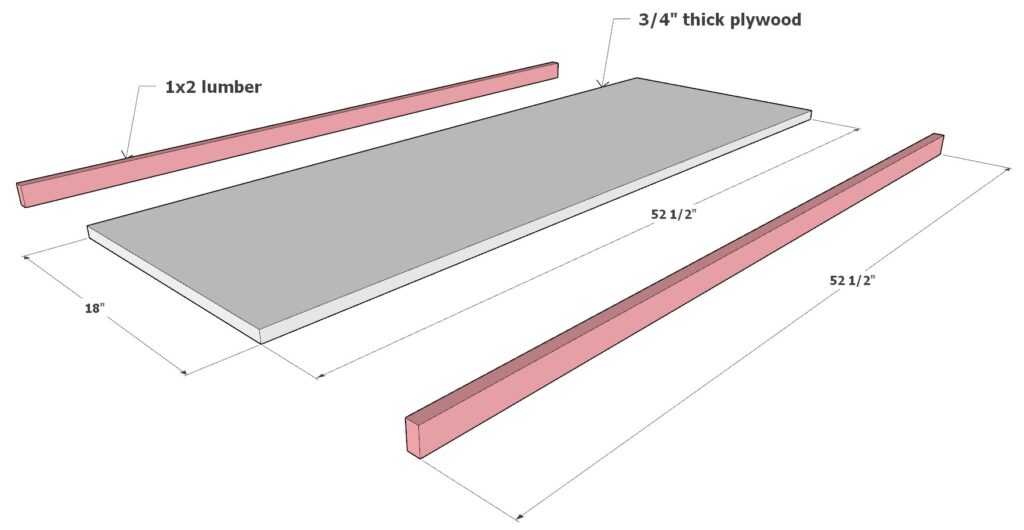
- Take a 52-1/2 inch x 18 inch, 3/4 inch thick plywood sheet.
Attach End Pieces:
- Attach two 52-1/2 inch long 1×2 lumber pieces to the ends of the plywood (color-coded in salmon pink in the diagram).
- Secure these pieces with wood glue and 1.25 inch pin nails.
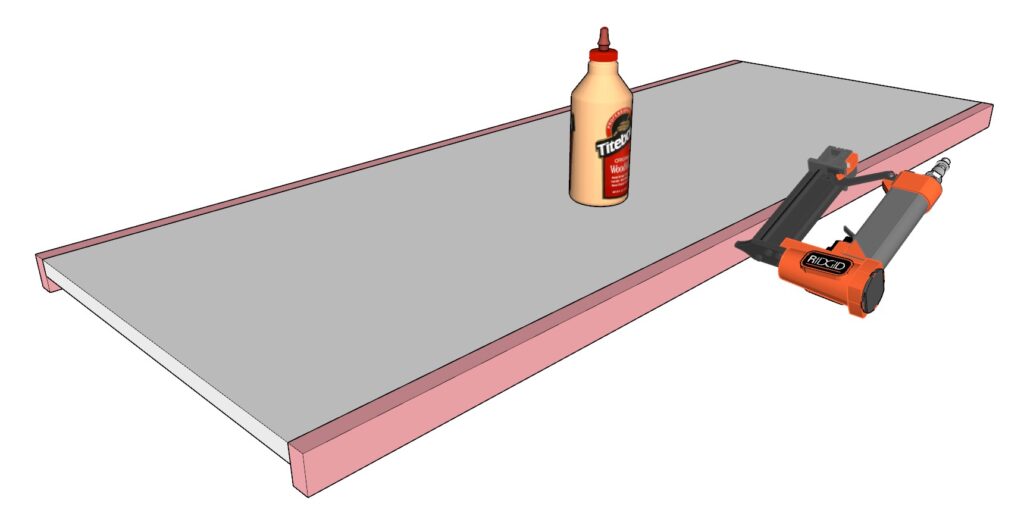
Step 4: Building the Bar Top
Sub-step 1: Create the Top Foundation
Prepare the Top Foundation:
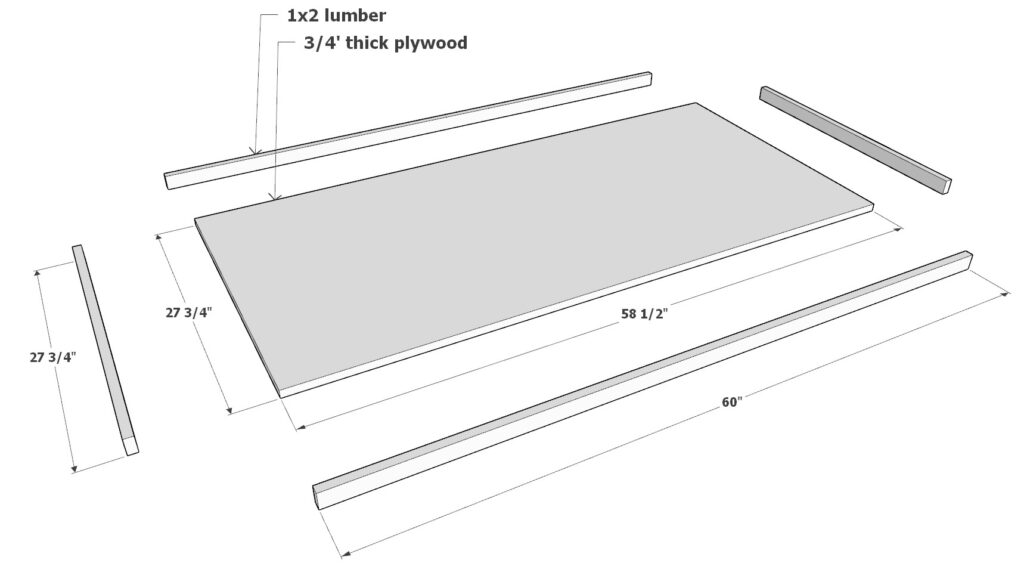
- Take a 58-1/2 inch x 27-3/4 inch, 3/4 inch thick plywood sheet.
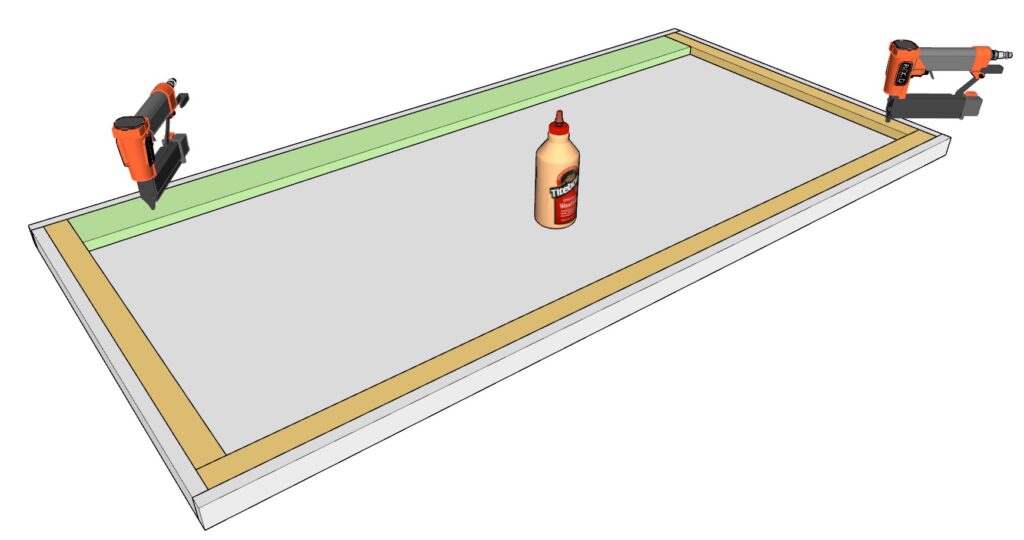
Attach the Lip Frame:
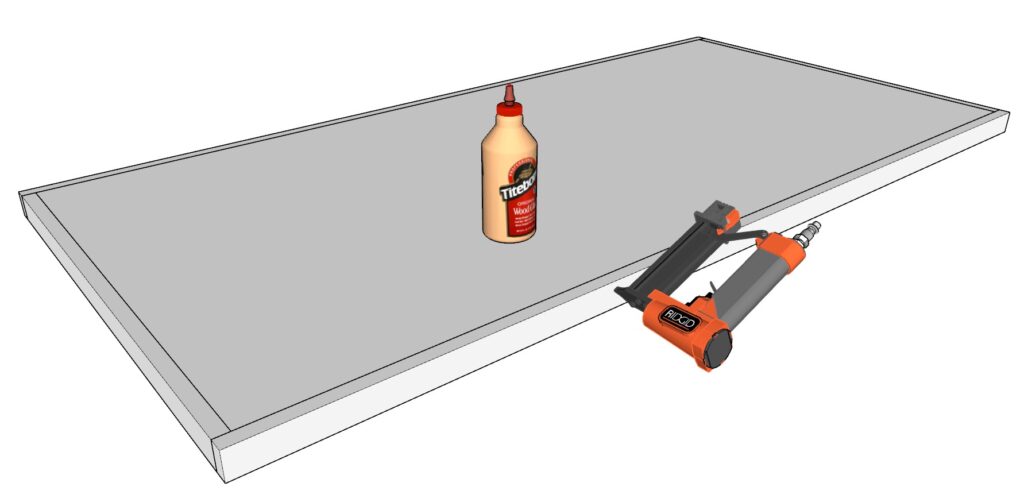
- Attach two 27-3/4 inch 1×2 lumber pieces and two 60 inch 1×2 lumber pieces around the edges of the plywood to create a lip.
- Secure these pieces with wood glue and 1.25 inch pin nails.
Sub-step 2: Reinforce the Bar Top
- Inlay the Support Pieces:
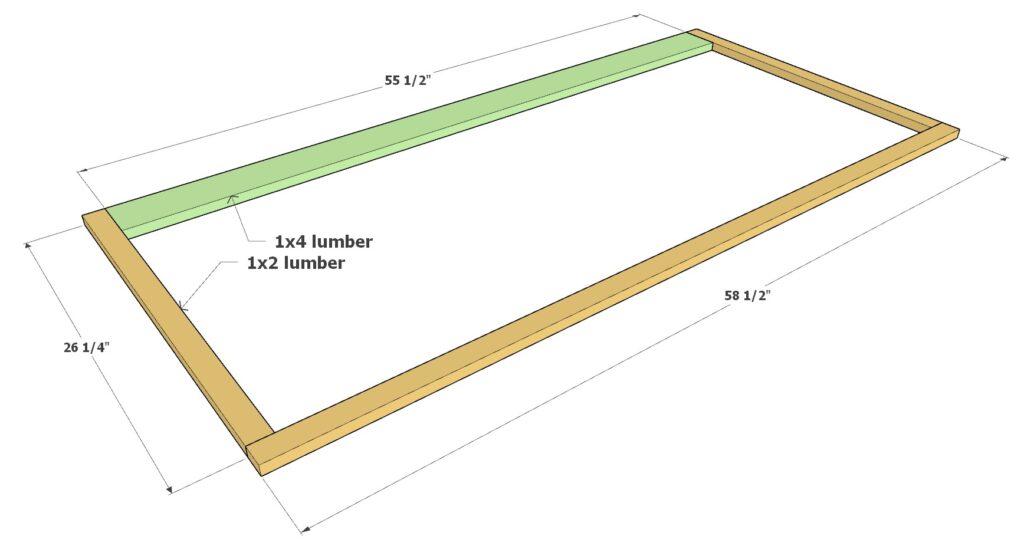
- Add one 55-1/2 inch long 1×4 lumber piece along the length of the top.
- Add two 26-1/4 inch long 1×2 lumber pieces on the shorter sides inside the lip frame.
- Add one 58-1/2 inch long 1×2 lumber piece along the other length inside the lip frame.
- Secure all these pieces with wood glue and 1.25 inch pin nails.
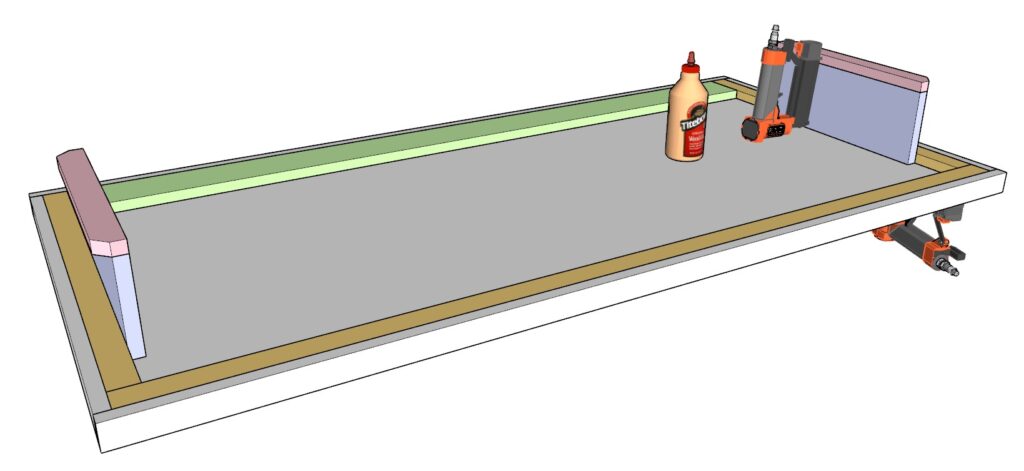
Sub-step 3: Trim the Lumber for Flaps
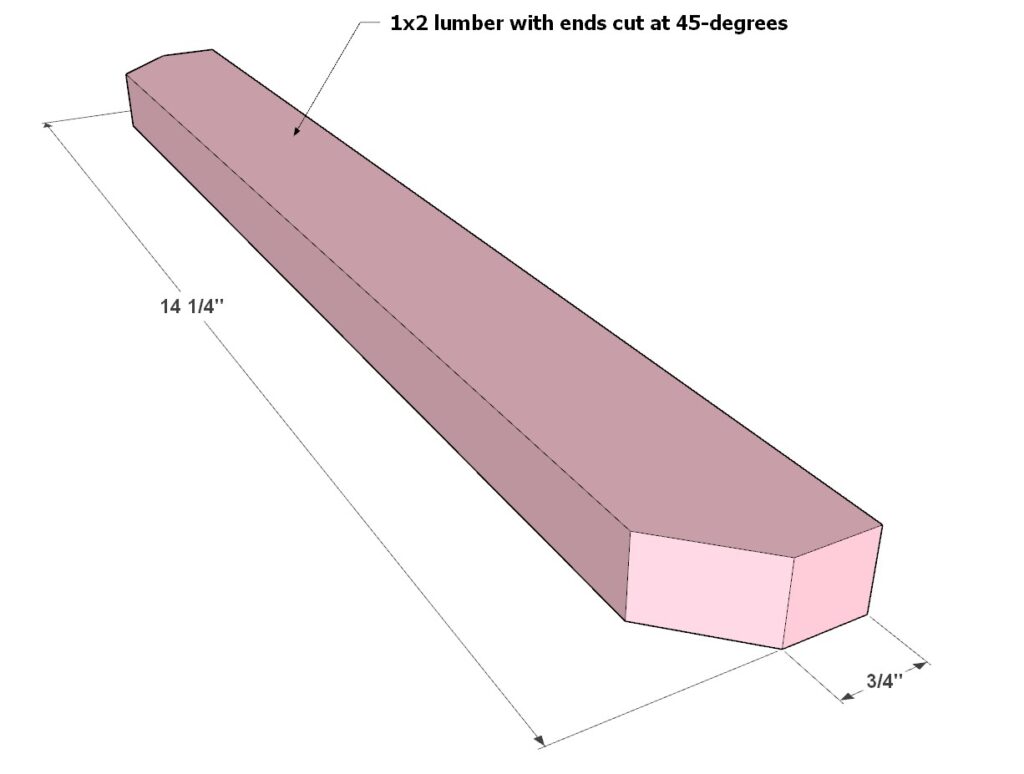
- Materials Needed:
- Two 14-1/4 inch long 1×2 lumber pieces (color-coded in pink)
- Instructions:
- Cut both ends of each 1×2 lumber piece at a 45-degree angle, as indicated in the diagram.
Sub-step 4: Assemble the Flaps
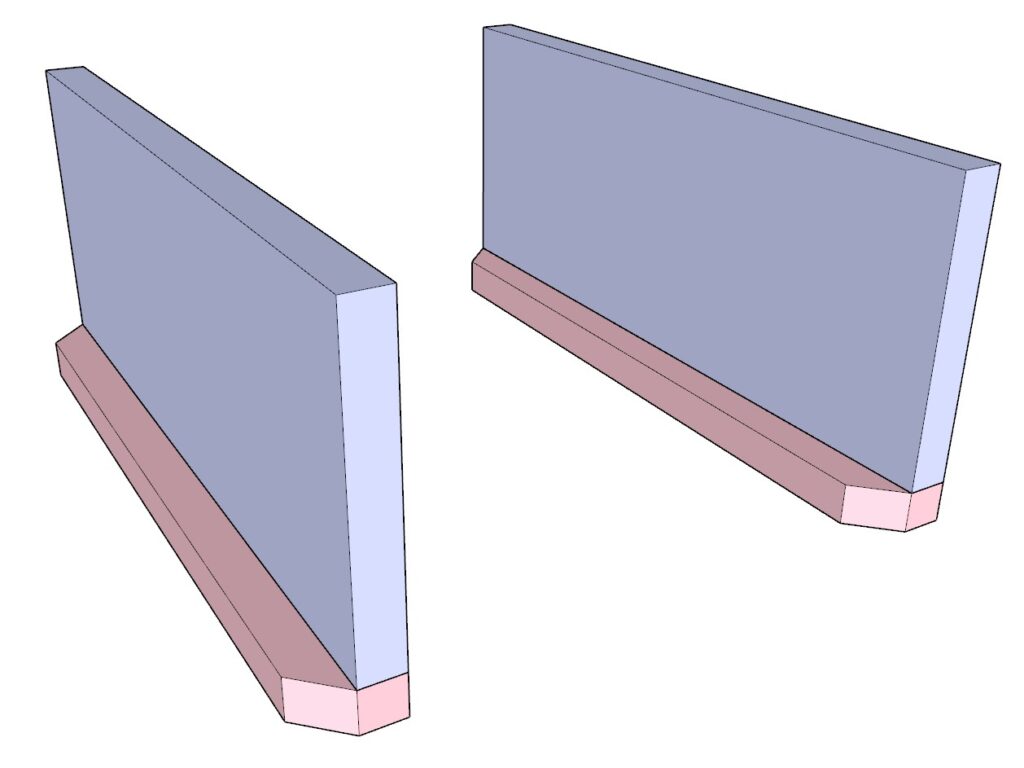
- Materials Needed:
- Two 14-1/4 inch long 1×6 lumber pieces (color-coded in lavender)
- Wood glue
- Pin nails
- Instructions:
- Apply wood glue to one side of each trimmed 1×2 piece.
- Align a 1×6 piece, ensuring edges are flush.
- Secure using pin nails.

Sub-step 5: Attach the Flaps to the Bar Top
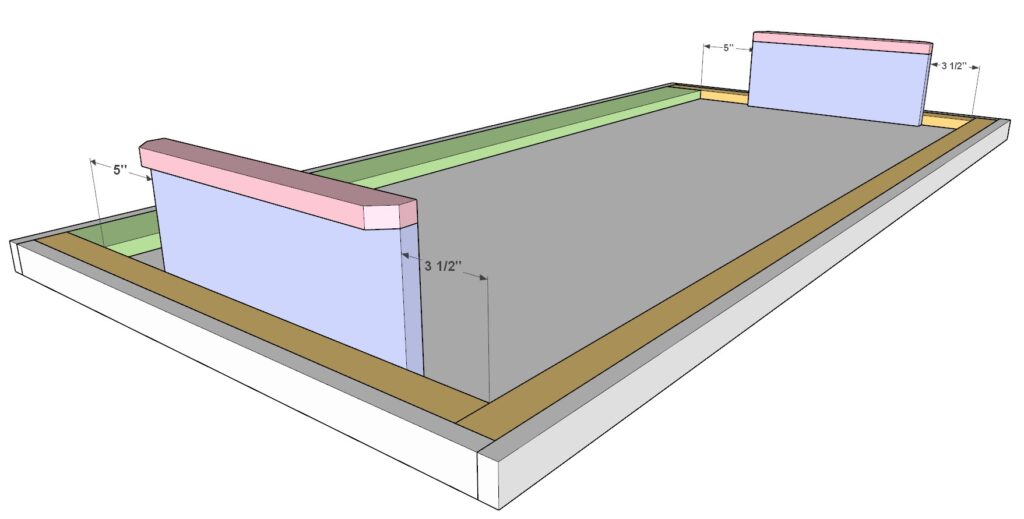
- Materials Needed:
- Wood glue
- Pin nails
- Instructions:
- Refer to the diagram for the correct placement and measurements.
- Apply wood glue on the edge of each flap where it will attach to the bar top.
- Position the flaps accordingly, ensuring they are spaced out as specified in the diagram.
- Secure the flaps to the bar top using pin nails.
- Ensure that both flaps are identical and correctly aligned.
Step 5: Assembling the Bar Sides and Front
Sub-step 1: Attach the Sides to the Front
Install Piano Hinges:
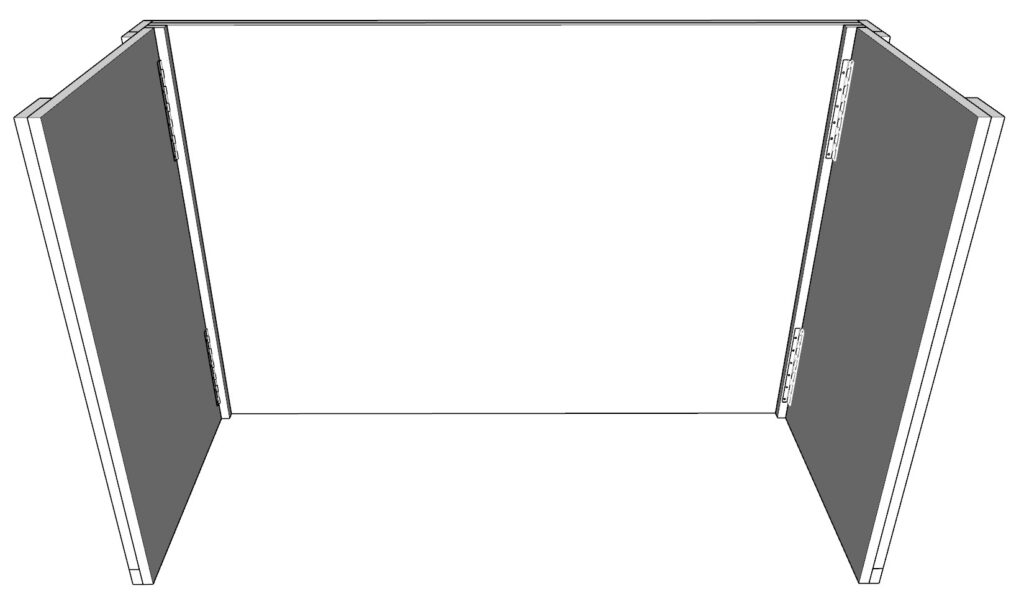
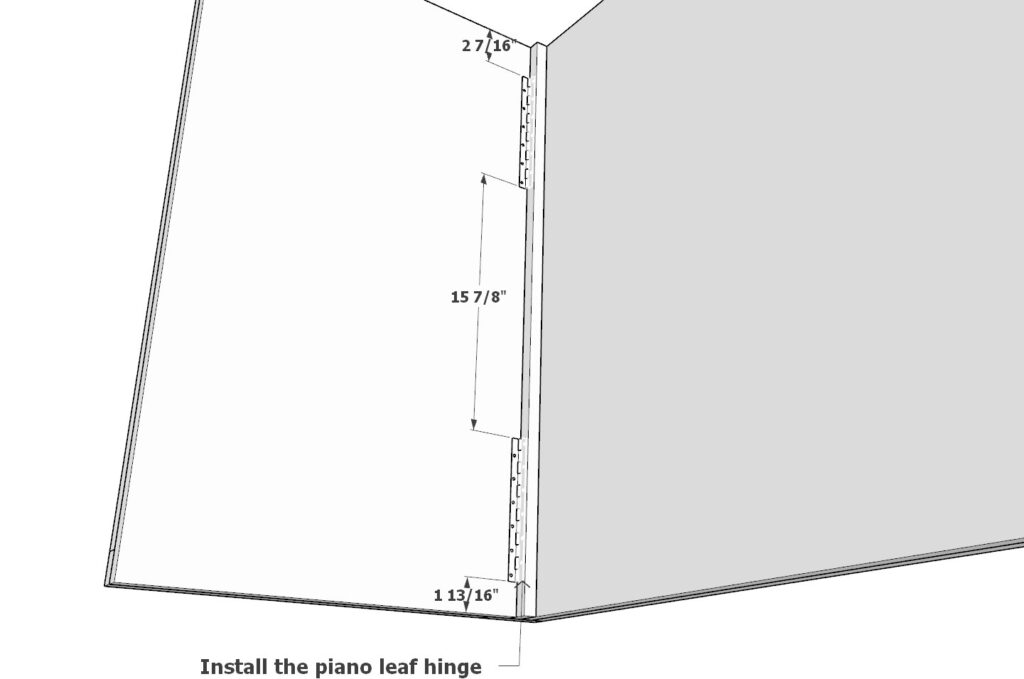
- Take four 8-inch long piano hinges.
- Attach two hinges to each side, placing them at the ends as shown in the diagram for maximum stability.
- Ensure the hinges do not obstruct where the shelves will be attached in future steps.
- Secure the hinges with appropriate screws.
Test the Folding Mechanism:
- Fold and unfold the sides to ensure everything operates smoothly.
- Make any necessary adjustments to the hinges to ensure proper alignment and movement.
Sub-step 2: Attach the Bar Assembly to the Bar top
Prepare the Bar top:
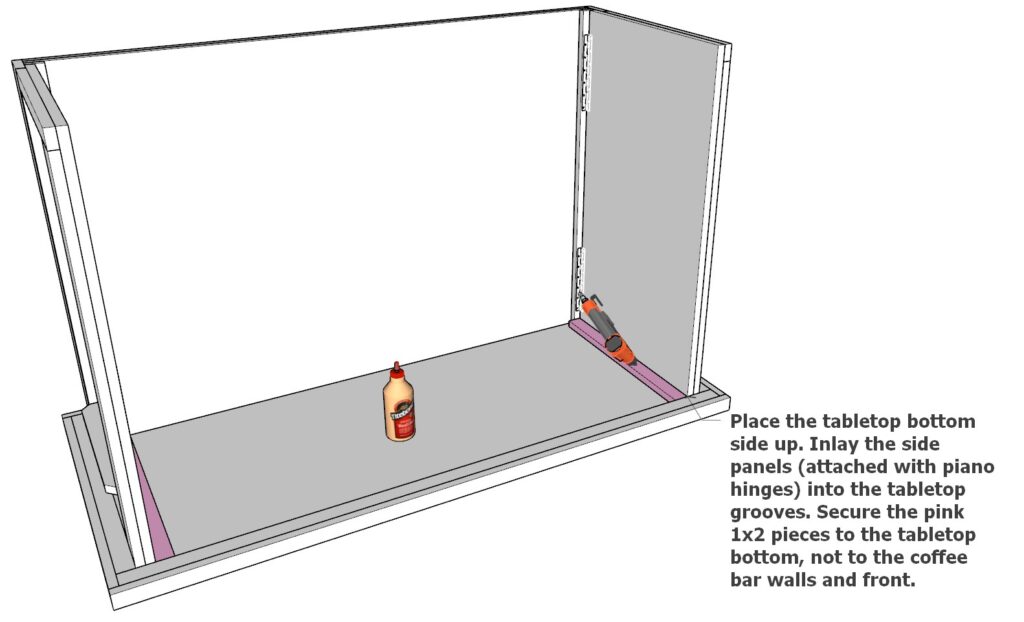
- Place the bar top upside down on a flat surface.
Inlay the Bar Assembly:
- Inlay the front and side panels (now attached with piano hinges) into the grooves of the bar top.
Secure the Support Pieces:
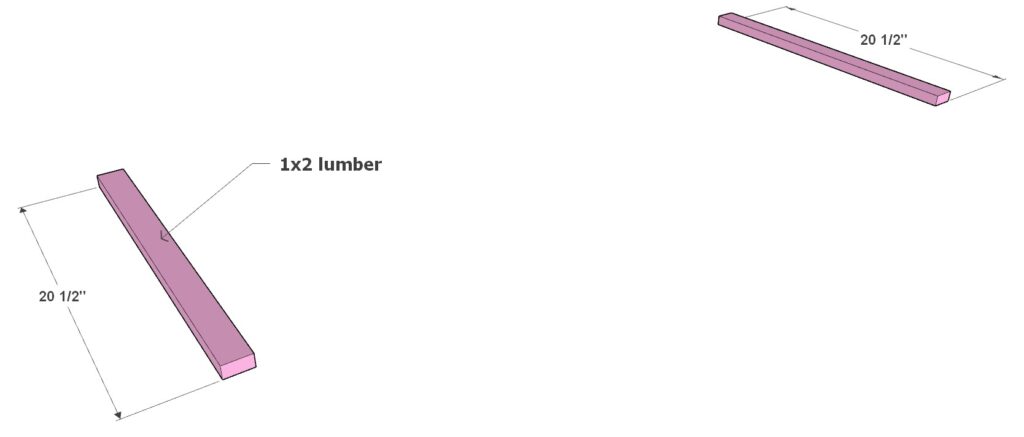
- Attach two 20-1/2 inch long 1×2 lumber pieces (color-coded in pink) to the bottom of the bar top.
- Secure these pieces to the bar top, not the event bar walls or front, using wood glue and 1.25-inch pin nails.
Ensure Snug Fit:
- Once the support pieces are in place, test the bar top to ensure it can be easily popped on and off.
- The bar top should fit snugly and securely without moving when in place.
Step 6: Attaching the Shelf Supports
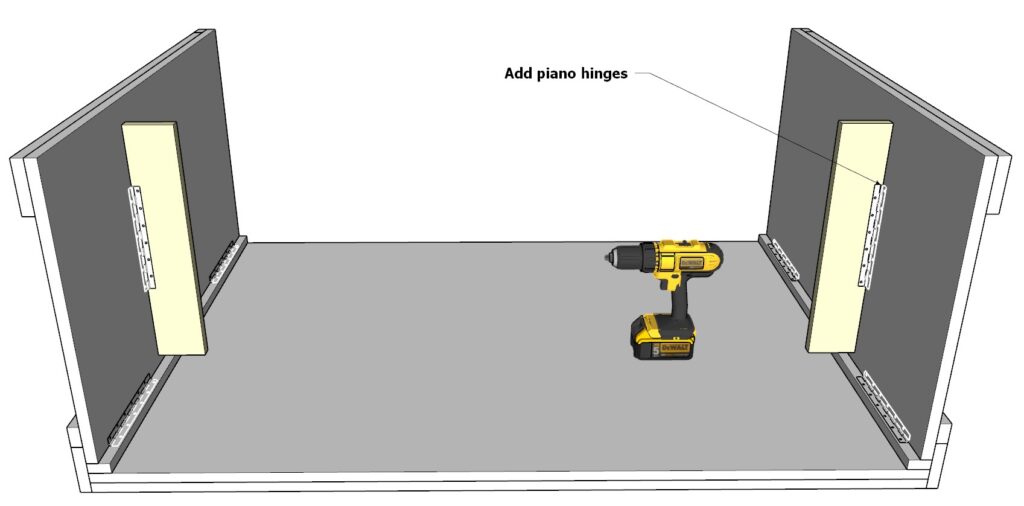
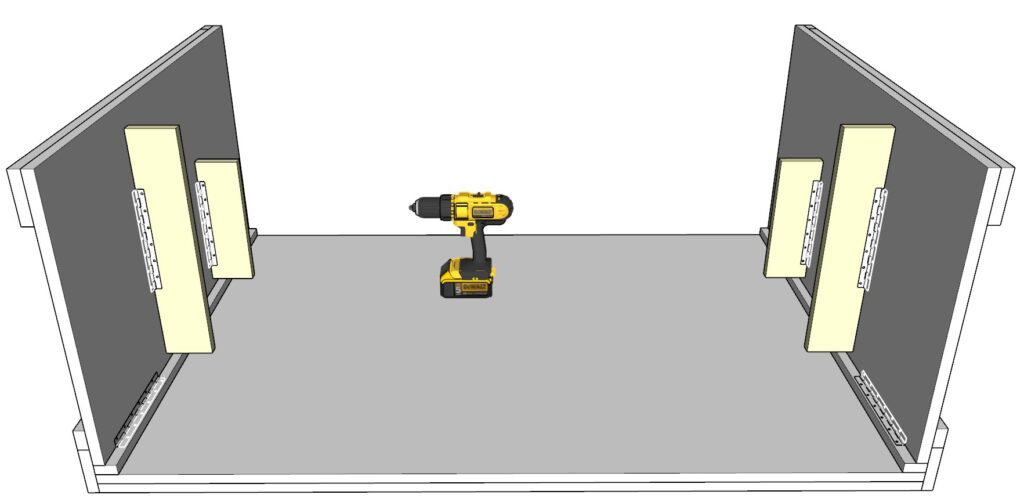
Sub-step 1: Attach the Larger Shelf Supports
Prepare Larger Shelf Supports:
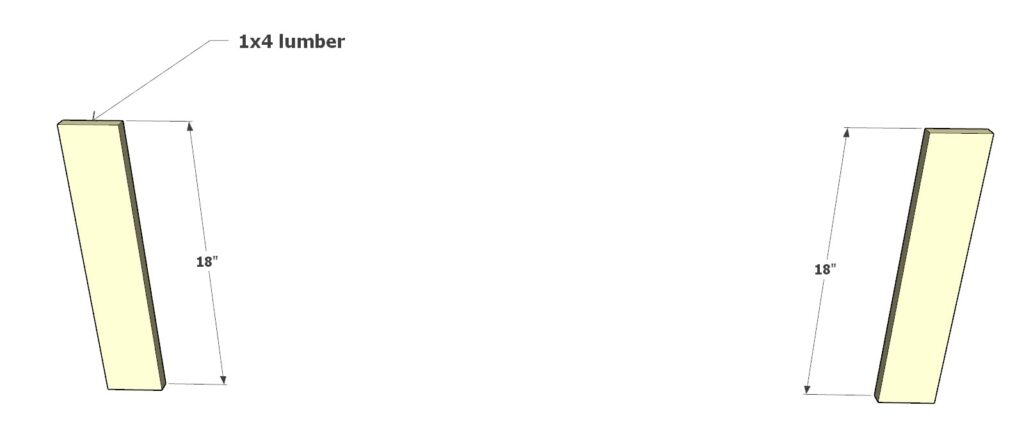
- Take two 18 inch long 1×4 lumber pieces (color-coded in yellow).
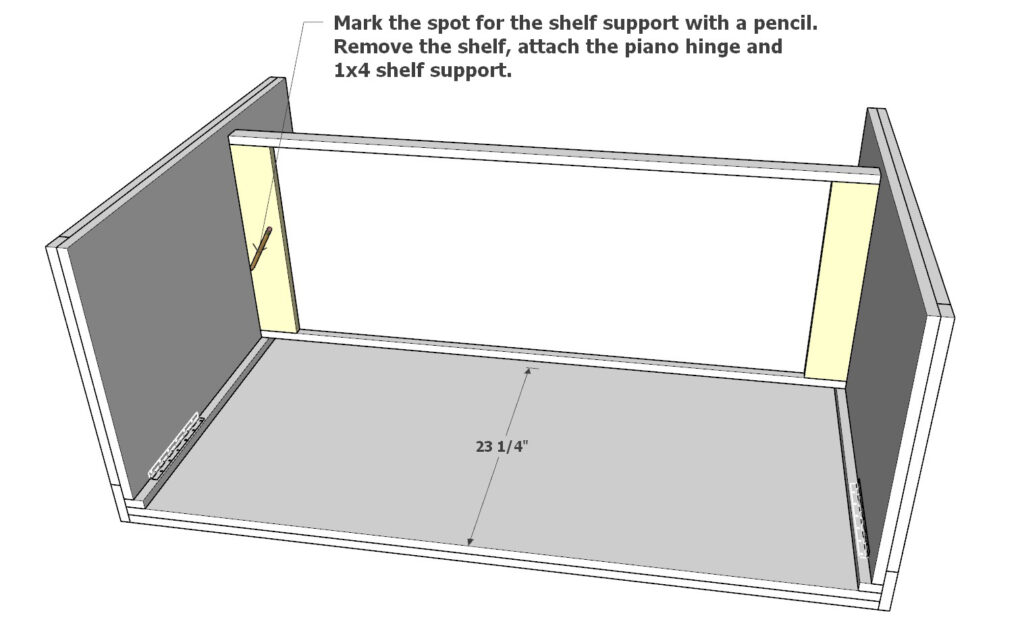
- Inlay these pieces (without attaching) into the larger shelf unit as shown in the diagram.
Position the Larger Shelf:
- Place the larger shelf unit with the inlaid 1×4 supports onto the bar face and sides as shown in the diagram.
- Mark the spot for the shelf support with a pencil. This will be the height you choose for the larger shelf.
Attach the Larger Shelf Supports:
- Remove the shelf unit and attach the 1×4 lumber supports to the marked spots using piano hinges.
- Secure the supports with the piano hinges to ensure stability.

Sub-step 2: Attach the Smaller Shelf Supports
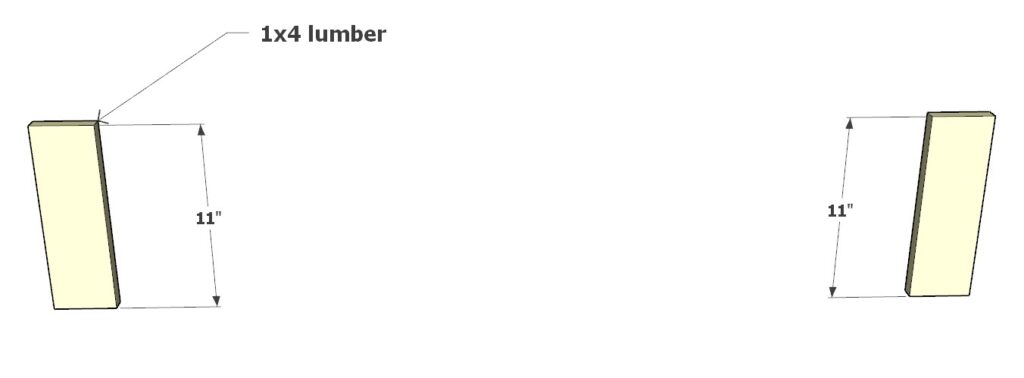
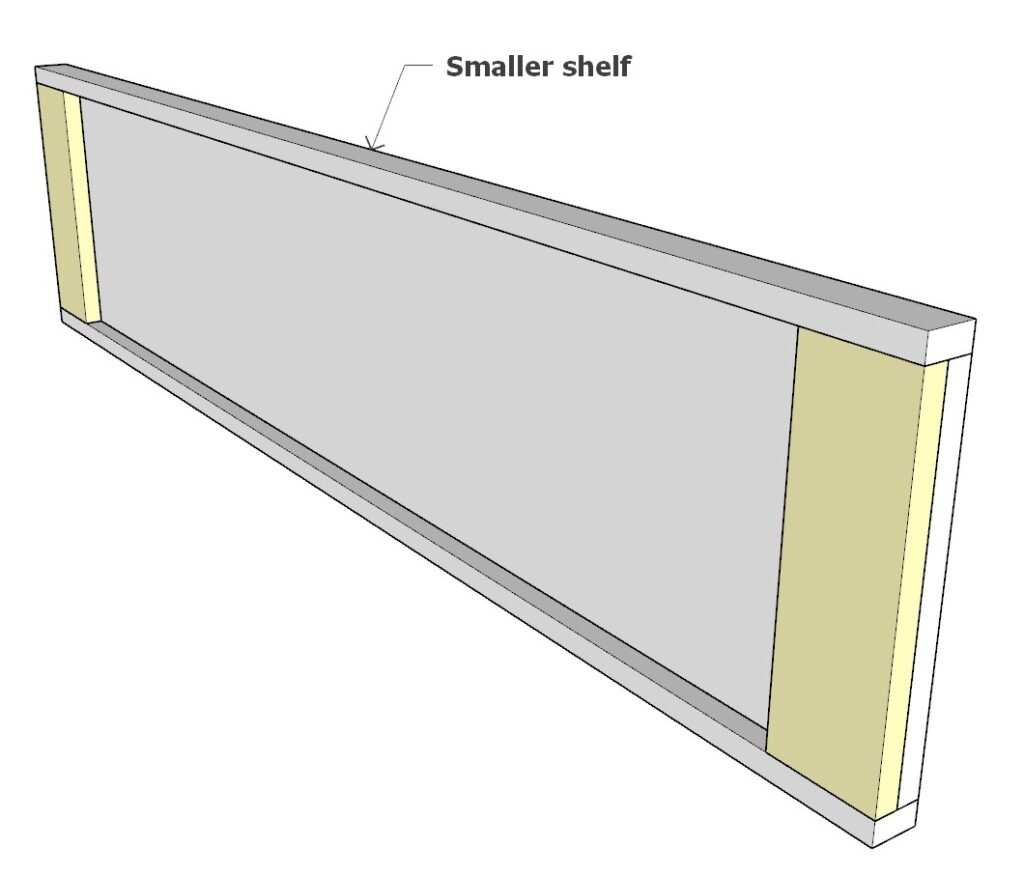
Prepare Smaller Shelf Supports:
- Take two 11 inch long 1×4 lumber pieces (color-coded in yellow).
- Inlay these pieces (without attaching) into the smaller shelf unit as shown in the diagram.
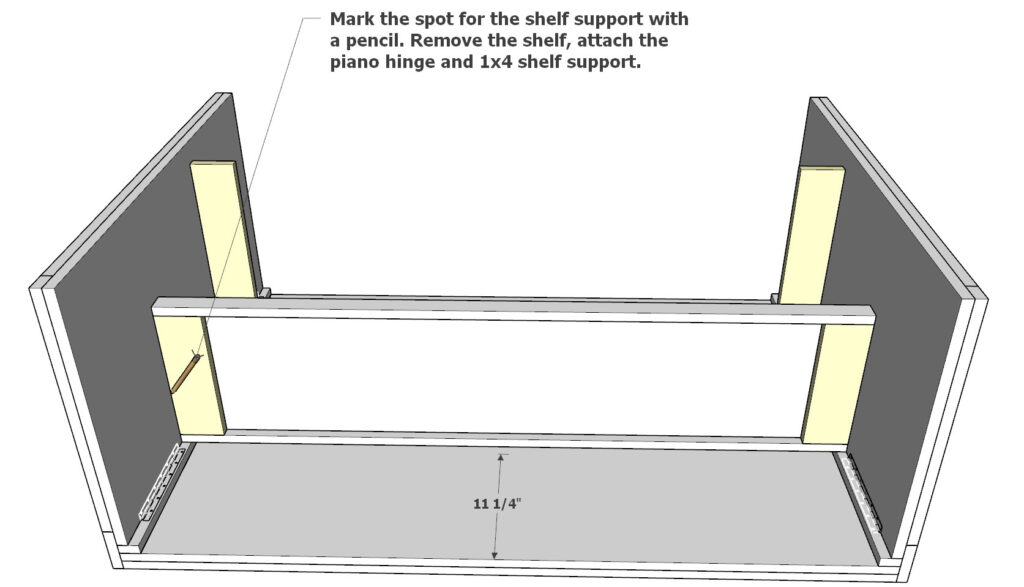
Position the Smaller Shelf:
- Place the smaller shelf unit with the inlaid 1×4 supports onto the bar face and sides as shown in the diagram.
- Mark the spot for the shelf support with a pencil. This will be the height you choose for the smaller shelf.
Attach the Smaller Shelf Supports:
- Remove the shelf unit and attach the 1×4 lumber supports to the marked spots using piano hinges.
- Secure the supports with the piano hinges to ensure stability.
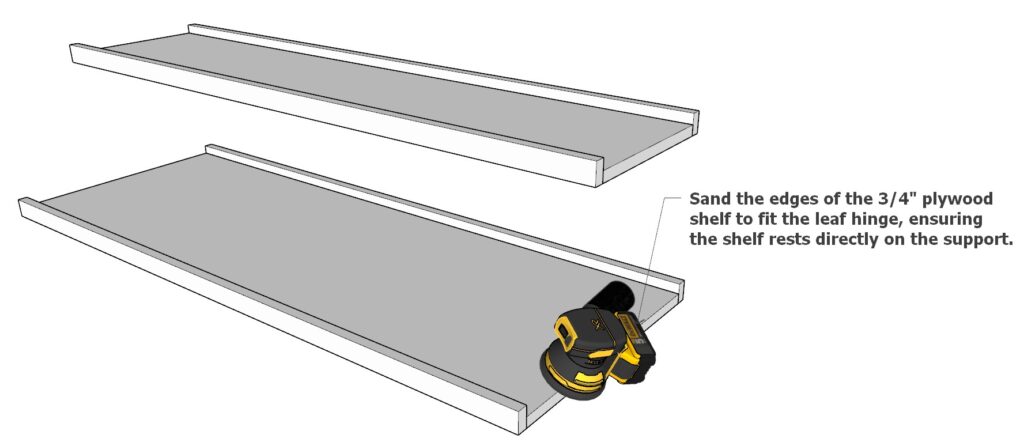
Sub-step 3: Sand the Shelf Edges
- Sand the Shelf Edges:
- Sand the edges of the 3/4 inch thick plywood shelves to fit the leaf hinges.
- Ensure the shelves rest directly on the supports, providing a smooth and stable surface.
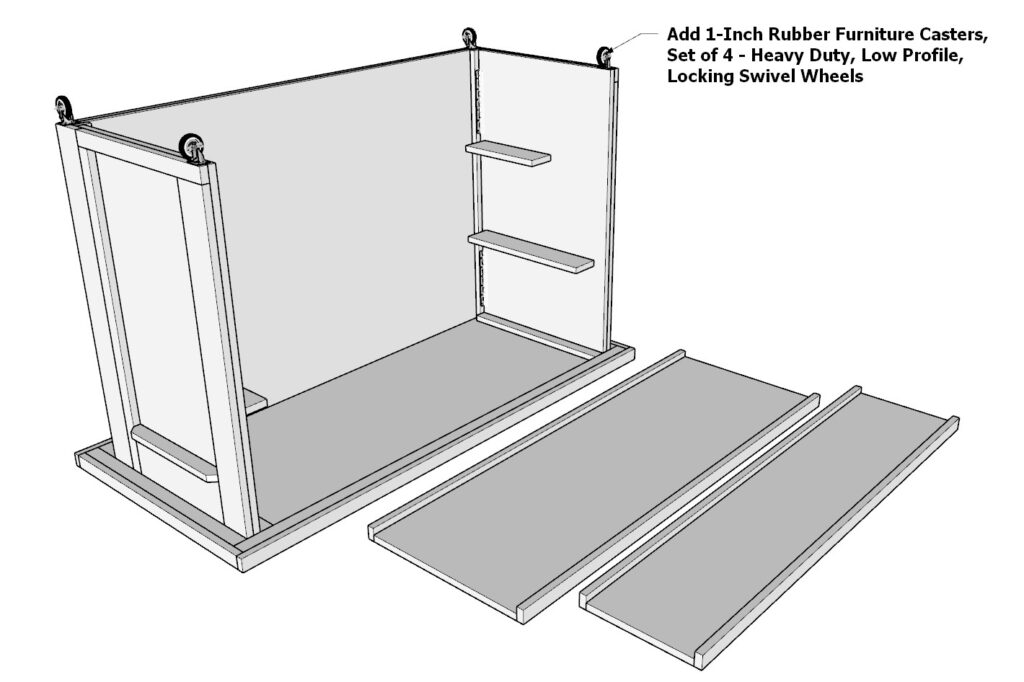
Step 7: Adding Casters
Attaching the Casters
To add mobility to your folding event bar, you can attach a set of 1-inch casters. Here’s how to do it:
Purchase the Casters:
- Obtain a set of 4, 1-inch rubber casters suitable for furniture. These should be heavy-duty, low-profile, and have locking mechanisms.
Prepare the Bar Bottom:
- Ensure the bottom of the bar is clean and free of any debris.
- Mark the positions for the casters at each corner of the bar’s bottom. Make sure the marks are evenly spaced and aligned.
Attach the Casters:
- Position each caster over the marked spots and secure them using screws that come with the caster set.
- Use a drill to drive the screws into the bottom of the bar (predrill holes to ensure that the wood doesn’t split), ensuring the casters are firmly attached.
- Make sure all casters are properly aligned and that the locking mechanisms are functional.
Test the Mobility:
- Once all casters are attached, test the mobility of the event bar by moving it around.
- Lock the casters to ensure the bar stays in place when stationary.
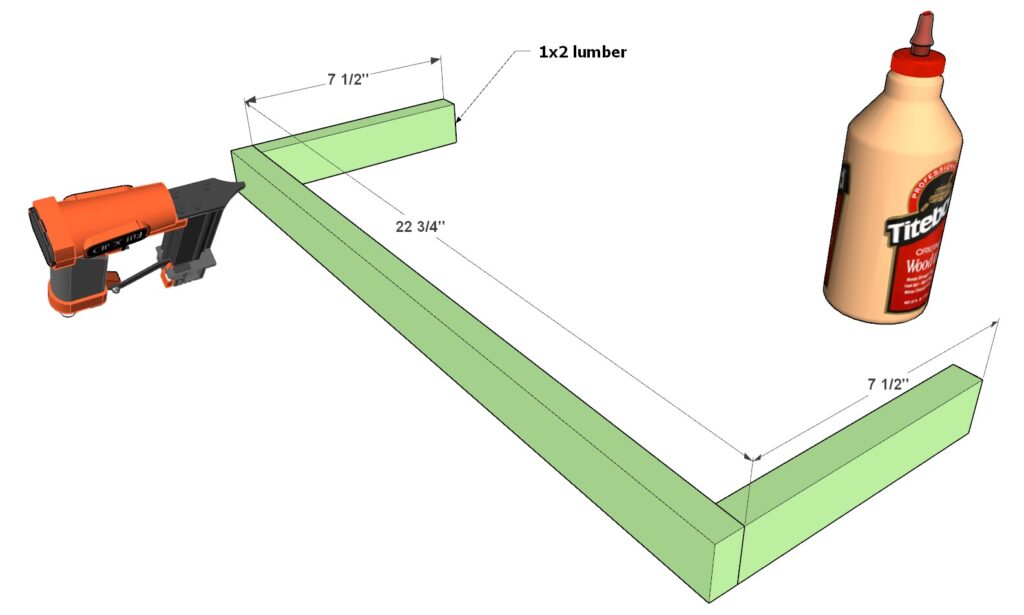
Step 8: Constructing the Bar Wings
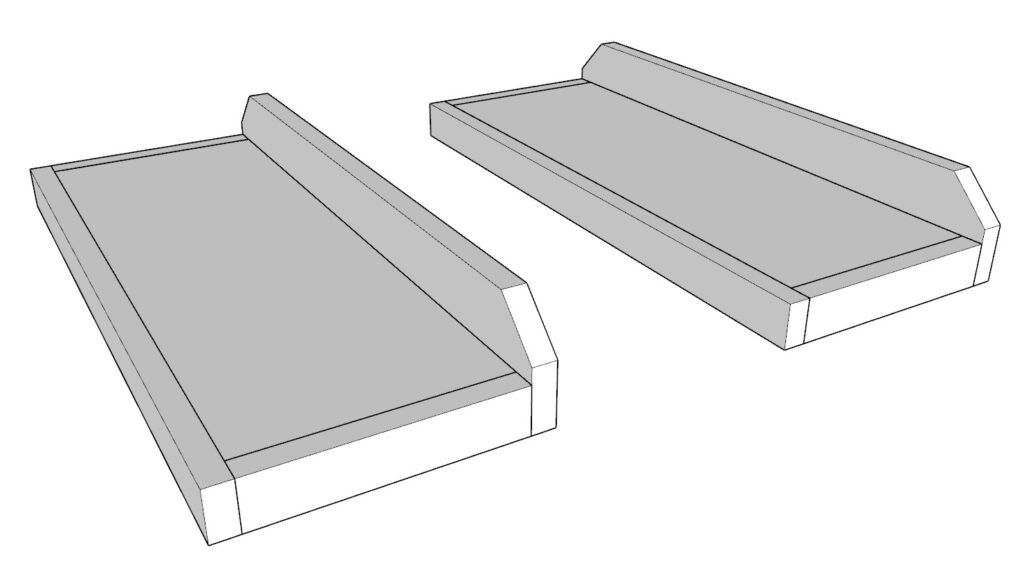
Sub-step 1: Prepare the Frame
- Materials Needed:
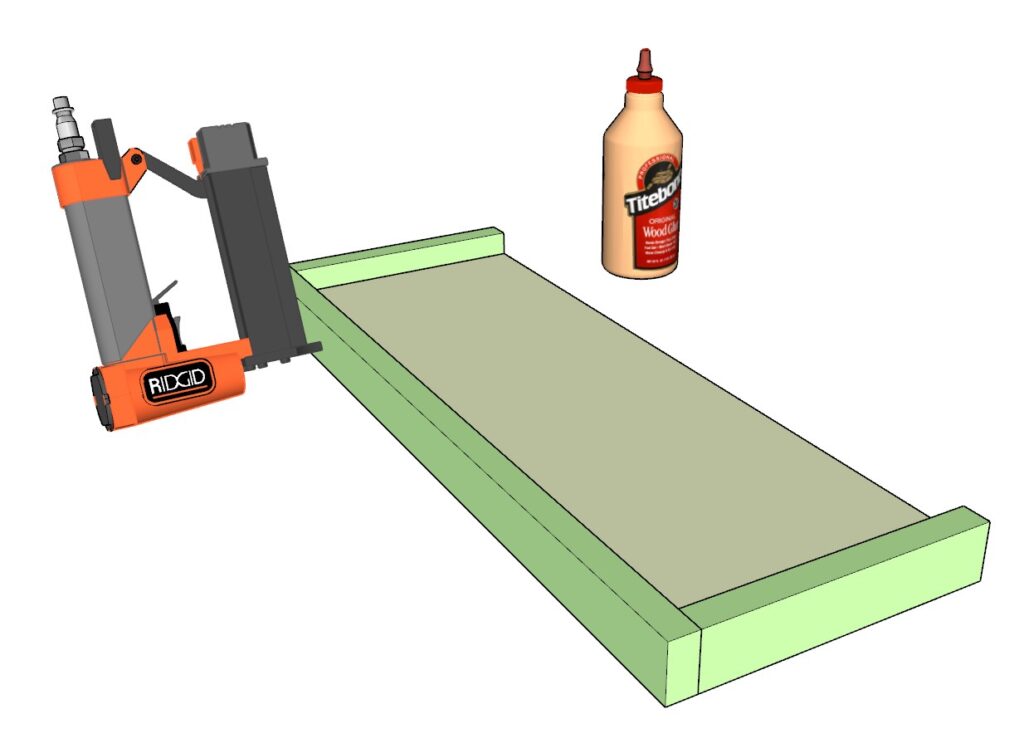
- Two 7-1/2 inch long 1×2 lumber pieces (color-coded in lime green)
- One 22-3/4 inch long 1×2 lumber piece (color-coded in lime green)
- Wood glue
- Pin nails
- Instructions:
- Arrange the two 7-1/2 inch pieces parallel to each other.
- Connect these with the 22-3/4 inch piece at the top to form a U-shaped frame.
- Secure the joints with wood glue and pin nails.
Sub-step 2: Attach the Plywood Base
- Materials Needed:
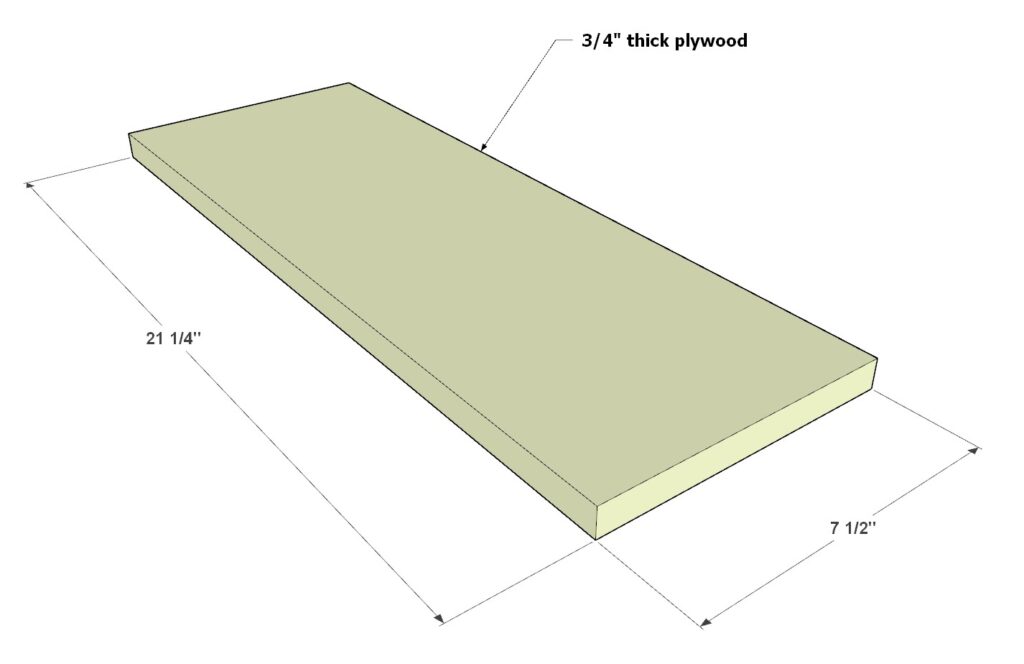
- One 21-1/4 inch x 7-1/2 inch, 3/4 inch thick plywood sheet (color-coded in pale yellow)
- Instructions:
- Position the plywood base inside the U-shaped frame.
- Secure the plywood to the frame using pin nails and wood glue, as shown in the diagram.
Sub-step 3: Add the Finishing Touch
- Materials Needed:
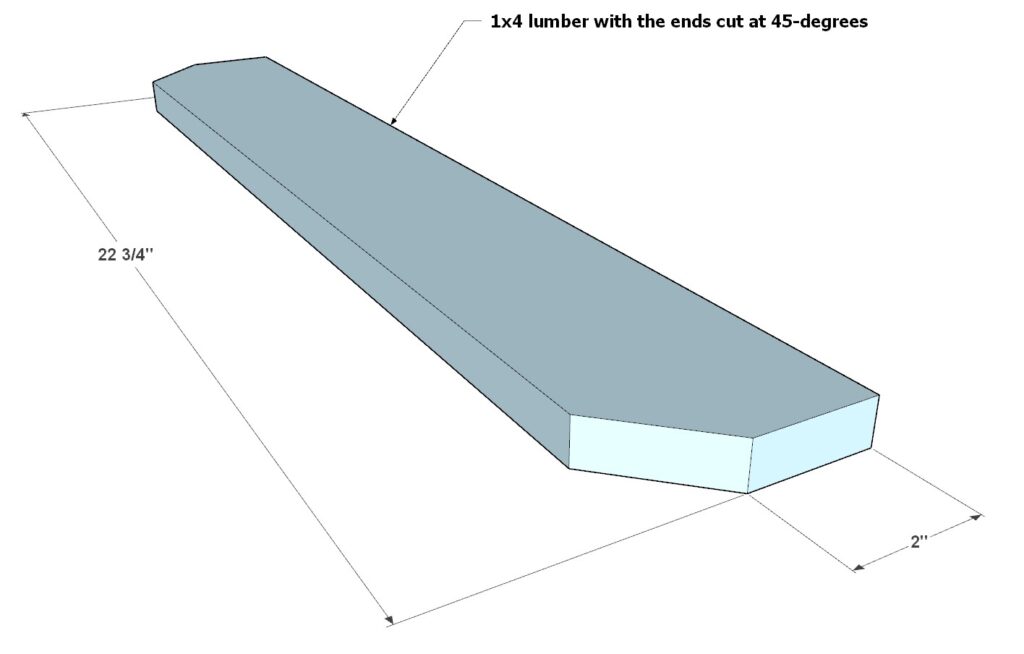
- One 22-3/4 inch long 1×4 lumber piece (color-coded in baby blue)
- Instructions:
- Trim both ends of the 1×4 piece at 45-degrees.
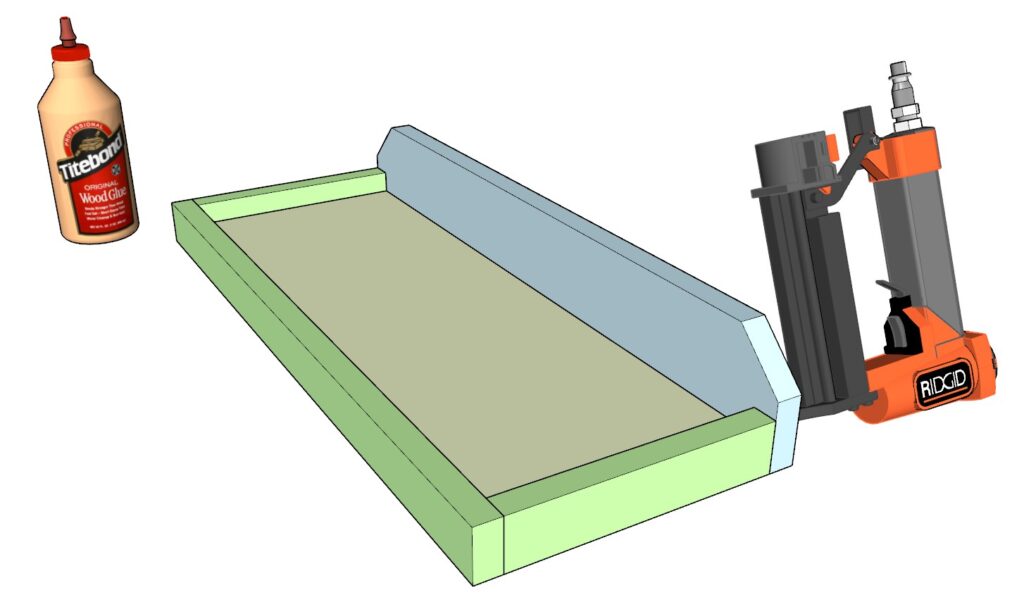
- Secure this trimmed piece to the top of the frame, aligning it with the edges of the U-shape.
- Use wood glue and pin nails to attach, ensuring it is firmly in place.
Sub-step 4: Duplicate for Symmetry
- Instructions:
- Repeat the above steps to create a second identical bar wing.
Step 9: Installing French Cleat Hangers
Sub-step 1: Prepare the Cleat Hangers
- Materials Needed:
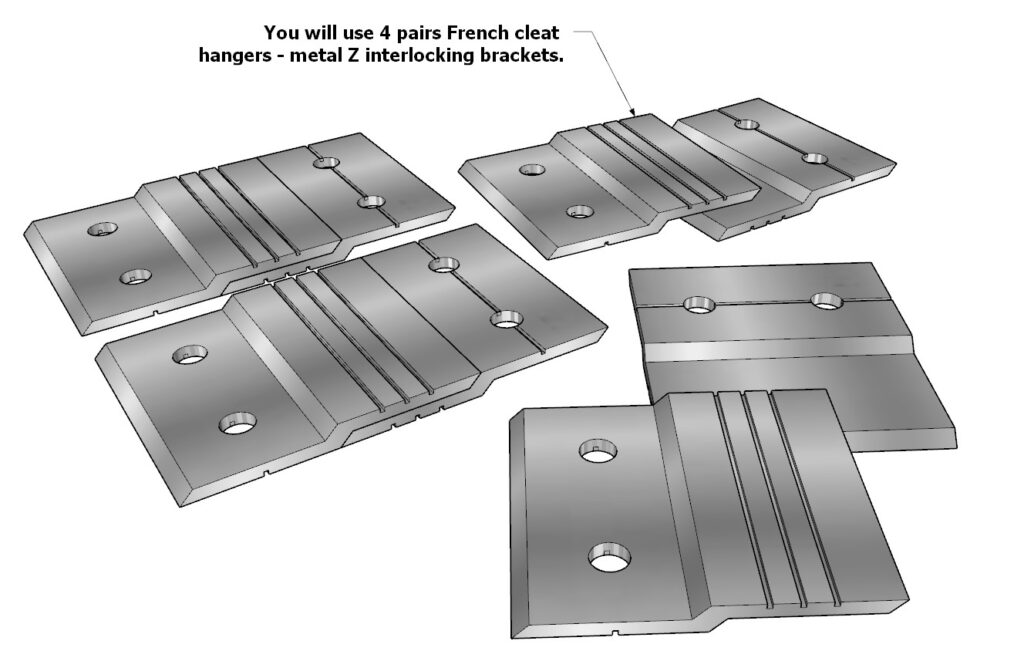
- 4 pairs of French cleat hangers (metal Z interlocking brackets) Available here
- Pencil
- Screws
- Instructions:
- Interlock a pair of brackets to mimic their final installed position.
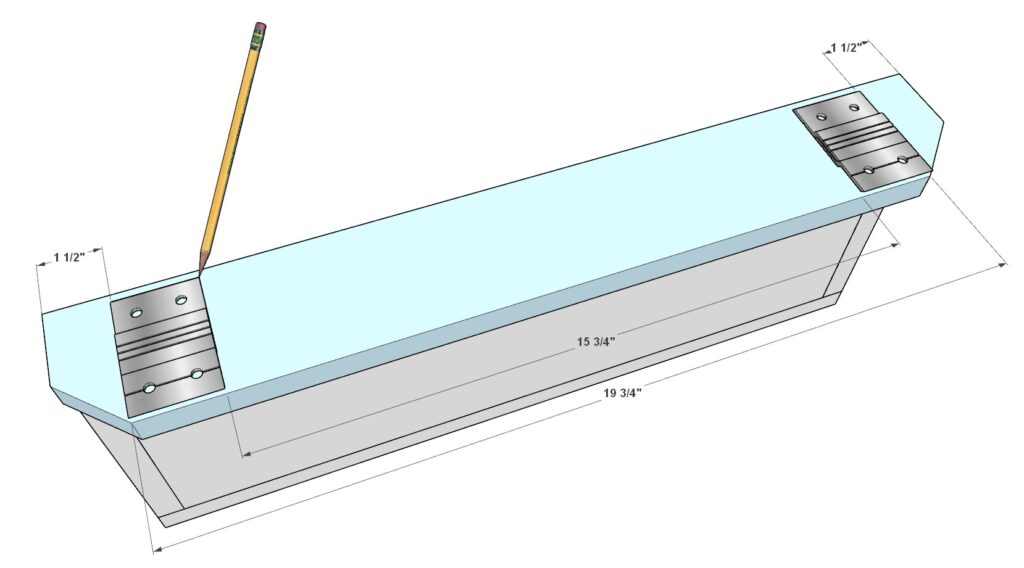
- Hold the interlocked brackets against the blue component of the bar wing as shown in the diagram.
- Use a pencil to mark the outline on the blue component where each bracket will be secured.
Sub-step 2: Secure the Brackets to the Bar Wings
- Instructions:
- Align the brackets within the penciled outlines on the blue component.
- Secure each bracket to the bar wing using screws, ensuring they are tightly fixed.
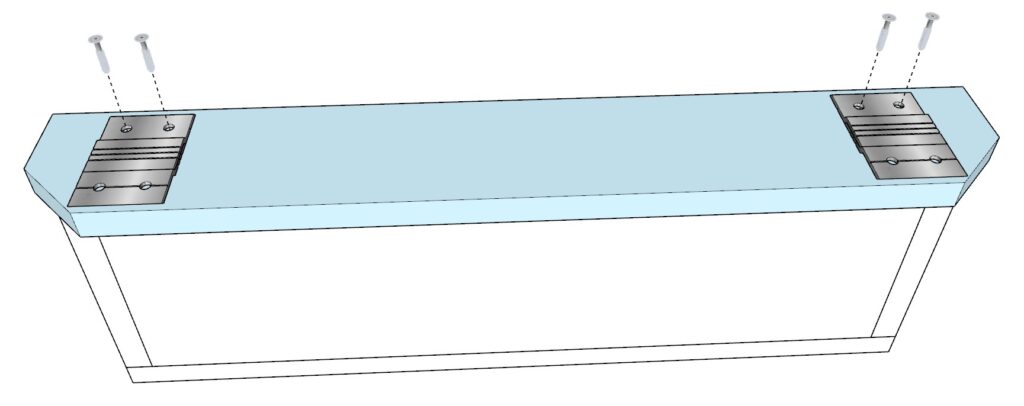

Sub-step 3: Attach Cleat Hangers to the Bar
- Instructions:
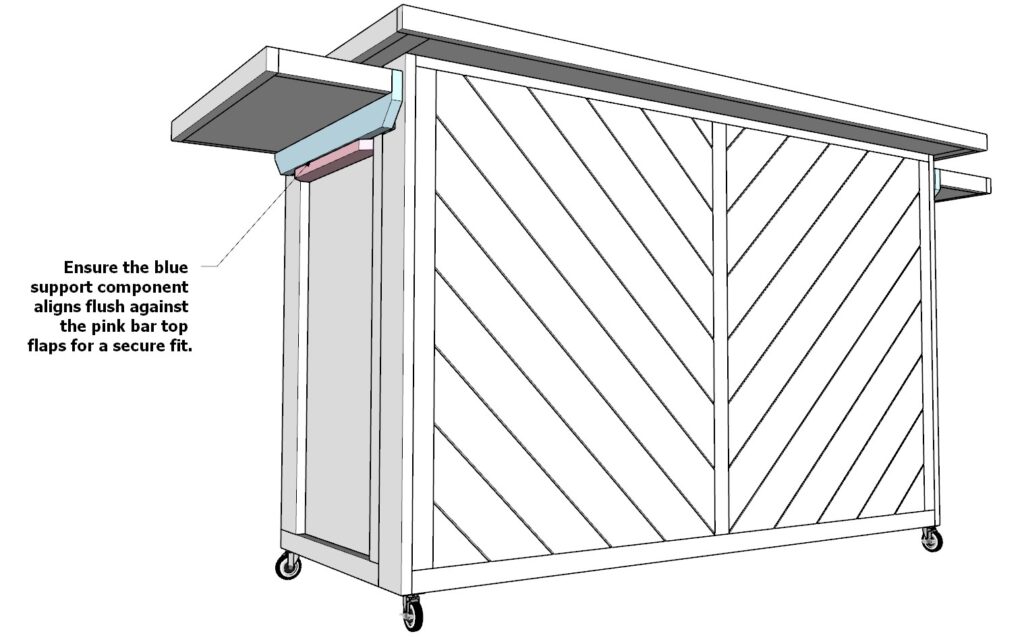
- Position the second part of each cleat hanger on the bar.
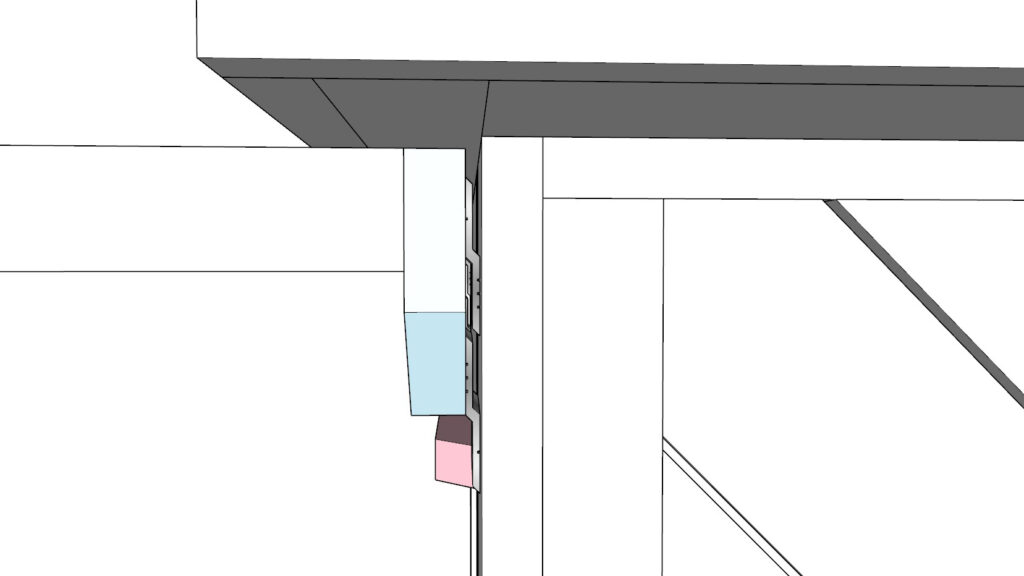
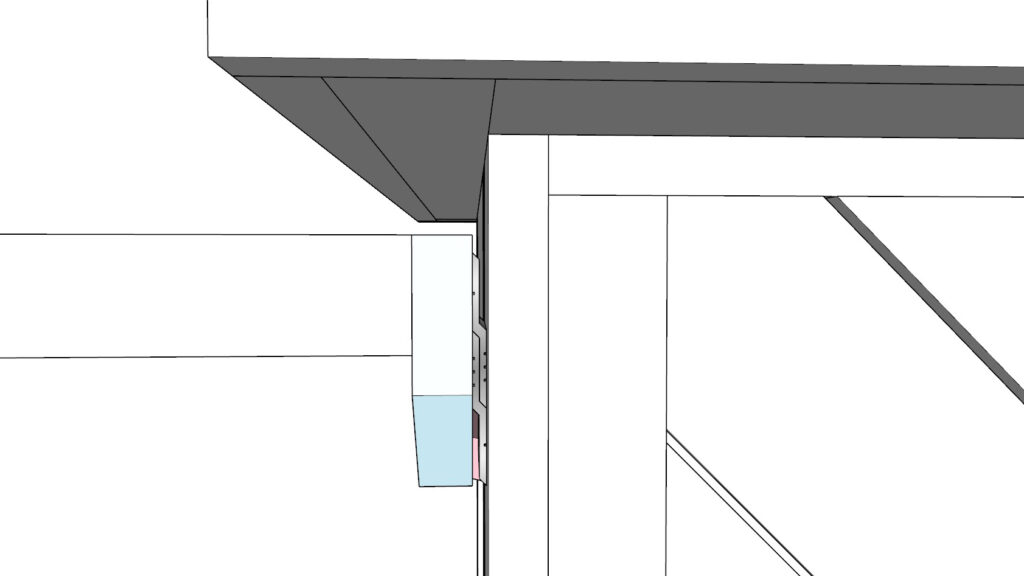
- Follow the placement indications in the diagram to ensure that when the bar wing is attached, the blue component lays flush against the pink component.
- Secure the hangers to the bar, making sure the bottom edges of the brackets align with the top edge of the pink component.
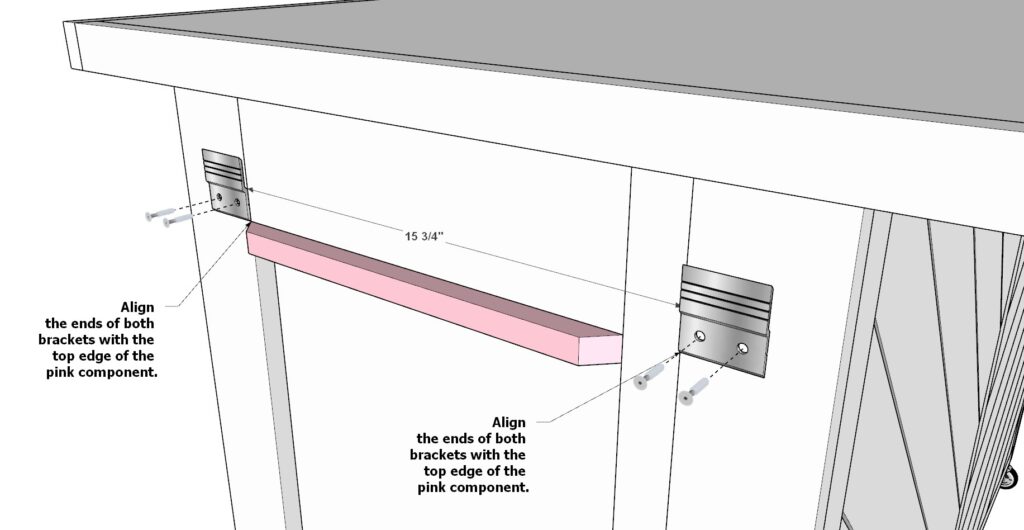
Sub-step 4: Test the Fit and Functionality
- Instructions:
- After all cleats are attached, test the bar wings by attaching and detaching them from the bar.
- Ensure they lock securely and can be removed smoothly.
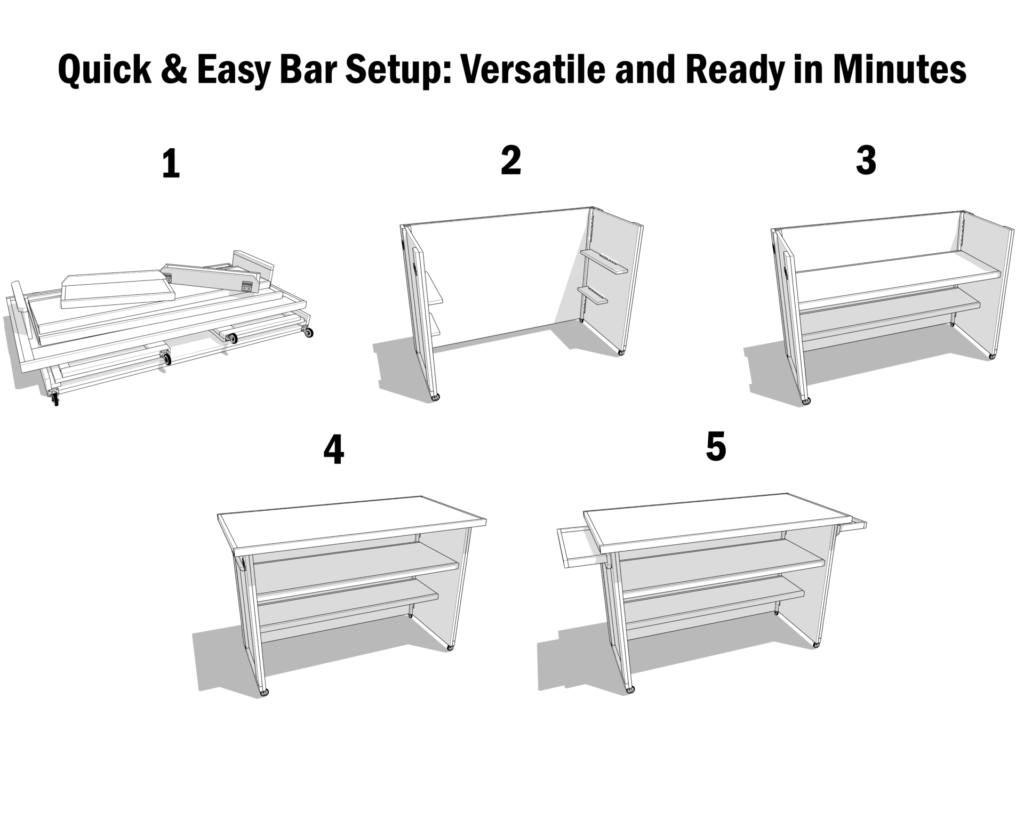
Step 10: Setting Up and Collapsing the Folding Event Bar
Sub-step 1: Prepare the Components
- Instructions:
- Transport all components of the folding bar to the assembly site.
Sub-step 2: Open the Main Bar Component
- Instructions:
- Open up the main bar component which includes the bar sides attached to the front with piano hinges.
- Swing out the bar sides to 90 degrees to form a U shape.
- Lower all of the shelf support flaps.
Sub-step 3: Install the Shelves
- Instructions:
- Place the top storage shelf and the bottom storage shelf onto the corresponding shelf flaps.
Sub-step 4: Add the Bar Top
- Instructions:
- Position the bar top directly on top of the main bar component (the assembled front and sides).
Sub-step 5: Attach the Bar Wings
- Instructions:
- Install the bar wings to interlock the bar top and the bar sides together, ensuring the structure is heavy-duty and secure for use.
Safety Note:
- Caution:
- Avoid placing too much weight on the bar wings. They are designed for lighter items such as utensils (spoons, forks, knives), cups, serving utensils (spatulas, ladles), and napkins, not for heavy loads.
- Utilize the bar wings to extend the bar surface and keep the main bar area clear and organized.
Step 11: Finishing and Renting Out the Event Bar
Sub-step 1: Sanding the Bar
- Materials Needed:
- Fine-grit sandpaper (e.g., 220-grit)
- Sanding block or electric sander
- Instructions:
- Gently sand the entire surface of the bar, including all wooden components.
- Use light, even pressure to avoid removing too much material, especially on plywood which can be damaged if layers are stripped.
- Focus on smoothing out rough edges and any splinters.
- Ensure all surfaces are smooth to the touch, preparing them for either staining or painting.
Sub-step 2: Staining the Bar
- Materials Needed:
- Wood conditioner
- Wood stain of your choice
- Clear coat polyurethane
- Brushes or rags for application
- Instructions:
- Apply Wood Conditioner:
- Cover all wooden surfaces with wood conditioner.
- This step ensures an even absorption of stain, preventing blotches and enhancing wood grain.
- Stain Application:
- After the conditioner has dried, apply the wood stain using a brush or rag.
- Work in sections, maintaining a wet edge to avoid lap marks.
- Seal with Polyurethane:
- Once the stain has fully dried, apply a clear coat of polyurethane to protect the surface.
- This layer provides durability and resistance to water and other elements.
- Apply Wood Conditioner:
Sub-step 3: Painting the Bar
- Materials Needed:
- Primer (if necessary)
- High-quality acrylic or enamel paint
- Paintbrushes or rollers
- Instructions:
- If the wood is untreated, start with a coat of primer to ensure better paint adhesion.
- Apply at least two coats of paint, letting each coat dry completely before applying the next.
- Use high-quality paint for durability, especially if the bar will be used outdoors or subjected to frequent handling.
Sub-step 4: Renting Out the Bar
- Suggestions:
- Price the rental at $150-$200 per event, depending on your location and the type of events.
- Market the bar as a versatile and elegant addition to weddings, parties, and corporate events.
- Maintain the bar in top condition by inspecting and touching up the finish as necessary between rentals.
- Use contracts specifying rental terms, liability, and damage policies to protect your investment.

