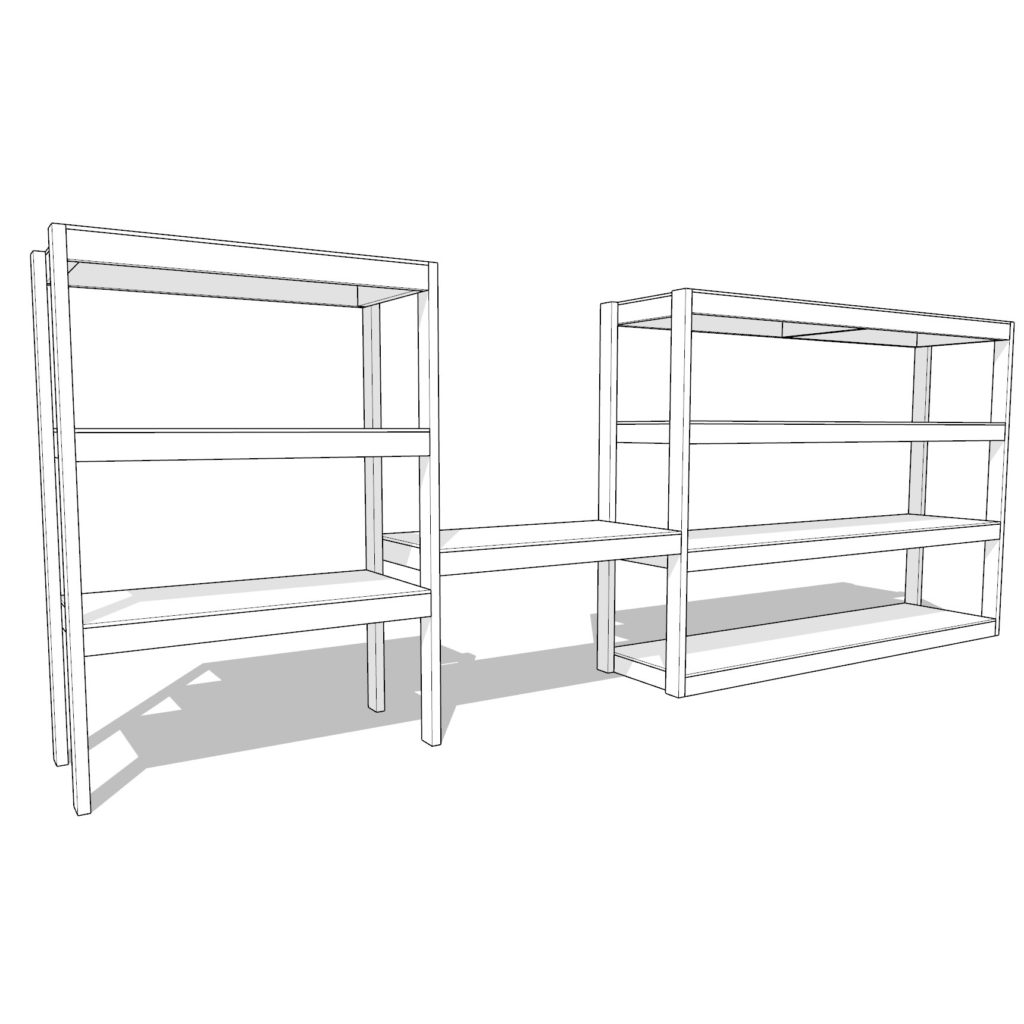
Introduction: Embrace a Clutter-Free Garage with Vertical Storage Solutions
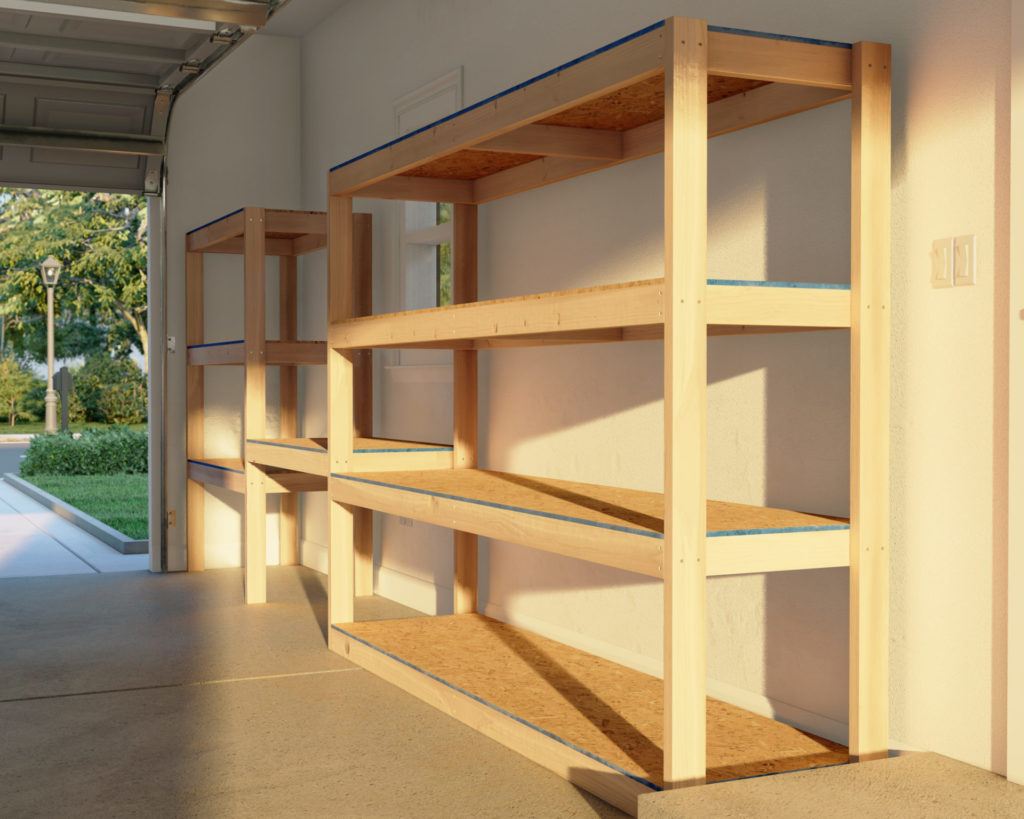
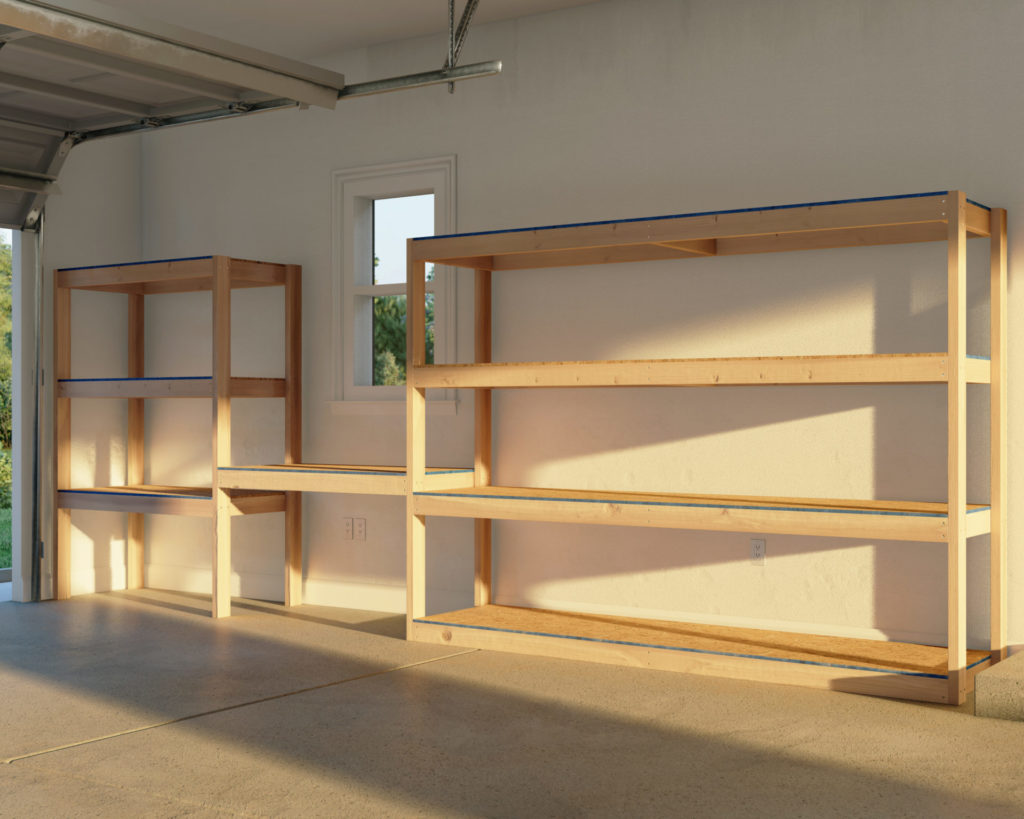
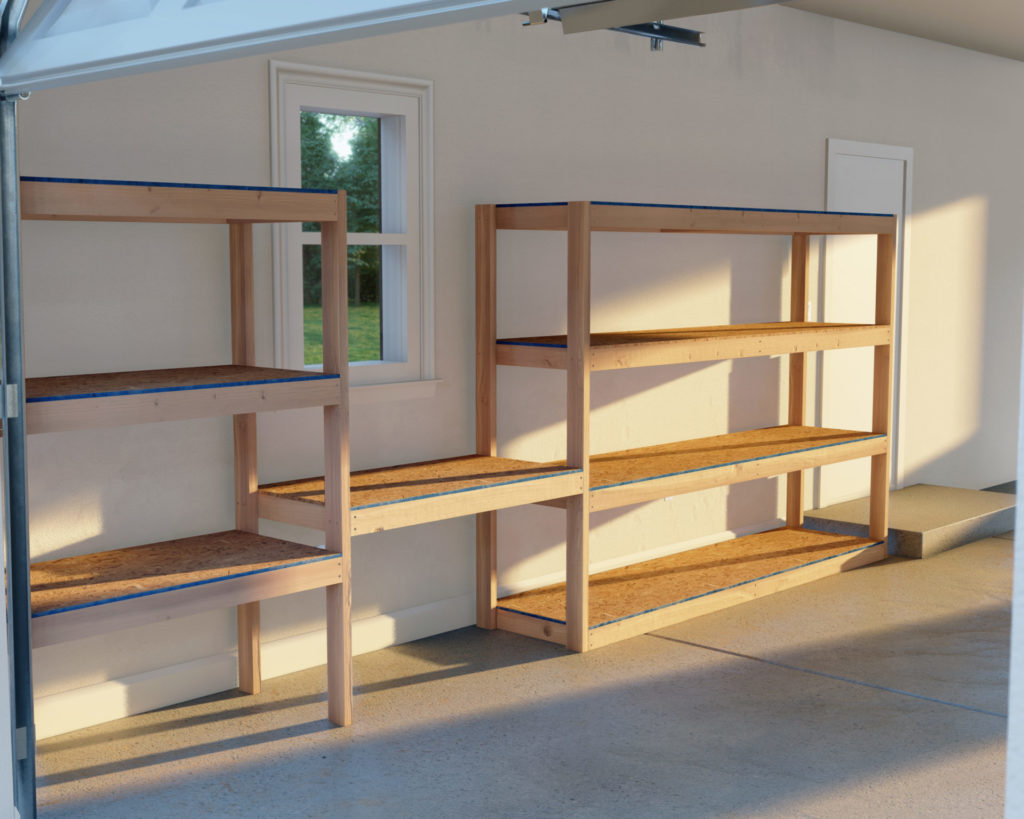
Imagine stepping into your garage and seeing everything in its place—tools neatly hung, work materials organized, and ample space to move around. Our DIY garage shelf plans offer just that, plus a bonus work desk to take advantage of vertical space. Say goodbye to clutter and hello to a streamlined garage where every item has its home.
Specifications
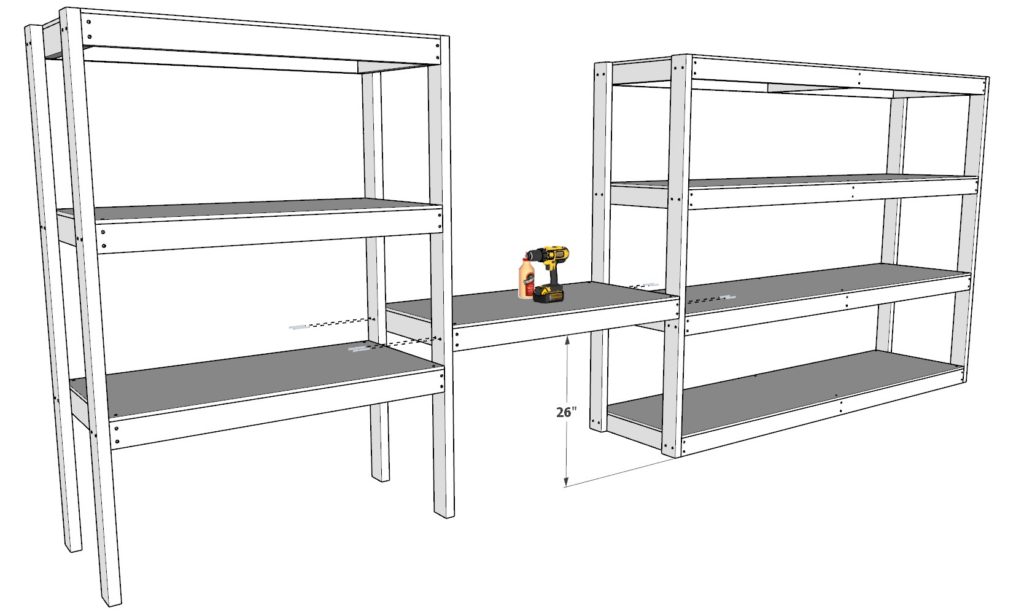
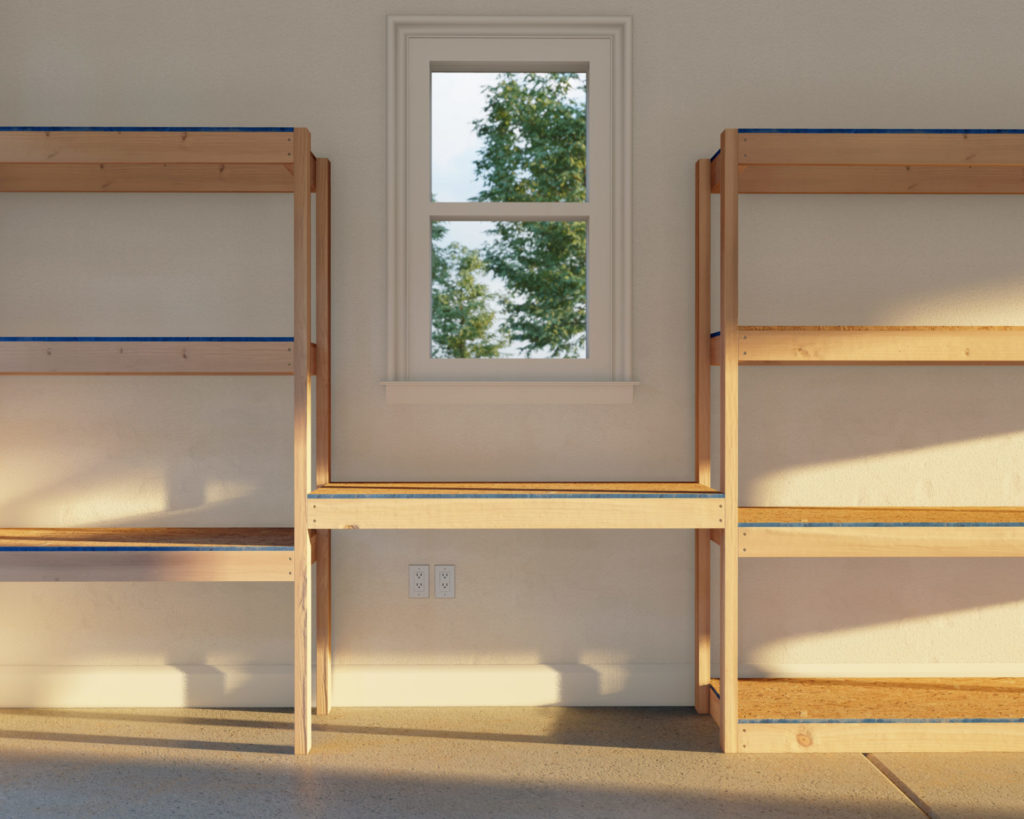
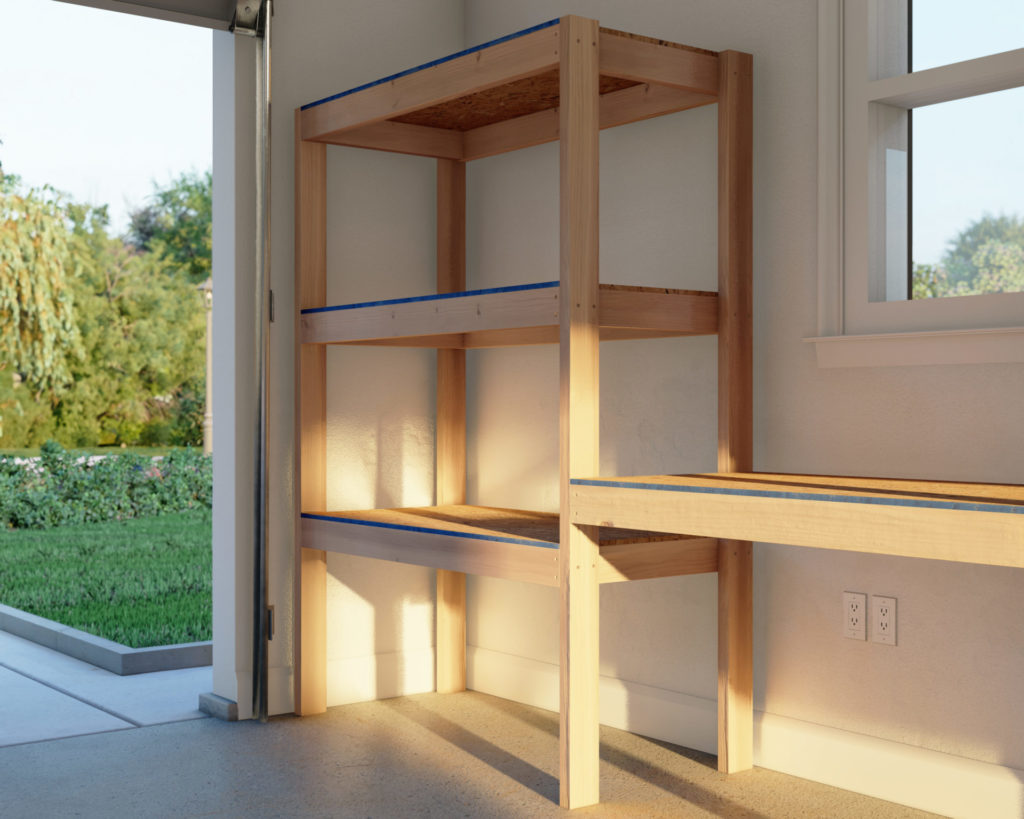
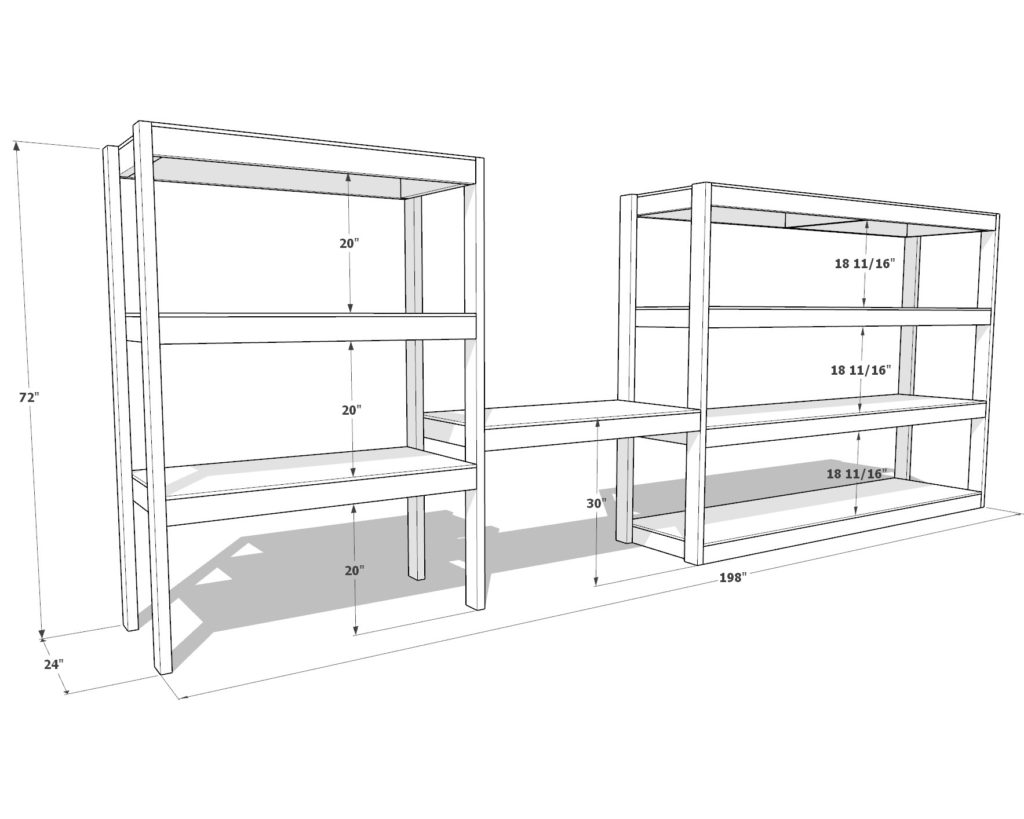
Our robust garage shelves span 198 inches in length and 24 inches in width, crafted to utilize your space efficiently. Built from three independently constructed sections that seamlessly screw together, this design includes 96-inch main storage shelves, a versatile work desk, and extra storage options. The shelving unit stands at an impressive 72 inches, with additional top shelving for oversized items, ensuring that you can store irregular-sized objects with ease.
Beginner-Friendly Project: No Complex Skills Required
Dive into this project with confidence, even as a novice. Our plans avoid complicated joints and intricate cuts. With straightforward cuts—many of which can be done for you at stores like Home Depot—you’ll have pre-sized pieces ready to assemble. All you need is plywood, 2x4s, and the will to transform your space. We guide you through every 90-degree cut and nail, making it a breeze to create a professional-looking shelf.
Customization Options: Tailor It to Your Needs
Not only is this project easy for beginners, but it’s also fully customizable. Adjust the desk height for standing or seated work, modify shelf orientations, and space them according to your storage needs. Whether you’re a weekend warrior or a pro DIYer, our plans provide the flexibility to create a space that works just for you.
Your Project Awaits
Ready to transform your garage with a DIY shelf that promises both organization and efficiency? Our detailed PDF plans are just a click away. Get instant access to a cleaner garage and a more productive workspace today. Purchase your plans, pick up your materials, and enjoy the satisfaction of building something great with your own hands.
Time
2 hours (varies with experience)
Cost
$150 (Costs may vary based on location and supplier.)
Skill level required
Beginner
DIY Garage Shelf PDF Plan
What is included in the PDF download?
- Easy to read step by step instructions
- Material list
- Tools needed
- Helpful links to materials and tools needed
Tools Needed for This Project:
- Saw: For precise cuts, an miter saw is recommended. However, any reliable saw that can handle 2x4s and plywood will work.
- Drill: Needed for making pilot holes; a countersink drill bit is also necessary to ensure screws sit flush with the wood.
- Driver and Driver Bit: A sturdy driver to secure screws tightly and efficiently.
- Screws: You’ll need less than a pound of 2.5-inch screws for attaching the legs, and less than a pound of 3.5-inch screws for assembling the frame.
- Sander: For smoothing out edges and surfaces. Sanding disks are also needed, with a grit appropriate for the wood you’re working with.
- Table Saw: This is for cutting plywood. If you don’t have one, take advantage of the free cuts offered at stores like Home Depot.
- Wood Glue: Though optional, it’s recommended for reinforcing the structure, making it more durable and sturdy.
- Right Angle Bracket: For securing the shelf to the garage wall studs.
Affiliate Link Notice: Just a heads up—our article includes affiliate links to products I personally use and trust. If you buy through these links, I may earn a commission at no additional cost to you. Your support helps me continue to bring you valuable content. Thank you!
Lumber Shopping & Cut List
Lumber shopping list:
(23)2in x 4in x 8ft
(3)48in x 96in (1/2″ thick) plywood sheet
2×4 lumber cut list:
(8)2in x 4in x 96in
(20)2in x 4in x 21in
(8)2in x 4in x 72in
(8)2in x 4in x 48in
Plywood cut list:
(4)24in x 96in
(4)24in x 48in
Step 1: Constructing the Main Shelving Unit
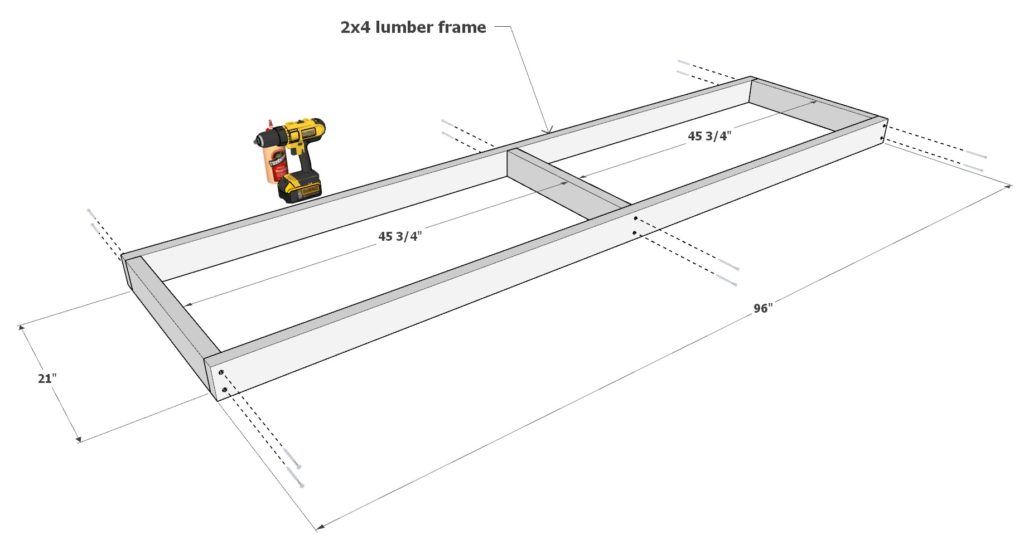
1.1 Layout the Base Structure
- Materials Needed: (2) 96-inch 2x4s, (3) 21-inch 2x4s
- Instructions:
- Lay out the two 96-inch 2x4s parallel to each other on a flat surface.
- Position the three 21-inch 2x4s perpendicularly between the longer 2x4s, spaced equally apart.
1.2 Joining the Base
- Materials Needed: 3.5-inch screws, wood glue
- Instructions:
- Secure each 21-inch 2×4 to the 96-inch 2x4s using wood glue and 3.5-inch screws. This will form the frame of your shelf.
- Ensure all joints are tight and level for a strong base.
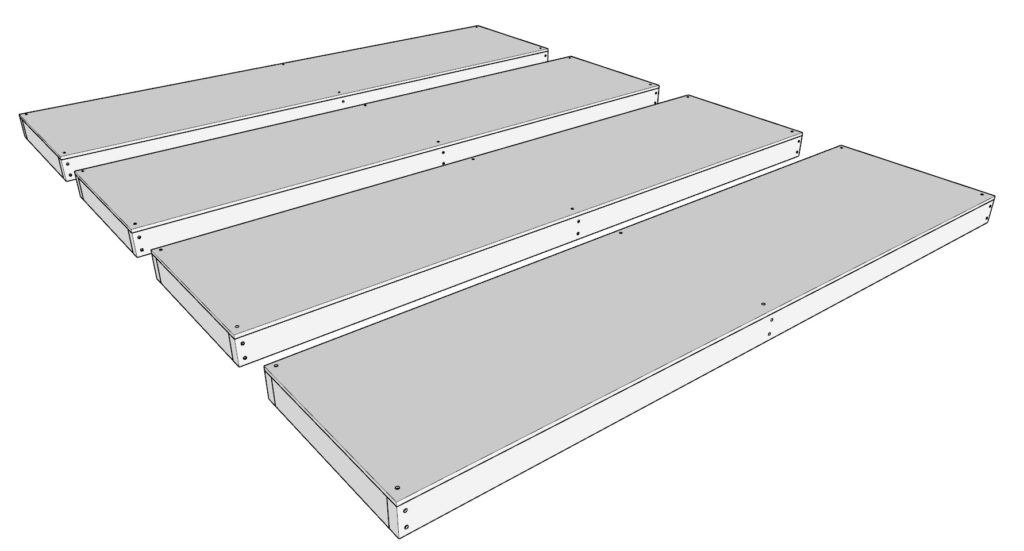
1.3 Attaching the Shelf Surface
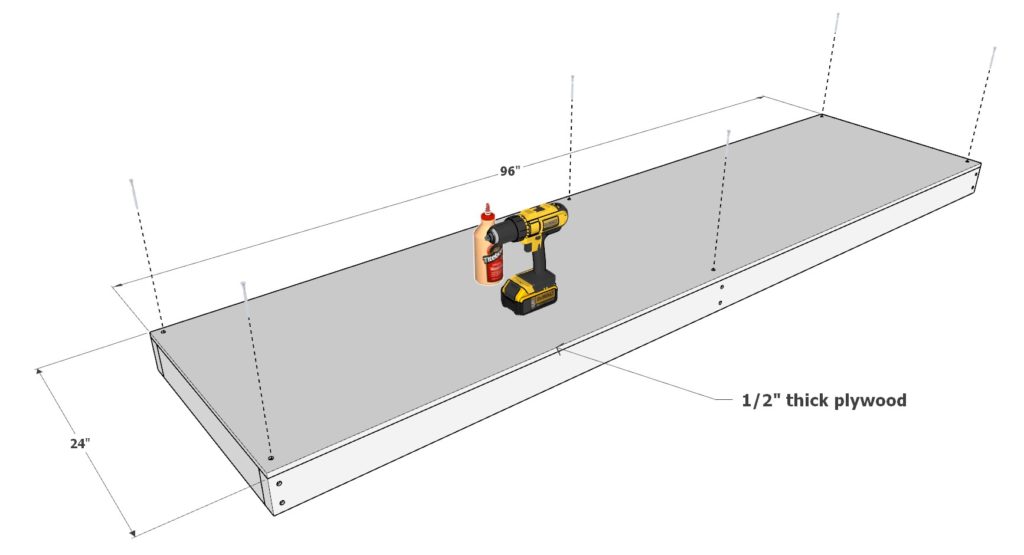
- Materials Needed: (1) 96-inch x 24-inch plywood sheet, wood glue, 2.5-inch screws
- Instructions:
- Place the plywood sheet on top of the assembled frame to create the shelf surface.
- Apply wood glue along the edges of the 2x4s, then secure the plywood with 2.5-inch screws, ensuring the screws are evenly spaced.
1.4 Assemble Additional Shelves
- Instructions:
- Repeat Steps 1.1 to 1.3 three more times to create a total of four identical shelves.
- Set the completed shelves aside for the next step.
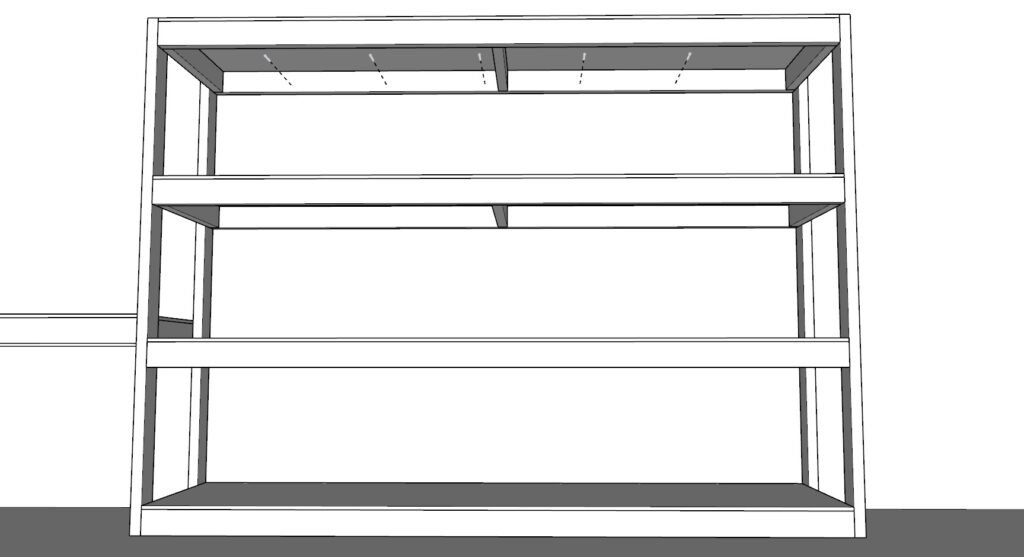
1.5 Setting Up the Frame
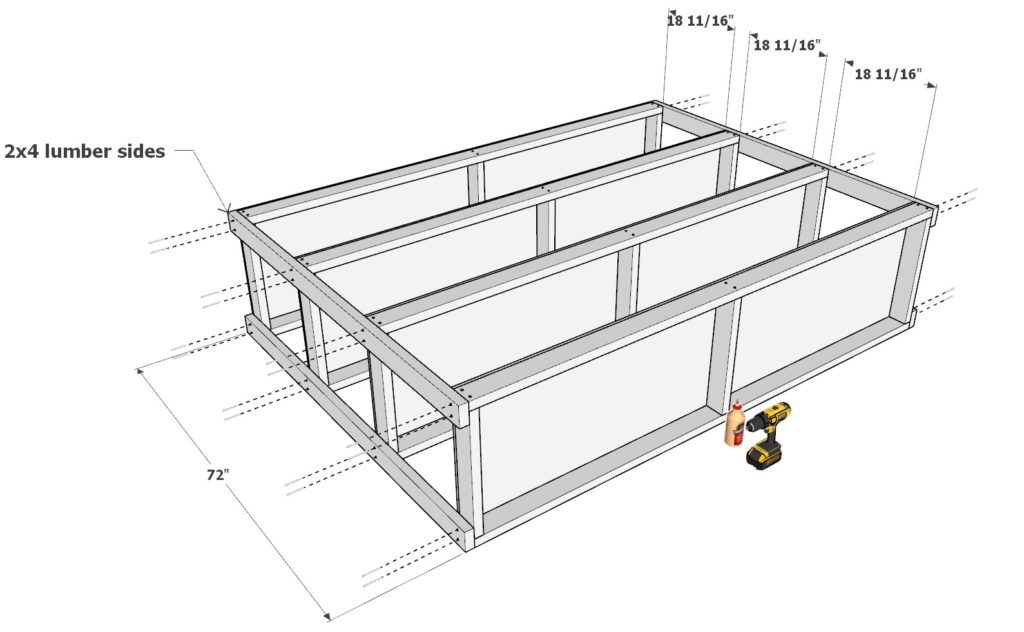
- Materials Needed: (4) 72-inch 2x4s, 2.5-inch screws
- Instructions:
- Position the 72-inch 2x4s vertically at each corner of the shelves to act as the legs and framework.
- Secure each leg to the shelf units using 2.5-inch screws. Make sure the screws don’t protrude through the wood. Check Image below for proper alignment and assembly.
Step 2: Building the Secondary Shelving Unit
2.1 Arrange the Frame
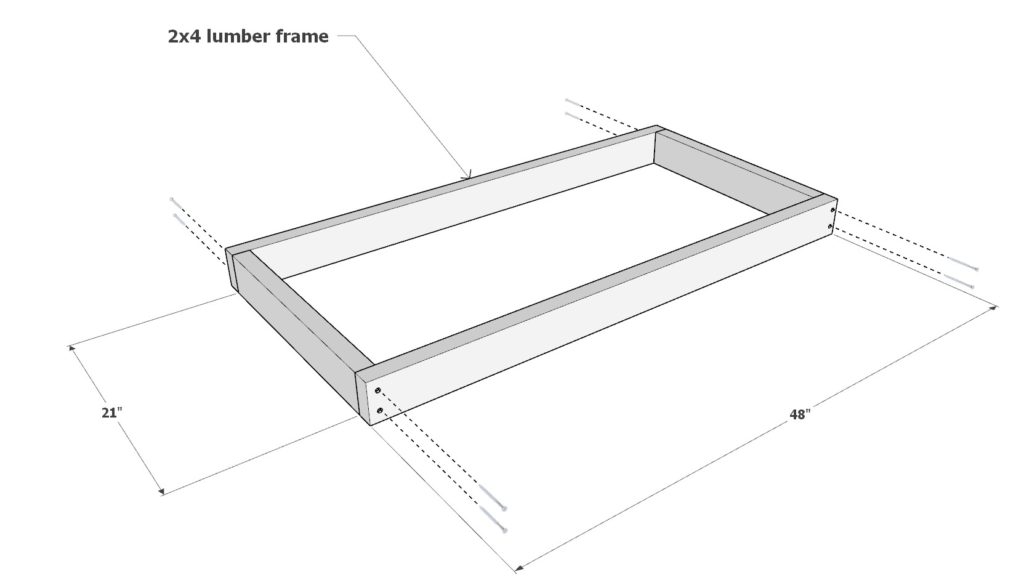
- Materials Needed: (2) 48-inch 2x4s, (2) 21-inch 2x4s
- Instructions:
- Lay out the two 48-inch 2x4s parallel to each other to form the length of the shelf.
- Position the two 21-inch 2x4s perpendicularly between the longer 2x4s, creating a rectangle. Refer to the first diagram of this step for proper layout.
2.2 Secure the Frame
- Materials Needed: 3.5-inch screws, wood glue
- Instructions:
- Fasten the 2x4s together at each corner using 3.5-inch screws.
- Apply wood glue at each joint to reinforce the frame, ensuring it’s stable and strong.
2.3 Attach the Shelf Top
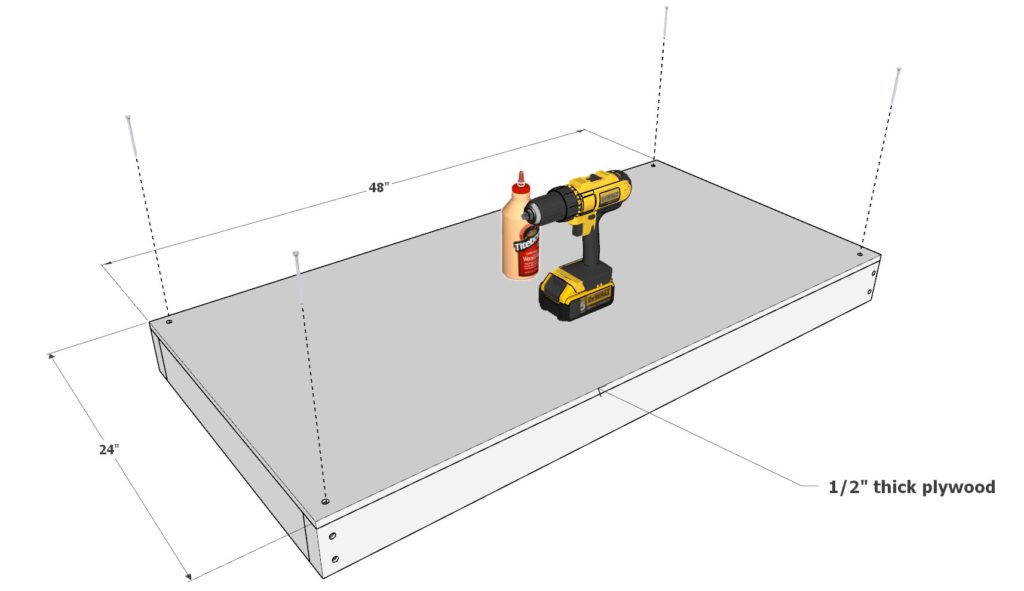
- Materials Needed: (1) 48-inch x 24-inch plywood sheet, wood glue, 2.5-inch screws
- Instructions:
- Place the plywood sheet on top of the frame, ensuring it is centered and flush with the edges.
- Secure it with wood glue along the edges and fasten with 2.5-inch screws. Make sure the top is level and securely attached.
2.4 Replicate for Additional Shelves
- Instructions:
- Repeat Steps 2.1 to 2.3 three more times to create a total of four identical shelving units.
- Set aside the completed shelves for the final assembly.
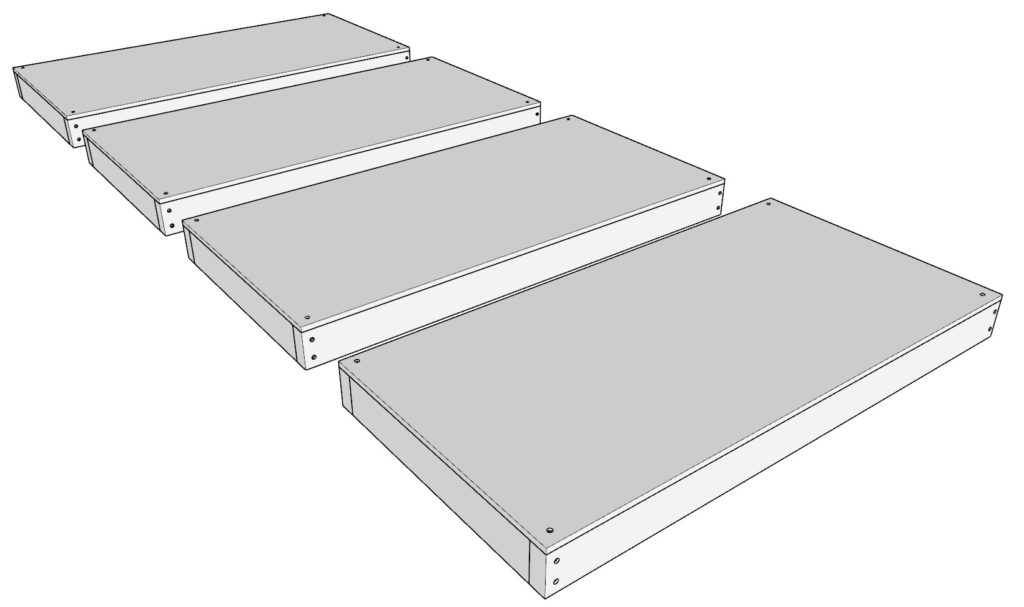
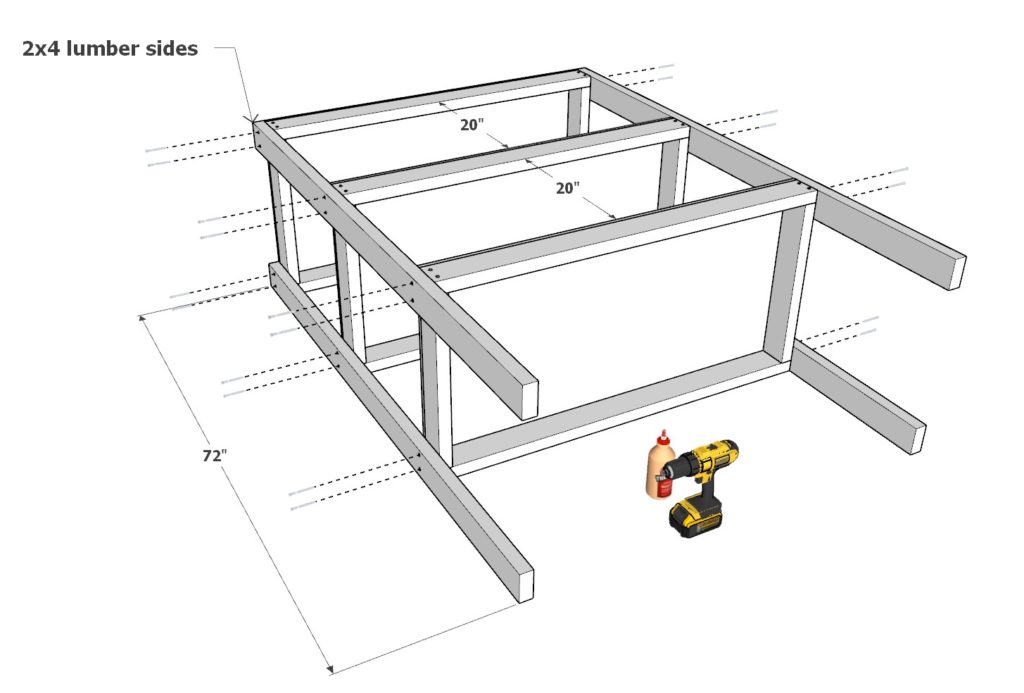
2.5 Install the Legs
- Materials Needed: (4) 72-inch 2x4s, 2.5-inch screws
- Instructions:
- Position the 72-inch 2x4s vertically at each corner of the assembled shelves to serve as the legs.
- Attach the legs to each shelf unit with 2.5-inch screws, ensuring that the screws do not go all the way through the wood.
Step 3: Securing the Units and Finishing Touches
3.1 Combine the Units
- Instructions:
- Arrange all the completed shelving units according to the final diagram.
- Secure the units together using screws at the connection points to ensure they are tightly aligned and stable.
3.2 Adjust the Work Desk Height
- Instructions:
- Determine the height of the work desk based on your preferred working position:
- For a comfortable standing height, position the desk between 38 to 42 inches from the ground.
- For a seated height, set the desk around 28 to 30 inches high to suit a standard chair.
- Once the height is set, secure the desk firmly in place with screws.
- Determine the height of the work desk based on your preferred working position:
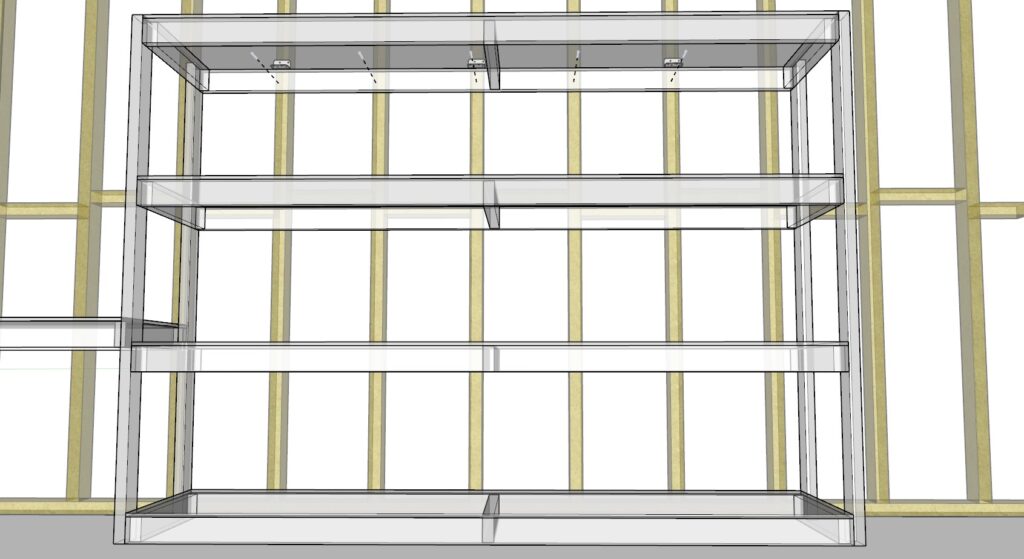
3.3 Wall Attachment for Safety and Stability
- Materials Needed: 3.5-inch screws, longer screws (if needed), metal braces/brackets
- Instructions:
- Secure to Wall Studs: Anchor the shelving unit to the wall studs using 3.5-inch screws. If attaching through the thicker 2×4 lumber, you may need longer screws (4-6 inches) or ensure screws are deeply sunk for a firm hold.
- Dealing with Baseboards: If your garage has baseboards, use spacers or trim the base of the shelf to sit flush against the wall, ensuring a solid attachment to the studs above the baseboard line.
- Additional Support: For added safety, use metal braces or brackets. Ensure these are securely fastened to both the shelf and the wall. The screws used should be long enough to penetrate the wall stud for maximum stability.
- Note: Proper wall attachment is crucial to prevent the unit from tipping and to safely handle the weight of stored items.
3.4 Finishing Touches
- Instructions:
- Sand all edges and surfaces for a smooth finish.
- Apply paint, stain, or varnish for added protection and a professional look. Allow adequate drying time before use.
Important Safety Note and Legal Disclaimer
- Instructions:
- Before loading items onto your shelves, double-check all screws, connections, and wall attachments to ensure everything is secure and stable. Proper installation is essential for safe usage.
- Legal Disclaimer: GoodDIYplans is not responsible for any injuries, accidents, or damage resulting from improper assembly, installation, or use of this shelving unit. By following this guide, you acknowledge that you are undertaking this project at your own risk. It is your responsibility to ensure the shelving unit is safely secured and suitable for your specific use.
