Why build a pergola?
In this post you will find pergola plans to build that much need structure in your backyard to give you shade, a cover for the hot tub, a special entertaining area, or to simply define an outdoor space into something special.
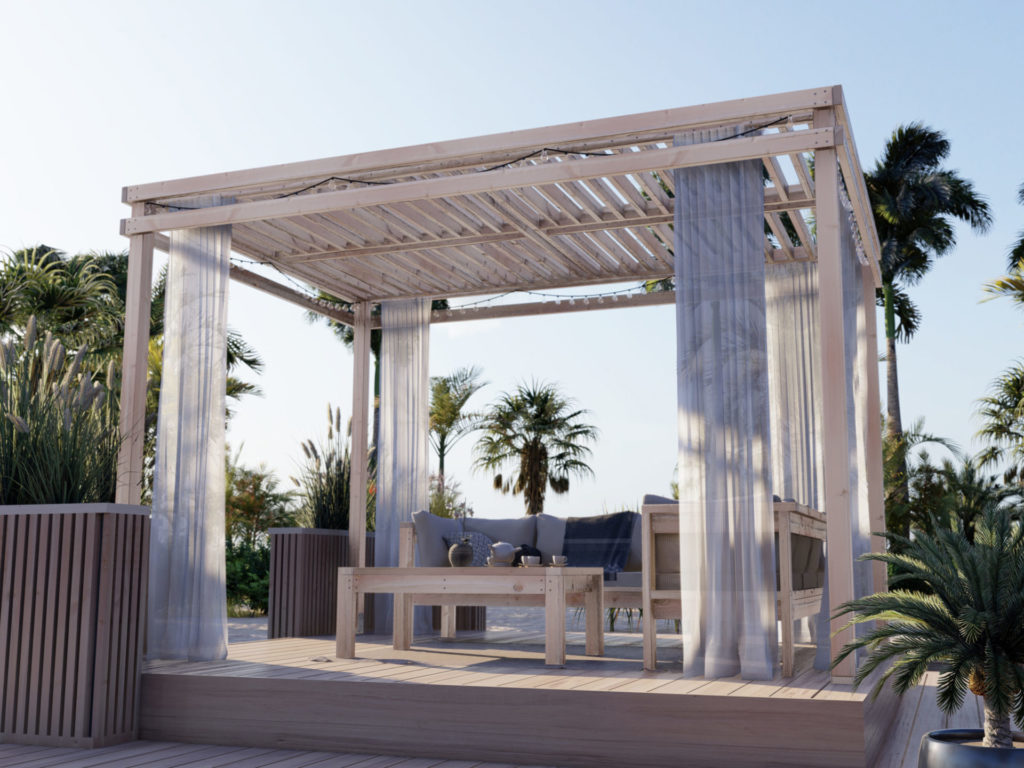
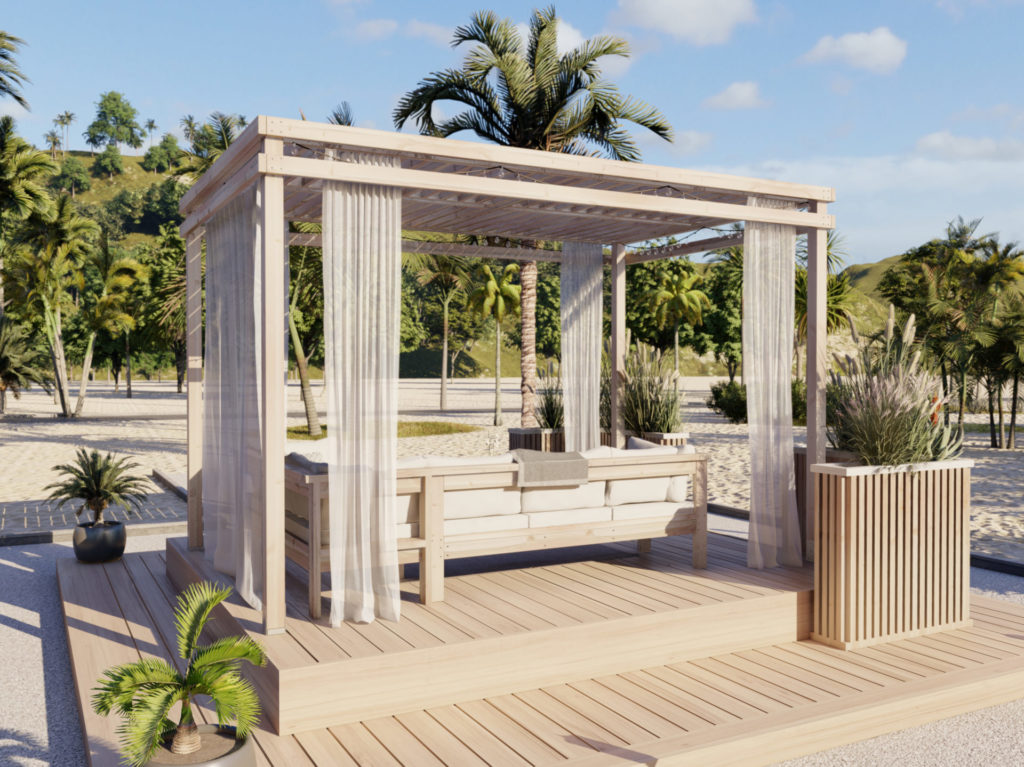
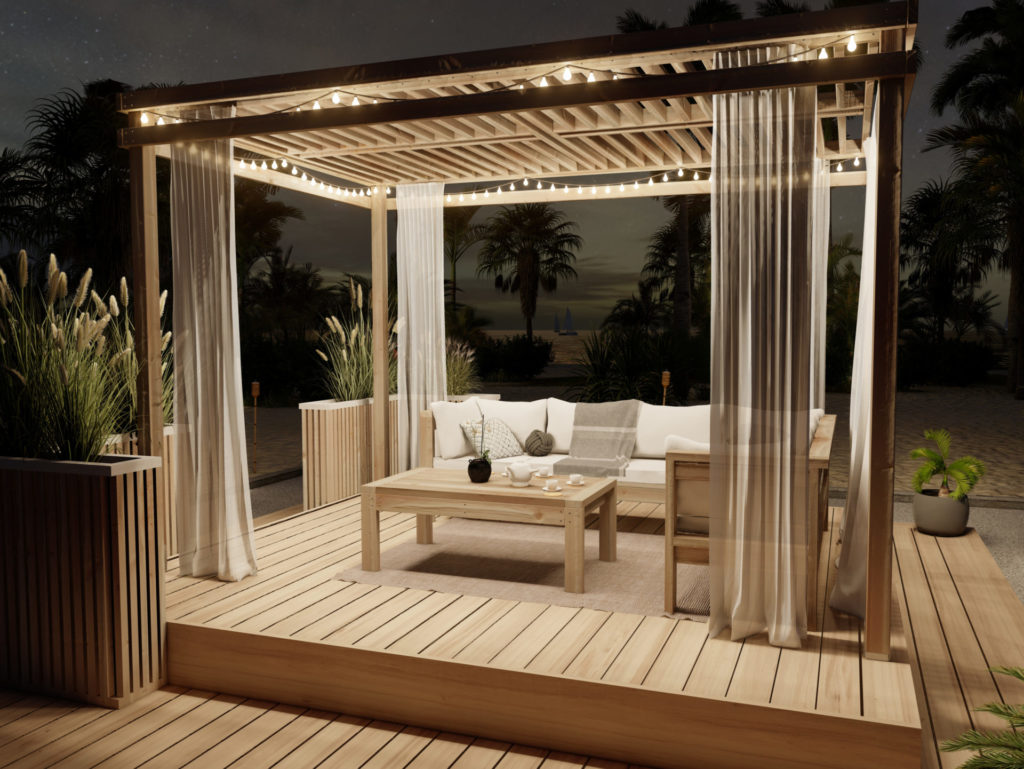
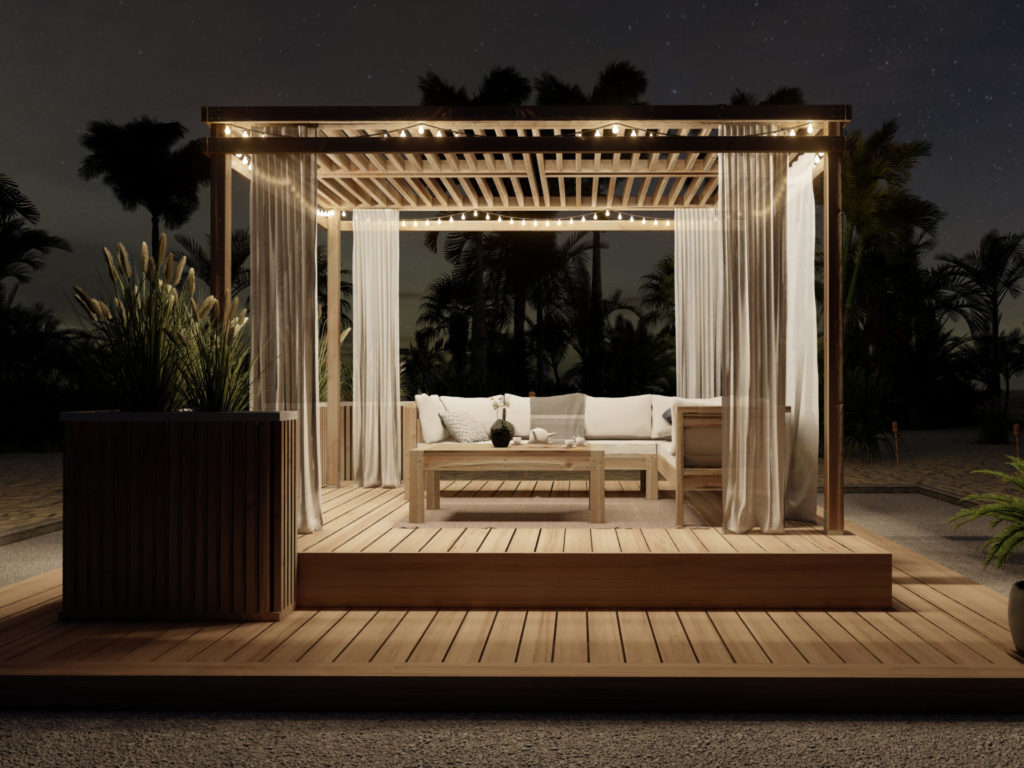
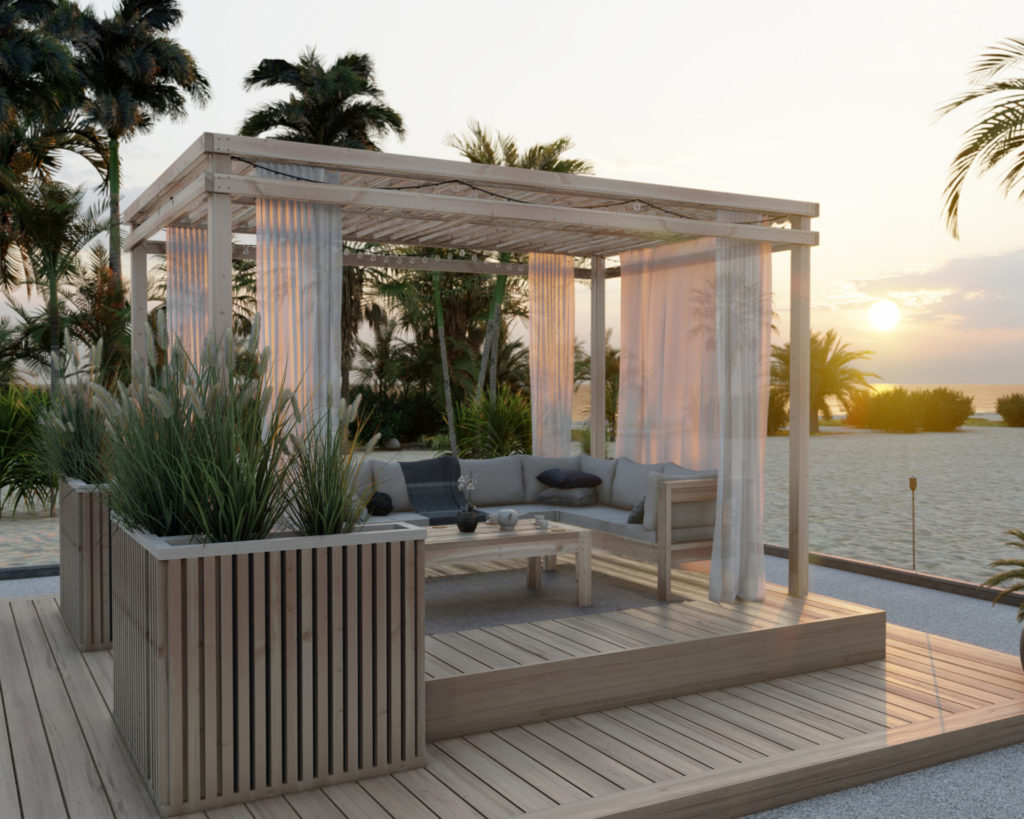
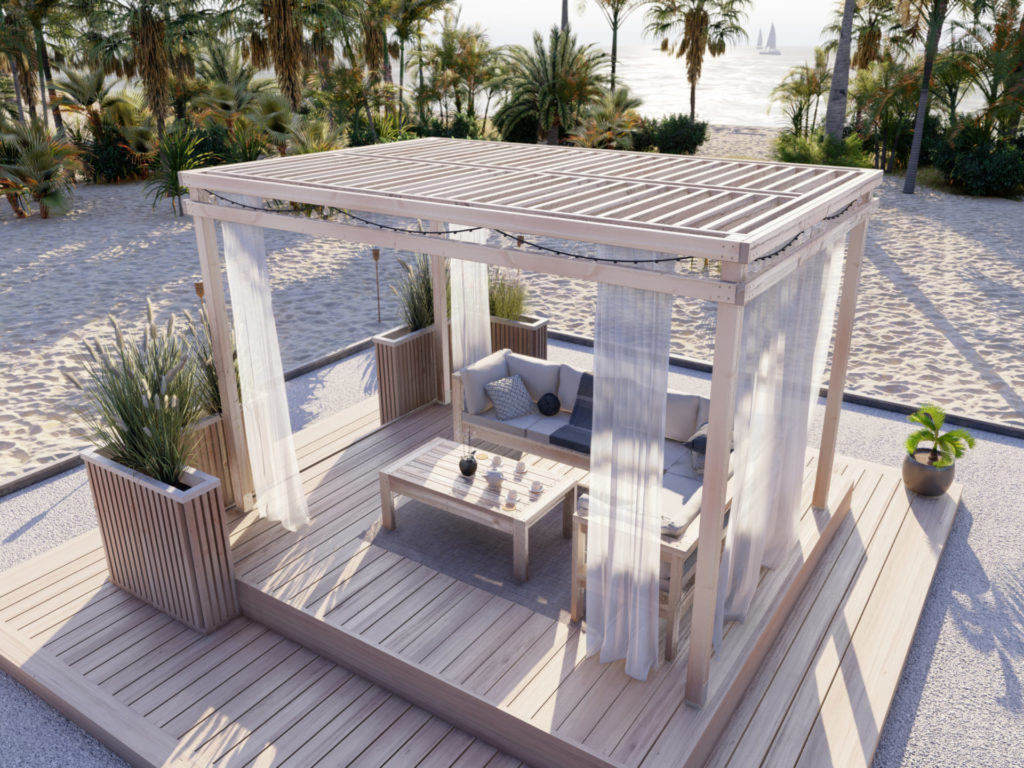
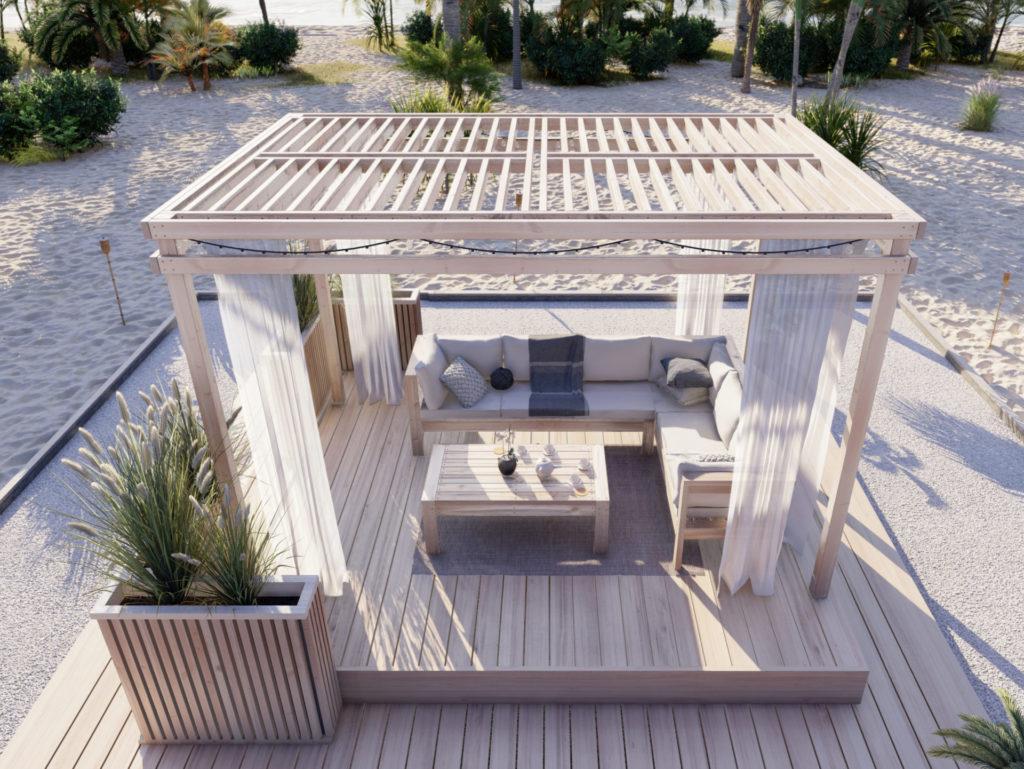
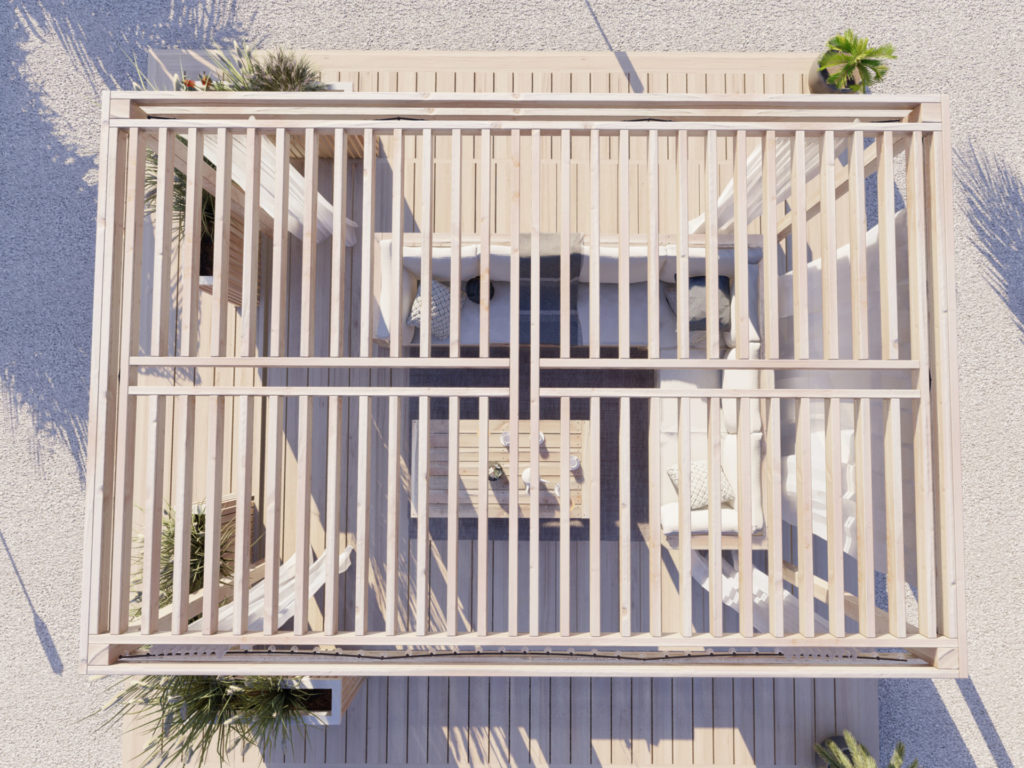
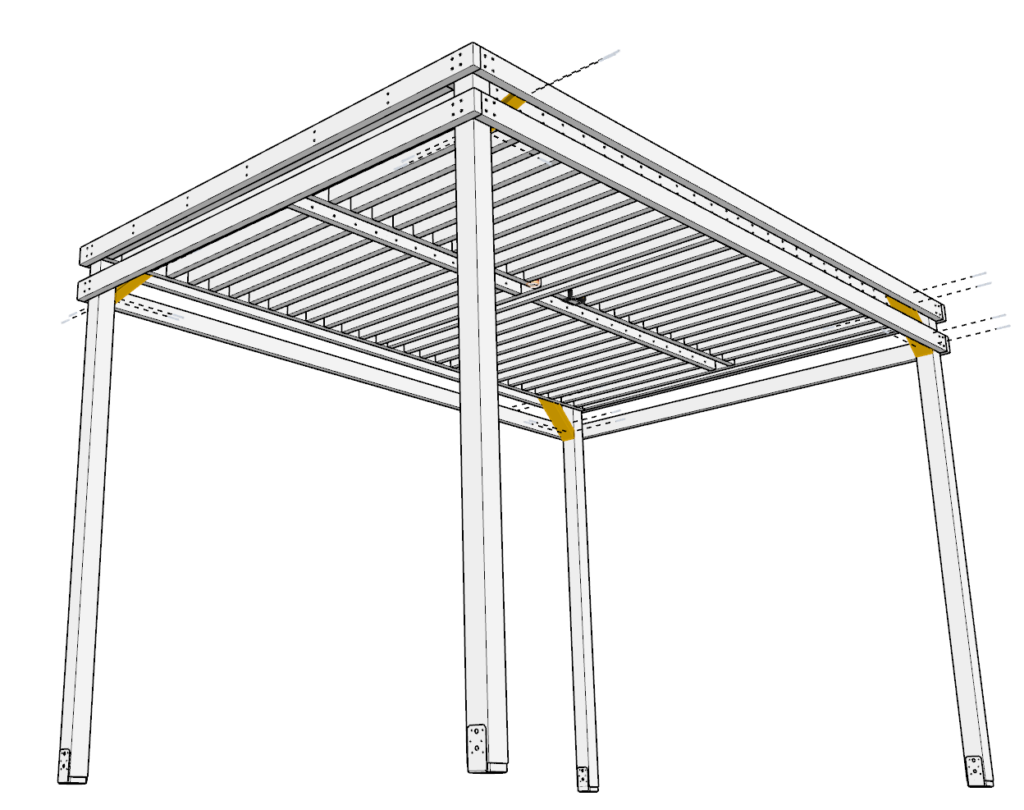
This pergola can transform your outdoor backyard space by covering your concrete patio, stone patio, or wood deck using wood beams and a lattice framework design to create dappled shade. This shade can feel cool, relaxing, and create a space to shelter yourself from the sun on a hot summer day.
What are the features of this pergola design?
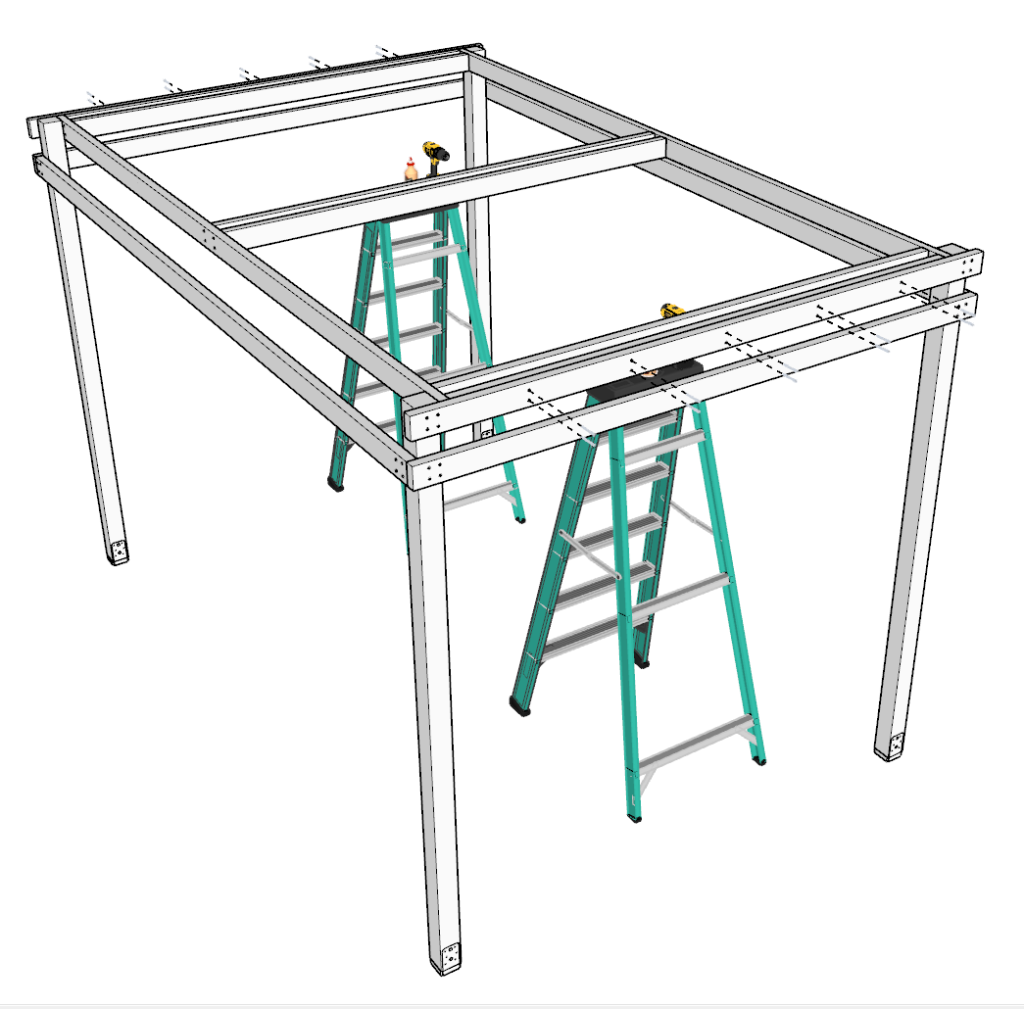
This pergola can be built as both a deck pergola and a free-standing pergola. Because the pergola design is made to stand independently of the house, you can place it right near your house of let it stand alone in the garden.
This is an inexpensive, cheap, and simple patio cover that looks like luxurious and resort like.
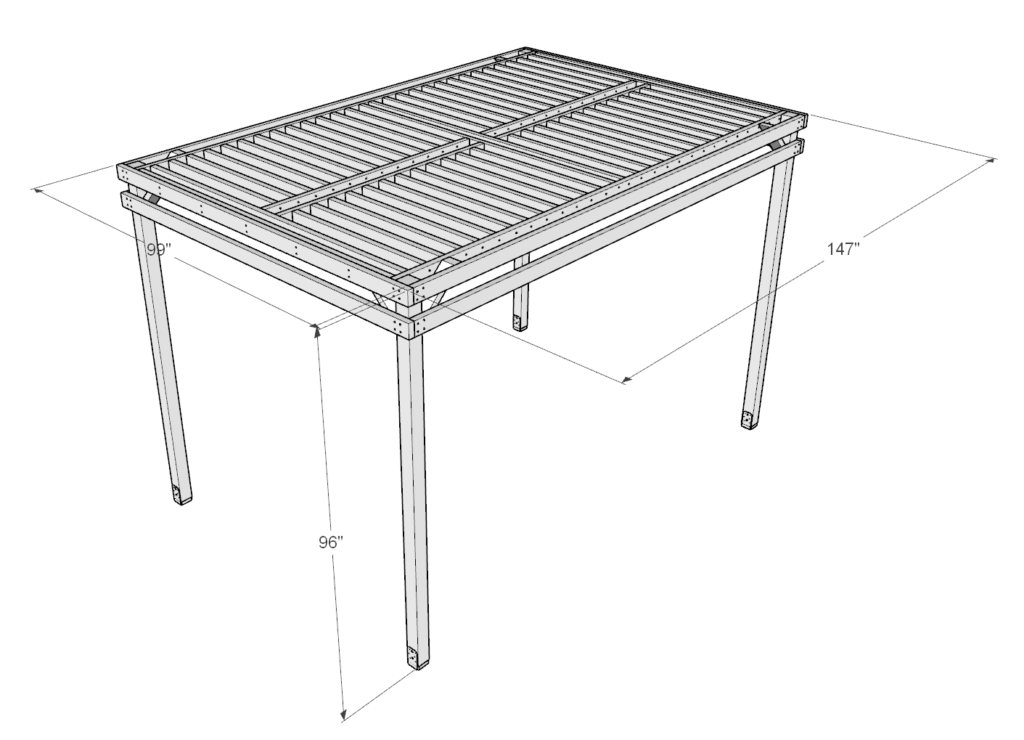
This summer project design uses 4×4 wood beams for the columns to support the lattice framework that is made from 2×4 wood studs. These materials are easy to find in most hardware stores.
What will you find in this post?
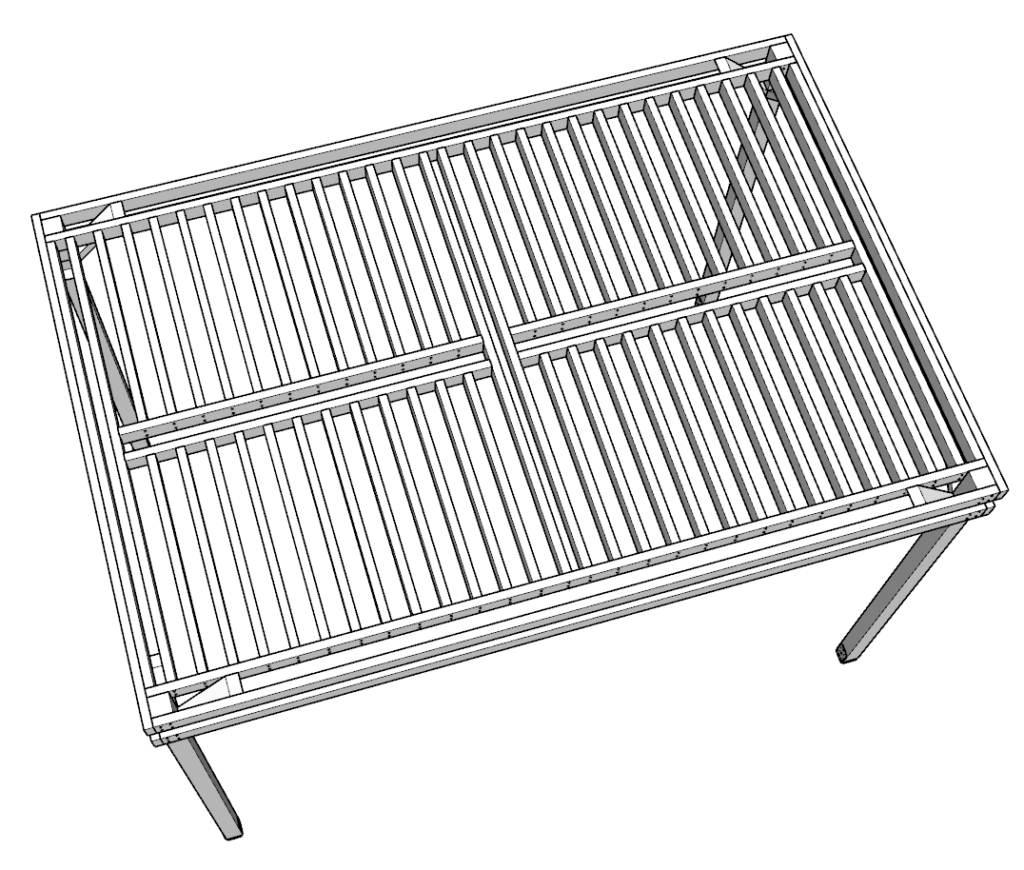
You will find pergola plans that include step by step instructions, list of tools needed, diagrams, and helpful links to tools and materials used in the build.
The step-by-step instruction of the DIY plan are designed to be simple and easy to read and follow. This design can work for beginners that are new to DIY woodworking and requires almost no experience to build. The plans on this page are for the pergola only and not for the deck underneath. The frame of the pergola can be assembled in one day.
Plans for the table and sectional shown in the pictures can also be seen by clicking the link.
Check out the entire website for plans for arbors, gazebos, sheds, picnic table, and more.
Time to build
(Varies with experience)
Total cost of build
About $400 (material prices may fluctuate; verify current costs for accuracy)
Skill level required
Beginner-Intermediate
Download PDF plans

Pergola DIY Plan PDF
What is included in the PDF download?
- Easy to read step by step instructions
- Material list
- Cut list
- Tools needed
- 3D illustrations
- Helpful links to tools and materials needed for the project
Recommend Tools & Materials
Pergola Project Tools & Materials List
Tools Required:
- Miter Saw: Recommended for precision lumber cuts.
- Drill: Essential for drilling holes.
- Impact Driver: With bits for driving screws.
- Sander: For smoothing wood surfaces.
- Sandpaper: Assorted grits for wood finishing.
- Wood Countersink Drill Bit: Prepares holes for screw heads.
- Ladder: Needed for reaching higher work areas.
- Level: Ensures everything is perfectly horizontal or vertical.
- Wood Clamps: Optional but helpful for holding pieces in place during assembly.
Materials Required:
- Screws (2.5″): 1 lb (for securing smaller wood joints).
- Screws (3.5″): 9 lbs (for main structural connections).
- Wood Glue: Provides extra bonding strength between wood pieces.
- 4×4 Standoff Post Base: Anchors posts securely to the ground.
Affiliate Disclaimer:
I believe in recommending products I truly believe in. Some links provided may be affiliate links, which means I may earn a commission at no extra cost to you if you make a purchase through my link. This helps support my work and allows me to continue bringing you valuable content.
Lumber Shopping & Cut List
Pergola Project Shopping List
Lumber Requirements:
2x4x8′ Lumber:
Quantity: 42 units
2x4x12′ Lumber:
Quantity: 6 units
2x4x10′ Lumber:
Quantity: 4 units
4x4x8′ Lumber:
Quantity: 4 units
Step-by-Step Pergola Lumber Cut List
Step 2: Assembling the Main Support Columns
- 4x4x8′ Posts: Use 4 units at full length (96″).
- 2x4x12′ (144″): 2 units for the sides of the posts.
Step 3: Erecting and Securing the Columns
- 2x4x8’3″ (99″) Braces: Cut 4 units for supports.
Step 4: Assembling the Central Pergola Frame
- 2x4x12′ (144″): 2 units for the sides of the central frame.
- 2x4x7’2″ (86″): Cut 6 units for the cross supports within the central frame.
Step 6: Constructing the Lattice Sections
- 2x4x39 3/4″: Cut 48 units for the lattice bars.
- 2x4x64.5″: Cut 4 units for the crosspiece of each lattice section.
Step 8: Finalizing the Pergola’s Upper Frame
- 2x4x12′ (144″): 2 units for the sides of the upper frame.
Step 9: Installing Reinforcement Braces
- 2x4x16″: Cut 4 units with ends at a 45-degree angle for broader support.
- 2x4x11 1/16″: Cut 4 units with ends at a 45-degree angle for additional support.
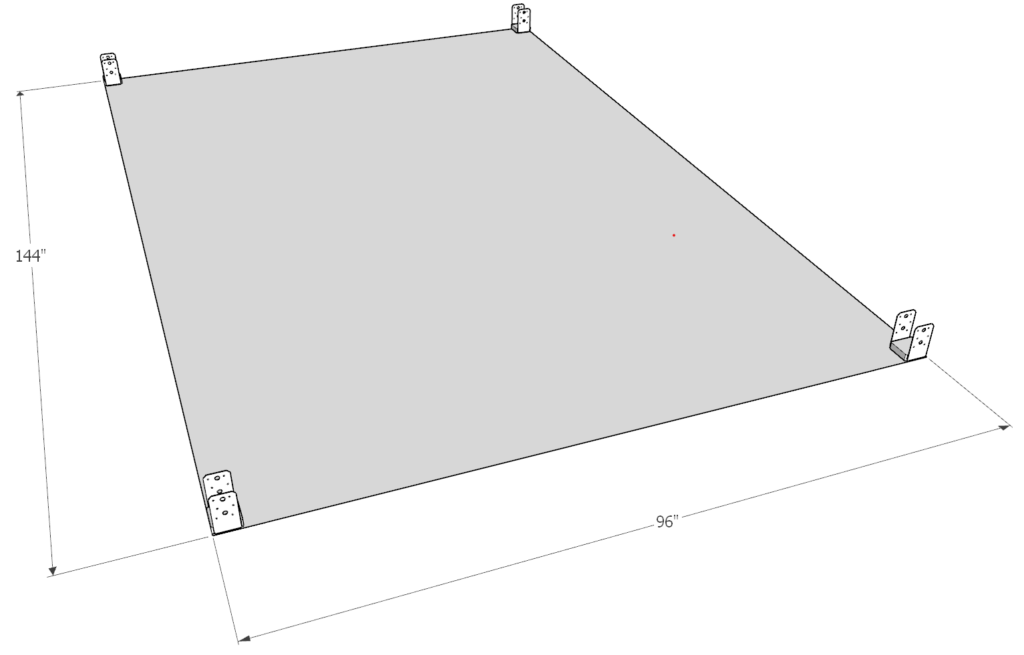
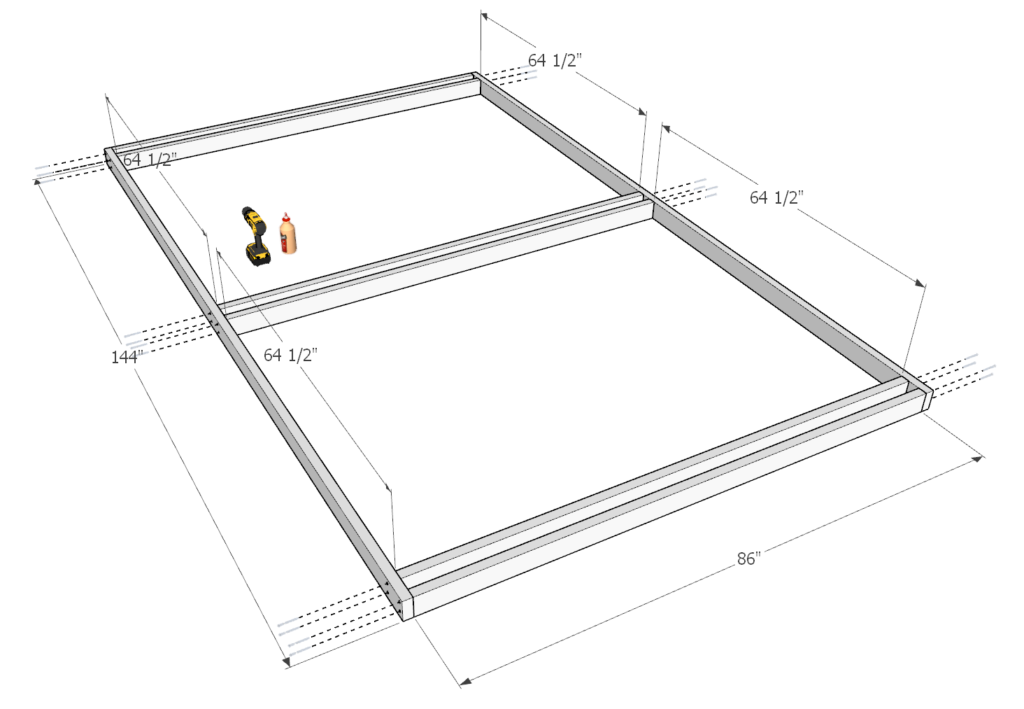
Step 1: Setting Up the Pergola Perimeter
Sub-step 1.1: Installing the Post Base Brackets
Before starting, gather your tools: a measuring tape, bolts, construction adhesive (glue), a drill, and potentially a hammer drill if you’re working with cement.
For a Wooden Deck:
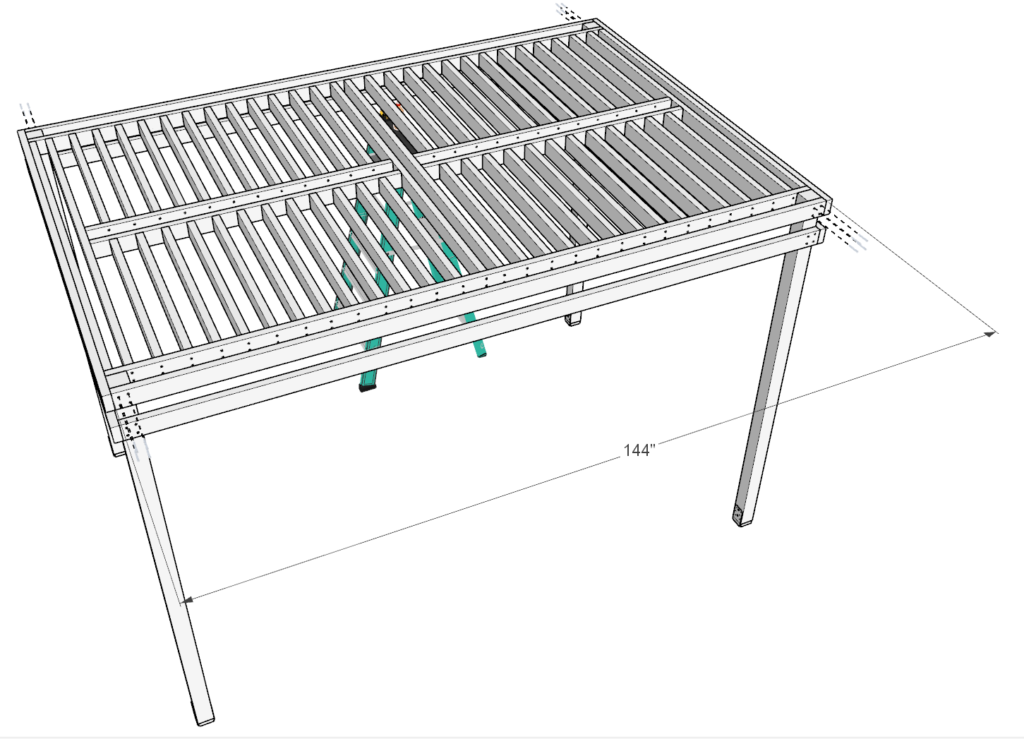
- Locate the Installation Points: Measure and mark the points where you will install the 4×4 standoff metal post base brackets according to the pergola’s perimeter dimensions (144 inches by 96 inches). Use a pencil or marker for visibility.
- Pre-drill Holes: Using a drill, pre-drill holes at the marked spots on your wooden deck. This step helps prevent the wood from splitting when you insert the bolts.
- Apply Construction Adhesive: On the bottom of each post base bracket, apply a generous amount of construction adhesive. This adhesive adds an extra layer of stability and helps to prevent water from seeping into the bolt holes.
- Secure the Brackets: Align the post base brackets over the pre-drilled holes and insert the bolts. Tighten the bolts securely with a drill or socket wrench, ensuring the brackets are firmly attached to the deck.
For a Cement Surface:
- Mark Installation Points: Use a measuring tape and chalk to mark where the post base brackets will be installed, keeping in line with the pergola’s perimeter (144 inches by 96 inches).
- Drill Holes in Cement: Using a hammer drill with a masonry bit, drill holes at the marked spots on the cement. These holes should match the size of the masonry bolts you’ll be using.
- Insert Masonry Bolts: Place the post base brackets over the holes. Insert masonry bolts through the brackets into the holes. You may need a hammer to lightly tap the bolts into place.
- Secure the Brackets: Tighten the bolts with a socket wrench until the brackets are securely fixed to the cement. Avoid over-tightening, which could crack the cement.
Sub-step 1.2: Measuring the Perimeter
- Straight Measurements: Using a measuring tape, measure and mark the perimeter of where the pergola will stand, ensuring the dimensions are 144 inches by 96 inches. Use stakes and string to visualize the area.
- Diagonal Check: To ensure your layout is perfectly rectangular, measure diagonally from each corner to the opposite corner. Both diagonal measurements should be equal. If they are not, adjust the stakes until they match. This step ensures your pergola is square and the perimeter is correctly laid out.
- Final Adjustments: Double-check all measurements and adjust if necessary. The accuracy of this step is crucial for the stability and appearance of your pergola.
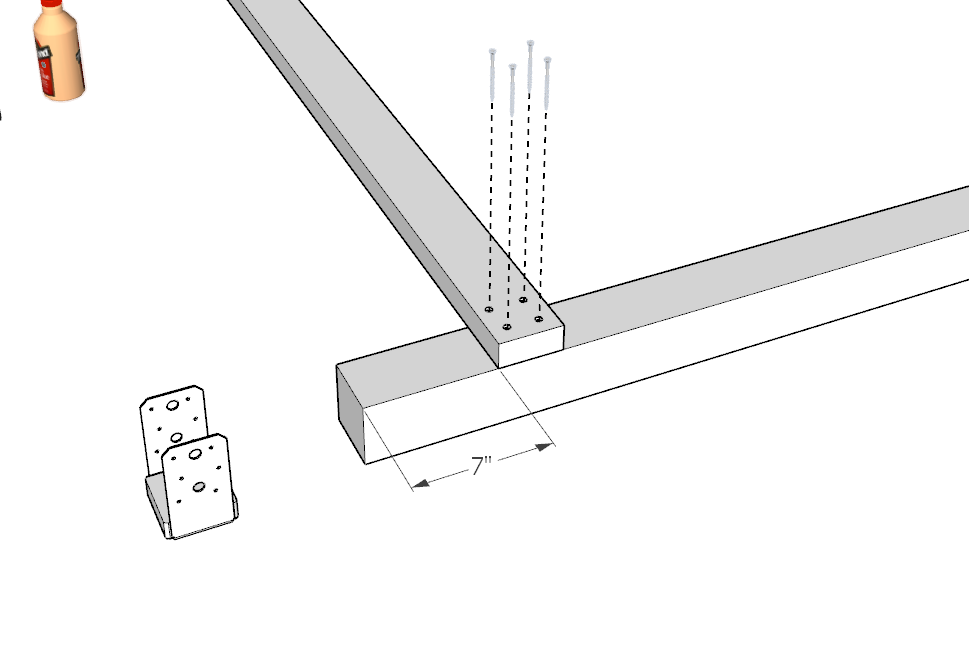
Step 2: Assembling the Main Support Columns
Prepare the Posts:
- Start with two 4x4x8ft posts.
- Measure and mark 7 inches from the top of each post for the 2×4 beam placement.
Attach the Beams:
- Pre-drill holes at the marks to avoid splitting.
- Apply wood glue on the marked areas.
- Secure a 144-inch 2×4 beam to each post with screws, ensuring it’s 7 inches from the top and faces outward.
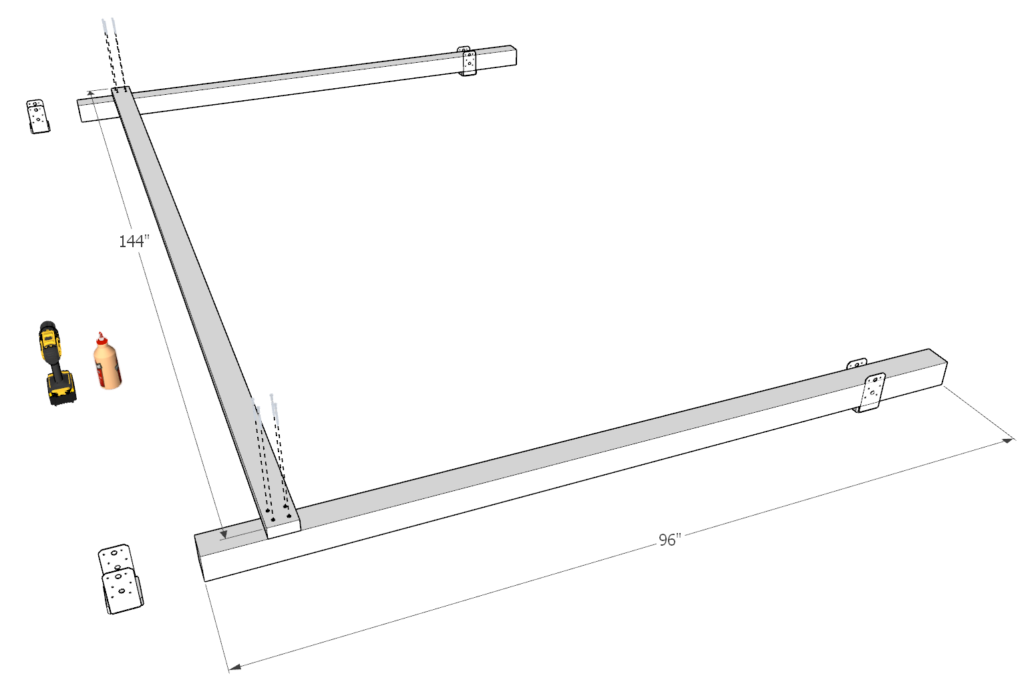
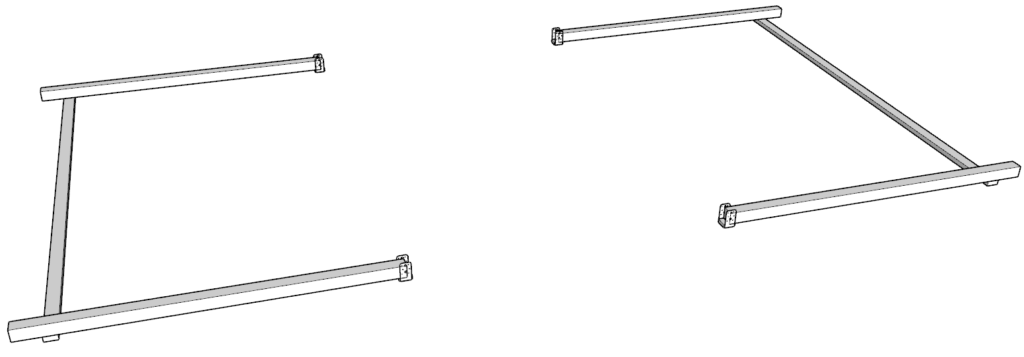
Create a Matching Set:
- Repeat the process to create another identical post-and-beam assembly. These will be your pergola’s main supports.
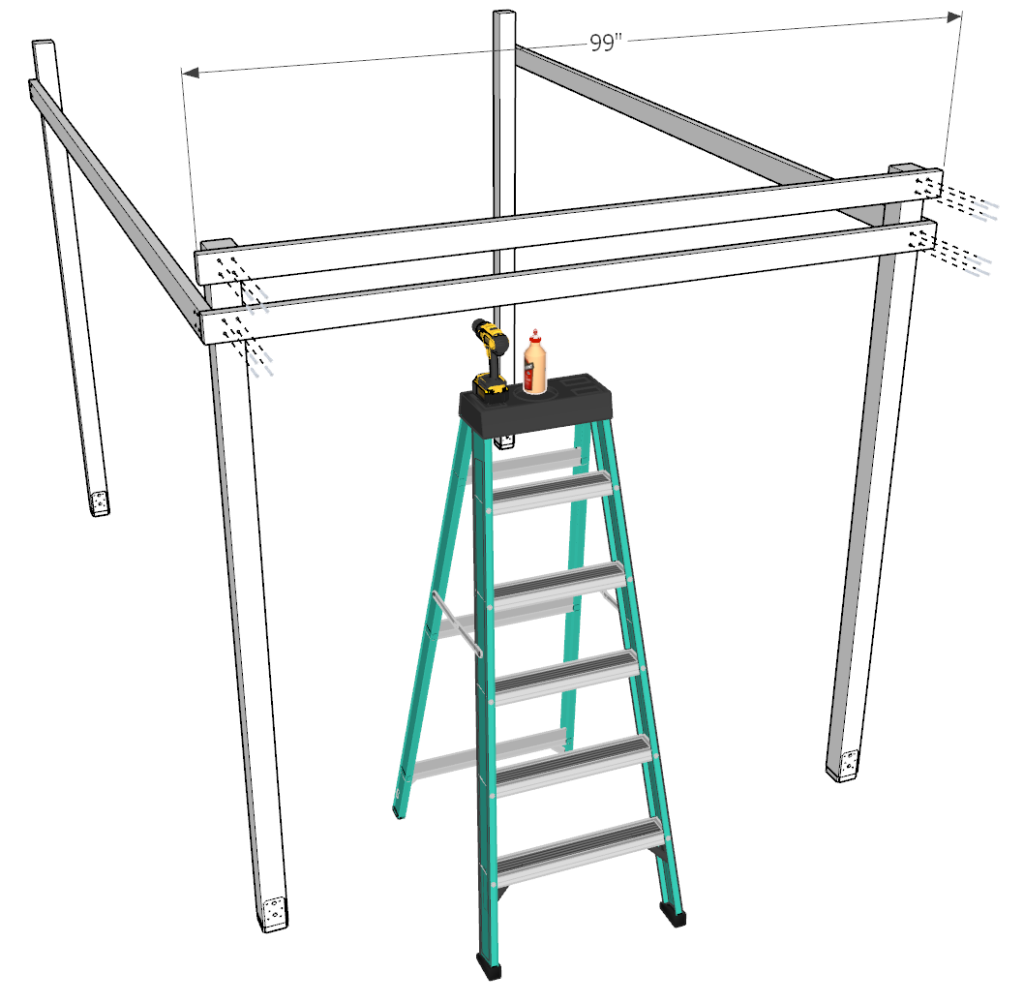
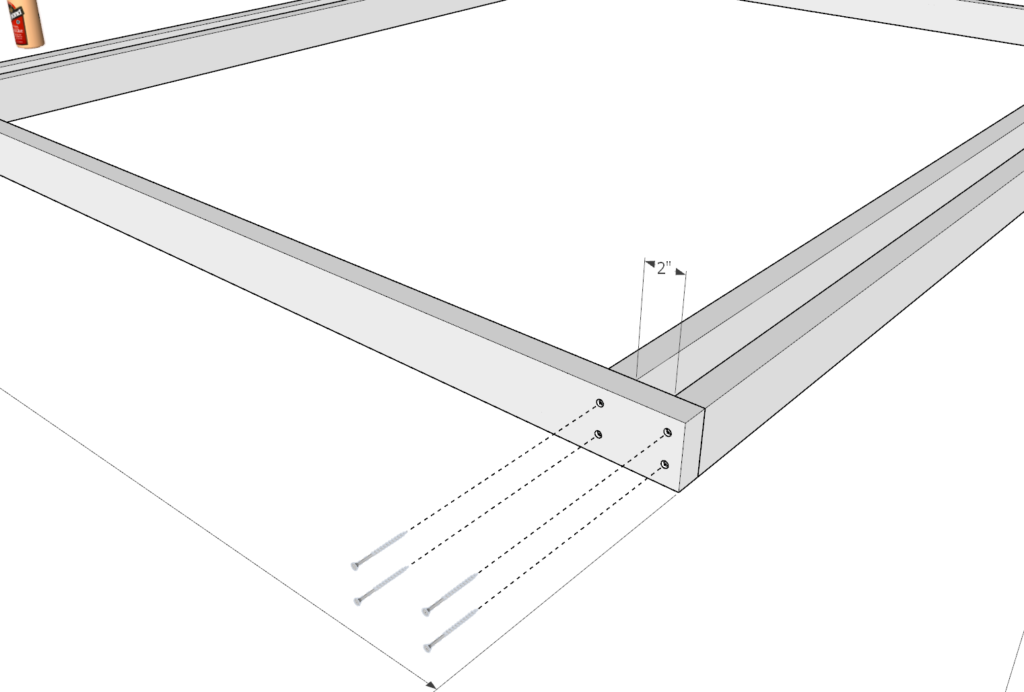
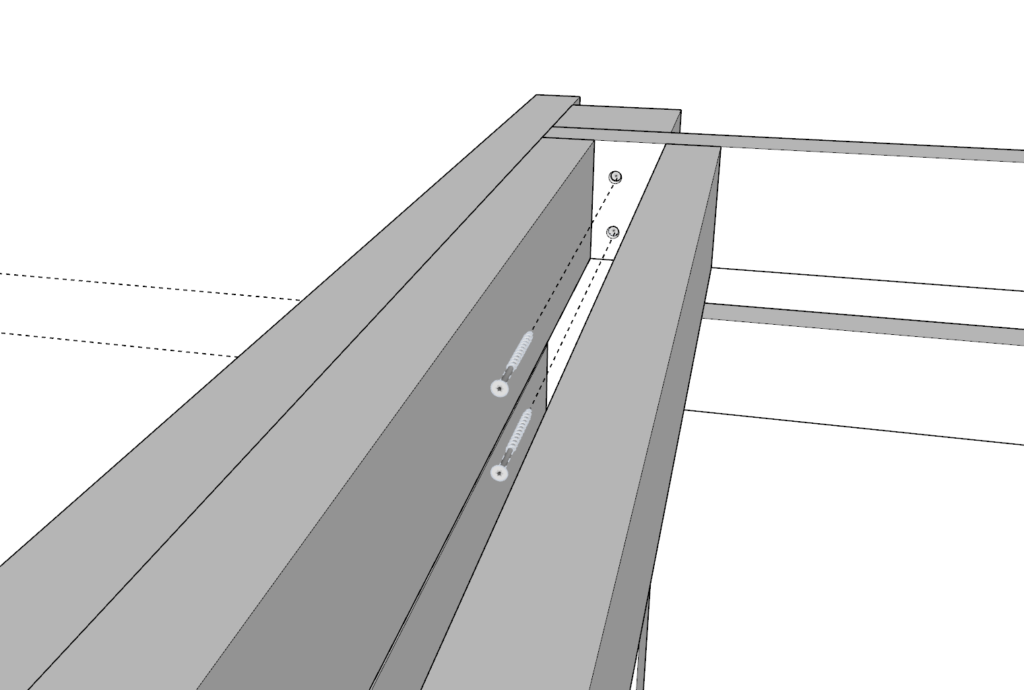
Step 3: Erecting and Securing the Columns
Position the Columns:
- With assistance, stand the two assembled column pieces upright in their designated locations.
- Align them according to the perimeter outlined in Step 1.
Secure Supports:
- Brace the columns with four 99-inch 2x4s to keep them upright and stable.
Attach the Columns:
- Pre-drilling: To ensure a secure fit and prevent wood splitting, pre-drill holes where the 2×4 braces will attach to the columns.
- Applying Wood Glue: Add wood glue to the contact points for added stability.
- Screwing in Place: Fasten the braces to the columns with screws, ensuring they are firmly attached.
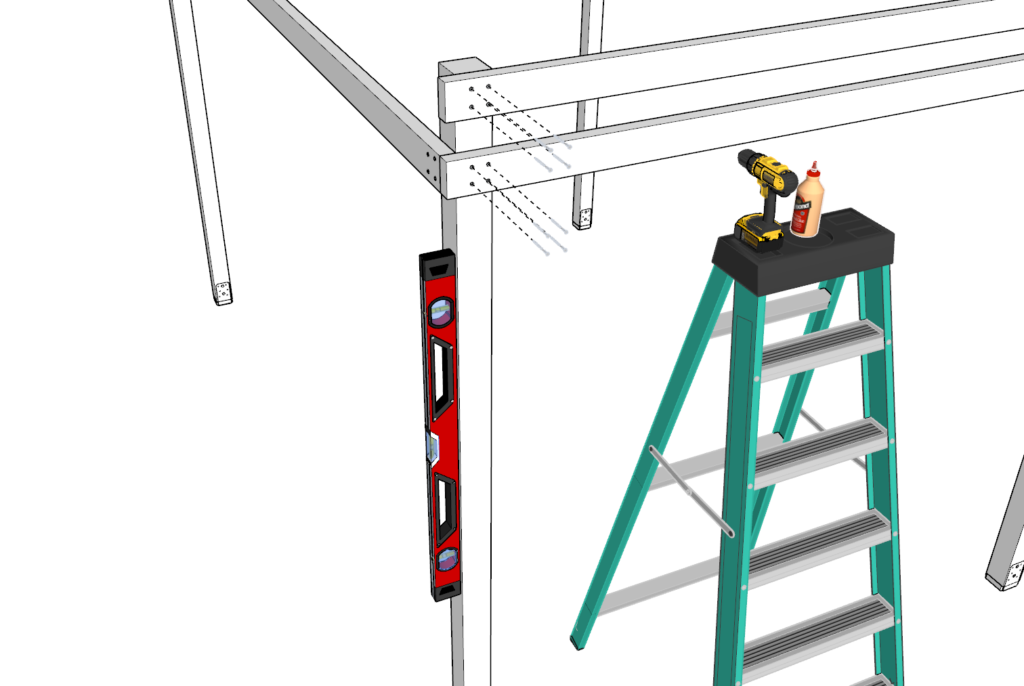

Ensure Proper Alignment:
- Use a level to check that each column is perfectly vertical (at a 90-degree angle to the ground).
- Adjust as necessary to achieve the correct alignment.
Finalize the Installation:
- Once the columns are correctly aligned and stable, secure them to the metal post bases. This may involve screwing or bolting them down, depending on your setup.
Check and Double-check:
- Ensure everything is tight, aligned, and properly secured before proceeding to the next steps.
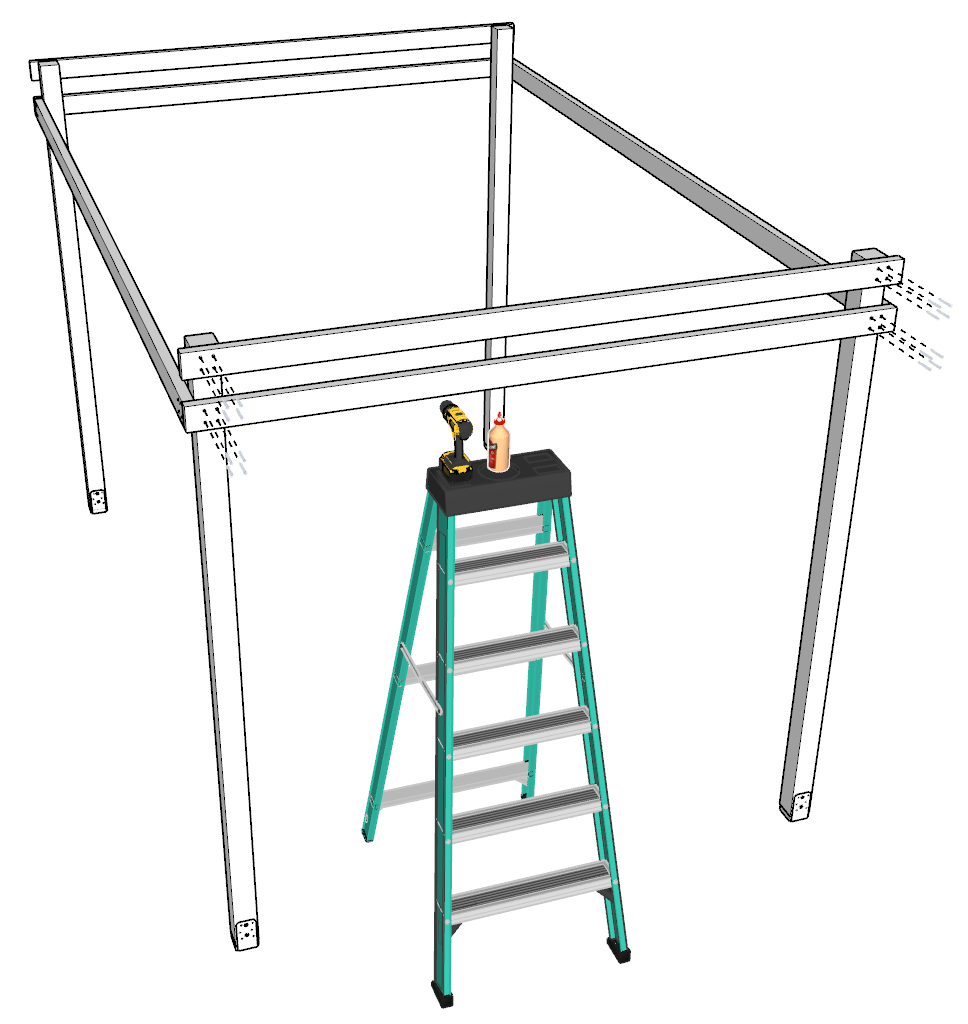
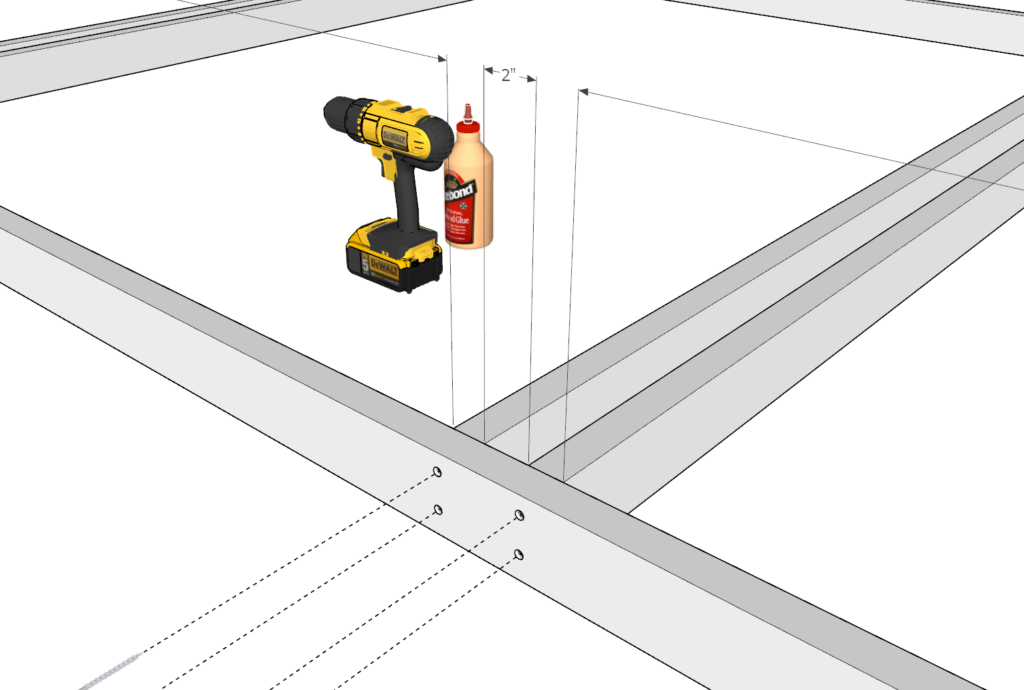
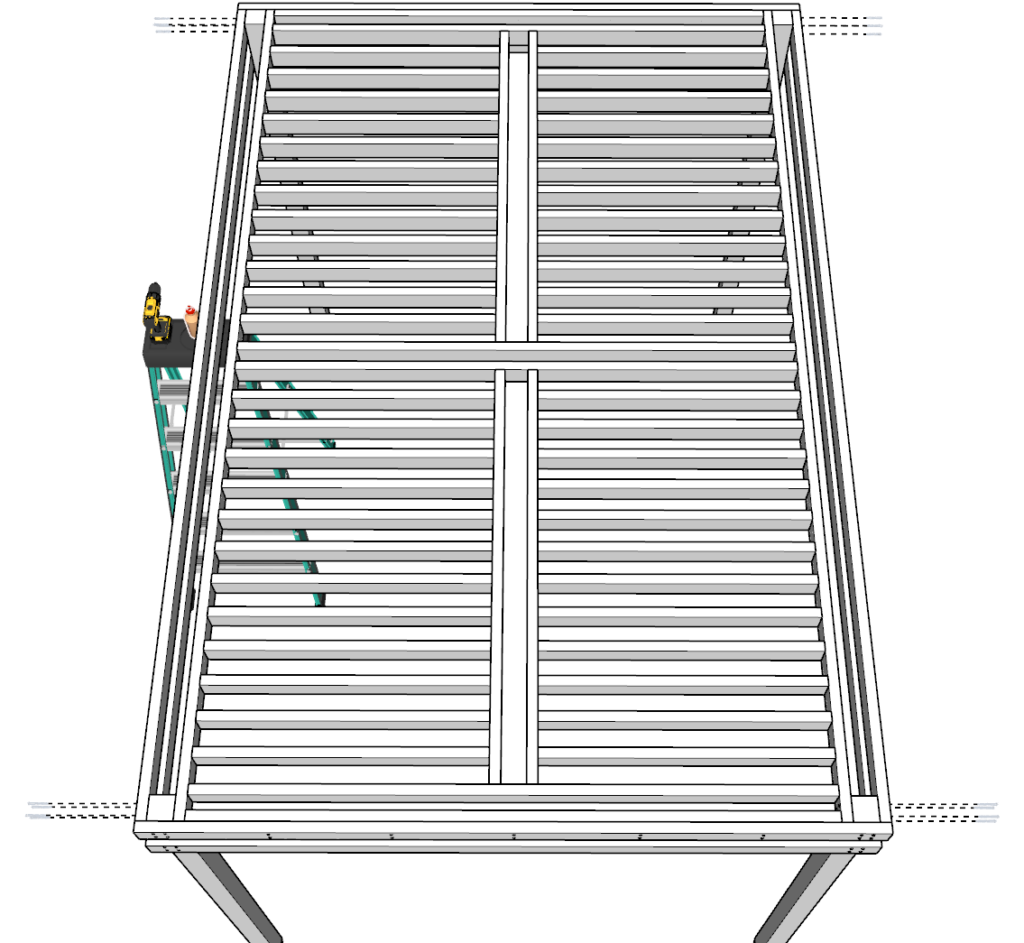
Step 4: Assembling the Central Pergola Frame
Gather Frame Components:
- Collect two 144-inch 2×4 pieces and six 86-inch 2×4 pieces for the frame assembly.
Layout the Frame:
- Lay out the two 144-inch 2x4s parallel to each other.
- Position three pairs of 86-inch 2x4s between them. Each pair should be 2 inches apart with 64.5 inches between each pair.
Assemble the Frame:
- Pre-drill: Before attaching, pre-drill holes in the ends of the 86-inch pieces and along the 144-inch 2x4s where they’ll connect. This prevents splitting.
- Apply Glue: Add wood glue to the contact points for extra strength.
- Secure with Screws: Fasten the 86-inch pieces to the 144-inch 2x4s using 3.5 inch screws. Ensure the spacing is maintained as you work.

Step 5: Installing the Central Frame into the Pergola Structure
Preparation:
- Ensure you have a helper and a second ladder ready for this step to manage the frame’s weight.
Fit Test:
- Before applying glue, do a dry fit test with the frame created in Step 4 to ensure it aligns correctly within the main pergola structure.
Apply Glue:
- Once confirmed, apply wood glue on all contact surfaces between the two frames for a strong bond.
Install the Frame:
- Lift and Position: Carefully lift the central frame and position it within the main pergola structure. Assistance is crucial here to hold the frame in place.
- Pre-drill and Secure: Pre-drill holes to prevent splitting, then secure the frame using 2.5-inch screws, ensuring they do not protrude through the 2×4 lumber.
Secure Frame to Columns:
- Alignment Check: Use a level to check the alignment of the 4×4 columns before securing.
- Attach with Screws: Attach the central frame to the 4×4 columns using 3.5-inch screws for a sturdy connection. Make sure the screws are well-positioned to enhance structural integrity.
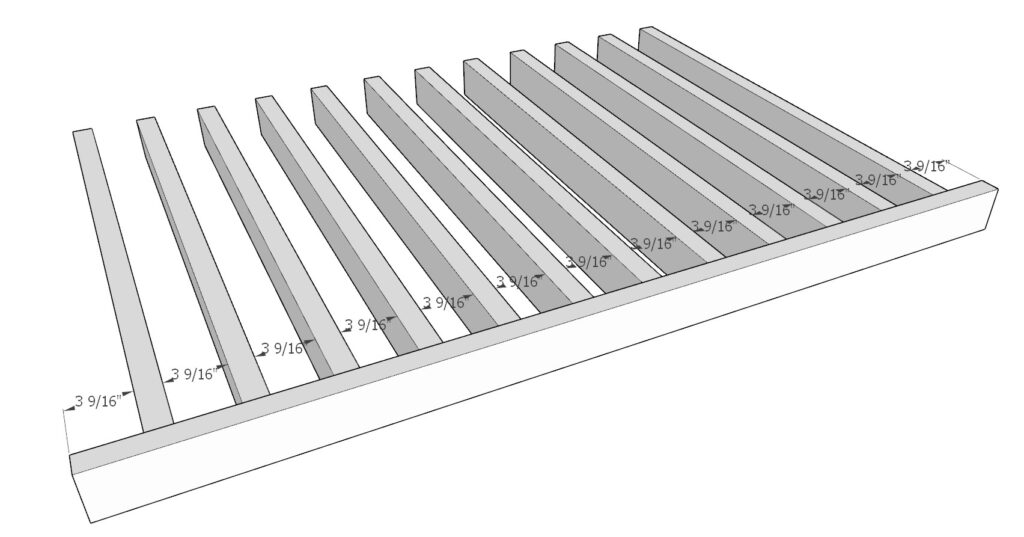
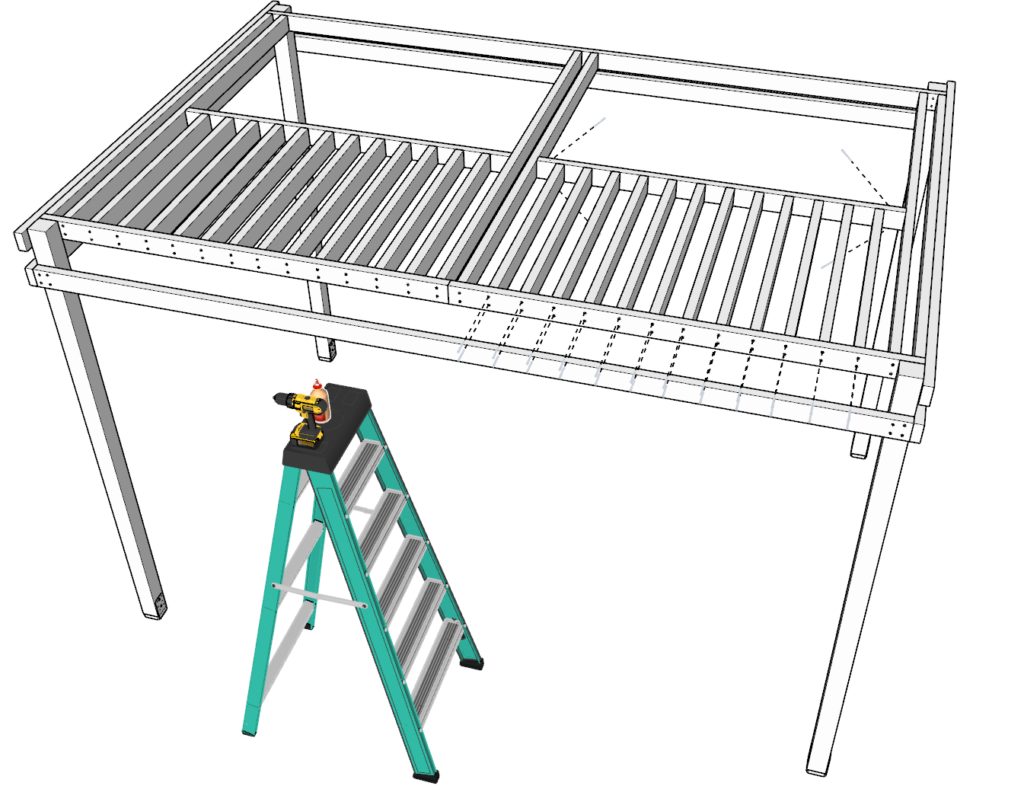
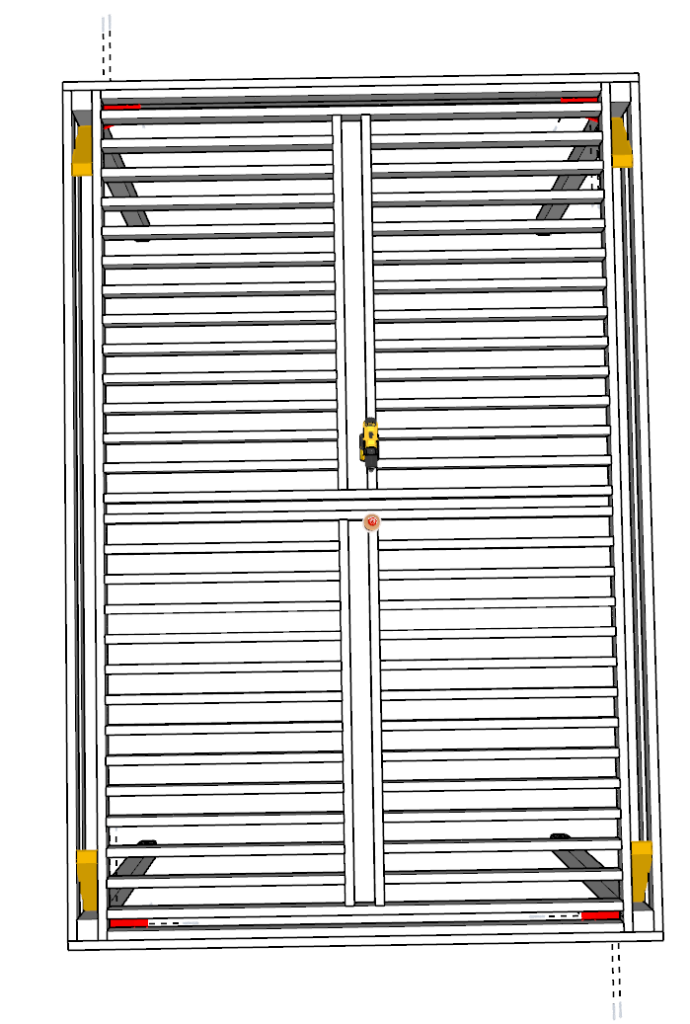
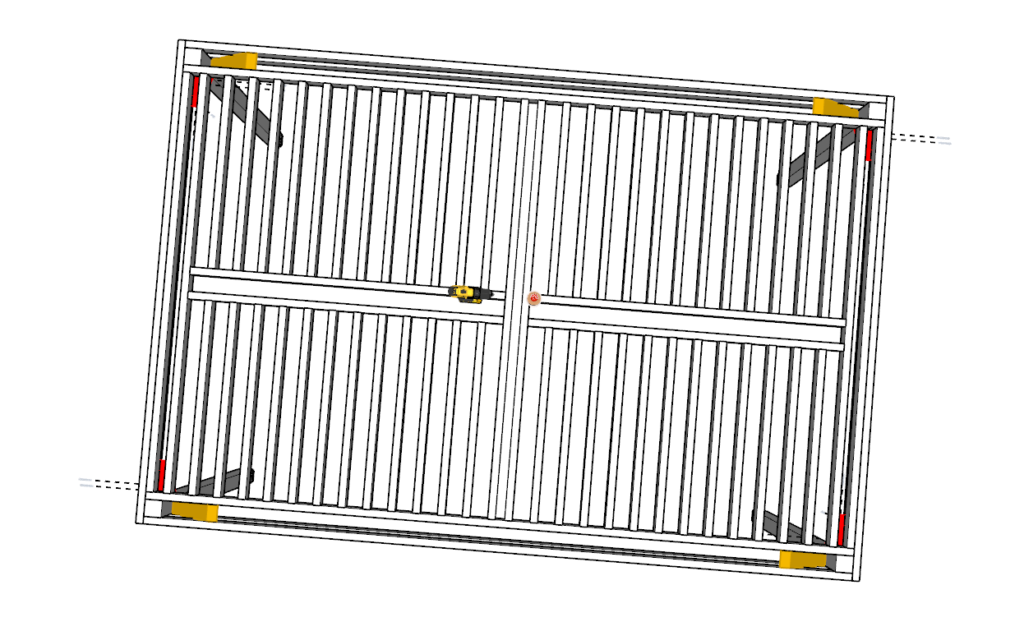
Step 6: Constructing the Lattice Sections
Prepare Lattice Bars:
- Cut twelve 39 3/4-inch 2×4 pieces for each lattice section.
Measure and Cut Crosspiece:
- Prepare a 64.5-inch 2×4 piece for the lattice’s crosspiece.
Layout and Spacing:
- Arrange the twelve 39 3/4-inch pieces against the 64.5-inch crosspiece, following the diagram for accurate placement.
- Space the 39 3/4-inch pieces 3-9/16 inches apart from each other to ensure even distribution.
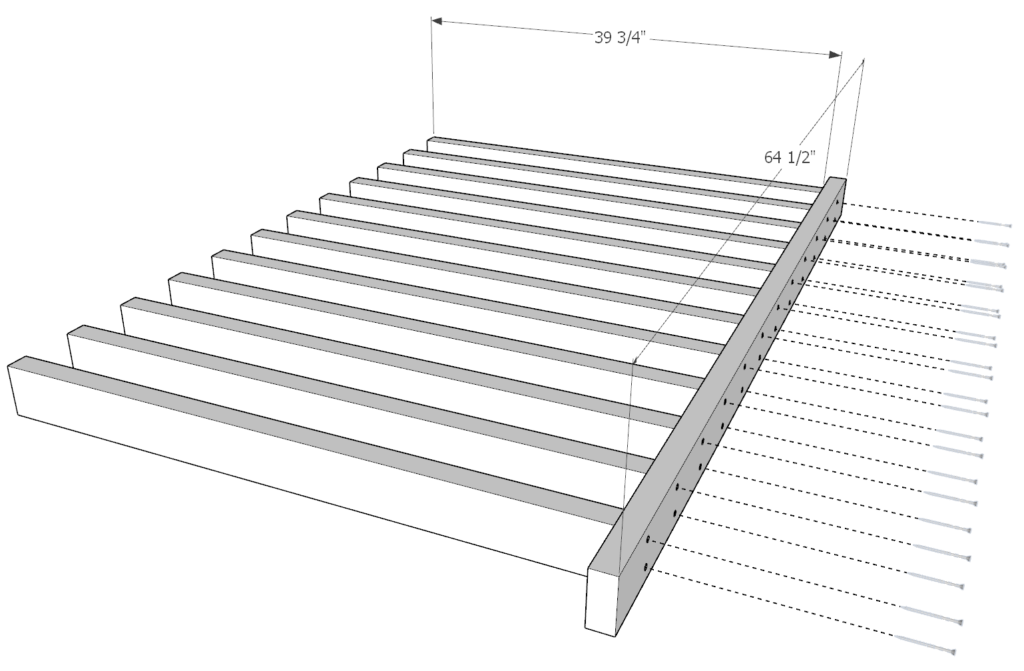
Assemble the Lattice:
- Pre-drill Holes: To avoid splitting, carefully pre-drill holes through the crosspiece into each vertical lattice bar.
- Apply Glue: Apply a thin layer of wood glue at each contact point for additional strength.
- Attach with Screws: Secure the lattice bars to the crosspiece using screws, ensuring each piece is firmly connected.
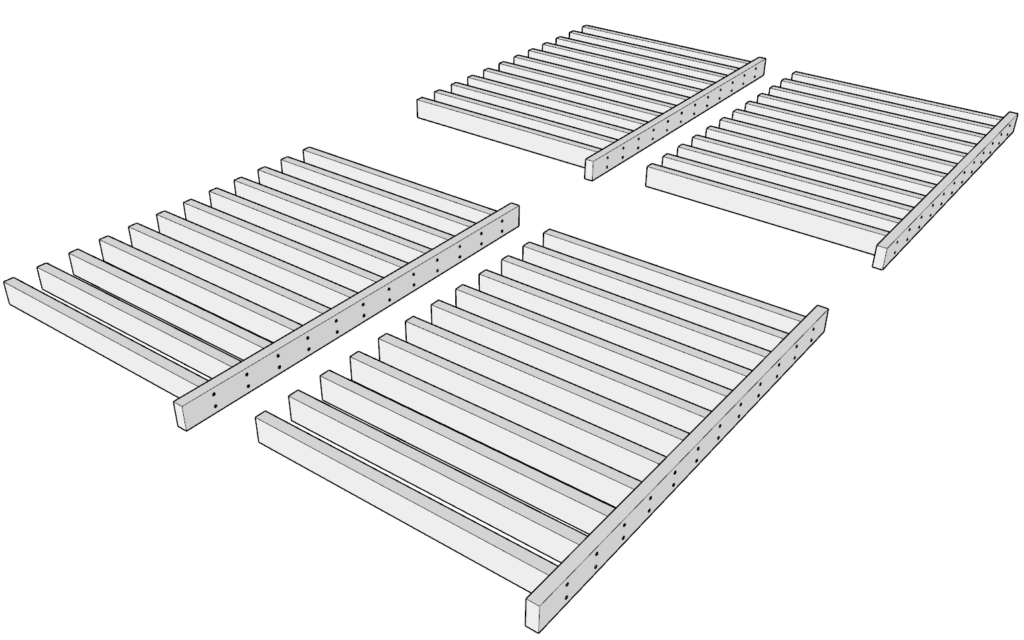
Repeat for Additional Lattices:
- Complete the above process three more times, resulting in a total of four lattice structures ready for installation.
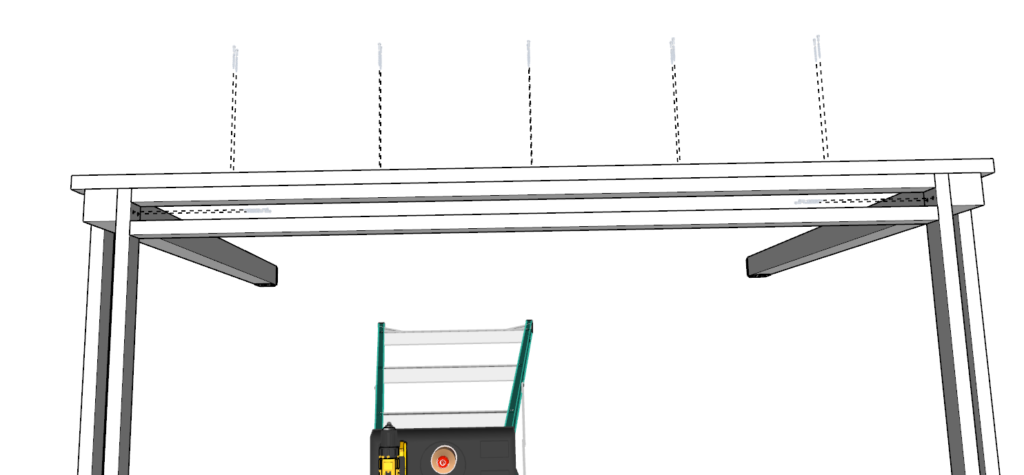
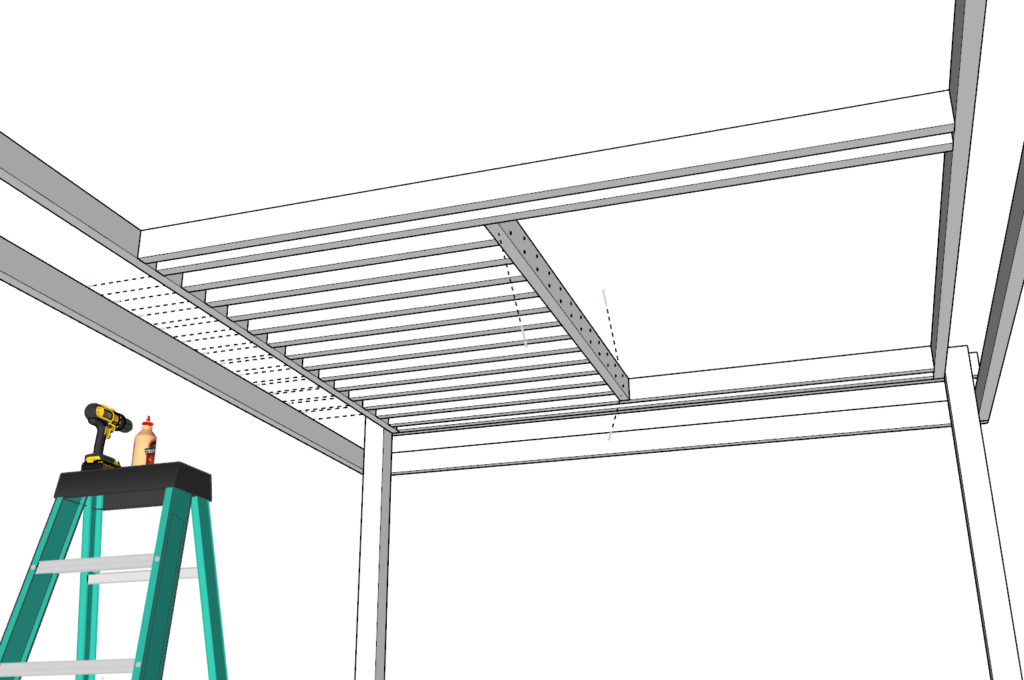
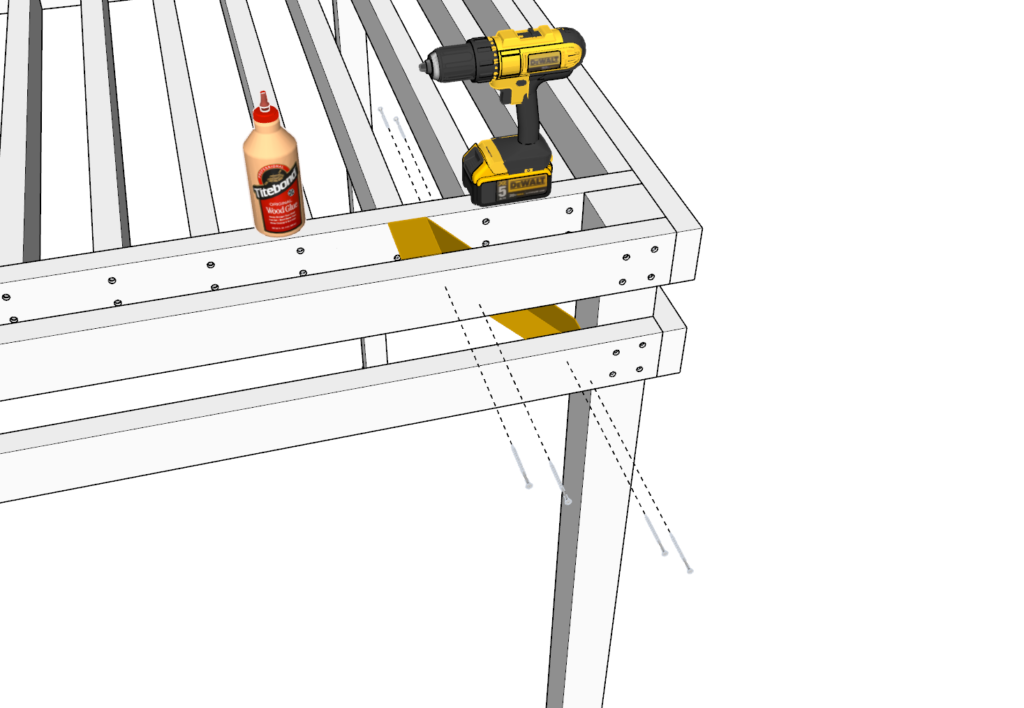
Step 7: Attaching the Lattice to the Pergola Frame
Enlist Help:
- Ensure you have an assistant or use wood clamps to temporarily hold the lattice in place against the pergola frame.
Position the Lattice:
- Carefully position one of the lattice sections created in Step 6 onto the designated area of the pergola frame. Using clamps can help stabilize the lattice before permanent attachment.
Secure the Lattice:
- Pre-drill Holes: To prevent the wood from splitting, pre-drill holes at the points where the lattice will connect to the frame.
- Apply Glue: Add wood glue to each contact point for a more secure bond.
- Attach with Screws: Fasten the lattice to the frame using screws. It’s crucial to follow the diagram closely and place screws at all indicated points, including diagonally, for added stability and support.
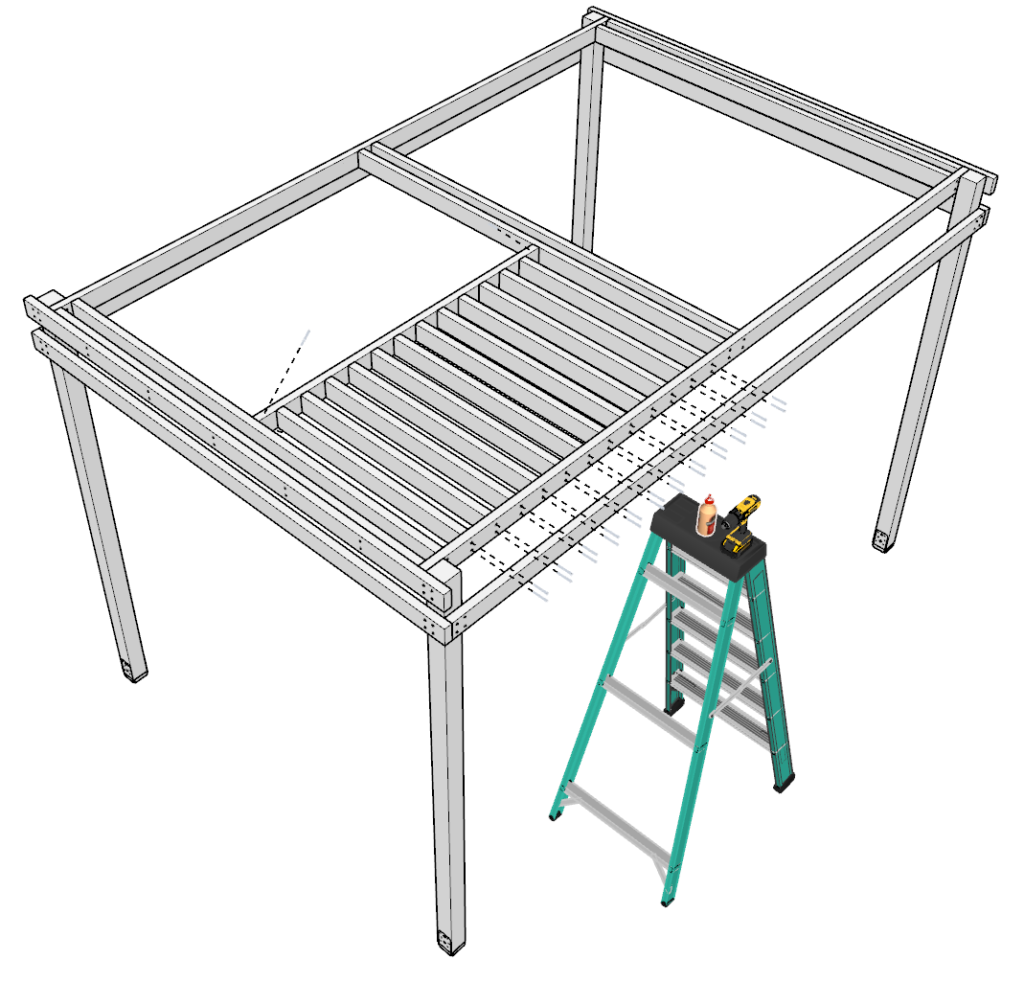
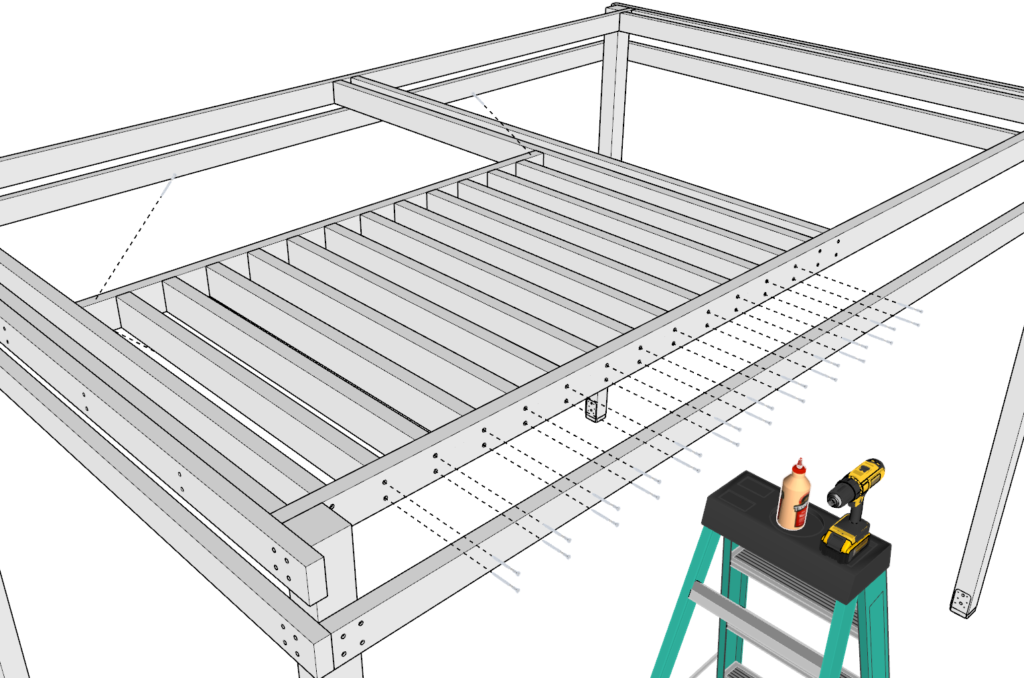
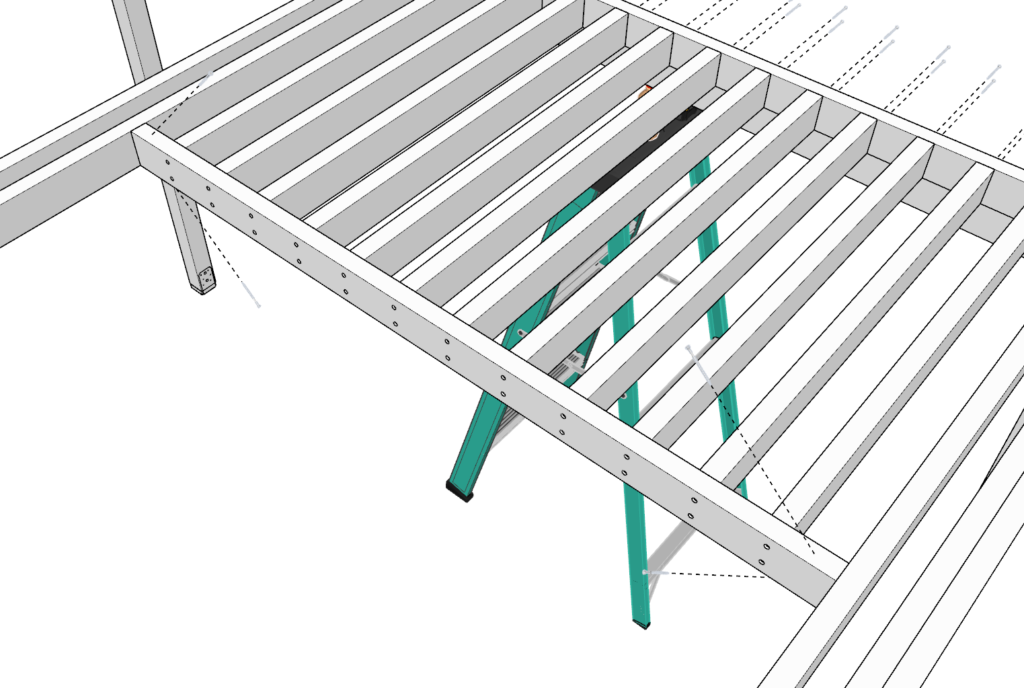
Repeat for Remaining Sections:
- Attach each of the remaining lattice sections to the pergola frame following the same process. Ensure each piece is aligned properly and securely attached.
Check for Stability:
- Once all lattice sections are in place, double-check the stability and alignment, making any necessary adjustments.
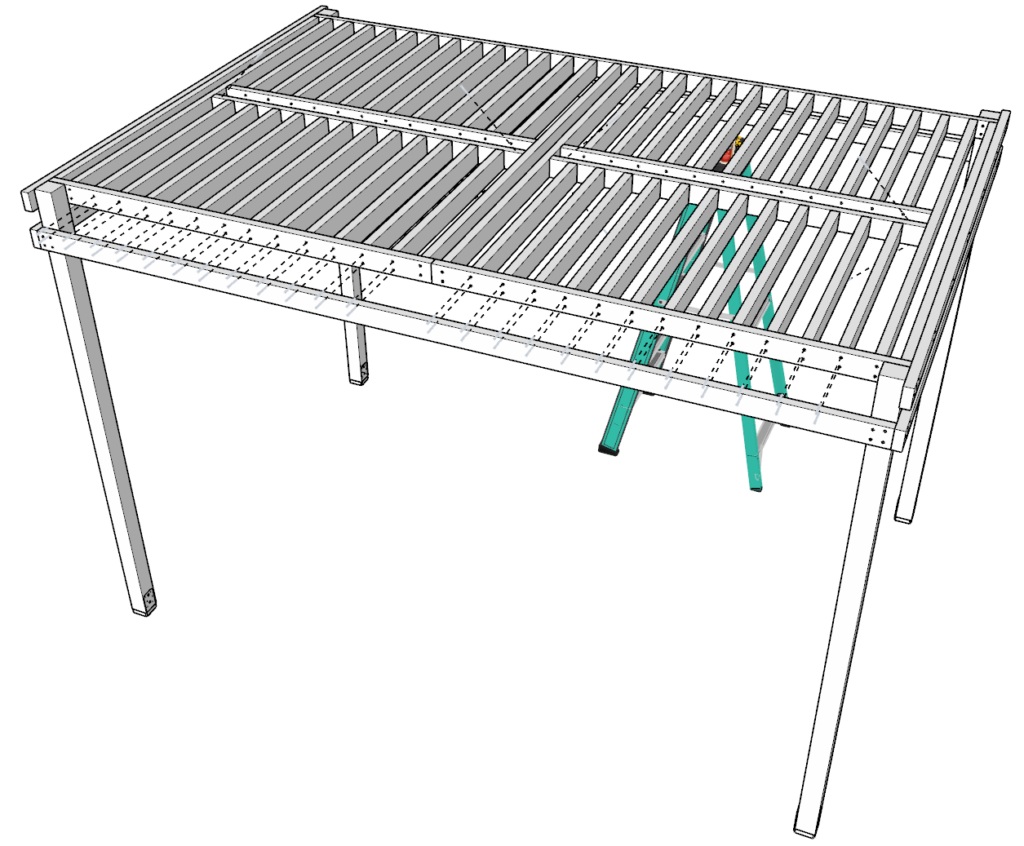
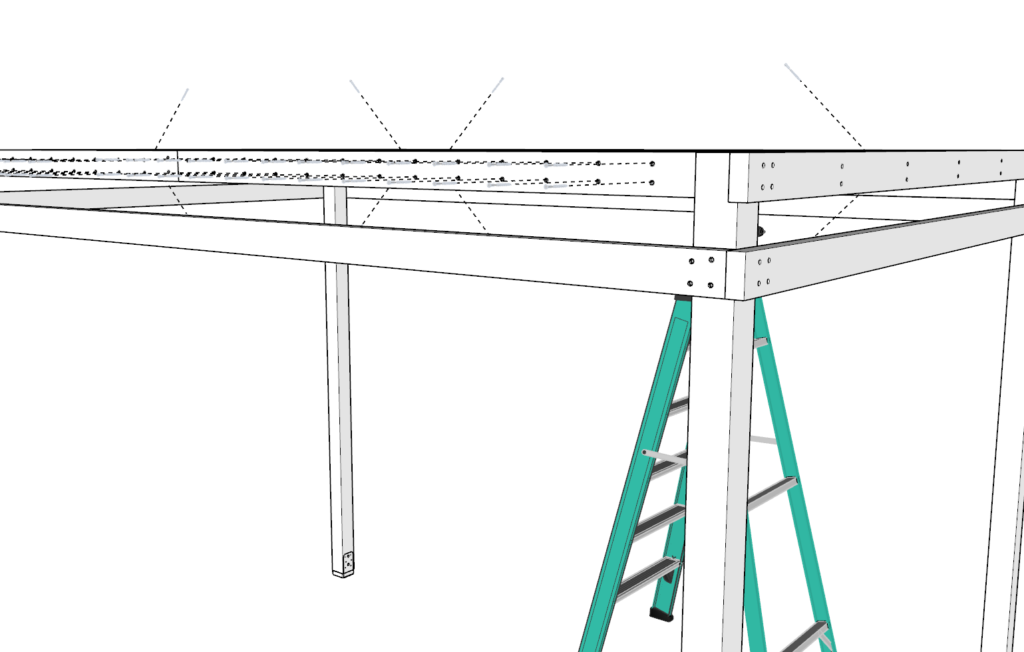
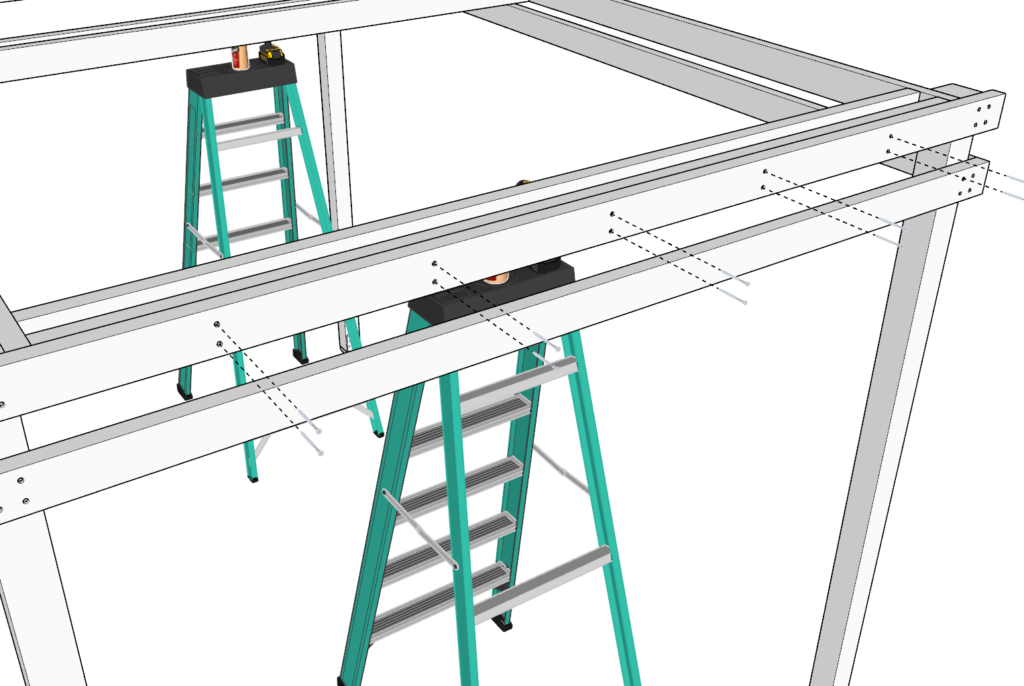
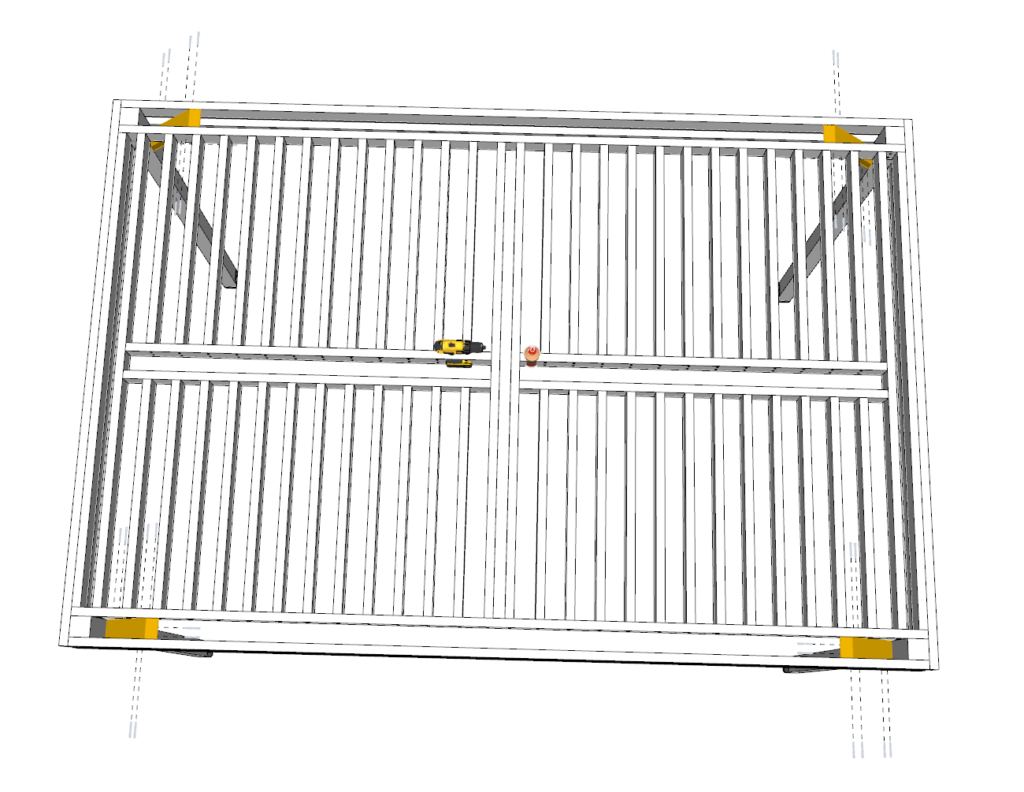
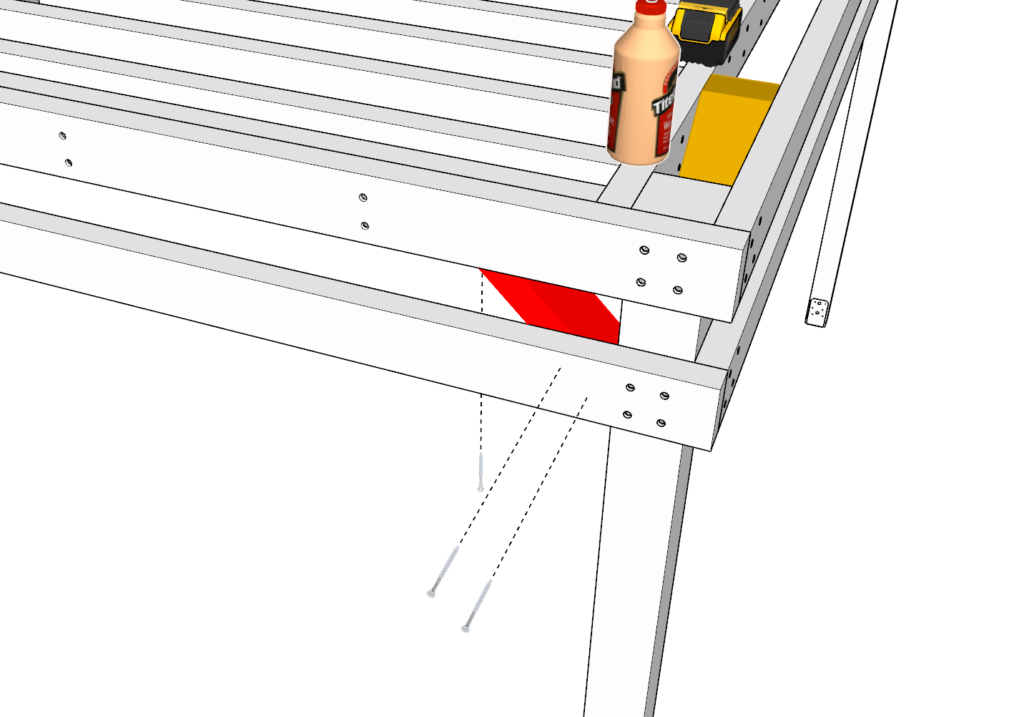
Step 8: Finalizing the Pergola's Upper Frame
Measure and Cut:
- Cut two 144-inch 2×4 pieces, one for each side of the pergola’s upper frame.
Ensure Vertical Alignment:
- Before attaching, use a level to check that each pergola pillar remains at a 90-degree angle to the ground. Adjust if necessary to ensure perfect vertical alignment.
Attach the Crosspieces:
- Position the 2x4s: Place each 144-inch 2×4 along the top sides of the pergola, following the diagram for exact placement.
- Pre-drill Holes: To prevent wood splitting, pre-drill holes at the ends of each 2×4 and at points where they will attach to the pillars.
- Apply Glue: Add wood glue to the contact points for a stronger bond.
- Secure with Screws: Fasten each 2×4 to the pergola’s pillars using screws, ensuring a tight and secure fit.
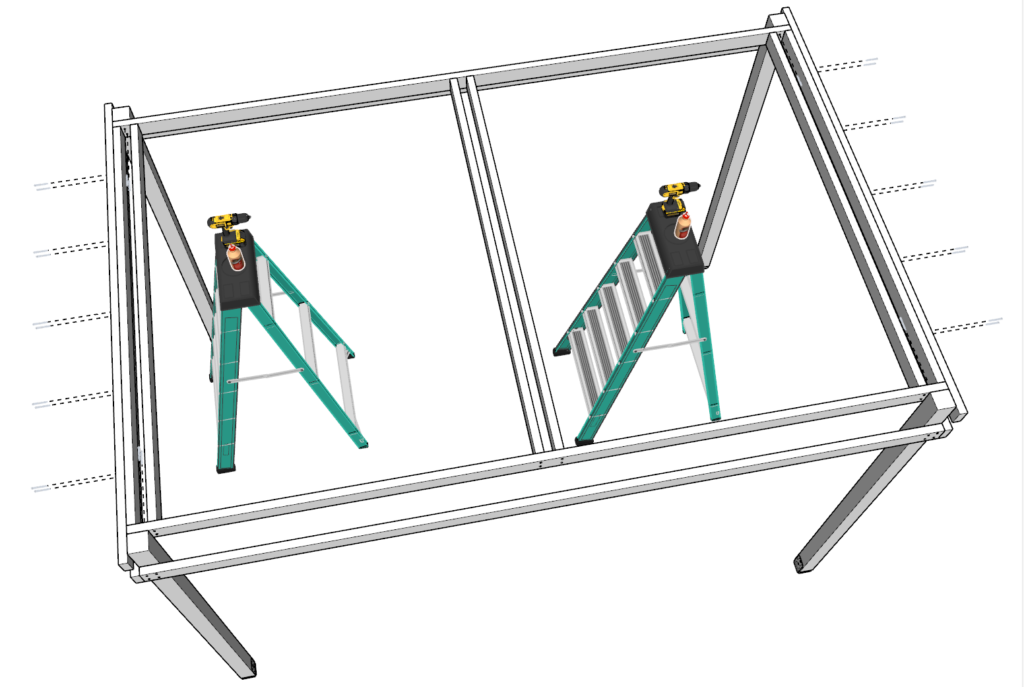
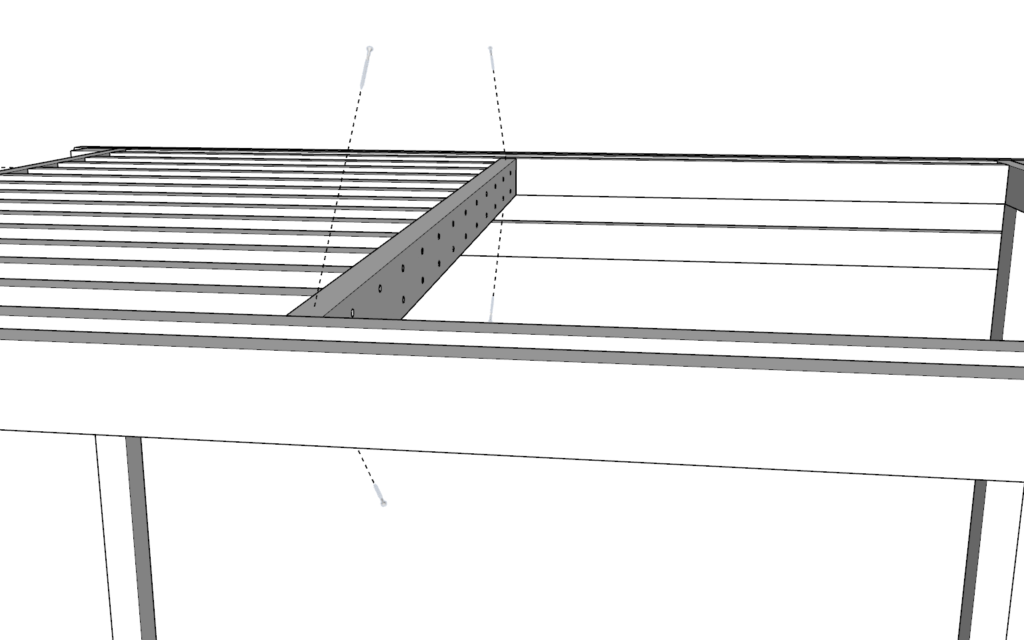
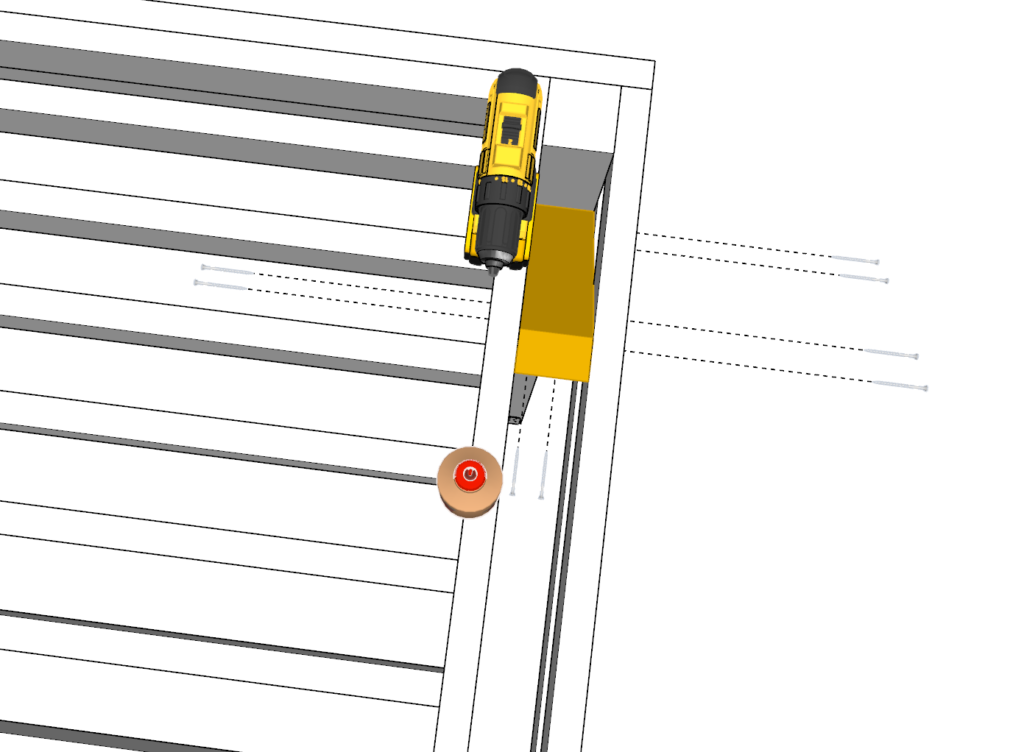
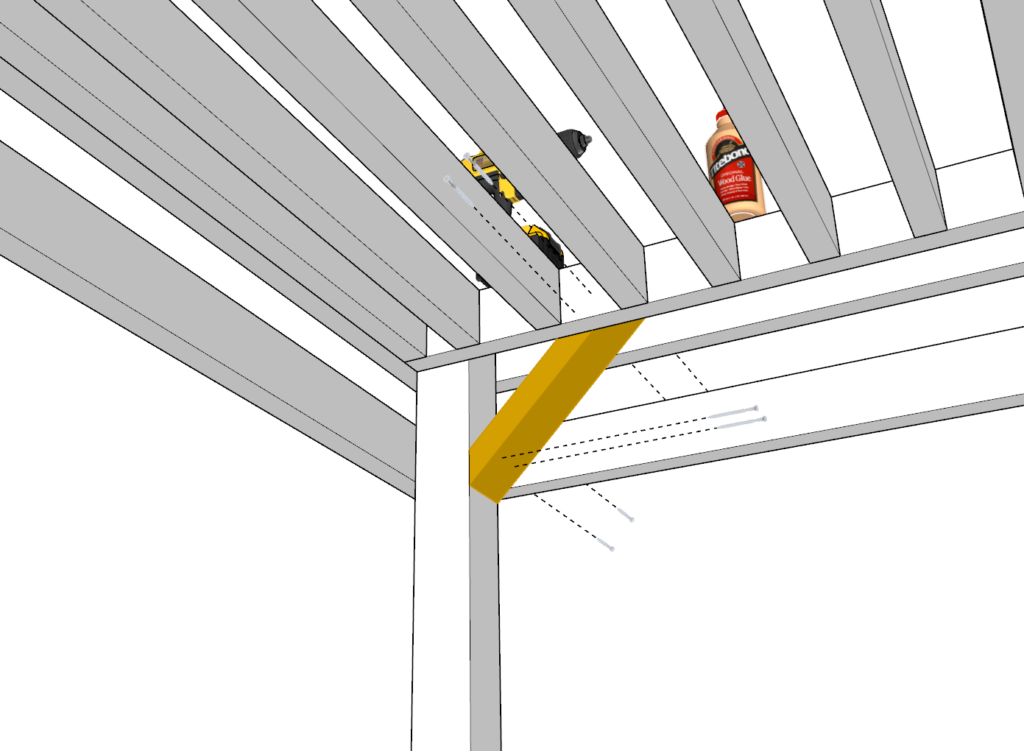
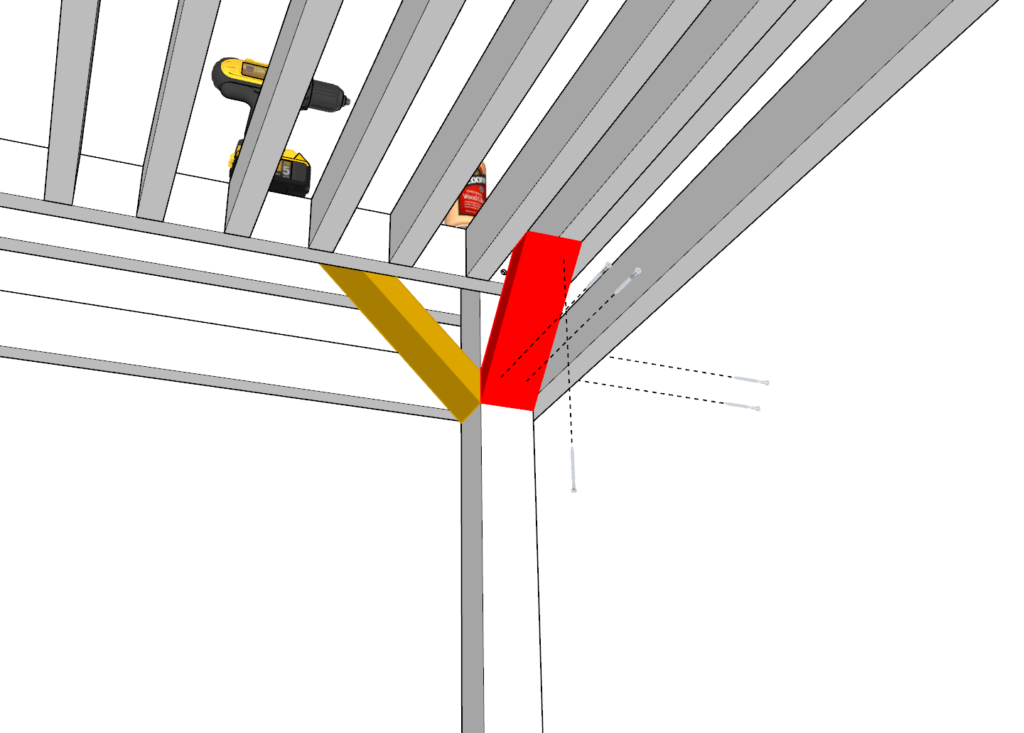
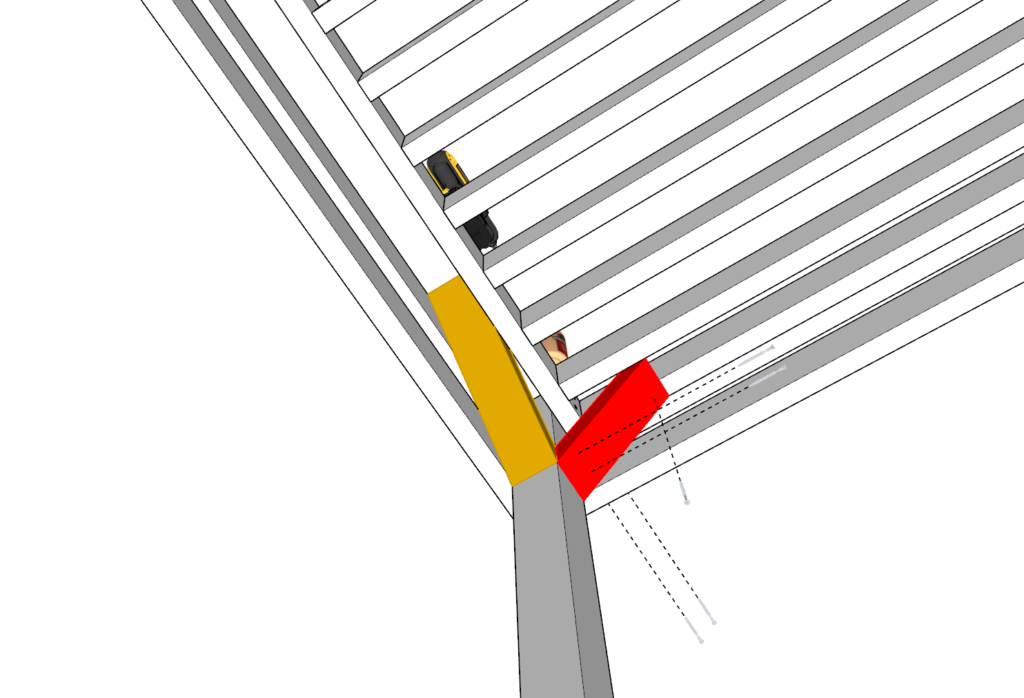
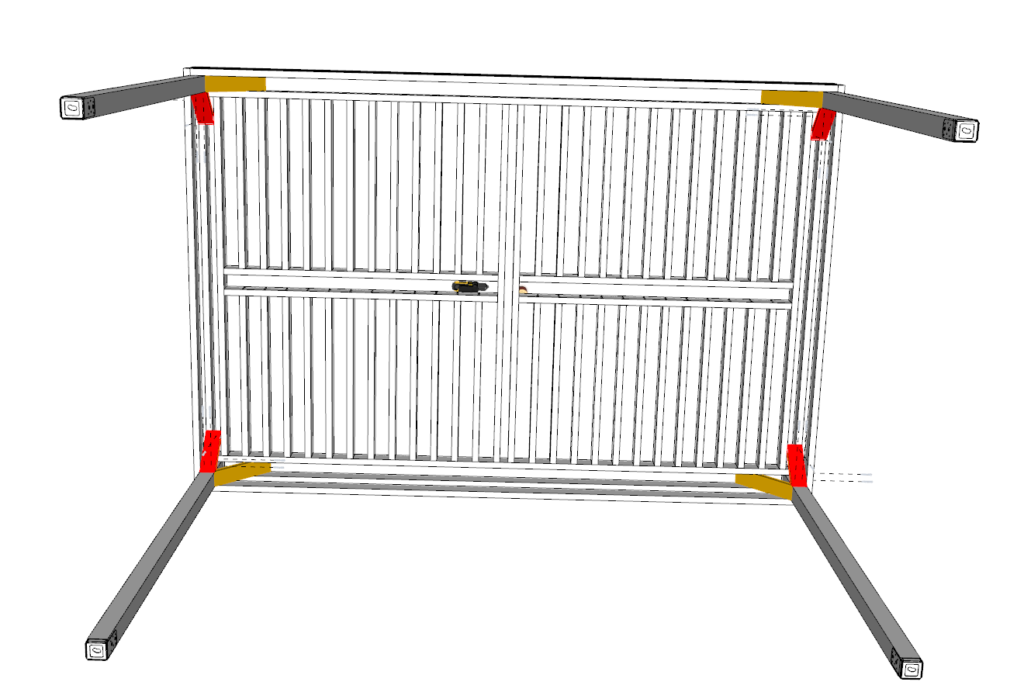
Step 9: Installing Reinforcement Braces
Cut and Angle Braces:
- Prepare four 16-inch 2×4 pieces, cutting ends at a 45-degree angle for broader support (represented in gold in the diagrams).
- Cut another set of four 11 1/16-inch 2×4 pieces, also angling ends at 45 degrees (represented in red in the diagrams).
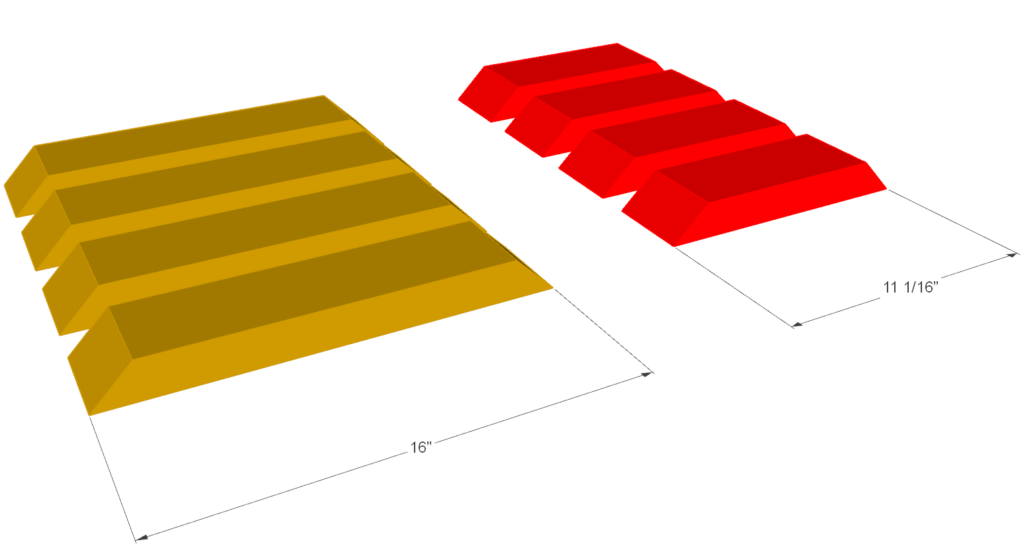
Positioning and Attaching the Braces:
16-inch Braces (Gold):
- Level and Align: Use a level to ensure the pergola’s 4×4 pillars and overall structure are vertically aligned.
- Pre-drill: Before attaching, pre-drill holes in the braces to prevent wood splitting.
- Apply Glue: Add wood glue to the ends of each brace for a secure bond.
- Secure Braces: Fasten the 16-inch braces as indicated in the diagrams using screws, ensuring each brace is flush and tight against the structure.
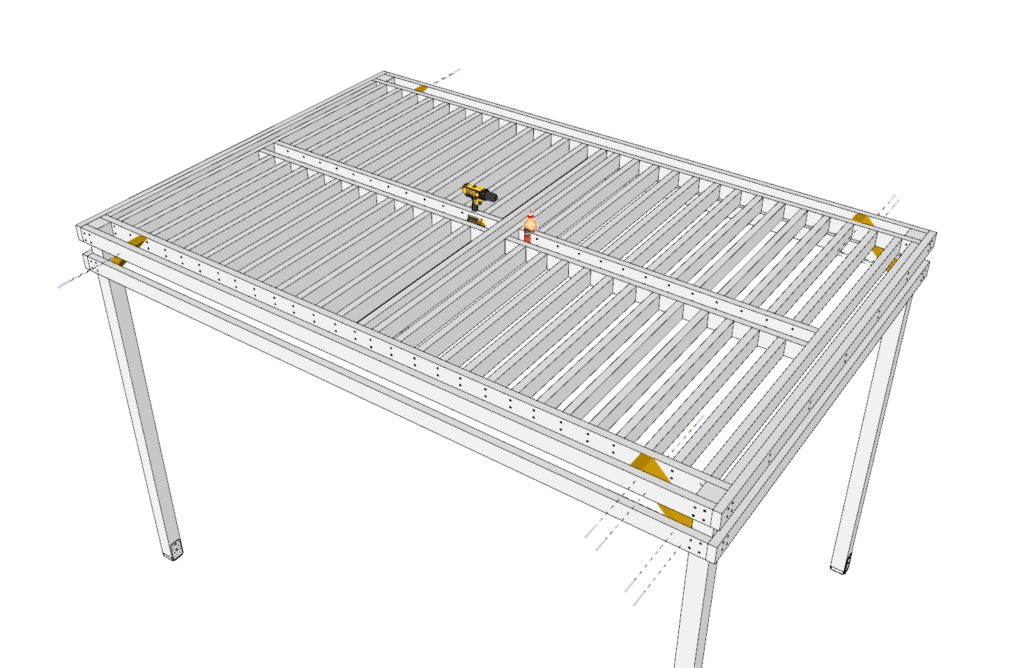
11 1/16-inch Braces (Red):
- Check Alignment: With a level, confirm the precise placement and angle for these smaller braces.
- Pre-drilling: Repeat the pre-drilling process for these braces.
- Gluing: Apply glue to the angled ends of the 11 1/16-inch braces.
- Attachment: Secure these braces as shown in red in the diagrams, maintaining the correct angle and positioning.

Step 10: Finishing Touches and Legal Disclaimer
Sanding the Structure:
- Start with Coarse Grit: Begin sanding using 80-grit sandpaper to remove rough surfaces and splinters. Move along the grain of the wood to prevent scratches.
- Progress to Finer Grit: Switch to 120-grit, then finish with 220-grit sandpaper for a smooth surface. Ensure every part of the pergola is evenly sanded, including hard-to-reach areas.
- Dust Removal: Use a tack cloth or a soft brush to remove all the sawdust from the pergola, preparing it for finishing.
Filling Holes:
- Wood Putty: Choose a wood putty that matches the color of your wood. Apply it to screw holes or imperfections, smoothing it with a putty knife. Allow it to dry according to the product’s instructions before sanding it smooth.
Painting:
- Primer: Apply a primer suitable for outdoor use and the type of wood of your pergola. Let it dry completely.
- Paint: Choose exterior-grade paint. Apply with a brush or roller in thin, even coats, allowing each coat to dry before applying the next. Usually, two coats are sufficient.
Staining:
- Wood Stain: Select a stain that offers UV protection and is meant for outdoor use. Apply with a brush, following the wood grain. Wipe away excess stain with a clean rag.
- Sealant: After the stain dries, apply a clear outdoor sealant to protect the wood from moisture and fading.
Maintenance:
- Annual Check: Inspect your pergola annually for any signs of wear or damage, especially before winter.
- Reapply Finish: Every 2-3 years, sand lightly and reapply paint, stain, or sealant to protect the wood.
- Cleaning: Regularly clean the pergola with a mild soap solution and a soft brush to prevent mold and mildew buildup.
Legal Disclaimer: GoodDIYplans provides these plans for informational purposes only and does not assume responsibility for any damage or injury resulting from the construction, use, or misuse of this pergola. Users are responsible for ensuring the structural integrity and safety of their projects. GoodDIYplans is not liable for:
- Damage to cement or any structures due to incorrect installation.
- Injuries or damages resulting from objects hung from the pergola or excessive weight load.
- Environmental or weather-related damages. Safety first: Always wear appropriate safety gear when constructing and finishing your pergola. Ensure all installations meet local building codes and regulations.
By following these detailed steps and adhering to the safety guidelines, you can enjoy a beautifully finished and durable pergola that enhances your outdoor space.