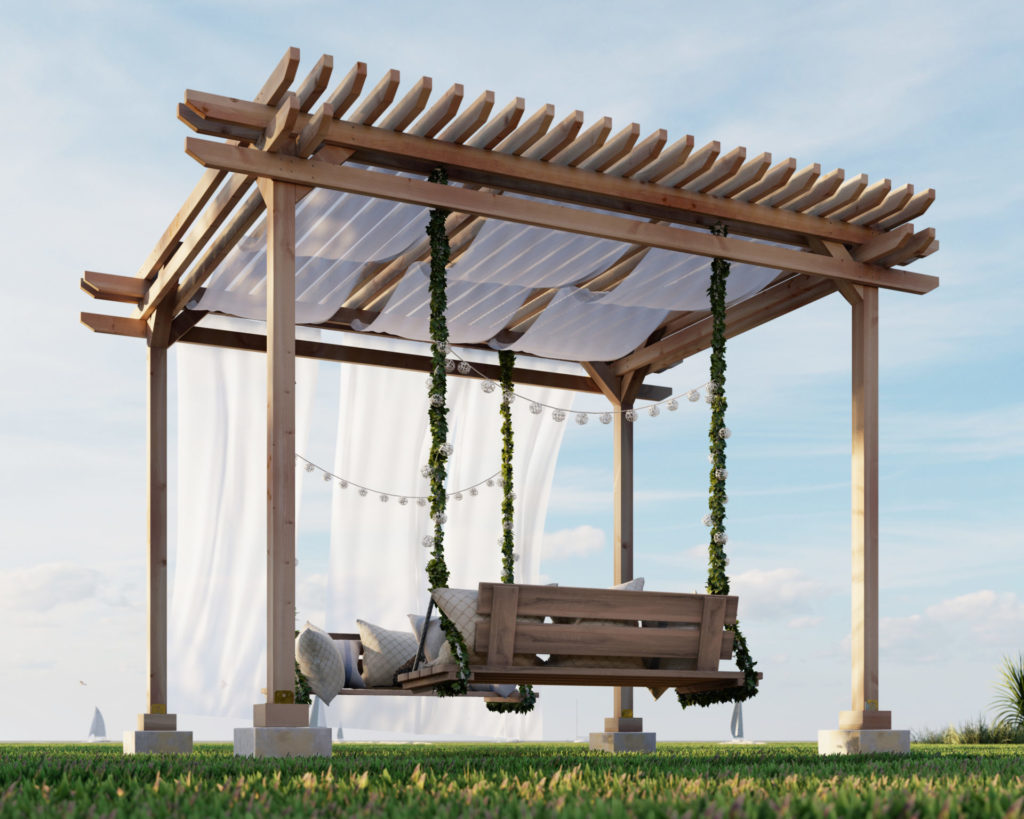
Discover the Benefits of Building a DIY Pergola: A Guide to the Perfect Outdoor Project
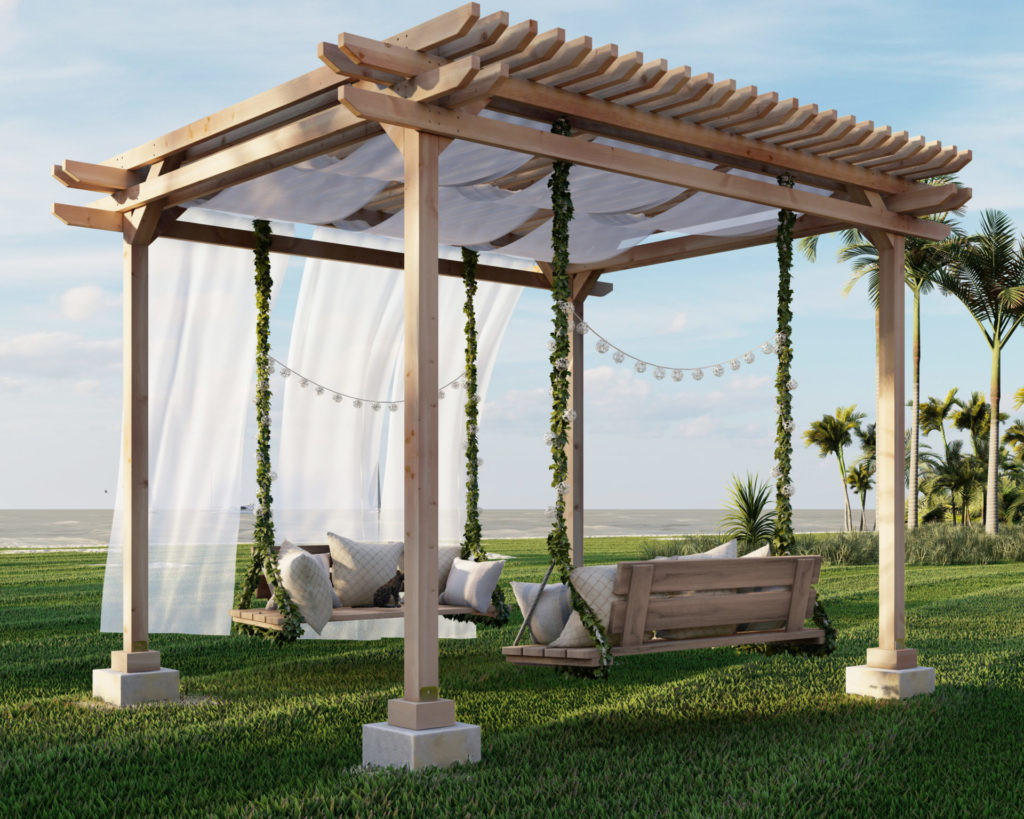
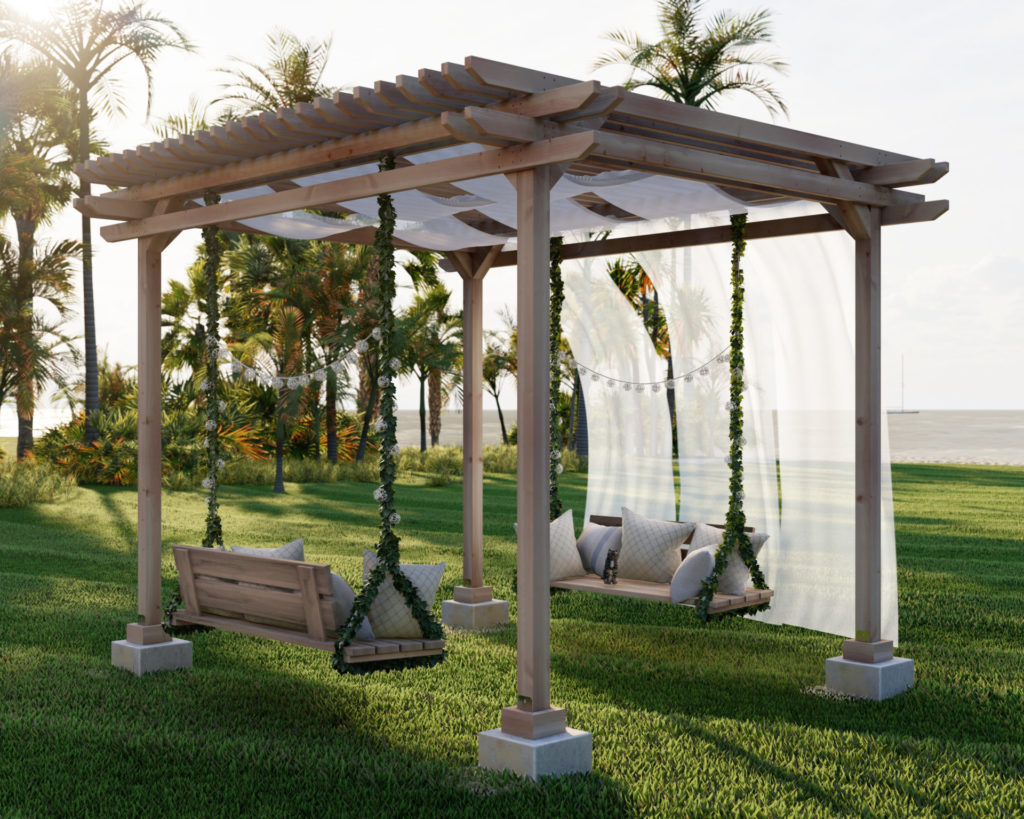
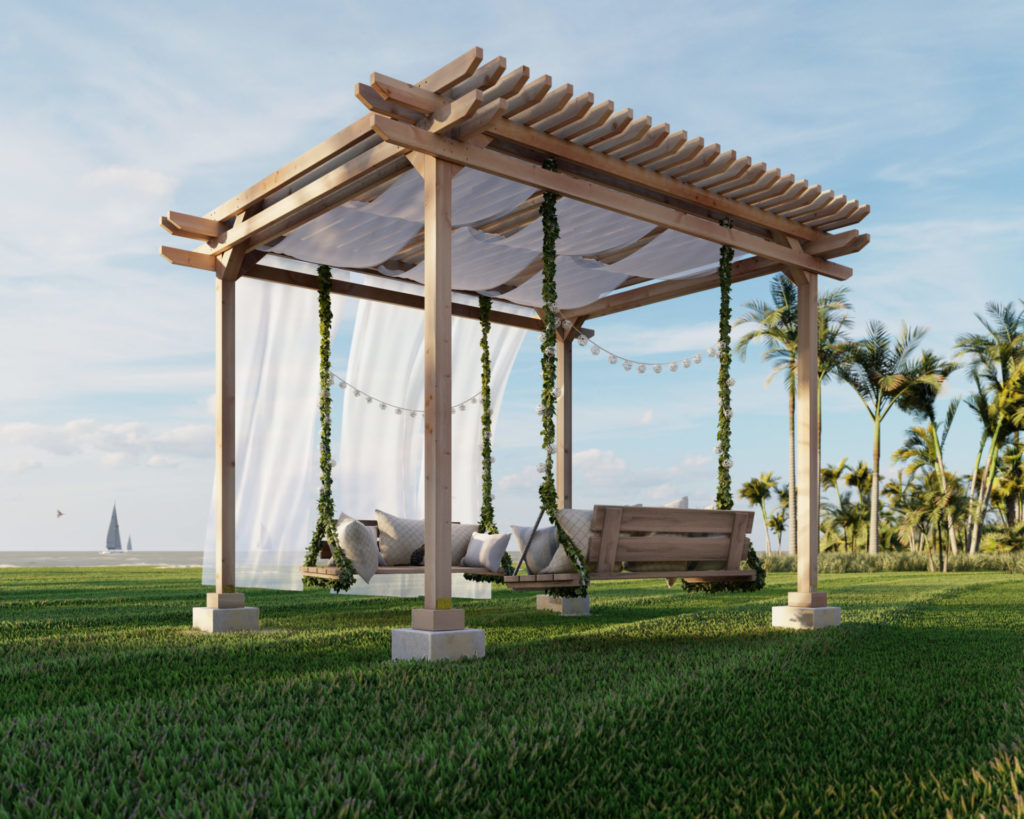
A DIY pergola is a wonderful outdoor structure that can transform your backyard into a beautiful and functional space. It provides a shaded and cozy area for you to relax and entertain guests, creating a comfortable and inviting outdoor living area. Whether you’re looking for a place to read a book, have a meal with family and friends, or simply lounge in the sun, a pergola offers the perfect solution.
Not only does a pergola provide a functional and relaxing space, but it also enhances the aesthetic appeal of your yard. The beautiful and timeless design of a pergola adds an architectural element to your property, increasing its visual appeal and property value. It can also be used to define a specific area in your yard, such as a seating area, hot tub, or garden, providing a natural and organic flow to your outdoor living space.
Additionally, building a DIY pergola can be a fun and fulfilling project. With the right plans and materials, anyone can build a pergola in just a few days. Not only will you save money by building it yourself, but you’ll also have the satisfaction of creating something beautiful and functional with your own two hands. Plus, the process of building a pergola is a great opportunity to improve your DIY skills, giving you the confidence to tackle even bigger projects in the future.
With so many benefits and so much potential, it’s easy to see why a DIY pergola is such an exciting project. So, why not get started today and add this beautiful and functional structure to your backyard?
Choosing the Right Wood for Your DIY Pergola: A Guide to Redwood, Cedar, and Pine
The type of wood you choose for your DIY pergola is a critical factor that will affect its overall look, durability, and maintenance requirements. Three of the most popular choices for pergola construction are redwood, cedar, and pine.
Redwood is an excellent option for its durability and resistance to rot and insects. This type of wood is naturally resistant to decay and has a high oil content that helps protect it from moisture and insects. It is also known for its attractive reddish-brown color and fine, straight grain. However, redwood is also the most expensive option of the three.
Cedar is a good balance between affordability and durability. This type of wood is naturally resistant to decay, rot, and insects, and has a beautiful reddish-brown color that turns gray with age. Cedar is also relatively lightweight, making it easy to work with. The only downside is that it is more susceptible to cracking and checking than redwood.
Pine is the most affordable option, but it requires more maintenance than the other two woods. Pine is not as naturally resistant to decay and rot as redwood and cedar, and it is also more susceptible to insect damage. However, pine is a soft wood that is easy to work with, and it is readily available and affordable. Pine is also a good option if you plan to paint or stain your pergola, as it takes paint and stain well.
When choosing a type of wood for your DIY pergola, consider your budget, the desired look and durability, and the maintenance requirements. Redwood is the most durable and resistant, but also the most expensive. Cedar is a good balance between affordability and durability, and pine is the most affordable but requires more maintenance. Ultimately, the decision will come down to your personal preferences and needs.
DIY Pergola Project: The Perfect Starter for Aspiring DIYers
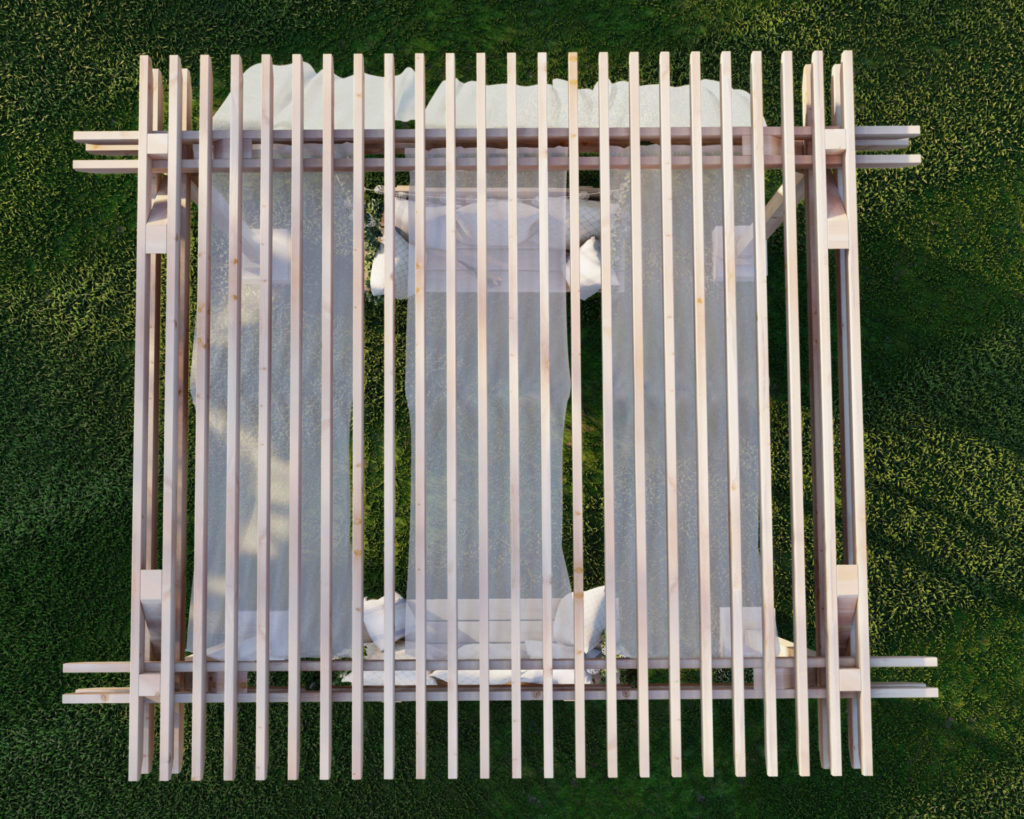
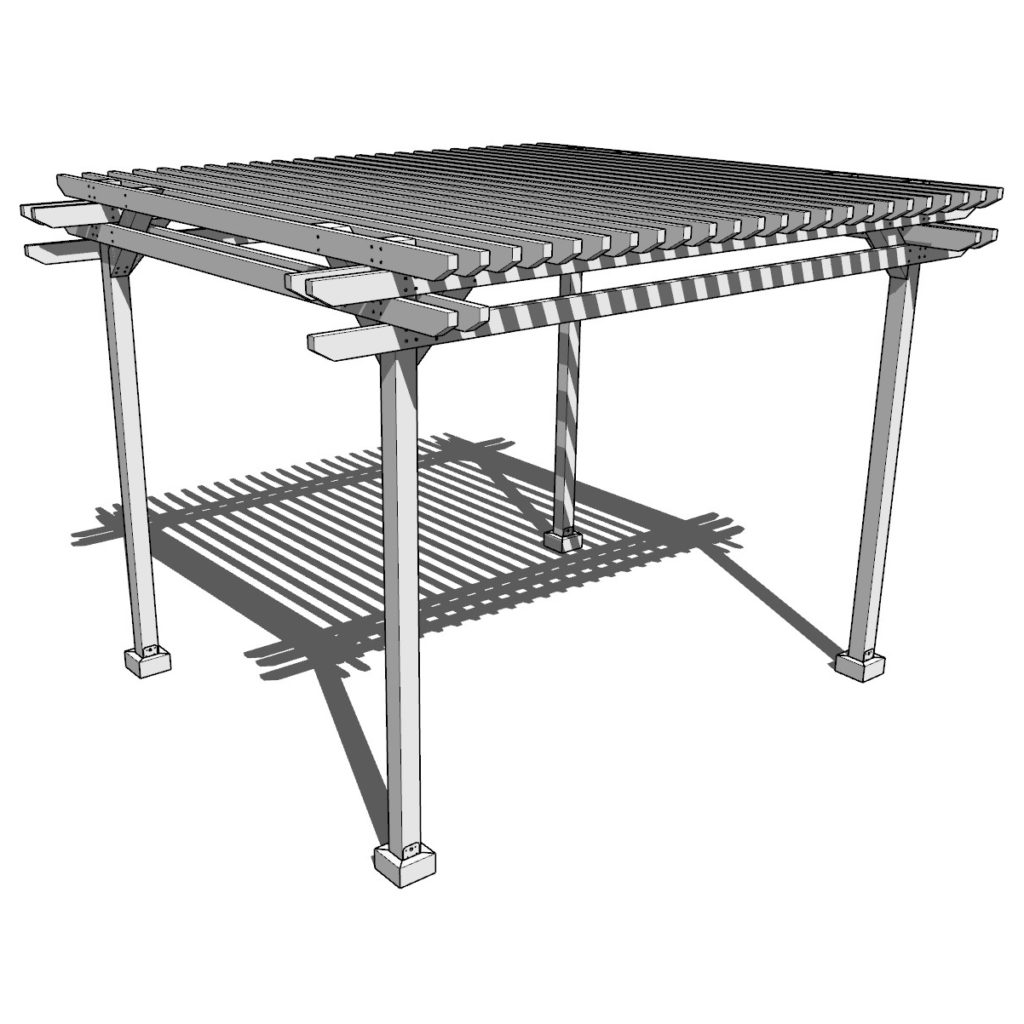
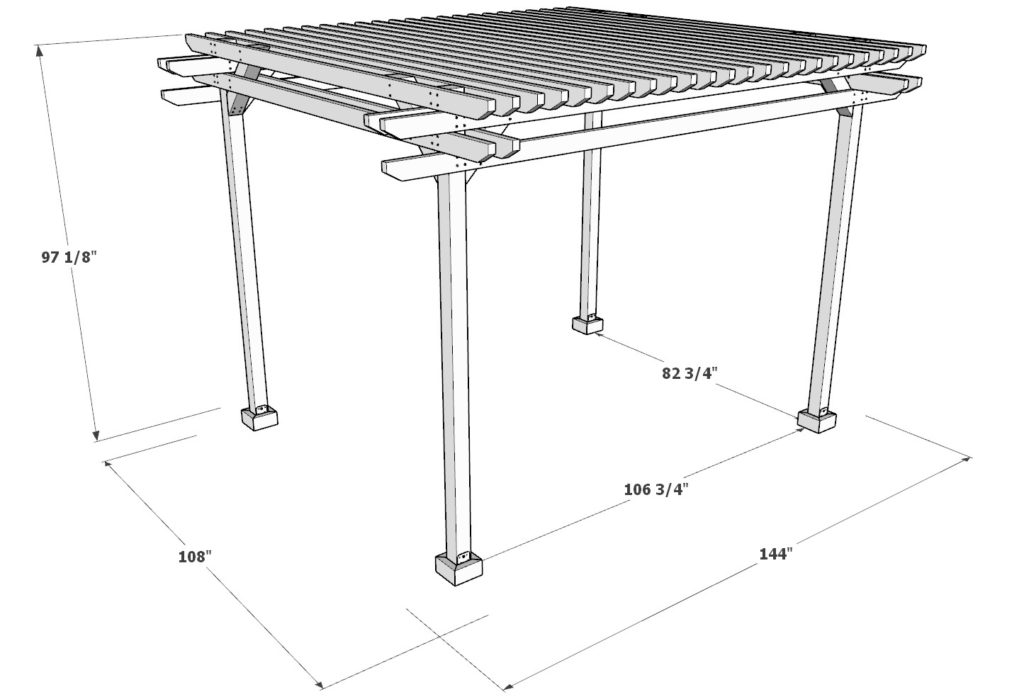
If you’re a beginner looking to take on a DIY project, this 10 ft. x 12 ft. pergola is an excellent choice. The simple design makes it an ideal starting point for anyone looking to build a pergola from scratch. The lack of fancy joints or cuts required means that you don’t need to have extensive woodworking knowledge to complete this project.
The benefits of tackling a DIY pergola project are numerous. Building a pergola provides you with hands-on experience in using tools, cutting and measuring materials, and following plans. These skills can be applied to future DIY projects, making you more confident in your abilities.
In addition, building a pergola is a rewarding experience that can save you money compared to hiring a contractor. You’ll have the satisfaction of creating a beautiful outdoor space that you can enjoy for years to come. Plus, you’ll have a new addition to your property that adds value to your home.
This pergola project is designed for simplicity, making it a great choice for beginners. The straightforward design and detailed instructions included in the DIY plan ensure that even those with limited woodworking experience can complete the project with confidence. The end result will be a sturdy, attractive pergola that you can be proud of.
So if you’re looking for a beginner-friendly DIY project, this 10 ft. x 12 ft. pergola is a great option. Not only will you have the satisfaction of creating a beautiful outdoor space, but you’ll also have the opportunity to gain valuable DIY skills that you can use on future projects.
Building Your Dream Pergola with a DIY Plan: The Benefits and Advantages
If you’re considering adding a pergola to your backyard, purchasing the DIY plans for this 10 ft. x 12 ft. pergola is a smart choice. Here are five reasons why building with a DIY plan is a better option than hiring a contractor or attempting to design a pergola from scratch.
- Cost Savings: Building a pergola with the DIY plans eliminates the cost of hiring a contractor, saving you money.
- Customization: With the DIY plans, you have the freedom to customize the pergola to match your backyard and personal style. You can choose the type of wood, stain, and other finishing touches to create a unique structure that perfectly fits your outdoor space.
- Quality Control: By building the pergola yourself, you have complete control over the quality of the materials and construction process. You can ensure that the pergola is built to your exact specifications and meets your standards for durability and longevity.
- DIY Fun: Building a pergola can be a fun and rewarding DIY project. You’ll have the satisfaction of creating a beautiful outdoor space that you can enjoy for years to come. Plus, you’ll have the opportunity to gain valuable DIY skills that you can use on future projects.
- Easy-to-Follow Plans: The DIY plans provide clear and detailed instructions, making the building process manageable and stress-free. Whether you’re a seasoned DIYer or a beginner, the plans will guide you through the entire process, step-by-step.
In conclusion, building a pergola with the DIY plans is a smart choice for those looking to add a beautiful structure to their backyard. The cost savings, customization options, quality control, DIY fun, and easy-to-follow plans make it an attractive option for anyone looking to take on a pergola project. So, why wait? Purchase the DIY plans today and start building your dream pergola.
Time to build
About 5 hours
Total cost of build
About $400
Skill level required
Beginner
Download the PDF plans
DIY pergola PDF plans
What is included in the PDF download?
Easy to read step by step instructions
Material list
Tools needed
3D illustrations
Recommended tools/materials
The tools and material list is available with the purchase of the DIY plan. Thank you for making this website possible with your support!.
Shopping list and cut list
Lumber shopping and cut list is available with the purchase of the DIY plan. Thank you for making this website possible with your support!.
Step 1 (DIY pergola lumber cut list)
First, cut all lumber pieces to size.
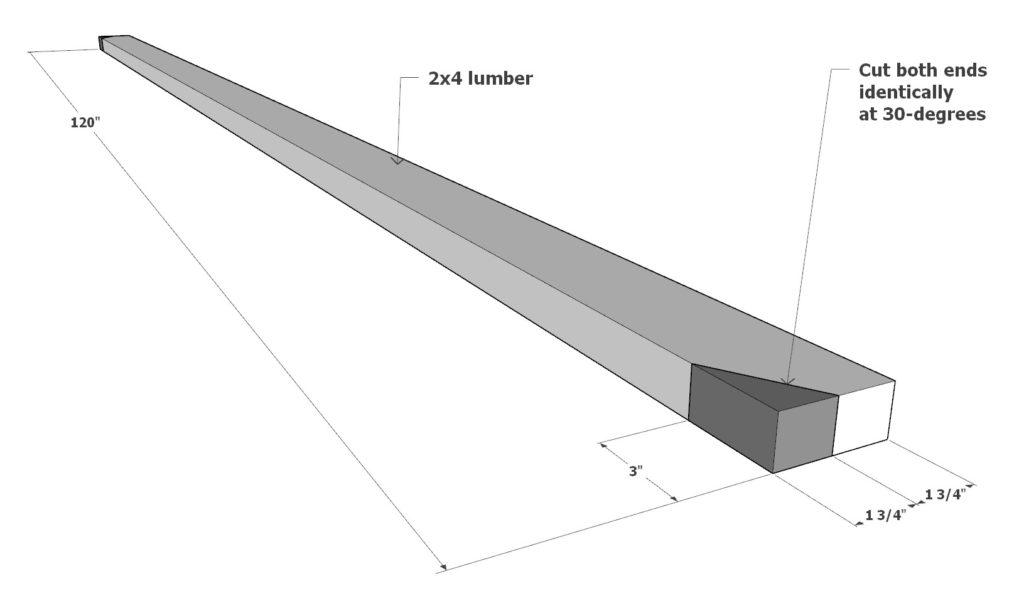
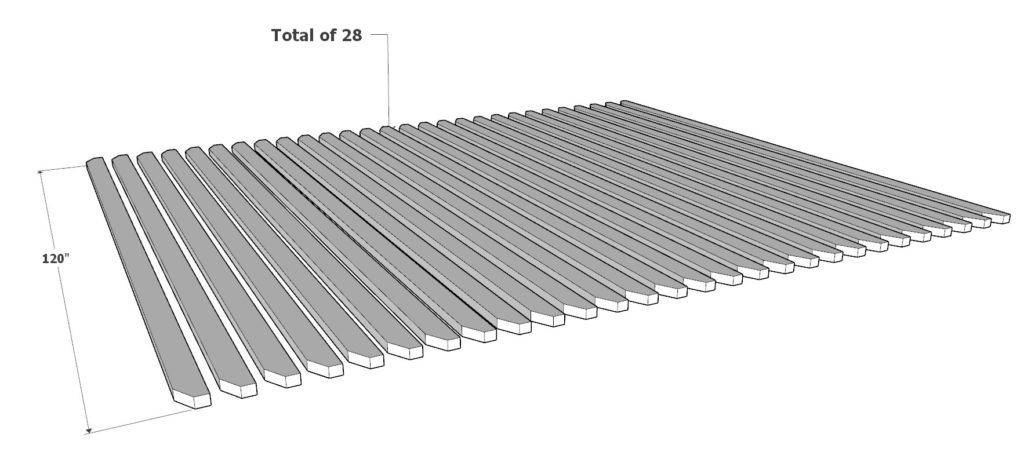
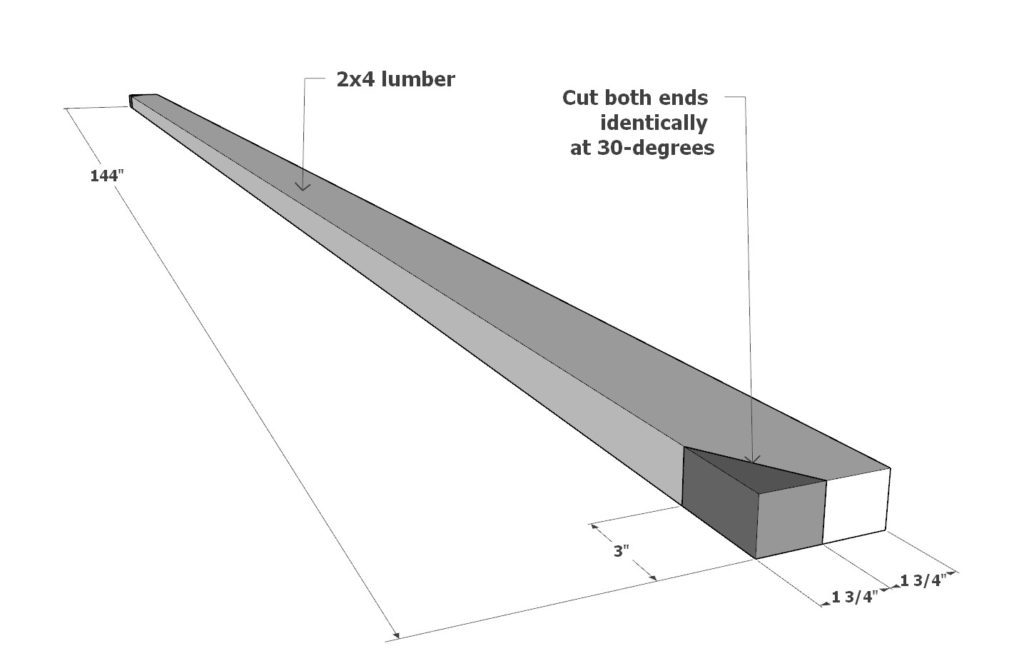
1. Cut twenty-eight 120 inch long 2×4 lumber pieces with the ends being cut at 30-degrees as illustrated below.
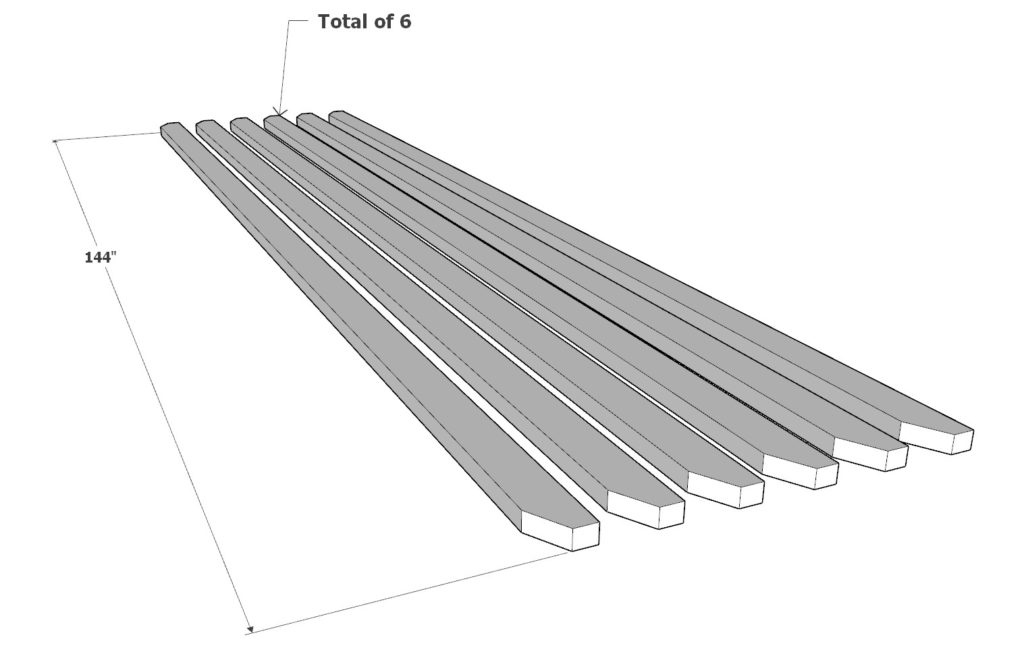
2. Cut six 144 inch long 2×4 lumber pieces with the ends being cut at 30-degrees as illustrated below.
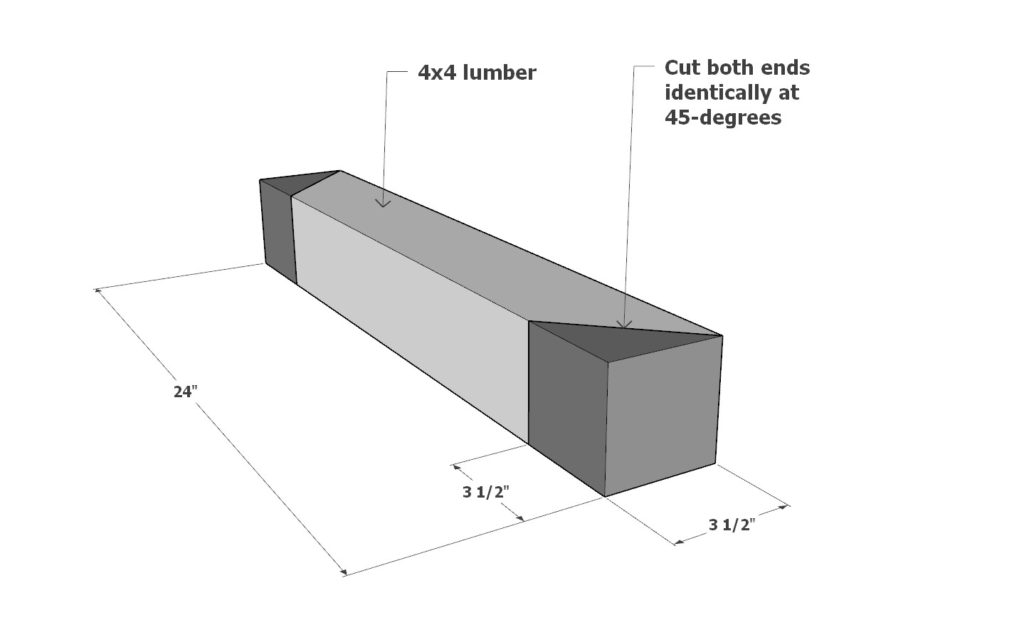
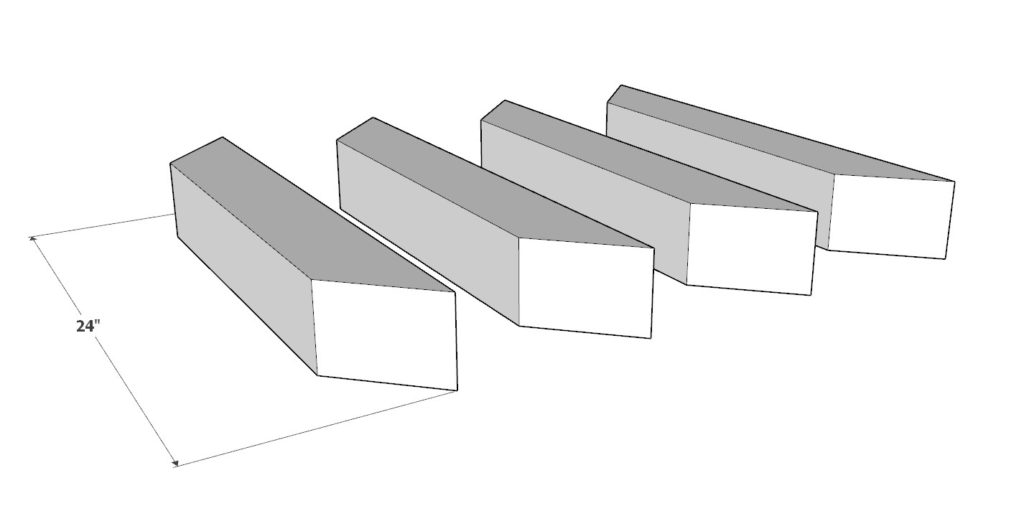
3. Cut four 24 inch 4×4 lumber pieces with both ends cut at 45-degrees as illustrated below.
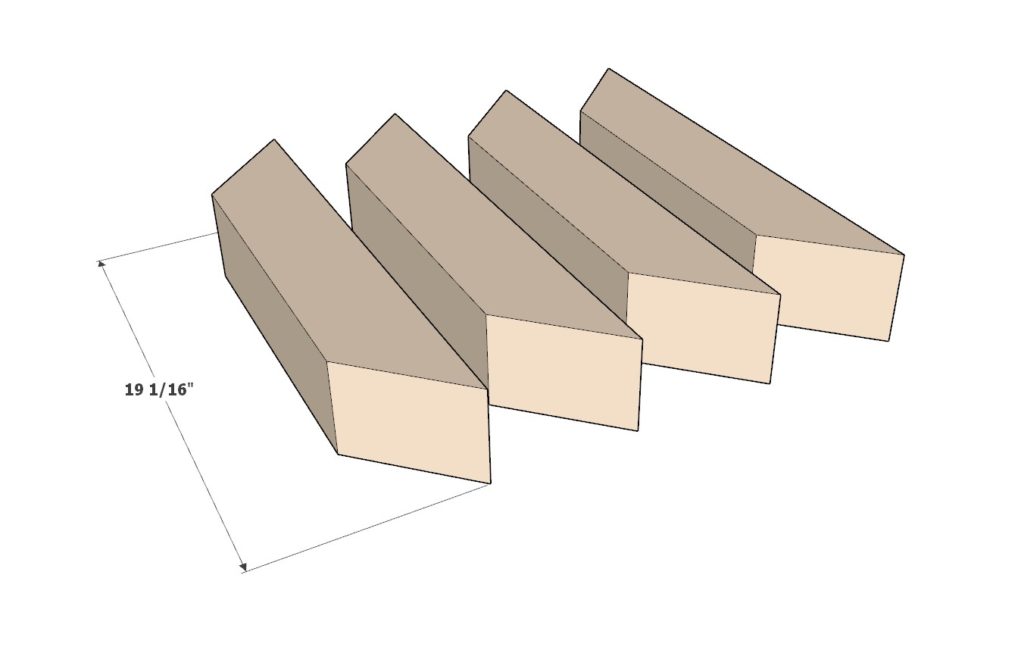
4. Cut four 19-1/16 inch 4×4 lumber pieces with both ends cut at 45-degrees as illustrated below.
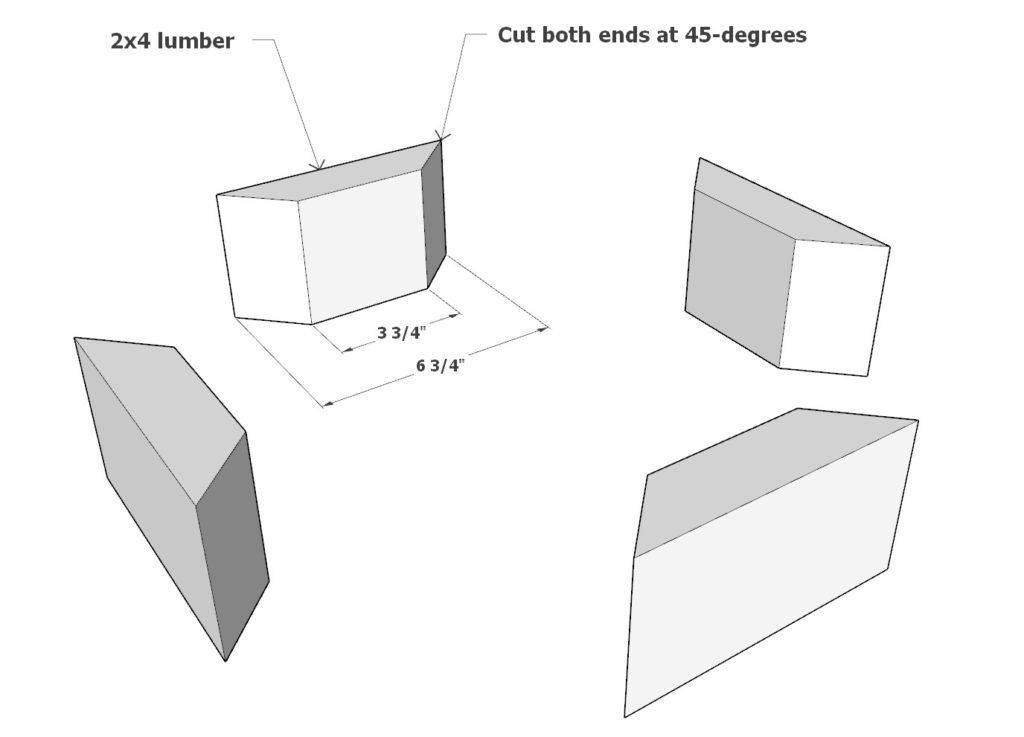
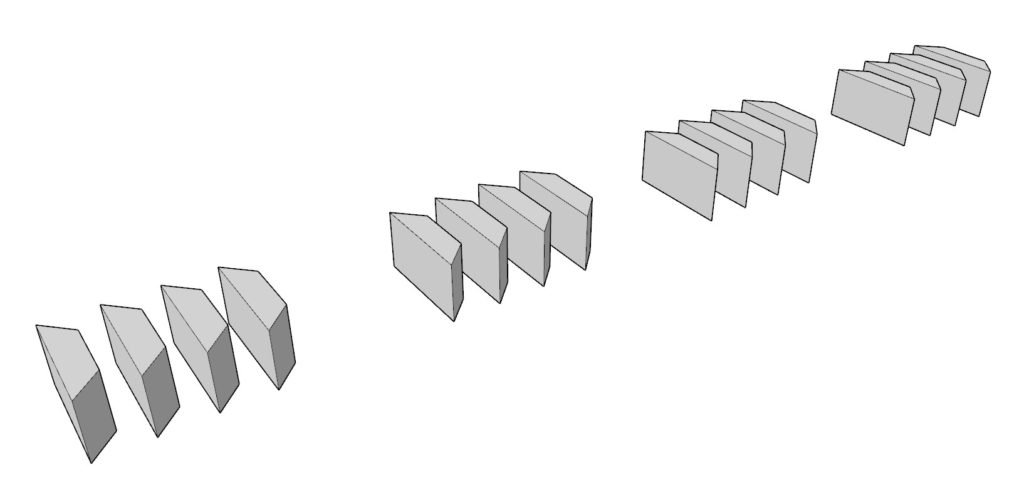
5. Cut sixteen 6-3/4 inch 2×4 lumber pieces with both ends cut at 45-degrees as illustrated below.

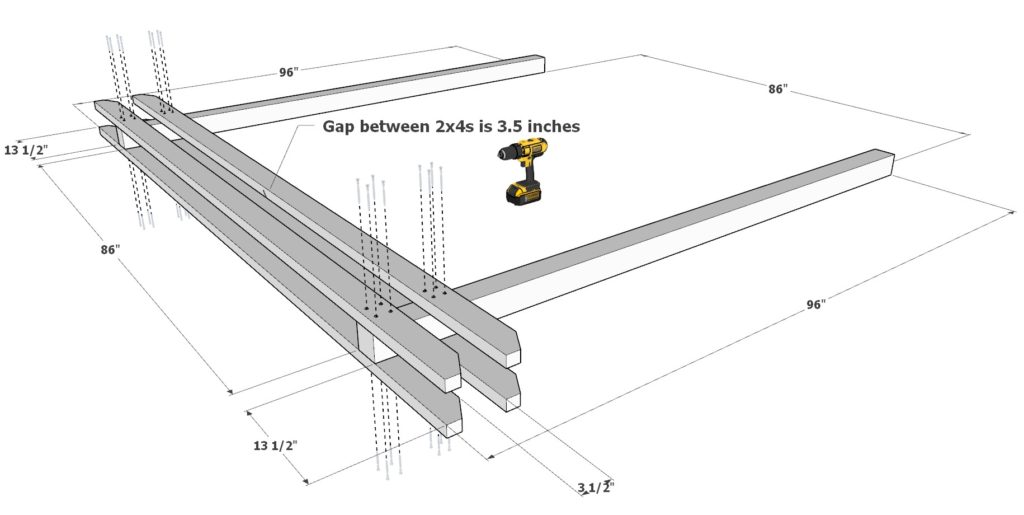
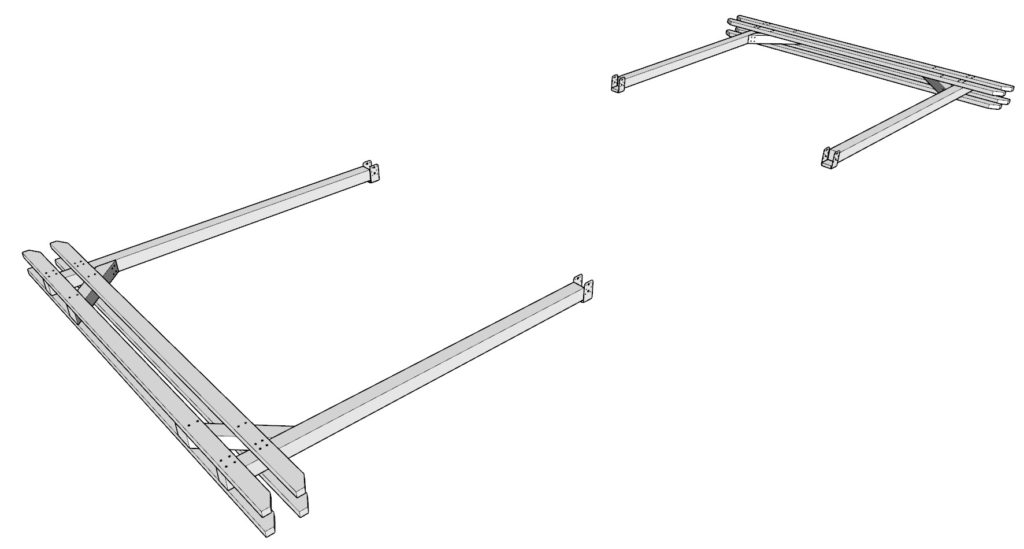
Step 2 (DIY pergola frame assembly)
Next, assemble the DIY pergola frame.
Take two 96 inch long 4×4 lumber pieces and four 120 inch 2×4 lumber pieces and arrange them as shown below. Space out the lumber pieces as indicated and add 3.5 inch screws to secure the frame together.
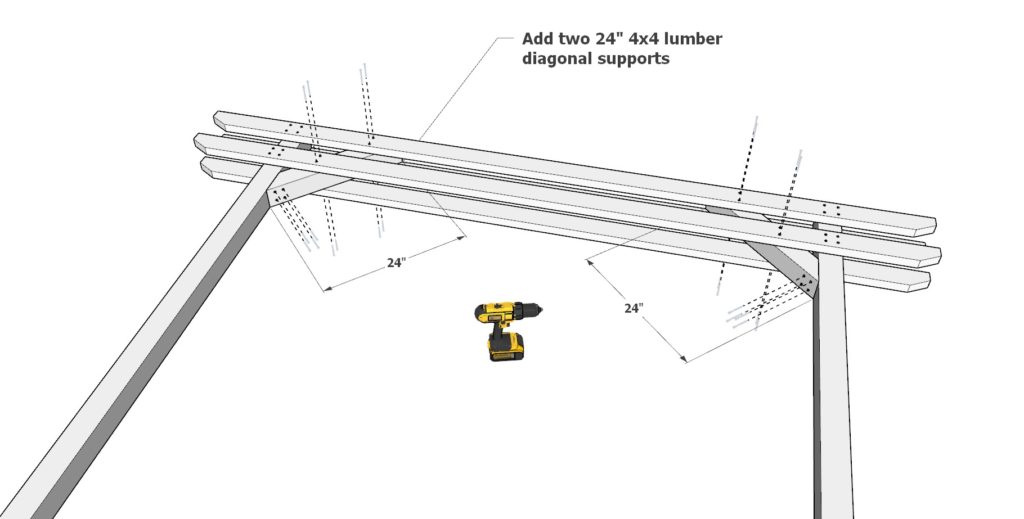
Next, add two 24 inch 4×4 lumber cross support beams to secure the frame together. Add screws as indicated in the illustration
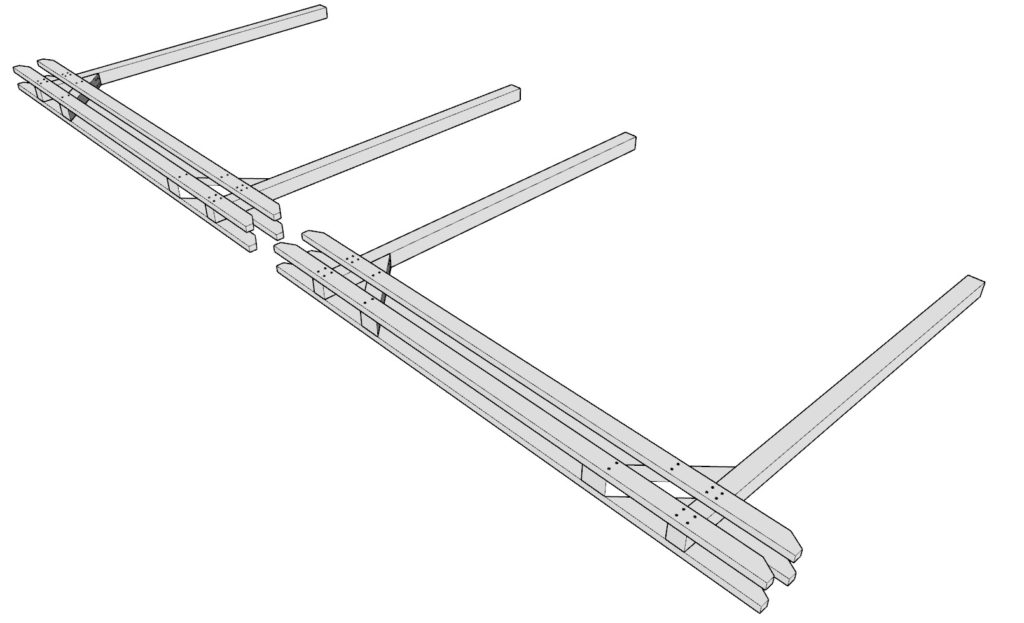
Make two identical DIY pergola frame pieces.
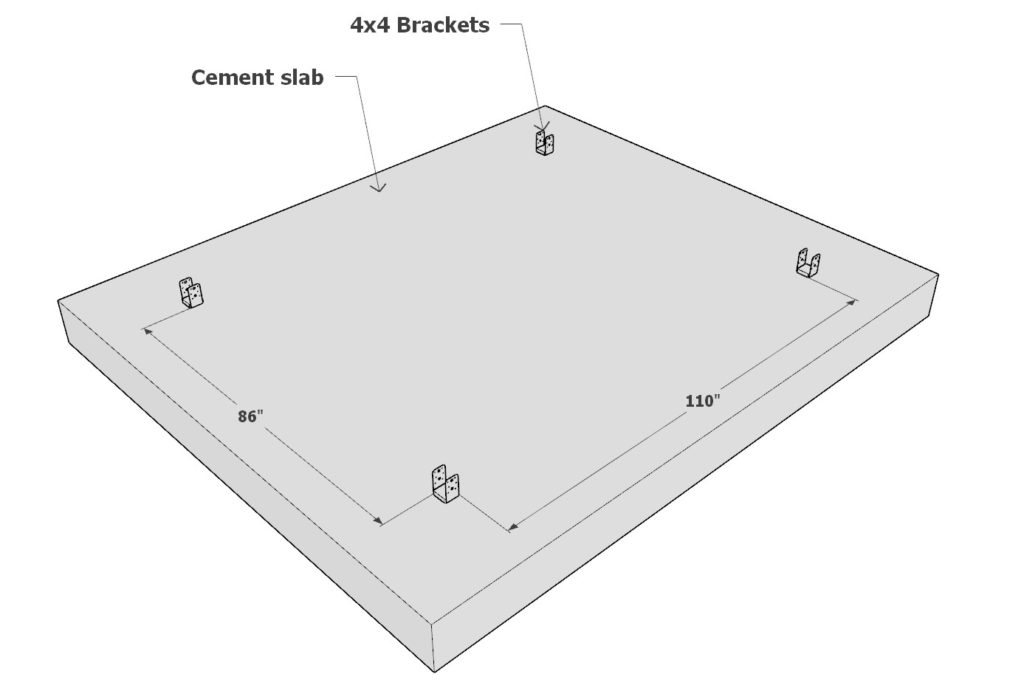
Step 3 (Cement slab preparation and bracket installation)
Adding Brackets to a Cement Slab:
When installing a pergola, the brackets are the main components that will secure the pergola to the ground. Brackets can be installed on a cement slab in a few different ways.
The most common way to add brackets to a cement slab is through drilling and anchoring. Before drilling into the cement slab, it is important to make sure that the slab is thick enough to support the weight of the pergola. To do this, you can measure the thickness of the slab with a tape measure. Once the thickness is confirmed, you can drill holes in the slab with a hammer drill and then anchor the bracket into the holes with concrete anchors.
Another way to add brackets to a cement slab is through epoxy anchoring. This method involves applying an epoxy adhesive to the underside of the bracket and then adhesive it to the cement slab. This method is best used for lighter pergolas and will provide a secure anchor for the pergola.
Advantages of Installing a Pergola Directly Into the Dirt:
Installing a pergola directly into the dirt is an alternative installation method. The main advantage of this method is that no drilling or anchoring is required. All that is needed is to dig a few holes in the ground and insert the posts. This method is best used for a small and lightweight pergola.
The main disadvantage of this method is that it does not provide as secure an anchor as the drilling and anchoring method. Additionally, the posts may need to be secured in the ground with concrete to provide a more secure anchor. This method is not recommended for larger and heavier pergolas.
When installing a pergola directly into the dirt, it is important to use pressure-treated posts. Pressure-treated posts will not rot, which is important for securing the pergola in the ground. If untreated posts are used, they will eventually rot, causing the pergola to become unstable. Pressure-treated posts are available at most hardware stores and should be used for any pergola installation into the ground.
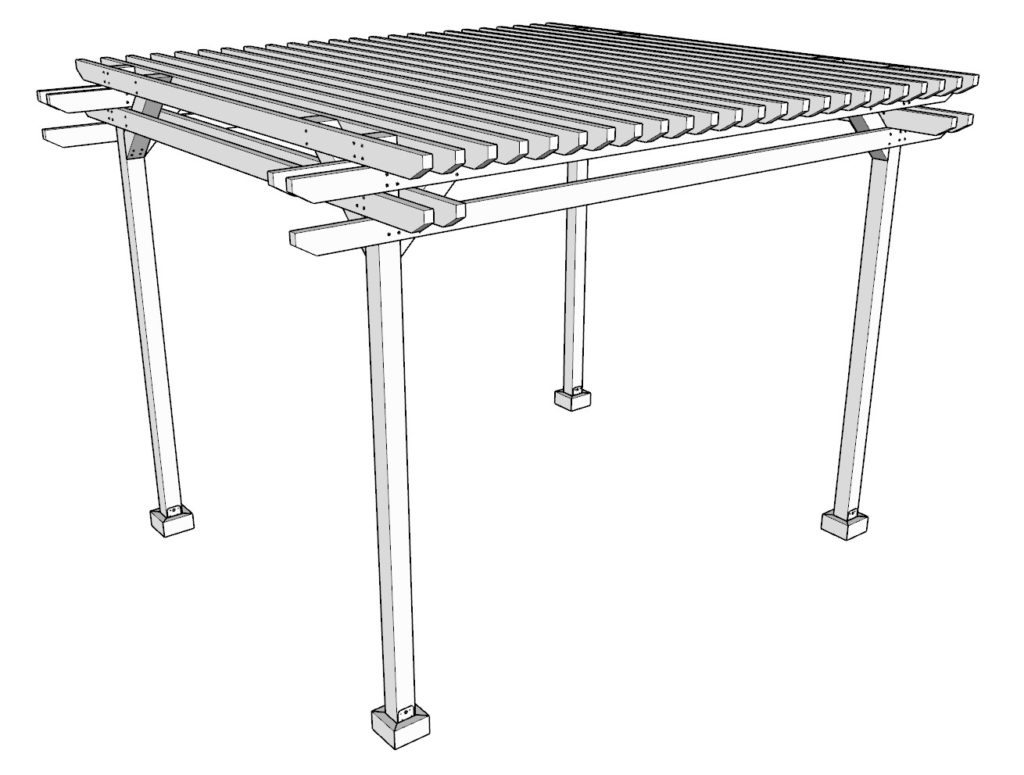
Step 4 (Putting up the DIY pergola frame)
Next, put up the pergola skeleton.
Take the two pergola frame pieces and put them upright. Add the six 144 inch 2×4 lumber pieces and secure them into place with 3.5 inch screws. Screw placement is indicated in the illustrations below.
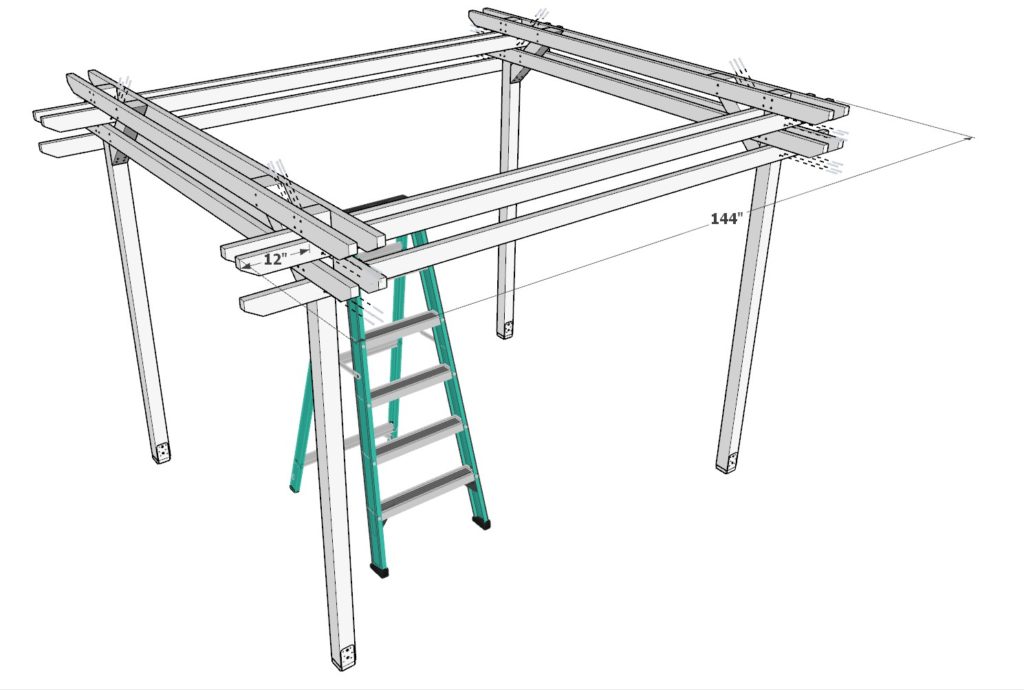
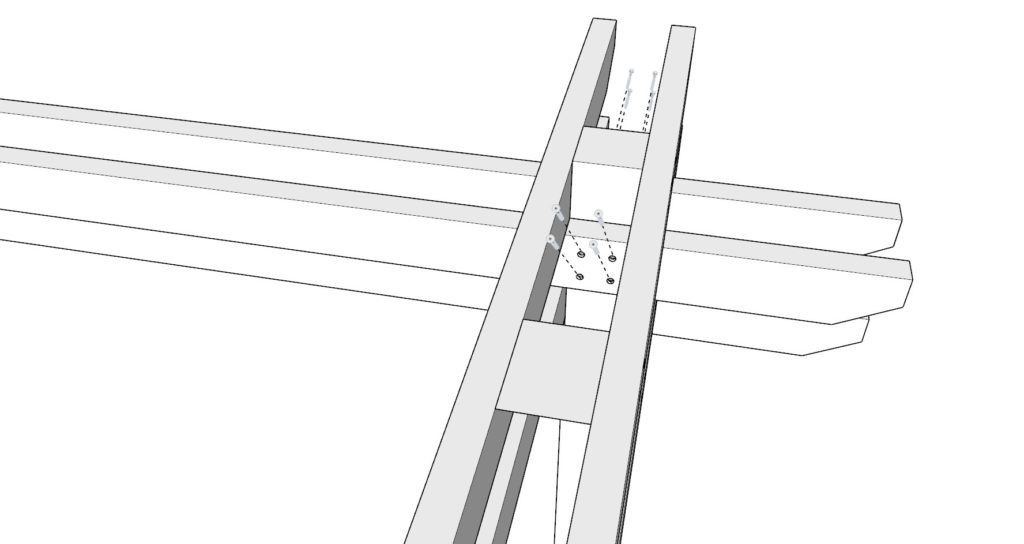
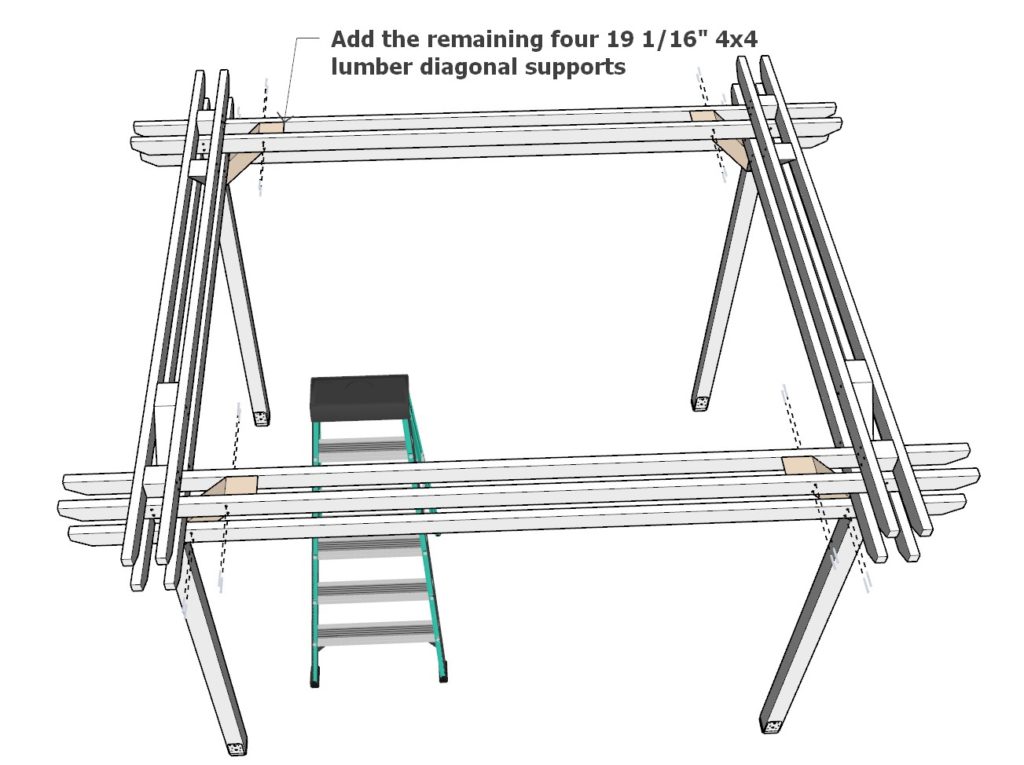
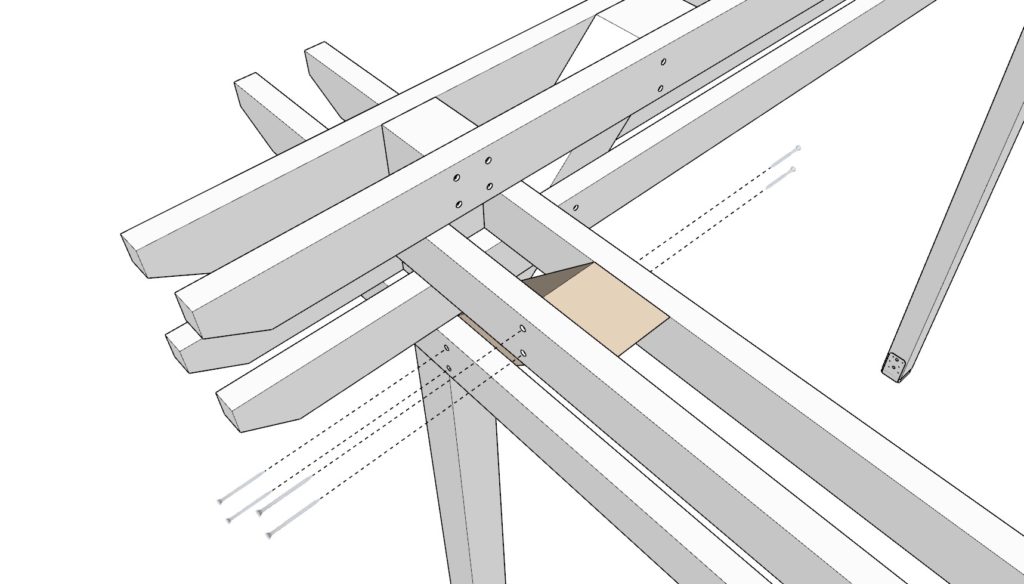
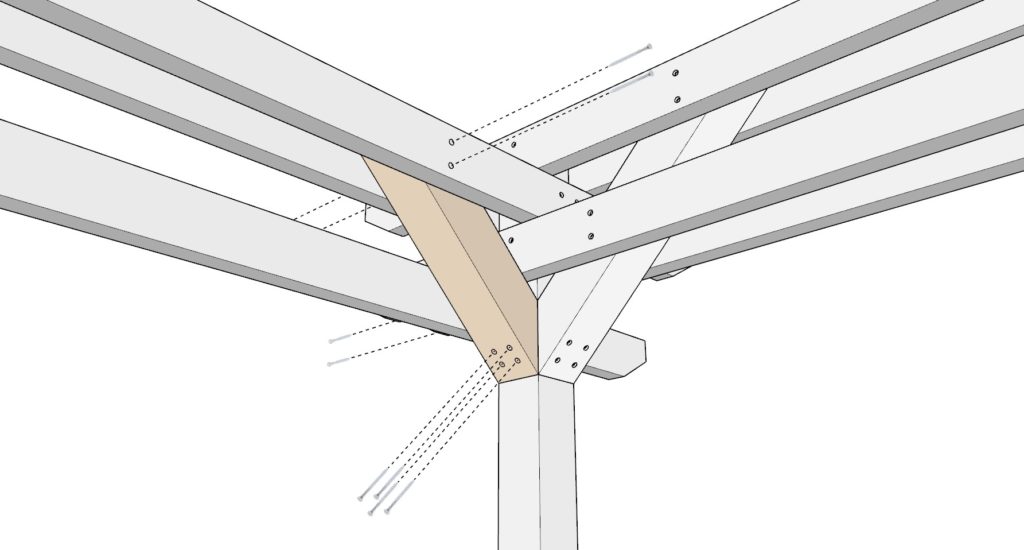
Step 5 (Adding 4x4 reinforcement cross beams)
Next, add the remaining four 19-1/16 inch 4×4 lumber diagonal supports (indicated in peach color). Secure these with 3.5 inch screws.
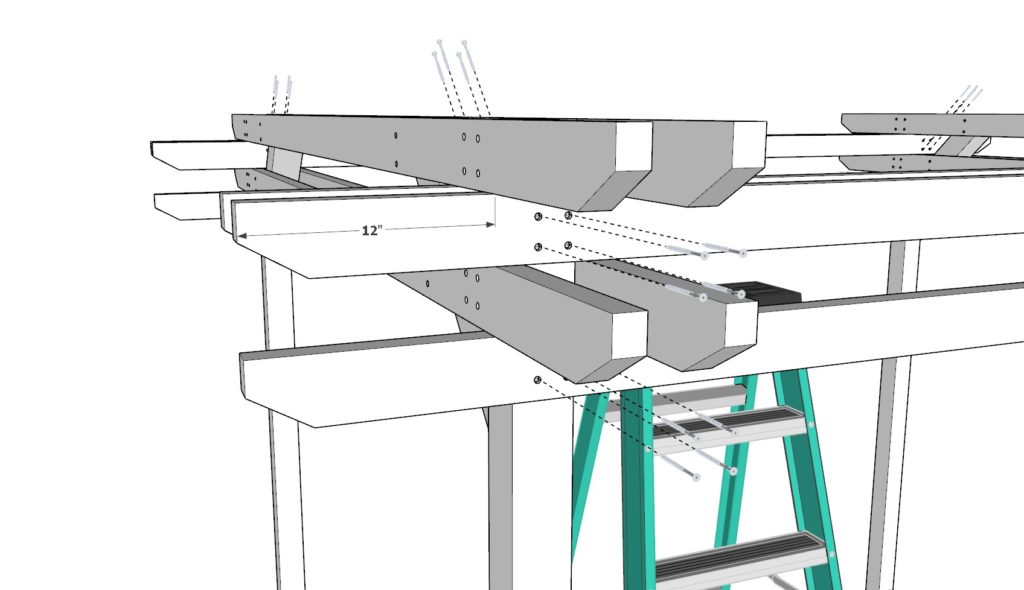
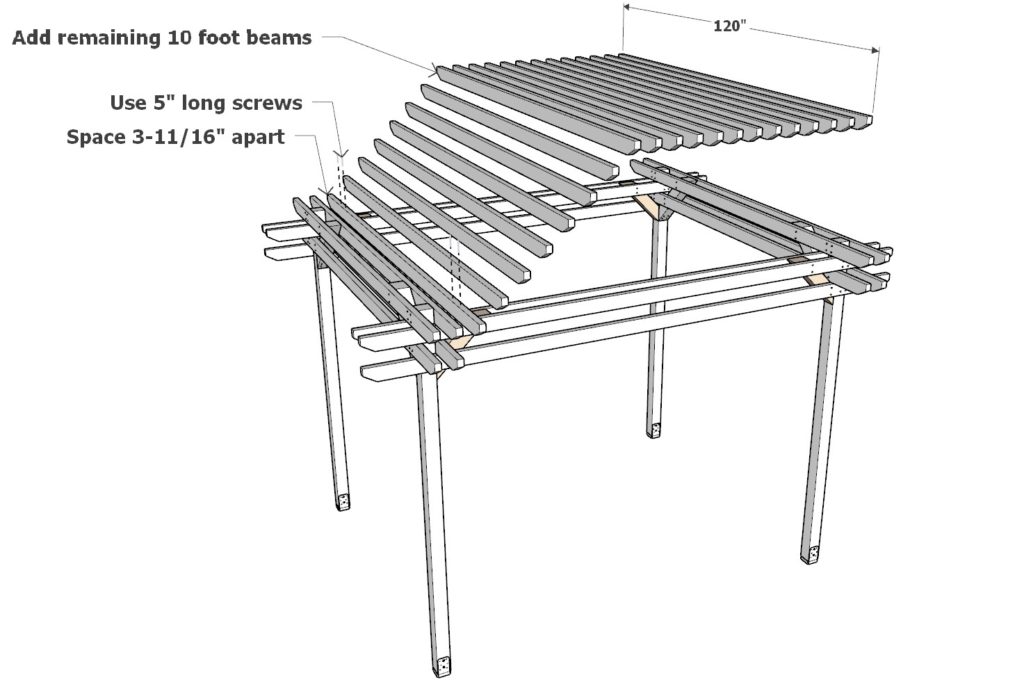
Step 6 (Adding DIY pergola rafter beams)
Next, add the remaining 120 inch 2×4 lumber cross beams. Space these out 3-11/16 inches apart. Use 5 inch screws to secure the beams in place.
Tip: Its best to use a spacer (can be cut from scrap lumber) to make sure the spaces are even between beams.
Tip: Add the beams one by one working away from the sides of the pergola simultaneously. This way if your spacer is not very accurate, the beams will still look uniform.
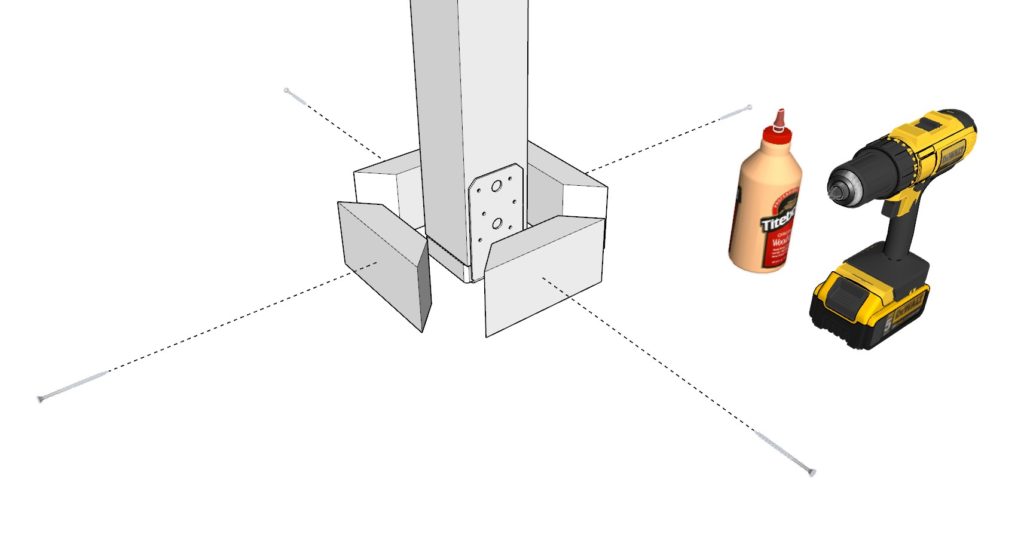
Step 7 (Adding DIY pergola pillar footings)
Next, add the pergola footings. These do not add any structural value by are purely for aesthetics. Use glue and screws to secure them in place. Make sure to predrill holes to prevent the wood from splitting.
Preserving and Maintaining the Wood on Your Pergola for Long-Lasting Beauty
Preserving and Sealing the Wood on the Pergola:
Preserving the wood on your pergola is essential to protect it from the elements and ensure it lasts for years to come. To properly preserve and seal the wood of your pergola, start by sanding down any rough spots or splinters. Use a medium grit sandpaper to ensure the wood is smooth.
Once sanded, you’ll want to apply an exterior-grade wood sealer or stain. Before applying the sealer, be sure to wipe down the wood with a damp cloth to remove any dust or debris. To apply the sealer, use a brush, roller, or sprayer, depending on the product you’re using. Be sure to follow all of the manufacturer’s instructions for the best results. Allow the sealer to dry completely before proceeding.
Maintaining the Wood on Your Pergola:
Once your pergola is sealed, you’ll need to maintain it to keep it looking its best. Depending on the climate and location of your pergola, you may need to reseal it every couple of years. To determine if it’s time to reseal, simply use a few drops of water on the wood. If the water beads up and stays on the surface, it’s still sealed. If the water is absorbed into the wood, it’s time to reseal.
In between resealing, you should check your pergola regularly for signs of wear and tear. If you find any signs of wood rot, you should repair it immediately to prevent any further damage.
Additional Tips for Pergola Wood Maintenance
When it comes to pergola maintenance, it’s important to do more than just reseal the wood. To keep your pergola looking its best, you should also:
• Inspect the wood regularly for signs of rot or decay.
• Apply a wood preservative every year, especially in areas with high humidity or temperatures.
• Use mildew-resistant paint or stain if you live in a humid area.
• Repair any damaged or rotten wood as soon as possible.
By following these tips, you’ll be able to keep your pergola looking great for years to come. With proper care and maintenance, your pergola will last for many years, providing you and your family with a beautiful outdoor space to enjoy.
Hello, can this pergola be used on top of a raised wood deck? Or is it too heavy? I am asking because in the 8ft x12ft pergola you do mention that one is great for a deck, but in this 10ft x 12ft version a deck is never mentioned.
Thank you for reaching out with your question, it’s a great one! Yes, you can definitely use this 10ft x 12ft pergola on top of a raised wood deck, although the process might be slightly more detailed than installing it directly onto the ground.
Firstly, you will need to ensure that the deck itself is structurally sound and able to support the additional weight of the pergola. This includes the weight of the pergola itself and potential loads from wind and, depending on your location, snow.
Once you have ensured that the deck can support the additional load, you can start the installation process. To secure the pergola to the deck, you will need to attach it to the deck’s beams, not just the deck’s surface. This ensures the pergola has a solid base and is secure against any winds or movement.
You will need to determine the exact location of your deck’s beams and mark these on the surface. This is where you will place the posts of your pergola.
To install the posts to the deck, you’ll need to use post bases. These are metal brackets that allow you to secure the pergola posts to your deck. Post bases are usually bolted to the deck surface and then the pergola posts are bolted to the bases. This helps to create a secure connection between the pergola and the deck.
Next, you’ll install the beams of the pergola, attaching them to the tops of the posts. Depending on the specific design of your pergola, you might need to use additional hardware to secure the beams to the posts.
Lastly, ensure all the connections are secure and double-check that the pergola is level. After these steps, your pergola should be securely installed to your raised wood deck!
I hope this detailed explanation is helpful and gives you the confidence to embark on this project. Please feel free to reach out if you have any more questions or need further clarification.